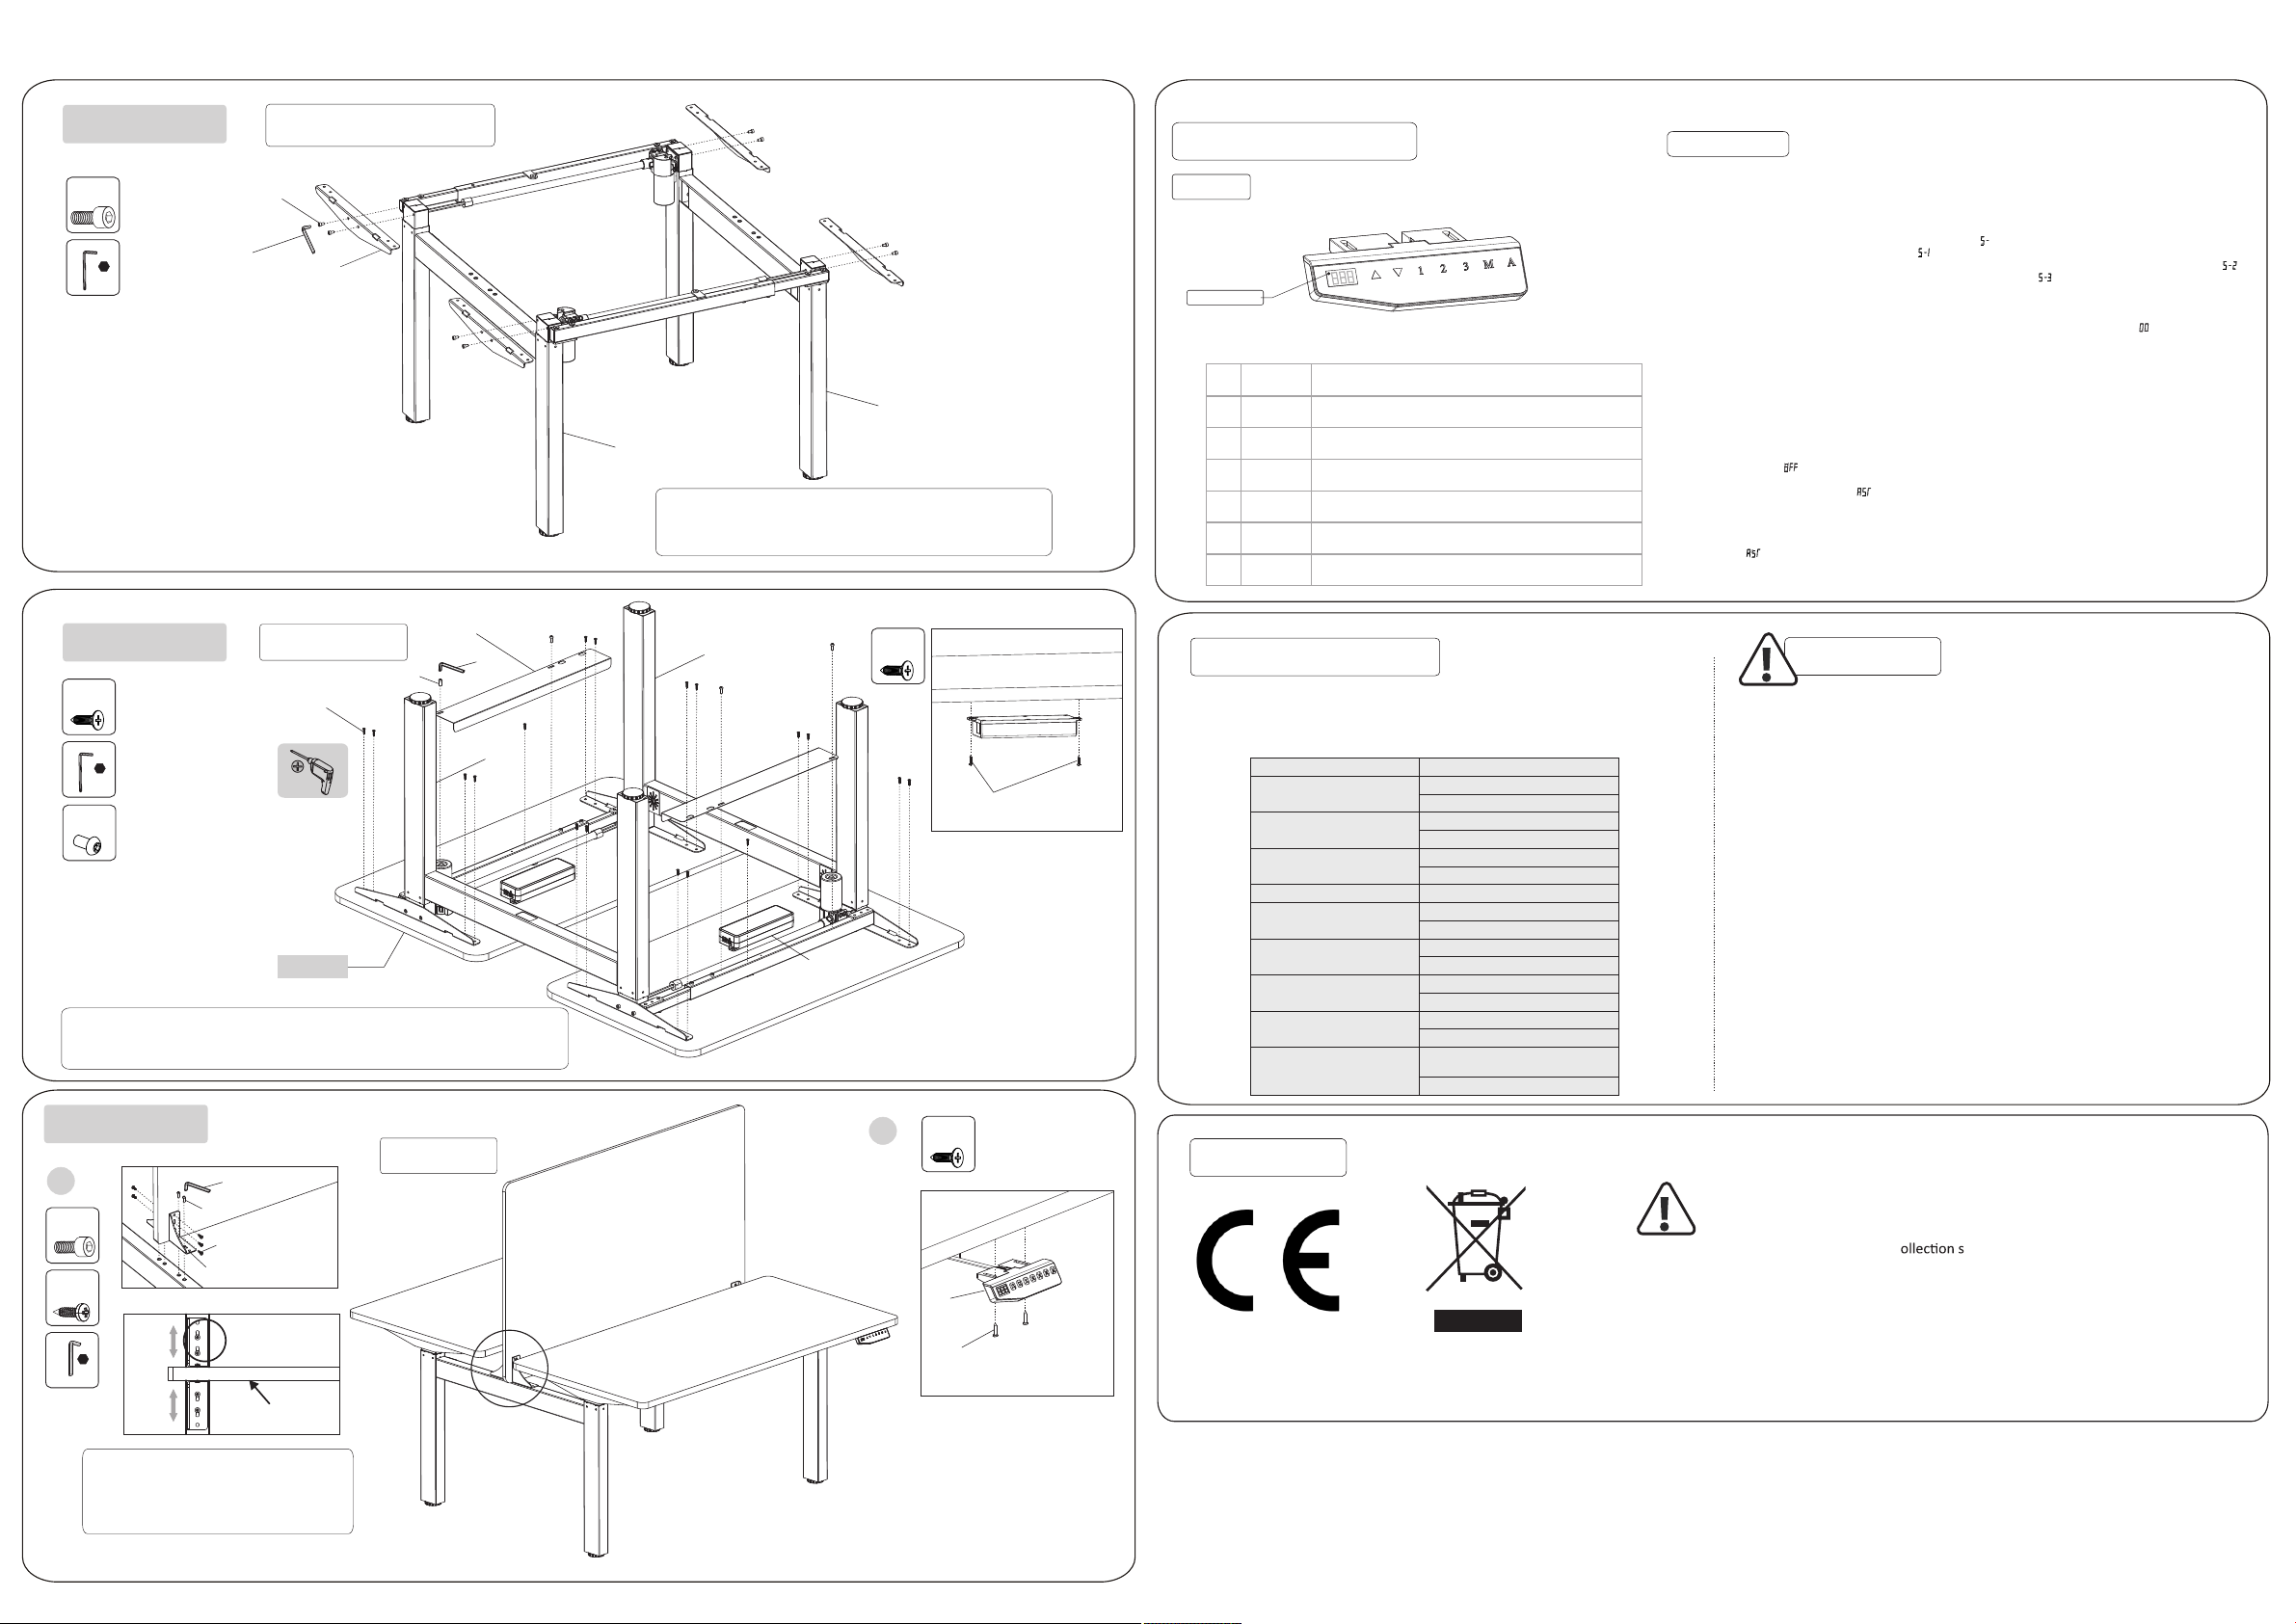
Step 4
Step 5
Step 6
H
10
2Hx4
Install handswitch (10)
onto the desktop
Gx8
A
5x5
Cx10
Install screen
A
G
C
screen
1
Hx4
Install control box(9) onto desktop
H
Install control box
12
Install desktop
and baffle
Gx8
A
5x5
G
A
Install supporting plate(6)
6
1
2
Hx18
B
2.5x2.5
Dx4
H
Connect desktop by screws(H), use pistol drill to tighten.
Connect baffle(8) by screws(D), use 5x5 wrench(A) to tighten.
B
D
8
1
2
desktop 9
Connect supporting plate (6) with column(1)&(2),
use 5*5 wrench(A) to tighten the screws(G).
Adjust place of screen fixing base
(12) according to the thickness of
screen, use 5x5 wrench(A) to
tighten the screws(G).
●“▲”
●
●
●
●
●
●
“▼”
“1”
“2”
“3”
“M”
“A”
Adjust the desk upwards
Adjust the desk downwards
Position 1, first height position saved by user
Position 2, second height position saved by user
Alarm button for reminding of keeping same
position for long time
Position 3, third height position saved by user
Memory button for height memory function
LED display
Button
How to use handswitch Instruction
• Press the UP button or DOWN button to lift or lower the height of desk surface. The LED display
shows the real time value. The range of the height value: 69.0cm-119.0cm.
• Saving A Height Position
a. Press the UP button or DOWN button to lift or lower the height of desk surface. For instance, you
adjust the height to 80cm.
b. Press "M" SAVE button and the LED display shows" ", then press "1" to save the 1st height
position to 80cm. The LED display shows " ".
c. Repeat step a and step b to save the 2nd height position to 117cm The LED display shows " ".
Save the 3rd height position to 116cm The LED display shows " ".
d. Press "1", "2","3", to automatically reach the height saved before.
• Long-Time Sitting Reminder
a. Press REMINDER button "A" to activate the function. The LED display shows " "
b. Two seconds later, press the "▲" or "▼" button to adjust the reminder time only when the display
screen flashes. Then press any button to save the time setup, or wait 5 seconds and system will
save the time setup automatically. During the countdown, any operation will lead to a repeat
starting of the timer. When the countdown finishes, the buzzer will be active with a 10-second
"DiDi...DiDi...DiDi..."tone.
c. Within the 10-second reminder buzz, press any button to reactivate the time countdown that is
set up in (b) step. If no operation during the 10-second reminder buzz, there will be another
reminder buzz after 5 minutes. No operation during the second buzz will turn off the Long-Time
Sitting Reminder.
d. Press and hold the "A" button for three seconds to turn off the Long-Time Sitting Reminder. The
LED display shows "
".
•
Troubleshooting
a. Reset: When the LED shows ” ”, press "▼" button until the desk reaches its lowest height and
rebounds to stop, it means the reset has been finished.
b. When it doesn't work and the LED shows ”E01” or “E02”, please retry 18 mins later.
c. If the "▼" button doesn't work, please check the cable connection and then cut off the power for
at least 10 seconds. Reconnect to the power and press "▼" button to start the reset process when
it shows the “
”.
d. If all these above process are inefficient, plz contact our customer service.
Attention
Fault phenomenon Method
No response while long pressing
down arrow after connected with
a power supply
1.Check if all the cables be connected well
1.Check if all the cables be connected well
2.Contact your supplier or dealer
2.Contact your supplier or dealer
No response while pressing up
arrow/ down arrow after
connected with a power supply
Rising in a low speed
1.Check if overloaded, max loading: 100kg;
1.Check if overloaded, max loading: 100kg;
1.Check if overloaded, max loading: 100kg;
2.Contact your supplier or dealer
2.Contact your supplier or dealer
2.Contact your supplier or dealer
The motor not move as instructed 1. Contact your supplier or dealer
1.Reposition
2.Contact your supplier or dealer
Go down but not go up
Downward sliding
Frequently Reposition
Overwork
(Duty cycle:Max 2min on/18min OFF)
1.Restart after suspend for 18mins while
connecting with power;
2.Contact your supplier or dealer;
1. Press "M"and "3" together for 3 seconds or
more, after hearing continuous beeping for twice,
it will restore factory settings
Not enough up&down height
Common fault treatment
The following tips will help you detected and eliminate the common fault and error.
If the fault you met is not listed below, please contact with your supplier. Only the
manufacturer and professionals are capable for investigating and correcting
those fault and error.
2.Contact your supplier or dealer
1. Power supply: AC100V-240V,50/60HZ
2. Service Environment: 0-40℃
3. Unplug the power plug before cleaning, wipe the dust on surface with slight wet dishcloth
when cleaning, be careful not to let the drops into the internal parts, not loose the connector.
4. The electric box contains electronic components, metals, plastics, wires etc., so dispose of
it in accordance with each country's environmental legislation, not the general household
waste.
5. Check carefully to ensure correct and complete assembly before using.
6. Be familiar with all functions and program settings of the product before first use.
7. Children are forbidden to play on the product because of unforeseen action when playing,
so any dangerous consequences caused by this improper action will not be on
8. Slight noise caused by the V-ribbed belt or brake system due to structure will not have any
effect on the use of the equipment.
9. Corrosive or abrasive materials are forbidden to clean the equipment. Must ensure that the
cleaner used will not pollute the environment.
10. This appliance can be used by children aged from 8 years and above and persons with
reduced physical, sensory or mental capabilities or lack of experience and knowledge if they
have been given supervision or instruction concerning use of the appliance in a safe way and
understand the hazards involved. Children shall not play with the appliance.
11. Cleaning and user maintenance shall not be made by children without supervision.
12. If the supply cord is damaged, it must be replaced by the manufacturer, its service agent or
a similarly
qualified person in order to avoid a hazard.
13. Please make sure there is no hazard sources in your operating environment. e.g., do not
litter the tools around. Always be careful to treat the packaging materials in order to avoid any
possible danger, e.g. plastic bag may lead to choking hazard to children.
14. Keep the original package of the equipment if necessary in case of the future use in
transportation.
Waste disposal This marking indicates that this product should not be disposed with other
household wastes. To prevent possible harm to the environment or human
health from uncontrolled waste disposal, recycle it responsibly to promote
the sustainable reuse of material resources. To return your used device,
please use the return and c ystems or contact the retailer where the
product was purchased. They can take this product for environmental safe
recycling.
Produced in ChRL for:
DMTrade Mikołaj Tomaszewski Wiśniowa 36; 64-000 Kościan, Poland
NIP: PL 6981681757
sklep@dmtrade.pl
Tel.: +48 661082052 / +48 785082052
We confirm that the technical construction of manufacturing, inspection and
testing processes for above mentioned product are comply with the essential
requirements of the European Directives 2014/30/UE (EMC), 2011/65/UE
(ROHS) and 2014/35/EU (LVD) based on the mentioned above following
harmonized test standards.


