Spar F1000Ki User manual
ECE R44/04
GROUPS 1+2+3
CHILD CAR SEAT FOR GROUPS 1+2+3
INSTRUCTION MANUAL
GB
ES
FR
IT
PT
DE

Child Car Seat for Groups 1+2+3
Thank you for your purchasing our childcar seat.
Please contact our Customer Service if you have comments
on the child car seat, wish to replace certain accessories, or
seek help.
Please note that the child car seat is only suitable for fitting
on a car seat compliant with ECE R16 or equivalent
standards with a three-point seat belt with an emergency
locking retractor.
It is important to always keep this Instruction Manual
together with the child car seat.
It is a good idea to place this Instruction Manual in the bag
behind the backrest of the child car seat.
Read this Instruction Manual thoroughly before use.
1.
2.
3.
4.
5.
6.
2

GB
ES
FR
IT
PT
DE
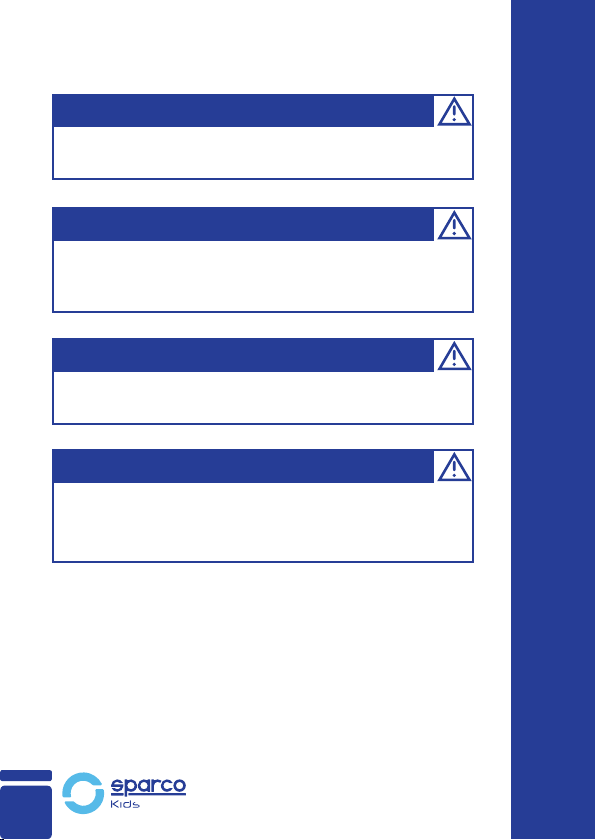
Precautions:
WARNING!
WARNING!
WARNING!
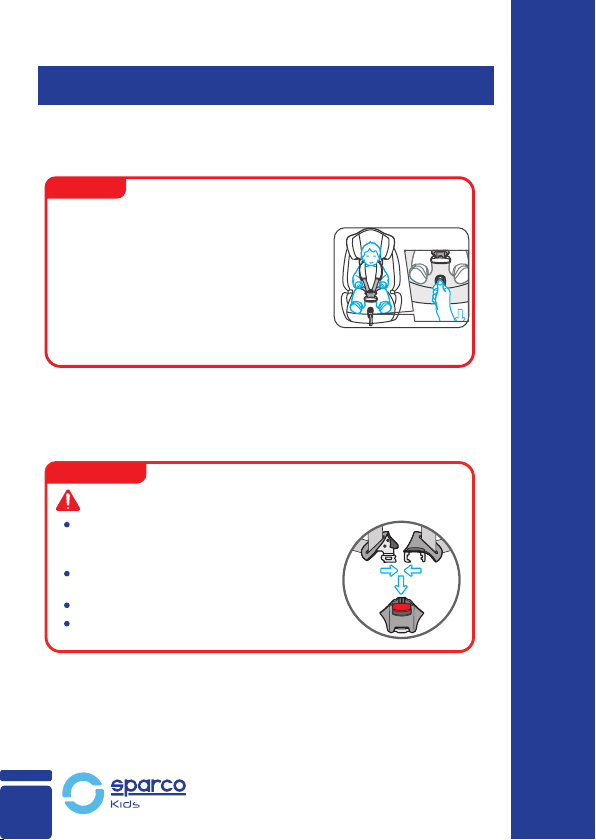
Do not fit the child car seat on a car seat in front of which an airbag is
installed, since the airbag may harm the child upon impact. It is
advisable to use the child car seat on a rear car seat only, even if your
local trac regulations allow fitting on such a front seat.
Please consult your local trac regulations, as they may vary in
dierent countries. Check your car’s owner manual for information on
the possibility of fitting the child car seat on a front seat. Do not fit the
child car seat on a car seat in front of which an airbag is installed,
since the airbag may harm the child upon impact.
Avoid letting the buckle come in contact with oil, as it may fail resulting
in damage. Check before use, whether there are any crumbs or other
small items which may have fallen into the buckle.
WARNING!
3
Do not use any load bearing contact points other than those described
in the instructions and marked in the child restraint.
Never use a child car seat without a backrest, since it
cannot provide maximum protection during a collision.
Toxic cleaning solutions may lead to illness. Do not bleach,
iron, machine-wash, or dry the child car seat covers with a
roller-drier, as these methods will damage the child car
seat covers and require a replacement..
Appropriate adjustment of the seat belts is a key factor in
protecting your child. Keep a finger-width space between
your child and the seat belt.
The socket of the car’s seat belt should not be located above
the lap belt guide of the child car seat. If this is not the case,
try to fit the child car seat onto another car seat. Please
contact the dealer’s service department, should you have
any doubts.
WARNING!
WARNING!
WARNING!
WARNING!
4

General Safety Information
Keep this Instruction Manual together with the child car seat,
so you can readily access it in the future. Noncompliance with
After the child car seat has been placed and fitted, under
normal driving conditions, there should be no compressed
part under the movable seat or car door or between the two.
Replace the child car seat which has undergone any accident,
because some unforeseeable damage may have happened to
thechild car seat.
Do not try to modify or add things to the child car seat without
permission of the manufacturer or a competent authorizing
body; otherwise, the child car seat becomes disqualified for
warranty.
Cover the child car seat to avoid direct sunlight to prevent
your child from being injured by overheated parts of the child
car seat.
Do not leave your child unattended in the child car seat.
5
GB
ES
FR
IT
PT
DE
This child seat has been designed for the European market
and conforms to the car seat regulations currently in force:
European Union ECE R44. PLEASE NOTE that this seat doesn’t
meet the U.S.A. regulation.

Using your SPARCO child car seat
Understand how to properly fit the child car seat before using
it.
Become familiar with the features and functions of the child
car seat to ensure a proper fit.
Take time to read and understand these instructions, as this
is the best way to ensure the best use of your child car seat.
Review the safety precautions from time to time.
Prepare the child car seat for your child, such as properly
setting the seat belts, before using the child car seat in your
car.
Ensure there is no loose luggage or other similar items in the
car, as they may harm passengers in the car in case of a
collision.
Always tightly secure all loose items to avoid injury to other
passengers.
Never use the child car seat without a seat cushion. Never use
child car seat covers other than those recommended by the
manufacturer to replace the cushion, otherwise, the protec-
tion provided by the child car seat may be compromised.
Always ensure that the car’s adult seat belt has been properly
buckled while the child car seat is fitted. Use the car’s adult
seat belt for securing your child car seat, even if it is not in
use. A loose child car seat may cause injury in the case of a
collision.
Check before use, whether there are any crumbs or other
small items which may have fallen into the buckle. Such items
will aect the performance of the buckle.
Some parts of the child car seat must be replaced due to wear
after several years of use. Please contact our Customer
Service for replacing such parts.
As for use in cold winter conditions, pay attention to ensure
that the child's clothing does not aect the regular tension of
the seat belt or aect the harness of the child car seat.
6
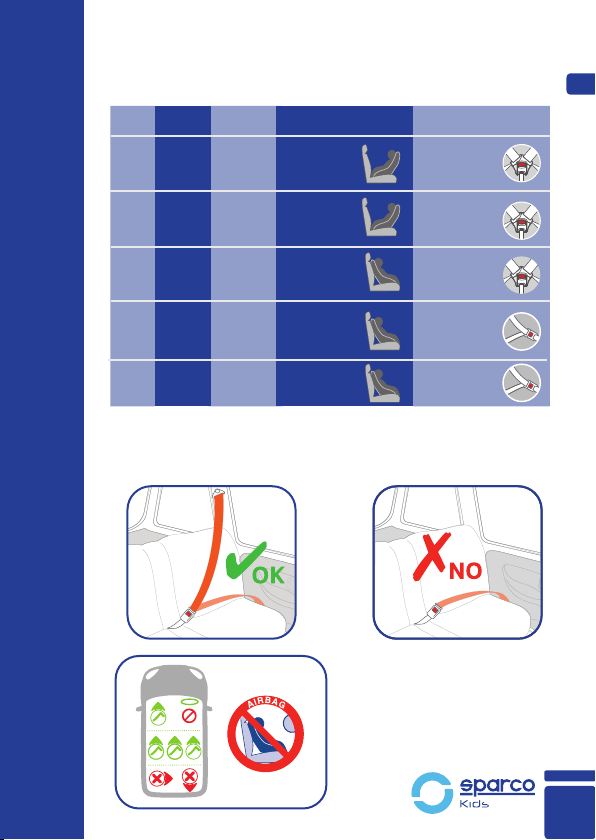
EU Standard ECE R44 04
NOTE: that the seat is designed to be secured with a 3-point seat
belt with an emergency locking retractor. Never use the child car
seat with a 2-point seat belt.
NOTE: that the seat is only
suitable for fitting on a car
seat compliant with ECE R16
or equivalent standards with
a three-point seat belt with
an emergency locking retrac-
tor.
Group
Group
0
Group
0+
Group
2
Group
3
Weight Age Orientation Fixing of child
0-10 kg 0-10
months Backward
facing
Backward
facing
Child seat belt
(5 points)
Child seat belt
(5 points)
Car’s seat belt
(3 points)
Car’s seat belt
(3 points)
0-18
months
3-7 years
6-12 years
0-13kg
Group
1
Child seat belt
(5 points)
Forward
facing
Forward
facing
Forward
facing
9 months –
4 years
9-18kg
15-25kg
22-36kg
7
GB
ES
FR
IT
PT
DE

Shoulder Belt Guide
Harness Strap
Shoulder Pads
Buckle Pads
Headrest
Harness Slots
Harness Buckle
Adjustment Device
Harness Adjustment Strap
8
Headrest Adjustment
Handle
Guide slot
Cover
Red waist
belt guide
ISOFIX release button
Snap button
ISOFIX Attachment
Top tether hook
Top tether strap
Top tether release
button
9
GB
ES
FR
IT
PT
DE
1. Installation in the vehicle
Installation in the vehicle
Please do not leave your child unattended in the
child safety seat in the vehicle.
For the protection of all vehicle occupants.
In the case of an emergency stop or an accident unsecured
persons or objects may cause injury to other vehicle occupants.
Pleasealways check that...
To protect your vehicle
Some vehicle seat covers of sensitive materials (e.g. velour,
leather, etc.) may develop wear marks when child seats are
used. This can be avoided by placing a blanket or towel under
the childseat.
The backrests of the vehicle seats are locked (i.e. that a
foldable rear seat bench latch is engaged).
All heavy or sharp‐edged objects in the vehicle(e.g. on the
parcel shelf) are secured.
All persons in the vehicle have their seat belts fastened.
The child safety seat is always secured when it is in the
vehicle,even ifno child is being transported.
10
按
Click
ISOFIX and Top tether
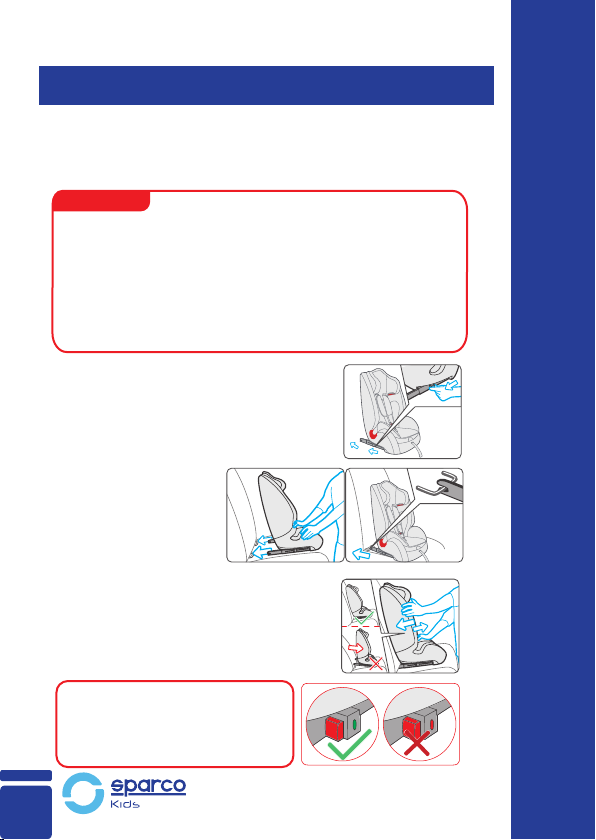
1.1 Installation of Group I for the children whose
weightbetween 9-18kg with ISOFIX and top tether.
IMPORTANT
First please check if there are 2 ISOFIX anchorages in
the perpendicular intersection of the vehicle seat back
and seat cushion, and the user ready tether anchorage
behind the vehicle seat.
Tips: The user-ready tether anchorage usually
permanently installed on the inner rear luggage shelf or
on the vehicle floor. Details you could read your vehicle
guidelines or contact the vehicle manufacturer.
Press the ISOFIX release button and
push the ISOFIX connectors forward as
far as possible.
Push the ISOFIX
connectors directly
into the anchorages
until heard an audible
sound “ click”.
Grasp the seat body to check the seat if it
is fastened tightly or shakes. If the seat
shakes and the ISOFIX connectors are
pulled out , please repeat the above steps
and install it again.
NOTE: The locking arm are only
correctly engaged if both of the
ISOFIX indicators are completely
green.
11
GB
ES
FR
IT
PT
DE
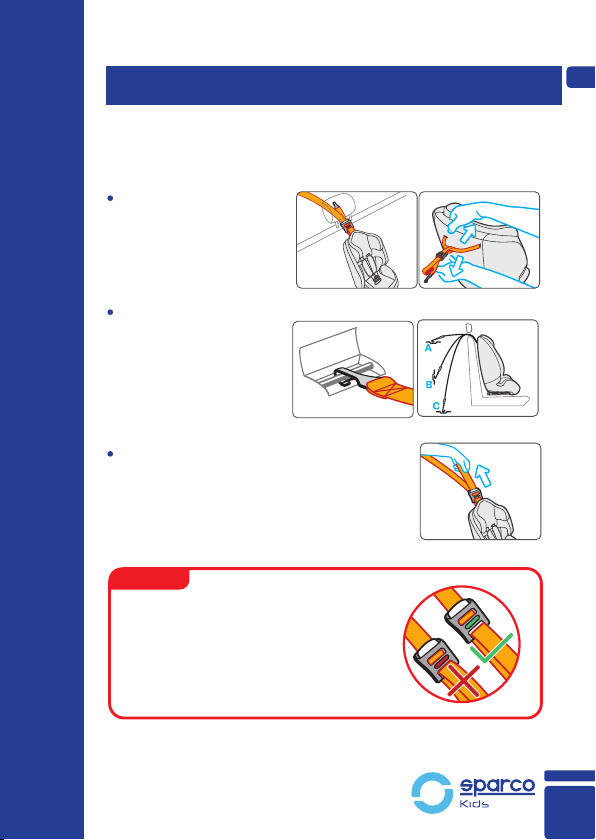
Pull out the top tether
and press the tether
strap release button to
extend the strap until it
is long enough to hook
the user-ready tether
anchorage behind.
Hook the tether strap
hook onto the
user-ready anchorages.
Check there maybe are
3 anchorages for the
hook, please find one in
your favor.
Pull the tether strap on another end back
to tighten the top tether.
If the top tether is tightened favorably
and correctly, a green mark will turn up
on the other end of the strap release
button, please do check it .
ISOFIX and Top tether
1.2 Installation ofGroupI for the children whose
weight between 9-18kg with ISOFIX and top tether.
CAUTION
12
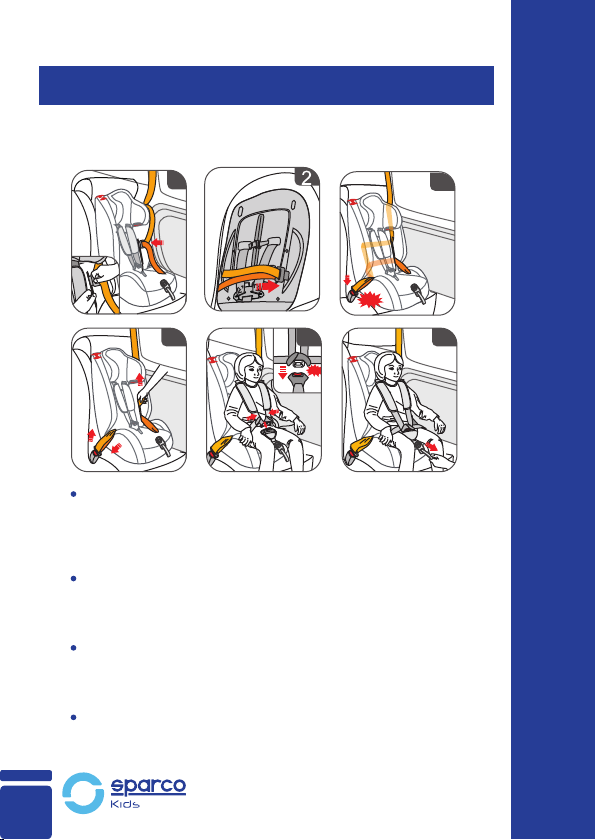
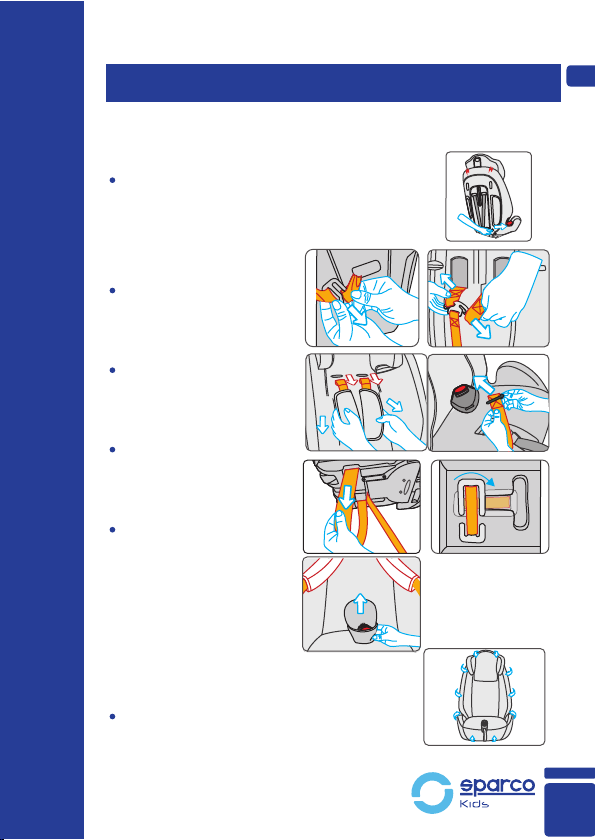
1.3 Group I Car Belt Installation
(For Children weight between 9-18KG)
Pull the car belt through guide slot and insert belt buckle
into front side cover hole(picture 1), then across seat
back and took out from the other side of cover hole
(picture 2) , finally buckle up until heard“click”sound.
(picture3)
Please make sure car belt should be through red guide
slot at the top of seat back and red waist belt guide without
no twist. After installation, tighten car belt as arrow
indicator direction. (picture4 )
Pull the harness strap as far as you can, and open safety
buckle of car seat, then put children inside 5-point
harness system and joint buckle clips until
heard”click”sound. (picture5)
Watch your children‘s feeling, adjust suitable harness
tightness by pulling adjusting strap and adjust headrest to
rightheight.(picture 6)
Group I Car Belt Installation
1
4 5 6
3
cl ic k
click

13
GB
ES
FR
IT
PT
DE
1.4 Installation ofGroupII/III and it is for the children
whoseweight between 15-36kg.
Before the installation, please take away the
Harness system of baby car seat.
Note: The Harness strap, Harness buckle,
Buckle pads& Shoulder pads should be
stored away safely for future use ( see 3.1
Removing the 5 point harness system and
cover ).
Group II/III Car Belt Installation
WARNING
Do not to use any load bearing contact points other than
those described in the instructions and marked in the child restraint.
The belt mustberouted as shown in the instructions.
Adjust the height of the headrest to suit your
child.
Put the shoulder belt through the shoulder belt
guide under the headrest.
Place your child on the car seat and pass the
belts through the red waist belt guide. Fasten
the car beltwith an audible sound “click”.
Make sure the Lap belt is stretched as low as
possible over the child’s hips, within the belt
guides, and fastened into the buckle. The
shoulder belt must cross-midway between
child's shoulder andneck.
Click

14
Securing your baby
2.1 How to adjust the belts, headrestand seat
positions
IMPORTANT
The correct belt height of the shoulder belts is attained
when the belt disappears into the shell slightly above the
shoulder of the child. Make sure that the shoulder belts fit
properly over the shoulders of the child.
Loosen the harness straps by pressing
the release button and pulling the
harness straps as far as you can.
Note! Do not pull the shoulder pads.
The headrest can be set at five
There are three additional positions in
Group II & III mode once the shoulder
pads and harness straps has been
removed.
Press and pull the handle behind
headrest. It is important to make sure
theheadrest fit properly to head.
by pulling adjusting board under seat base as shown in right
pictures.(Only for GroupI)
- Adjusting the belts
- Eightheights of the headrest
- Two positions adjustment mechanism
15
GB
ES
FR
IT
PT
DE
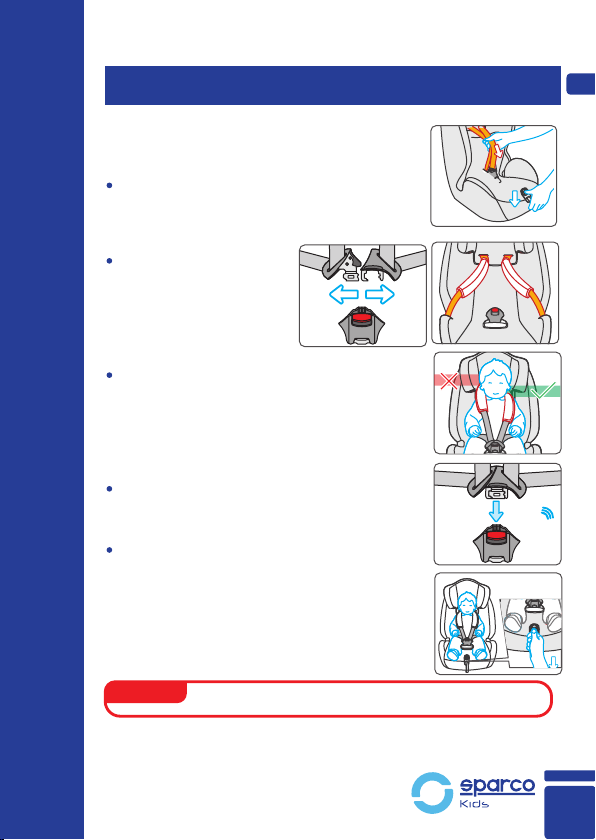
Securing your baby
2.2 Securing your baby using
the harness
Loosen the harness straps by pressing the
release button and pulling the harness
straps as far as you can.
Note! Do not pull the shoulder pads.
Open the harness
buckle, then place the
harness straps to the
sides of the car seat. Put
the baby into the car
seat.
The correct belt height of the shoulder
pads is attained when the strap disappears
into the shell slightly above the shoulder of
the child. Make sure that the harness
straps fit properly over the shoulders of
thechild.
Slide buckle tongues together and insert
them in the buckle with an audible sound “
click”.
Pull the straps tight by the harness adjust-
mentstrap, and make sure the tightness is
comfortable to your kid.
CAUTIONDo not twistor interchange the harness straps.
Click
16
Securing your baby
2.3 Tightening the harness
2.4 Checklist to ensurethat your baby is buckle
up correctly.
Pull the straps end straight towards
you,notupwards or downwards.
Please pay attention to the strap end.
Whilst traveling (especially outside the
car) it should always be attached to the
cover.
The harness straps of the car seat are
comfortable but firmly fit around your
child.
The harness straps are adjusted
correctly.
Theharness straps are not twisted.
The buckle tongues are engaged in
the harness buckle.
CAUTION
IMPORTANT
For the safety ofyour baby, please check that...
3.1 Removing the 5 point harness system and cover
GB
ES
FR
IT
PT
DE
Care instructions
Press adjusting a device and pull harness
strap towards as far as you can, details see
(1.2)
Open the cover snap
button at the bottom of
seat back as shown
right picture.
Loose the harness strap
and pull strap out o the
strap yoke as shown in
right picture.
Pull two harness straps
out o cover slot, then
separate strap with
buckle metal connector.
After above steps, draw
whole strap out from
the bottom of seat.
Rotate buckle clip to the
shown position, then
take it out from seat
base.
Remove the 5 point harness system then
remove the headrest cover and the shell
cover.
17

3.2 Refitting the 5 point harness system and cover
Care instructions
After washing, place the cover on the
shell.
Also pass the end of the shoulder pads
strap through the harness strap slot and
shell, then fix into the strap yoke. Make
sure the seat straps can not be rotated.
Close the buckle, then fasten the cover all
around. Close the snap buttons on the
back. Check that it works!
Pass both sides of
harness strap through
strap slots at the
bottom of seat. Then,
lead straps through
buckle metal connector
Pass buckle clip
through buckle pads
and put clip into bottom
slot, then rotate it to
shown position in right
picture.
Pass harness straps
through shoulder pads
and insert them into
harness slots, then
connect the end of
strap with metal
connectors.
18

3.3 Cleaning
GB
ES
FR
IT
PT
DE
Please be sure to use only original seat covers, as the seat cover is
important to the proper functioning of the system. Replacement
seat covers are available from your retailer and or at branches.
Caution! Never remove the buckle tongues from the straps.
The cover can be removed and washed with a mild detergent
using the washing machine's cycle for delicate items (30°C).
Please observe the instructions on the washing label of the cover.
The colors of the cover may fade if washed at more than 30°C. Do
not spins, and never tumble-dries in an electric clothes dryer (the
fabric may separate from the padding).
The plastic parts can be cleaned using soapy water. Do not use
harsh cleaning agents (such as solvents).
The harness can be removed and washed in lukewarm soapy
water.
The child seat must not be used without the seat cover.
Care instructions
19

CAUTIONS
1. This is a "Universal" child restraint. It is approved
to Regulation No. 44, 04 series of amendments, for
general use in vehicles and it will fit most, but not all,
car seats.
2. A correct fit is likely if the vehicle manufacturer
has declared in the vehicle handbook that the vehicle
is capable of accepting a "Universal" child restraint
for this age group.
3. This child restraint has been classified as "Univer-
sal" under more stringent conditions than those,
which applied to earlier designs, which do not carry
this notice.
4. Only suitable if the approved vehicles are fitted
with 3 point static/with retractor safety‐belts,
approved to UN/ECE Regulation No. 16 or other
equivalent standards.
5. If in doubt, consult either the child restraint
manufacturer or the retailer.
20
Other manuals for F1000Ki
1
Table of contents
Languages:
Other Spar Car Seat manuals


