Spar SK6000I User manual

CHILD CAR SEAT SK6000I
INSTRUCTION MANUAL
GBGB
202201
ECE R129
40-135
cm
DIRECTORY
2
TO DEAR USER 03
PRODUCT OVERVIEW 04
SAFETY WARNING 06
USAGE 08
3.1 Install position of the child seat in vehicle 08
3.2 Adjust the headrest 09
3.3 Checking the shoulder strap height 09
3.4 Usage of buckle 10
3.5 Adjust the length of harness 10
INSTALLATION 17
4.1 Installed rearward-facing 17
4.2 Installed forward-facing 19
4.3 Installed forward-facing 20
MAINTENANCE AND CLEAING
THE MAIN TECHNICAL PARAMETERS
22
5.1 Daily maintenance 22
5.2 Washing instruction 23
5.3 Remove and assemble the fabric cover 23
24
3.6 Removable and hidden objects 11
3.7 The method to store shoulder straps with chest pad and buckle 12
133.8 Adjust the ISOFIX attachments
143.9 Usage of the support leg
153.10 The method of rotate seat
163.11 Usage of reclining system
TO DEAR USER
3
GBGB
Congratulations on your purchase of the child restraint system.
Please read this instruction manual carefully before use.
If you have any questions concerning the use of this child restraint
system, please do not hesitate to contact with us.
IMPORTANT
DO NOT use the device in seating positions where an active frontal
airbag installed.
IMPORTANT
DO NOT use forward facing before the child’s age exceeds 15 months.

4
PRODUCT OVERVIEW
i-Size ECRS Additional marking
i-Size ECRS(40-105cm )Notice:
This is an i-Size Enhanced Child Restraint System.It is approved
according to UN Regulation No.129, for use in, i-Size compatible
vehicle seating positions as indicated by vehicle manufacturers in
the vehicle users’ manual.
If in doubt, consult either the Enhanced Child Restraint System
manufacturer or the retailer.
i-Size booster seats ECRS(105-135cm )Notice:
This is a i-Size booster seat Enhanced Child Restraint System.It is
approved according to UN Regulation No.129, for use promarily in
“i-Size seating position”as indicated by vehicle manufacturers in
the vehicle user’s manual.
If in doubt, consult either the Enhanced Child Restraint System
manufacturer or the retailer.

Headrest
The guide groove of the headrest
Shoulder pads
Comfortable cushion
Buckle
Crotch pad
The guide groove of the body
1
2
3
4
5
6
7
Body Angle adjuster
Harness adjuster strap
Support leg unlock button
Rotation adjuster
Base
Handle of headrest
ISOFIX release button
ISOFIX attachment
Support leg
9
10
11
12
13
14
15
16
8
1
2
3
45
9
10
67
8
11
12
16
15
13
14
5
GBGB
PRODUCT OVERVIEW
6
SAFETY WARNING
This product can be rearward-facing used for children with a
stature of 40-105cm (Weight: 0-18kg, about 0-4 years old), using
ISOFIX+Support leg to fix the child restraint system.
This product can also be forward-facing used by 5-point safety
system for children with a stature of 83-105cm (Weight:
9-18kg, about 9 months-4 years old), using ISOFIX+Support leg
to fix the child restraint system.
This product can also be forward-facing used for children with a
stature of 105-135cm (Weight:15-36kg, about 3-12 years old),
using adult three-point belt to fix the child restraint system, or
using ISOFIX and adult three-point belt together to fix the child
restraint system.
Do not use any load bearing contact points other than those
described in the instructions and marked in the child restraint
when in 105-135cm.
Please keep for furture reference,a storage compartment for
the instructions is located on the back of the child seat.
Do not use this child seat at home. It has not been designed for
home use and should only be used in your car.
Do not use rearward facing child seat in seating positions where
there is an active frontal airbag installed, death or serious
injury can occur.
For the reason of safety, the child seat must be fixed inside the
vehicle using ISOFIX anchorages even if you do not put your
child inside the child seat.
The rigid items and plastic parts of a child seat shall be so
located and installed that they are not liable , during everyday
use of the vehicle to become trapped by a moveable seat or in a
door of the vehicle.
Any straps holding the restraint to the vehicle should be tight;
Any support-leg should be in contact with the vehicle floor;

7
GBGB
SAFETY WARNING
Any straps restraining the child should be adjusted to the
child’s body;
Straps should not be twisted;
Ensure that any lap strap is worn low down, so that the pelvis
is firmly engaged, shall be stressed;
The device should be replaced when it has been subjust to
violent stresses in an accident;
It’s dangerous to make any alterations or additions to the
device without the approval of the Type Approval Authority,
also dangerous not to follow closely the installaton instruc-
tions provided by the manufacturer;
When the chair is not provided with a textile cover, the chair
should be kept away from sunlight, otherwise it may be too hot
for the child’s skin;
Don’t leave your child in the device unattended.
Any luggage or other object liable to cause injuries in the event
of a collision shall be properly secured;
The ECRS shall not be used without the cover;
The seat cover should not be replaced with any other than the
one recommended by the manufacturer, because the cover
constitutes an intergral part of the restraint performance;
The instructions shall be retained on the device for its life
period or in the vehicle handhook in the case of built-in
restraints;
The user shall also be referred to the vehicle manufacturer’s
handhook;
Never use a second-hand product , as you can never be certain
what was happened to it.
This child seat has been designed for the European market and
conforms to the car seat regulations currently in force:
European Union ECE R44. PLEASE NOTE that this seat doesn’t
meet the U.S.A. regulation.
8
USAGE
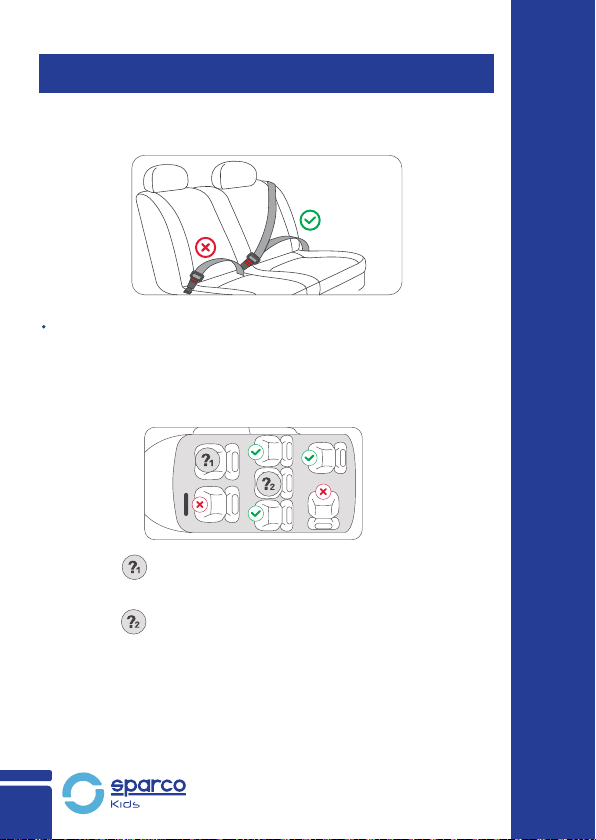
3.1 Install position of the child seat in vehicle
Only suitable if the approved vehicles are fitted with 3 point
safety-belt, approved to UN/ECE Regulation No.16 or other
equivalent standards.
Not to use rearward-facing in seating
positions where an active frontal airbag is
installed.
Only use on this seat if ISOFIX anchorages
are fitted.

As shown in picture 1, pull the adjusting ring to adjust the
headrest up and down, and hold it to the correct position.
The headrest has 7 gears which can be adjusted up or down
according to the child's height.
9
USAGE GBGB
3.3 Checking the shoulder strap height
3.2 Adjust the headrest
Always check that the shoulder straps are at the correct
height for your child. The child’s shoulder straps should
always be threaded through the slots in the cover and seat
shell that are closest to the top of your child’s shoulders.
Picture 1
10
USAGE
1
3.5 Adjust the length of harness
Picture 1
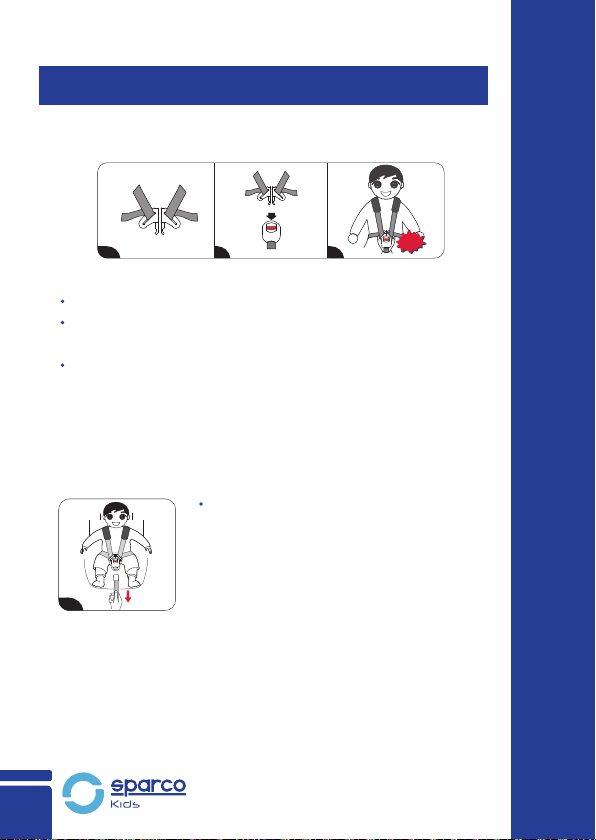
3.4 Usage of buckle
buckle (sketch map)
Step1:Get the left and the right pieces of buckle together.
Step2:Insert the two pieces into the slot of the buckle .At the
same time, hearing "click" means the buckle gets stuck,
pull the pieces of the buckle and check whether the buckle
is locked correctly.
Step 3: If you want to release the safety belts, it needs to
press the red button,then the pieces pop up.
1 2 3
click
Picture1:Tighten the harness.
Pull the harness upward to remove the
slack from the lap sections of the
harness then pull the front stretch belt
until the harness is fully tightened.
The harness should be adjusted as
tightly as possible without causing
discomfort to your child. A loose harness
can be dangerous.
Check the harness adjuster and tighten
each time when the child is placed in the
seat.
11
USAGE GBGB
2
Picture 2
Picture 2:Loosen the harness.
The harness can be slackened by
pressing the adjuster(under the seat
cover)on the front of the seat. Press down
the adjuster as you grip the two harness
with your another hand.Pull the harness
towards you to loosen the harness.
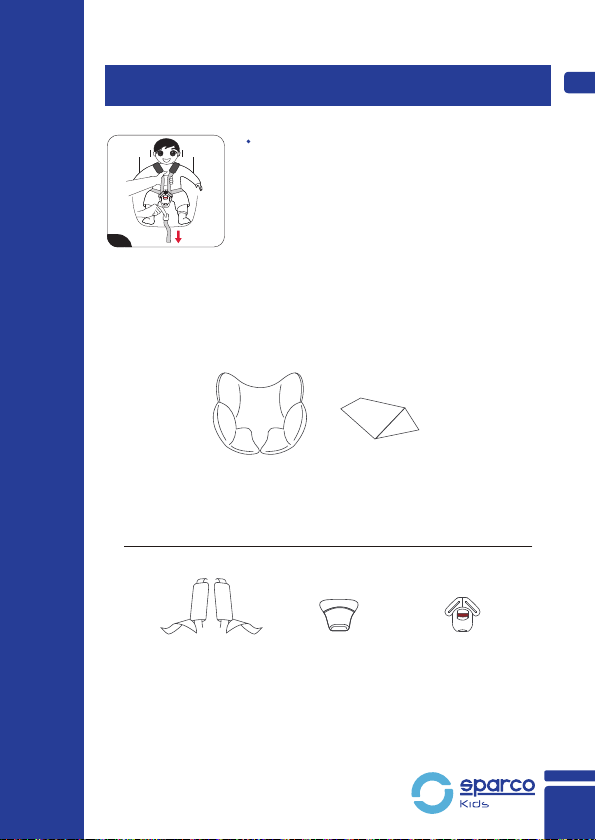
3.6 Removable and hidden objects
Stature 105-135cm : the above items need to be hidden
shoulder pads and
the shoulder straps crotch pad buckle
(sketch map)
Stature >60cm : the above items need to be removed
cushion Triangle sponge

Step 1:Open the buckle and the cloth cover of seat back;
Step 2: Store the shoulder straps with shoulder padon both
sides of the seat. Tighten the harness adjuster strap properly
and close up the cloth cover of seat back;
3.7 The method to store shoulder straps with chest
pad and buckle
The shoulder straps
and shoulder pads
1
Lift up the cloth cover of the seat, and put the disassembled
buckle into the storage slot.
3
2
12
USAGE

13
GBGB
USAGE
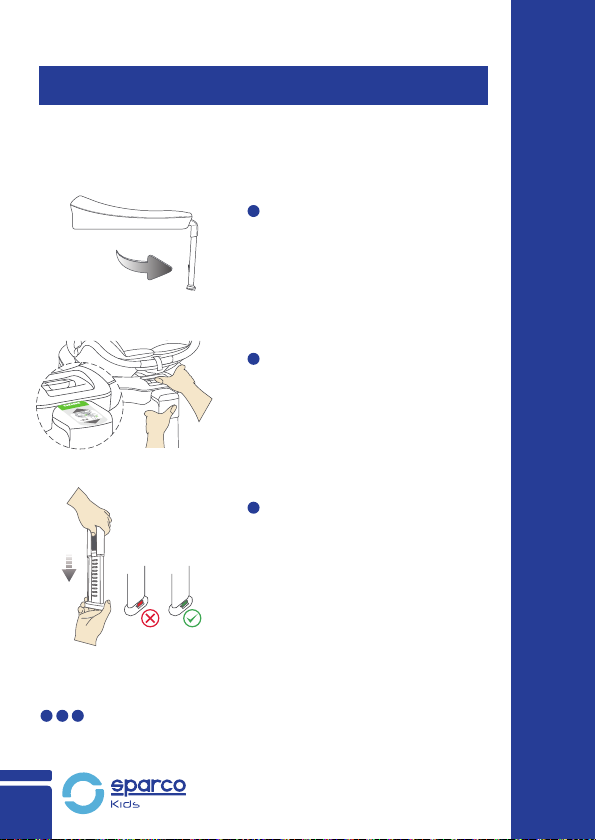
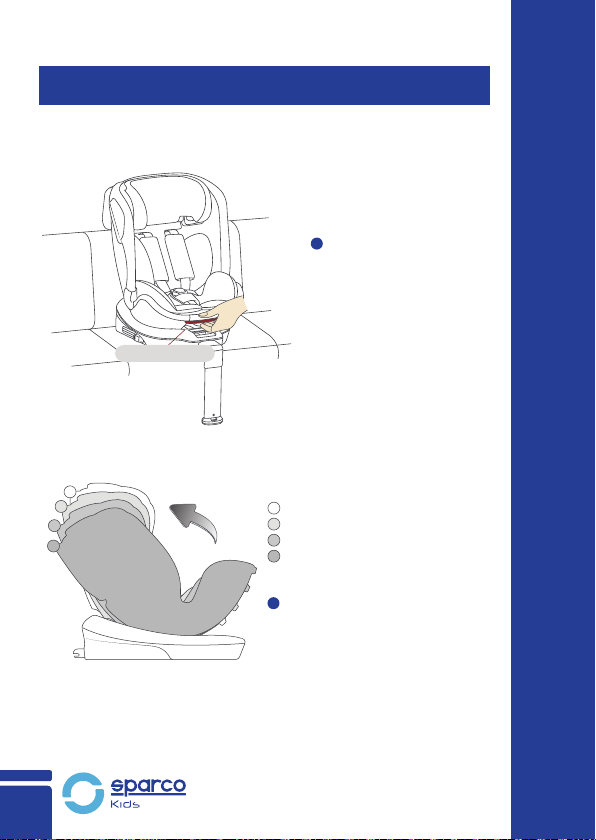
3.8 Adjust the ISOFIX attachments
ISOFIX
release button
ISOFIX locking
button
click
The ISOFIX attachments can be adjusted for many positions to
fit the dierent positions of ISOFIX low anchorages expending
from car seat. Press down the release button to adjust ISOFIX
attachment of both sides to the longest.
Then put the ISOFIX attachments into guide sleeves, and insert
them into ISOFIX anchorages. Make sure that you have heared a
“click"and the ISOFIX latching indication shows GREEN.
If you want to release the ISOFIX attachments, just installation
of the ISOFIX attachments is finished. Push the red release
button of the ISOFIX chuck at the direction as shown, the ISOFIX
chuck will be released.
After installed the ISOFIX chuck, push the child restraint
forwards until it is tight against the car seat. Now, the ISOFIX
base is installed in place.
14
USAGE
When child stature in 40-105cm, the support leg is in the usage state
3.9 Usage of the support leg
The method to adjust the length
of the support leg:
Press and hold the adjustment
button on the support leg, then
adjust the length up and down
until it hits the car ground.
The bottom of the support leg
will turn green.
3
When child stature in 105-135cm, the support leg is in the stowed
state. If you want to put away the support leg, just press the above
operation.
3 2 1
Take out the support leg from
the lower cover of the base,
which keep about 90°to the
base.
1
Press and hold the support leg
lock button, while holding the
support leg and pull it out to
correct position.
2
15
GBGB
USAGE
When you hear a "click"
sound, it is indicated
that the gear is in place.
3.10 The method of rotate seat
Pull out the rotation
adjuster with one hand
and rotate the safety
seat with the other hand,
both left and right
directions can be rotated;
1
2
When child stature in 40-83cm,
the safety seat should rearward-facing.
When child stature in 83-105cm,
the safety seat can forward-facing or
rearward-facing.
When child stature in 105-135cm,
the safety seat should forward-facing.
Rotation adjuster
Click
16
USAGE
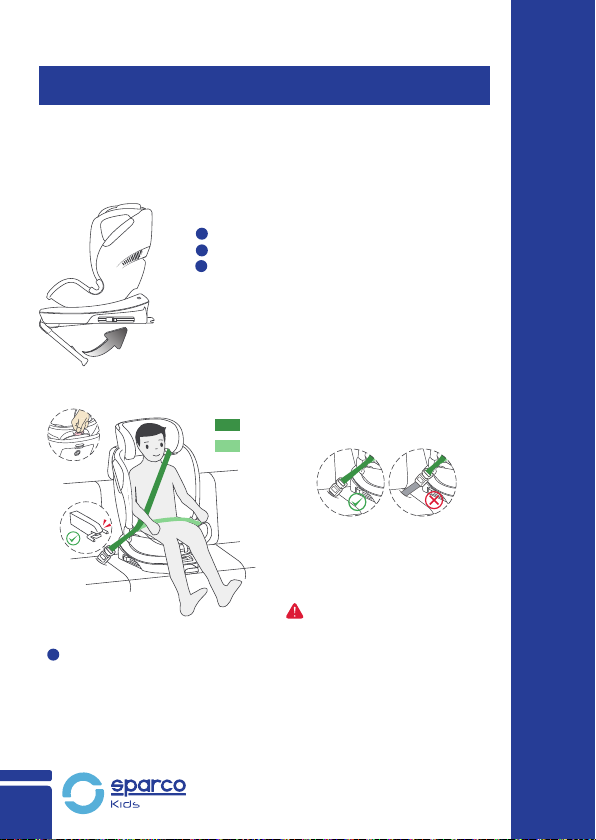
Pull out the angle
adjuster to adjust
the seat front and rear.
The car seat can recline in 4
dierent positions, as shown
in the above picture.
Forwad facing:
Stature 83-105 CM:①②③④
Stature 105-135 CM:①
Upright gear - 1st gear
Recline gear - 2nd gear
Recline gear - 3rd gear
Recline gear - 4th gear
1
2
3.11 Usage of reclining system
1
2
3
4
Bady Angle adjuster

17
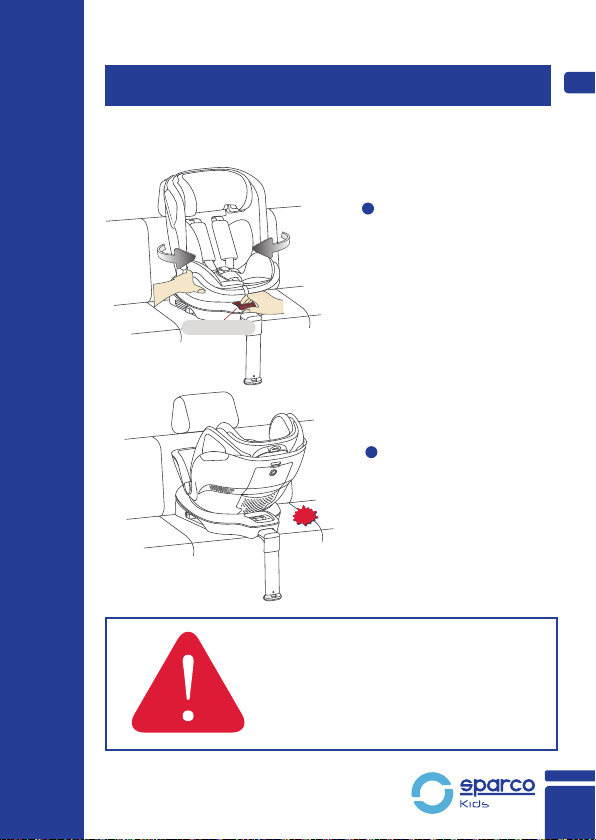
INSTALLATION GBGB
First, pull out the support leg of the base (see 3.9);
Second, pull out the ISOFIX attachment (see 3.8);
Third, place the child safety seat on the car seat;
1
1
2
3
2
4.1 Installed rearward-facing
DO NOT use forward facing before the child’s age
exceeds 15 months.
Stature: 40-105cm
Usage: ISOFIX+Support leg

18
INSTALLATION
Rotate the seat to the
position of the car door,
then put the child in the
safety seat, adjust the
shoulder straps and lock
the buckle (see 3.3~3.5);
Finally, fix the seat
in rearward.
4
5
Click
19
INSTALLATION GBGB
First, pull out the support leg of the base (see 3.9);
Second, pull out the ISOFIX attachment (see 3.8);
Third, place the child safety seat on the car seat;
Finally, put the child in the safety seat, adjust the
shoulder straps and lock the buckle (see 3.3~3.5).
4.2 Installed forward-facing
Stature: 83-105cm
Usage: ISOFIX+Support leg
1
2
3
4
Stature >60cm : the above items
need to be removed
Click
20
INSTALLATION
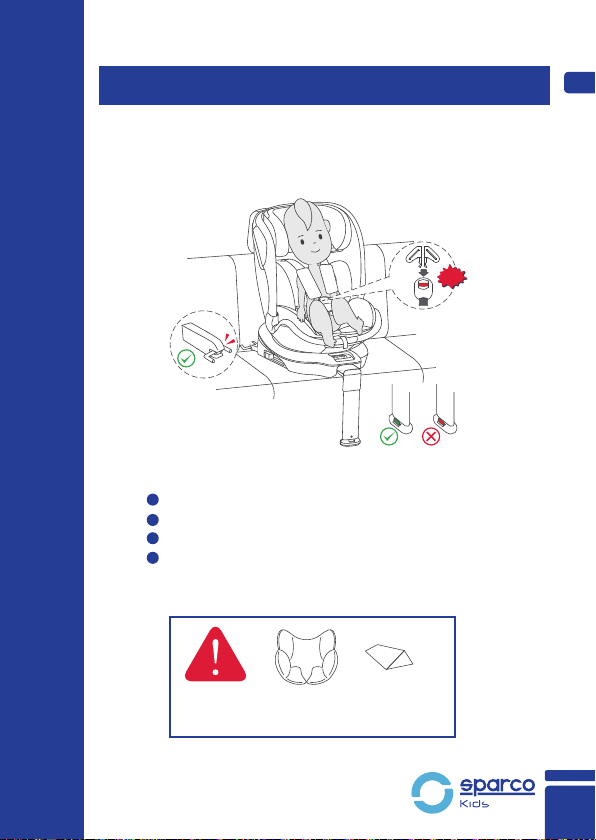
4.3 Installed forward-facing
Stature: 105-135cm
Usage①: Fixed with ISOFIX + adult three-point seat belt.
1
2
3
Put away the support leg (see 3.9)
Pull out the Fix attachment (see 3.8)
Place the child on the child restraint
system. Adjust the headrest height to
ensure that the headrest is at the child's
shoulder height and fixed well;
Shoulder belt
Lap belt
4
After belt fixed, the seat
buckle and belt guide
hook can not be placed in
this position. Please
contact the manufacturer
if in doubt.
Make sure the car seat
belt is not slack or twisted.
According to the installation path, insert the car seat belt
across the child's body into the car groove of the car seat;
Make sure that the car seat shoulder belt passes through the
guide groove of the headrest, and pull up the car seat lap belt
to check whether it is locked.
Table of contents
Other Spar Car Seat manuals


