Spar F300i User manual
GB
ECE R44/04
GROUP 0+
ISOFIX for Group 0+ Sparco F300i
INSTRUCTION MANUAL
0-13
kgs
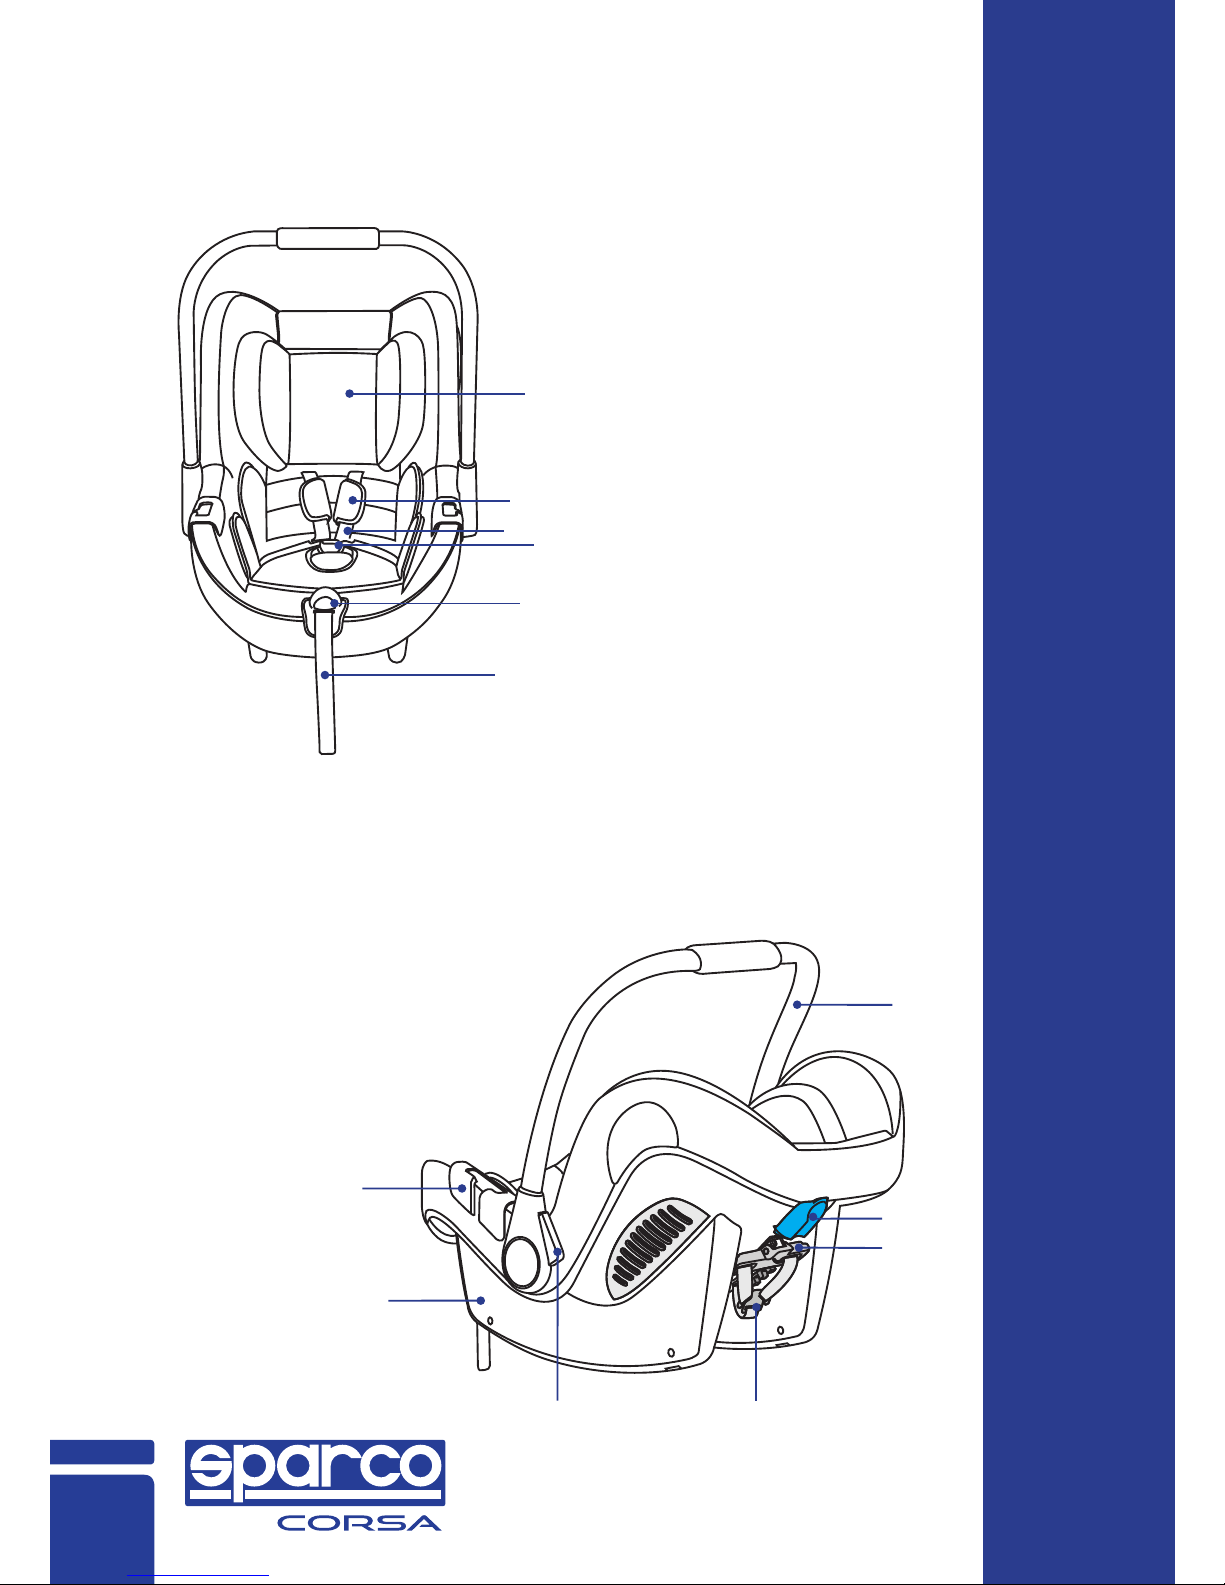
Know Your Child Seat
6
1
2
34
5
6
7
8
9
10 11
13
12
1. Headrest
2. Shoulder pad
3. Shoulder strap
4. Harness buckle
5. Harness release button
6. Harness strap
7. Handle
8. Lap belt guide
9. Seat shell
10. Handle adjustor
11. Harness yoke
12. Headrest adjuster
13. Diagonal belt guide
*ECE = European Standard for Safety Equipment
The child safety seat has been designed, tested and
certified according to the requirements of the
European Standard for Child Safety Equipment (ECE
R44/04).
The seal of approval E (in a circle) and the approval
number are located on the approval label (sticker on
the child safety seat).
This approval will be invalidated if you make any
modifications to the child safety seat. Only the
manufacturer is permitted to make modifications to
the child safety seat.
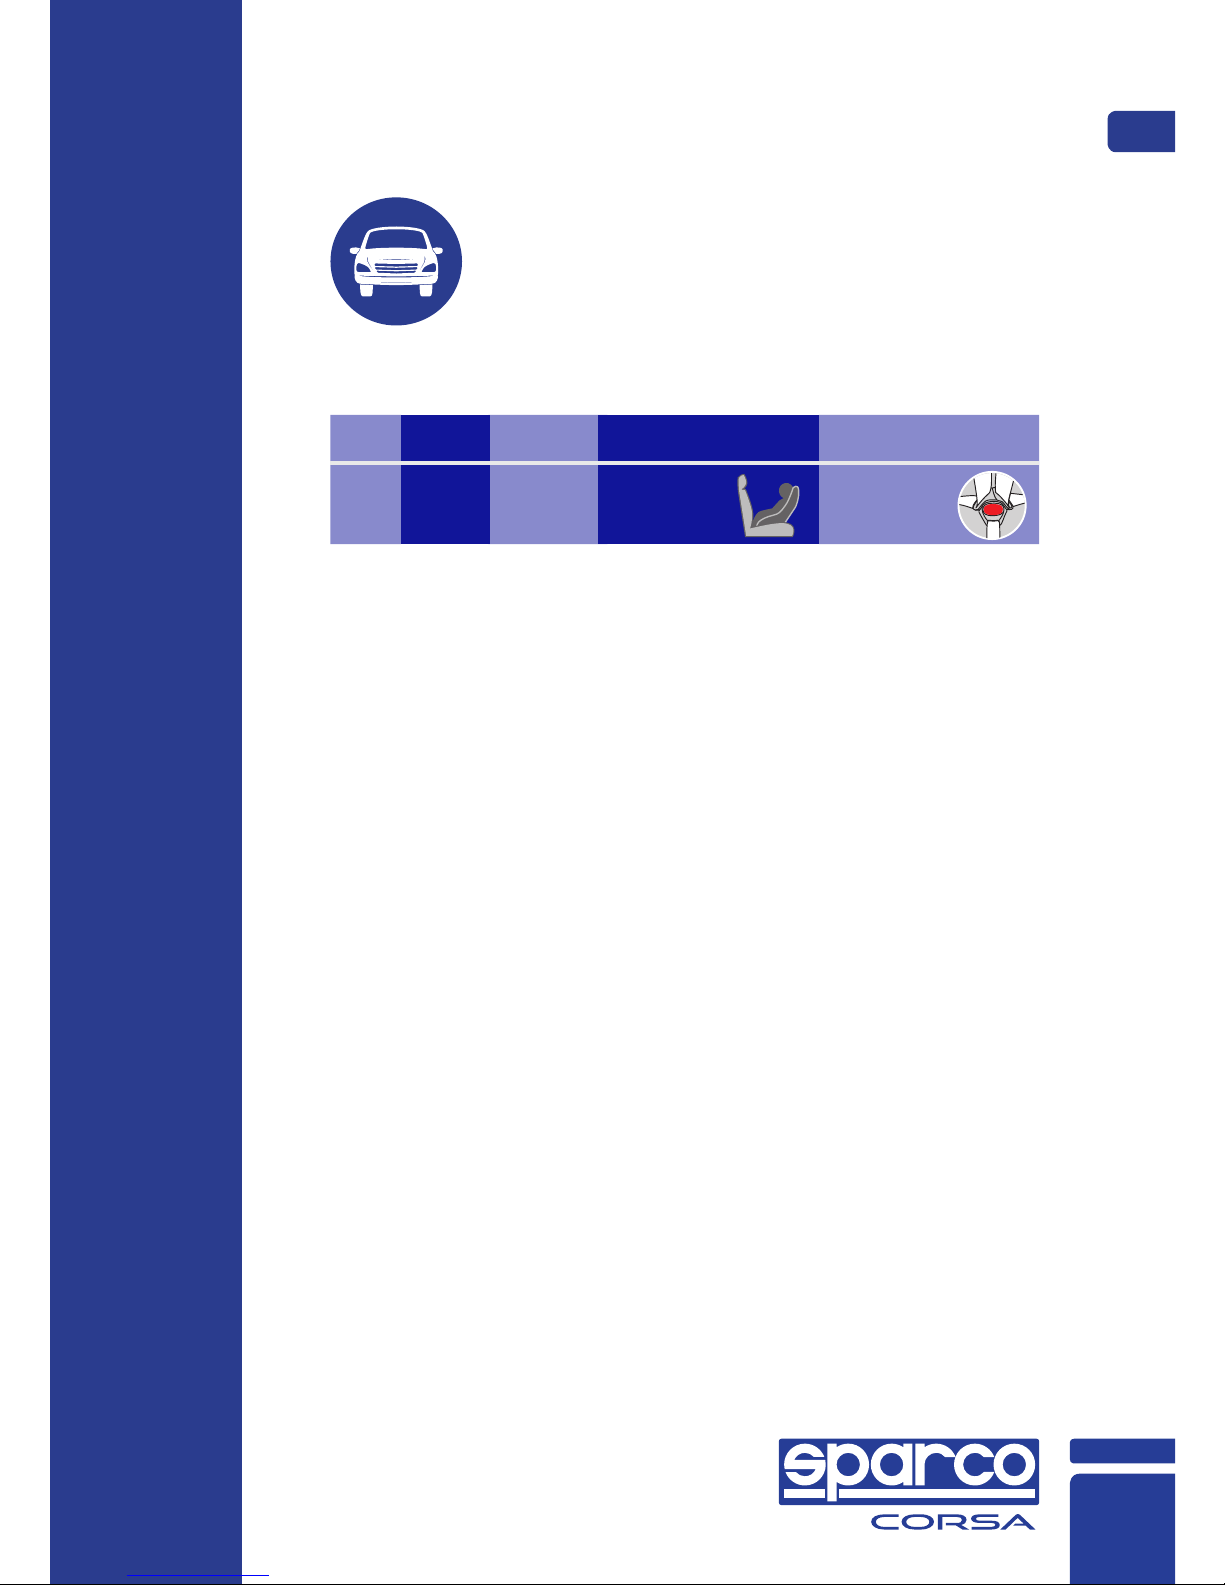
Suitability GB
7
...as a child safety seat installed in a vehicle.
EU Standard ECE R44 04
Group Weight Age Orientation Fixing of child
Group
0+
Backward
facing
Child seat belt
(5 points)
0-18
months
0-13kg

Use in The Vehicle
8
DO NOT use on a
passenger seat with a
front airbag!
DO NOT use with
2-point belt. With the
vehicle's 3-point
seatbelt.
Danger! An airbag hitting the infant carrier can cause
serious injuries to your child, possibly resulting in death.
Please observe the instructions in your vehicle manual for
the use of child seats.
Please observe the regulations applicable to your
particular country.
Do not use with 2-point belt.
The safety belt must be approved to ECE R 16 or a
comparable standard.
Do not use on passenger seats with a front airbag!
Can be used if the vehicle seat is equipped with a 3-point
belt.

With the vehicle's 3-point seatbelt
You can use your child car seat as follows:
GB
9
In the direction of travel NO
Against the direction of travel YES
With 2-point belt NO 1
With 3-point belt YES 2
On front passenger seat YES 3
On outer rear seat YES
On centre rear seat NO 4
(Please observe the regulations applicable to your
particular country).
1. The use of a 2-point belt substantially increases the
risk of injury to your child in the event of an accident.
2. The safety belt must be approved to ECE R 16 or a
comparable standard (see test label on belt with an "E"
or "e" in a circle).
3. Do not use on passenger seats with a front airbag!
4. Can be used if the vehicle seat is equipped with a
3-point belt.

1. Securing your baby using the baby insert
Securing Your Baby
For the protection of your baby.
The baby insert gives your baby the
necessary support while he or she
is still small.
The baby insert is used to provide
extra comfort for very small babies.
Caution! Please use the baby insert
attached to this infant carrier when
your baby's weight is less than 9kg.
Always secure your baby in the infant carrier using
the harness.
Never leave your baby unattended in the infant
carrier when placing it on elevated surfaces {e.g. a
table, nappy changing unit, etc.).
Never allow the strap end to become caught in
moving parts (e.g. automatic doors, escalators, etc.).
Caution! The plastic parts of the infant carrier heat up
in the sun, so that your baby may get burnt. Protect
your baby and the infant carrier against intensive
solar radiation (e.g. by putting a light cloth over the
seat).
The infant carrier requires only one seating position
in the car. This advantage means, however, that your
baby must be in a semi-reclined position.
Take your baby out of the infant carrier as often as
possible to relieve its spine. We recommend frequent
breaks during long journeys. Even outside of the car,
please avoid leaving your baby in the infant carrier
for too long.
10

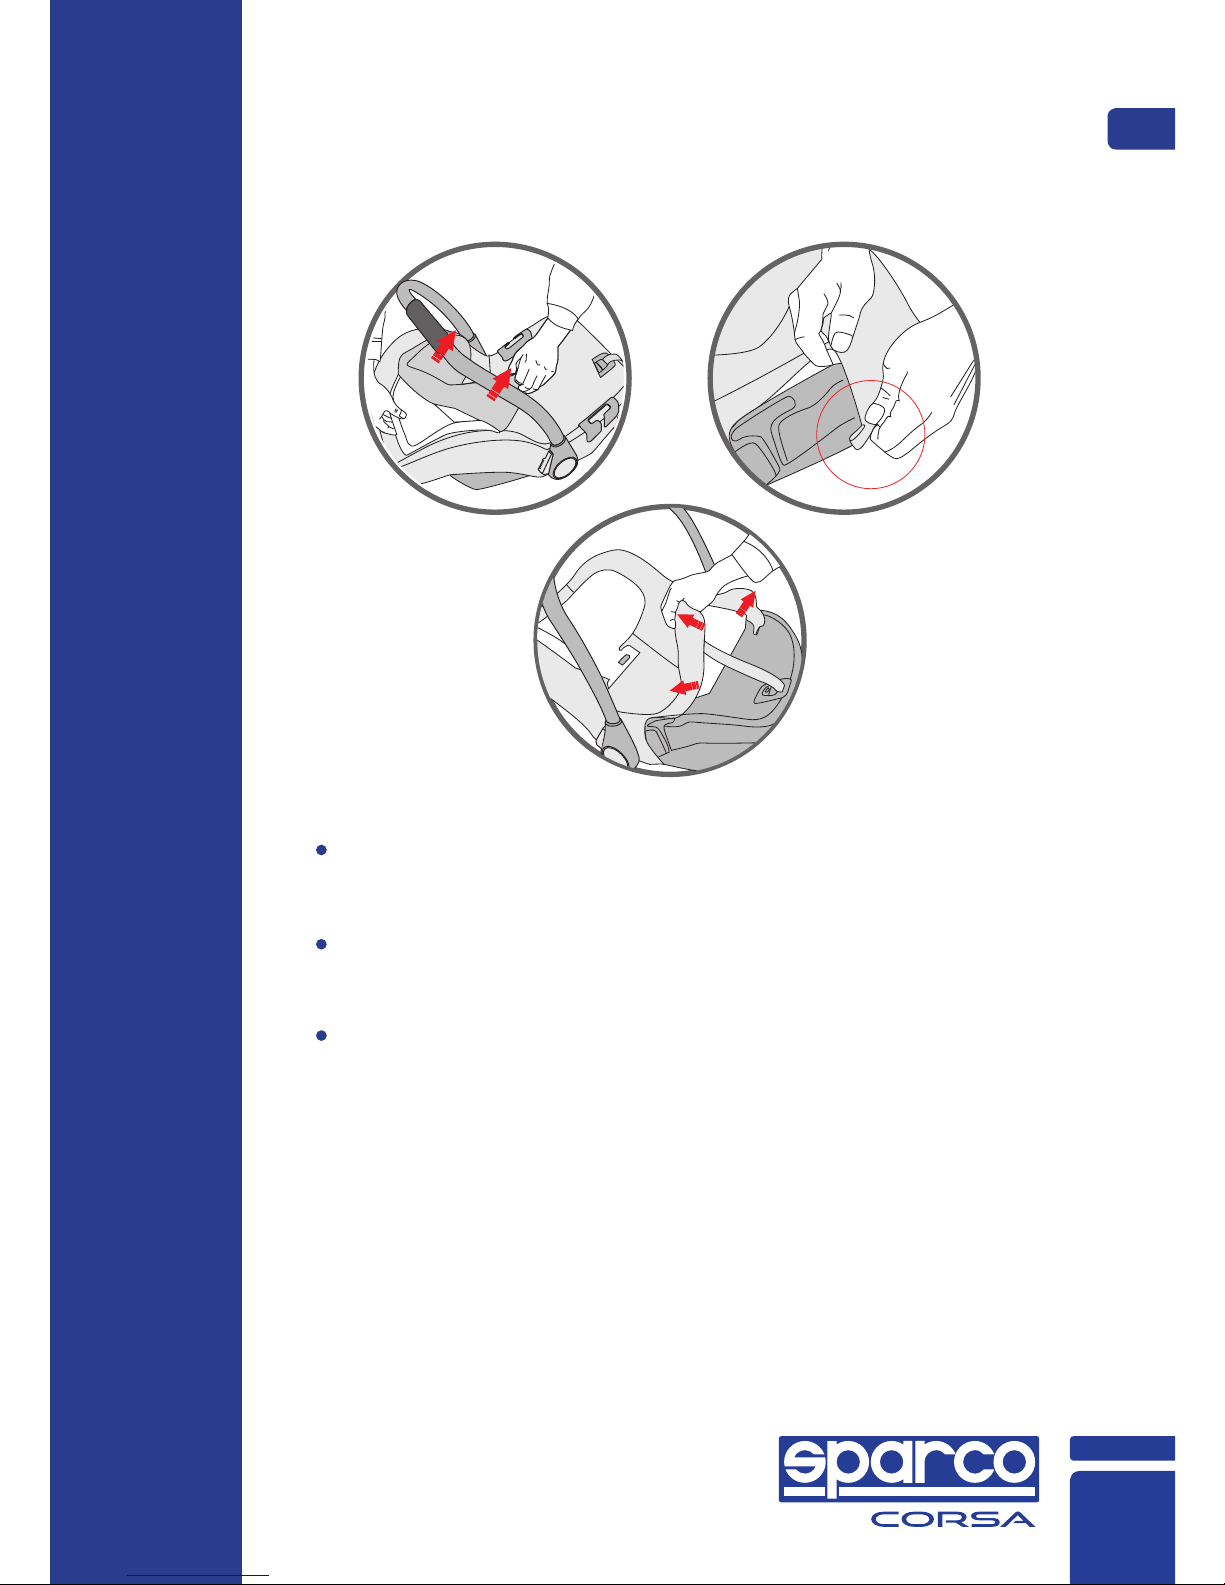
2. Adjusting The Handle
You can engage the adjustor in three positions:
Simultaneously press both buttons on the handle.
Then whilst holding the adjustor pressed turn the
handle backwards until it engages in the desired
position.
A: For carrying and for transport in the car.
Caution! Ensure that the handle is securely engaged
before you pick up the infant carrier.
B: For placing your baby into the infant carrier.
Tip! You can swivel the handle from position to position
without pressing the buttons.
C: For setting the infant carrier down safety outside the
car.
GB
11

A correctly adjusted headrest ensures your baby’s
optimal posture in the infant carrier.
The headrest must be adjusted so that the shoulder
straps are at the same level as your baby's shoulders
or slightly above.
To adjust the height of the headrest to fit your baby:
Tilt the headrest adjuster until it disengages.
Slide the headrest adjuster until the shoulder straps
are at the correct height and re-engage.
Press the harness release
button and at the same time
pull both shoulder straps
forward.
3. Adjusting the headrest
4. Loosening the shoulder straps
12

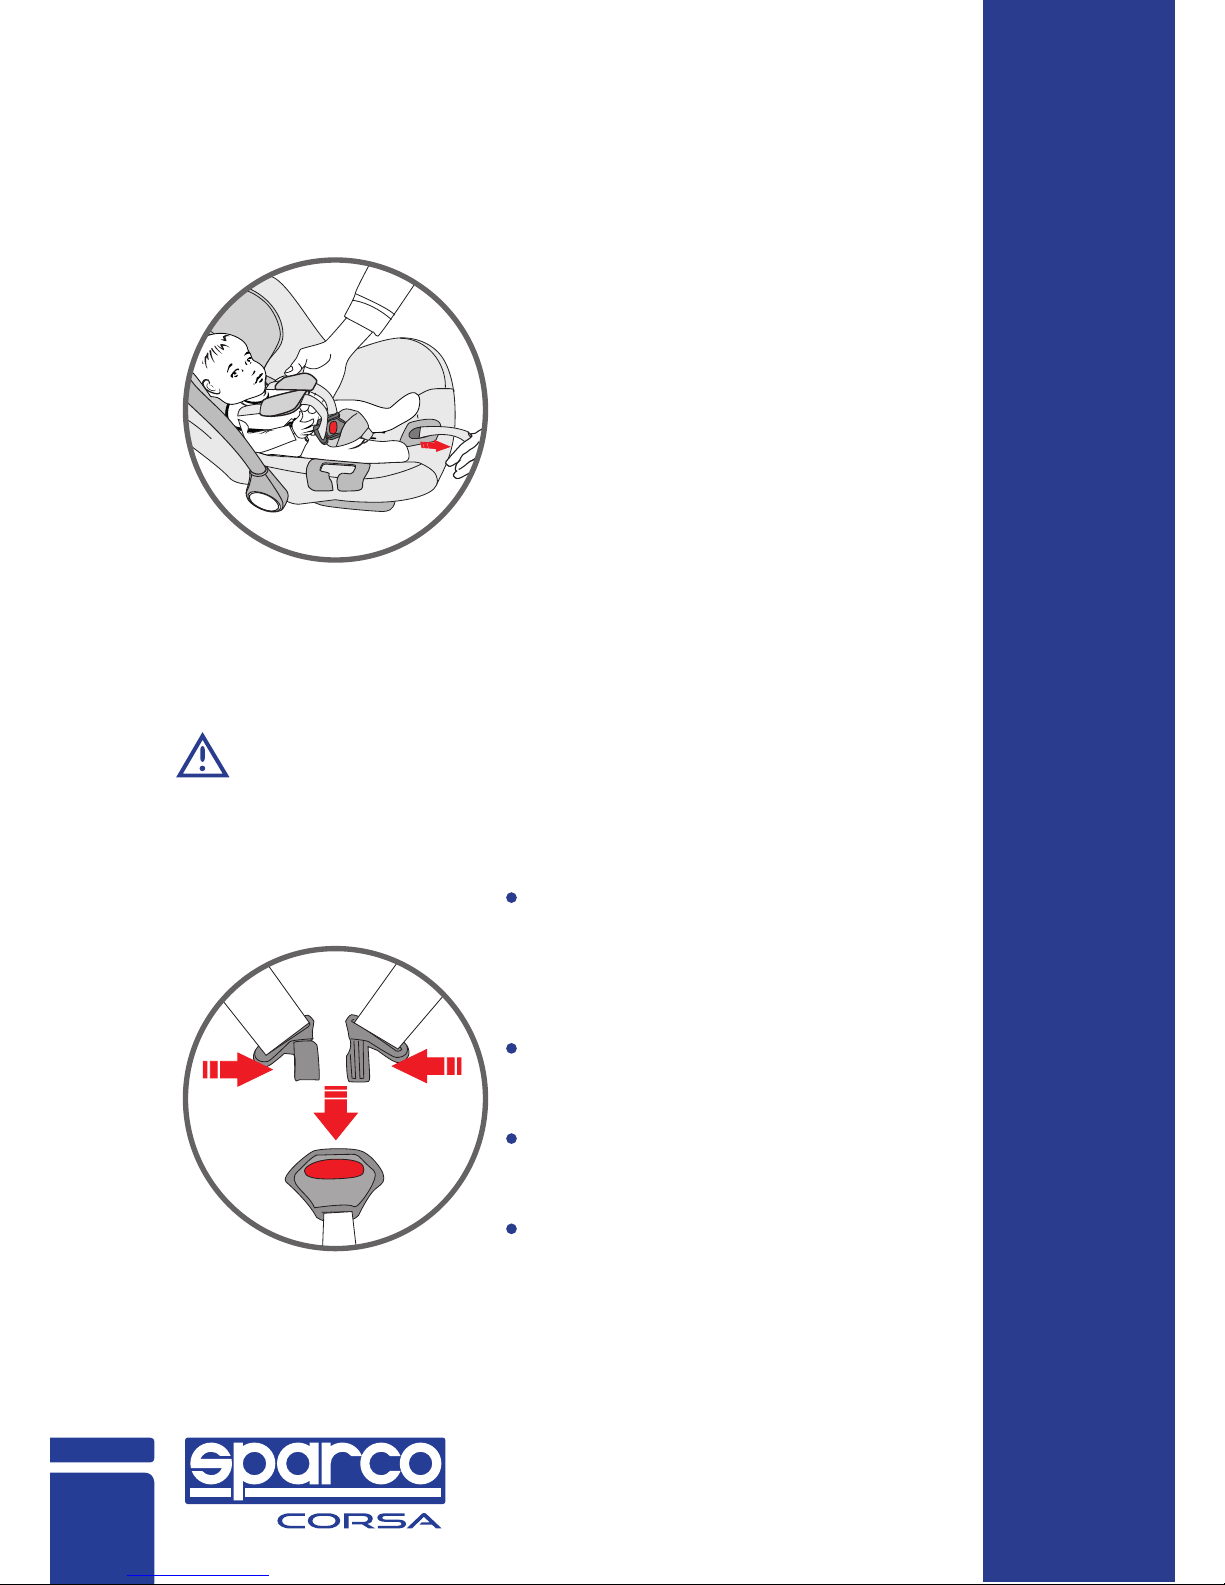
5. Securing your baby using the harness
Loosening the shoulder straps.
Open the harness buckle (press the red release
button).
Place your baby into the infant carrier.
Put the shoulder straps over the shoulders of your
baby, then put the buckle tongues together and
engage in the harness buckle with an audible "click".
Caution! Do not twist or interchange the shoulder
straps.
GB
13
For the safety of your baby, please check that...
6. Tightening the harness
7. Checklist to ensure that your baby is buckle up correctly.
Pull the strap end
Caution! Pull the strap end
straight towards you, not
upwards or downwards.
Please pay attention to the
strap end.
Whilst traveling (especially
outside the car) it should
always be attached to the
cover.
The shoulder straps of the
infant carrier are comfort-
able but FIRM fit around
your child.
The shoulder straps are
adjusted correctly.
The shoulder straps are not
twisted.
The buckle tongues are
engaged in the harness
buckle.
14
Installation In The Vehicle
Please do not leave your child unattend-
ed in the child safety seat in the vehicle.
In the case of an emergency stop or an accident
unsecured persons or objects may cause injury to other
vehicle occupants. Please always check that …
The backrests of the vehicle seats are locked (i.e.
that a foldable rear seat bench latch is engaged).
All heavy or sharp-edged objects in the vehicle (e.g.
on the parcel shelf) are secured.
All persons in the vehicle have their seat belts
fastened.
The child safety seat is always secured when it is in
the vehicle, even if no child is being transported.
Some vehicle seat covers of sensitive materials(e.g.
velour, leather, etc.) may develop wear marks when
child seats are used. This can be avoided by placing a
blanket or towel under the child seat.
For the protection of all vehicle
occupants.
To protect your vehicle
GB
15

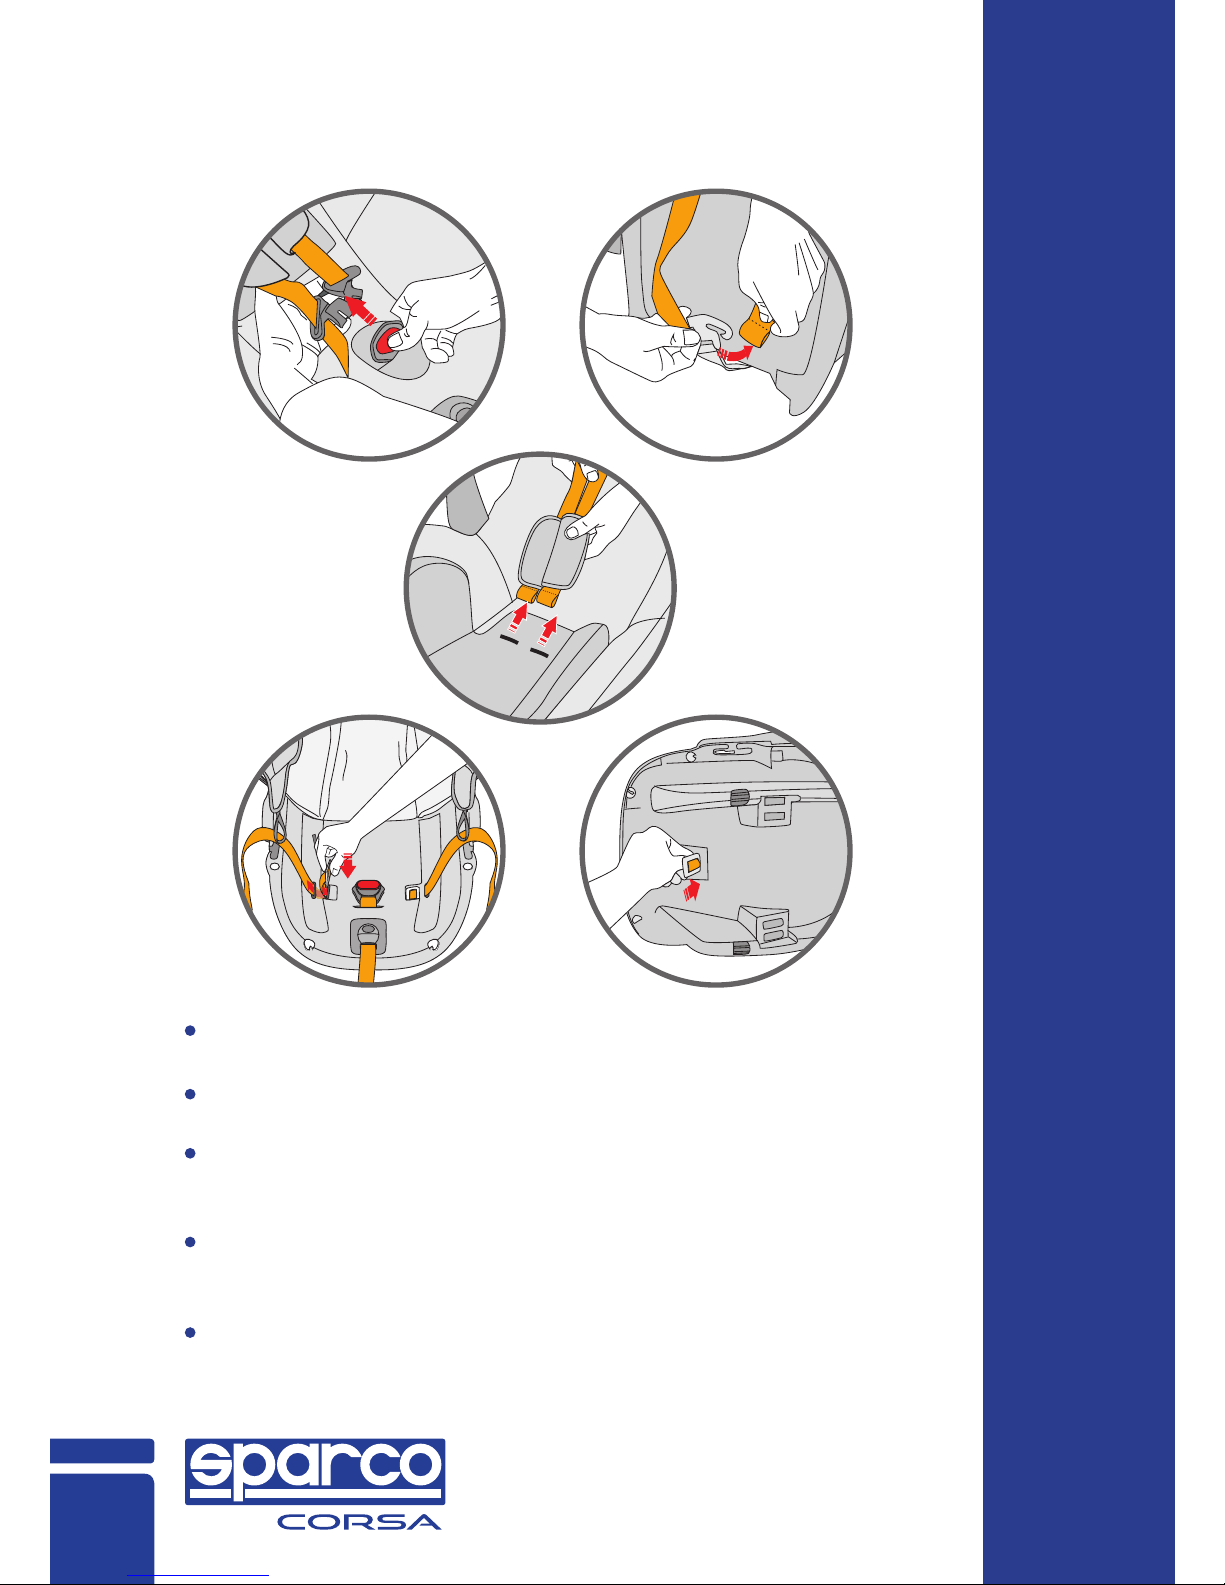
1. Securing the infant carrier in your vehicle
To securing the infant carrier using the 3-point belt of your
vehicle proceed as follows:
Caution! Do not twist the belt.
Tighten the lap belt section by pulling the diagonal belt section.
Caution! The buckle of the vehicle seat belt must not be
positioned in or front of the blue shell (in the direction of
travel).
Pull the diagonal seat belt section behind the top end of the
infant carrier.
Push the diagonal belt section between the blue shell and the
infant carrier until the belt engages.
Caution! Do not twist the belt.
Place the infant carrier rearward-facing on the vehicle
seat (baby is facing backwards).
Tip! In certain cases it is possible that the infant carrier
dose not rest securely or is inclined too steeply on the
vehicle seat.
This can be remedied by placing a blanket under the
child seat or choosing another seating position.
Ensure that the handle is in its upper position A.
Pull out the vehicle seat belt and place it across the
infant carrier.
Engage the buckle tongue in the vehicle seat buckle.
Place the lap belt section in the blue belt guides on both
sides of the infant carrier.
16

2. Checklist for the correct installation of the infant
carrier in your car
GB
17
For the safety of your baby, please check that...
The infant carrier is installed rearward-facing.
The infant carrier is only installed on the front
passenger seat if no front airbag can strike the infant
carrier.
The infant carrier is only secured using a 3-point belt.
The lap belt section runs through both light blue belt
guides on the infant carrier.
The diagonal belt section runs through the blue belt
holder and the infant carrier.
The vehicle seat buckle is not positioned in or in front of
the light blue belt guide.
The vehicle seat belt is tightened up and not twisted.
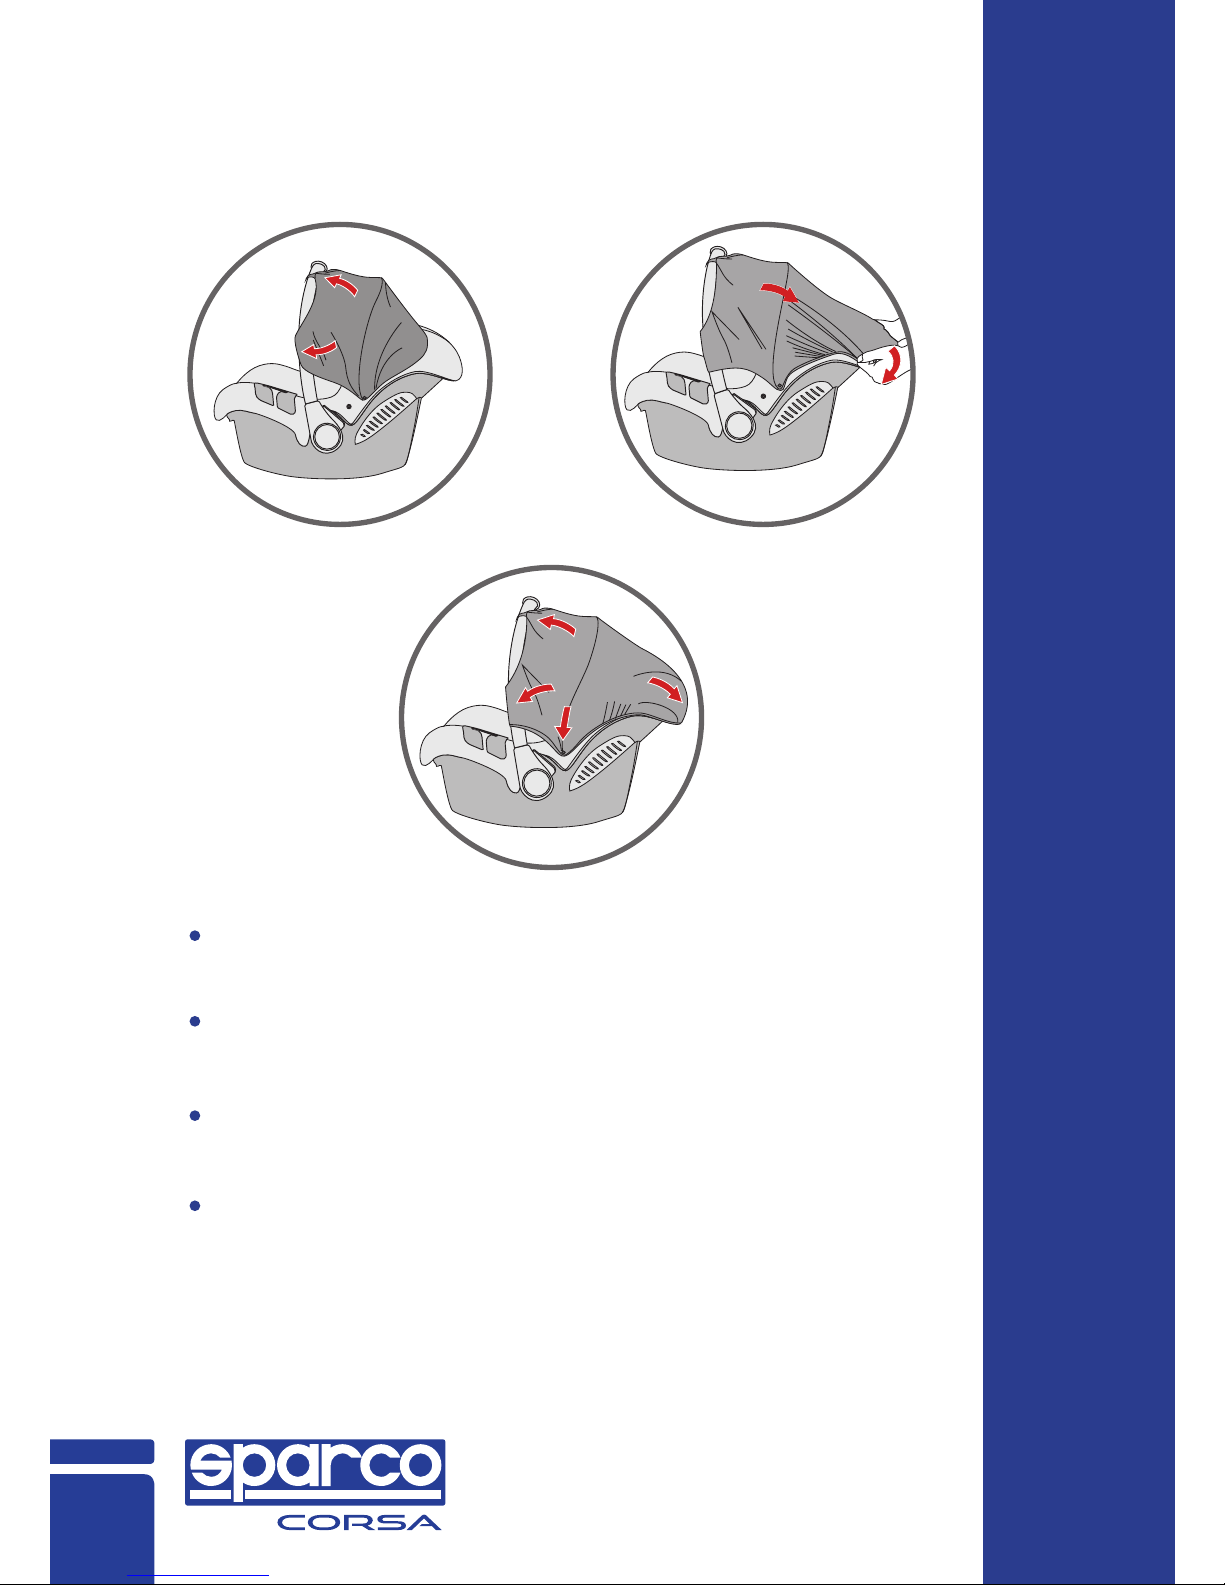
Fitting the sunshade
Hook the elastic loops of the sunshade from underneath
into the hooks on the handle.
Pull the elastic seam over the upper edge of the infant
carrier.
Hang the elastic loops in the hooks under the edge of
the infant carrier.
Tighten the sunshade by pulling the edge of the
sunshade over the handle.
18

To retain the protective eect
Care instructions
In an accident at a collision speed above 10 km/h the
child safety seat could suer damage which is not
necessarily obvious.
In such cases it is extremely important that you replace
the child seat. Please dispose of it properly.
Regularly check all important parts for damage.
Ensure the correct operation of all mechanical
components.
To prevent damage or breakage, ensure that the child
seat does not become jammed in the car door, seat
runners, etc.
Should the child seat be damaged (for example after
dropping it) it must be inspected by the manufacturer.
The buckle tongues are ejected only slowly when the
red release button is pressed.
The buckle tongues will no longer lock home (are
ejected again).
The buckle tongues engage without an audible "click".
The buckle tongues are dicult to insert (you feel
resistance).
The buckle only opens if extreme force is applied.
The function of the harness buckle is important for the
safety of your child. Malfunctions of the harness buckle
are mostly attributable to accumulations of dirt and dust.
1. Care for the harness buckle
Malfunction
GB
19

Removing the harness buckle
Open the harness buckle (press the red release
button).
Loosen the harness straps.
Tilt the infant carrier backwards and open the user
instructions compartment.
Push the metal plate, with which the harness buckle is
fixed to the seat shell, on its side upwards through the
belt slot.
Cleaning the harness buckle
Soak the buckle in warm water with dishwashing
liquid for at least an hour. Rinse and dry thoroughly.
Re-fitting the harness buckle
Push the metal plate on its side downwards through
the belt slot in the cover and through the seat shell.
Check for correct fitting by pulling firmly on the
harness buckle .
Malfunction
The buckle tongues can no longer be inserted into the
buckle housing.
Remedy
Unlock the buckle by pressing the red release button.
Remedy
Wash out the harness buckle so that it functions properly
once again:
20

2. Cleaning
Please be sure to use only original Diadem replacement
seat covers, the seat cover is important to the proper
functioning of the system. Replacement seat covers are
available from your retailer and or at branches.
The cover can be removed and washed with a mild
detergent using the washing machine's cycle for
delicate items (30°C). Please observe the instructions
on the washing label of the cover. The colors of the
cover may fade if washed at more than 30°C. Do not
spin, and never tumble dry in an electric clothes dryer
(the fabric may separate from the padding).
The plastic parts can be cleaned using soapy water. Do
not use harsh cleaning agents (such as solvents).
The harness can be removed and washed in lukewarm
soapy water.
The child seat must not be used without the seat
cover.
Caution! Never remove the buckle tongues from the
straps.
GB
21
3. Removing the harness
Open the harness buckle (press the red release button).
Unhook the shoulder straps from the harness yoke.
Pull the shoulder straps out of the belt slots of the baby
shell, and unthread the shoulder pads.
Pull out the metal part which is used to fasten the strap
to the bottom of the baby shell.
Push the metal plate, with which the harness buckle is
fixed to the seat shell, on its side upwards through the
belt slot.
22
Take the harness away and remove the cover of the
headrest.
Take the elastic loops o the hooks under the edge of
the baby shell.
Unhooking all the elastic loops from its hook stands, so
you can remove the seat cover from the seat.
To refit the cover on the seat just hook up the elastic loops
to its hook stand, and fit back the headrest cover.
4. Removing the cover
5. Re-fitting the cover
GB
23
1. This is a 'Universal’ child restraint. It is approved to
regulation No. 44.04 series of amendments, for general
use in vehicles and it will fit most, but not all, car seats.
2. A correct fit is likely if the vehicle manufacturer has
declared in the vehicle handbook that the vehicle is
capable of accepting a 'Universal' child restraint for this
age group.
3. This child restraint has been classified as 'Universal'
under more stringent conditions than those which
applied to earlier designs which do not carry this notice.
4. If in doubt, consult either the child restraint manufac-
turer or the retailer.
5. Only suitable if the approved vehicles are fitted with
3-point-static or retractor safety belts, approved to
UN/ECE Regulation No. 16 or other equivalent standards.
NOTICE
22
Table of contents
Other Spar Car Seat manuals


