Sperian 2000 Series User manual

I. INTRODUCTION
This manual provides instruction in the use and main-
tenance of the SURVIVAIR Series 2000 Belt Mounted
Half Mask Respirator. The respirator comes in three
sizes: small, P/N 250050, medium, P/N 260050, and
large, P/N 270050. You must read and understand
this manual and be trained in the proper use of this
respirator before wearing it in a contaminated at-
mosphere.
II. SAFETY PRECAUTIONS
The Warnings, Cautions, and Notes contained in this
manual have the following signicance:
WARNING
Maintenance or operating procedures
and techniques that will result in personal
injury or death if not carefully followed.
CAUTION
Maintenance or operating procedures and
techniques that may result in damage to
equipment if not carefully followed.
NOTE
Maintenance or operating procedures and
techniques or information considered impor-
tant enough to emphasize.
III. DESCRIPTION
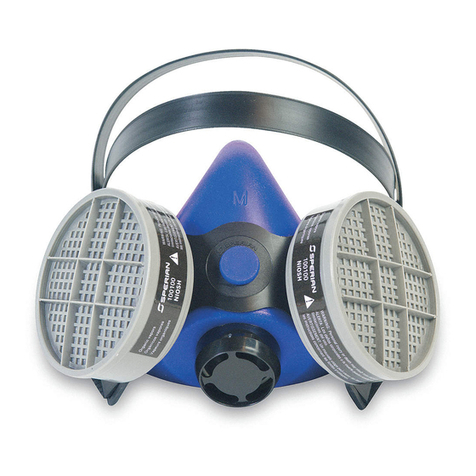
This SPERIAN air purifying respirator consists of a half
mask facepiece and breathing tube assembly, and a
plenum with two threaded connectors for attaching par-
ticulate lters, gas or vapor cartridges, and cartridge/
lter combinations as required for specic contaminant
protection. The plenum is designed to be clipped to the
user’s belt.
AIR PURIFYING RESPIRATOR Series 2000
Belt Mounted Half Mask
©Copyright Sperian Respiratory Protection USA, LLC
April 2008 All Rights Reserved
zP/N 270094 REV C 03/09
AN ISO 9001
REGISTERED
COMPANY
Sperian Respiratory Protection USA, LLC
3001 South Susan St., Santa Ana, CA 92704
Toll-Free 888.APR.SCBA or 714.545.0410
Fax 714.850.0299
www.sperianprotection.com
DO NOT USE this respirator until you completely read and understand this instruction manual. You
are required to inspect your respirator prior to putting it into service. Please refer to the inspection
procedures in this manual.
WARNING
WARNING
The employer is responsible for es-•
tablishing that this respirator is suit-
able for the user’s applications.
This respirator must be worn and used•
asspeciedinSPERIAN’sinstructions.
This respirator does not supply oxy-•
gen and must not be used in atmo-
spheres containing less than 19.5%
oxygen by volume.
Before entering a hazardous envi-•
ronment while wearing SPERIAN
equipment, you must conduct safe,
scientic tests to determine if the
environment could render the equip-
ment unsafe. Results of this testing
should be well documented. Seek the
helpofacertiedsafetyprofessional
or industrial hygienist. DO NOT USE
this equipment if the user would be
endangered in any way through envi-
ronmentally induced degradation of
the materials in the apparatus.
Do not use this respirator in environ-•
ments where the concentrations of
contaminants are unknown, or where
the atmosphere is immediately dan-
gerous to life or health (IDLH). IDLH
atmospheresaredenedas:
Those which the wearer could not1.
breathe for short periods.
Those from which the wearer2.
could not escape without the aid
of the respirator.
Those which have an immediate or3.
delayed adverse effect on health.
NEVER use this respirator without ap-•
propriate SPERIAN cartridges/lters
identiedontheNIOSHapprovallabel
securely threaded onto the plenum.
Always read cartridge labels prior to•
use to be certain that you have car-
tridgesand/orlterthatwillprovide
the required protection. Cartridges/
lters labeled for protection against
particulates only shall not be used
for gases/vapors, and cartridges/
lters labeled for protection against
gases/vapors only shall not be used
for particulates.

2
APR 2000 Belt-Mounted Half Mask
WARNING─continued
Immediately return to a non-contam-•
inatedareaif:
You taste or smell contaminants,a.
or your eyes, nose, or throat be-
come irritated;
Breathingbecomesdifcult;b.
The air you are breathing becomesc.
uncomfortably warm;
You feel nauseous or dizzy;d.
Any of the end-of-service-life in-e.
dicators on the metallic mercury
vapor cartridge turns gray; or
The facepiece moves, slips, or leaks.f.
This respirator must not be used for•
fumigation, abrasive blasting, under-
water diving, or interior structural
reghting.
If this respirator will be used during•
welding, it is the user’s responsibil-
ity to obtain the proper equipment
for protection against sparks, optical
radiation, and impact.
Do not wear this respirator if a satis-•
factoryt,asdeterminedbyaquali-
tativeorquantitativettest,cannot
be obtained. See ANSI Z88.2, latest
edition, and OSHA Standards for As-
bestos and Lead. Beards, stubble, or
sideburns will prevent a good face-
piece seal, and facial hair may inter-
fere with valve function. Do not use
this respirator unless you are clean
shaven. Absence of one or both den-
tures can seriously affect the t of
the facepiece.
Never use this respirator without•
SPERIAN cartridges or lters se-
curely threaded onto the plenum.
This respirator must be used in con-
junction with a written respirator
program meeting the requirements
of the OSHA Standard for Respira-
tory Protection, 29 CFR 1910.134,
available from the U.S. Department
of Labor, Occupational Safety and
Health Administration. The program
must include procedures for evaluat-
ing air contaminants and selecting
appropriate respirators, procedures
for proper use of respirators, proce-
dures for testing the facepiece-to-
facetofrespirators,proceduresfor
cleaning, disinfecting, inspecting,
maintaining, and storing respirators,
procedures for determining if work-
ers are physically and medically
capable of wearing respirators, and
procedures for training employees in
the use of respirators and in recog-
nizing the hazards associated with
contaminants in the work place. This
respirator will reduce, but not elimi-
nate the inhalation of contaminants.
Where suspected cancer-causing
contaminants are present, positive
pressure supplied air respirators will
provide higher protection levels.
WARNING─continued
All persons using this SPERIAN•
breathing apparatus must be made
aware of its limitations. We cannot
be responsible for any damage to
property, personal injury, or death in
which environmental exposure is a
contributing factor.
This respirator does not protect ex-•
posed areas of the body. Some con-
taminants can be absorbed directly
through the skin while others may
irritate exposed areas.
Do not use this respirator at temper-•
atures above 130°F (55°C).
SPERIAN respirators, accessories,•
and associated equipment should
not be used in atmospheres which
may contain contaminant concentra-
tions above the lower explosive limit
(LEL). Intrinsic safety certication
of electronic components does not
eliminate potential danger from igni-
tion in these atmospheres.
Your SPERIAN respirator has been•
made of materials chosen for their
performance, safety, and durabil-
ity. However, all respirator materials
have limitations when exposed to ex-
tremes of heat or cold, or to chemi-
cals. Materials may corrode or fail,
and permeation of gases and liquids
may occur. This could create condi-
tions in which this respirator would
be dangerous to use.
S. Special or Critical User’s Instruc-•
tion: The mercury vapor cartridges
incorporate four (4) end-of-service-
life indicators (ESLIs). The ESLIs
must be visible when wearing the
respirator without having to manipu-
late either the facepiece or the indi-
cator. If the indicator cannot be seen,
do not wear the respirator.
No respirator can provide complete•
protection from all conditions. Use
extreme care for emergency opera-
tions. Do not use this respirator for
applications involving exposure to
highheat,sparks,ordirectame.
Accessories not offered by SPERIAN•
may degrade performance, and will
voidNIOSHcertication.
Don not use this respirator if you have•
a health or respiratory problem.
FAILURE TO OBSERVE ALL WARN-•
INGS MAY RESULT IN PERSONAL IN-
JURY, SERIOUS ILLNESS, OR DEATH.
3
APR 2000 Belt-Mounted Half Mask
Figure 1. SURVIVAIR Series 2000 Belt-Mounted APR
IV. PARTS LIST
ITEM QTY P/N DESCRIPTION
1 1 260023 Headband Assy
2 1 250012 Facepiece Skirt, Small
260012 Facepiece Skirt, Medium
270012 Facepiece Skirt, Large
3 1 260019 Exhalation Valve Seat
4 1 140005 Exhalation Valve (Pkg. of 4)
5 1 260018 Exhalation Valve Cover
6 1 140002 Threaded Connector (Pkg. of 2)
7 1 985020 Cap
8 1 260061 Breathing Tube Assy.
9 1 260058 Connector Tube
10 1 260054 Plenum (includes 2 each of 11
and 12)
11 2 360008 Threaded Connector
12 2 140001 Inhalation Valve (Pkg. of 6)
13 2 941732 Clamp
2 140074 Filter Holder (not shown)
2 140079 Filter Holder (not shown)
Cartridges─See Table 1
Filters─See Table 1
TABLE 1. CARTRIDGES AND FILTERS
MODEL NO. CARTRIDGES
100100 Organic Vapors
100300 Organic Vapors and Acid Gases: Organic
Vapors; Sulfur Dioxide, Chlorine, Hydrogen
Chloride, Chlorine Dioxide, Hydrogen Fluo-
ride, Hydrogen Sulde (Escape Only)
100600 Mercury Vapor and Chlorine
109300 Combination Organic Vapors; Acid
Gases; HEPA; Dusts, Fumes, and Mists;
and Pesticides: Organic Vapors; Sulfur
Dioxide, Chlorine, Hydrogen Chloride,
Chlorine Dioxide, Hydrogen Fluoride,
Hydrogen Sulde (Escape Only); HEPA;
Dusts, Fumes, and Mists; Pesticides
109600 Combination Mercury Vapor; Chlorine;
HEPA; and Dusts, Fumes, and Mists
1093 Combination Organic Vapors; Acid
Gases; and P100: Organic Vapors; Sulfur
Dioxide, Chlorine, Hydrogen Chloride,
Chlorine Dioxide, Hydrogen Fluoride, Hy-
drogen Sulde (Escape Only); and P100
1096 Combination Mercury Vapor; Chlorine;
and P100
FILTERS
104000 Pesticides; Paint, Lacquer, and Enamel
Mists; and Dusts, Fumes, and Mists
when used with 100100 cartridge and
140079 retainer. Dusts, Fumes, and Mists
when used with 100300 cartridge and
140079 retainer.
109000 HEPA; and Dusts, Fumes, and Mists
1090 P100
1195 P100 Disk
NOTE
Use only components with the part numbers
listed on the NIOSH approval label. Use of
any other components will void the approval.
WARNING
Below is a partial list of materials for
which these respirators MUST NOT be
used. This list is far from complete.
Contact SPERIAN for information on
other materials.

4
APR 2000 Belt-Mounted Half Mask
Acroline Methanol
Aniline Methyl Bromide
Arsine Methyl Chloride
Boron Hydrides Methylene Chloride
Bromine Nitro Compounds:
Nitrogen Oxides
Nitroglycerin
Nitrobenzene
Nitromethane
Carbon Dioxide
Carbon Monoxide
Carbonyls
Cyanogen
Dimethylaniline Ozone
Dimethyl Sulfate Phosgene
Ethyl Cyanide Phosphine
Fluorine Phosphorous Trichloride
Hydrogen Cyanide Stibine
Hydrogen Selenide Sulfur Chloride
Isocyanates: TDI, HDI, MDI Vinyle Chloride
V. USE INSTRUCTIONS
WARNING
Always read cartridge labels prior to
use to be certain that you have cartridg-
esand/orltersthatwillprovidethere-
quired protection against particulates
only shall not be used for gases/vapors,
andcartridges/lterslabeledforprotec-
tion against gases/vapors only shall not
be used for particulates. Both cartridg-
es/ltersmustbeofthesametype.
A. Filter/Cartridge Installation
WARNING
Mercury vapor cartridges incorporate
four (4) end-of-service-life indicators
(ESLIs) around the side of the cartridge.
Each ESLI, yellow in color when new,
turns to gray when exposed to mercury
vapor. Cartridges with gray ESLIs must
not be used. Never enter or remain in a
hazardous atmosphere wearing a respi-
rator equipped with mercury vapor car-
tridgesunless:
you can distinguish between thea.
safe and discard colors of the end-
of-service-life indicators on the side
of the cartridge;
all end-of-service-life indicators areb.
yellow; AND
the end-of-service-life indicators arec.
visible when wearing the respirator.
Ensure that you have the correct lter and/or 1.
chemical cartridge for the specic contaminants
in your work area. If you are not sure, contact
your supervisor or safety professional.
Thread the P100 or HEPA lters or chemical car-2.
tridges onto the plenum connectors and carefully
hand-tighten, ensuring a good seal against the
plenum. Do not overtighten
Particulate Filter Pad Installation
Insert the correct particulate lter pad into the l-1.
ter retainer so that the side stamped with the part
number will face the wearer.
Snap the lter retainer onto the lter holder or 2.
chemical cartridge.
Inspect the assembly through the retainer to en-3.
sure that:
The edge of the lter makes contact with the a.
entire retainer wall.
The lter is not bunched or foldedb.
The lter completely covers the top of the c.
holder or cartridge and the outer diameter of
the pad is compressed between the top lip of
the cartridge or lter holder and the inner seal-
ing edge of the retainer.
Thread the lter assemblies onto the plenum 4.
connectors and carefully hand-tighten, ensuring
a good seal against the plenum. Do not over-
tighten.
C. Donning
Inspect the respirator as described in section VI,1.
paragraph B.
Clip the plenum, with cartridges and/or lters at-2.
tached, to the belt so that the breathing tube goes
over the right shoulder.
WARNING
When using the mercury vapor car-
tridge, position the plenum on your side
so that the cartridge end-of-service-life
indicators are visible. Do not enter a
hazardous atmosphere if the indicators
are not visible.
Position the bottom of the facepiece as low as3.
possible under the chin.
Fit the narrow portion of the facepiece onto the4.
bridge of the nose.
Position the cradle headband above the ears5.
so that it straddles the crown of the head with
the lower headband straps below the ears and
around the back of the neck.
Adjust the upper headband straps by pulling both6.
straps at the same time. Adjust the lower head-
band straps in the same manner. Do not over-
tighten.

5
APR 2000 Belt-Mounted Half Mask
D. Facepiece Fit Check
WARNING
If a leak-tight seal is not obtained dur-
ingthefollowingtchecks,donotwear
the respirator. Ask your supervisor or
safety professional for assistance.
Positive Pressure Fit Check1.
Hold the palm of your hand lightly over the ex-a.
halation valve outlet. DO NOT distort the natu-
ral shape of the facepiece.
Exhale gently to create a slight positive pres-b.
sure inside the facepiece.
If air leakage occurs, adjust the facepiece andc.
headband until leak-tight.
Negative Pressure Fit Check2.
Move the plenum so that you can gain accessa.
to the cartridges and/or lters.
Cover the inlet of the cartridges and/or lters b.
with the palms of your hands or another suitable
item, such as a thin sheet of plastic or rubber.
NOTE
Alternately, the cartridges may be removed to
perform the t check. If the cartridges are re-
moved, you must ensure that each cartridge
is tightly sealed against the plenum and that
the facepiece-to-face seal is not disturbed
when reinstalling the cartridges.
Inhale gently and hold your breath for a fewc.
seconds. The facepiece should collapse on
your face without leaking. The plenum should
also collapse slightly.
If air leakage occurs, adjust the facepiece andd.
headband until leak-tight
If a leak-tight seal can not be maintained, thee.
problem may be with the plenum and/or hose.
If a good t was achieved, relocate the plenum f.
to its original position.
E. Using the Respirator
To receive the maximum protection available from your
respirator, you must follow your employer’s instructions
on the use and maintenance of the respirator. Read
and understand the following warnings prior to using
the respirator.
WARNING
Never remove your respirator for any•
reason while you are in the work area.
You must leave the work area imme-•
diately if the facepiece seal is dis-
turbedforanyreason,suchas:
Slipping due to excessive sweat-a.
ing or excessive head movement.
The facepiece becomes dislodgedb.
as a result of being knocked.
WARNING─continued
You sneeze or cough while wear-c.
ing the facepiece.
You need to blow your nose ord.
scratch covered areas of your face.
Foranyotherreasonthatwould causee.
the facepiece seal to be disturbed.
You must restore the facepiece seal
andperformatcheckbeforereenter-
ing the work area.
F. Chemical Cartridge Service Life and Replacement
The Cartridge service life depends on the user’s breath-
ing rate, the characteristics of the contaminant, and en-
vironmental conditions such as humidity. Saturated car-
tridges leak trace amounts of contaminant to the wearer
which may be detected by odor, taste, and/or irritation.
Replace cartridges at the rst trace of the characteristic
contaminant odor or taste, at regularly scheduled inter-
vals recommended by your safety professional, or if they
show any signs of damage. Always replace cartridges
in pairs. Dispose of used cartridges in accordance with
applicable local, state, and federal guidelines.
Return to an area with clean air.1.
Unscrew the used cartridges from the plenum2.
and discard.
Securely install new cartridges onto the plenum3.
threaded connectors as described in section V,
paragraph A.
G. Filter Replacement
The lter service life depends on the user’s breathing
rate, the characteristics of the contaminant, and environ-
mental conditions such as humidity. Contaminant-laden
lters cause the breathing resistance to increase until it
becomes objectionable to the user. SPERIAN recom-
mends that lters be replaced at least daily, more often if
necessary, or in accordance with schedules established
by regulatory agencies. Replace lters when they be-
come contaminants; your eyes, nose, or throat become
irritated; breathing becomes difcult; or if they show any
signs of damage. Dispose of used lters in accordance
with local, state, or federal guidelines.
Return to an area with clean air.1.
Remove the lter retainers from the lter holders 2.
or chemical cartridges. Remove the lter pads
from the retainers and discard in accordance with
federal, state and local guidelines.
Clean the lter retainers and holders or face of 3.
cartridges if necessary.
Install new lter pads into the lters retainers as 4.
described in section V, paragraph B.
If using P100 or HEPA lters, unscrew the lters 5.
from the plenum connectors and discard.
Install new P100 or HEPA lters onto the plenum 6.
connectors as described in section V, paragraph A
Perform a t check.7.

6
APR 2000 Belt-Mounted Half Mask
VI. MAINTENANCE
NOTE
Inspect this respirator for defects before and
after each use, and at least once monthly if
not used. Repair as necessary. Clean and
disinfect after each use, and store properly
to assure that the respirator is maintained in
satisfactory working condition. Keep a record
of inspection and repair dates and results.
A. Cleaning
WARNING
Specialized processes are required to•
disinfect and decontaminate a respira-
tor. You MUST follow the instructions
of the manufacturer who supplies the
disinfecting or decontamination equip-
ment or chemicals.
Its is the user’s responsibility to en-•
sure that the cleaning process chosen
provides adequate disinfection or de-
contamination.
In the absence of a commercial sanitiz-•
ing product, the hypochlorite solution
described in the steps below will elimi-
nate many, but not all biohazards.
CAUTION
DO NOT USE gasoline, organic based•
solvents,orchlorinateddegreasinguids
to clean any part of the respirator.
You must ensure that this respirator is not•
damaged when using disinfecting or de-
contamination equipment or chemicals.
Avoid wetting the inside of the breathing•
tube hose since this area is slow to dry.
Be sure that all components are dry be-
fore reassembly.
NOTE
Silicone and rubber parts of the respirator•
may be cleaned between washings with
SPERIAN Mask Wipes, P/N 140096 or P/N
140082.
ANSI Z88.2, latest edition, also provides•
information and guidelines on the cleaning
and sanitizing of respirators.
Make a cleaning solution of warm water and a1.
mild detergent.
Unscrew and remove the breathing tube from the2.
facepiece.
Immerse the facepiece in the cleaning solution3.
and gently clean with a soft brush.
Thoroughly rinse the facepiece in fresh water,4.
paying particular attention to removal of all soap
residue from the exhalation valve. If possible, di-
rect running water onto the valve.
Wash the breathing tube and plenum if contami-5.
nated, avoiding as much as possible wetting the
inside of the tube or plenum. Remove the car-
tridges/lters from the plenum prior to washing.
Disinfect the facepiece in a warm (486. °C or 120°F
maximum) suitable sanitizing solution such as a
“hypochlorite solution” for 2 to 3 minutes. A hy-
pochlorite solution can be made by mixing two (2)
tablespoons of chlorine bleach per each gallon of
water. Rinse thoroughly with fresh warm (48°C or
120°F maximum) water.
Dry with a clean, lint-free cloth or allow to air7.
dry. Warm air may be used to speed drying.
Hold the facepiece rmly against your face and 8.
exhale several times to ensure that the exhala-
tion valve functions smoothly.
Screw the breathing tube onto the facepiece,9.
making sure that it makes a proper seal with the
facepiece.
Hold the facepiece rmly against your face and 10.
exhale several times to ensure that the exhala-
tion valve functions smoothly.
Carefully inspect the respirator as described in11.
section B. Reinstall the cartridges and/or lters.
B. Inspection
WARNING
Routinely used respirators must be
inspected before and after each use.
Stored emergency respirators must be
inspected after each use and at least
once every 30 days. A written record
must be kept of inspections of emer-
gency respirators.
Inspect the facepiece skirt for cuts, gouges,1.
punctures, tears, nicks, and deterioration from
age, heat, or contamination, and the face seal for
distortion.
Inspect the headbands for abrasions, cuts, nicks,2.
loss of elasticity, or deterioration from age, heat,
or contamination.
Remove the exhalation valve cover and carefully3.
inspect the valve for cracks, tears, wrinkles, cuts,
or distortion. Ensure that the valve seat is free of
nicks, dents, or cracks.
NOTE
The inhalation valves may flutter during
exhalation if:
no cartridges/lters are installed on the a.
plenum, or
the plenum is oriented with the cartridg-b.
es/lters facing up.
Check the exhalation valve for proper operation:4.
exhale through the respirator and pause before
inhaling. The exhalation valve must close during
the pause before inhalation begins. Valves which
fail to close must be replaced.

7
APR 2000 Belt-Mounted Half Mask
Check that the breathing tube elbow and the cap5.
make a proper seal with the facepiece.
Stretch the breathing tube and inspect it for6.
cuts, holes, or deterioration from age, heat or
contamination.
Inspect the tie wrap and clamps at the ends of the7.
breathing tube for damage or deterioration from
age, heat, or contamination.
Inspect the plenum for cuts, gouges, punctures, tears,8.
and deterioration from age, heat, or contamination.
Inspect the plenum inhalation valves for nicks,9.
cracks, or tears. Check the valves for proper op-
eration: Gently exhale through the respirator. The
inhalation valves must close during exhalation
(also see note above).
C. Repair
Repair by the user is limited to replacement of com-
ponents as listed on the NIOSH approval label and
repairs listed in this manual. Disassembly should be
performed only to the extent necessary to replace the
components. To protect your warranty and the NIOSH
certication of this respirator, all other repairs must be
done only by authorized SPERIAN-certied technicians
at your facility, consult your SPERIAN distributor for the
one nearest you.
Threaded Connector Replacement (Facepiece Only)1.
Remove breathing tube or cap as requireda.
Disengage threaded connector by press-b.
ing inward.
Insert the new connector, threaded endc.
rst, from inside the facepiece.
Push the connector until the threads ared.
clear and the rubber ange is securely
seated.
Exhalation Valve, Seat, and Cover Replacement2.
Using the small tab, remove the exhala-a.
tion valve cover. Pull out the exhalation
valve.
Push the valve seat inward to disengageb.
from the facepiece.
Insert the new valve seat from inside thec.
facepiece by exing the facepiece material.
Securely seat the smaller diameter ange d.
by pressing inward while working the
facepiece material into the groove of the
seat.
Replace the exhalation valve by pullinge.
the stem through the valve seat until it
snaps into place.
Snap on the valve cover.f.
Perform a t check as described in section g.
V paragraph D.
Threaded Connector Replacement (Plenum Only)3.
Firmly grasp the base of the plenum witha.
on hand and pull the threaded connector
out from the front of the plenum. To aid
in the removal, a cartridge/lter may be
loosely threaded onto the connector
Insert the new connector into the front ofb.
the plenum by working the material around
the connector ange until the threads are
clear.
Inhalation Valve Replacement4.
Remove the threaded connector from thea.
plenum as stated above.
Pull the old valve off the connector stem.b.
Press on the new valve and reinstall the
connector.
D. Storage
WARNING
This SPERIAN respirator does not have
adenedstoragelife.Carefullyinspect
it before each use.
CAUTION
The maximum storage temperature for this
device is 140°F (60°C). Long term exposure
to elevated storage temperatures could
cause premature deterioration.
After inspection and cleaning, store your SPERIAN res-
pirator to protect it against dust, sunlight, extreme heat
and cold, excessive moisture, or damaging chemicals.
E. Shipment
All products returned to SPERIAN’s factory, distribu-
tors, or repair centers must be decontaminated prior to
shipment.
F. Overhaul Frequency
This SPERIAN respirator does not have an overhaul require-
ment other than that required in Section VI, Maintenance.
G. Additional Information
If you need assistance or additional information on any
SPERIAN product, consult your local distributor or contact:
SPERIAN
3001 South Susan Street
Santa Ana, CA 92704
(714) 545-0410 or (888) APR-SCBA
FAX (714) 850.0299
ALL RETURNED PRODUCTS MUST BE
DECONTAMINATED PRIOR TO SHIP-
MENT. PRODUCTS CONTAMINATED
WITH DANGEROUS SUBSTANCES
WILL BE REFUSED AND RETURNED
FREIGHT COLLECT.

www.sperianprotection.com
Table of contents
Other Sperian Respiratory Product manuals

Sperian
Sperian COSMO User manual

Sperian
Sperian Surviair 2000 Series User manual

Sperian
Sperian 1688 User manual

Sperian
Sperian PANORAMASQUE User manual

Sperian
Sperian Panther Hip-Pac P9684 Series User manual

Sperian
Sperian SURVIVAIR Opti-Fit 7540 User manual

Sperian
Sperian SURVIVAIR Opti-Fit S-Series User manual

Sperian
Sperian OPENGO User manual

Sperian
Sperian 4000 Series User manual