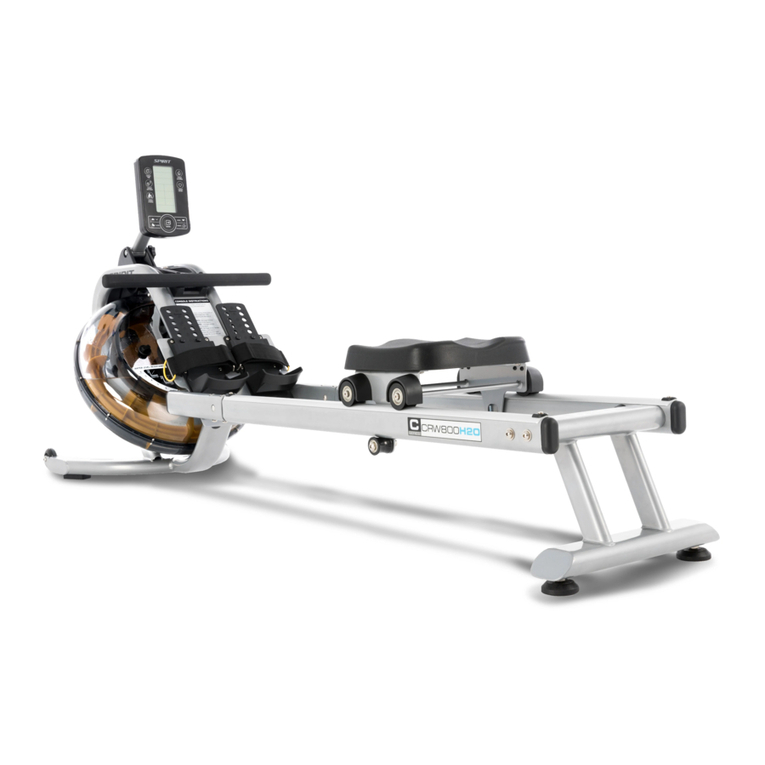
Spirit Commercial CRW800H2O User manual

Owner’s Manual
Model No.
16807938000
CRW800H2O
- Assembly
- Operation
- Adjustments
- Parts
- Warranty
CAUTION:
Read and
understand this
manual before
operating unit
Retain For Future Reference

Customer Service 1-888-707-1880 Dyaco Canada Inc
2
TABLE OF
CONTENTS
Product Registration ……………………………………………………………………………. 3
Safety Precautions ……………………………………………………………………………... 4
Safeguards ……………………………………………………………………………………… 6
Pre-Assembly ………………….……………………………………………………………….. 7
Assembly Instructions………………………………………………………………………….. 9
How to Fill and Empty the Tank ……………………………………………………………… 11
CRW800H20 Console Operation ……………..………….………………………………….. 13
Console Programs …………………………………………………………………………….. 16
General Maintenance ………………………………………………………………………..… 17
Troubleshooting ………………………………………………………………………………... 18
Diagram and Parts List.......................…………….……………………………………..…… 19
Manufacture’s Limited Warranty…………………………………………………………….... 23

Customer Service 1-888-707-1880 Dyaco Canada Inc
3
Thank you for your purchase of this quality CRW800H20 Water Rower from Dyaco Canada
Inc. Your new CRW800H20 Water Rower was manufactured by one of the leading fitness
manufacturers in the world and is backed by one of the most comprehensive warranties
available. Through your dealer, Dyaco Canada Inc. will do all we can to make your
ownership experience as pleasant as possible for many years to come. The local
dealership where you purchased this CRW800H20 Water Rower is your administrator for
all warranty and service needs. Their responsibility is to provide you with the technical
knowledge and service personnel to make your experience more informed and any
difficulties easier to remedy.
Please take a moment at this time to record the name of the dealer, their telephone number,
and the date of purchase below to make any future, needed contact easy. We appreciate
your support and we will always remember that you are the reason that we are in business.
Please complete and mail your registration card today and enjoy your new CRW800H20
Water Rower.
Name of Dealer______________________________________
Telephone Number of Dealer___________________________
Purchase Date_______________________________________
RECORD YOUR SERIAL NUMBER
Please record the Serial Number of this fitness product in the space provided below.
Serial Number_______________________________________
REGISTER YOUR PURCHASE
The self-addressed product registration card must be completed in full and returned to
Dyaco Canada Inc.
CONGRATULATIONS ON YOUR
NEW CRW800H2O WATER ROWE
R
Product Re
g
istration

Customer Service 1-888-707-1880 Dyaco Canada Inc
4
BEFORE YOU BEGIN
Thank you for choosing the CRW800H20 Water Rower. We take great pride in producing this
quality product and hope it will provide many hours of quality exercise to make you feel better,
look better, and enjoy life to its fullest. It's a proven fact that a regular exercise program can
improve your physical and mental health. Too often, our busy lifestyles limit our time and
opportunity to exercise. The CRW800H20 Water Rower provides a convenient and simple
method to begin your assault on getting your body in shape and achieving a happier and
healthier lifestyle.
Read this manual carefully before using the CRW800H20 Water Rower. Although Dyaco
Canada Inc. constructs its products with the finest materials and uses the highest standards of
manufacturing and quality control, there can sometimes be missing parts or incorrectly sized
parts. If you have any questions or problems with the parts included with your CRW800H20
Water Rower, please do not return the product. Contact us FIRST! If a part is missing or
defective call us toll free at 1-888-707-1880. Our Customer Service Staff are available to
assist you from 8:30 A.M. to 5:00 P.M. (Eastern Time) Monday through Friday. Be sure to have
the name and model number of the product available when you contact us.
IMPORTANT SAFETY INSTRUCTIONS
WARNING
This chapter includes precautions and fitness safeguards for the installation and use of the
Water Rower manufactured by SPIRIT FITNESS. Please read this chapter carefully before
installing or using your equipment.
USER SAFETY PRECAUTIONS
These safety notes are directed to you as the owner of the Water Rower manufactured by
Spirit Fitness. Please train all your users and fitness staff to follow these safety instructions.
Do:
• Do encourage each of your users to discuss their health program or fitness regimen with a
healthcare professional a qualified service personnel.
• Do stop operating your rower if you feel dizzy or faint
• Do perform regular preventative maintenance
• Do exercises slowly until you reach a level of comfort.
DO NOT:
• Do not let unsupervised children operate the rower.
• Do not use without proper athletic shoes.
• Do not use in rainy weather outdoors, or in an enclosed pool environment
• Do not drop or insert any object, hands, or feet into from this equipment any opening or
within the area operation of the product.
• Do not attempt to remove any shrouds or modify the rower.

Customer Service 1-888-707-1880 Dyaco Canada Inc
5
WARNING
• Your Water Rower manufactured by Spirit Fitness is designed for exercise in a
commercial or residential environment.
• Please check with your physician prior to beginning any exercise program.
• Do not push yourself to excess. Stop if you are feeling faint, dizzy, or exhausted. Use
common sense when rowing.
• Read the owner’s manual in its entirety before operating the rower.
• Failure to obey this warning can result in injury or death.
WARNING LABELS AND COMMUNICATION STICKERS
The image below shows an example of Spirit® Fitness warning labels and communication
stickers placed on the equipment as part of the manufacturing process. It is critical that
owners maintain the integrity and placement of these stickers. If you find any stickers missing
or damaged contact your local dealer or distributor for a replacement. NOTE: STICKERS AND
LABELS ARE NOT SHOWN TO SCALE.

Customer Service 1-888-707-1880 Dyaco Canada Inc
6
SAFEGUARDS
The following fitness safeguards and operating precautions are directed to purchasers and
users of the Water Rower. Club Managers should ensure that members and fitness staff are
trained to follow these same instructions. Failure to follow these safeguards may result in
injury or serious health risk.
• Do not use any equipment in any way other than designed or intended by the
manufacturer. It is imperative that equipment is used properly to avoid injury.
• Injuries may result if exercising improperly or excessively. It is recommended that all
individuals consult a physician prior to commencing an exercise program.
• If at any time during exercise you feel faint, dizzy or experience pain, stop exercising and
consult your physician.
• Keep body parts (hands, feet, hair, etc.), clothing and jewelry away from moving parts to
avoid injury.
• Follow instructions provided in this manual for correct foot position and basic rowing
techniques.
• The maximum weight for individuals riding the rower should not exceed 350 lbs.
• Do not use or permit use of any equipment that is damaged and/or has worn or broken
parts. For all equipment use only replacement parts supplied by Dyaco Canada Inc.
• Cables and belts pose an extreme liability if used when frayed. Always replace any cable
or belt at first sign of wear (consult Dyaco Canada Inc. if uncertain).
• Preventative maintenance is the key to smooth operating equipment as well as to keep
your liability to a minimum. Equipment needs to be inspected at regular intervals.
• Ensure that any person(s) making adjustments or performing maintenance or repair of any
kind is qualified to do so.
• Do not attempt to use or repair any accessory approved for use with the Spirit Fitness
Equipment which appears to be damaged or worn.
• Check all belts, pulleys and bungee cords regularly for signs of wear, and replace if
needed.
• Check regularly and follow all instructions for maintenance as specified in this manual.
• Replace immediately any defective parts and do not operate unit until all repairs are
complete.
• Keep children away from the equipment. Parents or others supervising children must
provide close supervision of children if the equipment is used in the presence of children.
• Do not allow users to wear loose fitting clothing or jewelry while using equipment. It is also
recommended to have users’ secure long hair back and up to avoid contact with moving
parts.
• All bystanders must stay clear of all users, moving parts and attached accessories and
components while machine is in operation.
• We recommend an area no less than 2ft kept clear around the rower for easier access and
safety.
WARNING
Do not insert fingers into tank
After rowing exercise, please allow the unit to sit for 5 minutes before standing it up for
storage
Do not fill past the calibration mark as indicated on the tank level sticker or water
spillage can occur
Never operate this rower without feet properly secured in foot straps, or without the
sliding portion of the slider footplate locked into position
Note: Rower is not suitable for therapeutic purposes.

Customer Service 1-888-707-1880 Dyaco Canada Inc
7
CRW800H2O PRE-ASSEMBLY
Use the following procedures to unpack and assemble your water rower manufactured by
Dyaco Canada Inc.:
Position the shipping carton so the heavy end is located at the bottom
Cut the straps then lift the box over the unit and unpack. Remove foam inserts and all
parts from the shipping carton, then use the parts list to verify that all parts are included
in your shipment.
Locate the hardware package. The hardware is separated into steps. Remove the tools
first. Remove the hardware for each step as needed to avoid confusion. As you read
through the assembly instructions, any number that is in brackets [#] refers to the item
number from the corresponding assembling drawing
NOTE: All tools required to assemble the rower are included within the packaging.
NOTE: If you are missing any of the parts listed above, inspect the packing material and the
box for items that may have been overlooked.
If parts are missing, or if you have any operational questions, please call Dyaco Canada Inc.
customer service department or the distributor who sold you the product. Have your serial
number ready.
CAUTION: Damage to the rower during assembly is not covered as part of the limited Spirit
Fitness warranty. Take care not to drop or lean the rower on its side. Carefully stand the rower
up in the normal upright position on a stable surface so it will not tip over during assembly
Protect the environment by not disposing of this product with household waste. Check your
local authority or approved waste center for recycling advice and facilities

Customer Service 1-888-707-1880 Dyaco Canada Inc
8
CRW800H2O ASSEMBLY PARTS CHECKLIST
Note: Above parts are all needed to assemble this
machine. Before you start to assemble, please
check the hardware packing to make sure they are
included
CRW800H2O Hardware Parts
Part No
Description
Q’ty
1
Main Frame
1
2
Rear Stabilizer
1
3R/3L
Slide Rail
1/1
38
Seat Assembly
1
54
Computer Assembly
1
52
Funnel
1
53
Pumping Siphon
1
Water-Purification
1
Tablet
User Manual
1
Hardware Parts 1

Customer Service 1-888-707-1880 Dyaco Canada Inc
9
ASSEMBLY INSTRUCTIONS
1 SLIDE RAILS AND REAR STABILIZER
Turn over the Slide Rails (No.3) as below. Attach the Seat Rollers (No.39) to the slide Rails
making sure the plate touches the rollers. To secure the Slide Rails between the Rollers, you’ll
need to insert it at an angle and rotate as shown in the diagram.
Secure the Rear Stabilizer (No.2) to the Slide Rails (No.3) using 2 Bolts (No.63) and 2
Washers (No.74) on both sides. Use the Allen Wrench (No. 93) to secure.
# 63 M8*45 4pcs
#74 OD20*ID8.5*1.5 4pcs
3L
74
74
63
63
3R
38
#93 S5
39
2 CONNECTING THE SLIDE RAIL TO THE MAIN BODY
This step can be made easier with the use of another person to assist you. Be careful of the
sliding Seat (No. 38) as it will move when placed upright.
Set the Main Frame (No. 1) in an upright position and connect the Slide Rails (No.3) using 4
Long Bolts (No. 99), 2 Small Bolts (No. 77), and 6 Screws (No. 65).
Use the Allen Wrench (No. 93) and Spanner (No. 94) to secure.
#93 S5
99
99
#94 S13-17
# 99 M8*57 4pcs
1
38
3L 3R
65 65
77
77
# 77 M8*27 2pcs
# 65 M6*15 6pcs

Customer Service 1-888-707-1880 Dyaco Canada Inc
10
3 ATTACHING THE CONSOLE
Place the 4 AA batteries into the back of the Computer (No. 54).
Turn the Main Frame (No.1) upright. Connect the Sensor Wire (No. 56) to the Connection Wire
(No. 96). Be careful not to pinch the wires. Feed any extra length of wire to lay in the Main
Frame.
Install the Decorative Cover (No. 26) into the Main Frame (No. 1).
Secure the Computer (No. 54) to the Main Frame using 4 Small Screws (No. 68).
Use the Allen Wrench (No. 93) to secure.

Customer Service 1-888-707-1880 Dyaco Canada Inc
11
How to Fill and Empty the Tank
Remove the Fill Plug (No. 50) from the Upper Tank (No. 24).
To fill the tank with water, refer to Fig. A. Insert the Funnel (No.52) into the tank, then use a
cup or the Siphon Pump (No.53) and a bucket to fill the tank. Use the water level gauge on the
side of the tank to measure the desired water level in the tank.
To empty the tank, refer to Fig. B. Place a bucket next to the rower and use the Siphon Pump
(No.53) to pump the water from the tank into the bucket.
Insert the Fill Plug (No.50) into the Upper Tank (No.24). Wipe the excess water off the frame.
Note: Fill the tank only with tap water. Add 1 water-purification tablet (1 packet is included).
Never use pool chlorine or chlorine bleach. This will damage the tank and void the warranty.
Add water purification tablet every 6 month or as needed. If water remains cloudy, replace the
water in the tank.
Water from the tank is not suitable for consumption. Dispose of the water after pumping it out
of the tank.
WATER LEVEL:
See Fig. A. The water level gauge is on the side of the tank. The maximum fill level is 6.
Never fill it over the limit. Filling the tank over this limit will void the warranty.
The resistance depends on the water level in the tank. Water level 2 is the lowest resistance.
Level 6 is the highest resistance.
Adjustment Guides
The pedal strap is adjustable and can be personalized to fit the user’s foot size.
To adjust the pedal strap, remove the hook and loop end of the strap from the mesh side by
pulling it upward and over the side. Once removed, you may increase the opening of the
pedal strap by pulling the mesh end up and to the side.
To tighten, pull the hook and loop end of the pedal strap upward and down to secure it to the
mesh side of the strap.

Customer Service 1-888-707-1880 Dyaco Canada Inc
12
Adjusting the Balance
Adjust the rear feet if the rower is out of balance
CAUTION
Moving parts, such as the seat, can crush and cut your fingers. Keep hands clear of the Slide
Rail during use.
Storage
To move the rower, lift up the rear stabilizer until the transportation wheels on the front stand
are touching the ground. With the wheels on the ground, you can transport the rower to the
desired location with ease.
CAUTION!
Move the Seat (No. 38) to front of Slide Rail
(No. 3) first or it will glide down when raising
the rower up!
CAUTION!
Move with caution when you raise the rower
up, as your head may touch the Rear
Stabilizer (No. 2).
CAUTION!
When not in use, you can save space by storing the
rower vertically. Lift by the Rear Stabilizer (No. 2)
to raise the rower to vertical position.
If not using the rower for more than a month, empty
the tank before storing.

Customer Service 1-888-707-1880 Dyaco Canada Inc
13
CRW800H2O CONSOLE OPERATION
CONSOLE BUTTONS
INTERVAL
DISPLAY
PANEL
QUICK
MODE
BUTTONS
HEART RATE
DISPLAY PANEL
WATER LEVEL
BUTTON
QUICK
MODE
BUTTONS
TIME,
DISTANCE,
CALORIES,
WATTS, SPEED,
RPM DISPLAY
PANEL
CONTROL
KEYPAD
The Quick Mode buttons will
go into the associated
mode immediately
The ▲/▼Arrow buttons allow the
user to increase or decrease
console values
Use the Level button to
communicate the water
level in the tank to the
console.
Use the Reset button
to clear a value, to
pause your workout,
end your workout.
Hold for 2 seconds for
a Total Reset of all
values (except Total
Strokes).
The Enter button is used to confirm a value as
making adjustments to a mode

Customer Service 1-888-707-1880 Dyaco Canada Inc
14
CONSOLE DISPLAY
TARGET TIME, DISTANCE, CALORIES MODE
The target panels will show Time, Distance, Calories and Strokes depending on operating
mode. When the target symbol is displayed, it means that target mode is operating in that
particular value.
The TIME will alternate showing the remaining or elapsed time
The DISTANCE will count or countdown in meters
The CALORIES will count or countdown the number of
calories burned during workout.
The STROKES will count or countdown the number of strokes during workout
The TOTAL STROKES show the total number of strokes during workout
TIME - 500M / AVERAGE DISPLAY
The TIME/500m is time per 500 meters
The AVERAGE is average time of several TIME/500m work out.
SPM / WATTS DISPLAY
SPM and Watts will be displayed during all modes.
SPM refers to Strokes per Minute.
The WATTS will show the amount of work produced in a particular time during workout.
Heart Rate Value will be
displayed here.
When "TARGET DISTANCE" is selected,
distance selected will be displayed
here. Overall distance will be
displayed during workout.
SPM: Strokes Per Minute
When "TARGET STROKE" is
selected, stroke selection will
be displayed here. Overall
stroke count will be displayed
here during exercise.
Resistance value displayed
When "TARGET TIME" is selected, time selection will be
displayed here. Total elapsed time or time count
down will be displayed during exercise.
Displays the time needed to row 500
meters according to current speed
and average speed.
When "TARGET CALORIES" is selected,
calorie selection will be displayed here.
Workout data for target calories will be
displayed here during exercise.
Displays the power consumption during
training.
Displays total accumulative stroke
count.
When "TARGET HR' is selected, heart rate
value will be displayed here during
exercise.

Customer Service 1-888-707-1880 Dyaco Canada Inc
15
HEART RATE DISPLAY
This panel will show every user’s heart rate information. When console detects a signal from
a wireless monitor, the BPM (beats-per-minute) will show in the large three-digit field and the
heart icon will flash. However, if no signal is detected signal, three dashes "- - -" will display
to indicate no heart rate detected.
While in TARGET HEART RATE mode, the console helps the user maintain in a BPM range
to build cardio-vascular endurance. The target value range will vary by 10% from the default
data. The q or p symbol will flash to indicate that an increase or decrease of workout speed is
needed to reach the desired range.
When the user’s heart rate is in the target range, the icons will light. To detect heart
rate, the heart rate receiver must be installed and a heart rate chest strap (not included) must
be used.
CONSOLE SETUP
BATTERY INSTALLATION
The console operates on 4 AA batteries. The battery compartment is on the back side
of the console. Please dispose of batteries properly after use.
WATER LEVEL BUTTON
Once you fill the tank to your desired resistance between 1 and 6 you can use the
LEVEL Button to communicate the resistance level to the console. Use the arrow keys
to adjust from L1 to L6, pressing ENTER to confirm the desired level. The default Level
is L1.
CONSOLE MODES
SLEEP MODE
After 60 seconds of inactivity, the console will switch into the power-saving "Sleep Mode". The
display will switch off.
Pulling the handlebar or pressing any button on the console will launch the "Ready Mode".
READY MODE
The "Ready Mode" informs the user that the console is powered on and ready to
enter into any mode. After a period of 60 seconds of inactivity the console will switch
into the "Sleep Mode".
STOP MODE
Press the RESET button to go into the "Stop Mode", or if there is no input via the
console for 4 minutes the console will automatically enter "Stop Mode". In "Stop
Mode", the 7-segment display will show “STOP”, TIME will show total time,
DISTANCE will show total distance, CALORIES will show total calories burned,
STROKES will show the number of strokes for the workout, TOTAL STROKES will
show the total number of strokes, TIME/500m and TIME/500m
AVERAGE will be shown alternately for one minute. If heart rates is input, the "Stop Mode" will
show current heart rate. If no heart rate monitor has been used, then no values will be
displayed.
WORKOUT SUMMARY
The console provides a brief workout summary after completed the workout.
Data displayed includes: Total Time, Total Distance and Total Watts
Current heart rate displays
here when heart rate
monitor (not included) is in
use.
Target heart
rate value
displays here

Customer Service 1-888-707-1880 Dyaco Canada Inc
16
RESET PROCESS
To reset all saved settings, press and hold RESET button for 2 seconds.
CONSOLE PROGRAMS
QUICK START
As strokes are detected, the console will immediately launch QUICK START. TIME,
DISTANCE, CALORIES, SPM, WATTS, STROKES, TOTAL STROKES will begin
counting. TIME/500m and TIME/500m AVERAGE will be alternately displayed every
5 seconds. The 7-segment display will show level according to the adjustments.
When there's heart rate input, the icon will stay lit, and the ♥icon will flash. Current
heart rates will be shown. In the absence of heart rate input, three dashes “- - -” will
be shown continuously.
TARGET TIME, DISTANCE, CALORIES, AND STROKES PROGRAMS
Target Time, Target Distance, Target Calories, and Target Strokes program allow
the target goal of each value to be customized.
Launch: Press the desired TARGET button (TIME, DISTANCE, CALORIES, STROKES).
Setup: When operating a target program (after the console has been reset), user will
enter the target value. Adjust the value by pressing ▲or ▼buttons, then pressing the
ENTER button to confirm the setting. If no value has been entered, the console will
not count down.
Start: Each mode display field will light up and begin to readout data as follows:
For the TARGET TIME program, the time target will begin to count down.
For the TARGET DISTANCE program, the distance will begin calculating.
For the TARGET CALORIES program, the calories will begin calculating.
For the TARGET STROKES program, the strokes will begin calculating.
End: The mode will end when the target is achieved. Pressing the RESET button at
any time will also end the target program. The workout summary will be shown after
the target program has ended, or the RESET button has been pressed.
TARGET HEART RATE PROGRAMS
The Target Heart Rate program allows the maximum beats per minute (BPM) target to be
customized to maximize cardiovascular training.
Launch: Press the Target Heart Rate button.
Setup: When operating a target program, the user enters the desired target heart rate (the
default is 100).
Adjust the value by pressing ▲or ▼buttons, then pressing the ENTER button to confirm.
Start: The display field will light up and begin to display heart rate and progress toward
cardiovascular goal. When the user's heart rate is lower than <10% of the calculated
maximum HR range, the ▲on screen will flash indicating minimum goal has not yet been
achieved.
When the user's heart rate is >10% than the target HR, the ▼on screen will flash to
indicate heart rate is over the maximum goal.
When the user's heart rate falls with the 10% of the target HR, the target number will
not display
End: The target program will end when the user stops rowing. Pressing the RESET button at
any time will also end the target program. The workout summary will be shown after the
"Target Program" has ended, or the RESET button has been pressed.
ENGINEERING MODE
Press Reset and Enter buttons for 2 seconds to enter Engineering Mode. The
console will also beep for 1 second. DISTANCE banner will blink first. Press ▲or
▼button to select setting section. (Sound →ODO →Sound)

Customer Service 1-888-707-1880 Dyaco Canada Inc
17
While in Engineering Mode if there is no activity for 30 seconds, the console will switch
STANDBY Mode. Pressing the Reset button will exit the Engineering Mode. The
console settings and ODO will not be reset using the "RESET Mode",
however, removing the batteries will return the console to original factory settings and the
ODO value will be zero.
AUDIO ON/OFF
Under Engineering Mode of the Audio ON/OFF setting. The SOUND sign will blink. Press
Enter to get into
After pressing Enter, the console will display “ON” or ”OFF”
If- the audio is on, the “ON” sign will blink.
If- the audio is off, the “OFF” sign will blink
Press Enter to confirm and the console will return to Engineering Mode.
While in this setting if there is no activity for 30 seconds or pressing Reset, the console will
switch STANDBY Mode
ODO
The “ODO” feature displays the total time usage for your machine as H : M : S (hours,
minutes, and seconds). Once the time odometer reaches the 2-hour mark, the
odometer will begin to display the time in 1-hour increments. For example, “3H” would
indicate 3 hours of total usage.
• When cycling through options in “Engineering Mode”, press enter when “ODO” is blinking
on the display.
• When the total exercise time exceeds 1:59:59, the LCD will display the numerical hour
number next to an “H” (hours).
• To exit, press the q or p button to switch between other Engineering modes.
• While in this setting if there is no activity for 30 seconds, the console will enter
STANDBY Mode. Pressing the Reset button twice will exit the Engineering Mode.
GENERAL MAINTENANCE
A regular preventative maintenance schedule with your fitness equipment ensures that
products are working at an optimal condition without affecting your exercise experience. To
assist in the maintenance regimen, it is recommended to break service into daily, weekly, &
monthly activities.
All preventive maintenance activities must be performed on a regular basis. Performing
routine preventive maintenance actions can aid in providing safe, trouble-free operation of
all SPIRIT equipment. SPIRIT is not responsible for performing regular inspection and
maintenance for your machines. Be sure to train all necessary personnel in equipment
inspection and maintenance actions, in addition to proper accident reporting and record
keeping.
Item Time Frame Instructions Notes
Seat and Seat Rails Weekly Wipe down seat rails with lint free
cloth
Frame Weekly Wipe down frame with lint free cloth
Tank and Water
Treatment
12m to 2years Follow instructions as specified on
page 11. of the manual.
Rowing Belt Check every hundred
hours for correct tension
and for signs of wear.
The rowing belt should provide many
years of trouble free use. If a rowing
belt replacement is required,please
contact your local service
representative for further details.

Customer Service 1-888-707-1880 Dyaco Canada Inc
18
TROUBLESHOOTING
Issue Possible Cause Instructions
Water changes color
or becomes cloudy Rower is in direct sunlight or has
not had water treatment
Local tap water is of poor quality
Change rower location to
reduce direct exposure to
sunlight. Add water treatment or
change tank water as directed
on page 11 of this manual.
Consider using distilled water to
refill tank.
Inconsistent readings
on the console for
500meter split time
and SPM (strokes per
minute)
Sensor gap issue
Faulty sensor
Sensor has moved out of position
Wiring harness issue
Use the back cover of the
computer as a “gap tool” to
check the gap between sensor
head and magnetic ring, or see
if the sensor head has moved
out of position. Please contact
your nearest SPIRIT customer
service center for details.
The console does not
illuminate after battery
installation
Batteries installed incorrectly
or need replacing Check to see if the batteries are
installed in the correct position.
Reinstall or replace as not
illuminate after needed. If the
LCD screen fails to illuminate,
try rotating the batteries slightly
in the computer. If this fails,
contact your local service
center.
The console screen
illuminates, but does
not register when
rowing
Loose or failed connection
Sensor gap too wide Check that the computer lead is
connected properly. If it is
connected then contact your
local service center. Check
sensor gap.
Please contact your Dyaco Canada Customer Service if any assistance is required.

Customer Service 1-888-707-1880 Dyaco Canada Inc
19
EXPLODED DIAGRAM
1
2
4
5
6
7
8
9
10
12
13
14
15
16
16 17
17
18
18
21
21
25
24
26R
27
28
30
31
32
33
34
35
36
38
42
42
42
42
42
42
43
44
45
45
45
46
47
48
49
50 51
51
52
53
56
59
61
61
62
62
62
62
63
63
64
64
65
65
65
65
65 65
87
67
67
68 68
65
73
74
74
89
74
78
78
76
90
98
98
79
79
81
81
101
83
83
84
84
84
84
85
85
86
88
88
92
93
94
69
95
26F
3L
3R
19
19
21
21
21
28
29
29
37
37
39
39
40
40
40
40
42
42
42
42
60
55
55
58
58
63
74
63
74
67
67
69
69
69
69 20
20
22
22
71
71
72
72
72
72
70
70
75
75
100
75
75
100
79
82
82
99
99
90
90
23
23
41
41
57
57
96
67
100
67
100
65
97
97
80
80
80
80
90
65
65
77
77 89 89
89
91
74
102
103
11
54
66
74
98 67
67
97

Customer Service 1-888-707-1880 Dyaco Canada Inc
20
PARTS LIST
PART
NO. DESCRIPTION Q'TY
9380001 Main Frame 1
9380002 Rear Stabilizer 1
9380003 Slide Rail R/L 2
9380004 Handlebar 1
9380005 Spring Fixed Plate 1
9380006 Seat Carriage 1
9380007 Sensor Stand L 1
9380008 Sensor Stand R 1
9380009 Support for Computer 1
9380010 Tank Plate 1
9380011 Support Plate 1
9380012 Impeller 1
9380013 Impeller Shaft 1
9380014 Mesh Belt Wheel Shaft 1
9380015 Belt Wheel 1
9380016 Guide Roller 2
9380017 Spacer for Guide Roller 2
9380018 Moving Wheel 2
9380019 Adjustable Knob 2
9380020 Aluminum Plate 2
9380021 Oval End cap 6
9380022 Cover for Roller 4
9380023 Lower Roller for Rail 2
9380024 Upper Tank 1
9380025 Lower Tank 1
9380026 Decorate Cover F/R 1
9380027 Handlebar Seat 1
9380028 Upper Pedal 2
9380029 Lower Pedal 2
9380030 Bearing Seat 1
9380031 Mesh Belt Wheel 1
9380032 Axle for Volute Spring 1
9380033 Base of Volute Spring 1
9380034 PC Board 1
9380035 Outer PC Board 1
9380036 Spacer for mesh belt wheel 1
Other manuals for CRW800H2O
1
This manual suits for next models
1
Table of contents
Languages:
Other Spirit Commercial Fitness Equipment manuals

Spirit Commercial
Spirit Commercial ST800FI User manual

Spirit Commercial
Spirit Commercial ST800DR3 User manual

Spirit Commercial
Spirit Commercial CSC900 User manual

Spirit Commercial
Spirit Commercial CVC800 User manual

Spirit Commercial
Spirit Commercial ST800FT User manual

Spirit Commercial
Spirit Commercial ST800DR3 User manual

Spirit Commercial
Spirit Commercial CRW800H2O User manual

Spirit Commercial
Spirit Commercial CT800 User manual

Spirit Commercial
Spirit Commercial CRW900 User manual

Spirit Commercial
Spirit Commercial CT800 User manual