Spitzer LIGHTING DOWNLIGHT Series User manual
DOWNLIGHT SERIES
SLIM CANLESS SWIVEL DOWNLIGHT
INSTALLATION MANUAL
SAFETY INFORMATION
BE SURE THE POWER IS OFF! RISK OF ELECTRICAL SHOCK: Always use the switch to power off. Do not perform
any operations while this unit is powered on. The electrical system you want to connect the device to must be
grounded. Read the instructions before using or powering this device. The safety instructions must remain with
the unit in case of transfer. Any damage to the device linked to an inappropriate use is excluded from support by
the warranty. Before connecting, make sure that the current and voltage are compatible with this device. We highly
recommend that all installations are made by QUALIFIED ELECTRICIAN. We are NOT responsible by any means for
the use or misuse of the following information. We are NOT responsible in whole or part for any harm or damage
that may or may not be caused. We reserve the right to revise the components of any product, due to part availability
or change ETL, CUL, UL standards without assuming any obligation or liability to modify any products previously
manufactured and without notice. These instructions do not cover all details of variations in equipment, nor do they
provide every possible contingency to be met. Turn off / unplug power when installing or service device.
WARNING: Read all safety precautions and installation instructions carefully before installing or servicing this
xture. Failure to comply with these instructions could result in a potentially fatal electric shock, re, and/or
property damage.
• Risk of fire or electrical shock
ꞏ LED retrofit kit installation requires knowledge of luminaires electrical systems. Do NOT attempt installation if not
qualified. Contact a qualified electrician
ꞏ Install this kit only in the luminaires that have the construction features and dimensions shown in the photographs
and/or drawings
ꞏ Do NOT exceed the input rating of the luminaire
ꞏ Do NOT make or alter any open holes in an enclosure of wiring or electrical components during installation
ꞏ To prevent wiring damage or abrasion, do NOT expose wiring to edges of sheet metal or other sharp objects
ꞏ This device is not intended for use with emergency exits
ꞏ This luminaire has been modified to operation LED lamp. Do NOT attempt to install or operate incandescent lamps
or CFL in this luminaire
ꞏ This retrofit kit is accepted as a component of a luminaire where the suitability of the combination shall be
determined by authorities having jurisdiction
WARNING
CAUTION
-Connect xture to a 120 Volt, 60 Hz power source only. Any other connection void the warranty
This device complies with Part 15 of the FCC Rules. Operation is subject to the following two conditions: (1) This
device may not cause harmful interference, and (2) this device must accept any interface received, including
interference that may cause undesired operation. This equipment has been tested and found to comply with the limits
for a Class B digital device, pursuant to part 15 of the FCC Rules. These limits are designed to provide reasonable
protection against harmful interference in a residential installation. This equipment generates, uses and can radiate
radio frequency energy and, if not installed and used in accordance with the instructions, may cause harmful
interference in a residential installation. This equipment generates, uses and can radiate radio frequency energy and,
if not installed and used in accordance with the instructions, may cause harmful interference to radio or television
reception, which can be determined by turning the equipment off and on. The user is encouraged to try to correct the
inference by one or more of the following measures:
- Reorient or relocate the receiving antenna
- Increase the separation between the equipment and the receiver
-Connect the equipment into an outlet on a circuit different from that to which the receiver is connected
PRE - INSTALLATION
Please read and understand all instructions before operate or install the product.
Failure to do so may lead to electric shock, fire or other injuries that could be
hazardous or even fatal.
- Shut off the electricity to the wires that you are working on
- Do NOT open, no user serviceable parts inside. Any changes or modifications
and applications not expressly approved by the manufacturer could void the user’s
authority to operate the equipment and warranty
INSTALLATION (Caution: Before beginning installation turn off the circuit breaker and light switch)
PRODUCT PARAMETER
INPUT VOLTAGE 120V
DIMMING TRIAC
MATERIAL DIE-CAST METAL
www.spitzerlighting.com 702 Interchange Blvd., Newark, DE 19711 Specication is subject to change without notice 1/2
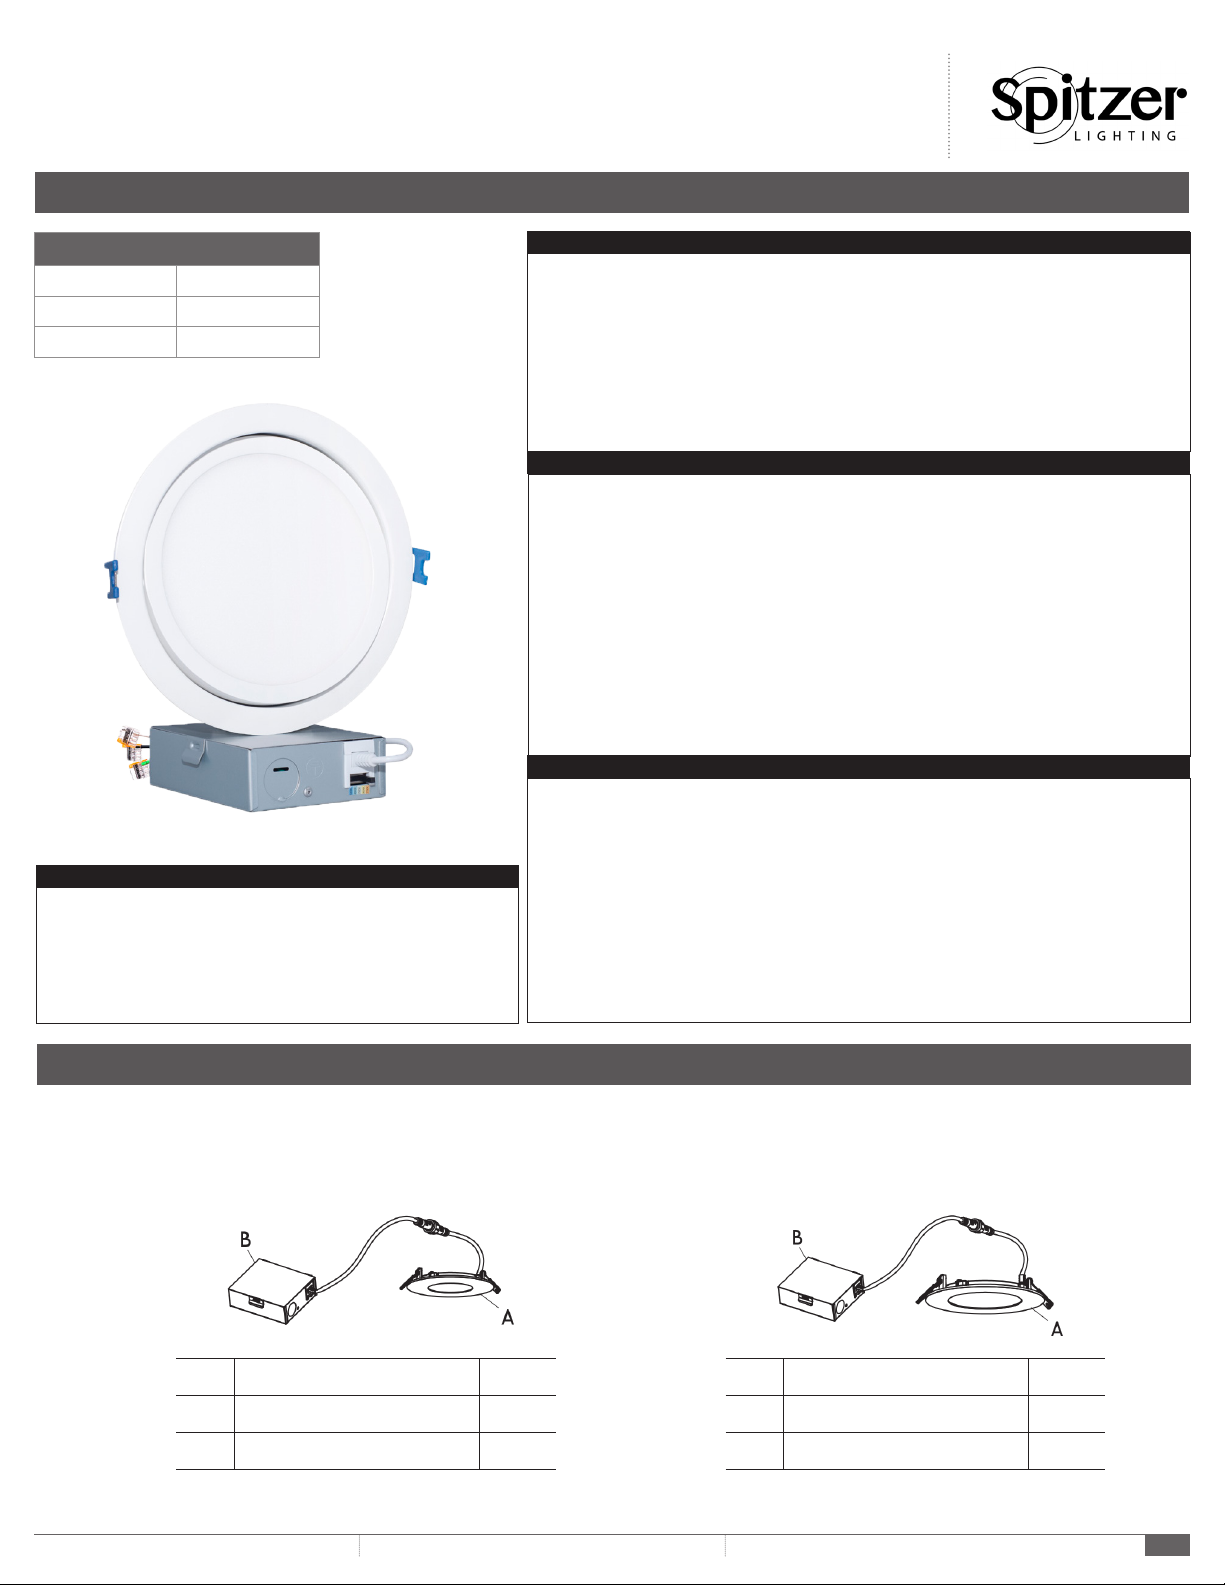
PARTS QT
A 4” Lamp 1
B Junction box with connector 1
PARTS QT
A 6” Lamp 1
B Junction box with connector 1
PACKAGE CONTENTS
4” MODEL 6” MODEL

DOWNLIGHT SERIES
SLIM CANLESS SWIVEL DOWNLIGHT
INSTALLATION MANUAL
INSTALLATION (Caution: Before beginning installation turn off the circuit breaker and light switch)
www.spitzerlighting.com 702 Interchange Blvd., Newark, DE 19711 Specication is subject to change without notice
V.1
2/2
STEP 1
STEP 3
STEP 2
STEP 4
STEP 5
Use the 6” hole size
template in the packaging
to cut a hole on the ceiling
for installation.
Connect downlight to
junction box. Select your
favorite color temperature
by using the 5CCT switch
on the junction box. Place
junction box into the
ceiling.
Remove the knockouts for wiring
and open the junction box. Junction
box contains three wires: hot (black),
netural (white) and bare ground.
Connect the two hot wires together
(one from the light switch cable and
the other from the recessed housing).
Repeat the step with the two netural
wires. Close the junction box to com-
plete the wiring.
Push the easy mount clips up
and insert the downlight into the
ceiling, release clips to mount
the downlight on the ceiling.
Secure the downlight, the
installation is completed.
CARE AND MAINTENANCE
WARRANTY
TROUBLE SHOOTING
Clean with non-abrasive glass cleaner and soft cloth. Do NOT use cleaner that contains abrasive
agents.
-Turned off the power before attempting to maintain the luminaire
- Liquid spray should be applied to the cleaning cloth, do NOT spry liquid directly onto the xture
Spitzer Lighting warrants this products to be free from defects in material and workmanship for up
to ve (5) years from the date of purchase at its sole discretion. Any changes or modications and
applications not expressly approved by the manufacturer could void the user’s authority to operate
the equipment and warranty. Please contact Spitzer Lighting at [email protected] or
call 844-312-4574 for more warranty information.
PROBLEM POSSIBLE CAUSE SOLUTION
Fixture does not light 1. Power is off
2. Incorrect wire connection
1. Check fuse, circuit breaker and
switch
2. Check Wiring
Circuit breaker trips when
turned on
1. Incorrect wire connection 1. Check wiring
Flickering when turned on 1. Dimmer not compatible
2. Loose wiring
3. Faulty switch
1. Check the updated dimmer list,
replace with the recommended
dimmer
2. Check wiring
3. Check switch
Other Spitzer LIGHTING Lighting Equipment manuals

Spitzer LIGHTING
Spitzer LIGHTING PARKING LOT LIGHT Series User manual

Spitzer LIGHTING
Spitzer LIGHTING DSKL10-18WCC-S User manual

Spitzer LIGHTING
Spitzer LIGHTING CANOPY Series User manual

Spitzer LIGHTING
Spitzer LIGHTING STR-22-25W-CCT User manual

Spitzer LIGHTING
Spitzer LIGHTING WALL PACK Series User manual

Spitzer LIGHTING
Spitzer LIGHTING WRAPAROUND Series User manual

Spitzer LIGHTING
Spitzer LIGHTING STRIP LIGHT Series User manual

Spitzer LIGHTING
Spitzer LIGHTING HIGH BAY Series User manual

Spitzer LIGHTING
Spitzer LIGHTING DSKL6-15WCC-M User manual

Spitzer LIGHTING
Spitzer LIGHTING HIGH BAY Series User manual


