LED DISK LIGHT
6” LED MOTION SENSOR CEILING LIGHT - DSKL6-15WCC-M
INSTALLATION MANUAL
PLEASE FOLLOW THESE STEPS FOR INSTALLATION
www.spitzerlighting.com 702 Interchange Blvd., Newark, DE 19711 Specication is subject to change without notice 2/2
mm
THIRD ANGLE
PROJECTION
审 核:
制 图:
批 准:
日 期:
页 次:
1
物料编码:3.508.00367
产品名称:
版 本: V1.0
材 质:
单 位:
深圳市博为光电股份有限公司
盘灯说明书
刘启立
基本尺寸
0~30
30~80
80~315
315~700
700~1300
1.0
1.5
2.0
2.5
3.0
1300~2500
4.0
公差
MM MM
版本
V1.0
更改内容
新建
尺寸:297mm×210mm 70克书纸 单黑色正面印刷,
中间对折
更改时间
LED DISK LIGHT
USE AND CARE GUIDE
DSKL6-15WCC-M
Toll-Free: 844-312-4574
www.spitzerlighting.com
702 Interchange Blvd, Newark, DE19711, USA
870 lumens
15w-28 pcs LED chips
INSTALLATION
RECESS MOUNT INSTALLATION
Make sure to release E26 lamp base inside can
to be replaced by UL listed E26 base adaptor
and find extension plug from E26 base adaptor.
Before installation, please set two screws in the juntion
To use wire plug to connect wire socket of the
box and do not drive screws to the end of junction box.
LED driver.And connect driver grounding wire in
the white wire from the j
connector and splice the black wire tothe black wire
junction box.Plug the grounding wire to the ground
connector of the driver.Then use screw driver to drive the
screw to the end and make the disk light tightly fix on the
Then squeeze the springs of LED disk light
to be inserted into the can and it can be
done one by one for both sides. To make sure to
Wattage 15W 36 pcs LED Chips
hookthem on the inside of the tabs of the can.
After that the disk light should be pushed on tothe
surface of the can to make sure that the disk
light is attached tothe ceiling surface. And
then twist the diffuser, which should be locked
in the disk metal enclosure and keep the diffuser
in place of the disk light surface.
SURFACE MOUNT
junction box. Finally twist diffuser on the disk light metal
enclosure and lock the diffuser in place.
120V LED DISK Light provides surface mount light for
most construction s . It fits most 4'' junction boxes and can
replace 5'' & 6'' recessed can lights to eliminate baffles. And it
is suitable for use in dry , or damp locations indoor/outdoor
provides surface mount light for new
Prior to installation. please install two screws
(furnished) into the junction box. Do Not drive
screws completely to the end of the junction box.
with proper size wire nuts or push wires into “push-in”
connector. Connect white to white, black to black, and
green or bare copper wire to bare copper wire.
With a Phillips screwdriver, attach the disk light
Complete the installation by twisting the diffuser on
the disk light metal enclosure and lock the diffuser
Translucent White PC Opal Diffuser.
All mounting screws and wire connectors.
Five year, limited warranty.
WARNING: For your safety read and understand
instructions completely before starting
installation. Before wiring to power supply, turn
off electricity at the fuse or circuit breaker box.
The edge of the fixture and the ceiling use
waterproof silicone to seal
Phillips Screw Driver.and Glue gun
It's suitable for wet location.
the disk light aluminum enclosure and lock the diffuser
LED Disc Closet
Fire rated boxes.
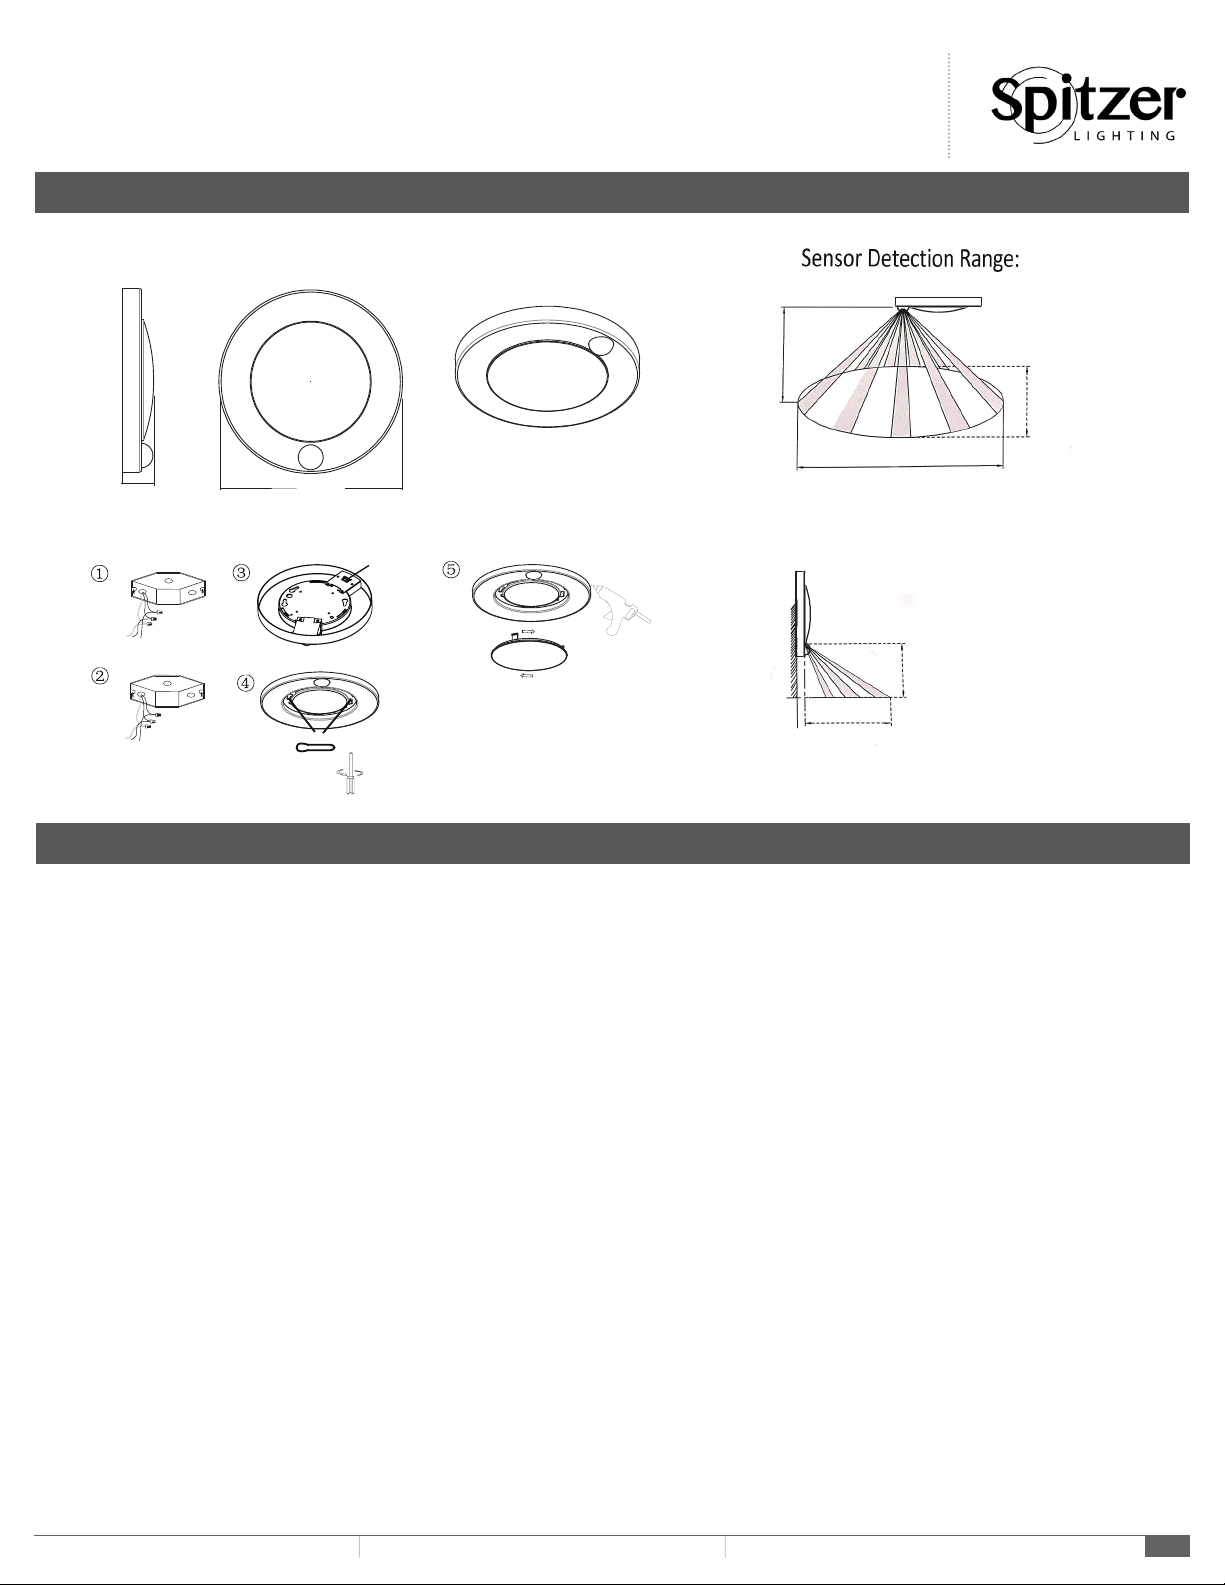
6” LED Closet Light with Motion Sensor SENSOR
PIR
2.4m
5m
5m
Max.6m
1.8m
Wall Mount sensor Detection Range
Ceiling Mount sensor Detection Range
SIDE VIEW
1.1” (28.5mm)
7.8” (199mm)
When motion is detected, it automatically turning lights ON
and turns the lights off after 30 seconds when the room is vacated
⑥
key hole solt
CCT switch
Select the color temperature you need by CCT changing
switch to warm white, cool white or day light setting.
1. Prior to installation . Please install two screws (furnished) into the junction box. Do Not drive screws completely to the end of the junction box.
2. Connect supply wires to wires in xture wiring box with proper size wire nuts or push wires into “push-in” connector. Connect white to white, black to black, and
green or bare copper wire to bare copper wire.
3. Select the color temperature you need by CCT changing switch to warm white, cool white or day light setting.
4. With a Phillips screwdriver, attach the disk light tightly to the j-box.
5. Complete the installation by twisting the diffuser on the disk light aluminum enclosure and lock the diffuser in place.
6. The edge of the xture and the ceiling use waterproof silicone to seal.
mm
THIRD ANGLE
PROJECTION
审 核:
制 图:
批 准:
日 期:
页 次:
1
物料编码:3.508.00367
产品名称:
版 本: V1.0
材 质:
单 位:
深圳市博为光电股份有限公司
盘灯说明书
刘启立
基本尺寸
0~30
30~80
80~315
315~700
700~1300
1.0
1.5
2.0
2.5
3.0
1300~2500
4.0
公差
MM MM
版本
V1.0
更改内容
新建
尺寸:297mm×210mm 70克书纸 单黑色正面印刷,
中间对折
更改时间
LED DISK LIGHT
USE AND CARE GUIDE
DSKL6-15WCC-M
Toll-Free: 844-312-4574
www.spitzerlighting.com
702 Interchange Blvd, Newark, DE19711, USA
870 lumens
15w-28 pcs LED chips
INSTALLATION
RECESS MOUNT INSTALLATION
Make sure to release E26 lamp base inside can
to be replaced by UL listed E26 base adaptor
and find extension plug from E26 base adaptor.
Before installation, please set two screws in the juntion
To use wire plug to connect wire socket of the
box and do not drive screws to the end of junction box.
LED driver.And connect driver grounding wire in
the white wire from the j
connector and splice the black wire tothe black wire
junction box.Plug the grounding wire to the ground
connector of the driver.Then use screw driver to drive the
screw to the end and make the disk light tightly fix on the
Then squeeze the springs of LED disk light
to be inserted into the can and it can be
done one by one for both sides. To make sure to
Wattage 15W 36 pcs LED Chips
hookthem on the inside of the tabs of the can.
After that the disk light should be pushed on tothe
surface of the can to make sure that the disk
light is attached tothe ceiling surface. And
then twist the diffuser, which should be locked
in the disk metal enclosure and keep the diffuser
in place of the disk light surface.
junction box. Finally twist diffuser on the disk light metal
enclosure and lock the diffuser in place.
120V LED DISK Light provides surface mount light for
most construction s . It fits most 4'' junction boxes and can
replace 5'' & 6'' recessed can lights to eliminate baffles. And it
is suitable for use in dry , or damp locations indoor/outdoor
provides surface mount light for new
Prior to installation. please install two screws
(furnished) into the junction box. Do Not drive
screws completely to the end of the junction box.
with proper size wire nuts or push wires into “push-in”
connector. Connect white to white, black to black, and
green or bare copper wire to bare copper wire.
With a Phillips screwdriver, attach the disk light
Complete the installation by twisting the diffuser on
the disk light metal enclosure and lock the diffuser
Translucent White PC Opal Diffuser.
All mounting screws and wire connectors.
Five year, limited warranty.
WARNING: For your safety read and understand
instructions completely before starting
installation. Before wiring to power supply, turn
off electricity at the fuse or circuit breaker box.
The edge of the fixture and the ceiling use
waterproof silicone to seal
Phillips Screw Driver.and Glue gun
It's suitable for wet location.
the disk light aluminum enclosure and lock the diffuser
LED Disc Closet
Fire rated boxes.
6” LED Closet Light with Motion Sensor SENSOR
PIR
2.4m
5m
5m
Max.6m
1.8m
Wall Mount sensor Detection Range
Ceiling Mount sensor Detection Range
SIDE VIEW
1.1” (28.5mm)
7.8” (199mm)
When motion is detected, it automatically turning lights ON
and turns the lights off after 30 seconds when the room is vacated
⑥
key hole solt
CCT switch
Select the color temperature you need by CCT changing
switch to warm white, cool white or day light setting.
SURFACE MOUNT INSTALLATION


