ST AEK-MOT-TK200G1 User manual

Introduction
The AEK-MOT-TK200G1 evaluation board has been developed to drive the opening/closing systems of the car power lift gates,
ensuring high levels of safety and reliability.
The board offers the possibility of driving three different motors. Two motors raise and lower the car tailgate, while the third
motor locks the trunk.
The board also allows driving two different high input capacity loads, that is, two strings of LEDs. One string lights up the interior
of the trunk when it is open, while the other one lights up the car license plate.
The AEK-MOT-TK200G1 evaluation board can be used as a small ECU that meets the typical requirements of a car lift gate.
The board hosts:
• a Chorus 1M ASIL-B microcontroller (SPC582B60E1), which communicates with the multimotor driver (L99DZ200G)
through the SPI;
• an L99DZ200G device that controls all the loads connected to the board;
• a CAN connector that allows a domain controller to interact remotely with the AEK-MOT-TK200G1.
Moreover, to support DC motor positioning and increase actuation safety, a circuitry for the current sensing of the L99DZ200G
H-bridges outputs has been added. On the board, this circuit is coupled by two connectors dedicated to Hall sensor feedback
coming from the motors. These two features can be combined or used alternatively.
To achieve a higher level of safety, a service key mechanism is provided. This mechanism consists of a continuous
communication interaction between the MCU and the L99DZ200G chip. This safety feature is concurrent with all the other
communications between the MCU and the L99DZ200G.
For a proper management of the L99DZ200G, the service key mechanism must be satisfied within a configurable temporal
window. When the service key fails, the L99DZ200G switches off all the outputs and enters the fail-safe mode. The service key
temporal window can be configured in real-time, too.
Warning: The AEK-MOT-TK200G1 evaluation board has not to be used in a vehicle as it is designed for R&D
laboratory use only.
Figure 1. AEK-MOT-TK200G1 evaluation board
Getting started with the AEK-MOT-TK200G1 evaluation board for car opening/
closing systems
UM2995
User manual
UM2995 - Rev 1 - May 2022
For further information contact your local STMicroelectronics sales office. www.st.com
Downloaded from Arrow.com.

1Hardware overview
1.1 Board main components
1. Power supply connector
2. Current sensing network based on the TSC103
3. STL76DN4LF7AG MOSFET for H-bridge. The MOSFET package contains a high-side and a low-side
4. Connector for a DC motor
5. CAN connector
6. L99DZ200G driver
7. SPC582B60E1 microcontroller
8. Connector for eventual Hall sensors
9. JTAG connector for MCU programming
10. Connector for the two high-side outputs
11. Reset button
12. WakeUp_LIN button
Figure 2. AEK-MOT-TK200G1 evaluation board: main components
10
8
4
3
2
6
7
12
9
11
5
1
1.1.1 SPC582B60E1
The AEK-MOT-TK200G1 evaluation board hosts a Chorus 1M SPC582B60E1 microcontroller that belongs to the
SPC58 Chorus family.
The MCU is in charge of controlling the L99DZ200G driver.
UM2995
Hardware overview
UM2995 - Rev 1 page 2/47
Downloaded from Arrow.com.Downloaded from Arrow.com.

The main MCU features are:
•AEC-Q100 qualified
• High performance e200z2 single core:
– 32-bit Power Architecture technology CPU
– Core frequency up to 80 MHz
• 1088 KB (1024 KB code flash memory + 64 KB data flash) on-chip flash memory: supports reading during
program and erase operations, and multiple blocks allow performing the EEPROM emulation
• 96 KB on-chip general-purpose SRAM
• Comprehensive new generation ASIL-B safety concept:
– ASIL-B of ISO 26262
– FCCU for collection and reaction to failure notifications
– Memory error management unit (MEMU) for collection and reporting of error events in the memories
• One enhanced 12-bit SAR analog-to-digital converter unit:
– up to 27 channels (two channels for the power lift gate application to monitor the linear actuator
position)
– enhanced diagnostic features (such as current sensing current monitoring)
• Seven CAN interfaces
• Four serial peripheral interface (DSPI) modules (a DSPI is used for the communication between the MCU
and the L99DZ200G chip).
Note: For further information, refer to RM0403 or to the SPC582Bx datasheet.
1.1.2 L99DZ200G
The L99DZ200G chip belongs to the STMicroelectronics "Door-Zone" family. It consists of a range of system ICs
specifically designed to integrate in a single package all the main components and functions required to manage
advanced automotive door applications.
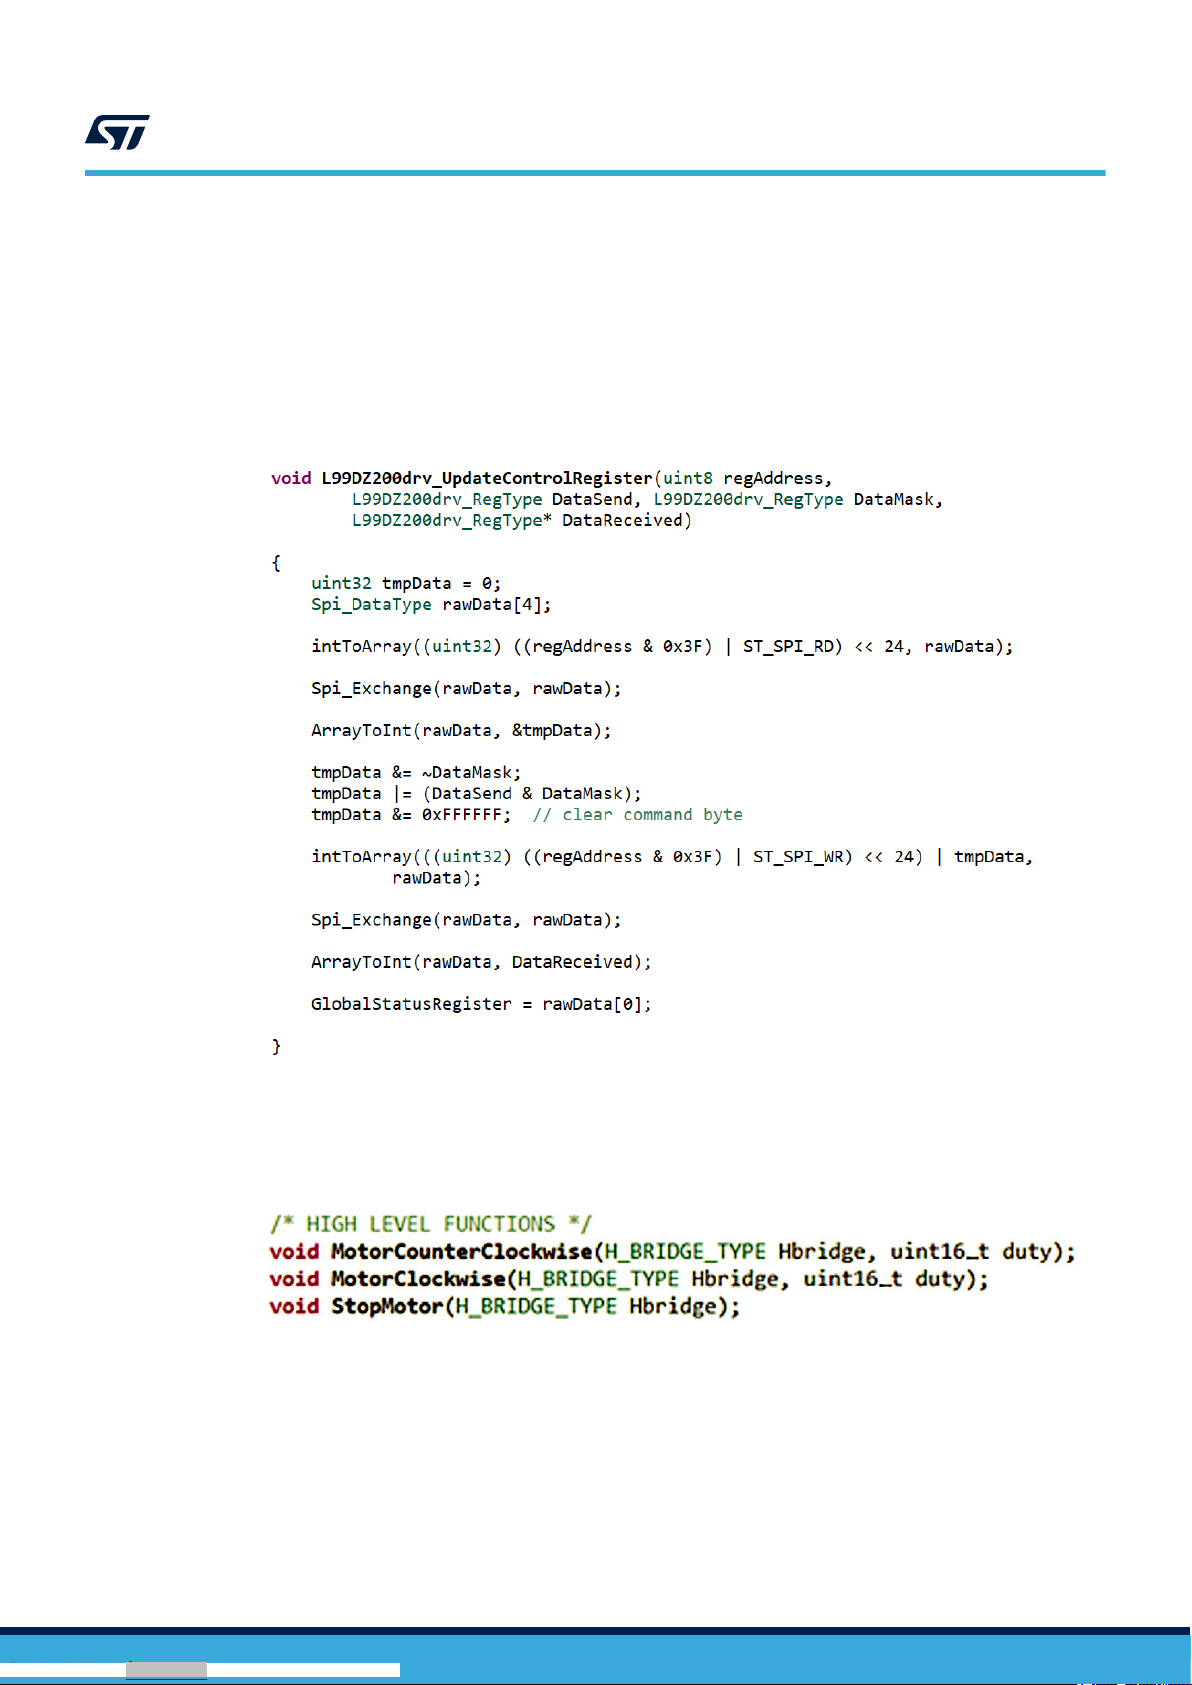
The L99DZ200G is a multifunctional actuator driver. It is programmed by a microcontroller. Its main features
include four half-bridges, seven high-side actuators, and two H-bridge drivers. Thanks to the H-bridge drivers
(configurable in single or dual mode), the L99DZ200G is able to manage the spindle motors used to raise and
lower the tailgate as well as the trunk lock. The L99DZ200G can also manage other typical loads located in the
power trunk (for example, buzzer, LED, and bulb supplies).
The device standby state reduces the battery power consumption.
The L99DZ200G features available in the AEK-MOT-TK200G1 are:
• Two H-bridge drivers for the spindle motors and lock motor. The on-board connector has eight outputs to
simplify the connection of the three motors. The outputs are doubled (that is, eight in total) as there are two
outputs for each half bridge of the two H-bridges. This duplication facilitates the connection of the third motor
in the middle of the two H-bridges
• Two high-side drivers for the LED modules
• One 5 V voltage regulator for the microcontroller supply
• One 5 V voltage tracker for the peripheral supply
• All the actuator outputs come with the following protection and supervisor features:
– Current monitoring (high-side only)
– Open-load and overcurrent
– Thermal warning and shutdown
• Configurable window watchdog
• A/D conversion of supply voltages and internal temperature sensors
Some of the L99DZ200G features are not implemented in the AEK-MOT-TK200G1:
• On the board, we disabled the MCU programming via the LIN and CAN transceiver by connecting the LIN
pin to Vsreg (12 V), while we left all the other pins related to CAN and LIN floating. To exit from a standby
condition, the L99DZ200G state machine requires at least one of the two interfaces to see a 12 V to 0 V
transition. We used the LIN one for this purpose. We also connected a wake-up button to the LIN pin to
wake up the device from the standby condition.
• All the other half-bridges and high-side outputs are not connected and left floating.
UM2995
Board main components
UM2995 - Rev 1 page 3/47
Downloaded from Arrow.com.Downloaded from Arrow.com.Downloaded from Arrow.com.

Note: The AEK-MOT-TK200G1 hosts an MCU that is always active as it is not powered by the L99DZ200G. Therefore,
the L99DZ200G standby status does not impact the MCU.
Note: For further information on the L99DZ200G, see the related datasheet.
1.1.3 Current sensing monitoring network
The AEK-MOT-TK200G1 also features a current sensing network. This network senses the current that the DC
motors absorb when connected to the AEK-MOT-TK200G1 H-bridges.
This motor current information can be used for rough position control and obstacle detection during the motor
actuation.
This current sensing network is based on the high-side current sensing topology, where the sensing resistor is
located between the power supply and the load.
Figure 3. TSC103 current sense amplifier
The following figure shows the diagram of the current sensing network implemented, based on the TSC103IYPT
current sense amplifier.
UM2995
Board main components
UM2995 - Rev 1 page 4/47
Downloaded from Arrow.com.Downloaded from Arrow.com.Downloaded from Arrow.com.Downloaded from Arrow.com.

Figure 4. TSC103 current sense amplifier
This current amplifier gives the possibility of selecting four different gain levels:
•25
• 50
• 75
• 100
The current sensing network on the board has been developed for the L12-50-100-12-P Actuonix DC motor.
Table 1. Specifications of the L12-50-100-12-P Actuonix DC motor
Characteristic Value
Maximum input voltage 12 V
Stall current 250 mA
Back drive force (static) 22 N
Closed length (hole to hole) 102 mm
Maximum speed (no load) 13 mm/s
Maximum force 42 N
The computed Rsense soldered on the board is 0.4 Ohms.
Note: Section 6 describes how to change the sensing network according to the chosen motor characteristics.
1.1.4 CAN connector and potentiometer connectors
The AEK-MOT-TK200G1 additional features are:
• A CAN connector for an external domain controller to drive the board via CAN messages, that is, to manage
the opening/closing of the trunk. The CAN network has been compensated with a 120 Ohm resistor as per
CAN bus specification
UM2995
Board main components
UM2995 - Rev 1 page 5/47
Downloaded from Arrow.com.Downloaded from Arrow.com.Downloaded from Arrow.com.Downloaded from Arrow.com.Downloaded from Arrow.com.

• The connectors for motor Hall sensor feedback. The sensors achieve an accurate motor positioning and
increase the actuation reliability
1.1.5 L99DZ200G state machine
As we are not using all the features of the L99DZ200G, the finite state machine (FSM) of the chip is simplified as
shown below.
Figure 5. Simplified L99DZ200G FSM
The main states are:
•Vbat_startup: the L99DZ200G enters this state when VS > VPOR. All the registers are set to the default
value. After about 0.1 milliseconds, the L99DZ200G enters the active mode.
•Active mode: to keep the device in the active state, the MCU activates a watchdog that monitors the
communication between the microcontroller and the chip. In this state, all the outputs are active, including
the H-bridge driver.
•V1_Standby: the transition from the active mode to V1_Standby mode is controlled through an SPI
message or it is a consequence of loosing the watchdog signal.
•VBAT_Standby: the L99DZ200G enters this state in case of:
– multiple watchdog failures
– multiple thermal shutdowns
– V1 regulator failures
– an explicit SPI command
UM2995
Board main components
UM2995 - Rev 1 page 6/47
Downloaded from Arrow.com.Downloaded from Arrow.com.Downloaded from Arrow.com.Downloaded from Arrow.com.Downloaded from Arrow.com.Downloaded from Arrow.com.

• To exit from the VBAT_Standby state and return to the active one, press the wake-up button on the LIN pin
or drive the MCU pin no. 58 (PIN_WAKEUP) from low to high. You can perform this second option only if:
– a jumper on JP1 connects pins two and three
– the wake-up pin is configured as an input pin in the L99DZ200G
– OUT15 is on and it is not driven through an internally generated PWM signal
Note: There is a software debug mode that simplifies the debugging procedure. In this mode, the watchdog
requirement is turned off. For further details on how to enter the debug mode, refer to Section 3.5 How to
execute SW debug for the AEK-MOT-TK200G1.
1.1.6 Watchdog scheme
The device state machine provides a state transition from the active mode to the standby mode when the
continuity of communication between the device and the microcontroller is lost. This continuity of communication
must be guaranteed by writing SPI messages into a special register that toggles a specific bit (bit 0 of the control
register CR1 or Config Reg).
After the power-on or the standby mode, the watchdog has to start within a maximum timeout (Long Open
Window TLW). The time window gives the microcontroller the time to run its own setup before starting the
watchdog. From this moment, the microcontroller has to serve the watchdog within a safe triggering time range.
The trigger time window is configurable by SPI, both at startup and runtime.
The watchdog failure happens if the watchdog trigger occurs before the t1, in the “early write" window, or after t2,
in the "late write" window. In case of watchdog failures, a reset signal is sent to the MCU.
Figure 6. Watchdog timing 1
Note: For further details, refer to the L99DZ200G documentation on www.st.com.
UM2995
Board main components
UM2995 - Rev 1 page 7/47
Downloaded from Arrow.com.Downloaded from Arrow.com.Downloaded from Arrow.com.Downloaded from Arrow.com.Downloaded from Arrow.com.Downloaded from Arrow.com.Downloaded from Arrow.com.

2Software overview
The AEK-MOT-TK200G1 software structure enhances reuse and simplifies maintenance. It also reduces the
prototyping time.
Thus, we have implemented a layered architecture that embeds the following blocks:
• Low-level drivers
• AEK_MOT_TK200G1_API
The library is written in embedded C code.
Figure 7. Software architecture
APPLICATION
AEK_MOT_TK200G1_API
LOW LEVEL DRIVERS
HARDWARE
2.1 Low-level drivers
The low-level drivers interface with the AEK-MOT-TK200G1 board. They support all the MCU peripherals (CAN,
SPI, PWM, and GPIO).
Figure 8. Low-level drivers
UM2995
Software overview
UM2995 - Rev 1 page 8/47
Downloaded from Arrow.com.Downloaded from Arrow.com.Downloaded from Arrow.com.Downloaded from Arrow.com.Downloaded from Arrow.com.Downloaded from Arrow.com.Downloaded from Arrow.com.Downloaded from Arrow.com.

The AEK_MOT_TK200G1_API software is based on the following peripherals:
•SPI: to implement the bidirectional communication between the MCU and the L99DZ200G
• Programmable interrupt timer (PIT): to trigger the watchdog
• PWM: to generate motor-driving signals
• CAN: to manage the messages received or transmitted by other ECUs
• ADC: to convert the signal coming from the Hall sensors
2.2 AEK_MOT_TK200G1_API
The purpose of the API implemented is to expose all the functions of the AEK-MOT-TK200G1 board. The figure
below shows the API functional blocks.
Figure 9. API architecture
UM2995
AEK_MOT_TK200G1_API
UM2995 - Rev 1 page 9/47
Downloaded from Arrow.com.Downloaded from Arrow.com.Downloaded from Arrow.com.Downloaded from Arrow.com.Downloaded from Arrow.com.Downloaded from Arrow.com.Downloaded from Arrow.com.Downloaded from Arrow.com.Downloaded from Arrow.com.

The main blocks are:
•The μC command block that wraps the low-level drivers for the MCU configuration
• The “Read, Update, Write”, which are low-level functions responsible for updating the L99DZ200G registers.
The input parameters are the register address, the data to write/update, the register mask to apply, and the
variable address to contain the data read. The return is the global status register value, which represents the
status and possible faults of the L99DZ200G device. The most common errors are:
– SPI error: related to SPI communication
– Fail-safe: error related to internal fault like watchdog failure
Figure 10. Update register function
• The “driver functions” cover all L99DZ200G features and significantly simplify the usage of the device by
masking the information of the register details.
•The wrapper functions expose at the AEK-MOT-TK200G1 level features (for example, motor driving)
Figure 11. Wrapper functions
Important: BOARD_STATUS_TYPE maps the current state of the board at runtime, while BOARD_CONFIG_TYPE stores the
board configuration in the flash memory for a future use.
To include the above APIs in an application code, include the AEK_MOT_TK200G1.h header file in the main.c
file.
To initialize the library, include the Sel_mot_tk200g1_init() function in your code.
UM2995
AEK_MOT_TK200G1_API
UM2995 - Rev 1 page 10/47
Downloaded from Arrow.com.Downloaded from Arrow.com.Downloaded from Arrow.com.Downloaded from Arrow.com.Downloaded from Arrow.com.Downloaded from Arrow.com.Downloaded from Arrow.com.Downloaded from Arrow.com.Downloaded from Arrow.com.Downloaded from Arrow.com.

Figure 12. Sel_mot_tk200g1_init() function
2.3 Safety mechanism: watchdog trigger
The AEK-MOT-TK200G1 features a safety mechanism. The software portion of this safety mechanism includes a
service key (that is, a watchdog) implemented with a programmable interrupt timer (PIT).
When the PIT expires, a global state variable is updated through the interrupt associated callback. The value of
this global variable is evaluated within each implemented API function. When this value confirms that the trigger
time has expired, the bit toggling SPI message is sent. This global state variable mechanism avoids the "missing
trigger" fault. It prevents overwriting the L99DZ200G CR1 register that would compromise the watchdog.
The AEK_MOT_TK200G1_CheckWDExpired() function is used for watchdog expiry check and it is included in all
the library APIs.
Moreover, in the user application code, a proper watchdog triggering has to be maintained. Therefore, the
AEK_MOT_TK200G1_CheckWDExpired() function has to be invoked in all the code portions that potentially
require an execution time comparable to the triggering time window (for example, a loop).
UM2995
Safety mechanism: watchdog trigger
UM2995 - Rev 1 page 11/47
Downloaded from Arrow.com.Downloaded from Arrow.com.Downloaded from Arrow.com.Downloaded from Arrow.com.Downloaded from Arrow.com.Downloaded from Arrow.com.Downloaded from Arrow.com.Downloaded from Arrow.com.Downloaded from Arrow.com.Downloaded from Arrow.com.Downloaded from Arrow.com.

3AEK-MOT-TK200G1 in AutoDevKit
The driver for the AEK-MOT-TK200G1 board is part of the AutoDevKit ecosystem.
An AutoDevKit component for the AEK-MOT-TK200G1 board has not been created, as the board hosts an MCU,
and it is similar to a small ECU.
In AutoDevKit, we have included some AEK-MOT-TK200G1 evaluation demos.
The developed L99DZ200G driver is included in all the demos. They represent a very good starting point for
user's development.
3.1 AutoDevKit ecosystem
The application development employing the AEK-MOT-TK200G1 takes full advantage of the AutoDevKit
ecosystem, whose basic components are:
•SPC5-STUDIO integrated development environment (IDE)
• AutoDevKit software library (STSW-AUTODEVKIT)
•PLS UDE programmer and debugger
3.1.1 SPC5-STUDIO
SPC5-STUDIO is an integrated development environment (IDE) based on Eclipse designed to assist the
development of embedded applications based on SPC5 Power Architecture 32-bit microcontrollers.
The package includes an application wizard to initiate projects with all the relevant components and key elements
required to generate the final application source code. It also contains straightforward software examples for each
MCU peripheral.
SPC5-STUDIO also features:
•the possibility of integrating other software products from the standard Eclipse marketplace
• free license GCC GNU C Compiler component
• support for industry-standard compilers
• support for multi-core microcontrollers
• PinMap editor to facilitate MCU pin configuration
Download the SPC5-UDESTK software to run and debug applications created with SPC5-STUDIO.
3.1.2 STSW-AUTODEVKIT
The STSW-AUTODEVKIT plug-in for Eclipse extends SPC5-STUDIO for automotive and transportation
applications.
STSW-AUTODEVKIT features:
• integrated hardware and software components, component compatibility checking, and MCU and peripheral
configuration tools
• the possibility of creating new system solutions from existing ones by adding or removing compatible
function boards
• new code can be generated immediately for any compatible MCU
• high-level application APIs to control each functional component
The GUI helps configure interfaces, including SPI, and can automatically manage all relevant pin allocation and
deallocation operations.
For more information, refer to UM2623 (in particular, Section 6 and Section 7) or watch the video tutorials.
Note: AutoDevKit does not have a dedicated component for the AEK-MOT-TK200G1 board, but includes some demos
containing the board drivers.
3.2 How to download demos from SPC5Studio and AutoDevKit
After downloading and installing SPC5-STUDIO and AutoDevKit, you can import the application samples related
to the AEK-MOT-TK200G1 evaluation board, as per the procedure below.
UM2995
AEK-MOT-TK200G1 in AutoDevKit
UM2995 - Rev 1 page 12/47
Downloaded from Arrow.com.Downloaded from Arrow.com.Downloaded from Arrow.com.Downloaded from Arrow.com.Downloaded from Arrow.com.Downloaded from Arrow.com.Downloaded from Arrow.com.Downloaded from Arrow.com.Downloaded from Arrow.com.Downloaded from Arrow.com.Downloaded from Arrow.com.Downloaded from Arrow.com.

Step 1. From the [Common task] panel, click on the [Import sample from application library] icon.
Figure 13. Import sample from application library
Step 2. In the Visual Studio Wizard, from the drop-down menu, select the family, the product, and the device.
Then, click on the next button.
Step 3. Type “AEK-MOT-TK200G1” in [Choose your sample application] text-box.
Step 4. Tick the demo to import and click on the finish button.
Figure 14. MCU and demo selection
3.3 How to locate the AEK-MOT-TK200G1 SW library in the demo
Step 1. After importing a demo into SPC5-STUDIO, run the code generation.
UM2995
How to locate the AEK-MOT-TK200G1 SW library in the demo
UM2995 - Rev 1 page 13/47
Downloaded from Arrow.com.Downloaded from Arrow.com.Downloaded from Arrow.com.Downloaded from Arrow.com.Downloaded from Arrow.com.Downloaded from Arrow.com.Downloaded from Arrow.com.Downloaded from Arrow.com.Downloaded from Arrow.com.Downloaded from Arrow.com.Downloaded from Arrow.com.Downloaded from Arrow.com.Downloaded from Arrow.com.

Step 2. Select the platform component and click on the Generate application Code icon.
Figure 15. Code generation
The code generation produces a new folder in the demo project called 'component'. This folder holds
the libraries of the SPC5-STUDIO and AutoDevKit components associated with the project, that is, the
low-level driver library, the interrupt request queue library, and the board initialization library. The AEK-
MOT-TK200G1 driver is in the aek_mot_tk200g1_component_rla subfolder under the source folder.
Figure 16. Driver folders
Step 3. To create from scratch a project that requires the AEK-MOT-TK200G1, copy the
aek_mot_tk200g1_component_rla folder with all its content from a demo project and paste it under
the source folder of the new project.
3.4 How to configure the low-level drivers
The configuration of the low-level drivers is mandatory. This configuration is simplified by the [Configuration
Application] tab in SPC5-STUDIO (refer to UM2623, paragraph 7.4). The low-level drivers to be configured for
the AEK-MOT-TK200G1 board are:
• SPI: to implement the bidirectional communication between the MCU and the L99DZ200G
• Programmable interrupt timer (PIT): to trigger the watchdog
• PWM: to generate the motor driving signal
• CAN: to manage the messages received or transmitted by other ECUs
• ADC: to convert the signal coming from the Hall sensors
To enable the low-level drivers, follow the procedure below.
Step 1. Select [Low level driver Component].
Step 2. Select [Enabled Drivers] from the outline tab.
UM2995
How to configure the low-level drivers
UM2995 - Rev 1 page 14/47
Downloaded from Arrow.com.Downloaded from Arrow.com.Downloaded from Arrow.com.Downloaded from Arrow.com.Downloaded from Arrow.com.Downloaded from Arrow.com.Downloaded from Arrow.com.Downloaded from Arrow.com.Downloaded from Arrow.com.Downloaded from Arrow.com.Downloaded from Arrow.com.Downloaded from Arrow.com.Downloaded from Arrow.com.Downloaded from Arrow.com.

Step 3. Selects the low-level drivers to enable.
In the [Outline] tab, the enabled drivers become selectable.
Figure 17. Enabling low-level drivers
Step 4. To configure each of the enabled driver, select and double-click the driver in the [Outline] tab to open
the corresponding configuration dialog.
Since the microcontroller pins are already wired on the board, the possible changes related to the
configurations of the low-level drivers concern only some parameters, like the baud rate in the SPI,
the frequency of the PIT, and the names of the callback functions. Some of the key configurations are
described in the following paragraphs.
3.4.1 SPI configuration
To configure the SPI according to the AEK-MOT-TK200G1 hardware requirements, follow the procedure below.
Step 1. Double-click on [DSPI and I2S Settings] in the [Outline] tab.
Step 2. Choose the DSPI3 (DSPI stands for SPI) in the [Select] section.
Figure 18. SPI selection
UM2995
How to configure the low-level drivers
UM2995 - Rev 1 page 15/47
Downloaded from Arrow.com.Downloaded from Arrow.com.Downloaded from Arrow.com.Downloaded from Arrow.com.Downloaded from Arrow.com.Downloaded from Arrow.com.Downloaded from Arrow.com.Downloaded from Arrow.com.Downloaded from Arrow.com.Downloaded from Arrow.com.Downloaded from Arrow.com.Downloaded from Arrow.com.Downloaded from Arrow.com.Downloaded from Arrow.com.Downloaded from Arrow.com.

Step 3. In the [SPI configurations] section, click on the [+] button to add a row and configure the SPI port
selected in the previous step.
Figure 19. SPI configuration list
Step 4. Double-click on the row just added.
Step 5. Add the name that you want to give to the configuration in the [Symbolic Name] field.
For example, type "configuration_name”. In addition, to set up the communication with the L99DZ200G
device properly, set the parameters in the [Transfer] section as shown below.
Figure 20. SPI transfer configuration
UM2995
How to configure the low-level drivers
UM2995 - Rev 1 page 16/47
Downloaded from Arrow.com.Downloaded from Arrow.com.Downloaded from Arrow.com.Downloaded from Arrow.com.Downloaded from Arrow.com.Downloaded from Arrow.com.Downloaded from Arrow.com.Downloaded from Arrow.com.Downloaded from Arrow.com.Downloaded from Arrow.com.Downloaded from Arrow.com.Downloaded from Arrow.com.Downloaded from Arrow.com.Downloaded from Arrow.com.Downloaded from Arrow.com.Downloaded from Arrow.com.

Step 6. In the [Timings] section, configure the baud rate for the L99DZ200G device.
The values used in the demo are:
– baud rate (bit/s): 250000
– tCSC(nsec): 4800
– tASC(nsec): 4800
– tDT(nsec): 1200
Figure 21. SPI timing configuration
UM2995
How to configure the low-level drivers
UM2995 - Rev 1 page 17/47
Downloaded from Arrow.com.Downloaded from Arrow.com.Downloaded from Arrow.com.Downloaded from Arrow.com.Downloaded from Arrow.com.Downloaded from Arrow.com.Downloaded from Arrow.com.Downloaded from Arrow.com.Downloaded from Arrow.com.Downloaded from Arrow.com.Downloaded from Arrow.com.Downloaded from Arrow.com.Downloaded from Arrow.com.Downloaded from Arrow.com.Downloaded from Arrow.com.Downloaded from Arrow.com.Downloaded from Arrow.com.

Step 7. Fill the [Chip Select] section as shown below.
Figure 22. SPI chip selection
3.4.2 Programmable interrupt timer (PIT) configuration
The PIT configuration is important to satisfy the correct triggering of the watchdog.
Step 1. Double-click on [PIT Settings] in the [Outline] tab.
Step 2. In the [PIT settings] section, tick [PIT0].
Step 3. In the [Channel1] box, enable the channel to insert the frequency according to the requirements
of the L99DZ200G device and add the name of the callback function that is invoked as
soon as the PIT expires. The name of the callback used in the demo we have developed is
AEK_MOT_TK200G1_TriggerWatchDog.
Figure 23. PIT configuration
3.4.3 PWM configuration
To drive the motors connected to the AEK-MOT-TK200G1 board with PWM signals, configure the eMIOS low-
level driver.
Step 1. Double-click on [eMios Settings] in the [Outline] tab.
Step 2. Set the global prescaler in the [Internal Counter Frequency Settings] section.
UM2995
How to configure the low-level drivers
UM2995 - Rev 1 page 18/47
Downloaded from Arrow.com.Downloaded from Arrow.com.Downloaded from Arrow.com.Downloaded from Arrow.com.Downloaded from Arrow.com.Downloaded from Arrow.com.Downloaded from Arrow.com.Downloaded from Arrow.com.Downloaded from Arrow.com.Downloaded from Arrow.com.Downloaded from Arrow.com.Downloaded from Arrow.com.Downloaded from Arrow.com.Downloaded from Arrow.com.Downloaded from Arrow.com.Downloaded from Arrow.com.Downloaded from Arrow.com.Downloaded from Arrow.com.

Step 3. In the [eMios Group0], select channels 2, 5, 6, and 7 as PWM.
Figure 24. PWM configuration (1 of 3)
Step 4. In the [PWM Configurations] section, click on the [+] button to add a row where to configure the PWM.
Step 5. Double-click on the row just added.
Figure 25. PWM configuration (2 of 3)
Step 6. In the [PWM Configuration Settings [0]] section, set the parameters as shown in the figure below.
Figure 26. PWM configuration (3 of 3)
3.5 How to execute SW debug for the AEK-MOT-TK200G1
The software debug mode in the L99DZ200G is used for the micro controller code debugging. In this mode, all
the L99DZ200G functionalities are available, except the watchdog requirement. Thus, the watchdog deactivation
eases the debug of the microcontroller firmware.
To enter the debug mode, follow the procedure below.
UM2995
How to execute SW debug for the AEK-MOT-TK200G1
UM2995 - Rev 1 page 19/47
Downloaded from Arrow.com.Downloaded from Arrow.com.Downloaded from Arrow.com.Downloaded from Arrow.com.Downloaded from Arrow.com.Downloaded from Arrow.com.Downloaded from Arrow.com.Downloaded from Arrow.com.Downloaded from Arrow.com.Downloaded from Arrow.com.Downloaded from Arrow.com.Downloaded from Arrow.com.Downloaded from Arrow.com.Downloaded from Arrow.com.Downloaded from Arrow.com.Downloaded from Arrow.com.Downloaded from Arrow.com.Downloaded from Arrow.com.Downloaded from Arrow.com.

Step 1. Insert a jumper in the JP2 connector.
Figure 27. Debug input mode: jumper positioning
Step 2. Connect the power supply to the J1 connector and power the board.
Figure 28. Debug input mode: powering the board
12 V
Step 3. Remove the jumper added in step 1.
UM2995
How to execute SW debug for the AEK-MOT-TK200G1
UM2995 - Rev 1 page 20/47
Downloaded from Arrow.com.Downloaded from Arrow.com.Downloaded from Arrow.com.Downloaded from Arrow.com.Downloaded from Arrow.com.Downloaded from Arrow.com.Downloaded from Arrow.com.Downloaded from Arrow.com.Downloaded from Arrow.com.Downloaded from Arrow.com.Downloaded from Arrow.com.Downloaded from Arrow.com.Downloaded from Arrow.com.Downloaded from Arrow.com.Downloaded from Arrow.com.Downloaded from Arrow.com.Downloaded from Arrow.com.Downloaded from Arrow.com.Downloaded from Arrow.com.Downloaded from Arrow.com.
Table of contents
Other ST Motherboard manuals

ST
ST STM32G070RBT6 User manual

ST
ST STM32G4 Nucleo-32 User manual

ST
ST STLink User manual

ST
ST STEVAL-QUADV01 User manual

ST
ST STEVAL-IPP003V1 Quick start guide

ST
ST SPC563M64CAL144 User manual

ST
ST STM32L4 Series User manual

ST
ST STM32L152-EVAL User manual

ST
ST EVAL-RHRPMPOL01 User manual

ST
ST EVAL-L9963-MCU Installation and operating instructions