manuals.online logo
Brands
  1. Home
  2. •
  3. Brands
  4. •
  5. StarTech.com
  6. •
  7. TV Mount
  8. •
  9. StarTech.com BRACKET125PT User manual

StarTech.com BRACKET125PT User manual

Other StarTech.com TV Mount manuals

StarTech.com FPWFXBAT User manual

StarTech.com

StarTech.com FPWFXBAT User manual

StarTech.com FPWTLTPORT User manual

StarTech.com

StarTech.com FPWTLTPORT User manual

StarTech.com FPWTLTB1 User manual

StarTech.com

StarTech.com FPWTLTB1 User manual

StarTech.com FPCEILBTB User manual

StarTech.com

StarTech.com FPCEILBTB User manual

StarTech.com MBLTVSTNDEC User manual

StarTech.com

StarTech.com MBLTVSTNDEC User manual

StarTech.com RK219WALLV User manual

StarTech.com

StarTech.com RK219WALLV User manual

StarTech.com FPWFXB1 User manual

StarTech.com

StarTech.com FPWFXB1 User manual

StarTech.com BRACKET25 User manual

StarTech.com

StarTech.com BRACKET25 User manual

StarTech.com FPWARPS User manual

StarTech.com

StarTech.com FPWARPS User manual

StarTech.com V934459 User manual

StarTech.com

StarTech.com V934459 User manual

StarTech.com TV-Wall-Mount-65FS User manual

StarTech.com

StarTech.com TV-Wall-Mount-65FS User manual

StarTech.com BRACKET125PTP User manual

StarTech.com

StarTech.com BRACKET125PTP User manual

StarTech.com FPWARTS1 User manual

StarTech.com

StarTech.com FPWARTS1 User manual

StarTech.com WALLMOUNTH2 User manual

StarTech.com

StarTech.com WALLMOUNTH2 User manual

StarTech.com FPCEILPTBLP User manual

StarTech.com

StarTech.com FPCEILPTBLP User manual

StarTech.com RK119WALLV User manual

StarTech.com

StarTech.com RK119WALLV User manual

StarTech.com FPWARTS2 User manual

StarTech.com

StarTech.com FPWARTS2 User manual

StarTech.com FPWTLTBAT User manual

StarTech.com

StarTech.com FPWTLTBAT User manual

StarTech.com FHA-TV-WALL-MOUNT User manual

StarTech.com

StarTech.com FHA-TV-WALL-MOUNT User manual

StarTech.com FPCEILPTBSP User manual

StarTech.com

StarTech.com FPCEILPTBSP User manual

Popular TV Mount manuals by other brands

Krüger & Matz KM1300 owner's manual

Krüger & Matz

Krüger & Matz KM1300 owner's manual

Barkan E220 manual

Barkan

Barkan E220 manual

Bauhn ACTVB-1120 installation guide

Bauhn

Bauhn ACTVB-1120 installation guide

Vantage Point Products CB01 instructions

Vantage Point Products

Vantage Point Products CB01 instructions

Ergotron Neo Flex Cantilever UHD user guide

Ergotron

Ergotron Neo Flex Cantilever UHD user guide

ECG LD 174203 instruction manual

ECG

ECG LD 174203 instruction manual

VonHaus 05/038 instruction manual

VonHaus

VonHaus 05/038 instruction manual

Techlink ECHO TV manual

Techlink

Techlink ECHO TV manual

Sandstrom SSTVMC12X instruction manual

Sandstrom

Sandstrom SSTVMC12X instruction manual

Kanto RCAD590 user manual

Kanto

Kanto RCAD590 user manual

Forging Mount HY9440 instruction manual

Forging Mount

Forging Mount HY9440 instruction manual

ICW SCACC18 installation instructions

ICW

ICW SCACC18 installation instructions

LG WM-L640V owner's manual

LG

LG WM-L640V owner's manual

Gembird WM-65ST-01 user manual

Gembird

Gembird WM-65ST-01 user manual

ERARD FiTUP XXL 035320 quick start guide

ERARD

ERARD FiTUP XXL 035320 quick start guide

PEERLESS PLCK-1 Installation and assembly

PEERLESS

PEERLESS PLCK-1 Installation and assembly

GEM GEM GP001 instructions

GEM

GEM GEM GP001 instructions

Gladiator Joe GJ0A0053 quick start guide

Gladiator Joe

Gladiator Joe GJ0A0053 quick start guide

manuals.online logo
manuals.online logoBrands
  • About & Mission
  • Contact us
  • Privacy Policy
  • Terms and Conditions

Copyright 2025 Manuals.Online. All Rights Reserved.

*actual product may vary from photos
Instruction manual
FR: Guide de l’utilisateur - fr.startech.com
DE: Bedienungsanleitung - de.startech.com
ES: Guía del usuario - es.startech.com
NL: Gebruiksaanwijzing - nl.startech.com
PT: Guia do usuário - pt.startech.com
IT: Guida per l’uso - it.startech.com
Manual Revision: 07/10/2016
For the latest information, technical specications, and support for
this product, please visit www.StarTech.com/BRACKET125PT.
BRACKET125PT
2.5” SSD/HDD Mounting Bracket for 3.5” Drive Bay - Tool-less Installation
Important: Read and understand the entire manual before
you use this product, and follow the instructions as they are
outlined in the manual.
Failure to do so might result in property damage or device
failure.
Introduction
You can use the BRACKET125PT to install a 2.5 in. SSD (solid-state
drive) or HDD (hard disk drive) into a 3.5 in. drive bay. The tool-less
design of the BRACKET125PT makes it easy to install drives.
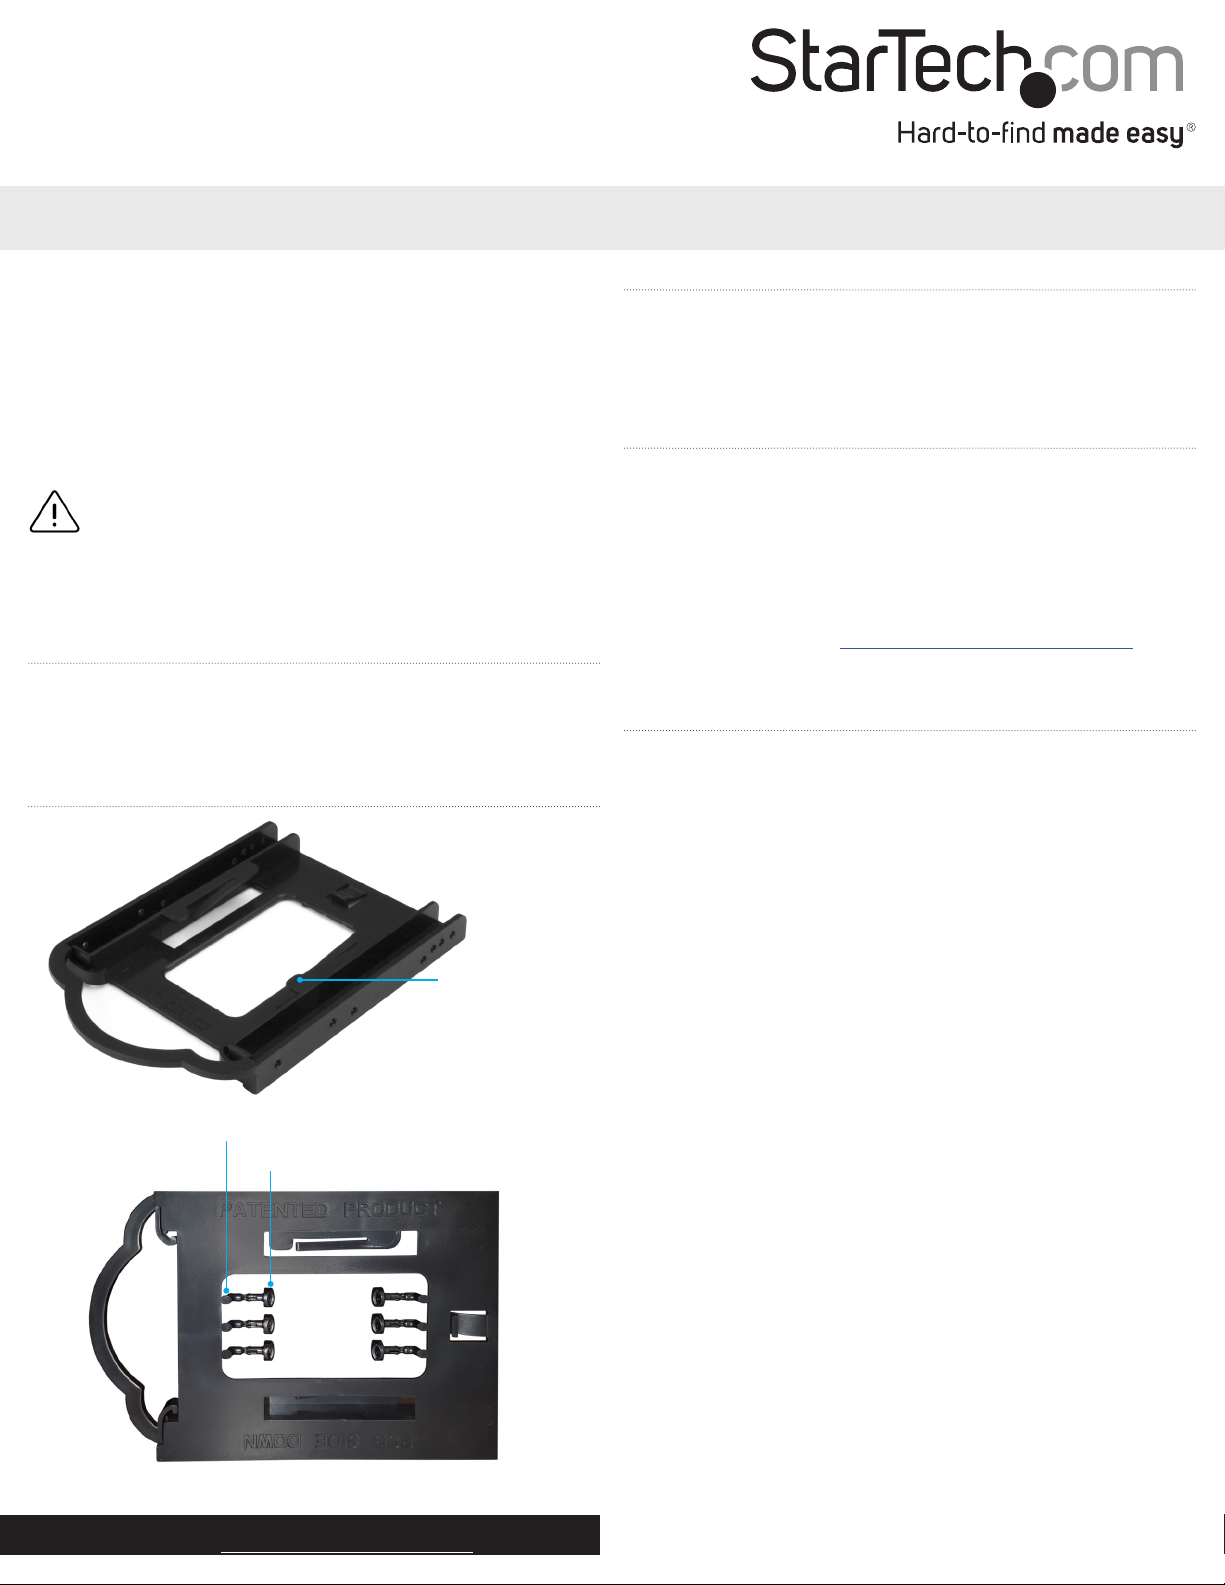
Product diagram
Package contents
• 1 x 2.5 in. SSD/HDD to 3.5 in. mounting bracket
• 6 x plastic pegs
• 1 x instruction manual
System requirements
• Computer with an available 3.5 in. drive bay
• One 2.5 in. SSD or HDD
The operating system of your computer will detect the drive and
automatically install it.
System requirements are subject to change. For the latest
requirements, please visit www.StarTech.com/BRACKET125PT.
Plastic post
Plastic peg
Install the drive and bracket
Warning! Hard drives and storage enclosures should be handled
carefully, especially when they’re transported. If you’re not careful
with your drives, you may experience lost data as a result. Always
handle storage devices with caution. Make sure that you’re properly
grounded by wearing an anti-static strap when you install any
computer component. If an anti-static strap isn’t available, touch a
large grounded metal surface for several seconds to discharge any
built-up static electricity.
1. Remove the six Plastic pegs from the Plastic posts that are
attached to the mounting bracket.
2. Pull the Plastic posts o of the mounting bracket and discard the
posts.
3. Align your SSD or HDD with the Tenons (plastic projections) on
the mounting bracket, and gently push the drive into place.
4. Turn o your computer and any devices or peripherals that are
connected to it (for example, printers, external hard drives, and
so on).
5. Unplug the power cable from the back of your computer.
6. Disconnect any peripheral devices that are connected to your
computer.
7. Remove the cover from your computer case. Consult the
documentation that came with your computer for details about
how to do this safely.
8. Place the bracket into the 3.5 in. hard drive slot, and use the
Plastic pegs that you removed in step 1 to secure the drive in
place.
9. Connect a power connection from the computer’s power supply
to the drive’s power connector.
(continued on next page)
Tenon
(plastic projections)
Use of Trademarks, Registered Trademarks, and other Protected Names and Symbols
This manual may make reference to trademarks, registered trademarks, and other protected names and/or symbols of third-party companies not related in any way to
StarTech.com. Where they occur these references are for illustrative purposes only and do not represent an endorsement of a product or service by StarTech.com, or an endorsement of the product(s)
to which this manual applies by the third-party company in question. Regardless of any direct acknowledgement elsewhere in the body of this document, StarTech.com hereby acknowledges that all
trademarks, registered trademarks, service marks, and other protected names and/or symbols contained in this manual and related documents are the property of their respective holders.
Technical Support
StarTech.com’s lifetime technical support is an integral part of our commitment to provide industry-leading solutions. If you ever need help with your product, visit www.startech.com/support and
access our comprehensive selection of online tools, documentation, and downloads.
For the latest drivers/software, please visit www.startech.com/downloads
Warranty Information
This product is backed by a two-year warranty.
StarTech.com warrants its products against defects in materials and workmanship for the periods noted, following the initial date of purchase. During this period, the products may be returned for
repair, or replacement with equivalent products at our discretion. The warranty covers parts and labor costs only. StarTech.com does not warrant its products from defects or damages arising from
misuse, abuse, alteration, or normal wear and tear.
Limitation of Liability
In no event shall the liability of StarTech.com Ltd. and StarTech.com USA LLP (or their ocers, directors, employees or agents) for any damages (whether direct or indirect, special, punitive, incidental,
consequential, or otherwise), loss of prots, loss of business, or any pecuniary loss, arising out of or related to the use of the product exceed the actual price paid for the product. Some states do not
allow the exclusion or limitation of incidental or consequential damages. If such laws apply, the limitations or exclusions contained in this statement may not apply to you.
10. Use the appropriate cable and connect the drive to the host
controller.
11. Place the cover back onto your computer case.
12. Reconnect the power cable to the back of your computer and
reconnect all of the peripheral devices that you previously
disconnected.
13. Turn on your computer and any peripherals that are connected
to it.