Steinberg Systems SBS-BT-612 User manual

SBS-BT-612
BEDIENUNGSANLEITUNG
DIGITALER BATTERIE-TESTER
USER MANUAL
DIGITAL BATTERY TESTER
INSTRUKCJA OBSŁUGI
TESTER AKUMULATORÓW
NÁVOD K POUŽITÍ
DIGITÁLNÍ TESTER AUTOBATERIE
MANUEL D´UTILISATION
TESTEUR DE BATTERIE NUMÉRIQUE
ISTRUZIONI PER L’USO
TESTER DIGITALE BATTERIA
MANUAL DE INSTRUCCIONES
COMPROBADOR DE BATERÍAS DIGITAL
DE | EN | PL | CZ | FR | IT | ES

2 3
Rev. 23.01.2020
Rev. 23.01.2020
ACHTUNG! Warnung vor elektrischer Spannung!
Augenschutz benutzen.
Handschutz benutzen.
ACHTUNG! Warnung vor brandfördernden
Stoen!
ACHTUNG! Heiße Fläche. Verbrennungsgefahr!
Nur zur Verwendung in geschlossenen Räumen.
Das Produkt erfüllt die geltenden
Sicherheitsnormen.
Gebrauchsanweisung beachten.
Recyclingprodukt.
ACHTUNG!, WARNUNG! oder HINWEIS!, um auf
bestimmte Umstände aufmerksam zu machen
(allgemeines Warnzeichen).
INHALT | CONTENT | TREŚĆ | OBSAH | CONTENU | CONTENUTO | CONTENIDO
Deutsch
English
Polski
Česky
Français
Italiano
Español
3
9
14
20
25
31
37
PRODUKTNAME DIGITALER BATTERIE-TESTER
PRODUCT NAME DIGITAL BATTERY TESTER
NAZWA PRODUKTU TESTER AKUMULATORÓW
NÁZEV VÝROBKU DIGITÁLNÍ TESTER AUTOBATERIE
NOM DU PRODUIT TESTEUR DE BATTERIE NUMÉRIQUE
NOME DEL PRODOTTO TESTER DIGITALE BATTERIA
NOMBRE DEL PRODUCTO COMPROBADOR DE BATERÍAS DIGITAL
MODELL
SBS-BT-612
PRODUCT MODEL
MODEL PRODUKTU
MODEL VÝROBKU
MODÈLE
MODELLO
MODELO
IMPORTEUR
EXPONDO POLSKA SP. Z O.O. SP. K.
IMPORTER
IMPORTER
DOVOZCE
IMPORTATEUR
IMPORTATORE
IMPORTADOR
ADRESSE VON IMPORTEUR
UL. NOWY KISIELIN-INNOWACYJNA 7, 66-002 ZIELONA GÓRA | POLAND, EU
IMPORTER ADDRESS
ADRES IMPORTERA
ADRESA DOVOZCE
ADRESSE DE L'IMPORTATEUR
INDIRIZZO DELL'IMPORTATORE
DIRECCIÓN DEL IMPORTADOR
TECHNISCHE DATEN
Die Begrie „Gerät“ oder „Produkt“ in den Warnungen und
Beschreibung des Handbuchs beziehen sich auf DIGITALER
BATTERIE-TESTER. Benutzen Sie das Gerät nicht in Räumen
mit sehr hoher Luftfeuchtigkeit oder in unmittelbarer
Nähe von Wasserbehältern! Lassen Sie das Gerät nicht
nass werden. Gefahr eines elektrischen Schlags! Die
Ventilationsönungen dürfen nicht verdeckt werden!
2.1. ELEKTRISCHE SICHERHEIT
a) Berühren Sie das Gerät nicht mit nassen oder
feuchten Händen.
b) ACHTUNG LEBENSGEFAHR! Tauchen und Halten Sie
das Gerät während des Reinigens oder des Betriebes
nie in Wasser oder andere Flüssigkeiten.
2.2. SICHERHEIT AM ARBEITSPLATZ
a) Halten Sie Ihren Arbeitsplatz sauber und
gut beleuchtet. Unordnung oder schlechte
Beleuchtung kann zu Unfällen führen. Handeln Sie
vorausschauend, beobachten Sie, was getan wird,
und nutzen Sie Ihren gesunden Menschenverstand
bei der Verwendung des Gerätes.
b) BenutzenSiedasGerätnichtinexplosionsgefährdeten
Bereichen, zum Beispiel in Gegenwart von
brennbaren Flüssigkeiten, Gasen oder Staub. Geräte
können unter Umständen Funken erzeugen, welche
Staub oder Dämpfe entzünden können.
c) Bei Zweifeln, ob das Produkt ordnungsgemäß
funktioniert, oder wenn Schäden festgestellt werden,
wenden Sie sich bitte an den Kundendienst des
Herstellers.
d) Das Produkt darf nur vom Hersteller repariert
werden. Reparieren Sie es nicht selbst!
e) Zum Löschen des Gerätes bei Brand oder Feuer, nur
Pulverfeuerlöscher oder Kohlendioxidlöscher (CO2)
verwenden.
f) Halten Sie Kinder und Unbefugte fern; Unachtsamkeit
kann zum Verlust der Kontrolle über das Gerät
führen.
g) Verwenden Sie das Gerät in einem gut belüfteten
Bereich.
Produktname Digitaler Batterie-Tester
Produktname SBS-BT-612
Modell III
Schutzklasse IP 40
Schutzart IP 210 x 120 x 73
Abmessungen [mm] 0,78
Gewicht [kg] Blei-Säure, 6 / 12 V
Typ der unterstützten
Batterien <80
Ladestrom-Testbereich [A] 40 – 200
Batteriekapazität Testbereich
[Ah] 19,99
Maximale Spannung für DC
Strom [V] 1,00 – 99,99
Interner
Batteriewiderstandstest (mΩ) 40 – 200 (Schritt je 5)
Unterstützter
Batteriekapazitätsbereich [Ah] Fü 12V Batterien
Unterstützte Batteriestandards
[A]
CCA 100 ~ 1700
IEC 100 ~ 1000
EN 100 ~ 1700
DIN 100 ~ 1000
Temperaturbereich [oC] -10 – +40
Testzeit / Intervall Ca. 10 s / Alle 5 min
1. ALLGEMEINE BESCHREIBUNG
Diese Anleitung ist als Hilfe bei der sicheren und
zuverlässigen Nutzung gedacht. Das Produkt wurde strikt
nach den technischen Vorgaben und unter Verwendung
modernster Technologien und Komponenten sowie unter
Wahrung der höchsten Qualitätsstandards entworfen und
angefertigt.
VOR INBETRIEBNAHME MUSS DIE ANLEITUNG
GENAU DURCHGELESEN
UND VERSTANDEN WERDEN.
Für einen langen und zuverlässigen Betrieb des Geräts muss
auf die richtige Handhabung und Wartung entsprechend
den in dieser Anleitung angeführten Vorgaben geachtet
werden. Die in dieser Anleitung angegebenen technischen
Daten und die Spezikation sind aktuell. Der Hersteller
behält sich das Recht vor, im Rahmen der Verbesserung der
Qualität Änderungen vorzunehmen.
ERLÄUTERUNG DER SYMBOLE
HINWEIS! In der vorliegenden Anleitung sind
Beispielbilder vorhanden, die von dem tatsächlichen
Aussehen der Maschine abweichen können.
Die originale Anweisung ist die deutschsprachige Fassung.
Sonstige Sprachfassungen sind Übersetzungen aus der
deutschen Sprache.
2. NUTZUNGSBEDINGUNGEN
ACHTUNG! Lesen Sie alle Sicherheitshinweise und
alle Anweisungen durch. Die Nichtbeachtung der
Warnungen und Anweisungen kann zu elektrischen
Schlägen, Feuer und/oder schweren Verletzungen
oder Tod führen.
DE
BEDIENUNGSANLEITUNG

4 5
Rev. 23.01.2020
Rev. 23.01.2020
2.3. PERSÖNLICHE SICHERHEIT
a) Es ist nicht gestattet, das Gerät im Zustand der
Ermüdung, Krankheit, unter Einuss von Alkohol,
Drogen oder Medikamenten zu betreiben, wenn das
die Fähigkeit das Gerät zu bedienen, einschränkt.
b) Das Gerät darf nur von körperlich geeigneten
Personen bedient werden, die zu ihrem Benutzen
fähig und entsprechend geschult sind und die
diese Bedienungsanleitung gelesen und verstanden
haben und im Rahmen der Sicherheit und des
Gesundheitsschutzes am Arbeitsplatz geschult
wurden.
c) Das Gerät ist kein Spielzeug. Kinder sollten in der
Nähe des Geräts unter Aufsicht stehen, um Unfälle
zu vermeiden.
2.4. SICHERE ANWENDUNG DES GERÄTS
a) Überhitzen Sie das Gerät nicht. Verwenden
Sie nur geeignete Werkzeuge für die jeweilige
Anwendung. Richtig ausgewählte Geräte und der
sorgsame Umgang mit ihnen führen zu besseren
Arbeitsergebnissen.
b) Trennen Sie das Gerät von der Stromversorgung,
bevor Sie mit der Einstellung, Reinigung und Wartung
beginnen. Eine solche vorbeugende Maßnahme
verringert das Risiko einer versehentlichen
Aktivierung des Geräts.
c) Nicht verwendete Werkzeuge sind außerhalb
der Reichweite von Kindern sowie von Personen
aufzubewahren, welche weder das Gerät noch die
Anleitung kennen. In den Händen unerfahrener
Personen können diese Geräte eine Gefahr
darstellen.
d) Halten Sie das Gerät stets in einem einwandfreien
Zustand. Prüfen Sie vor jeder Inbetriebnahme, ob
am Gerät und seinen beweglichen Teilen Schäden
vorliegen (defekte Komponenten oder andere
Faktoren, die den sicheren Betrieb der Maschine
beeinträchtigen könnten). Im Falle eines Schadens
muss das Gerät vor Gebrauch in Reparatur gegeben
werden.
e) Halten Sie das Gerät außerhalb der Reichweite von
Kindern.
f) Reparatur und Wartung von Geräten dürfen
nur von qualiziertem Fachpersonal und mit
Originalersatzteilen durchgeführt werden. Nur
so wird die Sicherheit während der Nutzung
gewährleistet.
g) Um die Funktionsfähigkeit des Gerätes zu
gewährleisten, dürfen die werksmäßig montierten
Abdeckungen oder Schrauben nicht entfernt
werden.
ACHTUNG!ObwohldasGerät inHinblickauf Sicherheit
entworfen wurde und über Schutzmechanismen
sowie zusätzlicher Sicherheitselemente verfügt,
besteht bei der Bedienung eine geringe Unfall-
oder Verletzungsgefahr. Es wird empfohlen, bei der
Nutzung Vorsicht und Vernunft walten zu lassen.
3. NUTZUNGSBEDINGUNGEN
Das Gerät ist bestimmt für:
• Prüfung des Zustands von 6/12 V Blei-Säure-Batterien;
• Prüfung des Zustands von Lichtmaschinen in Fahrzeugen.
Für alle Schäden bei nicht sachgemäßer Verwendung
haftet allein der Betreiber.
3.1. GERÄTEBESCHREIBUNG
Das Gerät ist mit einem Schutz gegen:
• schlechten Kontakt der Polklemmen,
• falsche Polarität
• zu hohe Spannung ausgestattet
h) Überprüfen Sie regelmäßig den Zustand der
Sicherheitsinformationsaufkleber. Falls die Aufkleber
unleserlich sind, sollten diese erneuert werden.
i) Bewahren Sie die Gebrauchsanleitung für den
weiteren Gebrauch auf. Sollte das Gerät an Dritte
weitergegeben werden, muss die Gebrauchsanleitung
mit ausgehändigt werden.
j) Verpackungselemente und kleine Montageteile
außerhalb der Reichweite von Kindern aufbewahren.
k) Halten Sie das Gerät von Kindern und Tieren fern.
l) Im Laufe der Nutzung dieses Werkzeugs
einschlieβlich anderer Werkzeuge soll man sich nach
übrigen Betriebsanweisungen richten.
1 5
4
2
3
1. Lüftungsgitter
2. Display
3. Bedienfeldtasten
• v ^ - Menünavigierung
• ESC - Beenden / Rückgängig machen
• ENTER - Bestätigen / Auswählen
4. Batteriestatusanzeigen:
• Grün (GOOD) - Batterie OK
• Gelb (WEAK) - schwache Batterie (wiederauadbar)
• Rot (BAD) - Batterie entladen
5. Klemmen für Batterieklemmen (rot +, schwarz -)
3.2. VORBEREITUNG ZUR VERWENDUNG
ARBEITSPLATZ DES GERÄTES:
Verwenden Sie das Gerät nicht bei Umgebungstemperaturen
über 40°C sein und einer relativen Luftfeuchtigkeit über 85
%. Stellen Sie das Gerät so auf, dass eine gute Luftzirkulation
gewährleistet ist. Halten Sie das Gerät von heißen Flächen
fern. Das Gerät sollte immer auf einer ebenen, stabilen,
sauberen, feuerfesten und trockenen Oberäche und
außerhalb der Reichweite von Kindern und Personen mit
eingeschränkten geistigen, sensorischen und psychischen
Fähigkeiten verwendet werden.
3.3. ARBEIT MIT DEM GERÄT
3.3.1 AN DIE STROMVERSORGUNG ANSCHLIESSEN
A. Den Motor abstellen und alle Zubehörteile
abklemmen. Schließen Sie die rote Klemme unter
dem Pluspol (+) der Batterie und die schwarze
Klemme unter dem Minuspol (-) an. Das Gerät wird
von einer Batterie gespeist. Das Menü erscheint auf
dem Bildschirm:
• „POWER BATTERY“ - Batterieladetest
• „STARTING BATTERY“ - Startstromtest der Batterie
• „CHARGE SYSTEM“ - Lichtmaschine-Zustandstest
B. Wählen Sie den Testmodus mit den Tasten [^] [v] und
bestätigen Sie mit [ENTER].
3.3.2 BATTERIELADETEST
A. Nachdem Sie das Gerät an den Akku angeschlossen
haben (siehe Punkt 3.3.1), wählen Sie mit den Tasten
[^] [v] den Punkt „POWER BATTERY“ und bestätigen
Sie mit [ENTER].
B. Das Fenster „SET VOLTAGE“ erscheint auf dem
Bildschirm. Verwenden Sie die Tasten [^] [v], um die
zu prüfende Batterie auszuwählen. Das Gerät zeigt
die aktuelle Batteriespannung an. ( „ACTUAL ...“)
C. Daraufhin wird das Fenster zum Einstellen der
Akkukapazität „SET BATTERY AH“ angezeigt.
Verwenden Sie die Tasten [^] [v], um den
entsprechenden Ah-Wert für die getestete Batterie
einzustellen.
D. Drücken Sie die [ENTER] -Taste und das Gerät
beginnt mit dem Testen des Akkus. Nach ca. 10
Sekunden wird das Testergebnis zusammen mit
der Statusbewertungskontrolle auf dem Bildschirm
angezeigt (siehe Punkt 3.1).
• „ACTUAL“ - Batteriespannung im Ruhezustand
• „LOAD“ - Batteriespannung unter Last (wählen Sie
diesen Punkt und halten Sie die [ENTER] -Taste
gedrückt, um die aktuelle Spannung unter Last zu
lesen)
• „RATED“ - Batteriekapazität
• „IR“ - interner Batteriewiderstand (Resistanz
aufgrund denierter Parameter und Test.
E. Indikative Angaben zur Batteriebewertung nach dem
Test:
• 12V
Gemessene
Spannung <12.00V <12.20V <12.40V ≥12.60V
Batterieleis-
tung <25% <50% <75% 100%
• 6V
Gemessene
Spannung <6.00V <6.10V <6.20V ≥6.30V
Batterieleis-
tung <25% <50% <75% 100%
• Interpretation des Batteriezustands anhand von drei
Farbindikatoren:
Kontrollleuchte Batteriestatu
Grün „GOOD” Der Akku ist leistungsfähig,
ausreichend ezient
Gelb „WEAK”
Wenn die Kontrollleuchte nicht
dunkel wird oder blinkt, ist der Akku
funktionstüchtig, aber die Leistung ist
niedrig - er muss aufgeladen werden
Czerwona „BAD”
Zusammen mit der roten
Kontrollleuchte ertönt ein Alarm, dass
der Akku zu schwach ist. In diesem
Fall sollten Sie die Überprüfung des
Ladevorgangs unter Last überspringen
und nur dann überprüfen, wenn
die Spannung schnell auf ≥ 12 V
zurückkehrt, was bedeutet, dass der
Akku nicht funktionstüchtig ist. Wenn
die Wiederherstellung langsam erfolgt,
sollte sie weiter getestet werden.
• ACHTUNG!
Wenn während des Tests die Batteriespannung unter Last
unter 11,80 V (für 12 V) oder 5,60 V (für 6 V) liegt, zeigt
das Gerät eine Meldung über eine zu niedrige Spannung
an (siehe Abbildung unten). Laden Sie den Akku vor dem
Testen auf.
HINWEIS! Kinder und Unbeteiligte müssen bei der
Arbeit mit diesem Gerät gesichert werden.
h) Lassen Sie dieses Gerät während des Betriebs nicht
unbeaufsichtigt.
i) Das Gerät muss regelmäßig gereinigt werden, damit
sich nicht dauerhaft Schmutz festsetzt.
j) Lufteinlass und Luftauslass dürfen nicht verdeckt
werden.
k) Das Gerät ist kein Spielzeug. Reinigung und Wartung
dürfen nicht von Kindern ohne Aufsicht durch eine
erwachsene Person durchgeführt werden..
l) Es ist untersagt, in den Aufbau des Geräts
einzugreifen, um seine Parameter oder Konstruktion
zu ändern.
m) Geräte von Feuer – und Wärmequellen fernhalten.
n) Überlasten Sie das Gerät nicht.
o) Vermeiden Sie den Kontakt von Metallgeräten mit den
Batteriepolen oder Klemmen des angeschlossenen
Gerätes - Risiko eines Kurzschlusses und einer
Beschädigung der Elektrik.
DE DE

6 7
Rev. 23.01.2020
Rev. 23.01.2020
3.3.3. BATTERIE UNTER LAST TESTEN
A. Schließen Sie das Gerät wie in Punkt 3.3.1 beschrieben
an den Akku an. Der Testauswahl-Menübildschirm
wird angezeigt, in dem der Batterietestpunkt unter
„STARTING BATT“ ausgewählt werden sollte.
B. Das Hauptmenü „MAIN MENU“ zum Testen unter
Last wird angezeigt. Verwenden Sie die Tasten [^] [v],
um den Einstellungspunkt „BATT CAPACITY“ für die
Akkukapazität auszuwählen.
C. Wählen Sie anhand des vom Hersteller angegebenen
Batteriestandards mit den Tasten [^] [v] den
Teststandard „SET RATING“. Überprüfen Sie für eine
Batterie mit Parametern gemäß dem japanischen
Standard (JIS) die Umrechnungstabelle nach dem
amerikanischen Standard CCA (SAE).
D. Verwenden Sie gemäß dem Batteriestandard die
Tasten [^] [v], um auch die Kapazität „SET CAPACITY“
einzustellen.
E. NachdemSiedieentsprechendenStandardparameter
für den Test eingestellt haben, drücken Sie [ENTER],
um den Test zu starten. Nach Abschluss des Tests
wird das Testergebnis wie folgt auf dem Bildschirm
angezeigt.
F. Interpretation des Lasttestergebnisses (Beispiel)
• Batteriespannung „VOLT“ 12,41 V
100% - 12,78 V
75% - 12.54 V
50% - 12.3 V
25% - 12.12 V
Entladen 11,94 V
• Interner „IR“ -Batteriewiderstand: 4,75 mΩ
• „SOH“ CCA - 588 CCA 100%
„GREAT“ - positives Ergebnis
Unter 45% muss die Batterie ausgetauscht werden.
Andere mögliche Beispiele:
„SUGGEST REPLACE“ – Ersatz der Batterie wird empfohlen
„GREAT NEED_CHG“ - Funktioniert, muss aber aufgrund
niedriger Spannung im Ruhezustand aufgeladen werden.
„CHARGE & RETEST“ - Die Batteriespannung ist zu niedrig,
so dass das Testergebnis möglicherweise gestört wird.
Laden Sie den Akku auf und wiederholen Sie den Test.
3.3.4. LADETEST BEIM ANLASSEN DES MOTORS
A. Schließen Sie das Gerät wie unter Punkt beschrieben
an 3.3.1 und mit den Tasten [^] [v] im Menü
„STARTING BATT“ und dann „START UPLOAD“
auswählen. Bestätigen Sie mit [ENTER], um den Test
zu starten.
B. Während des Tests werden die folgenden Parameter
auf dem Bildschirm angezeigt:
„CURR-VOL“ - statische Batteriespannung (im
Ruhezustand)
„INSTA-VOL“ - Spannung vor dem Start 12.30V; 9,6 V
niedrigste Spannung während des Startvorgangs.
C. Das Gerät speichert das Ergebnis beim Start
automatisch und zeigt es auf dem Bildschirm an. Die
Batteriespannung sollte während des Starts größer als
9,6 V sein. Überprüfen Sie andernfalls die Klemmen
(Anschluss, Korrosion), Kabel und Anschlüsse. Wenn
alles in Ordnung ist, ersetzen Sie die Batterie.
D. Mit „ESC“ kehren wir zum Punkt zurück 2 Hauptmenü
für Batterietests unter Last.
3.3.5. TESTEN UNTER VOLLLAST
A. Schließen Sie das Gerät bei laufendem Motor gemäß
der Polarität an die Batterieklemme an.
B. Drücken Sie im Hauptmenü „MAIN MENU“
zum Testen unter Last die Tasten [^] [v], um die
Testposition unter der maximalen Last „MAX WORK
LOAD“ auszuwählen.
C. Nach der Bestätigung mit [ENTER] erscheinen
folgende Informationen auf dem Bildschirm:
„Turnon loads and Speed up to 2000 To 2500
rpm,then Press <Enter>”- erhöhen Sie die
Motordrehzahl auf 2000, dann auf 2500 und drücken
Sie [ENTER]. Die folgenden Informationen werden
auf dem Bildschirm angezeigt (Beispielparameter):
Wenn die niedrigste Spannung höher als 12,8 V
ist, ist das Ladesystem in Ordnung. Liegt der Wert
unter diesem Wert, das Ladesystem überprüfen
(Riemenspannung, Lichtmaschine usw.)
D. Drücken Sie die [ESC] -Taste, um zum vorherigen
Menü zurückzukehren.
3.3.6. BATTERIELADETEST
A. Abhängig von der Art des Batterieladetests, des
Batterieladegeräts oder des Motorstarts
B. Schließen Sie das Gerät wie unter Punkt beschrieben
unter dem Akku an 3.3.1
C. Wenn das folgende Auswahlmenü auf dem
Bildschirm angezeigt wird (siehe Abbildung unten),
wählen Sie mit den Tasten [^] [v] die Option
„CHARGE SYSTEM“ und bestätigen Sie Ihre Auswahl
mit der Taste [ENTER].
E. Markieren und wählen Sie je nach Art der
Batterieversorgung die entsprechende Option und
bestätigen Sie mit [ENTER].
„ON-LINE“ - Laden von der Lichtmaschine
„OFF-LINE“ - Laden von einer externen Quelle,
beispielsweise einem Ladegerät
F. Wenn der Lichtmaschinenmodus („ONLINE“)
ausgewählt ist, wird die folgende Meldung auf dem
Bildschirm angezeigt:
„Start engine and Speed up to 2500 To 3500 rpm,then
Press <Enter>” - Starten Sie den Motor und erhöhen
Sie die Drehzahl auf 2500, dann auf 3500. Drücken
Sie dann die [ENTER] -Taste.
G. Man soll nach der oberen Meldung vorgehen und auf
dem Display wird die Meldung wie unten erscheinen
(Bespilsdaten):
Dies bedeutet, dass der maximale Ladestrom am Ausgang
13,88 V beträgt und das Maximum für die 12-V-Batterie 15
V (maximal 7,50 V für die 6-V-Batterie) und das gemessene
Maximum 14,1 V beträgt.
Die Mindestladung am Ausgang beträgt wiederum 13,88
V, wobei das zulässige Minimum 13,30 V (für 6-V-Batterien
das Standardminimum 6,60 V) und das gemessene
Minimum 13,58 V beträgt.
ACHTUNG!
• Wenn die gemessene Maximalspannung 15,0
V überschreitet (7,50 V für 6-V-System), den
Spannungsregler prüfen.
• Wenn die gemessene Mindestspannung unter 13,3 V
liegt (6,60 V für ein 6-V-System), überprüfen Sie die
elektrischen Anschlüsse, Drähte und den Motor.
DEDE
„The battery voltage is low, please recharge test” - führen
Sie den Belastungstest unter Last durch.
• ACHTUNG!
Während des Belastungstests können die
Gerätekomponenten heiß werden. Wenn die Temperatur
des Geräts den dafür zu hohen Wert überschreitet,
wechselt es möglicherweise in den Schutzmodus. Wenn
diese Temperatur nicht sinkt und der Benutzer das Gerät
weiterhin verwendet, wird die Überhitzungswarnung
aktiviert (Abbildung unten). Verwenden Sie das Gerät
nicht weiter und lassen Sie es auf die normale Temperatur
abkühlen. Die Umgebungstemperatur beeinusst auch den
Betrieb und die Temperatur des Geräts.
D. Nachdem die Meldung „SET VOLTAGE“ auf
dem Bildschirm angezeigt wird, wählen Sie die
Nennspannung für das System aus - 6 oder 12 V

8 9
Rev. 23.01.2020
Rev. 23.01.2020
ATTENTION! Electric shock warning!
Wear protective goggles.
Wear protective gloves.
ATTENTION! Fire hazard - ammable materials!
ATTENTION! Hot surface, risk of burns!
Only use indoors.
3.4. REINIGUNG UND WARTUNG
a) Vor jeder Reinigung und Einstellung, dem Austausch
von Zubehör oder wenn das Gerät nicht benutzt
wird, muss der Netzstecker gezogen werden und das
Gerät vollständig abkühlen.
b) Bewahren Sie das Gerät an einem trockenen, kühlen,
vor Feuchtigkeit und direkter Sonneneinstrahlung
geschütztem Ort auf.
c) Es ist verboten, das Gerät mit einem Wasserstrahl zu
besprühen oder in Wasser zu tauchen.
d) Es darf kein Wasser über die Belüftungsönungen
am Gehäuse ins Innere des Geräts gelangen.
e) Die Belüftungsönungen sind mit Pinsel und
Druckluft zu reinigen.
f) In Hinblick auf technische Ezienz und zur
Vorbeugung vor Schäden sollte das Gerät regelmäßig
überprüft werden.
g) Benutzen Sie einen weichen Lappen zur Reinigung.
ENTSORGUNG GEBRAUCHTER GERÄTE
Dieses Produkt darf nicht über den normalen Hausmüll
entsorgt werden. Geben Sie das Gerät bei entsprechenden
Sammel- und Recyclinghöfen für Elektro- und
Elektronikgeräte ab. Überprüfen Sie das Symbol auf dem
Produkt, der Bedienungsanleitung und der Verpackung.
Die bei der Konstruktion des Gerätes verwendeten
Kunststoe können entsprechend ihrer Kennzeichnung
recycelt werden. Mit der Entscheidung für das Recycling
leisten Sie einen wesentlichen Beitrag zum Schutz unserer
Umwelt. Wenden Sie sich an die örtlichen Behörden,
um Informationen über Ihre lokale Recyclinganlagen zu
erhalten.
TECHNICAL DATA
The terms „device“ or „product“ are used in the warnings
and instructions to refer to DIGITAL BATTERY TESTER. Do
not use in very humid environments or in the direct vicinity
of water tanks. Prevent the device from getting wet. Risk of
electric shock! Do not cover the ventilation openings!
2.1. ELECTRICAL SAFETY
a) Do not touch the device with wet or damp hands.
b) ATTENTION! DANGER TO LIFE! While cleaning, never
immerse the device in water or other liquids.
2.2. SAFETY IN THE WORKPLACE
a) Make sure the workplace is clean and well lit. A messy
or poorly lit workplace may lead to accidents. Try
to think ahead, observe what is going on and use
common sense when working with the device.
b) Do not use the device in a potentially explosive
environment, for example in the presence of
ammable liquids, gases or dust. The device
generates sparks which may ignite dust or fumes.
c) If you are unsure about whether the product is
operating correctly or if you nd damage, please
contact the manufacturer’s service centre.
d) Only the manufacturer’s service centre may make
repairs to the product. Do not attempt to make
repairs yourself!
e) In case of re, use a powder or carbon dioxide
(CO2) re extinguisher (one intended for use on live
electrical devices) to put it out.
f) Children or unauthorised persons are forbidden to
enter a work station. (A distraction may result in loss
of control over the device).
g) Use the device in a well-ventilated space.
h) Regularly inspect the condition of the safety labels. If
the labels are illegible, they must be replaced.
i) Please keep this manual available for future
reference. If this device is passed on to a third party,
the manual must be passed on with it.
j) Keep packaging elements and small assembly parts
in a place not available to children.
k) Keep the device away from children and animals.
l) If this device is used together with another
equipment, the remaining instructions for use shall
also be followed.
The product satises the relevant safety
standards.
Read instructions before use.
The product must be recycled.
WARNING! or CAUTION! or REMEMBER!
Applicable to the given situation (general
warning sign).
Product name Digital Battery Tester
Model SBS-BT-612
Protection class III
Protection rating IP IP 40
Dimensions [mm] 210 x 120 x 73
Weight [kg] 0,78
Type of supported batteries lead-acid, 6 / 12 V
Charging current test range
[A] <80
Battery capacity test range
[Ah] 40 – 200
Maximum DC voltage [V] 19,99
Internal battery resistance
test (mΩ) 1,00 – 99,99
Supported battery capacity
range [Ah] 40 – 200 (steps of 5)
Cranging test for 12V batteries
Battery standards supported
[A]
CCA 100 ~ 1700
IEC 100 ~ 1000
EN 100 ~ 1700
DIN 100 ~ 1000
Operating temperature range
[°C] -10 – +40
Test time / interval approx. 10 s every
5 min
LEGEND
1. GENERAL DESCRIPTION
The user manual is designed to assist in the safe and
trouble-free use of the device. The product is designed
and manufactured in accordance with strict technical
guidelines, using state-of-the-art technologies and
components. Additionally, it is produced in compliance
with the most stringent quality standards.
DO NOT USE THE DEVICE UNLESS YOU HAVE
THOROUGHLY READ AND UNDERSTOOD THIS
USER MANUAL.
To increase the product life of the device and to ensure
trouble-free operation, use it in accordance with this user
manual and regularly perform maintenance tasks. The
technical data and specications in this user manual are
up to date. The manufacturer reserves the right to make
changes associated with quality improvement.
PLEASE NOTE! Drawings in this manual are for
illustration purposes only and in some details may
dier from the actual machine.
The original operation manual is in German. Other
language versions are translations from German.
2. USAGE SAFETY
ATTENTION! Read all safety warnings and all
instructions. Failure to follow the warnings and
instructions may result in an electric shock, re and/
or serious injury or even death.
ENDE
USER MANUAL

10 11
Rev. 23.01.2020
Rev. 23.01.2020
• POWER BATTERY - battery charge test
• STARTING BATTERY - battery starting current test
• CHARGE SYSTEM - alternator status test
B. Select the test mode with the [^] [v] buttons and
conrm with [ENTER].
C. Then the SET BATTERY AH capacity setting window
will appear. Use the [^] [v] buttons to set the
appropriate Ah value for the tested battery.
D. Press the [ENTER] button and the device will start
testing the battery. After approx. 10 seconds, the
test result will appear on the screen along with the
battery condition assessment (see section 3.1).
• ACTUAL - battery voltage at rest
• LOAD - battery voltage under load (select this item
and hold the ENTER button to read the current
voltage under load)
• RATED - battery capacity
• IR - internal battery resistance resulting from the
dened parameters and the test.
E. Indicative characteristics for battery evaluation after
the test:
• 12V
Measured
voltage <12.00V <12.20V <12.40V ≥12.60V
Battery
performance <25% <50% <75% 100%
• 6V
Measured
voltage <6.00V <6.10V <6.20V ≥6.30V
Battery
performance <25% <50% <75% 100%
• Interpretation of battery status based on three colour
indicators:
Indicator Battery status
Green: GOOD The battery is in good working
condition, suciently ecient.
Yellow: WEAK
If the indicator does not dim or blink,
the battery is OK, but its performance
is low and it needs recharging.
• IMPORTANT!
If during the test the battery voltage under load is lower
than 11.80 V (for 12 V) or 5.60 V (for 6V) the device will
display a message about the voltage being too low (see the
picture below). Charge the battery before testing.
“The battery voltage is low, please recharge test.”
• IMPORTANT!
During the load test, the device components can become
hot. If the temperature of the device exceeds the level that
is too high for it, it may go into protection mode. If the
temperature does not drop and the user continues to use the
device, the overheating warning will be activated (see picture
below). If this happens stop using the device and allow it to
cool to normal temperature. The ambient temperature also
aects the operation and temperature of the device.
b) The device can be handled only by physically t
persons who are capable of handling it, properly
trained, familiar with this manual and trained within
the scope of occupational health and safety.
c) The device is not a toy. Children must be supervised
to ensure that they do not play with the device.
2.4. SAFE DEVICE USE
a) Do not overload the device. Use the appropriate
tools for the given task. A correctly-selected device
will perform the task for which it was designed better
and in a safer manner.
b) Disconnect the device from the power supply
before commencement of adjustment, cleaning and
maintenance. Such a preventive measure reduces
the risk of accidental activation.
c) When not in use, store in a safe place, away from
children and people not familiar with the device who
have not read the user manual. The device may pose
a hazard in the hands of inexperienced users.
d) Keep the device in perfect technical condition.
Before each use check for general damage and
especially check for cracked parts or elements and
for any other conditions which may impact the safe
operation of the device. If damage is discovered,
hand over the device for repair before use.
e) Keep the device out of the reach of children.
f) Device repair or maintenance should be carried out
by qualied persons, only using original spare parts.
This will ensure safe use.
g) To ensure the operational integrity of the device, do
not remove factory-tted guards and do not loosen
any screws.
h) Do not leave this appliance unattended while it is in use.
i) Clean the device regularly to prevent stubborn grime
from accumulating.
j) Do not cover the air intake and outlet.
k) The device is not a toy. Cleaning and maintenance
may not be carried out by children without
supervision by an adult person.
l) It is forbidden to interfere with the structure of
the device in order to change its parameters or
construction.
m) Keep the device away from sources of re and heat.
n) Do not overload the device.
o) Do not allow metal objects to come into contact with
the battery poles or clamps of the device connected
to the battery—risk of short circuit and damage to
the electrical system.
3. USE GUIDELINES
The device is intended for:
• testing the status of 6/12 V lead-acid batteries;
• testing the status of alternators in vehicles.
The user is liable for any damage resulting from
unintended use of the device.
1 5
4
2
3
1. Ventilation grille
2. Display
3. Control panel
• v ^ - menu navigation
• ESC - exit / back
• ENTER - conrm / select
4. Battery status indicators:
• green (GOOD) - battery OK
• yellow (WEAK) - weak battery (must be charged)
• Red (BAD) - battery discharged
5. Terminals for battery poles / clamps (red +, black -)
3.2. PREPARING FOR USE
APPLIANCE LOCATION
The temperature of environment must not be higher than
40°C and the relative humidity should be less than 85%.
Ensure good ventilation in the room in which the device is
being used. Keep the device away from any hot surfaces.
The device should always be used when positioned on an
even, stable, clean, reproof and dry surface, and be out of
the reach of children and persons with limited mental and
sensory functions
3.3. DEVICE USE
3.3.1 CONNECTING TO POWER SUPPLY
A. Turn o the engine, disconnect all accessories.
Connect the red clamp to the positive (+) pole of the
battery, connect the black clamp to the negative (-)
pole. The device will be powered by the battery. The
menu will appear on the screen:
ATTENTION! Despite the safe design of the device and
its protective features, and despite the use of additional
elements protecting the operator, there is still a slight
risk of accident or injury when using the device. Stay
alert and use common sense when using the device.
3.3.2. BATTERY CHARGE TEST
A. After connecting the device to the battery (see 3.3.1),
use the [^] [v] buttons to select the POWER BATTERY
item and conrm with [ENTER].
B. The SET VOLTAGE window will appear on the screen.
Use the [^] [v] buttons to select the voltage proper
for the battery to be tested. The device will show the
current battery voltage. (ACTUAL ...).
Red: BAD
Along with the red indicator light, an
alarm will sound which means that the
battery is too weak. In this case, give
up checking the charging under load
and check only if the voltage quickly
returns to ≥ 12V which means that the
battery is out of order. If such return
occurs slowly, the battery requires
further testing.
3.3.3. TESTING THE BATTERY UNDER LOAD
A. Connect the device to the battery as described in
3.3.1. The test selection menu will be displayed.
Select STARTING BATT. which is battery test under
load.
B. The MAIN MENU window for testing under load will
appear. Use the [^] [v] buttons to select the „BATT
CAPACITY“ setting.
C. Based on the battery standard provided by the
manufacturer, use the [^] [v] buttons to select the
SET RATING testing standard. For a battery with
Japanese standard parameters (JIS), check the table
for conversion from the American standard CCA
(SAE).
ENEN
REMEMBER! When using the device, protect children
and other bystanders.
2.3. PERSONAL SAFETY
a) Do not use the device when tired, ill or under the
inuence of alcohol, narcotics or medication which can
signicantly impair the ability to operate the device.
3.1. DEVICE DESCRIPTION
The device is protected against:
• poor contact of pole terminals,
• swapping the poles,
• too high voltage.

12 13
Rev. 23.01.2020
Rev. 23.01.2020
C. After conrmation with [ENTER], the following
information will appear on the screen:
„Turn on loads and speed up to 2000 to 2500 rpm,
then press <Enter>”. The following information will
appear on the screen (sample parameters):
If the lowest voltage is higher than 12.8 V, the
charging system is OK. If below this value, check the
charging system (belt tension, alternator, etc.)
D. Press the ESC button to exit to the previous menu.
3.3.6. BATTERY CHARGING TEST
A. Depending on the type of the battery charging test,
connect a battery charger to the battery or start the
engine.
D. After the “SET VOLTAGE” message appears on the
screen, select the nominal voltage for the system, 6
or 12 V.
E. Depending on the type of battery power supply,
mark and select the appropriate option and conrm
with [ENTER].
“ON-LINE” - charging from the alternator
OFF-LINE” - charging from an external source, e.g.
a charger.
F. If the alternator mode (ON-LINE) is selected, the
following message will appear on the screen:
„Start engine and speed up to 2500 to 3500 rpm,
then press <Enter>” -
G. Follow the above instruction and the following
message will appear on the screen (sample data)
This means that the maximum charging current at the
output is 13.88 V while the maximum for 12V batteries is
15 V (the maximum for 6 V batteries is 7. 50 V) and the
measured maximum is 14.1 V.
In turn, the minimum charge at the output is 13.88 V while
the permissible minimum is 13.30 (the standard minimum
for 6 V batteries is 6.60 V) and the measured minimum is
13.58 V.
D. According to the battery standard, use the [^] [v]
buttons to set its capacity [SET CAPACITY].
E. After setting the appropriate standard parameters
for testing, press [ENTER] to start the test. After
completion, the test result will be displayed on the
screen as seen below.
F. Interpretation of the load test result (example)
• “ VOLT” battery voltage 12.41 V
100% - 12,78 V
75% - 12.54 V
50% - 12.3 V
25% - 12.12 V
Discharged 11.94 V
• Internal battery resistance „IR“: 4.75 mΩ
• „SOH“ CCA - 588 CCA 100%
„GREAT“ - positive result
Below 45% the battery must be replaced.
Other examples:
“SUGGEST REPLACE” – replacement of battery is suggested
B. The following parameters will appear on the screen
during the test:
“CURR-VOL” - static battery voltage (at rest)
“INSTA-VOL” - voltage before start 12.30V; lowest
voltage during start-up 9.6V.
C. The device automatically saves the result during
start-up and shows it on the screen. The battery
voltage during start-up should be greater than 9.6 V.
Otherwise, check the terminals (contact, corrosion),
cables and connections. If those are OK, replace the
battery.
D. By pressing [ESC] you can exit to item 2 of the main
menu for battery testing under load.
3.3.5 BATTERY CHARGING TEST AT FULL LOAD
A. With the engine running, connect the device to the
battery clamps according to polarity.
B. In the “MAIN MENU” for testing under load, press the
[^] [v] buttons to select the “MAX WORK LOAD” for
testing under the maximum load.
“GREAT NEED_CHG” - the battery is functional but needs
recharging due to low voltage at rest.
“CHARGE & RETEST” - the battery voltage is so low it can
disturb the test result. Recharge the battery and retest.
3.3.4 CHARGING TEST DURING ENGINE START-UP
A. Connect the device as described in 3.3.1. Use the [^]
[v] buttons to select STARTING BATT in the menu,
then select START UPLOAD. Press ENTER to conrm
in order to start the test.
B. Connect the device to the battery as described in
3.3.1.
C. After the following menu appears on the screen
(see below), use the [^] [v] buttons to choose the
CHARGE SYSTEM item and conrm your choice with
the [ENTER] button.
WARNING!
• If the measured maximum voltage exceeds 15.0 V
(7.50 V for 6V systems), check the voltage regulator.
• If the measured minimum voltage is below 13.3
V (6.60 V for 6 V systems), check the electrical
connections, wires and engine.
3.4. CLEANING AND MAINTENANCE
a) Unplug the mains plug and allow the device to cool
completely before each cleaning, adjustment or
replacement of accessories, or if the device is not
being used.
b) Store the unit in a dry, cool place, free from moisture
and direct exposure to sunlight.
c) Do not spray the device with a water jet or submerge
it in water.
d) Do not allow water to get inside the device through
vents in the housing of the device.
e) Clean the vents with a brush and compressed air.
f) The device must be regularly inspected to check its
technical eciency and spot any damage.
g) Use a soft cloth for cleaning.
DISPOSING OF USED DEVICES
Do not dispose of this device in municipal waste systems.
Hand it over to an electric and electrical device recycling
and collection point. Check the symbol on the product,
instruction manual and packaging. The plastics used
to construct the device can be recycled in accordance
with their markings. By choosing to recycle you are
making a signicant contribution to the protection of our
environment. Contact local authorities for information on
your local recycling facility. ENEN

14 15
Rev. 23.01.2020
Rev. 23.01.2020
UWAGA! Ostrzeżenie przed porażeniem prądem
elektrycznym!
Założyć okulary ochronne.
Stosować rękawice ochronne.
UWAGA! Niebezpieczeństwo pożaru - materiały
łatwopalne!
Uwaga! Gorąca powierzchnia może
spowodować oparzenia!
Do użytku tylko wewnątrz pomieszczeń.
DANE TECHNICZNE
INSTRUKCJA OBSŁUGI
1. OGÓLNY OPIS
Instrukcja przeznaczona jest do pomocy w bezpiecznym
i niezawodnym użytkowaniu. Produkt jest zaprojektowany
i wykonany ściśle według wskazań technicznych przy
użyciu najnowszych technologii i komponentów oraz przy
zachowaniu najwyższych standardów jakości.
PRZED PRZYSTĄPIENIEM DO PRACY NALEŻY
DOKŁADNIE PRZECZYTAĆ I ZROZUMIEĆ NINIEJSZĄ
INSTRUKCJĘ.
Dla zapewnienia długiej i niezawodnej pracy urządzenia
należy dbać o jego prawidłową obsługę oraz konserwację
zgodnie ze wskazówkami zawartymi w tej instrukcji. Dane
techniczne i specykacje zawarte w tej instrukcji obsługi są
aktualne. Producent zastrzega sobie prawo dokonywania
zmian związanych z podwyższeniem jakości.
OBJAŚNIENIE SYMBOLI
UWAGA! Przeczytaj wszystkie ostrzeżenia
dotyczące bezpieczeństwa oraz wszystkie instrukcje.
Niezastosowanie się do ostrzeżeń i instrukcji może
spowodować porażenie prądem, pożar i/lub ciężkie
obrażenia ciała lub śmierć.
Termin „urządzenie” lub „produkt” w ostrzeżeniach i w opisie
instrukcji odnosi się do TESTER AKUMULATORÓW. Nie
należy używać urządzenia w pomieszczeniach o bardzo
dużej wilgotności / w bezpośrednim pobliżu zbiorników
z wodą! Nie wolno dopuszczać do zamoczenia urządzenia.
Ryzyko porażenia prądem! Nie wolno zasłaniać otworów
wentylacyjnych urządzenia!
2.1. BEZPIECZEŃSTWO ELEKTRYCZNE
a) Nie wolno dotykać urządzenia mokrymi lub
wilgotnymi rękoma.
b) UWAGA – ZAGROŻENIE ŻYCIA! Podczas czyszczenia
lub użytkowania urządzenia nigdy nie wolno
zanurzać go w wodzie lub innych cieczach.
2.2. BEZPIECZEŃSTWO W MIEJSCU PRACY
a) Utrzymywać porządek w miejscu pracy i dobre
oświetlenie. Nieporządek lub złe oświetlenie może
prowadzić do wypadków. Należy być przewidującym,
obserwować co się robi i zachowywać rozsądek
podczas używania urządzenia.
b) Nie używać urządzenia w stree zagrożenia
wybuchem, na przykład w obecności łatwopalnych
cieczy, gazów lub pyłów. Urządzenie wytwarzają
iskry, mogące zapalić pył lub opary.
c) W razie wątpliwości czy produkt działa poprawnie
lub stwierdzenia uszkodzenia należy skontaktować
się z serwisem producenta.
d) Naprawę produktu może wykonać wyłącznie
serwis producenta. Nie wolno dokonywać napraw
samodzielnie!
e) W przypadku zaprószenia ognia lub pożaru, do
gaszenia urządzenia pod napięciem należy używać
wyłącznie gaśnic proszkowych lub śniegowych (CO2).
f) Na stanowisku pracy nie mogą przebywać dzieci
ani osoby nieupoważnione. (Nieuwaga może
spowodować utratę kontroli nad urządzeniem.)
g) Urządzenie używać w dobrze wentylowanej
przestrzeni.
h) Należy regularnie sprawdzać stan naklejek
z informacjami dotyczącymi bezpieczeństwa.
2. BEZPIECZEŃSTWO UŻYTKOWANIA
Produkt spełnia wymagania odpowiednich norm
bezpieczeństwa.
Przed użyciem należy zapoznać się z instrukcją
Produkt podlegający recyklingowi.
UWAGA! lub OSTRZEŻENIE! lub PAMIĘTAJ!
opisująca daną sytuacje (ogólny znak
ostrzegawczy).
Instrukcją oryginalną jest niemiecka wersja instrukcji.
Pozostałe wersje językowe są tłumaczeniami z języka
niemieckiego.
UWAGA! Ilustracje w niniejszej instrukcji obsługi
mają charakter poglądowy i w niektórych szczegółach
mogą różnić się od rzeczywistego wyglądu produktu.
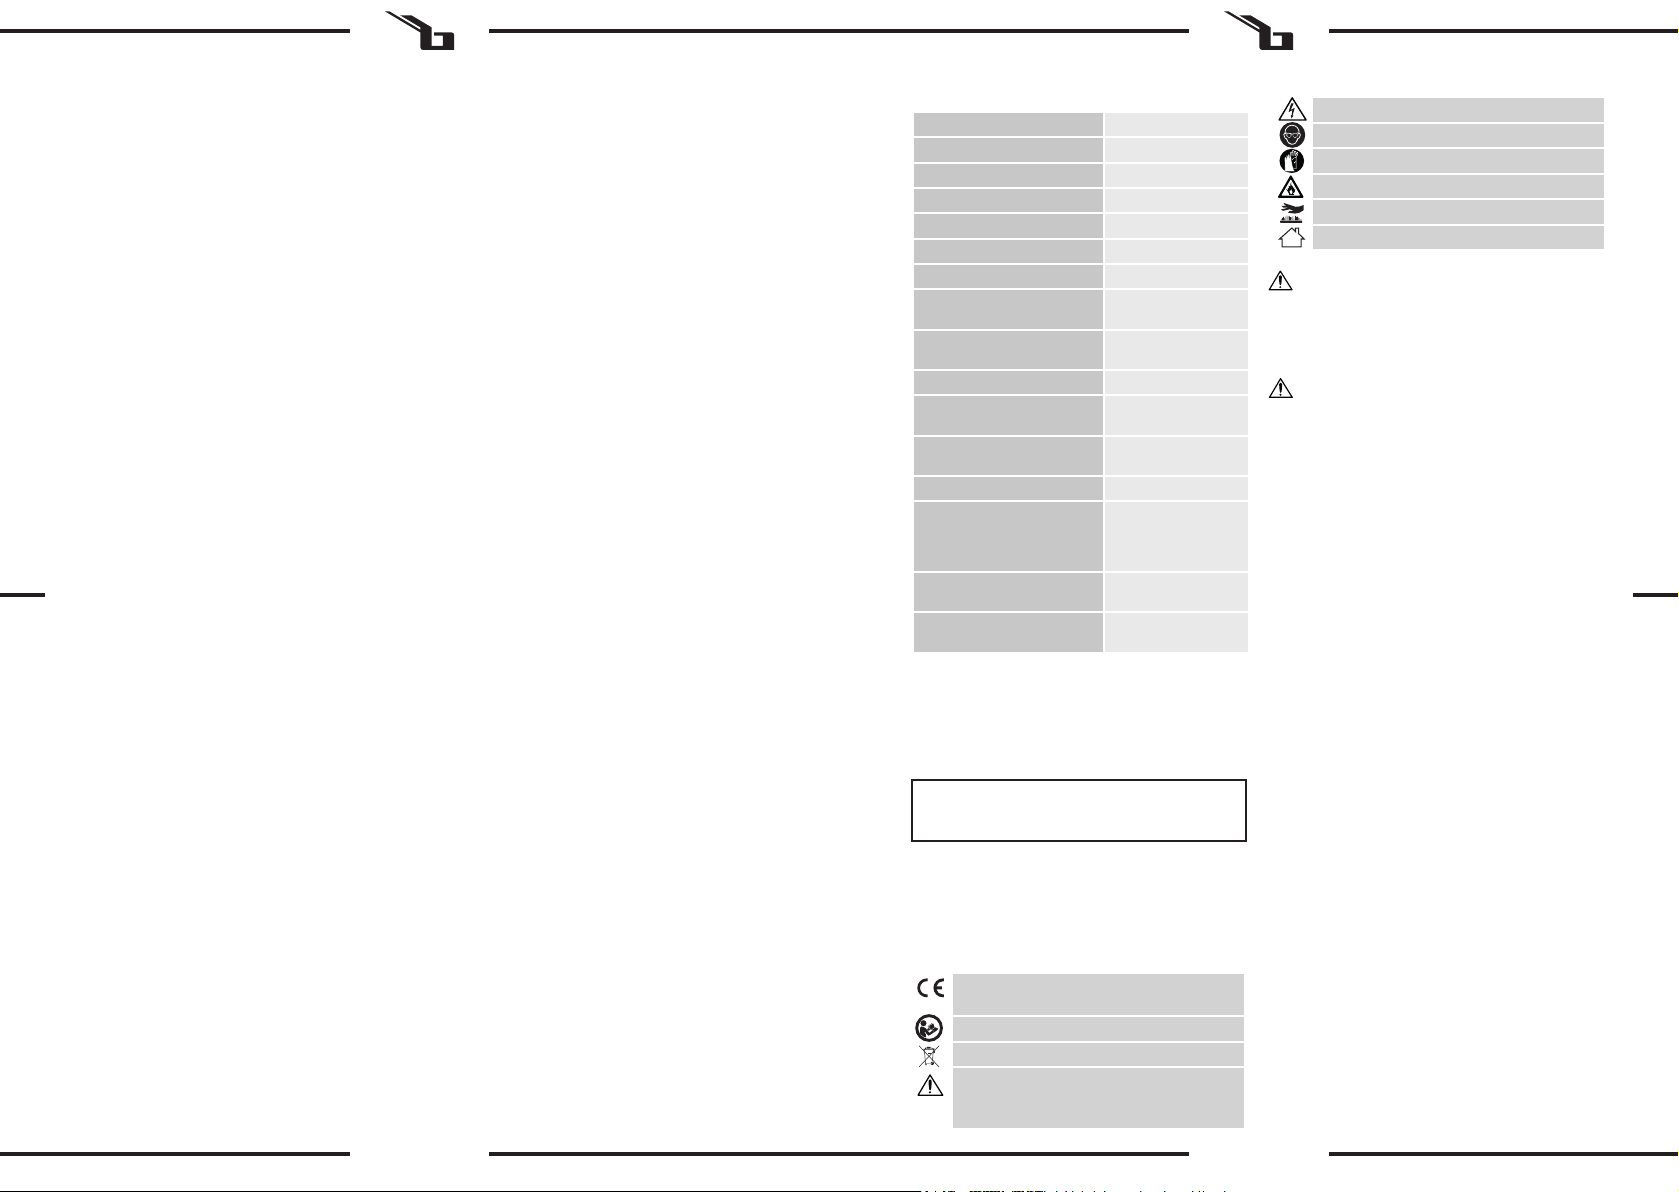
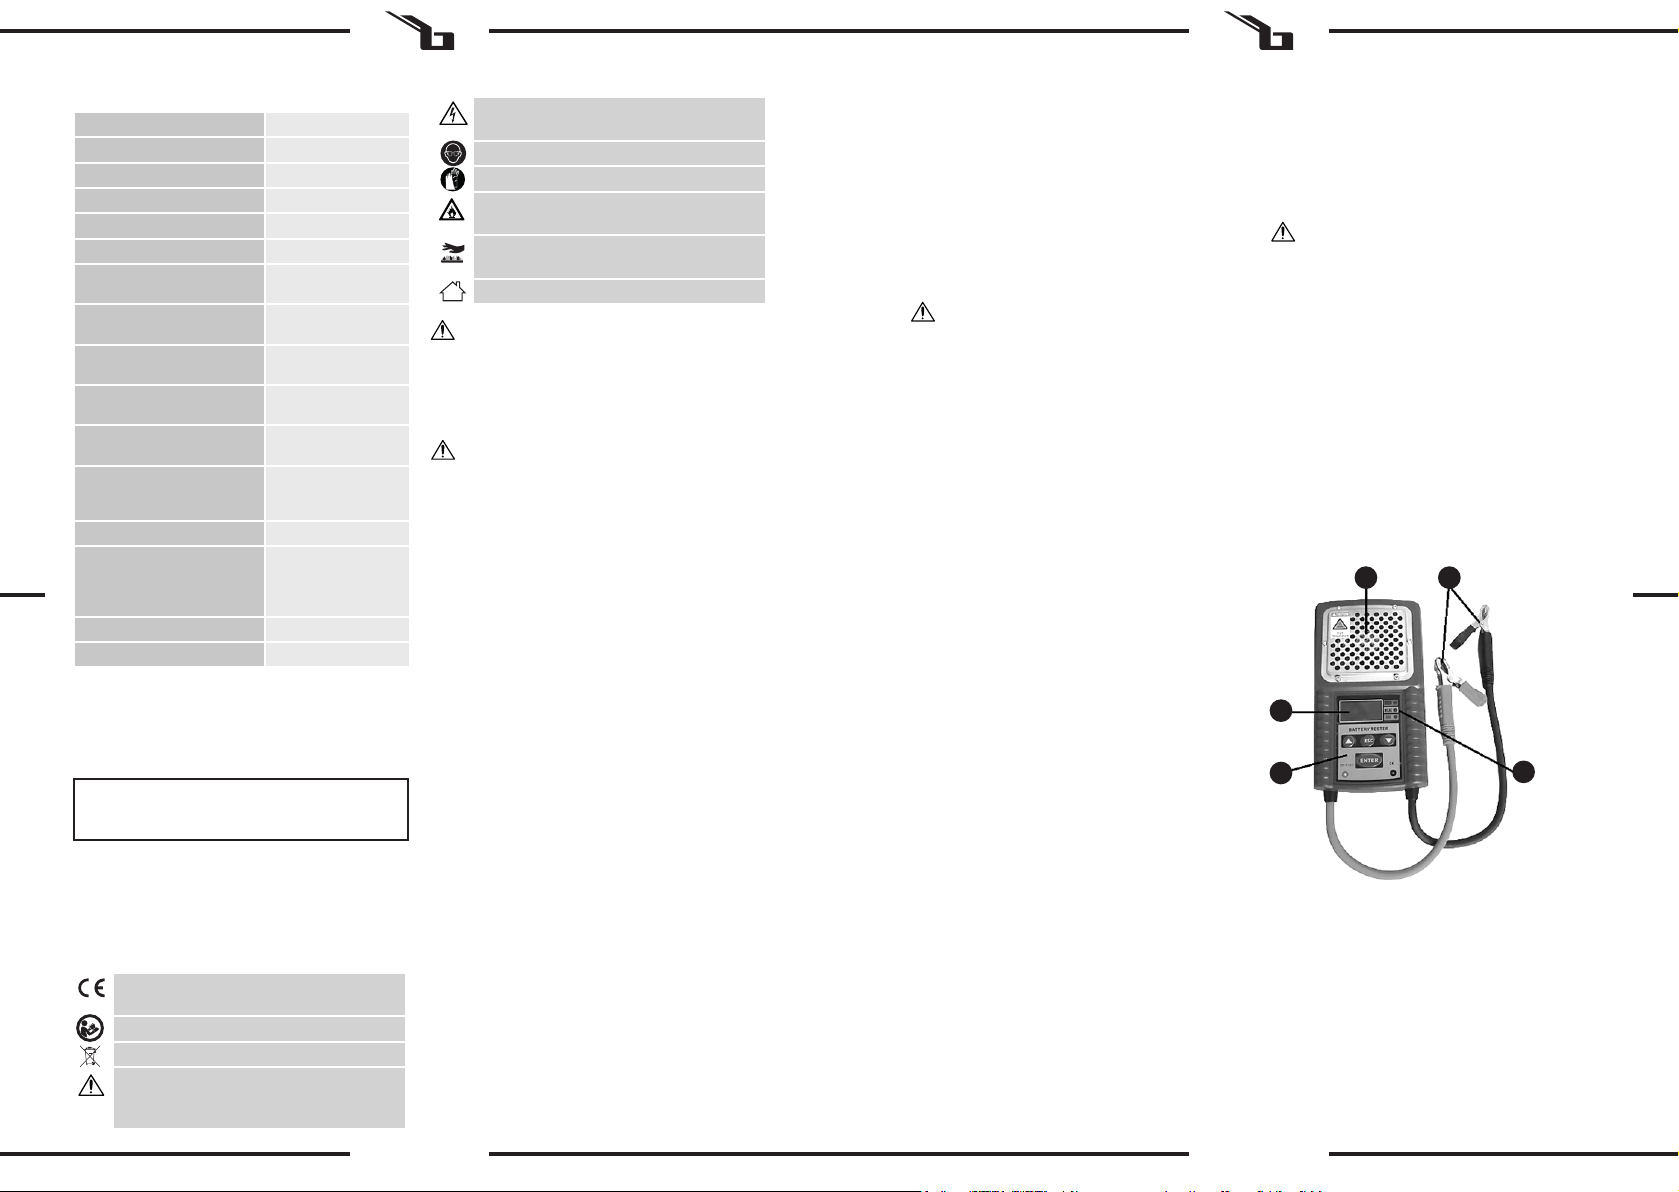
Nazwa produktu Tester Akumulatorów
Model SBS-BT-612
Klasa ochronności III
Klasa ochrony IP IP 40
Wymiary [mm] 210 x 120 x 73
Ciężar [kg] 0,78
Typ obsługiwanych
akumulatorów Ołowiowo-kwasowe,
6/12 V
Zakres testu prądu ładowania
[A] <80
Zakres testu pojemności
akumulatora [Ah] 40 – 200
Maksymalna wartośc napięcia
dla prądu stałego [V] 19,99
Test wewnętrznego oporu
akumulatora (mΩ) 1,00 – 99,99
Zakres pojemności
obsługiwanego akumulatora
[Ah] 40 – 200 (skok co 5)
Test rozruchowy Dla akumulatorów 12V
Obsługiwane standardy
zakresu akumulatorów [A]
CCA 100 ~ 1700
IEC 100 ~ 1000
EN 100 ~ 1700
DIN 100 ~ 1000
Zakres temperatury pracy [°C] -10 – +40
Czas/interwał testu Ok. 10 s / co 5 min.
PAMIĘTAJ! Należy chronić dzieci i inne osoby
postronne podczas pracy urządzeniem.
2.3. BEZPIECZEŃSTWO OSOBISTE
a) Niedozwolone jest obsługiwanie urządzenia w stanie
zmęczenia, choroby, pod wpływem alkoholu,
narkotyków lub leków, które ograniczają w istotnym
stopniu zdolności obsługi urządzenia.
b) Urządzenie mogą obsługiwać osoby sprawne
zycznie, zdolne do jego obsługi i odpowiednio
wyszkolone, które zapoznały się z niniejszą instrukcją
oraz zostały przeszkolone w zakresie bezpieczeństwa
i higieny pracy.
c) Urządzenie nie jest zabawką. Dzieci powinny być
pilnowane, aby nie bawiły się urządzeniem.
2.4. BEZPIECZNE STOSOWANIE URZĄDZENIA
a) Nie należy przeciążać urządzenia. Używać narzędzi
odpowiednich do danego zastosowania. Prawidłowo
dobrane urządzenie wykona lepiej i bezpieczniej
pracę dla którego zostało zaprojektowane.
b) Przed przystąpieniem do regulacji, czyszczenia
i konserwacji urządzenie należy odłączyć od
zasilania. Taki środek zapobiegawczy zmniejsza
ryzyko przypadkowego uruchomienia.
c) Nieużywane urządzenia należy przechowywać
w miejscu niedostępnym dla dzieci oraz osób
nieznających urządzenia lub tej instrukcji
obsługi. Urządzenia są niebezpieczne w rękach
niedoświadczonych użytkowników.
d) Utrzymywać urządzenie w dobrym stanie
technicznym. Sprawdzać przed każdą pracą czy
nie posiada uszkodzeń ogólnych lub związanych
z elementami ruchomymi (pęknięcia części
i elementów lub wszelkie inne warunki, które mogą
mieć wpływ na bezpieczne działanie urządzenia).
W przypadku uszkodzenia, oddać urządzenie do
naprawy przed użyciem.
e) Urządzenie należy chronić przed dziećmi.
f) Naprawa oraz konserwacja urządzeń powinna być
wykonywana przez wykwalikowane osoby przy
użyciu wyłącznie oryginalnych części zamiennych.
Zapewni to bezpieczeństwo użytkowania.
g) Aby zapewnić zaprojektowaną integralność
operacyjną urządzenia, nie należy usuwać
zainstalowanych fabrycznie osłon lub odkręcać śrub.
h) Nie należy pozostawiać włączonego urządzenia bez
nadzoru.
i) Należy regularnie czyścić urządzenie, aby nie
dopuścić do trwałego osadzenia się zanieczyszczeń.
j) Nie wolno zasłaniać wlotu i wylotu powietrza.
k) Urządzenie nie jest zabawką. Czyszczenie
i konserwacja nie mogą być wykonywane przez
dzieci bez nadzoru osoby dorosłej.
PAMIĘTAJ! Pomimo iż urządzenie zostało
zaprojektowane tak aby było bezpieczne, posiadało
odpowiednie środki ochrony oraz pomimo użycia
dodatkowych elementów zabezpieczających
użytkownika, nadal istnieje niewielkie ryzyko wypadku
lub odniesienia obrażeń w trakcie pracy z urządzeniem.
Zaleca się zachowanie ostrożności i rozsądku podczas
jego użytkowania.
3. ZASADY UŻYTKOWANIA
Urządzenie przeznaczone jest do:
• testowania stanu akumulatorów ołowiowo-
kwasowych 6/12 V;
• testowania stanu alternatorów w pojazdach.
Odpowiedzialność za wszelkie szkody powstałe w wyniku
użytkowania niezgodnego z przeznaczeniem ponosi
użytkownik.
3.1. OPIS URZĄDZENIA
Urządzenie wyposażenie jest w zabezpieczenie przed:
• słabym kontaktem zacisków biegunowych,
• pomyleniem biegunów,
• zbyt wysokim napięciem.
W przypadku gdy, naklejki są nieczytelne należy je
wymienić.
i) Zachować instrukcję użytkowania w celu jej
późniejszego użycia. W razie, gdyby urządzenie miało
zostać przekazane osobom trzecim, to wraz z nim
należy przekazać również instrukcję użytkowania.
j) Elementy opakowania oraz drobne elementy
montażowe należy przechowywać w miejscu
niedostępnym dla dzieci.
k) Urządzenie trzymać z dala od dzieci i zwierząt.
l) W trakcie użytkowania tego urządzenia wraz z innymi
urządzeniami należy zastosować się również do
pozostałych instrukcji użytkowania.
1 5
4
2
3
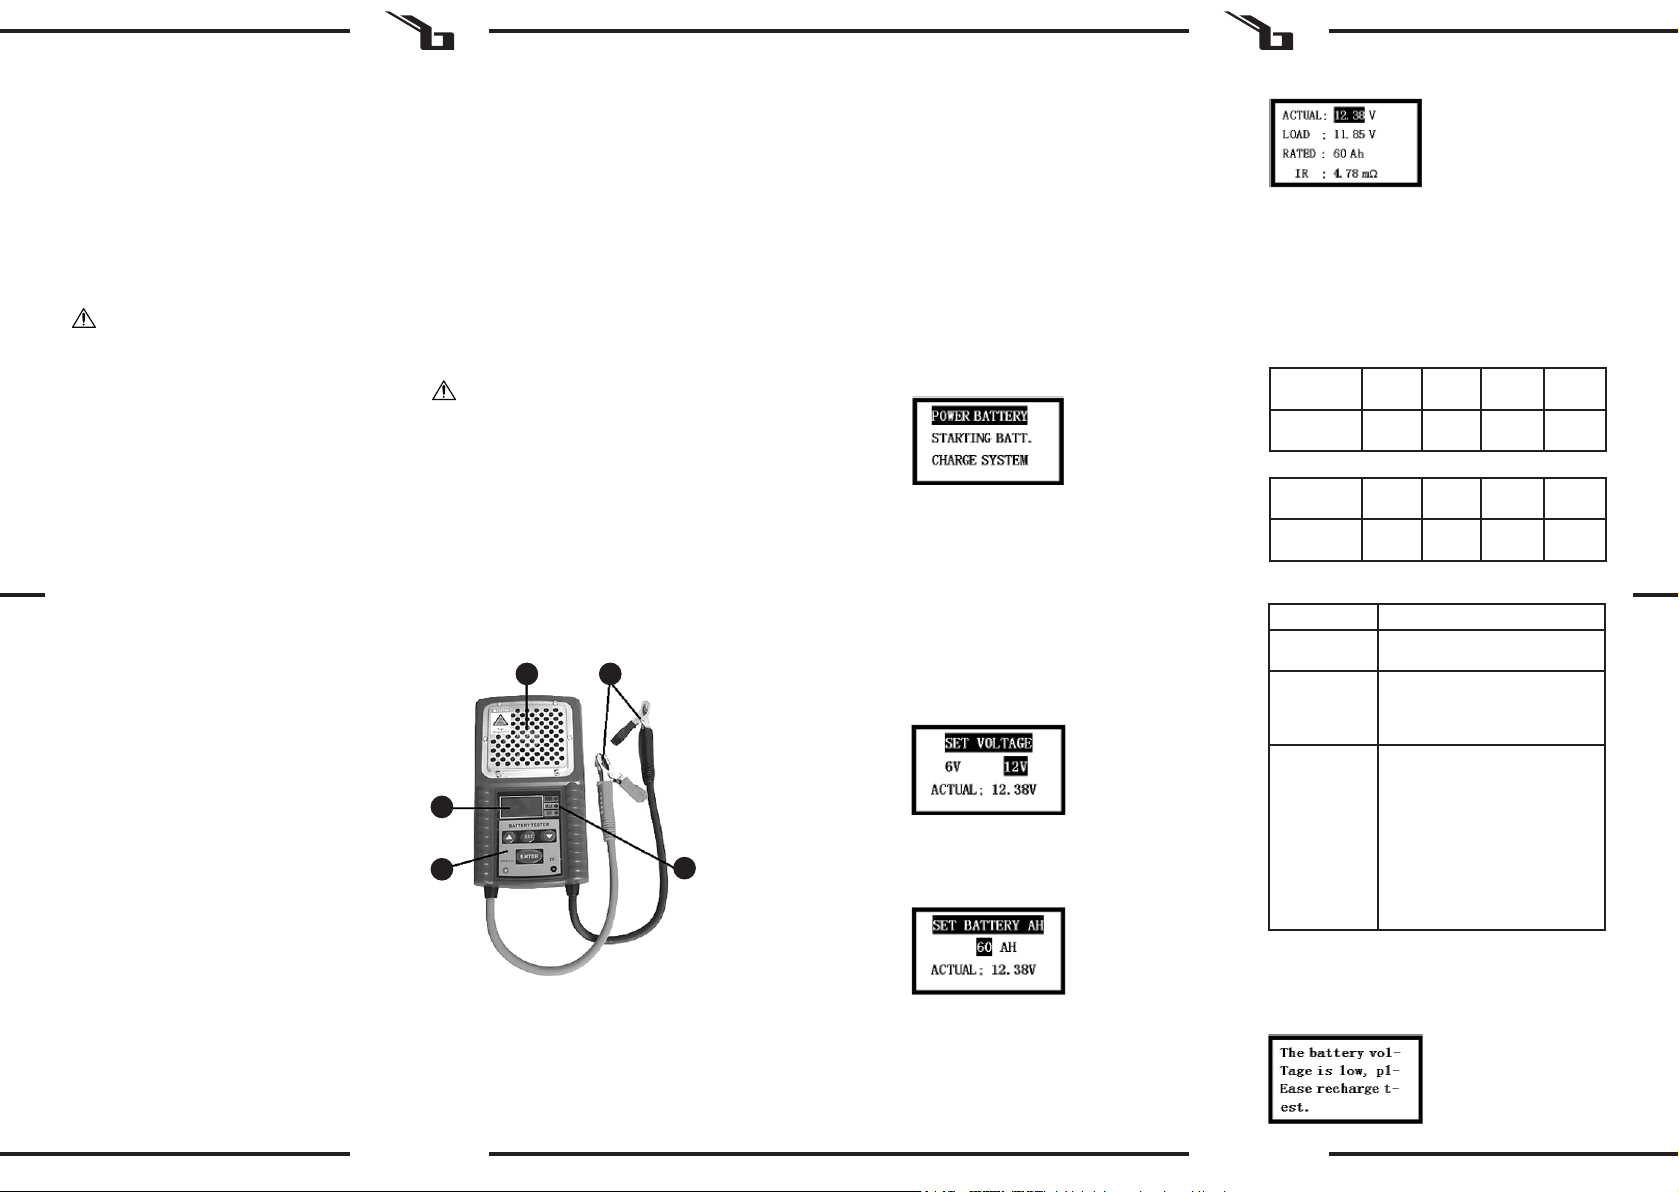
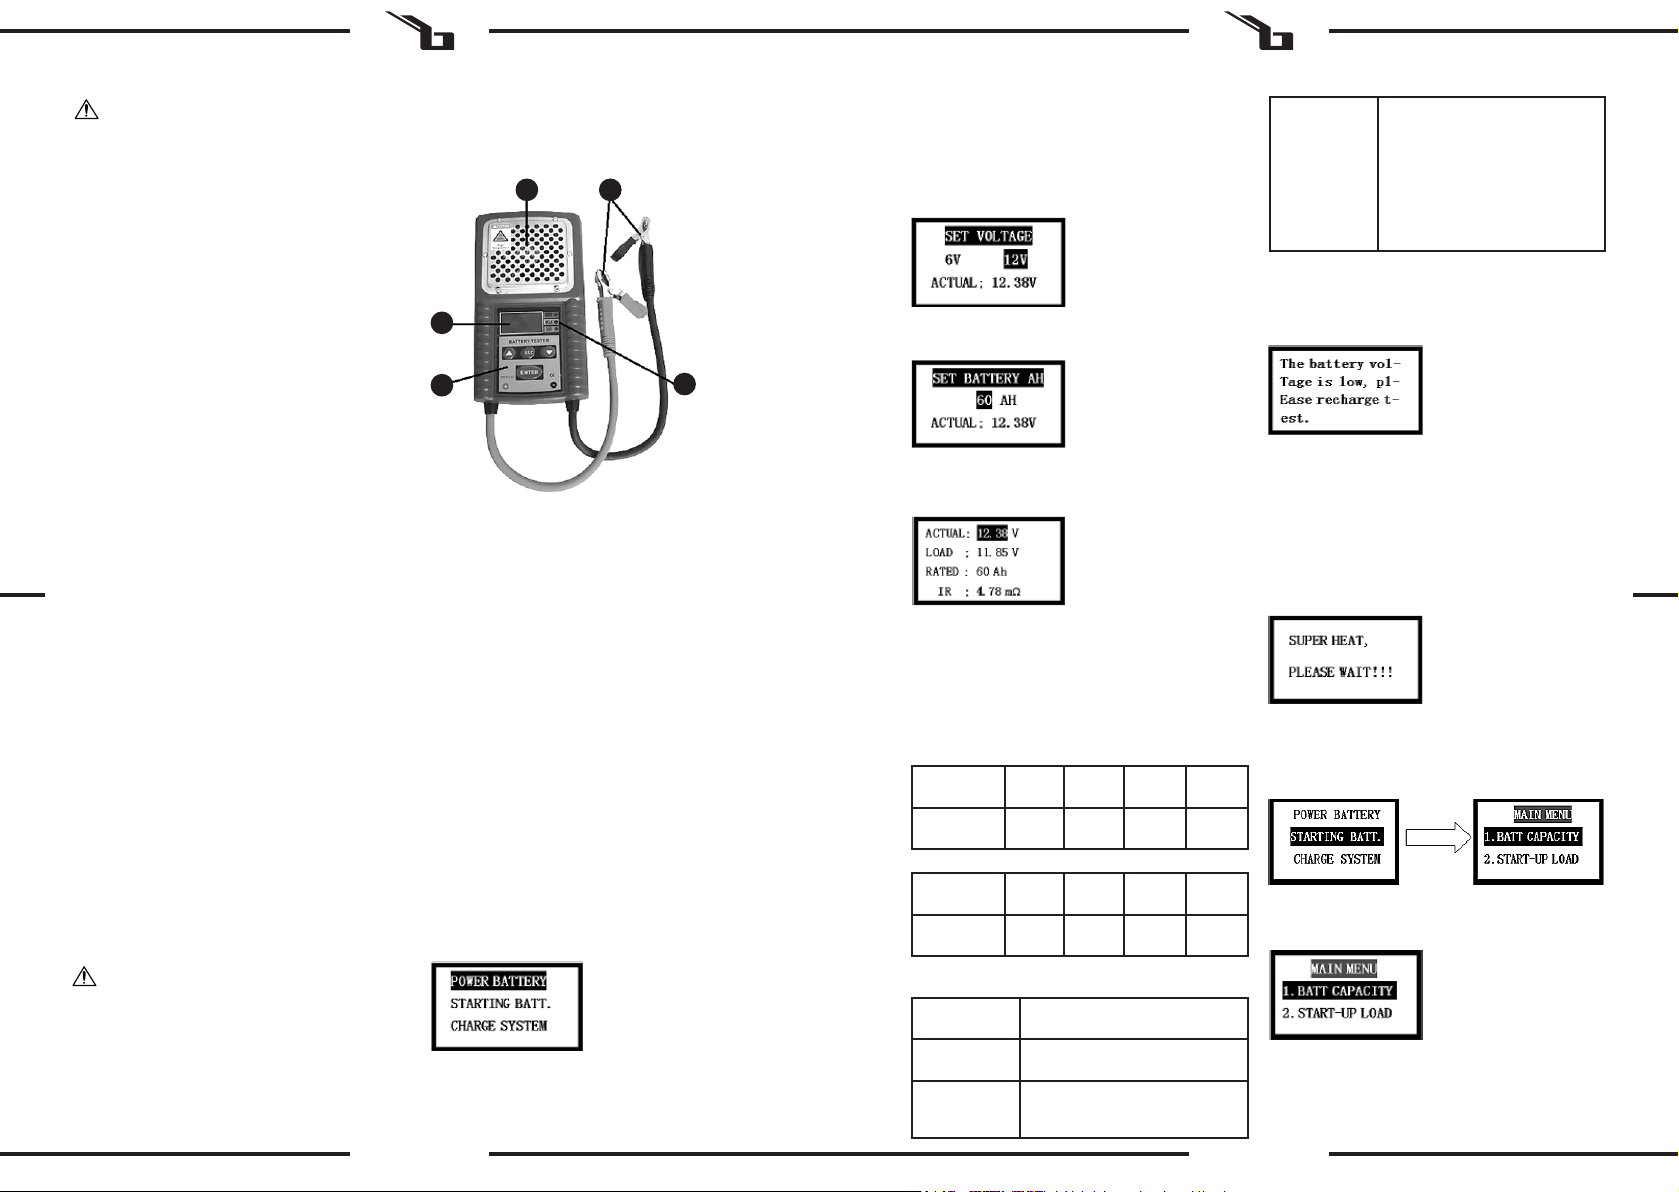
1. Kratka wentylacyjna
2. Wyświetlacz
3. Panel przycisków sterowania
• v ^ - nawigacja w menu
• ESC – wyjdź/cofnij
• ENTER – zatwierdź/wybierz
4. Kontrolki stanu akumulatora:
• Zielona (GOOD) – akumulator sprawny
• Żółta (WEAK) – akumulator słaby (do naładowania)
• Czerwona (BAD) – akumulator rozładowany
5. Zaciski na bieguny akumulatora/klemy (czerwony +,
czarny -)
3.2. PRZYGOTOWANIE DO PRACY
UMIEJSCOWIENIE URZĄDZENIA
Temperatura otoczenia nie może przekraczać 40°C
a wilgotność względna nie powinna przekraczać 85%.
PLPL
l) Zabrania się ingerowania w konstrukcję urządzenia
celem zmiany jego parametrów lub budowy.
m) Trzymać urządzenia z dala od źródeł ognia i ciepła.
n) Nie należy przeciążać urządzenia.
o) Unikać kontaktu metalowych przyrządów z biegunami
akumulatora lub klemami urządzenia podłączonego
do niego – ryzyko zwarcia i uszkodzenia instalacji
elektrycznej.

16 17
Rev. 23.01.2020
Rev. 23.01.2020
Urządzenie należy ustawić w sposób zapewniający dobrą
cyrkulację powietrza Urządzenie należy trzymać z dala od
wszelkich gorących powierzchni. Urządzenie należy zawsze
użytkować na równej, stabilnej, czystej, ognioodpornej
i suchej powierzchni i poza zasięgiem dzieci oraz osób
ograniczonych funkcjach psychicznych, sensorycznych
i umysłowych.
3.3. PRACA Z URZĄDZENIEM
3.3.1 PODŁĄCZANIE DO ZASILANIA
A. Wyłączyć silnik, odłączyć wszystkie akcesoria.
Podłączyć czerwoną klemę pod biegun dodatni
(+) akumulatora, czarną klemę pod biegun ujemny
(-). Urządzenie zasilone będzie z akumulatora. Na
ekranie wyświetli się menu:
• „POWER BATTERY” – test naładowania akumulatora
• „STARTING BATTERY” – test prądu rozruchowego
akumulatora
• „CHARGE SYSTEM” – test stanu alternatora
B. Wybrać przyciskami [^][v] dany tryb testu
i zatwierdzić przyciskiem [ENTER]
3.3.2 TEST NAŁADOWANIA AKUMULATORA
A. Po podłączeniu urządzenia do akumulatora (patrz
pkt 3.3.1) wybrać przyciskami [^][v] pozycję „POWER
BATTERY” i zatwierdzić przyciskiem [ENTER].
B. Na ekranie wyświetli się okno „SET VOLTAGE” (wybór
napięcia akumulatora). Wybrać przyciskami [^]
[v] odpowiednie dla sprawdzanego akumulatora.
Urządzenie wskaże aktualne napięcie akumulatora.
(„ACTUAL:…”)
C. Następnie pojawi się ekran okno ustawienia
pojemności akumulatora „SET BATTERY AH”.
Przyciskami [^][v] ustawić odpowiednią wartość Ah
dla testowanego akumulatora.
D. Nacisnąć przycisk [ENTER], a urządzenie zacznie
testowanie akumulatora. Po ok. 10 sek. wynik testu
pojawi się na ekranie wraz z kontrolką oceny jego
stanu (patrz pkt 3.1)
• „ACTUAL” – napięcie akumulatora w stanie
spoczynku
• „LOAD” – napięcia akumulatora pod obciążeniem
(wybrać tę pozycję i przytrzymać przycisk [ENTER]
aby odczytać aktualne napięcia pod obciążeniem)
• „RATED” – pojemność akumulatora
• „IR” – wewnętrzna rezystencja akumulatora
wynikająca ze zdeniowanych parametrów oraz
testu.
E. Orientacyjne wyznaczniki do oceny akumulatora po
teście:
• 12V
Zmierzone
napięcie <12.00V <12.20V <12.40V ≥12.60V
Wydajność
akumulatora <25% <50% <75% 100%
• 6V
Zmierzone
napięcie <6.00V <6.10V <6.20V ≥6.30V
Wydajność
akumulatora <25% <50% <75% 100%
• Interpretacja stanu akumulatora na bazie 3-ech
kolorowych kontrolek:
Kontrolka Status akumulatora
Zielona „GOOD” Akumulator sprawny, odpowiednio
wydajny
Żółta „WEAK”
Jeśli kontrolka nie przygasa lub mruga,
to akumulator jest sprawny, ale
jego wydajność jest niska – wymaga
podładowania
Czerwona „BAD”
Wraz z czerwona kontrolką pojawi
się dźwięk alarmujący, że akumulator
jest za słaby. W tym przypadku należy
odpuścić sprawdzania jego ładowania
pod obciążeniem i sprawdzić jedynie,
czy napięcie szybko powróci do stanu
≥ 12V, co oznacza, że akumulator
jest niesprawny. Jeśli powrót do tego
napięcia przebiega powoli, należy go
dodatkowo przetestować.
• UWAGA!
Jeśli podczas testowania napięcie akumulatora pod
obciążeniem jest niższe niż 11.80 V (dla 12 V) lub 5.60 V (dla
6V) urządzenie wyświetli komunikat o za niskim napięciu
(patrz poniższy obrazek). Należy naładować akumulator
przed testem.
„The battery voltage is low, please recharge test” – napięcie
akumulatora za niskie, proszę przeprowadzić test ładowania
pod obciążeniem.
• UWAGA!
Podczas testu obciążenia komponenty urządzenia mogą się
mocno nagrzać. Jeśli temperatura urządzenia przekroczy
za wysoki dla niego poziom, może ono przejść w tryb
ochronny. Jeśli ta temperatura nie spadnie, a użytkownik
dalej będzie używał urządzenia, włączy się ostrzeżenie
o przegrzaniu (poniższy obrazek) – należy zaprzestać
używania urządzenia i pozwolić ostygnąć do normalnej
3.3.3 TESTOWANIE AKUMULATORA POD OBCIĄŻENIEM
A. Podłączyć urządzenie pod akumulator wedle opisu
w pkt 3.3.1. Wyświetli się menu wyboru testu na
którym należy wybrać pozycję testu akumulatora
pod obciążeniem „STARTING BATT.”
B. Pojawi się okno menu głównego „MAIN MEN”
testowania pod obciążeniem. Przyciskami [^][v]
wybrać pozycję ustawienia pojemności akumulatora
„BATT CAPACITY”.
C. Bazując na standardzie akumulatora podanym
przez producenta należy przy pomocy przycisków
[^][v] wybrać standard testowania „SET RATING”.
W przypadku akumulatora o parametrach wedle
standardu japońskiego (JIS) należy sprawdzić tabelę
przeliczania ze standardu amerykańskiego CCA
(SAE).
D. Wedle standardu akumulatora ustawić za pomocą
przycisków [^][v] również jego pojemność „SET
CAPACITY”.
E. Po ustawieniu odpowiednich parametrów standardu
do testowania nacisnąć [ENTER] aby rozpocząć
test. Po jego zakończeniu wynik testu zostanie
wyświetlony na ekranie jak poniżej.
F. Interpretacja wyniku testu na obciążenie (przykład)
• Napięcie akumulatora „VOLT” 12.41 V
100% - 12,78 V
75% - 12.54 V
50% - 12.3 V
25% - 12.12 V
Rozładowany 11.94 V
• Wewnętrzna rezystencja akumulatora „IR”: 4.75 mΩ
• „SOH” CCA – 588 CCA 100%
„GREAT” – wynik pozytywny
Poniżej 45% akumulator musi być wymieniony.
Inne możliwe przykłady:
„SUGGEST REPLACE” – zalecana wymiana
„GREAT NEED_CHG” – sprawny, ale wymaga podładowania
ze względu na za niskie napięcie w stanie spoczynku.
„CHARGE & RETEST” – napięcie akumulatora za niskie,
więc może zaburzyć wynik testu. Podładuj akumulator
i przeprowadź test ponownie.
3.3.4 TEST ŁADOWANIA PODCZAS ROZRUCHU SILNIKA
A. Podłączyć urządzenie wedle opisu w pkt. 3.3.1
i przyciskami [^][v] w menu wybrać „STARTING
BATT.”, a następnie „START UPLOAD”. Przyciskiem
[ENTER] zatwierdzić aby rozpocząć test.
B. Podczas testu na ekranie pojawią się następujące
parametry:
„CURR-VOL” – napięcie akumulatora statyczne
(w stanie spoczynku)
„INSTA-VOL” – napięcie przed rozruchem 12.30V;
9.6V najniższe napięcie podczas rozruchu.
C. Urządzenie automatycznie zapamiętuje wynik
podczas rozruchu i pokazuje go na ekranie. Napięcie
akumulatora podczas rozruchu powinno być większe
niż 9.6 V. W przeciwnym wypadku należy sprawdzić
PLPL
temperatury. Wpływ na pracę i temperaturę urządzenia ma
również temperatura otoczenia.

18 19
Rev. 23.01.2020
Rev. 23.01.2020
terminale (podłączenie, korozja), przewody oraz
połączenia. Jeśli wszystko jest sprawne, należy
wymienić akumulator.
D. Naciskając „ESC” powracamy do pkt. 2 menu
głównego testowania akumulatora pod obciążeniem.
3.3.5 TESTOWANIE ŁADOWANIA POD PEŁNYM
OBCIĄŻENIEM
A. Przy odpalonym silniku podłączyć urządzenie do
klem akumulatora zgodnie z biegunowością.
B. W menu głównym „MAIN MENU” testowania pod
obciążeniem przyciskami [^][v] wybrać pozycję
testowania pod maksymalnym obciążeniem „MAX
WORK LOAD”.
C. Po zatwierdzeniu przyciskiem [ENTER] na ekranie
pojawi się następująca informacja:
„Turnon loads and Speed up to 2000 To 2500
rpm,then Press <Enter>” - zwiększyć obroty silnika
do 2000, potem do 2500 i nacisnąć przycisk [ENTER].
Na ekranie pojawią się następujące informacje
(parametry przykładowe):
Jeśli najniższa wartość napięcia jest wyższa od 12.8
V, system ładowania jest sprawny. Jeśli poniżej tej
wartości, należy sprawdzić układ ładowania (napięcie
paska, alternator itd.)
D. Naciskając przycisk [ESC] wychodzimy do
poprzedniego menu.
3.3.6 TESTOWANIE ŁADOWANIA AKUMULATORA
A. W zależności od rodzaju testu ładowania
akumulatora podłączyć prostownik pod akumulator
bądź uruchomić silnik
B. Urządzenie podłączyć pod akumulator wedle opisu
w pkt. 3.3.1
C. Po pojawieniu się na ekranie następującego menu
wyboru (patrz poniższy obrazek) przyciskami [^]
[v] wybrać pozycję „CHARGE SYSTEM” (ładowanie
układu) i zatwierdzić wybór przyciskiem [ENTER].
D. Po pojawieniu się na ekranie komunikatu „SET
VOLTAGE” (wybór napięcia) należy wybrać napięcie
nominalne dla danego układu – 6 lub 12 V
E. W zależności od rodzaju zasilania akumulatora
zaznaczyć i wybrać odpowiednią opcję oraz
przyciskiem [ENTER] zatwierdzić.
„ON-LINE” – ładowanie od alternatora
„OFF-LINE” – ładowanie od zewnętrznego źródła np.
prostownika
F. W przypadku wyboru trybu ładowania od alternatora
(„ON-LINE") na ekranie wyświetli się komunikat:
„Start engine and Speed up to 2500 To 3500
rpm,then Press <Enter>” – należy uruchomić silnik
i zwiększyć jego obroty wpierw do 2500, a później do
3500 i następnie nacisnąć przycisk [ENTER].
G. Należy postępować zgodnie z powyższym
komunikatem, a na ekranie pojawi się poniższy
komunikat (dane przykładowe)
Oznacza to, że maksymalny prąd ładowania na wyjściu
wynosi 13.88 V, a maksimum dla akumulatora 12V wynosi
15 V (7. 50 V maksimum w przypadku akumulatora 6 V),
a zmierzone maksimum wynosi 14.1 V.
Z kolei minimalne ładowanie na wyjściu to 13.88 V, gdzie
dopuszczalne minimum wynosi 13.30 (dla akumulatorów
6 V standardowe minimum to 6.60 V), zaś zmierzone
minimum to 13.58 V.
UWAGA!
• Jeśli zmierzone maksymalne napięcie przekracza 15.0
V (7.50 V dla układu 6V) należy sprawdzić regulator
napięcia.
• Jeśli zmierzone minimalne napięcie jest poniżej
13.3 V (6.60 V dla układu 6 V) należy skontrolować
połączenia elektryczne, przewody i silnik.
3.4. CZYSZCZENIE I KONSERWACJA
a) Przed każdym czyszczeniem, regulacją, wymianą
osprzętu, a także jeżeli urządzenie nie jest używane,
należy wyciągnąć wtyczkę sieciową i całkowicie
ochłodzić urządzenie.
b) Urządzenie należy przechowywać w suchym
i chłodnym miejscu chronionym przed wilgocią
i bezpośrednim promieniowaniem słonecznym.
c) Zabrania się spryskiwania urządzenia strumieniem
wody lub zanurzania urządzenia w wodzie.
d) Należy pamiętać, aby przez otwory wentylacyjne
znajdujące się w obudowie nie dostała się woda.
e) Otwory wentylacyjne należy czyścić pędzelkiem
i sprężonym powietrzem.
f) Należy wykonywać regularne przeglądy urządzenia
pod kątem jego sprawności technicznej oraz
wszelkich uszkodzeń.
g) Do czyszczenia należy używać miękkiej ściereczki.
USUWANIE ZUŻYTYCH URZĄDZEŃ.
Po zakończeniu okresu użytkowania nie wolno usuwać
niniejszegoproduktupoprzeznormalneodpadykomunalne,
lecz należy go oddać do punktu zbiórki i recyklingu
urządzeń elektrycznych i elektronicznych. Informuje o tym
symbol, umieszczony na produkcie, instrukcji obsługi lub
opakowaniu. Zastosowane w urządzeniu tworzywa nadają
się do powtórnego użycia zgodnie z ich oznaczeniem.
Dzięki powtórnemu użyciu, wykorzystaniu materiałów lub
innym formom wykorzystania zużytych urządzeń wnoszą
Państwo istotny wkład w ochronę naszego środowiska.
Informacji o właściwym punkcie usuwania zużytych
urządzeń udzieli Państwu lokalna administracja. PLPL

20 21
Rev. 23.01.2020
Rev. 23.01.2020
VAROVÁNÍ! Nebezpečí úrazu elektrickým
proudem!
Používejte ochranné brýle.
Používejte ochranné rukavice.
VAROVÁNÍ! Nebezpečí požáru – lehce hořlavé
materiály!
VAROVÁNÍ! Horký povrch může způsobit
popálení!
Pouze k použití ve vnitřních prostorech.
TECHNICKÉ ÚDAJE
NÁVOD K POUŽITÍ
Pojem „zařízení“ nebo „výrobek“ v bezpečnostních pokynech
a návodu se vztahuje na DIGITÁLNÍ TESTER AUTOBATERIE.
Zařízení nepoužívejte v prostředí s velmi vysokou vlhkostí /
v přímé blízkosti nádrží s vodou! Zařízení nenořte do vody.
Hrozí nebezpečí úrazu elektrickým proudem!
Nezakrývejte větrací otvory!
2.1. ELEKTRICKÁ BEZPEČNOST
a) Nedotýkejte se uzemněných předmětů jako jsou
trubky, topidla, kamna a chladničky. Pokud je
zařízení uzemněno, existuje zvýšené nebezpečí
úrazu elektrickým proudem v následku působení
deště, mokrého povrchu a práce se zařízením ve
vlhkém prostředí. Proniknutí vody do zařízení zvyšuje
nebezpečí jeho poškození a úrazu elektrickým
proudem.
b) Zařízení se nedotýkejte mokrýma nebo vlhkýma
rukama.
c) POZOR – OHROŽENÍ ŽIVOTA! Během čistění nebo
používání zařízení nikdy nesmí být ponořováno ve
vodě nebo jiných kapalinách.
2.2. BEZPEČNOST NA PRACOVIŠTI
a) Na pracovišti udržujte pořádek a mějte dobré
osvětlení. Nepořádek nebo špatné osvětlení mohou
vést k úrazům. Buďte předvídaví a sledujte, co se
během práce kolem vás děje. Při práci se zařízením
vždy zachovávejte zdravý rozum.
b) Se zařízením nepracujte ve výbušném prostředí,
například v přítomnosti hořlavých kapalin, plynů
nebo prachu. Zařízení vytváří jiskření, skrze které
může dojít ke vznícení prachu nebo výparů.
c) Budete-li mít pochybnosti, zda výrobek funguje
správně, nebo zjistíte poškození, kontaktujte servis
výrobce.
d) Výrobek může opravovat pouze servis výrobce.
Opravy neprovádějte sami!
e) V případě vzniku požáru k hašení zařízení pod
napětím používejte pouze práškové nebo sněhové
hasicí přístroje (CO2).
f) Na pracovišti se nesmí zdržovat děti a nepovolané
osoby. (Nepozornost může způsobit ztrátu kontroly
nad zařízením.)
Výrobek splňuje požadavky příslušných
bezpečnostních norem.
Před použitím výrobku se seznamte s návodem.
Recyklovatelný výrobek.
UPOZORNĚNÍ! nebo VAROVÁNÍ! nebo
PAMATUJTE! popisující danou situaci (všeobecná
výstražná značka).
Název výrobku Digitální tester
autobaterie
Model SBS-BT-612
Třída ochrany III
Stupeň ochrany IP IP 40
Rozměry [mm] 210 x 120 x 73
Hmotnost [kg] 0,78
Typ podporovaných
akumulátorů Olověné, 6 / 12 V
Rozsah testu nabíjecího
proudu [A] <80
Rozsah testu kapacity
akumulátoru [Ah] 40 – 200
Maximální hodnota napětí
stejnosměrného proudu [V] 19,99
Test vnitřního odporu
akumulátoru (mΩ) 1,00 – 99,99
Rozsah kapacity testovaného
akumulátoru [Ah] 40 – 200 (krok po 5)
Startovací test Pro 12V akumulátory
Podporované standardy
akumulátorů [A]
CCA 100 ~ 1700
IEC 100 ~ 1000
EN 100 ~ 1700
DIN 100 ~ 1000
Rozsah provozních teplot [°C] -10 – +40
Čas/interval testu cca 10 s / každých
5 min
VYSVĚTLENÍ SYMBOLŮ
2.3. OSOBNÍ BEZPEČNOST
a) Zařízení nepoužívejte, jste-li unaveni nebo pod
vlivem drog, alkoholu nebo léků, které významně
snižují schopnost zařízení ovládat.
b) S výrobkem mohou pracovat pouze fyzicky zdravé
osoby, které jsou schopné ho obsluhovat. Musejí být
náležitě proškolené z hlediska bezpečnosti a ochrany
zdraví při práci a seznámené s tímto návodem.
c) Zařízení není hračka. Dohlížejte na děti, aby si
nehrály se zařízením.
2.4. BEZPEČNÉ POUŽÍVÁNÍ ZAŘÍZENÍ
a) Zařízení nepřetěžujte. Pro daný úkol používejte
vždy správný typ nářadí. Správně zvolené nářadí
lépe a bezpečněji provede práci, pro kterou bylo
navrženo.
b) Před každým seřízením, čištěním a údržbou odpojte
zařízení od napájení. Toto bezpečnostní opatření
snižuje nebezpečí náhodného zapnutí.
c) Nepoužívaná zařízení uchovávejte mimo dosah dětí
a osob, které nejsou seznámeny se zařízením nebo
návodem k obsluze. Zařízení jsou nebezpečná v
rukou nezkušených uživatelů.
d) Zařízení udržujte v dobrém technickém stavu.
Kontrolujte před každou prací jeho celkový stav
i jednotlivé díly a ujistěte se, že je vše v dobrém
stavu, a uživateli tak při práci se zařízením nehrozí
žádné nebezpečí. V případě, že zjistíte poškození,
nechte zařízení opravit.
e) Udržujte zařízení mimo dosah dětí.
f) Opravu a údržbu zařízení by měly provádět
pouze kvalikované osoby za výhradního použití
originálních náhradních dílů. Zajistí to bezpečné
používání zařízení.
g) Pro zachování navržené mechanické integrity
zařízení neodstraňujte předem namontované kryty
nebo neuvolňujte šrouby.
h) Zapnuté zařízení nenechávejte bez dozoru.
i) Pravidelně čistěte zařízení, aby nedošlo k trvalému
usazovaní nečistot.
j) Nezakrývejte vstupní a výstupní otvor vzduchu.
k) Zařízení není hračka. Čištění a údržbu nesmí provádět
děti bez dohledu dospělé osoby.
l) Nezasahujte do zařízení s cílem změnit jeho
parametry nebo konstrukci.
m) Udržujte zařízení mimo zdroje ohně a tepla.
n) Zařízení nepřetěžujte.
3. ZÁSADY POUŽÍVÁNÍ
Zařízení je určeno pro:
• testování stavu olověných akumulátorů 6/12 V;
• testování stavu alternátorů ve vozidlech.
Odpovědnost za veškeré škody vzniklé v důsledku
použití zařízení v rozporu s určením nese uživatel.
3.1. POPIS ZAŘÍZENÍ
Přístroj je vybaven ochranou proti:
• špatnému kontaktu svorek pólů akumulátoru,
• opačným zapojením pólů,
• příliš vysokým napětím.
1 5
4
2
3
1. Větrací mřížka
2. Displej
3. Ovládací panel s tlačítky
• v ^ – navigace v menu
• ESC – opustit/zpět
• ENTER – potvrdit/vybrat
4. Kontrolky stavu akumulátoru:
• Zelená („GOOD“) – funkční, dostatečně nabitý
akumulátor
• Žlutá („WEAK“) – akumulátor není dostatečně nabitý,
je nutné ho nabít
• Červená („BAD“) – akumulátor je vybitý
5. Svorky na póly akumulátoru (červená +, černá -)
3.2. PŘÍPRAVA K PRÁCI
UMÍSTĚNÍ ZAŘÍZENÍ
Teplota okolí nesmí být vyšší než 40°C a relativní vlhkost
nesmí být vyšší než 85 %. Zařízení postavte takovým
způsobem, aby byla zajištěna dobrá cirkulace vzduchu.
Zařízení se musí nacházet daleko od jakéhokoli horkého
povrchu. Zařízení vždy používejte na rovnoměrném,
stabilním, čistém a ohnivzdorném povrchu, mimo dosah dětí
a osob s omezenými psychickými, smyslovými a duševními
funkcemi.
1. VŠEOBECNÝ POPIS
Návod slouží jako nápověda pro bezpečné a spolehlivé
používání výrobku. Výrobek je navržen a vyroben přesně
podle technických údajů za použití nejnovějších technologií
a komponentů a za dodržení nejvyšších jakostních norem.
PŘED ZAHÁJENÍM PRÁCE SI DŮKLADNĚ PŘEČTĚTE
TENTO NÁVOD A UJISTĚTE SE, ŽE JSTE POCHOPILI
VŠECHNY POKYNY.
Pro zajištění dlouhého a spolehlivého fungování zařízení
pravidelně provádějte revize a údržbu v souladu s pokyny
uvedenými v tomto návodu. Technické údaje a specikace
uvedené v návodu jsou aktuální. Výrobce si vyhrazuje právo
provádět změny za účelem zvýšení kvality.
POZOR! Ilustrace v tomto návodu mají náhledovou
povahu, a v některých detailech se od skutečného
vzhledu stroje mohou lišit.
Originálním návodem je německá verze návodu. Ostatní
jazykové verze jsou překladem z německého jazyka.
2. BEZPEČNOST POUŽÍVÁNÍ
POZNÁMKA! Přečtěte si pečlivě tento návod včetně
všech bezpečnostních pokynů. Nedodržování
pokynů může vést k úrazu elektrickým proudem,
požáru a/nebo těžkému úrazu nebo smrti.
g) Zařízení používejte v dobře větraných prostorách.
h) Je třeba pravidelně kontrolovat stav etiket s
bezpečnostními informacemi. V případě, že jsou
nečitelné, je třeba etikety vyměnit.)
i) Návod k obsluze uschovejte za účelem jeho
pozdějšího použití. V případě předánání zařízení
třetím osobám musí být spolu se zařízením předán
rovněž návod k obsluze.
j) Obalový materiál a drobné montážní prvky
uchovávejte na místě nedostupném pro děti.
k) Zařízení mějte v dostatečné vzdálenosti od dětí
a zvířat.
l) Pokud společně s tímto nástrojem používáte nějaké
další nářadí, pak musíte dodržovat také jeho návod k
použití.
PAMATUJTE! Při práci se zařízením chraňte děti
a jiné nepovolané osoby.
POZNÁMKA! I když zařízení bylo navrženo tak, aby
bylo bezpečné, tedy má vhodné bezpečnostní prvky,
tak i přes použití dodatečné ochrany uživatelem při
práci se zařízením nadále existuje malé riziko úrazu
nebo poranění. Doporučuje se zachovat opatrnost
a zdravý rozum při jeho používání.
CZCZ

22 23
Rev. 23.01.2020
Rev. 23.01.2020
C. Poté se zobrazí okno nastavení kapacity akumulátoru
„SET BATTERY AH“. Pomocí tlačítek [^] [v] nastavte
požadovanou hodnotu Ah pro testovaný akumulátor.
D. Stiskněte tlačítko [ENTER] a zařízení začne testovat
akumulátor. Přibližně po 10 sekundách se výsledek
testu objeví na displeji spolu s kontrolkou posouzení
jeho stavu (viz bod 3.1).
• „ACTUAL“ – napětí akumulátoru v klidu
• „LOAD“ – napětí akumulátoru při zatížení (vyberte
tuto položku a podržte [ENTER] pro odečtení
aktuálního napětí při zatížení)
• „RATED“ – kapacita akumulátoru
• „IR“ – vnitřní odpor akumulátoru vyplývající
z denovaných parametrů a testu.
E. Orientační hodnoty pro vyhodnocení akumulátoru
po zkoušce:
• 12V
• POZOR!
Pokud je během testování napětí akumulátoru při zatížení
menší než 11,80 V (pro 12 V) nebo 5,60 V (pro 6V), zařízení
zobrazí zprávu o příliš nízkém napětí (viz obrázek níže). Před
testováním nabijte akumulátor.
„The battery voltage is low, please recharge test“ – napětí
akumulátoru je příliš nízké, proveďte test nabíjení při
zatížení.
• POZOR!
Během zátěžového testu mohou být součásti zařízení velmi
horké. Pokud teplota zařízení dosáhne příliš vysokou úroveň,
může se zařízení přepnout do ochranného režimu. Pokud
tato teplota neklesne a uživatel nadále pokračuje v používání
zařízení, aktivuje se varování o přehřátí (obrázek níže). V
tomto případě přestaňte zařízení používat a nechte jej
vychladnout na normální teplotu. Provoz a teplotu zařízení
také ovlivňuje teplota okolí.
Kontrolka Stav akumulátoru
Zelená „GOOD“ Akumulátor je funkční a je dostatečně
nabitý
Žlutá „WEAK“
Pokud kontrolka svítí nebo bliká,
je akumulátor v pořádku, ale jeho
kapacita je nízká – akumulátor je třeba
dobít
Červená „BAD“
Spolu s červenou kontrolkou zazní
zvukový alarm, že akumulátor je příliš
slabý. V tomto případě byste měli
přeskočit kontrolu nabíjení při zatížení
a jen byste měli zkontrolovat, jestli
se napětí vrátí na hodnotu ≥ 12V
rychle (což znamená, že akumulátor
je vadný). Pokud se napětí vrátí na
hodnotu ≥ 12V pomalu, pokračujte v
testování akumulátoru.
3.3.3. TESTOVÁNÍ AKUMULÁTORU PŘI ZATÍŽENÍ
A. Připojte zařízení k akumulátoru, jak je popsáno v
bodě 3.3.1. Poté se zobrazí menu výběru testu, kde
položku testu akumulátoru vyberete pod položkou
„STARTING BATT.“
C. Na základě standardu akumulátoru poskytovaného
výrobcem použijte tlačítka [^] [v] pro výběr standardu
testování „SET RATING“. U akumulátoru s parametry
podle japonského standardu (JIS) zkontrolujte
tabulku převodu z amerického standardu CCA (SAE).
C. Po potvrzení pomocí tlačítka [ENTER] se na displeji
objeví následující informace:
D. Podle standardu akumulátoru můžete pomocí
tlačítek [^] [v] také nastavit kapacitu „SET CAPACITY“.
E. Po nastavení příslušných standardních parametrů
pro testování stiskněte [ENTER] pro spuštění testu.
Po dokončení se výsledek testu zobrazí na displeji,
jako je zobrazeno níže.
F. Interpretace výsledku zkoušky při zatížení (příklad)
• Napětí akumulátoru „VOLT“ 12.41 V
100% - 12,78 V
75% - 12.54 V
50% - 12.3 V
25% - 12.12 V
Vybitý – 11.94 V
• Interní odpor akumulátoru „IR“: 4,75 mΩ
• „SOH“ CCA – 588 CCA 100%
„GREAT“ – pozitivní výsledek
Pod 45% musí být akumulátor vyměněn.
Další možné příklady:
„SUGGEST REPLACE“ – doporučuje se výměna.
B. Během testu se na displeji objeví následující
parametry:
„CURR-VOL“ – statické napětí akumulátoru (v klidu)
„INSTA-VOL“ – napětí před startem 12,30 V; nejnižší
napětí během spouštění 9,6 V.
C. Zařízení automaticky uloží výsledek při spuštění
a zobrazuje jej na displeji. Napětí akumulátoru
při spuštění musí být vyšší než 9,6 V. V opačném
případě zkontrolujte svorky (připojení, koroze),
kabely a připojení. Pokud je vše v pořádku, vyměňte
akumulátor.
D. Stiskem „ESC“ se vrátíte do bodu 2 hlavního menu
pro testování akumulátoru při zatížení.
3.3.5 TESTOVÁNÍ NABÍJENÍ PŘI PLNÉM ZATÍŽENÍ
A. Při běžícím motoru připojte zařízení ke svorkám
akumulátoru shodně s jeho polaritou.
B. V hlavní nabídce „MAIN MENU“ pro testování pod
zatížením stiskněte tlačítka [^] [v] a vyberte volbu
testování pod maximálním zatížením „MAX WORK
LOAD“.
„CHARGE & RETEST“ – napětí akumulátoru je příliš nízké,
takže může negativně ovlivnit výsledek testu. Nabijte
akumulátor a test proveďte znovu.
3.3.4 TEST NABÍJENÍ BĚHEM SPOUŠTĚNÍ MOTORU
A. Připojte zařízení podle popisu v bodě 3.3.1 a pomocí
tlačítek [^] [v] vyberte v menu „STARTING BATT“
a pak „START UPLOAD“. Stisknutím tlačítka [ENTER]
potvrďte spuštění testu.
• POWER BATTERY“ – test nabití akumulátoru
• „STARTING BATTERY“ – test startovacího proudu
akumulátoru
• „CHARGE SYSTEM“ – test stavu alternátoru
B. Vyberte požadovaný testovací režim pomocí tlačítek
[^] [v] a volbu potvrďte tlačítkem [ENTER]
3.3.2. TEST NABITÍ AKUMULÁTORU
A. Po připojení zařízení k akumulátoru (viz bod 3.3.1)
vyberte pomocí tlačítek [^] [v] položku „POWER
BATTERY“ a volbu potvrďte stisknutím tlačítka
[ENTER].
B. Na displeji se objeví okno „SET VOLTAGE“ (výběr
napětí akumulátoru). Pomocí tlačítek [^] [v] vyberte
požadované napětí pro testovaný akumulátor.
Zařízení zobrazí aktuální napětí akumulátoru.
(„ACTUAL:…“)
CZCZ
3.3. PRÁCE SE ZAŘÍZENÍM
3.3.1 PŘIPOJENÍ K NAPÁJENÍ
A. Vypněte motor a odpojte veškeré příslušenství.
Připojte červenou svorku pod kladný (+) pól
akumulátoru, černou svorku pod záporný (-)
pól. Zařízení bude napájeno akumulátorem. Na
obrazovce se objeví menu:
Naměřené
napětí <12.00V <12.20V <12.40V ≥12.60V
Kapacita
akumulátoru <25% <50% <75% 100%
• 6V B. Objeví se okno hlavní nabídky „MAIN MENU“ pro
testování při zatížení. Pomocí tlačítek [^] [v] vyberte
položku nastavení kapacity akumulátoru „BATT
CAPACITY“.
„GREAT NEED_CHG“ – funkční, ale vyžaduje dobití kvůli
nízkému napětí v klidu

24 25
Rev. 23.01.2020
Rev. 23.01.2020
ATTENTION ! Mise en garde liée à la tension
électrique !
Portez une protection oculaire.
Portez des protections pour les mains.
ATTENTION ! Mise en garde liée à des
substances comburantes !
ATTENTION ! Surfaces chaudes. Risque de
brûlures !
Pour l'utilisation intérieure uniquement.
D. Jakmile se na displeji objeví zpráva „SET VOLTAGE“
(nastavení napětí), zvolte jmenovité napětí pro
systém – 6 nebo 12 V
E. V závislosti na typu napájení akumulátoru označte
a vyberte příslušnou možnost a potvrďte ji tlačítkem
[ENTER].
„ON-LINE“ – nabíjení z alternátoru
„OFF-LINE“ –nabíjení z externího zdroje, např.
nabíječky
F. Pokud je vybrán režim nabíjení z alternátoru („ON-
LINE“), na displeji se objeví následující zpráva:
To znamená, že maximální nabíjecí napětí na výstupu je
13,88 V, maximum pro 12V akumulátor je 15 V (maximum
pro 6 V akumulátor je 7,50 V) a změřené maximum je 14,1 V.
Naopak, minimální nabíjení na výstupu je 13,88 V, přípustné
minimum je 13,30 V (pro 6 V akumulátory je standardní
minimum 6,60 V) a naměřené minimum je 13,58 V.
POZOR!
• Pokud naměřené maximální napětí překročí 15,0 V
(7,50 V pro systém 6V), zkontrolujte regulátor napětí.
• Pokud je naměřené minimální napětí pod 13,3 V (6,60
V pro systém 6 V), zkontrolujte elektrické zapojení,
vodiče a motor.
3.4. ČIŠTĚNÍ A ÚDRŽBA
a) Před každým čištěním, seřizováním, výměnou
příslušenství a také vždy, když zařízení nepoužíváte,
vytáhněte síťovou zástrčku a nechte zařízení úplně
vychladnout.
b) Zařízení skladujte na suchém a chladném místě,
chráněném proti vlhkosti a přímému slunečnímu
svitu.
c) Je zakázáno zařízení polévat vodou nebo je do vody
ponořovat.
d) Dávejte pozor, aby se ventilačními otvory
nacházejícími se na krytu zařízení nedostala dovnitř
voda.
e) Ventilační otvory čistěte pomocí štětečku
a stlačeného vzduchu.
f) Pravidelně provádějte revize zařízení a kontrolujte,
zda je technicky způsobilé a není poškozeno.
g) K čištění používejte měkký hadřík.
LIKVIDACE OPOTŘEBENÝCH ZAŘÍZENÍ
Po ukončení doby používání nevyhazujte tento výrobek
společně s komunálním odpadem, ale odevzdejte jej k
recyklaci do sběrny elektrických a elektronických zařízení.
O tom informuje symbol umístěný na zařízení, v návodě
k obsluze nebo na obalu. Komponenty použité v zařízení
jsou vhodné pro zužitkování v souladu s jejich označením.
Díky zužitkování, recyklaci nebo jiným způsobům využití
opotřebených zařízení významně přispíváte k ochraně
životního prostředí. Informace o příslušné sběrně
opotřebených zařízení poskytne místní obecný nebo
městský úřad.
Pokud je nejnižší napětí vyšší než 12,8 V, nabíjecí
systém je v pořádku. Pokud je pod touto hodnotou,
zkontrolujte nabíjecí systém (napnutí řemenu,
alternátor atd.)
D. Stisknutím tlačítka [ESC] se vrátíte do předchozí
nabídky.
3.3.6. TESTOVÁNÍ NABÍJENÍ AKUMULÁTORU
A. V závislosti na typu testování nabíjení akumulátoru
testovat nabíječku akumulátoru nebo spustit motor
B. Připojte zařízení k akumulátoru, jak je popsáno v
bodě 3.3.1
C. Poté, co se na displeji objeví následující menu (viz
obrázek níže), pomocí tlačítek [^] [v] vyberte položku
„CHARGE SYSTEM“ a výběr potvrďte stisknutím
tlačítka [ENTER].
DÉTAILS TECHNIQUES
MANUEL D´UTILISATION
Les notions d‘« appareil », de « machine » et de « produit
» gurant dans les descriptions et les consignes du manuel
se rapportent à/au TESTEUR DE BATTERIE NUMERIQUE.
N‘utilisez pas l‘appareil dans des pièces où le taux d‘humidité
est très élevé, ni à proximité immédiate de récipients d‘eau !
Ne mouillez pas l‘appareil. Risque de chocs électriques ! Ne
couvrez pas les orices de ventilation !
2.1. SÉCURITÉ ÉLECTRIQUE
a) Ne touchez pas l‘appareil lorsque vos mains sont
humides ou mouillées.
b) ATTENTION DANGER DE MORT ! Ne trempez et
n’immergez jamais l’appareil dans l’eau ou dans d’autres
liquides pendant le nettoyage ou le fonctionnement.
2.2. SÉCURITÉ AU POSTE DE TRAVAIL
a) Veillez à ce que votre poste de travail soit toujours
propre et bien éclairé. Le désordre ou un éclairage
insusant peuvent entraîner des accidents. Soyez
prévoyant, observez les opérations et faites preuve
de bon sens lorsque vous utilisez l’appareil.
b) N‘utilisez pas l‘appareil dans les zones à risque
d‘explosion, par exemple à proximité de liquides,
de gaz ou de poussières inammables. Certains
appareils peuvent produire des étincelles
susceptibles d’enammer la poussière et les vapeurs.
c) En cas de doute quant au bon fonctionnement de
l‘appareil ou si vous constatez des dommages sur
celui-ci, veuillez communiquer avec le service client
du fabricant.
d) Seul le fabricant doit réparer le produit. Ne tentez
pas de réparer le produit par vous-même !
e) En cas de feu ou d’incendie, utilisez uniquement des
extincteurs à poudre ou au dioxyde de carbone (CO2)
pour étouer les ammes sur l’appareil.
Collecte séparée.
ATTENTION ! , AVERTISSEMENT ! et REMARQUE
attirent l‘attention sur des circonstances
spéciques (symboles d‘avertissement
généraux).
Nom du produit Testeur de batterie
numérique
Modèle SBS-BT-612
Classe de protection III
Classe de protection IP IP 40
Dimensions [mm] 210 x 120 x 73
Poids [kg] 0,78
Type de batteries prises en
charge Plomb-acide, 6 / 12 V
Plage de test du courant de
charge [A] <80
Plage de test de capacité de la
batterie [Ah] 40 – 200
Valeur de tension maximale
pour courant continu [V] 19,99
Test de résistance interne de la
batterie (mΩ) 1,00 – 99,99
Plage de capacité des
batteries prises en charge [Ah] 40 – 200
(pas tous les 5)
Test de démarrage Pour batteries 12V
Normes de batterie prises en
charge [A]
CCA 100 ~ 1700
IEC 100 ~ 1000
EN 100 ~ 1700
DIN 100 ~ 1000
Plage de température de
fonctionnement [oC]
-10 – +40
Temps / intervalle de test env. 10 s / toutes les
5 min
1. DESCRIPTION GÉNÉRALE
L'objectif du présent manuel est de favoriser une utilisation
sécuritaire et able de l'appareil. Le produit a été conçu
et fabriqué en respectant étroitement les directives
techniques applicables et en utilisant les technologies et
composants les plus modernes. Il est conforme aux normes
de qualité les plus élevées.
LISEZ ATTENTIVEMENT LE PRÉSENT MANUEL ET
ASSUREZ-VOUS DE BIEN LE COMPRENDRE AVANT
LA PREMIÈRE UTILISATION.
An de garantir le fonctionnement able et durable de
l'appareil, il est nécessaire d'utiliser et d'entretenir ce
dernier conformément aux consignes gurant dans le
présent manuel. Les caractéristiques et les spécications
contenues dans ce document sont à jour. Le fabricant se
réserve le droit de procéder à des modications à des ns
d’amélioration du produit.
SYMBOLES
Le produit est conforme aux normes de sécurité
en vigueur.
Respectez les consignes du manuel.
ATTENTION! Certaines illustrations, présentes
dans cette notice, peuvent diérer de la véritable
apparence de l‘appareil.
La version originale de ce manuel a été rédigée en
allemand. Les autres versions sont des traductions de
l‘allemand.
2. CONSIGNES DE SÉCURITÉ
ATTENTION! Lisez attentivement toutes les
consignes de sécurité et toutes les instructions. Le
non-respect des avertissements et instructions peut
entraîner des chocs électriques, des incendies et/
ou des blessures graves ou la mort.
FRCZ
„Turn on loads and Speed up to 2000 To 2500 rpm,
then Press <Enter>“ – zvyšte otáčky motoru na 2000
ot./min., poté na 2500 ot./min. a stiskněte tlačítko
[ENTER]. Na displeji se zobrazí následující informace
(příklady parametrů):
„Start engine and Speed up to 2500 To 3500 rpm,
then Press <Enter>“ – nastartujte motor a nejprve
zvyšte jeho otáčky na 2500 ot./min., poté na 3500
ot./min. a poté stiskněte tlačítko [ENTER].
G. Postupujte podle výše uvedené zprávy a na displeji se
objeví následující zpráva (ukázkové údaje)

26 27
Rev. 23.01.2020
Rev. 23.01.2020
• Rouge (BAD) – batterie déchargée
5. Bornes pour pôles de batterie / pinces de batterie
(rouge +, noir -)
3.2. PRÉPARATION À L‘UTILISATION
CHOIX DE L’EMPLACEMENT DE L’APPAREIL :
La température ambiante ne doit pas dépasser 40°C et le
taux d‘humidité relative ne doit pas être de plus de 85 %.
Positionnez l’appareil de sorte qu’une bonne circulation d’air
soit assurée. Tenez l’appareil à l’écart des surfaces chaudes.
Utilisé toujours l’appareil sur une surface plane, stable,
propre, ininammable et sèche, hors de portée des enfants
et des personnes présentant des capacités physiques,
sensorielles ou mentales diminuées.
3.3. UTILISATION DE L‘APPAREIL
3.3.1 CONNEXION À L‘ALIMENTATION
A. Éteignez le moteur, débranchez tous les accessoires.
Connectez la pince rouge au pôle positif (+) de la
batterie, la pince noire au pôle négatif (-). L‘appareil
sera alimenté par la batterie. Le menu apparaîtra à
l‘écran :
• „POWER BATTERY” – test de charge de la batterie
• „STARTING BATTERY” – test de courant de démarrage
de batterie
• „CHARGE SYSTEM” – test de condition de
l‘alternateur
B. Sélectionnez le mode de test avec les touches [^] [v]
et conrmez avec la touche [ENTER]
3.3.2 TEST DE CHARGE DE LA BATTERIE
A. Après avoir connecté l’appareil à la batterie
(voir point 3.3.1), utilisez les touches [^] [v] pour
sélectionner la position „POWER BATTERY“ et
conrmez en appuyant sur [ENTER].
B. La fenêtre „SET VOLTAGE“ (sélection de la tension de
la batterie) apparaîtra à l‘écran. Utilisez les touches
[^][v] pour sélectionner la tension appropriée pour
la batterie testée. L‘appareil indiquera la tension
actuelle de la batterie. („ACTUAL:…”)
C. Ensuite, la fenêtre de réglage de la capacité de la
batterie apparaîtra„SET BATTERY AH”. Utilisez les
boutons [^] [v] pour dénir la valeur Ah appropriée
pour la batterie testée.
D. Appuyez sur le bouton [ENTER] et l‘appareil
commencera à tester la batterie. Après environ 10
secondes le résultat du test apparaîtra à l‘écran avec
le voyant d‘évaluation de l‘état (voir section 3.1)
• „ACTUAL” – tension de la batterie au repos
• „LOAD“ - tension de la batterie sous charge
(sélectionnez cette position et maintenez la touche
[ENTER] enfoncée pour lire la tension actuelle sous
charge)
• „RATED” – capacité de la batterie
• „IR” – résistance interne de la batterie résultant de
paramètres et de tests dénis.
E. Marqueurs indicatifs pour l‘évaluation de la batterie
après le test :
• 12V
Tension
mesurée <12.00V <12.20V <12.40V ≥12.60V
Performance
de la batterie <25% <50% <75% 100%
• 6V
Tension
mesurée <6.00V <6.10V <6.20V ≥6.30V
Performance
de la batterie <25% <50% <75% 100%
• Interprétation de l’état de la batterie à partir de trois
voyants en couleur :
Voyant État de la batterie
Vert „GOOD” Batterie fonctionnelle, susamment
ecace
Jaune „WEAK”
Si l‘indicateur ne s‘assombrit pas ou
ne clignote pas, la batterie est en
bon état, mais ses performances sont
médiocres - il faut la recharger.
Rouge „BAD”
Avec le voyant rouge un son va
apparaître pour vous avertir que la
batterie est trop faible. Dans ce cas,
évitez de vérier son chargement sous
charge et vérier uniquement si la
tension revient rapidement à ≥ 12 V,
ce qui signie que la batterie est en
panne. Si la récupération se produit
lentement, la batterie devrait être testé
davantage.
• ATTENTION!
Si, au cours des tests, la tension de la batterie sous charge
est inférieure à 11,80 V (pour 12 V) ou à 5,60 V (pour 6 V),
l‘appareil ache un message indiquant une tension trop
basse (voir l‘illustration ci-dessous). Chargez la batterie
avant de lancer le test.
2.3. SÉCURITÉ DES PERSONNES
a) N‘utilisez pas l‘appareil lorsque vous êtes fatigué,
malade, sous l‘eet de drogues ou de médicaments
et que cela pourrait altérer votre capacité à utiliser
l‘appareil.
b) Seules des personnes aptes physiquement à se servir
de l‘appareil, qui ont suivi une formation appropriée
et ont lu ce manuel d‘utilisation peuvent utiliser le
produit. En outre, ces personnes doivent connaître
les exigences liées à la santé et à la sécurité au travail.
c) Cet appareil n‘est pas un jouet. Les enfants doivent
demeurer sous la supervision d’un adulte an qu’ils
ne jouent pas avec l’appareil.
2.4. UTILISATION SÉCURITAIRE DE L‘APPAREIL
a) Ne faites pas surchauer l‘appareil. Utilisez les outils
appropriés pour l‘usage que vous en faites. Le choix
d‘appareils appropriés et l‘utilisation soigneuse de
ceux-ci produisent de meilleurs résultats.
b) Avant de procéder au nettoyage et à l’entretien
de l’appareil, débranchez-le. Une telle mesure
préventive réduit le risque de mise en marche
accidentelle de l’appareil.
c) Les outils qui ne sont pas en cours d‘utilisation
doivent être mis hors de portée des enfants et des
personnes qui ne connaissent ni l‘appareil, ni le
manuel d‘utilisation s‘y rapportant. Entre les mains
de personnes inexpérimentées, ce genre d‘appareils
peut représenter un danger.
d) Maintenez l‘appareil en parfait état de marche. Avant
chaque utilisation, vériez l’absence de dommages
en général et au niveau des pièces mobiles (assurez-
vous qu’aucune pièce ni composant n’est cassé et
vériez que rien ne compromet le fonctionnement
sécuritaire de l’appareil). En cas de dommages,
l’appareil doit impérativement être envoyé en
réparation avant d’être utilisé de nouveau.
e) Tenez l‘appareil hors de portée des enfants.
f) La réparation et l‘entretien des appareils doivent être
eectués uniquement par un personnel qualié, à
l‘aide de pièces de rechange d‘origine. Cela garantit
la sécurité d’utilisation.
g) Pour garantir l‘intégrité opérationnelle de l‘appareil,
les couvercles et les vis posés à l‘usine ne doivent pas
être retirés.
3. CONDITIONS D’UTILISATION
L‘appareil est destiné à :
• tester l‘état des batteries plomb-acide 6/12 V;
• tester l‘état des alternateurs dans les véhicules.
L’utilisateur porte l’entière responsabilité pour l’ensemble
des dommages attribuables à un usage inapproprié.
3.1. DESCRIPTION DE L‘APPAREIL
L‘appareil est équipé d‘une protection contre:
• faible contact des bornes polaires,
• confusion des pôles,
• tension trop haute.
f) Aucun enfant ni personne non autorisée ne doit se
trouver sur les lieux de travail. (Le non-respect de
cette consigne peut entraîner la perte de contrôle
sur l‘appareil).
g) Utilisez l‘équipement dans un endroit bien aéré.
h) Vériez régulièrement l‘état des autocollants portant
des informations de sécurité. S’ils deviennent
illisibles, remplacez-les.
i) Conservez le manuel d’utilisation an de pouvoir
le consulter ultérieurement. En cas de cession de
l’appareil à un tiers, l’appareil doit impérativement
être accompagné du manuel d’utilisation.
j) Tenez les éléments d’emballage et les pièces de
xation de petit format hors de portée des enfants.
k) Tenez l’appareil hors de portée des enfants et des
animaux.
l) Lors de l’utilisation combinée de cet appareil avec
d’autres outils, respectez également les consignes se
rapportant à ces outils.
1 5
4
2
3
1. Grille de ventilation
2. Écran d‘achage
3. Panneau des boutons de commande
• v ^ - navigation dans le menu
• ESC – sortie / retour
• ENTER – conrmation / sélection
4. Voyants de l‘état de la batterie :
• Vert (GOOD) – batterie fonctionnelle
• Jaune (WEAK) – batterie faible (à charger)
REMARQUE ! Veillez à ce que les enfants et les
personnes qui n'utilisent pas l'appareil soient en
sécurité durant le travail.
h) Ne laissez pas l’appareil fonctionner sans surveillance.
i) Nettoyez régulièrement l‘appareil pour en prévenir
l’encrassement.
j) Ne couvrez pas l‘entrée et la sortie d‘air
k) Cet appareil n‘est pas un jouet. Le nettoyage et
l’entretien ne doivent pas être eectués par des
enfants, à moins qu’ils se trouvent sous la supervision
d’un adulte responsable.
l) Il est défendu de modier l’appareil pour en changer
les paramètres ou la construction.
m) Gardez le produit à l’écart des sources de feu et de
chaleur.
n) Ne surchargez pas l’appareil.
o) Ne laissez pas d‘objets métalliques entrer en contact
avec les pôles de la batterie ou les pinces de l‘appareil
connecté à la batterie - risque de court-circuit et
d‘endommagement du circuit électrique.
ATTENTION ! Bien que l'appareil ait été conçu en
accordant une attention spéciale à la sécurité et qu'il
comporte des dispositifs de protection, ainsi que des
caractéristiques de sécurité supplémentaires, il n’est
pas possible d’exclure entièrement tout risque de
blessure lors de son utilisation. Nous recommandons
de faire preuve de prudence et de bon sens lorsque
vous utilisez l’appareil.
FRFR

28 29
Rev. 23.01.2020
Rev. 23.01.2020
„ACTUAL” – tension statique de la batterie (au repos)
„INSTA-VOL” – tension avant le démarrage 12.30V;
Tension la plus basse au démarrage 9,6 V.
C. L‘appareil enregistre automatiquement le résultat
au démarrage et l‘ache à l‘écran. La tension de
la batterie au démarrage doit être supérieure à 9,6
V. Sinon, vériez les bornes (connexion, corrosion),
les câbles et les connexions. Si tout fonctionne bien,
remplacez la batterie.
D. En appuyant sur „ESC“ nous revenons au point 2 du
menu principal pour tester la batterie sous charge.
3.3.5 TEST DE CHARGE SOUS PLEINE CHARGE
A. Avec le moteur en marche, connectez l‘appareil aux
pinces de batterie en respectant la polarité.
B. Dans le menu principal „MAIN MENU“ pour tester
sous charge, appuyez sur les touches [^] [v]
pour sélectionner la position de test sous charge
maximale „MAX WORK LOAD“.
C. Après conrmation avec [ENTER], les informations
suivantes apparaîtront à l‘écran :
„Turnon loads and Speed up to 2000 To 2500
rpm,then Press <Enter>” - augmentez le régime
moteur jusqu‘à 2 000, puis jusqu‘à 2 500, puis
appuyez sur le bouton [ENTER]. Les informations
suivantes apparaitrons à l’écran (exemples de
paramètres):
Si la tension la plus basse est supérieure à 12,8 V,
le système de charge est en bon état. Si elle est
en dessous de cette valeur, vériez le système de
charge (tension de la courroie, alternateur, etc.)
D. En appuyant sur la touche [ESC], nous revenons au
menu précédent.
3.3.6 TEST DE CHARGE DE LA BATTERIE
A. En fonction du type de test de charge de la batterie,
du chargeur de batterie ou du démarrage du moteur
B. connectez l‘appareil sous la batterie comme décrit
au point 3.3.1.
C. Une fois que le menu de sélection suivant apparaît à
l‘écran (voir l‘image ci-dessous), utilisez les touches
[^] [v] pour sélectionner la position „CHARGE
SYSTEM“ et conrmez la sélection en appuyant sur
[ENTER].
D. Lorsque le message „SET VOLTAGE“ (sélection de la
tension) apparaît à l‘écran, sélectionnez la tension
nominale pour le système concerné - 6 ou 12 V
E. Selon le type d‘alimentation de la batterie, marquez
et sélectionnez l‘option appropriée, puis conrmez
avec [ENTER].
„ON-LINE” – charge de l‘alternateur
„OFF-LINE” – chargement à partir d‘une source
externe, par exemple un redresseur
F. Si le mode de charge de l’alternateur („ON-LINE“) est
sélectionné, le message suivant apparaît à l’écran :
„Start engine and Speed up to 2500 To 3500 rpm,then
Press <Enter>” – démarrez le moteur et augmentez
sa vitesse jusqu‘à 2500 puis 3500 puis appuyez sur la
touche [ENTER].
G. Veuillez suivre les instructions du message ci-
dessus et le message ci-dessous apparaîtra à l‘écran
(exemple de données).
Cela signie que le courant de charge maximum à
la sortie est de 13,88 V et que le maximum pour une
batterie 12 V est de 15 V (7. 50 V maximum pour
une batterie 6 V) et le maximum mesuré est de 14,1
V. À son tour, la charge minimale à la sortie est de
13,88 V, où le minimum autorisé est de 13,30 (pour
les batteries de 6 V, le minimum standard est de 6,60
V) et le minimum mesuré est de 13,58 V.
ATTENTION!
• Si la tension maximale mesurée dépasse 15,0 V (7,50
V pour le système 6 V), vériez le régulateur de
tension.l
3.3.3 TEST DE LA BATTERIE SOUS CHARGE
A. Connectez l‘appareil sous la batterie comme décrit
au point 3.3.1. Le menu de sélection de test s’ache,
dans lequel l’élément de test de la batterie doit être
sélectionné dans la liste „STARTING BATT“.
B. La fenêtre du menu principal „MAIN MENU“
apparaîtra pour tester sous charge . Utilisez les
touches [^] [v] pour sélectionner l’élément de réglage
de la capacité de la batterie „BATT CAPACITY“.
C. Selon la norme de batterie fournie par le fabricant,
utilisez les touches [^] [v] pour sélectionner la norme
de test „SET RATING“. Pour une batterie avec des
paramètres conformes à la norme japonaise (JIS),
consultez le tableau de conversion de la norme
américaine CCA (SAE).
D. Selon le standard de la batterie, utilisez les touches
[^] [v] pour dénir également sa capacité „SET
CAPACITY“.
E. Après avoir déni les paramètres standard
appropriés pour le test, appuyez sur [ENTER] pour
lancer le test. Une fois terminé, le résultat du test
sera aché à l‘écran comme ci-dessous.
F. Interprétation du résultat de test de charge (exemple)
• Tension de la batterie „VOLT” 12.41 V
100% - 12,78 V
75% - 12.54 V
50% - 12.3 V
25% - 12.12 V
Déchargée 11.94 V
• Résistance interne de la batterie „IR“ : 4.75 mΩ
• „SOH” CCA – 588 CCA 100%
„GREAT” – résultat positif
En dessous de 45%, la batterie doit être remplacée.
Autres exemples possibles :
„SUGGEST REPLACE” – remplacement recommandé
„GREAT NEED_CHG” – ecace, mais nécessite une recharge
due à une basse tension au repos.
„CHARGE & RETEST” – tension de la batterie trop basse,
cela peut aecter le résultat du test. Rechargez la batterie
et refaites le test.
3.3.4 ESSAI DE CHARGE AU DÉMARRAGE DU MOTEUR
A. Connectez l‘appareil comme décrit au point 3.3.1 et
avec les touches [^] [v] dans le menu, sélectionnez
„STARTING BATT“, puis „START UPLOAD“. Appuyez
sur [ENTER] pour conrmer le lancement du test.
B. Pendant le test, les paramètres suivants apparaîtront
à l‘écran :
• ATTENTION!
Pendant le test de charge, les composants de l‘appareil
peuvent chauer. Si la température de l‘appareil dépasse
le niveau trop élevé, il peut passer en mode de protection.
Si cette température ne baisse pas et que l‘utilisateur
continue à utiliser l‘appareil, l‘avertissement de surchaue
s‘activera (illustration ci-dessous). Arrêtez d‘utiliser
l‘appareil et laissez-le refroidir jusqu‘à la température
normale. La température ambiante aecte également le
fonctionnement et la température de l‘appareil.
FR
FR
„The battery voltage is low, please recharge test” – tension
de la batterie trop basse, veuillez eectuer un test sous
charge.

30 31
Rev. 23.01.2020
Rev. 23.01.2020
ATTENZIONE! Pericolo di tensione elettrica!
Indossare una protezione per gli occhi.
Utilizzare dei guanti protettivi.
ATTENZIONE! Presenza di sostanze comburenti!
ATTENZIONE! Supercie calda. Pericolo di
ustione!
Usare solo in ambienti chiusi.
• Si la tension minimale mesurée est inférieure à 13,3 V
(6,60 V pour le système 6 V), vériez les connexions
électriques, les câbles et le moteur.
3.4. NETTOYAGE ET ENTRETIEN
a) Avant chaque nettoyage ou réglage, avant tout
changement d’accessoire et lorsque vous ne
comptez pas utiliser l‘appareil pour une période
prolongée, débranchez l’appareil et laissez-le
refroidir complètement.
b) Conservez l‘appareil dans un endroit propre, frais et
sec, à l‘abri de l‘humidité et des rayons directs du
soleil.
c) Il est interdit d’asperger l‘appareil d‘eau ou de
l‘immerger dans l‘eau.
d) Évitez que de l’eau ne pénètre à l’intérieur de
l’appareil par l’intermédiaire des orices de
ventilation du boîtier.
e) Nettoyez les orices de ventilation à l‘aide d‘un
pinceau et d‘air comprimé.
f) Contrôlez régulièrement l‘appareil pour vous assurer
qu‘il fonctionne correctement et ne présente aucun
dommage.
g) Utilisez un chion doux lors du nettoyage.
MISE AU REBUT DES APPAREILS USAGÉS
À la n de sa vie, ce produit ne doit pas être jeté dans les
ordures ménagères ; il doit impérativement être remis
dans un point de collecte et de recyclage pour appareils
électroniques et électroménagers. Un symbole à cet
eet gure sur le produit, l‘emballage ou dans le manuel
d‘utilisation. Les matériaux utilisés lors de la fabrication
de l‘appareil sont recyclables conformément à leur
désignation. En recyclant ces matériaux, en les réutilisant ou
en utilisant les appareils usagés d’une autre manière, vous
contribuez grandement à protéger notre environnement.
Pour obtenir de plus amples informations sur les points de
collecte appropriés, adressez-vous à vos autorités locales.
DATI TECNICI
ISTRUZIONI PER L’USO
Il termine „apparecchio“ o „prodotto“ nelle avvertenze
e descrizioni contenute nel manuale si riferisce alla/al
TESTER DIGITALE BATTERIA. Non utilizzare l‘apparecchio
in ambienti con umidità molto elevata / nelle immediate
vicinanze di contenitori d‘acqua! Non bagnare il dispositivo.
Rischio di scossa elettrica! Le aperture di ventilazione non
devono essere coperte!
2.1. SICUREZZA ELETTRICA
a) Non toccare l‘apparecchio con mani umide
o bagnate.
b) ATTENZIONE: PERICOLO DI MORTE! Non immergere
il dispositivo in acqua o altri liquidi durante la pulizia
o la messa in funzione.
2.2. SICUREZZA SUL LAVORO
a) Mantenere il posto di lavoro pulito e ben illuminato. Il
disordine o una scarsa illuminazione possono portare
a incidenti. Essere sempre prudenti, osservare che
cosa si sta facendo e utilizzare il buon senso quando
si adopera il dispositivo.
b) Non usare il dispositivo all‘interno di luoghi
altamente combustibili, per esempio in presenza di
liquidi, gas o polveri inammabili. Il dispositivo può
produrre scintille in presenza di polvere o vapore
inammabili.
c) In presenza di dubbi sul corretto funzionamento
del dispositivo o se ci sono dei danni, rivolgersi al
servizio clienti del produttore.
d) Il prodotto può essere riparato soltanto dal fornitore.
Non auto-ripararlo.
e) In caso di incendio, utilizzare solo estintori a polvere
o ad anidride carbonica (CO2).
f) I bambini e le persone non autorizzate non devono
essere presenti sul posto di lavoro. (La disattenzione
può causare la perdita del controllo sul dispositivo).
g) Utilizzare il dispositivo in una zona ben ventilata.
h) Controllare regolarmente lo stato delle etichette
informative di sicurezza. Se le etichette non sono ben
leggibili, devono essere sostituite.
i) Conservare le istruzioni d‘uso per uso futuro. Nel
caso in cui il dispositivo venisse adato a terzi,
consegnare anche queste istruzioni.
Nome del prodotto Tester digitale batteria
Modello SBS-BT-612
Classe di protezione III
Classe di protezione IP IP 40
Dimensioni [mm] 210 x 120 x 73
Peso [kg] 0,78
Tipo di batteria supportata Piombo-acido, 6 / 12 V
Campo di prova della corrente
di carica [A] <80
Campo di prova della capacità
della batteria [Ah] 40 – 200
Valore massimo della tensione
per la corrente continua [V] 19,99
Test di resistenza interna della
batteria (mΩ) 1,00 – 99,99
Campo di capacità della
batteria supportata [Ah] 40 – 200 (salto ogni 5)
Test di avviamento Per batterie 12V
Standard di batteria supportati
[A]
CCA 100 ~ 1700
IEC 100 ~ 1000
EN 100 ~ 1700
DIN 100 ~ 1000
Campo di temperatura
d'esercizio [oC]
-10 – +40
Tempo / intervallo della prova circa 10 s / ogni 5 min
Il prodotto soddisfa le attuali norme di
sicurezza.
Leggere attentamente le istruzioni.
Prodotto riciclabile.
ATTENZIONE o AVVERTENZA! o NOTA!
per richiamare l‘attenzione su determinate
circostanze (indicazioni generali di avvertenza).
1. DESCRIZIONE GENERALE
Queste istruzioni sono intese come ausilio per un uso sicuro
e adabile. Il prodotto è stato rigorosamente progettato
e realizzato secondo le direttive tecniche e l'utilizzo delle
tecnologie e componenti più moderne e seguendo gli
standard di qualità più elevati.
PRIMA DELLA MESSA IN FUNZIONE È NECESSARIO
AVER LETTO E COMPRESO LE ISTRUZIONI D'USO.
Per un funzionamento duraturo e adabile del dispositivo
assicurarsi di maneggiarlo e curarne la manutenzione
secondo le disposizioni presentate in questo manuale.
I dati e le speciche tecniche indicati in questo manuale
sono attuali. Il fornitore si riserva il diritto di apportare
delle migliorie nel contesto del miglioramento dei propri
prodotti.
SPIEGAZIONE DEI SIMBOLI
IMPORTANTE! Le immagini contenute in questo
manuale sono puramente indicative e potrebbero
dierire dal prodotto.
Il manuale originale è stato scritto in tedesco. Le versioni in
altre lingue sono traduzioni dalla lingua tedesca.
2. NORME DI SICUREZZA
ATTENZIONE! Leggere le istruzioni d'uso e di
sicurezza. Non prestare attenzione alle avvertenze
e alle istruzioni può condurre a gravi lesioni
o addirittura al decesso.
ITFR

32 33
Rev. 23.01.2020
Rev. 23.01.2020
• „POWER BATTERY“ - test di carica della batteria
• „STARTING BATTERY“ - test della corrente di
avviamento della batteria
• „CHARGE SYSTEM“ - test di funzionamento
dell‘alternatore
B. Selezionare una determinata modalità di test
mediante i tasti [^][v] e confermare la selezione con
il tasto [ENTER].
3.3.2 TEST DI CARICA DELLA BATTERIA
A. Dopo aver collegato il dispositivo alla batteria (vedi
punto 3.3.1), selezionare con i tasti [^][v] la voce
„POWER BATTERY“ e confermare la selezione con il
tasto [ENTER].
B. Sullo schermo comparirà la schermata „SET
VOLTAGE“. (selezione della tensione della batteria).
Utilizzare i pulsanti [^][v] per selezionare la tensione
corretta per la batteria testata. Il dispositivo mostrerà
la tensione attuale della batteria. („ACTUAL:...“)
C. Quindi apparirà la schermata di impostazione della
capacità della batteria „SET BATTERY AH“. Utilizzare
i tasti [^][v] per impostare il valore Ah adeguato per
la batteria testata.
D. Premere il tasto [ENTER] e il dispositivo inizierà il test
della batteria. Dopo circa 10 secondi, il risultato del
test apparirà sullo schermo insieme alla relativa spia
di valutazione del suo stato (vedi punto 3.1).
• „ACTUAL“ - tensione della batteria a riposo
• „LOAD“ - tensioni della batteria sotto carico
(selezionare questa voce e tenere premuto il tasto
[ENTER] per leggere le attuali tensioni sotto carico).
• „RATED“ - capacità della batteria
• „IR“ - resistenza interna della batteria ottenuta in
base a parametri e test deniti.
Tensione
misurata <12.00V <12.20V <12.40V ≥12.60V
Prestazione
della batteria <25% <50% <75% 100%
• 6V
Tensione
misurata <6.00V <6.10V <6.20V ≥6.30V
Prestazione
della batteria <25% <50% <75% 100%
• Interpretazione dello stato della batteria basata su 3
indicatori luminosi a colori:
Indicatore Stato della batteria
Verde „GOOD” Batteria funzionante, sucientemente
eciente
Giallo „WEAK”
Se la luce non si attenua o non
lampeggia, la batteria è operativa,
ma le sue prestazioni sono scarse -
dovrebbe essere ricaricata.
Rosso „BAD”
Una spia rossa e un segnale acustico
indicheranno che la batteria è
troppo debole. In questo caso, non
è necessario controllare la carica
della batteria sotto carico e occorre
vericare soltanto che la tensione
ritorni rapidamente a ≥ 12V, il che
signica che la batteria è inutilizzabile.
Se il ritorno a tale tensione è lento,
occorre testarla ulteriormente.
• ATTENZIONE!
Se la tensione della batteria sotto carico è inferiore a 11,80
V (per 12 V) o 5,60 V (per 6 V) durante il test, il dispositivo
visualizzerà un messaggio che informa di tensione troppo
bassa (vedere l‘immagine sotto). Caricare la batteria prima
del test.
„The battery voltage is low, please recharge test“ - la
tensione della batteria è troppo bassa, si prega di eseguire
un test di carica sotto carico.
• ATTENZIONE!
Durante il test di carico, i componenti del dispositivo
possono diventare molto caldi. Qualora la temperatura del
dispositivo dovesse superare un livello troppo elevato, il
dispositivo potrebbe entrare in modalità di protezione. Se
la temperatura non scende e l‘utente continua ad utilizzare
il dispositivo, viene attivato l‘avviso di surriscaldamento
(gura sotto) - occorre interrompere l‘utilizzo del dispositivo
e lasciarlo rareddare no alla temperatura normale. La
temperatura ambiente inuisce anche sul funzionamento e
sulla temperatura del dispositivo.
2.3. SICUREZZA PERSONALE
a) Non è consentito l‘uso del dispositivo in uno stato
di aaticamento, malattia, sotto l‘inuenza di alcol,
droghe o farmaci, se questi limitano la capacità di
utilizzare il dispositivo.
b) Il dispositivo può essere usato solo da persone
con capacità siche adeguate che sono state
adeguatamente istruite e che hanno letto queste
istruzioni, le hanno capite e hanno appreso le norme
di sicurezza e di protezione sul posto di lavoro.
c) Questo dispositivo non è un giocattolo. I bambini
devono essere sorvegliati anché non giochino con
il prodotto.
2.4. USO SICURO DEL DISPOSITIVO
a) Non far surriscaldare il dispositivo. Utilizzare
strumenti appropriati. Dispositivi scelti correttamente
e un attento utilizzo degli stessi portano a risultati
migliori.
b) Scollegare l‘unità dall‘alimentazione prima di iniziare
l‘impostazione, la pulizia e la manutenzione. Tale
misura preventiva riduce il rischio di attivazione
accidentale del dispositivo.
c) Gli strumenti inutilizzati devono essere tenuti fuori
dalla portata dei bambini e delle persone che non
hanno familiarità con il dispositivo e le istruzioni
d’uso. Nelle mani di persone inesperte, questo
dispositivo può rappresentare un pericolo.
d) Mantenere il dispositivo in perfette condizioni.
Prima di ogni utilizzo, vericare che non vi siano
danni generali o danni alle parti mobili (frattura
di parti e componenti o altre condizioni che
potrebbero compromettere il funzionamento sicuro
del prodotto). In caso di danni, l‘unità deve essere
riparata prima dell‘uso.
e) Tenere il dispositivo fuori dalla portata dei bambini.
f) La riparazione e la manutenzione dell‘attrezzatura
devono essere eseguite esclusivamente da personale
specializzato qualicato e con pezzi di ricambio
originali. Ciò garantisce la sicurezza durante l‘uso.
g) Per garantire l‘integrità di funzionamento
dell‘apparecchio, i coperchi o le viti installati in
fabbrica non devono essere rimossi.
h) Non lasciare il dispositivo incustodito mentre è in
uso.
i) Pulire regolarmente l‘apparecchio in modo da
evitare l‘accumulo di sporcizia.
j) Non coprire l‘ingresso e l‘uscita dell‘aria.
k) Questo apparecchio non è un giocattolo! La pulizia
e la manutenzione non devono essere eseguite da
bambini a meno che non siano sotto la supervisione
di un adulto.
l) È vietato intervenire sulla costruzione del dispositivo
per modicare i suoi parametri o la sua costruzione.
m) Tenere dispositivi lontano da fonti di fuoco e calore.
n) Non sovraccaricare il dispositivo.
3. CONDIZIONI D‘USO
Il dispositivo è stato progettato per:
• verica delle condizioni delle batterie al piombo-acido
6/12 V;
• verica delle condizioni degli alternatori nei veicoli.
L‘operatore è responsabile di tutti i danni derivanti da un
uso improprio.
3.1. DESCRIZIONE DEL DISPOSITIVO
Il dispositivo è dotato di un dispositivo di protezione da:
• cattivo contatto dei terminali polari,
• polarità non corretta
• tensione troppo alta.
1 5
4
2
3
1. Griglia di ventilazione
2. Display
3. Pannello dei pulsanti di controllo
• v ^ - navigazione in menu
• ESC - esci/indietro
• ENTER - conferma/seleziona
4. Indicatori di stato della batteria:
• Verde („GOOD“) - batteria funzionante
• Giallo („WEAK“) - batteria debole (da caricare)
• Rosso („BAD“) - batteria scarica
5. Morsetti per i terminali della batteria/blu (rosso +,
nero -)
3.2. PREPARAZIONE AL FUNZIONAMENTO
POSIZIONAMENTO DEL DISPOSITIVO:
La temperatura ambiente non deve superare i 40°C e
l‘umidità relativa non deve superare l‘85%. Posizionare
l‘apparecchio in modo da garantire una buona circolazione
dell‘aria. Tenere il dispositivo lontano da fonti di calore. Il
dispositivo va sempre utilizzato su una supercie piana,
stabile, pulita, ignifuga e asciutta, lontano dalla portata dei
bambini e di persone con capacità psichiche, sensoriali e
mentali ridotte.
AVVERTENZA! Quando si lavora con questo
dispositivo, i bambini e le persone non coinvolte
devono essere protetti.
ATTENZIONE! Anche se l'apparecchiatura è
stata progettata per essere sicura, sono presenti
degli ulteriori meccanismi di sicurezza. Malgrado
l'applicazione di queste misure supplementari di
sicurezza sussiste comunque il rischio di ferirsi. Si
raccomanda inoltre di usare cautela e buon senso.
ITIT
j) Tenere gli elementi di imballaggio e le piccole parti
di assemblaggio fuori dalla portata dei bambini.
k) Tenere il dispositivo fuori dalla portata dei bambini e
degli animali.
l) Durante l’impiego del dispositivo in contemporanea
con altri dispositivi, è consigliabile rispettare le altre
istruzioni d’uso.
o) Evitare il contatto di dispositivi di metallo con
i poli della batteria oppure i morsetti del dispositivo
collegato. Sussiste il rischio di un corto circuito e di
danni al sistema elettrico.
3.3. LAVORARE CON IL DISPOSITIVO
3.3.1 COLLEGAMENTO ALL‘ALIMENTAZIONE ELETTRICA
A. Spegnere il motore, scollegare tutti gli accessori.
Collegare il morsetto rosso al polo positivo (+)
della batteria e il morsetto nero al polo negativo
(-). Il dispositivo sarà alimentato dalla batteria. Sullo
schermo apparirà il menu:
E. Indicatori orientativi per la valutazione della batteria
dopo il test:
• 12V

34 35
Rev. 23.01.2020
Rev. 23.01.2020
„CURR-VOL“ - tensione statica della batteria
(a riposo)
„INSTA-VOL“ - tensione prima dell‘avviamento
12,30V; tensione più bassa durante l‘avviamento
9,6V.
C. Durante l‘avviamento, il dispositivo salva
automaticamente il risultato e lo visualizza sullo
schermo. La tensione della batteria durante
l‘avviamento deve essere superiore a 9,6 V. In caso
contrario, controllare i terminali (collegamento,
corrosione), i li e i collegamenti. Se tutto è in ordine,
occorre sostituire la batteria.
C. Dopo aver confermato con il tasto [ENTER], sullo
schermo appariranno le seguenti informazioni:
„Turnon loads and Speed up to 2000 To 2500
rpm,then Press <Enter>” - aumentare il regime
motore a 2000, poi a 2500 e premere il tasto [ENTER].
Sullo schermo appariranno le seguenti informazioni
(esempi di parametri):
Se la tensione più bassa è superiore a 12,8 V, il
sistema di ricarica è operativo. Se è inferiore a questo
valore, controllare il sistema di carica (tensione della
cinghia, alternatore, ecc.).
D. Premere il pulsante [ESC] per uscire e tornare al
menu precedente.
3.3.6 TEST DELLA CARICA DELLA BATTERIA
A. A seconda del tipo di test di carica della batteria,
collegare il raddrizzatore alla batteria o avviare il
motore.
B. Collegare il dispositivo alla batteria come descritto al
punto 3.3.1
C. Dopo che sullo schermo appare il seguente menu
di selezione (vedere l‘immagine sotto), utilizzando
i tasti [^][v], selezionare la voce „CHARGE SYSTEM“
(caricamento dell’impianto) e confermare la
selezione con il tasto [ENTER].
D. Dopo che sullo schermo appare il messaggio „SET
VOLTAGE“. (selezione della tensione) selezionare la
tensione nominale dell‘impianto - 6 o 12 V
E. A seconda del tipo di alimentazione della batteria,
selezionare l‘opzione adeguata e confermare con il
tasto [ENTER].
„ON-LINE“ - ricarica dall‘alternatore
„OFF-LINE“ - ricarica da una fonte esterna, ad
esempio un raddrizzatore
F. In caso di selezione della modalità di ricarica
dall‘alternatore („ON-LINE“), sul display viene
visualizzato un messaggio:
„Start engine and Speed up to 2500 To 3500
rpm,then Press <Enter>” occorre avviare il motore e
aumentarne la velocità no a 2500, poi a 3500, quindi
premere il tasto [ENTER].
G. Procedere in conformità con il messaggio di cui sopra
e sullo schermo apparirà il seguente messaggio (dati
di esempio)
Questo signica che la corrente massima di carica in
uscita è di 13,88 V mentre la corrente massima per
una batteria a 12 V è di 15 V (7. 50 V per una batteria
a 6 V) e la massima corrente misurata è di 14,1 V. La
carica di uscita minima è di 13,88 V, dove il minimo
consentito è di 13,30 (per batterie da 6 V il minimo
standard è 6,60 V) e il minimo misurato è di 13,58 V.
ATTENZIONE!
• Se la tensione massima misurata supera i 15,0 V (7,50
V per un impianto a 6 V), controllare il regolatore di
tensione.
• Se la tensione minima misurata è inferiore
a 13,3 V (6,60 V per un impianto a 6 V), controllare
i collegamenti elettrici, il cablaggio e il motore.
3.4. PULIZIA E MANUTENZIONE
a) Prima di pulire o regolare il dispositivo, prima
di sostituire gli accessori o quando il dispositivo
non viene utilizzato, staccare la spina e lasciarlo
rareddare completamente.
3.3.3 TEST DELLA BATTERIA SOTTO CARICO
A. Collegare il dispositivo alla batteria secondo la
descrizione in 3.3.1, quindi apparirà la schermata
del menu di selezione del test, in cui si dovrebbe
selezionare la voce di test della batteria sotto il carico
„STARTING BATT“.
B. Apparirà la schermata del menu principale „MAIN
MENU“ per il test sotto carico. Selezionare la voce
di impostazione della capacità della batteria „BATT
CAPACITY“ utilizzando i tasti [^][v].
C. In base allo standard della batteria specicato
dal produttore, selezionare lo standard di test
„SET RATING“ utilizzando i tasti [^][v]. Nel caso di
una batteria con parametri secondo lo standard
giapponese (JIS), si prega di controllare la tabella di
conversione dello standard americano CCA (SAE).
D. Impostare la capacità „SET CAPACITY“ della batteria
utilizzando i pulsanti [^][v].
E. Dopo aver impostato i relativi parametri dello
standard di test, premere [ENTER] per avviare il test.
Al termine del test, il suo risultato verrà visualizzato
sullo schermo come mostrato di sotto.
F. Interpretazione del risultato della prova di carico
(esempio)
• Tensione batteria „VOLT“ 12,41 V
100% - 12,78 V
75% - 12.54 V
„SUGGEST REPLACE“ - si consiglia la sostituzione.
„GREAT NEED_CHG“ - operativo ma che deve essere
caricato a causa della bassa tensione a riposo.
„CHARGE & RETEST“ - tensione della batteria troppo bassa,
quindi può interferire sul risultato del test. Caricare la
batteria ed eseguire nuovamente il test.
3.3.4 TEST DI CARICA DURANTE L‘AVVIAMENTO DEL
MOTORE
A. Collegare l‘unità come descritto nel paragrafo 3.3.1
e utilizzando i tasti [^][v] nel menu selezionare
„STARTING BATT“ e poi „START UPLOAD“. Confermare
con il tasto [ENTER] per iniziare il test.
B. Durante il test, sullo schermo appariranno i seguenti
parametri:
50% - 12.3 V
25% - 12.12 V
Scaricato 11,94 V
• Resistenza interna della batteria „IR“: 4,75 mΩ
• „SOH“ CCA - 588 CCA 100%.
„GREAT „ - risultato positivo.
Al di sotto del 45%, la batteria deve essere sostituita.
Altri possibili esempi:
D. Premendo „ESC“ si ritorna al punto 2 di menu
principale per il test della batteria sotto carico.
3.3.5 TEST DI CARICA A PIENO CARICO
A. Quando il motore è in funzione, collegare il
dispositivo al morsetto della batteria secondo la
polarità.
B. Utilizzando i tasti [^][v] selezionare la voce di test
sotto carico massimo „MAX WORK LOAD“ nel menu
principale „MAIN MENU“ del test sotto carico,
ITIT

36 37
Rev. 23.01.2020
Rev. 23.01.2020
¡ATENCIÓN! ¡Advertencia de tensión eléctrica!
Utilizar protección para los ojos.
Utilizar guantes de protección.
¡ATENCIÓN! ¡Advertencia de sustancias
inamables!
¡Atención! ¡Supercie caliente! ¡Peligro de
quemaduras!
Uso exclusivo en áreas cerradas.
b) Tenere l‘apparecchio in un luogo asciutto, fresco,
protetto dall‘umidità e dalla luce diretta del sole.
c) È vietato spruzzare il dispositivo con un getto
d‘acqua o immergere il dispositivo in acqua.
d) Evitare che l‘acqua entri nell‘alloggiamento
attraverso le aperture di ventilazione.
e) Le aperture di ventilazione devono essere pulite con
una spazzola e aria compressa.
f) Eettuare controlli regolari del dispositivo per
mantenerlo eciente e privo di danni.
g) Per la pulizia utilizzare un panno morbido.
SMALTIMENTO DELLE ATTREZZATURE USATE
Questo prodotto, se non più funzionante, non deve
essere smaltito insieme ai normali riuti, ma deve essere
consegnato ad un’organizzazione competente per lo
smaltimento dei dispositivi elettrici e elettronici. Maggiori
informazioni sono reperibili sull‘etichetta sul prodotto, sul
manuale di istruzioni o sull‘imballaggio. I materiali utilizzati
nel dispositivo possono essere riciclati secondo indicazioni.
Riutilizzando i materiali o i dispositivi, si contribuisce
a tutelare l‘ambiente circostante. Le informazioni sui
rispettivi punti di smaltimento sono reperibili presso le
autorità locali.
DATOS TÉCNICOS
MANUAL DE INSTRUCCIONES
Conceptos como „aparato“ o „producto“ en las
advertencias y descripciones de este manual se reeren
a COMPROBADOR DE BATERÍAS DIGITAL. ¡No utilizar el
aparato en locales con humedad muy elevada / en las
inmediaciones de depósitos de agua! ¡No permita que el
aparato se moje! ¡Peligro de electrocución! ¡Los oricios de
ventilación no deben cubrirse!
2.1. SEGURIDAD ELÉCTRICA
a) No toque el dispositivo con las manos mojadas
o húmedas.
b) ¡ATENCIÓN, PELIGRO DE MUERTE! Nunca sumerja el
equipo en agua u otros líquidos durante su limpieza
o funcionamiento.
2.2. SEGURIDAD EN EL PUESTO DE TRABAJO
a) Mantenga el lugar de trabajo limpio y bien iluminado.
El desorden o la mala iluminación pueden provocar
accidentes. Tenga cuidado, preste atención al trabajo
que está realizando y use el sentido común cuando
utilice el dispositivo.
b) No utilice el aparato en atmósferas potencialmente
explosivas, p. ej., en la cercanía de líquidos,
gases o polvo inamables. Bajo determinadas
circunstancias los aparatos generan chispas que
pueden inamar polvo o vapores circundantes.
c) En caso de duda sobre si el producto funciona
correctamente o si detectara daños, póngase en
contacto con el servicio de atención al cliente del
fabricante.
d) El producto solamente puede ser reparado por el
fabricante. ¡No intente repararlo usted mismo!
e) En caso de incendio, utilice únicamente extintores
de polvo o dióxido de carbono (CO2) para apagar el
aparato.
f) Se prohíbe la presencia de niños y personas no
autorizadas en el lugar de trabajo (la falta de atención
puede llevar a la pérdida de control del equipo).
¡ATENCIÓN!, ¡ADVERTENCIA! o ¡NOTA! para
llamar la atención sobre ciertas circunstancias
(señal general de advertencia).
Nombre del producto Testeur de batterie
numérique
Modelo SBS-BT-612
Clase de protección III
Clase de protección IP IP 40
Dimensiones [mm] 210 x 120 x 73
Peso [kg] 0,78
Tipo de baterías compatibles De plomo y ácido,
6/12 V
Alcance de la prueba de
corriente de carga [A] <80
Alcance de la prueba de
capacidad de la batería [Ah] 40 – 200
Tensión máxima de la
corriente continua [V] 19,99
Prueba de resistencia interna
de la batería (mΩ) 1,00 – 99,99
Intervalo de capacidad de la
batería [Ah] 40 – 200 (salto cada 5)
Prueba de arranque Para baterías de 12V
Modelos de baterías
compatibles [A]
CCA 100 ~ 1700
IEC 100 ~ 1000
EN 100 ~ 1700
DIN 100 ~ 1000
Intervalo de temperatura de
trabajo [°C] -10 – +40
Tiempo / intervalo de la
prueba Aprox. 10 s / cada 5
minutos
El producto cumple con las normas de
seguridad vigentes.
Respetar las instrucciones de uso.
Producto reciclable.
1. DESCRIPCIÓN GENERAL
Este manual ha sido elaborado para favorecer un empleo
seguro y able. El producto ha sido estrictamente diseñado
y fabricado conforme a las especicaciones técnicas y para
ello se han utilizado las últimas tecnologías y componentes,
manteniendo los más altos estándares de calidad.
ANTES DE LA PUESTA EN FUNCIONAMIENTO,
LEA LAS INSTRUCCIONES MINUCIOSAMENTE Y
ASEGÚRESE DE COMPRENDERLAS.
Para garantizar un funcionamiento duradero y able del
aparato, el manejo y mantenimiento deben llevarse a cabo
de acuerdo con las instrucciones de este manual. Los
datos técnicos y las especicaciones de este manual están
actualizados. El fabricante se reserva el derecho de realizar
modicaciones para mejorar la calidad.
EXPLICACIÓN DE LOS SÍMBOLOS
¡ADVERTENCIA! En este manual se incluyen fotos
ilustrativas, que podrían no coincidir exactamente
con la apariencia real del dispositivo.
El texto en alemán corresponde a la versión original. Los
textos en otras lenguas son traducciones del original en
alemán.
2. SEGURIDAD
¡ATENCIÓN! Lea todas las instrucciones
e indicaciones de seguridad. La inobservancia de
las advertencias e instrucciones al respecto puede
provocar descargas eléctricas, incendios, lesiones
graves o incluso la muerte.
ESIT

38 39
Rev. 23.01.2020
Rev. 23.01.2020
ES
3.2. PREPARACIÓN PARA LA PUESTA EN MARCHA
LUGAR DE TRABAJO:
La temperatura ambiente no debe superar los 40°C y la
humedad relativa no debe exceder el 85%. Instale el equipo
teniendo en cuenta que debe garantizarse una buena
ventilación. Mantenga el aparato alejado de supercies
calientes. El aparato se debe usar siempre en una supercie
plana, estable, limpia, ignífuga y seca, fuera del alcance de
los niños y de personas con funciones psíquicas, mentales y
sensoriales limitadas.
3.3. MANEJO DEL APARATO
3.3.1 CONEXIÓN A LA RED
A. Apague el motor y desconecte todos los accesorios.
Conecte la clema roja al polo positivo (+) de la
batería, y la clema negra al polo negativo (-). El
aparato recibirá la alimentación de la batería. En la
pantalla aparecerá el menú:
• “POWER BATTERY” – prueba de carga de la batería
• “STARTING BATTERY” – prueba de corriente de
arranque de la batería
• “CHARGE SYSTEM” – prueba del estado del
alternador
B. Elija la prueba que quiera con los botones [^][v] y
conrme con el botón [ENTER]
3.3.2 PRUEBA DE CARGA DE LA BATERÍA
A. Después de conectar el aparato a la batería (ver
punto 3.3.1), seleccione “POWER BATTERY” con los
botones y conrme con el botón [ENTER].
B. En la pantalla aparecerá la ventana “SET VOLTAGE”
(selección de tensión de la batería). Use los botones
[^][v] para conrmar la tensión adecuada de la
batería comprobada. El aparato mostrará la tensión
actual de la batería. (ACTUAL:…)
C. continuación, aparecerá “SET BATTERY AH”, la
ventana para regular la capacidad de la batería.
Ajuste el valor adecuado de Ah de la batería probada
mediante los botones [^][v].
D. Pulse el botón [ENTER] para que el aparato comience
a comprobar la batería. Después de aprox. 10
segundos, el resultado de la prueba se mostrará en
la pantalla junto con el testigo de evaluación de su
estado (ver punto 3.1).
• ACTUAL – tensión de la batería en reposo.
• LOAD – tensión de la batería con carga (elija esta
opción y mantenga pulsado el botón [ENTER] para
conocer la tensión actual con carga).
• RATED – capacidad de la batería.
• IR – resistencia interna de la batería resultante de los
parámetros denidos y de la prueba.
E. Indicadores orientativos para evaluar la batería tras
la prueba:
• 12V
Tensión
medida <12.00V <12.20V <12.40V ≥12.60V
Rendimiento
de la batería <25% <50% <75% 100%
• 6V
Tensión
medida <6.00V <6.10V <6.20V ≥6.30V
Rendimiento
de la batería <25% <50% <75% 100%
• Interpretación del estado de la batería con base en
los 3 testigos de colores:
Testigo Estado de la batería
Verde GOOD Batería en buen estado con el
rendimiento adecuado
Amarillo WEAK
Si el testigo no se apaga o parpadea,
la batería está en buen estado pero su
rendimiento es bajo: hay que cargarla
Rojo BAD
Además del testigo rojo, sonará una
alarma que avisa que la batería está
demasiado baja. En este caso, deje de
comprobar su recarga y compruebe
únicamente si la tensión vuelve
rápidamente al estado ≥ 12V, lo cual
signica que la batería no funciona
correctamente. Si vuelve a esa tensión
lentamente, hay que vericarla de
forma adicional.
• ¡ATENCIÓN!
Si la tensión de la batería bajo carga durante la prueba
es menor de 11.80 V (en las de 12 V) o 5.60 V (en las de
6V), el aparato mostrará un mensaje de tensión baja (ver
la siguiente imagen). Cargue la batería antes de la prueba.
„The battery voltage is low, please recharge test” – la
tensión de la batería es demasiado baja, vuelva a realizar
la prueba de recarga.
2.3. SEGURIDAD PERSONAL
a) No está permitido utilizar el aparato en estado de
fatiga, enfermedad, bajo la inuencia del alcohol,
drogas o medicamentos, ya que estos limitan la
capacidad de manejo del aparato.
b) El producto solamente puede utilizarse por personas
con la forma física adecuada para el trabajo, con
el equipo de protección personal apropiado, que
hayan leído atentamente y comprendido este
manual de instrucciones y que cumplan con la
normativa en materia de seguridad y salud para el
trabajo correspondiente.
c) Este aparato no es un juguete. Debe controlar que
los niños no jueguen con él.
2.4. MANEJO SEGURO DEL APARATO
a) No permita que el aparato se sobrecaliente. Utilice
las herramientas apropiadas para cada trabajo.
Debe seleccionarse el aparato adecuado para cada
aplicación y utilizarse conforme al n para el que
ha sido diseñado, para conseguir así los mejores
resultados.
b) Antes de proceder a la limpieza, ajuste
o mantenimiento, desconecte el dispositivo del
suministro eléctrico. Esta medida preventiva reduce
el riesgo de que el dispositivo se ponga en marcha
accidentalmente.
c) Mantenga las herramientas fuera del alcance de los
niños y de las personas que no estén familiarizadas
con el equipo en sí o no hayan recibido las
instrucciones pertinentes al respecto. En manos de
personas inexpertas este equipo puede representar
un peligro.
d) Mantenga el aparato en perfecto estado
de funcionamiento. Antes de cada trabajo,
compruébelo en busca de daños generales o de
piezas móviles (fractura de piezas y componentes
u otras condiciones que puedan perjudicar el
funcionamiento seguro de la máquina). En caso de
daños, el aparato debe ser reparado antes de volver
a ponerse en funcionamiento.
e) Mantenga la unidad fuera del alcance de los niños.
f) La reparación y el mantenimiento de los equipos
solo pueden ser realizados por personal cualicado
y siempre empleando piezas de repuesto originales.
Esto garantiza la seguridad durante el uso.
g) A n de asegurar la integridad operativa del
dispositivo, no se deben retirar las cubiertas o los
tornillos instalados de fábrica.
h) No deje este equipo sin supervisión mientras esté en
funcionamiento.
3. INSTRUCCIONES DE USO
El aparato está indicado para:
• Comprobar el estado de baterías de plomo y ácido
de 6/12 V.
• Comprobar el estado de los alternadores de vehículos.
El usuario es responsable de los daños derivados de un
uso inadecuado del aparato.
3.1. DESCRIPCIÓN DEL APARATO
El aparato está equipado con un seguro contra:
• Un contacto ojo de las pinzas de conexión
• El desorden de los polos
• Tensiones demasiado altas
ES
g) Utilice el equipo en un espacio bien ventilado.
h) Compruebe regularmente el estado de las etiquetas
de información de seguridad. Si las pegatinas fueran
ilegibles, habrán de ser reemplazadas.
i) Conserve el manual de instrucciones para futuras
consultas. Este manual debe ser entregado a toda
persona que vaya a hacer uso del dispositivo.
j) Los elementos de embalaje y pequeñas piezas de
montaje deben mantenerse alejados del alcance de
los niños.
k) Mantenga el equipo alejado de niños y animales.
l) Al utilizar este equipo junto con otros, también
deben observarse otras instrucciones de uso.
1 5
4
2
3
1. Rejilla de ventilación
2. Pantalla
3. Panel de botones de control
• v ^ - navegación en el menú
• ESC – salir/atrás
• ENTER – conrmar/elegir
4. Controles del estado de la batería:
• Verde (GOOD) – batería en buen estado
• Amarillo (WEAK) – batería baja (se debe recargar)
• Rojo (BAD) – batería descargada
5. Botones en los polos de la batería/clema (rojo +,
negro -)
i) Limpie regularmente el dispositivo para evitar que la
suciedad se incruste permanentemente.
j) ¡No cubra la entrada ni la salida de aire!
k) Este aparato no es un juguete. La limpieza y el
mantenimiento no deben ser llevados a cabo por
niños que no estén bajo la supervisión de adultos.
l) Se prohíbe realizar cambios en la construcción del
dispositivo para modicar sus parámetros o diseño.
m) Mantenga el dispositivo alejado de fuentes de fuego
o calor.
n) No permita que el aparato se sobrecargue.
o) No permita que los polos de la batería o las pinzas del
aparato conectadas a la misma entren en contacto
con objetos metálicos, ya que esto conlleva riesgo de
cortocircuito y daños en el sistema eléctrico.
¡ADVERTENCIA!Los niños y las personas no
autorizadas deben estar asegurados cuando trabajen
con esta unidad. ¡ATENCIÓN! Aunque en la fabricación de este aparato
se ha prestado gran importancia a la seguridad,
dispone de ciertos mecanismos de protección
extras. A pesar del uso de elementos de seguridad
adicionales, existe el riesgo de lesiones durante el
funcionamiento, por lo que se recomienda proceder
con precaución y sentido común.
Other manuals for SBS-BT-612
1
Table of contents
Languages:
Other Steinberg Systems Test Equipment manuals
Popular Test Equipment manuals by other brands

DH Instruments
DH Instruments E-DWT-10000-AF Operation and maintenance manual

Omnitronic
Omnitronic SLM Series user manual

Beha-Amprobe
Beha-Amprobe UAT-600-EUR Series user manual

Hisense
Hisense HKF-D1EC Instructions for installation, use and maintenance manual

Teledyne Lecroy
Teledyne Lecroy HDO4032 Operator's manual

Alcolizer
Alcolizer Druglizer LE5 user manual