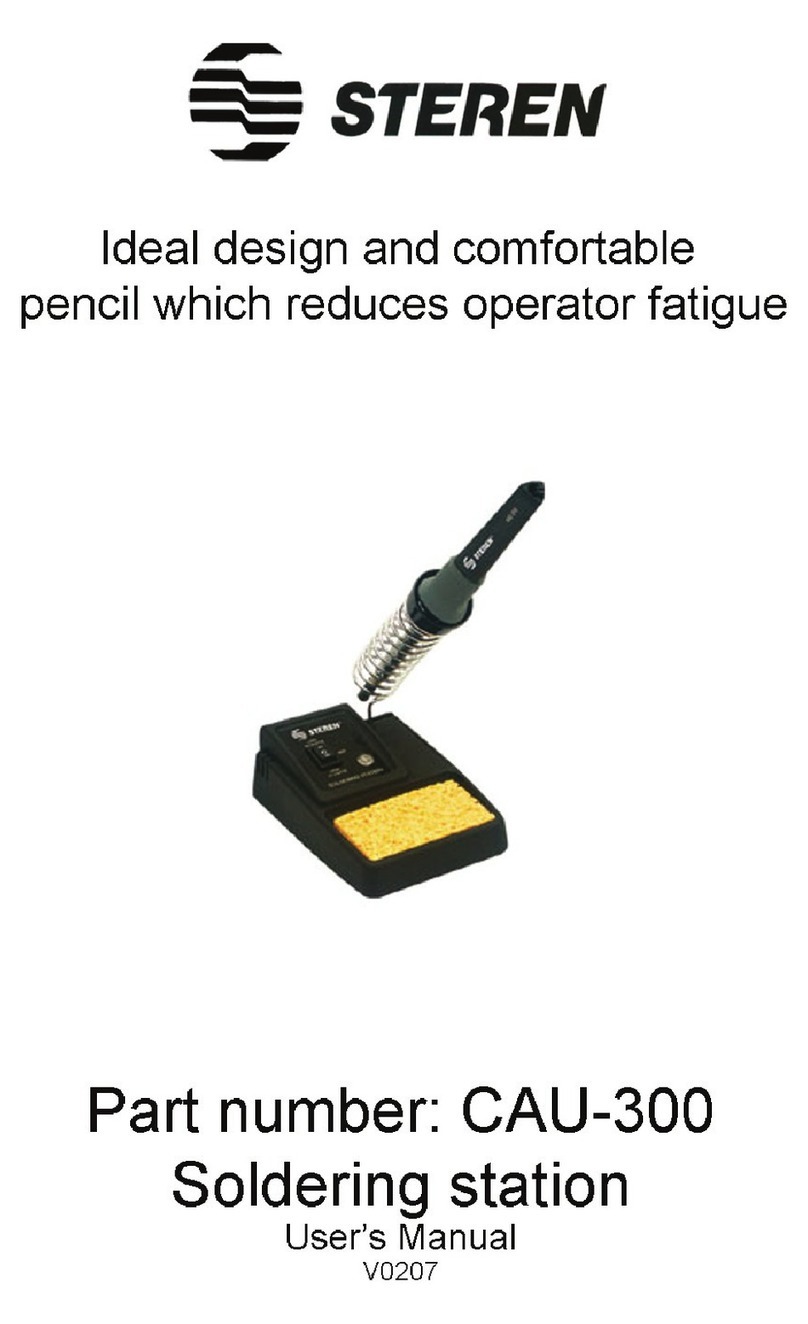
Steren CAU-300 User manual


CAUTÍN DE ESTACIÓN DOBLE POTENCIA
CAU-250
Gracias
por haber adquirido su nuevo Cautín de
Estación. Para apoyo, compras y para
todo lo nuevo que tiene Steren, visite
nuestro sitio Web en:
www.steren.com
Antes de usar su nuevo Cautín de Estación Steren, lea por
completo este instructivo.
2

IMPORTANTE
- No toque el cautín en las partes metálicas cuando esté
conectado.
- No utilice el equipo cerca de cualquier material combustible.
- Antes de limpiar o intercambiar partes del equipo,
desconéctelo de la toma de corriente.
- Siempre utilice un paño suave, limpio y seco para limpiar el
equipo.
- No intente abrir el equipo, puede ocasionar
malfuncionamiento y se anulará de la garantía.
- No use ni almacene este equipo en lugares donde este
expuesto a salpicaduras o goteo, esto puede causar mal
funcionamiento.
- Si el cordón de alimentación se encuentra dañado o
machucado, deberá ser reemplazado únicamente por el
fabricante o el personal calicado, para evitar riesgos.
- No introduzca la punta del cautín en agua para acelerar el
enfriamiento.
- No utilice limas para limpiar la punta del cautín.
- Para su uso en interiores únicamente.
3

CARACTERISTICAS
- Luz Indicadora de encendido. La luz se prende cuando el
cautín está funcionando.
- Selector de temperatura de 20/40 Watts. Le permite soldar
tanto circuitos electrónicos como trabajos más pesados.
- Protector de silicón antirresbalante para proteger del calor.
Hace el trabajo rápido y fácil.
- Estación con disipador de calor integrado. Ayuda a evitar
quemaduras y salpicaduras de soldadura en el área de trabajo.
- Esponja para limpiar la punta. Permite mantener la punta
limpia mientras se usa el cautín.
- Soporte de resorte que disipa el calor. Sostiene el cautín en
un ángulo cómodo y evita quemaduras.
- Base antiderrapante. Evita que el cautín se resbale y caiga.
4

PARTES
1. Cautín.
2. Base.
3. Soporte.
4. Esponja limpiadora.
5. Interruptor.
6. LED indicador.
5

INSTRUCCIONES
1. Coloque el soporte en la base y humedezca ligeramente la
esponja limpiadora.
2. Coloque el interruptor en la posición de OFF y conecte el
cautín a la red eléctrica.
3. Seleccione la temperatura según sus necesidades (20 W
para circuitos impresos y 40 W para trabajos pesados)
4. Espere a que se caliente hasta el término en que la
soldadura comience a fundirse.
5. Mantenga la punta del cautín cubierta con una ligera capa de
soldadura. Esto hace que haya mejor transferencia de calor.
6. Cuando haya terminado de utilizar el cautín, ponga el
interruptor en la posición de OFF y desconecte el cautín del
tomacorriente.
7. Para mantener en condiciones óptimas el equipo, remueva
los residuos de soldadura de la punta del cautín una vez que el
equipo se haya enfriado por completo.
No mantenga el equipo conectado por períodos de tiempo
largos.
Si requiere cambiar a punta del cautín, espere que esté
totalmente frío, luego desenrosque y cambie la punta. La punta
de repuesto es el modelo CAU-301.
6

ESPECIFICACIONES
- Entrada: 120V~
- Frecuencia: 50/60Hz
- Potencia de consumo: 20/40 W seleccionable
El diseño del producto y las especicaciones pueden
cambiar sin previo aviso.
7

PÓLIZA DE GARANTÍA
Esta póliza garantiza el producto por el término de un año en todas sus partes y mano de obra, contra cualquier
defecto de fabricación y funcionamiento, a partir de la fecha de entrega.
CONDICIONES
1.- Para hacer efectiva la garantía, presente ésta póliza y el producto, en donde fue adquirido o en Electrónica
Steren S.A. de C.V.
2.- Electrónica Steren S.A de C.V. se compromete a reparar el producto en caso de estar defectuoso sin ningún
cargo al consumidor. Los gastos de transportación serán cubiertos por el proveedor.
3.- El tiempo de reparación en ningún caso será mayor a 30 días, contados a partir de la recepción del producto
en cualquiera de los sitios donde pueda hacerse efectiva la garantía.
4.- El lugar donde puede adquirir partes, componentes, consumibles y accesorios, así como hacer válida esta
garantía es en cualquiera de las direcciones mencionadas posteriormente.
ESTA PÓLIZA NO SE HARA EFECTIVA EN LOS SIGUIENTES CASOS:
1.- Cuando el producto ha sido utilizado en condiciones distintas a las normales.
2.- Cuando el producto no ha sido operado de acuerdo con el instructivo de uso.
3.- Cuando el producto ha sido alterado o reparado por personal no autorizado por Electrónica Steren S.A. de C.V.
El consumidor podrá solicitar que se haga efectiva la garantía ante la propia casa comercial donde adquirió el
producto. Si la presente garantía se extraviara, el consumidor puede recurrir a su proveedor para que le expida
otra póliza de garantía, previa presentación de la nota de compra o factura respectiva.
DATOS DEL DISTRIBUIDOR
Nombre del Distribuidor
Domicilio
Número de serie
Fecha de entrega
ELECTRONICA STEREN S.A. DE C.V.
Camarones 112, Obrero Popular, 02840, México, D.F. RFC: EST850628-K51
STEREN PRODUCTO EMPACADO S.A. DE C.V.
Biólogo MaximIno Martínez No. 3408 Int. 3 y 4, San Salvador Xochimanca, México, D.F. 02870,
RFC: SPE941215H43
ELECTRONICA STEREN DEL CENTRO, S.A. DE C.V.
Rep. del Salvador 20 A y B, Centro, 06000, México. D.F. RFC: ESC9610259N4
ELECTRONICA STEREN DE GUADALAJARA, S.A.
López Cotilla No. 51, Centro, 44100, Guadalajara, Jal. RFC: ESG810511HT6
ELECTRONICA STEREN DE MONTERREY, S.A.
Colón 130 Pte., Centro, 64000, Monterrey, N.L. RFC: ESM830202MF8
ELECTRONICA STEREN DE TIJUANA, S.A. de C.V.
Calle 2a, Juárez 7636, Centro, 22000, Tijuana, B.C.N. RFC: EST980909NU5
En caso de que su producto presente alguna
falla, acuda al centro de distribución más
cercano a su domicilio y en caso de tener
alguna duda o pregunta por favor llame a
nuestro Centro de Atención a Clientes, en
donde con gusto le atenderemos en todo lo
relacionado con su producto Steren.
Centro de Atención a Clientes
01 800 500 9000
Producto: Cautín de Estación Doble Potencia
Modelo: CAU-300
Marca: Steren
8


DUAL HEAT SOLDERING STATION
CAU-250
Thank you
for purchasing your new Soldering
Station. For support, shopping, and
everything new at Steren, visit our
website:
www.steren.com
Before using your new Steren’s Soldering Station, read
this user’s manual carefully.
2

IMPORTANT
- Do not touch the iron’s metallic parts while it’s in use.
- Do not use this equipment near ammable materials.
- Before clean or replace equipment’s parts, unplug it from
power.
- Always use a soft and dry cloth to clean the equipment.
- Do not try to open the equipment, this may cause malfunction
and void the warranty.
- Do not use the equipment in wet or damp places.
- If the power cord is damaged, it must be replaced by the
manufacturer or by authorized personnel to avoid risks.
- Do not put the iron’s tip in water to accelerate cooling.
- Do not use a le to clean the tip.
- Only for indoor use.
3

FEATURES
- Power on light indicator. Lights when the soldering iron is
heating.
- 20 / 40 Watt switchable temperature setting in one soldering
iron. Lets you solder either electronic circuits or heavier jobs.
- Comfortable lightweight pencil iron with cool rubber. Makes
soldering work easy and quick.
- Built-in soldering station with coil holder for iron. Helps keep
your workbench free from solder splatters and burn marks.
- Tip cleaning sponge pad. Makes it easy to keep the soldering
iron clean while you use it.
- Heat dissipating coil. Securely hold the soldering iron at a
convenient angle, avoiding burns.
- Non slip base. Stays in place and will not allow the iron to tip
over.
4

PARTES
1. Soldering iron.
2. Base.
3. Coil holder.
4. Sponge pad.
5. Swtch.
6. Indicator LED.
5

INSTRUCTIONS
1. Place the coil iron holder into its slot on the base.
2. Set the switch to the OFF position and connect the iron to the
AC outlet.
3. Select the temperature according to your needs (20 W for
circuit boards and 40 W for heavier work).
4. The tip will be hot enough when the solder begin to melt.
After this you can start to solder.
5. Maintain the iron’s tip covered with a small amount of solder.
This improves heat transfer.
6. When you nish to use the iron, set the switch to the OFF
position an unplug the iron.
7. To maintain the equipment in peak conditions, remove any
solder residues from the iron’s tip once it’s cold.
Do not maintain the equipment connected for long periods of
time.
If you require to change the tip of the soldering iron, wait until
it’s completely cold, then unscrew and remove the tip. The
replacement tip is model CAU-301.
6

SPECIFICATIONS
- Power input: 120V~
- Frequency: 50/60Hz
- Power output: 20/40W selectable
Product design and specications are subject to change
without notice.
7

WARRANTY
This Steren product is warranted under normal usage against defects in
workmanship and materials to the original purchaser for one year from the date of purchase.
CONDITIONS
1.- This warranty card with all the required information, invoice or purchase ticket, product box or package, and
product, must be presented when warranty service is required.
2.- If the product stills on the warranty time, the company will repair it free of charge.
3.- The repairing time will not exceed 30 natural days, from the day the claim was received.
4.- Steren sell parts, components, consumables and accesories to costumer, as well as warranty service, at any of
the addresses mentioned later.
WARRANTY IS VOID IN NEXT CASES:
If the product has been damaged by an accident, acts of God, mishandling, leaky batteries, failure to follow enclosed
instructions, improper repair by unauthorized personnel, improper safe keeping, among others.
a) The consumer can also claim the warranty service in the purchase establishment.
b) If you lose the warranty card, we can reissue it, if you show the invoice or
purchase ticket.
In case your product fails, contact tour nearest retailer. If you have any doubt, please call our Call Center.
Call Center
01 800 500 9000
Product: Dual Heat Soldering Station
Part number: CAU-300
Brand: Steren
8
Other manuals for CAU-300
1
Table of contents
Languages:
Other Steren Soldering Gun manuals