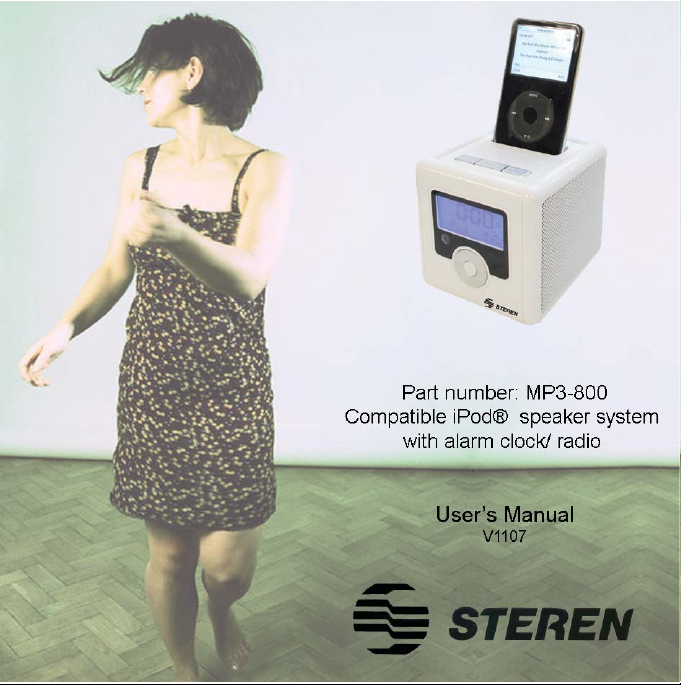
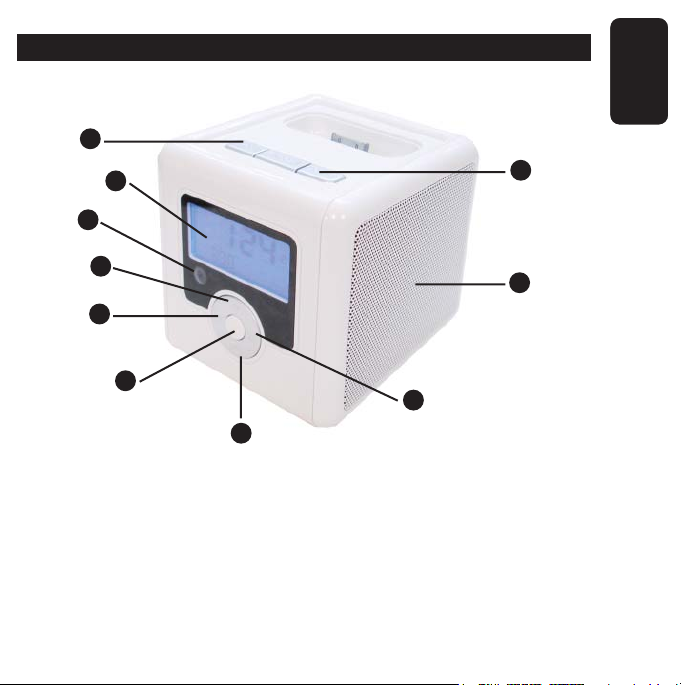
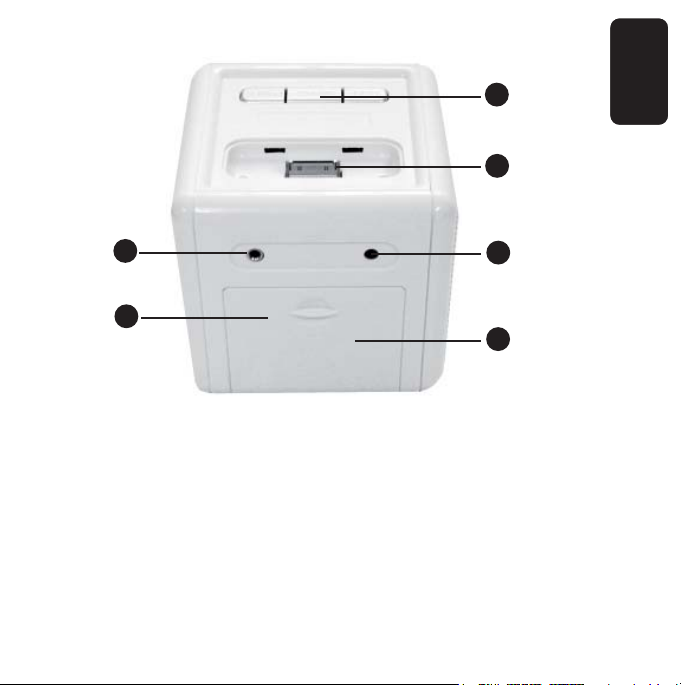
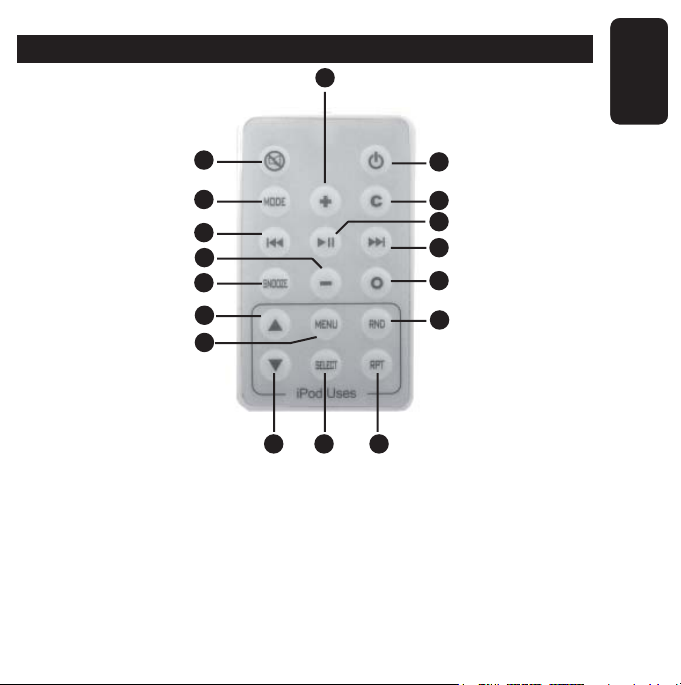
Steren MP3-800 User manual


ENGLISH
ENGLISH-02
Before using your new compatible iPod® speaker system with
alarm clock/ radio please read this instruction manual to prevent
any damage. Put it away in a safe place for future references.
IMPORTANT
Do not expose to extreme temperatures.
Do not drop or bump the device, may cause damages on it.
Clean only with a soft, dry cloth.
FEATURES
Alarm clock
Universal audio input jack
iPod® dock
Remote control
FM radio
Clock backup battery
CONTENT
1 Portable audio system
1 AC power adapter
3,5mm audio cable
5 plastic adapters compatible with iPod®
•
•
•
•
•
•
•
•
•
•
•
•
•
Before usin
g
y
our new compatible iPod
®
speaker s
y
stem with
a
larm clock
/
radio please read this instruction manual to prevent
a
n
y
dama
g
e. Put it awa
y
in a safe place for future references
.

ENGLISH
ENGLISH-03
CONTROLS
1.- Speakers
2.- Volume + / -
Increase or diminish the sound volume level
1
2
3
4
5
6
7
810
2

ENGLISH
ENGLISH-04
3.- Forward
In radio mode, search for next radio signal or memory
In iPod® mode, jumps to next song
Press and hold 2 seconds to enter Program mode
4.- Backward
In Radio mode, returns to last radio station or memory
In iPod® mode, returns to previous song
Press and hold 2 seconds to enter Program mode
5.- Play / Pause
In iPod® mode plays a song / makes a pause
In Program mode, press it to store a radio station in memory or leave
the Program mode
6.- LCD screen
7.- Infrared sensor
8.- Mode
Switch between iPod®, line or radio modes.

ENGLISH
ENGLISH-05
9.- Snooze
Press once to deactivate the alarm temporarily 5 minutes. Press and
hold for 2 seconds to disable the alarm.
10.- Power
Press to power on / off the device
9
11
12 13
14
15

ENGLISH
ENGLISH-06
11.- Dock connector
Use this connector to plug almost all kind of iPod® models (with dock
connector). If needed, this device includes 5 different adapters
according to your iPod®.
12.- Line-in
Use it to connect an external audio device, such as MP3 player or
mobile with a 3,5mm output jack.
13.- AC input jack
Use it to connect the supplied AC power adapter
14.- Battery compartment
Allows you to use 6 AAA batteries to power it up.
15.- Backup battery compartment
This device uses a CR2032 battery as a backup system, in case the
electricity fails.

ENGLISH
ENGLISH-07
REMOTE CONTROL
1.- Mute
2.- On / Off
3.- Mode
4.- Volume +
5.- Alarm time / Auto on-off display
6.- Backward
7.- Play / Pause
8.- Forward
12
3
4
5
67
8
9
10 11
12
13 14
151612

ENGLISH
ENGLISH-08
9.- Snooze
10.- Volume –
11.- Alarm on / off
Functions designed for iPod®
12.- Volume + / - / option selection
13.- Main menu
14.- Random play mode on /off
15.- Repeat mode on / off
16.- Option confirmation
POWER SUPPLY
Your audio system can works using the included AC power adapter or
with 6 AAA alkaline batteries.
If you use the power adapter:
Just plug the AC power adapter to the input jack (DC 9V IN), then plug it
into an AC outlet.
If you want to use the batteries:
Slide the battery compartment cover down and place 6 AAA alkaline
batteries, paying attention to polarity.
Finally, replace the cover.

ENGLISH
ENGLISH-09
Remember that this device includes a backup battery, just open
the battery compartment cover and you will find the compartment
for a CR2032 button type battery. This backup battery works for the
clock if the electricity goes off.
INSTRUCTIONS
1.- Unpack the device and accessories carefully.
2.- Place the speaker in a flat surface.
3.- If you use a MP3 player, CD or DVD player or a mobile, or any
other device with a 3,5mm output jack, use the supplied audio cable
and connect them to the LINE IN connector. If you use an iPod® with
dock connector, place it over the base. Remember, you have 5 different
bases to fit your iPod® on the base.
Remember that this device includes a backup batter
y
,
j
ust open
t
he batter
y
compartment cover and
y
ou will find the compartment
f
or a CR2032 button t
y
pe batter
y
. This backup batter
y
works for th
e
c
lock if the electricit
y
g
oes off
.

ENGLISH
ENGLISH-10
4.- Plug the AC power adapter to the speaker and the outlet.
5.- Turn the speaker on. The LCD screen will light up.
6.- Press Mode button to select the device you want to use (Line,
iPod®, or Radio).
7.- If you use a MP3 player, turn it on and press play for playing. If you
use the radio, tune a radio station. If you use an iPod®, press Play /
Pause in the frontal panel (or remote control) of the speaker.
8.- You can set the volume level while playing music.
9.- Press Power button after their use and remove the portable audio
device from the speaker.
Dock connector allows you to charge the iPod®’s battery while
listening to music. Make sure to place it well in order to have a
good performance.
If you want to charge the iPod®’s battery without listening to the
music, turn the speakers off but DO NOT unplug the AC power
adapter.
D
ock connector allows
y
ou to char
g
e the iPod
®
’s batter
y
while
li
sten
i
n
g
to mus
i
c.
M
a
k
e sure to p
l
ace
i
t we
ll
i
n or
d
er to
h
ave a
g
ood performance
.
If
y
ou want to char
g
e the iPod
®
’s batter
y
without listenin
g
to the
m
usic, turn the speakers off but DO NOT unplu
g
the AC power
ad
apter
.

ENGLISH
ENGLISH-11
SETTING TIME
1.- Press and hold Mode 2 seconds, in the screen will flash the first two
digits of the alarm.
2.- Press Mode twice to select 24 or 12 hour system.
3.- Press Mode once again, the first two digits of the current time will
flash. Use Forward / Backward to set the current hour.
4.- Press Mode once, now the minutes will flash. Use Forward /
Backward to configure them.
5.- Press Play / Pause to store the changes.
SETTING THE ALARM
1.- Press and hold Mode 2 seconds.
2.- The first two digits of the alarm will flash, use Forward / Backward to
set the hour of the alarm.
3.- Press Mode once again, now the minutes will flash. To configure
them use Forward / Backward buttons.
4.- Press Play / Pause to store the changes.
Press Snooze button once to turn the alarm off for 5 minutes.
Press and hold Snooze 2 seconds to disable the alarm.
ENABLING THE ALARM
With the device off, press Play / Pause to activate or deactivate the
alarm. If the alarm is ON, a “bell” icon will appear in the screen.
Press Snooze button once to turn the alarm off for 5 minutes
.
Press and hold Snooze 2 seconds to disable the alarm
.

ENGLISH
ENGLISH-12
AUTOMATIC POWER ON
1.- Press and hold Mode 2 seconds to enter program mode.
2.- Press Mode 5 times to enter automatic ON menu. The first two digits
will flash.
3.- Use Forward / Backward buttons to set the time when then speakers
will turn on automatically.
4.- Press Mode once again, the minutes will flash. Use Forward /
Backward to set the minutes.
5.- Press Mode twice to set the auto-off time.
6.- As in last steps, use Forward / Backward to set the hour.
7.- Press Mode once, the minutes will flash.
8.- To set the minutes, use Forward / Backward.
9.- Press Play / Pause to store the changes.
10.- The alarm will turn on / off at the specified time.
HOW TO TUNE AND STORE RADIO STATIONS
1.- Turn the speakers on.
2.- Press Mode to select the Radio mode.
3.- Press and hold Forward two seconds to enter Tune Mode.
4.- Use Forward / Backward to select a radio station.
5.- After you found a radio station, press Play / Pause to store the
station into a memory. When the number of the memory blinks, press
Forward / Backward to select a number of memory. Press Play / Pause
to store the changes (the system can stores up to 6 memories).

ENGLISH
ENGLISH-13
SPECIFICATIONS
Power output: 2W rms x 2
Frequency response: 200Hz at 12kHz
Impedance 4Ohms
Sensitivity: 89dB
THD: <0,1%
Input: 9V (6 x AAA)
9V 1A (AC adapter)
Dimensions: 110x110x115mm
Weight: 956g
AC power adapter
Input: 100-250V~ 50-60Hz 11W max.
Output: 9V 1A
Remote Control
Input: 3V (1xCR2032)
Product design and specifications are subject to change without
previous notice
This set does not contain an iPod®.
All brands and product names mentioned on this user’s manual
may be trademarks or registered trademarks of their respective
owners.
P
roduct desi
g
n and specifications are sub
j
ect to chan
g
e without
p
revious notic
e
T
his set does not contain an iPod
®.
A
ll brands and
p
roduct names mentioned on this user’s manual
m
a
y
be trademarks or re
g
istered trademarks of their respective
o
w
ners.

WARRANTY
This Steren product is warranted under normal usage against defects in workmanship and
materials to the original purchaser for one year from the date of purchase.
CONDITIONS
1.- This warranty card with all the required information, invoice or purchase ticket, product
box or package, and product, must be presented when warranty service is required.
2.- If the product stills on the warranty time, the company will repair it free of charge.
3.- The repairing time will not exceed 30 natural days, from the day the claim was received.
4.- Steren sell parts, components, consumables and accesories to costumer, as well as
warranty service, at any of the addresses mentioned later.
THIS WARRANTY IS VOID IN THE NEXT CASES:
If the product has been damaged by an accident, acts of God, mishandling, leaky batteries,
failure to follow enclosed instructions, improper repair by unauthorized personnel, improper
safe keeping, among others.
a) The consumer can also claim the warranty service in the purchase establishment.
b) If you lose the warranty card, we can reissue it, if you show the invoice or purchase ticket.
Product: Compatible iPod® speaker system
Part number:MP3-800
Brand: Steren

RETAILER INFORMATION
Name of the retailer
Address
Product
Brand
Part number
Serial number
Date of delivery
In case your product fails or have questions, please contact your nearest dealer. If
you are in Mexico, please give a call to our Call Center.
Call Center
01 800 500 9000


Antes de utilizar su nuevo Sistema de Audio, FM y alarma
compatible con iPod® lea este instructivo para evitar cualquier mal
funcionamiento. Guárdelo para futuras referencias.
IMPORTANTE
No exponga el equipo a temperaturas extremas.
No deje caer el equipo, podría ocasionar fallas.
Siempre utilice un paño suave, limpio y seco para limpiar el equipo.
CARACTERÍSTICAS
Reloj despertador
Entrada universal de audio
Entrada para iPod®
Control remoto
Radio FM
Batería de respaldo para reloj
CONTENIDO
Un sistema de audio portátil
Convertidor de corriente
Cable de audio con conectores 3,5mm
5 adaptadores de plástico compatibles con iPod®
•
•
•
•
•
•
•
•
•
•
•
•
•
ESPAÑOL-02
ESPAÑOL
A
ntes de utilizar su nuevo Sistema de Audio, FM
y
alarma
c
ompatible con iPod
®
lea este instructivo para evitar cualquier mal
f
uncionamiento. Guárdelo para futuras referencias
.

CONTROLES
1.- Bocinas
2.- Volumen + / -
Aumenta o disminuye el nivel de volumen durante la reproducción de
audio
ESPAÑOL-03
ESPAÑOL
1
2
3
4
5
6
7
810
2

3.- Adelantar
En modo de radio, cambia a la siguiente estación de radio o memoria
En modo de iPod®, cambia a la siguiente canción
Mantenga presionado el botón para entrar al modo de programación
4.- Regresar
En modo de radio, regresa a la estación de radio o memoria previa
En modo de iPod®, cambia a la canción previa
Mantenga presionado el botón para entrar al modo de programación
5.- Reproducir / Pausa
En modo de iPod® comienza la reproducción de un archivo / realiza
una pausa.
En modo de programación permite salvar una estación en memoria o
salir del modo de programación
6.- Pantalla de LCD
7.- Sensor infrarrojo
8.- Modo
Permite elegir entre el modo de iPod®, Entrada de Línea, o Radio.
ESPAÑOL-04
ESPAÑOL

9.- Botón de repetición
Presione una vez para desactivar la alarma por 5 minutos. Mantenga
presionado el botón por 2 segundos para apagar la alarma.
10.- Apagar / Encender
Permite encender o apagar el equipo.
ESPAÑOL-05
ESPAÑOL
9
11
12 13
14
15
Other manuals for MP3-800
1
Table of contents
Languages:
Other Steren Speakers manuals

Steren
Steren BOC-852 User manual

Steren
Steren BOC-870 User manual

Steren
Steren BAF-0880 User manual

Steren
Steren BOC-830 User manual

Steren
Steren BOC-868 User manual

Steren
Steren TR5-588PB User manual

Steren
Steren BOC-838 User manual

Steren
Steren BAF-1245 User manual

Steren
Steren BAF-210 User manual

Steren
Steren BAF-1595 User manual

Steren
Steren BOC-851 User manual

Steren
Steren BRK-210 User manual

Steren
Steren V0808 User manual

Steren
Steren BOC-839 User manual

Steren
Steren SPK-640 User manual

Steren
Steren BOC-1130 User manual

Steren
Steren MG-200 User manual

Steren
Steren BOC-040 User manual

Steren
Steren MG-600 User manual

Steren
Steren BAF-1594 User manual