V1.0
0118A
Gun style digital IR thermometer
Instruction manual
HER-427
MODE
SET
T/DN/UP
H
ºF
L
D
38 mm@
450 mm
75 mm@
900 mm
132 mm@
1500 mm
1.5 “@
18 “ 3 “@
36 “
5.3 “ @
60 “
S
-32°
-32°
350°
-32°
-32°
350°
MODE
SET
T/DN
/UP
IMPORTANT
CAUTIONS
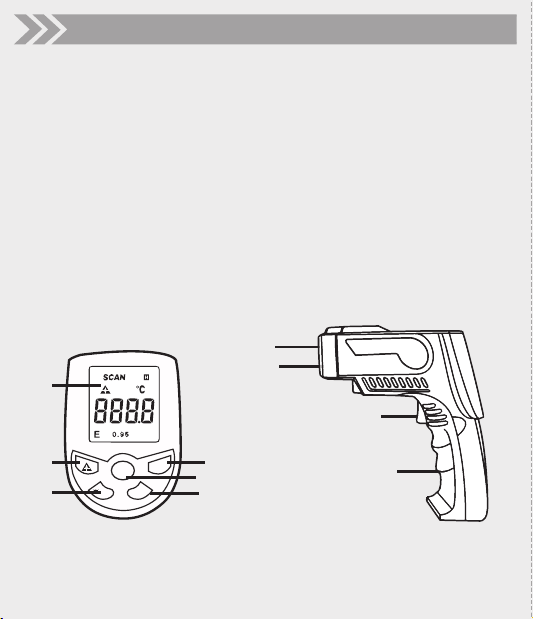
PARTS SYMBOLS OF THE SCREEN IMPORTANT CONSIDERATIONS
Read this instruction carefully to avoid any malfunction.
The information shown in this manual serves only as a reference for the product.
Due to updates there may be differences.
Please check our website www.steren.com for the most recent version of this manual.
• This device is not intended for use by persons (including children), whose physical, sensory or mental abilities
are different or reduced, or who lack experience or knowledge.
• Children should be supervised to ensure they do not use the device as a toy.
• To avoid damage and injury to the eyes, do not look directly at the laser. Do not point directly at people or
animals or at reflective surfaces.
• If laser radiation hits the eye, you should close your eyes and immediately move your head out of the beam.
• Do not try to use dark glasses as protection, as they do not protect against laser radiation.
• Do not use the appliance in an environment where there are liquid fuels, gases or powdered materials, as this
may cause sparks and fire.
• Pay attention to what you are doing when operating this appliance.
* Press the backlight button to turn on / off
1. Laser pointer
2. Infrared sensor
3. Measuring trigger
4. Battery compartment
5. Change of function (MAX, MIN, AVG, LAL, HAL)
6. Degrees (Celsius or Fahrenheit)
7. Backlight / Top
8. Power on / off laser pointer
9. LCD screen
10. Change of emissivity
1. Laser on
2. High temperature warning indicator
3. Low temperature warning indicator
4. Data retention
5. Temperature measurement ºC or ºF
6. Emissivity
7. Scanning
8. Main measurement
* Before measuring any surface, make sure it is clean.
* If the surface of the object you want to measure is very reflective, apply adhesive tape or apply matte black
paint and before measuring, wait for it to adjust to the temperature of the covered object.
* The measurements should be taken as close as possible to the object. The thermometer can take
measurements at a greater distance (up to 12 meters), however, they can be affected by external agents (steam,
dust, smoke, dirt, etc.).
* Measurements made through transparent surfaces such as glass may not be accurate.
* The thermometer automatically compensates for ambient temperature deviations, however, it may take a few
minutes to adjust to wide temperature changes.
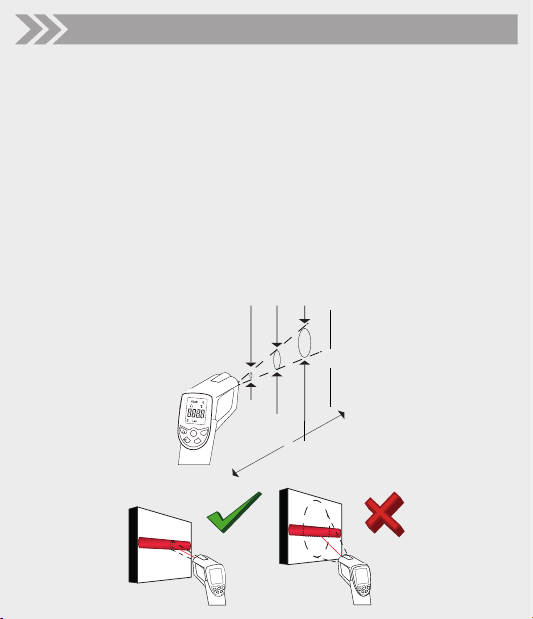
Measurement area
The measurement target must be larger than the infrared size of the equipment. As the distance (D) of the lens
increases, the size of the measurement area also becomes larger. Thus. the smaller the surface (S) to be
measured, the closer you should bring the thermometer.
BATTERY PLACEMENT INSTRUCTIONS OTHER FUNCTIONS APPENDIX
Use a 9 V battery, and install it as shown in the image. Replace it if necessary. Temperature measurement
A) Adjustments
1. Press the trigger to turn on the thermometer.
2. Press T / DN to select the unit of measurement: degrees Celsius (° C) or fahrenheit (° F).
3. If necessary, change the emissivity values according to the material of the measurement object. The
thermometer is set at 0.95, the standard emissivity value for most organic materials and painted surfaces. For
more information, see the Appendix at the end of this manual.
B) Mode of use
1. Point the thermometer at the measurement object. You can press the [__] button to activate or deactivate the
laser.
2. Press and hold the trigger to start the measurement. At the top of the screen, the word SCAN will appear and
the reading of the current temperature will be displayed.
3. Release the trigger. The H symbol will appear at the top of the screen and the last registered temperature
reading will be maintained (for a few seconds).
After approximately 30 s of inactivity, the thermometer will turn off automatically.
Maximum temperature
Press the "MODE" button until the MAX symbol appears on the screen. During a measurement, the maximum
registered temperature value will be kept at the bottom of the screen.
Minimum temperature
Press the "MODE" button until the MIN symbol appears on the screen. During a measurement, the minimum
registered temperature value will be kept at the bottom of the screen.
Average temperature
Press the "MODE" button until the AVG symbol appears on the screen. Hold the trigger while pointing the
thermometer at different points on an object; The meter will record the different temperatures and automatically
display the average temperature at the bottom of the screen.
Low temperature warning
Press the "MODE" button until the LAL symbol appears on the screen. Press the "UP" and "T / DN" buttons to
set a temperature. If a temperature lower than the set temperature is registered during a measurement, the
symbol L (Low) will appear on the screen.
High temperature warning
Press the "MODE" button until the HAL symbol appears on the screen. Press the "UP" and "T / DN" buttons to
set a temperature. If a temperature exceeds the set temperature during a measurement, the H (High) symbol will
appear on the display.
Emissivity adjustment
1. Press the "SET" button.
2. Use the "UP" and "T / DN" buttons to change the emissivity values according to the material of the
measurement object. You can consult the reference table.
SPECIFICATIONS:
Input: 9 V - - - (1 x 9 V)
Temperature range: -30 to 320 °C (-22 to 608 °F)
Emissivity: Preset 0.95
Accurate: -30 to 0°C + 3°C / 0°C a 100°C + 2°C / 100 a 320°C + 3°C)
Response time: 500 ms
Laser power output: <1 mW
Wave length: 630 - 670 nm
Spectre response: 8 -14 um
Storage / Operating temperature: -20 to 65 °C / 0 to 50 °C
Storage / Operating RH: <80 % / 0 to 90 % (non-condensed)
Maximum measuring distance: 12 m
11
8
7
2
6
3
2
3
4
7
9
8
5
10
4
5
6
(-)
(+)
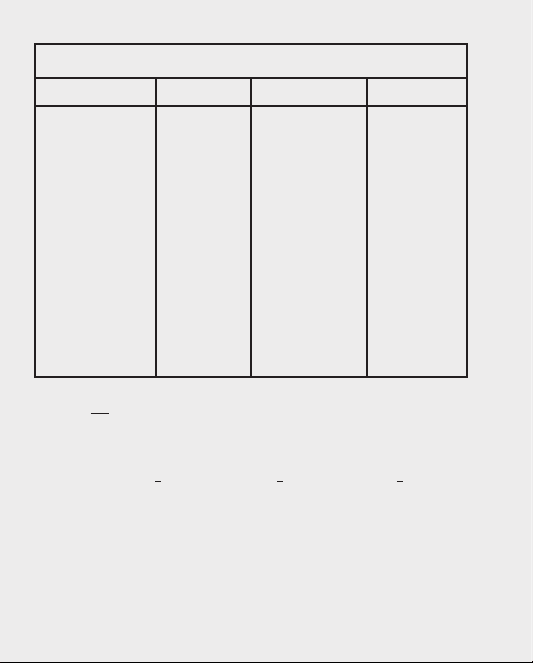
Emissivity Table
Material
Asphalt
Concrete
Cement
Sand
Floor
Water
Ice
Snow
Glass
Ceramics
Marble
Cast
Compost
Brick
Textile (dark)
Human skin
Soap bubbles
Coal (powder)
Lacquer
Lacquer (bright)
Rubber (dark)
Plastic
Wood
Paper
Chromic oxide
Copper oxide
Iron oxide
Stainless steel
0,90 a 0,98
0,94
0,96
0,90
0,92 a 0,96
0,92 a 0,96
0,96 a 0,98
0,83
0,90 a 0,95
0,90 a 0,94
0,94
0,80 a 0,90
0,89 a 0,91
0,93 a o,96
0,98
0,98
0,74 a 0,80
0,96
0,80 a 0,95
0,97
0,94
0,85 a 0,95
0,90
0,70 a 0,94
0,81
0,78
0.78 a 0,82
0,2 a 0,3
Emissivity Material Emissivity