Stewart Golf X3R User manual

X3R Owners Manual
Stewart Golf Limited
The Coach House
Ryeford Road South
Kings Stanley
Gloucestershire
GL10 3HG
United Kingdom
Tel: +44 (0) 870 350 18 18
Fax: +44 (0) 870 350 18 19
Email: info@stewartgolf.com
Web: htt
p
://www.stewart
g
olf.com
Stewart Golf USA
24 Monument Square
Boston
MA
02129
United States of America
Tel: +1 877 783 9872
Web: http://www.stewartgolfusa.com
Stewart Golf Asia Pacific Pty Ltd
Level 21
201 Miller Street
North Sydney
NSW 2060
Australia
Tel: +61 1 300 738 381
Web: http://www.stewartgolf.com/aus/
This device complies with Part 15 of the FCC Rules. Operation is subject to the
following two conditions:
1. This device may not cause harmful interference, and
2. This device must accept any interference received, including interference that
may cause undesired operation.
Changes or modifications not expressly approved by Stewart Golf Limited could
void the users authority to operate the equipment.

R 8-Oct-05 / P 27-Jul-06 - 1 -
Owners Manual Contents
2 Welcome
3 The Anatomy Of Your X3R
4 To Start Using Your New X3R
5 Getting The Best From Your X3R
To Help Conserve Battery Power
6 X3R Handset Information
7 Other X3R Information & Tips
8 Trim Adjustment
Cruise Control
9 Quick Release Wheels
Scorecard Holder
10 Beverage Holder (Optional)
Towel Loop & Sunglasses Holder
11 When You Have Finished Your
Round
12 X3R Electronics System
13 Battery & Battery Charger
Charging The Battery
14 Battery Charging Safety
15 After Sales Service & Warranty

R 8-Oct-05 / P 27-Jul-06 - 2 -
16 Trouble Shooting Guide
Welcome
Congratulations on your purchase of the X3R from Stewart Golf.
Please try to avoid the temptation of going straight out to the course to use your new X3R,
and take a few minutes to read this manual so that you can get the best from your X3R.
•The first thing that you need to do is remove the battery and charger from their
respective boxes and put the battery on charge. The battery is supplied fully charged,
however as a precautionary measure it is recommended that you allow the battery to
complete one full cycle before use (see page 13). This will ensure that the X3R will be
able to complete its first full round without any power problems.
•The first time you use your X3R, use it on an area of open grass. The speeds and
steering characteristics of the X3R will change on different surfaces. You will find that
the X3R will steer very quickly on a hard, smooth car park but will behave differently on
grass. The weight of a golf bag will also affect speed and steering.
•If you should ever suffer any problems or faults with your X3R, we will need to know the
serial number of your trolley. This is located on the chassis, just next to the electronics
box. Please make a note of the serial number here, so that it is at hand if you ever
need to call us.
Serial Number: ________________________
Delivery Date: ________________________
**** IMPORTANT SAFETY INFORMATION ****
When using your X3R:
•in a car park or other crowded area, always steer it manually by holding onto the
handle. This will ensure that you remain in control of the X3R and that it will not cause
any unintended damage or injury.
•be aware of your surroundings. Ensure that you know the whereabouts of other
players, trees, streams, bunkers and other objects.
•never aim the X3R at other people or golf trolleys

R 8-Oct-05 / P 27-Jul-06 - 3 -
•never let it run out of your sight.

R 8-Oct-05 / P 27-Jul-06 - 4 -
The Anatomy Of Your X3R
X3R is made from an innovative system of bonded composites and precision injection
mouldings. The drawings below show the basic anatomy of the machine, with the major
parts labeled. These parts will be referred to in this manual.
Handle
Scorecard Holder
Ball & Tee Holder
Top Bag Strap
Main Support
Aerial
Front Cover
Rear Wheels
‘S’ Logos
Lower Bag Stay
Bottom Bag Strap
Beverage Holder (Optional)
Remote Cradle
Top Clip
Bottom Clips
Safety Switch
Rear Cover
Stabiliser

R 8-Oct-05 / P 27-Jul-06 - 5 -
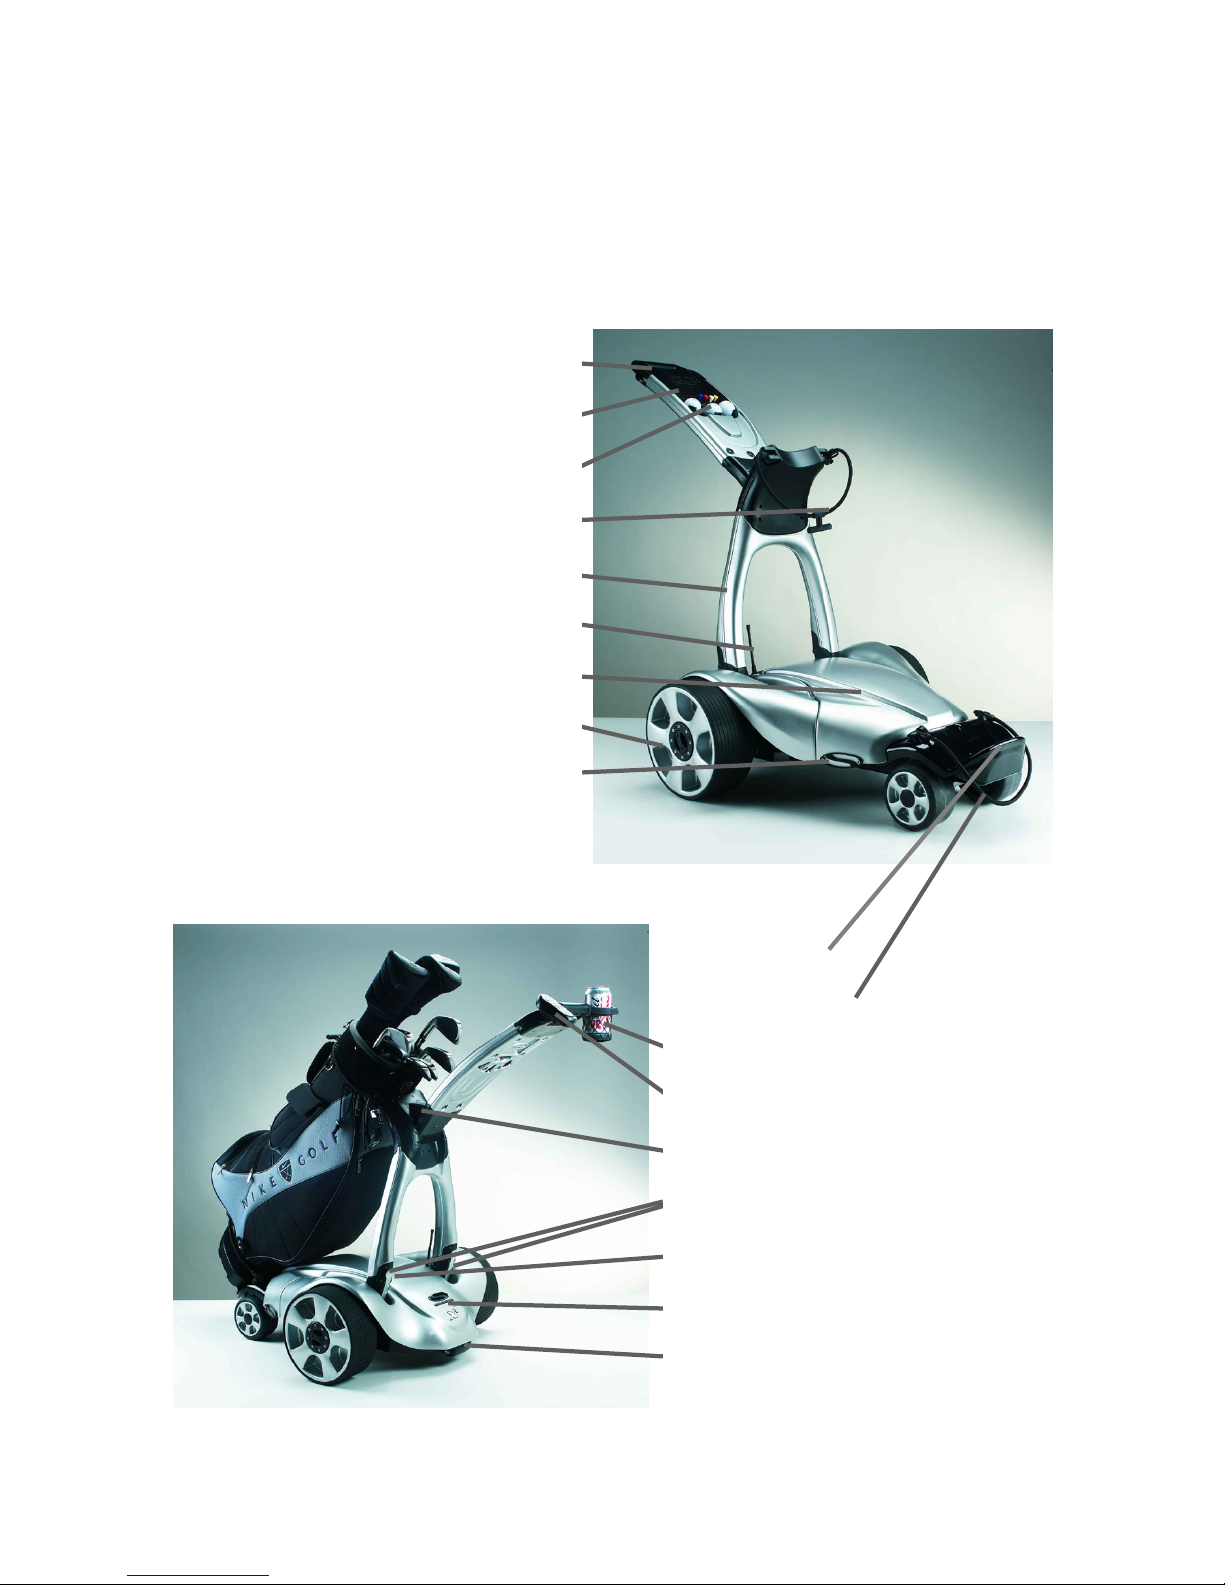
Fig 1: Removing the front cover
Fig 2: Inserting the battery
To Start Using Your New X3R
1. The X3R has two purpose designed lifting
places, one being the anti-tip device and the
other under the front of the chassis. These are
the only places from which you should lift
the X3R.
2. With the X3R placed on the floor, hold the
handle and pull it up and towards you until both
top and bottom clips snap into place.
3. Remove the front cover (fig 1). To do this, hold
the 'S' logos on either side of the front cover,
apply slight outward pressure and lift. The front
cover can then be lifted completely away from
the X3R.
4. Remove the battery from its box. The battery is
already in the Stewart Golf carry case for your
convenience.
5. Ensuring that the straps are out of the way, insert the battery into the chassis with the
power lead facing forwards (fig 2) and secure with the straps.
6. Connect the battery and ensure that the safety switch is in the 'off' position (the ‘O’).
7. Replace the front cover. Holding the front cover by the 'S' logos, line up the two lugs on
the rear of the front cover with the corresponding parts of the rear cover, and then pivot
it into place. Ensure that the front of the cover is behind the ‘bump’ on the chassis.
8. Make sure that the 'S' clips are secured to the chassis. Gently press the front cover
down until it is secured in place.
9. With the lower bag strap out of the way and the top one only connected on one side,
place your bag onto the lower bag stay and rest it against the top bag stay.
10.Using the large handle in the middle of the strap, pull the lower bag strap over the base
of the golf bag. Using the handle means that you are less likely to trap your fingers.
11.Take the loose end of the top bag strap and pull it around the golf bag, then attach it to
the clip on the other side.
12.Ensure that both wheels are in the ‘drive’ position (not in freewheel, page 9)
13.Operate as outlined in this manual.

R 8-Oct-05 / P 27-Jul-06 - 6 -
Fig 3: The safety switch
shown
Getting The Best From Your X3R
To get the most from your X3R, follow these hints and
tips.
•When using the X3R in a car park or other crowded
area, always steer it manually by holding onto the
handle. This will ensure that you remain in control
of the X3R and that it will not cause any unintended
damage or injury.
•If you are going to leave your X3R unattended, turn
the safety switch to the off position (‘0’). The switch
is located on the rear cover (fig 3).
•Your X3R is designed for use on the fairway. Do not attempt to drive the X3R through
bunkers or deep puddles. Do not attempt to drive your X3R down steps or off high
kerbs.
•When negotiating kerbs, you may need to assist the X3R by lifting the front or back.
Under no circumstances should you try to make the X3R ‘jump’ up or down kerbs.
To Help Conserve Battery Power
•Try not to overload your bag. Extra weight in your golf bag will reduce the life of your
battery and change the characteristics of the X3R's operation.
•Try to keep the X3R on the fairway, as long grass and rugged terrain will sap strength
from the battery.
•When negotiating hills, try not to let the X3R 'pull' you.
•Make sure that you charge the battery as soon as possible after each round that you
play. The supplied CTEK charger is designed to allow you to leave the battery on
charge until your next round. Failure to charge the battery within 24 hours of
finishing a round can cause irreparable damage to the battery.
•Avoid subjecting the battery to extremes of temperature, as this will shorten its life.
•NEVER DROP THE BATTERY. This can cause internal damage, which is both
severely debilitating and irreparable.

R 8-Oct-05 / P 27-Jul-06 - 7 -
Fig 4: The X3R handset
Directional
Controls
Emergenc
y Brake
Off
Button
Cruise
Control
Indicator
Light
X3R Handset Information
•Before you start, ensure that the
safety switch is in the 'on' position
(fig 3).
•Get to know your X3R by practicing
away from any obstacles. Be aware
that the handling characteristics of
your X3R will be different on grass
than on the car park, and with or
without a golf bag fitted.
•The indicator light will flash every
time a signal is sent to the receiver.
•The red button in the middle of the
directional controls is an emergency brake. Press and release to bring the X3R to an
immediate stop. Do not use this as a matter of course as it may cause the X3R to skid.
This function can also be used as a parking brake when on slopes, however it is still
recommended that the X3R be parked ‘across’ a slope.
•Pressing the ‘Off’ button will bring the X3R to a gradual stop. Use this for normal
stopping.
•Pressing either the forward button, or any of the 4 cruise control buttons will set the
X3R in forward motion.
•Once the X3R is in motion, continually pressing the forward or back buttons will either
speed up or slow down the trolley respectively.
•The Cruise Control buttons are factory set; button 1 is the slowest with button 4 the
fastest. You can also program your own walking speeds. See the Cruise control section
for instructions.
•Holding either the left or right button down from stationary will make the X3R turn on
the spot. Releasing the button will stop the caddy.
•The X3R's handset is designed to have an operating range of 50 metres. This may be
affected by factors such as atmospheric conditions, proximity to buildings, hills and
trees, power lines and condition of the handset battery (which should be changed every
year).
oThe handset uses a standard 9V PP3 battery. To replace this, remove the
screws on the back of the controller and carefully separate the two halves.

R 8-Oct-05 / P 27-Jul-06 - 8 -
Remove the old battery, and then press every button before connecting the new
battery. Now carefully replace the two halves, ensuring that the battery lead is
not obstructing location, and replace the screws, making sure they are not over-
tightened.

R 8-Oct-05 / P 27-Jul-06 - 9 -
Fig 5: Handset clipped to
Other X3R Information & Tips
•The hand controller transmits a 'stay awake' signal
to the X3R every few seconds. If the caddy is out of
range and does not receive a stay awake signal
within ten seconds it will stop until it receives a valid
signal from the handset. This means that your X3R
should never run too far away from you. However,
you should never let the X3R out of your sight when playing.
•When taking a shot or negotiating a tight path, the handset can be clipped to the cradle
(which can be attached to either side of the handle). You can then steer the X3R
manually, while controlling its speed with your thumb. The clip on the back of the
handset can also be used to attach the handset to a belt or pocket.
•The X3R handset is splash resistant but never allow it to be submerged in water (i.e.
dropped in a puddle).
•Do not store the handset in your pocket. Loose change, for example, may engage one
of the buttons and set the X3R in motion. Instead use the belt clip on the handset to
attach the handset to a belt or pocket.
•When you are not using the X3R (for example, if you are in the pro shop or having
lunch), either disconnect the battery or use the safety switch (located on the rear
cover). This removes the possibility of accidentally engaging the motors.
•When the power has been disconnected and the X3R is not in use, we strongly
recommend that the handset be stored in your golf bag. This will ensure that it is not
damaged, and also that you will not forget to take it to the course!
•When reversing the X3R, it is necessary to stop it before commanding it to move
forwards. Reverse has only one preset speed.
•If you are going to walk any distance away from the X3R (for example when putting or
looking for a lost ball), take the handset with you. The handset is lightweight and can be
easily clipped to a belt or pocket. You can then make the X3R drive to you.
•If you are a right-handed player, park the X3R to the right of the ball so that it does not
interfere with your shot.

R 8-Oct-05 / P 27-Jul-06 - 10 -
Cruise Control
To program your own walking speeds into the handset, simply follow the following
instructions:
1. Use the speed up and slow down buttons to achieve your ideal walking pace.
2. Press and hold one of the numbered buttons until the indicator light flashes (approx 5
seconds).
3. To resume this speed simply press the preferred button
4. Please note that these speeds will change depending on bag weight, battery condition
Trim Adjustment
It is possible that after some use, the X3R may not travel in a straight line even on flat
ground. The X3R has two motors which can wear unevenly, in this situation the trim may
require adjustment.
This can be done from the handset by following these easy steps:
1. Ensure that your X3R is on a flat level surface. It is useful to align the caddy with a curb
or object in the distance so that you know when the X3R is moving in a straight line.
2. Hold down the 'Off' button for 5 seconds to activate the trim mode. The X3R will set off
at a slow speed.
3. Use the left and right buttons until the caddy is traveling in a straight line.
4. Press the emergency stop button to store the new trim settings. The X3R will now
operate as normal.
Declaration of Conformity
Hereby, Stewart Golf Limited, declares that the ‘Radio transmitter and receiver’ is in
compliance with the essential requirements and other relevant provisions of Directive
1999/05/EC. The declaration of conformity may be consulted at www.stewartgolf.com.

R 8-Oct-05 / P 27-Jul-06 - 11 -
Fig 7: Using the scorecard on
the X3R
Fig 6: Operating the quick
release mechanism.
Quick Release Rear Wheels
The quick release mechanism has been designed for
ease of use. To remove the wheel from the ‘locked’
position, just turn the handle 90 degrees clockwise so
that the arrows point to the unlocked padlock. Now just lift
the side of the X3R and pull off the wheel.
The X3R has a built in freewheel setting so that you can
always finish your round even in the unlikely event of a
fault. To engage this mode, move the handle clockwise
to the 'unlock' symbol and move the wheel 15 to 20mm
towards you. Now rotate the wheel by 90 degrees and
push it back towards the motor until it stops. Turn the
handle 90 degrees anti-clockwise to 'lock' and spin the
wheel.
Scorecard Holder
The scorecard holder has been designed to accept
most common sizes and shapes of scorecard. To
use it, just lift the lid and slide your card under the
two integrated clips. A pencil can be held under the
clip at the front of the moulding. To close the lid, just
press it down until you feel it clip.

R 8-Oct-05 / P 27-Jul-06 - 12 -
Fig 8: Beverage Holder
Beverage Holder (Optional)
The beverage holder can be attached to either side of the
handle with the simple thumbscrew. The covering cap
can be easily removed by hand.
To adjust the base of the beverage holder to fit small
cans:
•Hold the base and lift it so that it is above the larger
ring
•Twist the base. The more you twist the base, the
higher the beverage will sit.
•Drop it back through the larger ring
•This is quite simple but does take a little practice to perfect.
Towel Loop & Sunglass Holder
•There is provision on the X3R for you to place these items. See images below.
•To attach your sunglasses or spectacles, slide one arm through the loop until they rest
on the hinge. Be aware that if the X3R is operating on rough terrain, e.g. a bumpy path,
then it is possible for your glasses to 'bounce' out of the loop. This problem is much
less of an issue on a smooth fairway.
•You can attach a towel to any of the loops in the same way that you would attach it to
your bag.
Fig 9: Towel clip
Fig 10: Sunglasses

R 8-Oct-05 / P 27-Jul-06 - 13 -
Fig 11: Releasing the top clip
Fig 12: Releasing the lower clips
Fig 13: X3R Travel Bag (Optional)
When You Have Finished Your Round:
1. Remove one side of the top bag strap and then
lift your golf bag away. The lower bag strap will
release automatically.
2. Remove the front cover, disconnect and remove
the battery, then replace the cover as described
earlier. It is possible to leave the battery in
place when transporting the X3R. This is not
recommended, as lifting the combined weight
of the X3R and battery can cause injury.
3. Release the top clip whilst supporting the
handle and lower the handle until it comes to
rest on the rear cover, Fig 11.
4. Now release both lower clips (by pressing the
clips with your thumbs) simultaneously and
slowly lower the parts until they nest
together, Fig 12. Do not 'drop' either
of the folding parts of the X3R.
5. Place the X3R into the travel bag
(optional),with the logo on the bag
facing upwards, Fig.13. The X3R
has two purpose designed lifting
places, one being the anti-tip device
and the other under the front of the
chassis. These are the only places
from which you should lift the X3R.
6. Carefully lift the X3R into your car.
7. When transporting the battery, ensure that it is
secured in place and not able to 'roll' from
place to place.
8. Charge the battery as soon as possible
after a round, following the guidelines in this
manual (page 14).

R 8-Oct-05 / P 27-Jul-06 - 14 -
Fig 14: The X3R Electronics
System
X3R Electronics System
Just in front of the battery enclosure lies the heart of
the X3R: the microprocessor controlled electronics
system. If your X3R should suffer a fault, there are
four diagnostic lights on the electronics case, which
are there to help you and us.
When you connect the battery, the electronics
system will automatically run through a start up routine. This in indicated by all of the
lights coming on for approximately 2 seconds. When the start up routine is complete, all of
the lights will go out except the green ‘power on’ light. If the lights fail to go out, check that
the safety switch is in the ‘on’ position. The safety switch should be used when you are
leaving the X3 unattended for short periods of time, for example if you go into the pro shop
or stop for a drink.
Green Power On. This light will remain on all of the time that the battery is
connected.
Red Means that the battery is flat. In this situation, you can make use of the
‘freewheel’ position on the rear wheels and use the X3R like a regular
trolley.
Yellow Transmitter sending and receiving. Every time any of the control buttons
are pressed this light will flash.
Red Over temperature. Your X3R has overheated and the power has been
temporarily isolated. As soon as a safe operating temperature is
reached the light will go off and the caddy will be ready for use again. If
you have persistent overheating problems then please contact Stewart
Golf.
Both Red
Lights
If both red lights are on then it means that the electronics have been
overloaded. For example, accidentally leaving your X3R running when
against a tree or wall will do this. The LED's will reset to normal when
the problem is resolved.

R 8-Oct-05 / P 27-Jul-06 - 15 -
All Lights The safety switch has been activated. The X3R will not respond to any
signals until the switch is deactivated. If all lights are on and the safety
switch is activated, you should contact us immediately.
Important: The electronics box contains no user serviceable parts. The lid to the case is
sealed to reduce the risk of water ingress. Breaking this seal increases the risk of moisture
entering the case, and reduces the reliability of your X3R. No attempt should be made to
open the case and doing so may invalidate the warranty.

R 8-Oct-05 / P 27-Jul-06 - 16 -
Fig 15: CTEK XS 7000
Battery
Your X3R has been supplied with a superior Gel technology battery. Correct treatment of
the battery will result in increased life and better performance. Observing the following tips
below will help achieve this.
•Treat the battery with care, as any damage can result in a dramatic reduction in the life
of the battery. NEVER DROP THE BATTERY, this can cause internal damage, which is
both irreparable and severely debilitating.
•The battery is supplied fully charged. However as a precautionary measure it is
recommended that you allow the battery to charge for one full cycle before use.
•Always keep your battery on charge between games. If the battery is not used for
long periods of time, every two weeks put the battery through a full charging
procedure.
•Always recharge the battery as soon as possible after every round, and never leave it
for more than 24 hours before charging.
•Even if you only complete a few holes, it is important to fully charge the battery.
•The battery is covered by a 1-year manufacturers warranty.
•When not using your X3 always disconnect the battery from the electronics and remove
it from the battery compartment. Stewart Golf will not be responsible for any
damage caused if the battery is left connected when not in use.
Battery Charger
Stewart Golf has chosen the 7 Amp CTEK
XS 7000 charger because of its advanced
technology and suitability for the Gel battery.
The five step, fully automatic charge cycle
with boost and float can actually increase the
life and performance of the battery.
Charging The Battery
•To start the charge cycle, connect the battery to the charger before making the
connection from charger to the mains.

R 8-Oct-05 / P 27-Jul-06 - 17 -
•Once the power is connected correctly, the charger will automatically diagnose which
type of charge the battery needs - you don’t have to do anything!
•A full charge of the battery will take up to 8 hours.
•If the battery is connected to reverse polarity, no charging will take place.
•It is recommended that you leave your battery on charge until your next round. The
charger will automatically go into a maintenance mode when the battery is fully
charged.
Battery Charging Safety
Please follow these important safety tips when charging the battery. For more information
please refer to the literature supplied with the charger.
•The charger is designed for batteries 14-225 Ah. Do not use for any other purposes.
•Always use safety glasses and turn your face away from the battery when making or
breaking connections.
•A battery being charged could emit explosive gasses. Prevent flames and sparks close
to the battery.
•Always provide proper ventilation when charging.
•Avoid covering the charger.
•Battery acid is corrosive. Rinse immediately with water if acid comes into contact with
skin or eyes. Seek medical advice.
•Do not charge a frozen battery.
•Never operate a damaged charger.
•Never place the charger on top of the battery when charging.
•Always check that the charger has gone into maintenance mode before leaving the
charger unattended and connected for long periods. If the charger has not gone into
maintenance after 72 hours, this is an indication of an error. In this case the charger
must be disconnected manually.
•All batteries fail eventually. A battery that fails during charging is normally taken care of
by the chargers advanced control, but some rare errors in the battery could still exist.
Do not leave any battery unattended for a long period of time.
•For more details about the charger, please consult the literature supplied in the
CTEK box. Alternatively please visit http://www.ctek.se

R 8-Oct-05 / P 27-Jul-06 - 18 -
After Sales Service & Warranty
The X3R unit and battery are guaranteed to be free from defects in materials or
workmanship for a period of one (1) year after delivery. If you have any problems with your
X3R, all you have to do is contact Stewart Golf. We will do everything we can to make
good any problems and get you back on the course as quickly as possible.
If you have a problem that cannot be easily solved over the telephone, we will arrange
collection of the X3R from a place of your choosing (home or work for example). When we
receive your X3R, we will repair or replace it, then have it delivered back to you as quickly
as possible. We recommend that you keep the box that your X3R came in, incase you
ever need to return it. For your convenience, the boxes can be flat packed for storage.
Please note: Faults due to accidental damage, wear and tear, misuse or modification of
the standard products are not covered by this warranty. You must report any fault to
Stewart Golf as soon as it is noticed. Further information regarding the terms and
conditions of the warranty can be found on the warranty card supplied with your X3R.
Returning Your X3R To Stewart Golf
If your address is within the United Kingdom and you agree to use a carrier nominated by
Stewart Golf, we shall bear the associated carriage costs. If your address is outside the
United Kingdom, you shall bear the associated carriage costs. In this instance it may still
be beneficial for you to contact Stewart Golf as we receive preferential rates from our
nominated carrier.
Maintenance
The X3R has been designed so that you as a user can concentrate on playing golf. To
keep your X3R looking its best, we advise that you wipe any loose mud or grass from the
covers and chassis after every round. Cleaning is best performed with a soft, damp cloth.
Do not use a hard bristled brush as this may scratch the material surface. Do not use any

R 8-Oct-05 / P 27-Jul-06 - 19 -
high-pressure jet washers as this increases the possibility of moisture entering the motors,
gearboxes and electronics.
Other manuals for X3R
1
Table of contents
Other Stewart Golf Golf Trolley manuals

Stewart Golf
Stewart Golf X7 Lithium User manual

Stewart Golf
Stewart Golf X3R Guide

Stewart Golf
Stewart Golf X9 FOLLOW Guide

Stewart Golf
Stewart Golf X9 FOLLOW Operating instructions

Stewart Golf
Stewart Golf X Follow Series User manual

Stewart Golf
Stewart Golf R1-S PUSH User manual

Stewart Golf
Stewart Golf F1-S REMOTE Guide

Stewart Golf
Stewart Golf Q REMOTE User manual

Stewart Golf
Stewart Golf X9 FOLLOW Guide

Stewart Golf
Stewart Golf X Series User manual