Stewart Golf Q REMOTE User manual

1
OWNER’S MANUAL

2
CERTIFICATION:
This machine has been tested and
conforms to:
EN 61000-6-3:2007+A1:2011
FCC Part 15 Class B
EN 61000-6-1:2019
For further certificates and
declaration of conformity please
visit stewartgolf.com/technical.
IMPORTANT NOTICES:
This red box is used from time to
time in this manual to indicate a
potentially hazardous situation
which, if not avoided, could result
in damage to the product, serious
injury or death.
IMPORTANT INFORMATION
This machine is designed solely for the
transportation of golf equipment on a golf course.
Warnings and important safety instructions
appearing in this manual are not meant to cover all
possible conditions and situations that may occur.
Common sense, caution and care must be exercised
when operating or cleaning this equipment.
Always contact Stewart Golf or your local
distributor/dealer about problems or conditions
that you do not understand.
INTELLECTUAL PROPERTY
The design and technology within the Stewart Golf Q
Series, as well as the Stewart Golf brand is protected
by numerous trademarks, design registrations and
patents. For a full register of Stewart Golf intellectual
property please visit stewartgolf.com/IP.
GOLF BAG TYPE & WEIGHT
The Q Remote has been optimised for use with a cart
or tour style bag weighing 14kg (31lbs). Weigh your
golf bag and ensure it is between 13kg (28lbs) and
15kg (33lbs).
Using a light and often ‘top heavy’ stand bag reduces
the load on the front wheels, which means the
steering may react faster than intended, and the
machine will spend more time on the stabiliser than is
desirable.
Using a golf bag heavier than advised increases the
load on the front wheels, slowing steering speeds.
Additionally a heavy bag will increase the strain and
wear on the structure of the Q Remote, reduce your
battery life and increase the risk of overloading the
electronics and motors.

3
Congratulations on buying a Stewart Golf Q Remote:
the lightest, smallest, strongest Remote golf trolley
in the world.
First things first: resist the temptation to take your
Q Remote straight out for a round immediately –
first read this manual fully as it contains important
safety information, but more importantly tips and
advice on how to get the very best experience when
using the machine.
BEFORE YOU GET TOO EXCITED:
The first thing that you should do is give both the
main battery and handset a full charge, instructions
are found on pages 7 and 10.
Next, practice with it. Find an area of open grass
with your normal golf bag on the machine, with all
your clubs and everything else in it: we recommend
a weight of 14kg or 31lbs. Using it on grass is
important: speed and steering are both aected by
the surface the Q Remote is on, and it’s obviously
designed to be used on grass.
You should steer the machine manually from the
handle when on paths or in a car park (for example),
or by using remote control when you’re in the rough
or around tees and greens. Please see pages 12-15
for more on this.
There are lots of videos available at:
www.stewartgolf.com and on our YouTube channel
(youtube.com/c/stewartgolf): they’ll help you get
the most from your Q Remote.
CONTENTS
Important Information
Welcome
Q Remote Anatomy
Unfolding
Folding & Carrying
SmartPower Battery
SmartPower Charging
Battery Care
Handset Guide
Handset Charging & Care
Manual Operation
Remote Operation
Other Features
FAQ
Warranty Information
Trouble-Shooting Guide
WELCOME
2
3
4
5
6
7
8
9
10
11
12
14
16
17
18
19

4
The Q Remote is built from a unique microcellular composite structure and precision
injection mouldings. Get to know its main features here as we’ll be referring to them in
this manual:
Q REMOTE ANATOMY
1. Scorecard holder
2. Handle
3. Silicone bag strap
4. Bag cradle
5. LED
6. SmartPower battery
7. Lower bag strap
8. Front chassis
9. Front wheels
10. Main chassis
11. EcoDrive motors
12. Rear wheels
13. Wheel arches
14. On/O switch
15. Handle release button
16. Accessory points
17. Handset cradle
18. Umbrella holder mount
19. Handset storage
20. Main support
21. Main support release button
22. Stabiliser wheels
23. Electronics enclosure
1
2
3
4
5
6
7
89
10
11
12
13
14
15
16
17
18
19
20
21
22
23

5
UNFOLDING YOUR Q REMOTE
1. Stand the machine on the floor so it is sitting vertically (A).
2. Squeeze the slider on the front chassis (between the front wheels) to release (B).
3. Rotate the front chassis 180° until it clicks in to place (C).
4. Handle pivot point, put the machine on all four wheels (D). Now fold the bag cradle
all the way out. This automatically releases a hidden lock that secures the main
support to the chassis.
5. Now press the handle release button (E) and simultaneously lift the handle and
main support (F) until they both click in to place. As the main support is lifted, the
stabliser wheels automatically deploy.
Note: Lifting the main support without first pressing the handle release button may
damage internal components.
FITTING YOUR GOLF BAG
1. Stand the base of your golf bag on the front chassis.
2. Ensure the bag cradle is fully lowered, then lean the golf bag back until it rests on
the silicone bag pads.
3. Pull the silcone bag strap around the bag evenly and fix. Note the strap does not
have to be pulled tight as the silicone material will gently grip the bag surface. Pull
the lower bag strap over the bottom of the bag using the handle.
Note: The Q Remote has been optimised for use with a cart or tour style bag weighing
14kg (31lbs). Please refer to page 1 for more information.
A
D
B C
E F

6
FOLDING YOUR Q REMOTE
Prior to folding, clear any debris from the trolley using compressed air or a soft brush or
cloth (never use water). Pay particular attention to the battery tray and gear at the base of
the main support. See the FAQ for a cleaning guide.
1. With your golf bag removed, press the main support release button (image A), then
press the handle release button.
2. You can now lower the handle and main support to rest on the chassis. You will see that
the stabiliser has automatically retracted.
3. Close the bag cradle. This automatically locks the handle and main support to the
chassis so that it won’t fall open during transportation.
4. Now stand the Q Remote up so it is standing vertically.
5. Squeeze the slider on the front chassis, then fold the front chassis 180° to its stowed
position. Once it clicks in to place, the trolley is completely folded.
You can store your handset on the main support. Be sure to keep the handset in its
silicone case to avoid marking the main support.
You can pick up your Q Remote from either
its vertical or horizontal positions.
Vertical: When folded, the carry handle is in
the centre of the trolley and clearly visible.
Lift with the wheel arches closest to your
body (image B).
WARNING:
Always ensure that your Q Remote is turned OFF at the switch when not in use. Leaving it
ON could drain the SmartPower battery totally and risk irrecoverably damaging it. This will
ensure that the trolley is not accidentally activated in transit.
You may choose to remove the SmartPower battery prior to folding to enable you to
charge it.
In any case, it is good practice to always turn the switch to the OFF (O) position when not
in use.
Horizontal: To lift with two hands: lift from
the handle/main support pivot point with
one hand and just above the stabiliser arm
at the back of the machine (image C).
Never pick up the Q Remote by any points
other than those described, doing so may
cause damage.
CARRYING YOUR Q REMOTE
6
ABC

7
SMARTPOWER BATTERY
Your Q Remote has a purpose designed SmartPower battery that slots seamlessly into
the chassis, connecting automatically.
Removal: Press the release button at the end of the case, just behind the Stewart Golf
GB crest. Press the button in and simultaneously pivot the battery around the front
edge, pressing the battery backwards if necessary. Once the battery is partially out,
grab it with your other hand and lift away.
Insertion: Place the front of the battery under the small tongue and slowly pivot into
place with your fingers on the release button. If it does not click in to its secured
position automatically, press gently on the top of the battery until you hear a ‘click’.
DO NOT drop the battery into the chassis as this may damage the connections.
SMARTPHONE APP
Developed specifically for use with the SmartPower technology in the new Q Remote,
the free app lets you monitor power both on and o the course.
To download the app, please scan the correct code below with your smartphone.
Battery
Health Checks
Stay informed with
your trolley and
perform health
checks from home.
Bluetooth
Connectivity
Simply connect
your phone via the
Stewart Golf app
and check
the battery.
Free Of Charge
No hidden charges.
Just scan the
QR codes to
download.
Power Updates
Never be caught
out on the course.
Use the app to
receive real-time
battery usage. 7

8
CHARGING THE SMARTPOWER BATTERY
Always start a charging cycle by following these steps:
1. Connect the charger to the battery.
2. Connect the charger to the wall.
3. Switch the wall socket on.
The charger has an indicator light on it:
RED: Indicates the battery is charging.
GREEN:Indicates that the charge cycle has finished.
The charge cycle time varies depending on how much power has been used: the
average charge should take 3-4 hours, but can be up to 10 hours. You can accurately
check the power level of the battery with the free smartphone app, even while it is
charging.
BEST PRACTICE
If the battery is being used regularly (once a week for example), it is OK to leave it
connected to the charger, with the charger turned on. The Battery Management System
(BMS) within the battery will prevent any damage.
However it is good practice to disconnect the battery from the charger once the green
light shows.
TECHNICAL INFORMATION
• Operating temperature: -10°C to 50°C (14°F to 122°F)
• Charging & storage temperature: 15°C to 25°C (59°F to 77°F)
• Battery Lifespan: >1000 charge cycles
• Nominal Voltage: 12.8V
• Charge current: 2~5A
8

9
BATTERY LIFE & BATTERY LIFESPAN
“Battery life” is the amount of time your
machine will run for before the battery needs
to be recharged. “Battery lifespan” is the
amount of time a battery lasts until it needs
to be replaced. The mix of things you do
with your Q Remote aects battery life and
lifespan but no matter how you use it, there
are ways to help.
A battery’s lifespan is related to its “chemical
age,” which is more than just the passage
of time. It includes dierent factors, such as
the number of charge cycles and how it was
cared for.
To help maximise battery performance
and help extend battery lifespan, avoid
charging or leaving the battery in very hot
environments (including direct sun exposure)
for extended periods of time. Please read and
follow the advice in this manual.
LONG TERM STORAGE
If you are not going to use the Q Remote for
more than one month, the battery should
be fully charged after its last game then
disconnected from the charger and stored in
a dry environment between 15°C and 25°C
(59°F and 77°F).
Once a month you should put the battery
through a full charge cycle. Before using
it again, the battery should be given a full
charge cycle.
Batteries are a complex technology and a
number of variables contribute to battery
performance and thus the performance of
your Q Remote.
All rechargeable batteries are consumables
and have a limited lifespan: eventually their
capacity and performance decline so that
they need to be replaced. As batteries
age, it can contribute to changes in their
performance.
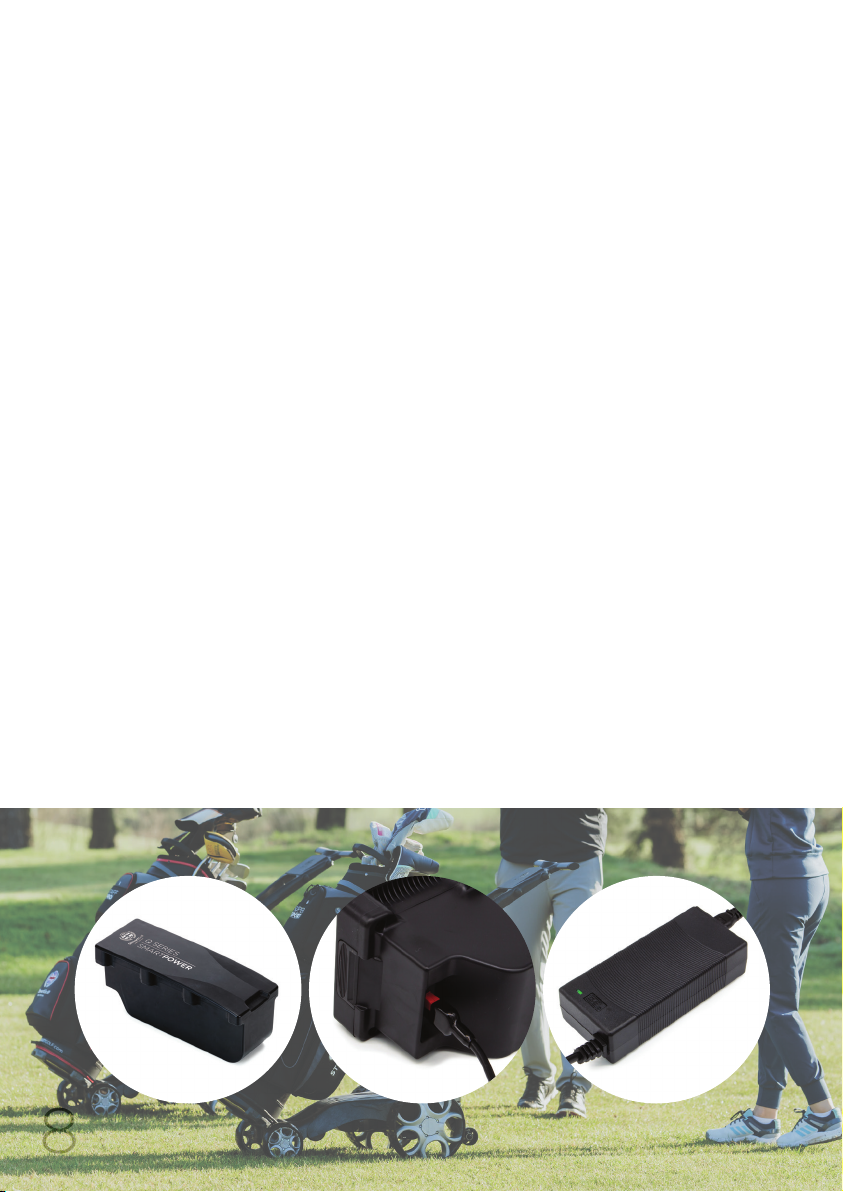
CARING FOR YOUR BATTERY
• DO follow these instructions
exactly.
• DO only use the charger
supplied to charge the battery.
• DO charge the battery
immediately after each use,
certainly within 48 hours.
• DO check the battery charge
level with the app prior to use
to ensure you have sucient
power to complete your round.
• DO charge in a well ventilated
area.
• DO store & charge the battery
in a dry environment between
15°C and 25°C (59°F and 77°F).
• DO fully disconnect and unplug
the charger from the mains and
battery between charges.
• DO NOT drop, throw, puncture
or crush the battery.
• DO NOT immerse in water or
any liquid.
• DO NOT clean with any
abrasives or solvents; a damp
cloth is fine.
• DO NOT leave the battery in a
discharged state.
• DO NOT open or disassemble
the battery or charger. This is
dangerous and will void the
warranty.
• DO NOT cover during use or
charging.
• DO NOT expose the battery to
extreme temperatures (never
store in a car in winter or
summer.)
• DO NOT solder or connect
anything to the terminals other
than as guided in this manual.
9

10
HANDSET GUIDE
Your Q Remote is supplied with a rechargeable Bluetooth handset. The handset is
supplied paired to your machine and cannot be used with any other.
1. Forward/speed up.
2. Indicator light.
3. Left & right turn.
4. STOP. Use as primary stopping function.
5. Slow down/reverse.
6. Glide Stop. Also see notes on glide steering.
7. Cruise Control speeds.
8. Bluetooth ON/OFF. Press & hold for one second to turn on. When turning o, a red
light shows momentarily.
In normal use, the indicator light will be blue:
LIGHT OFF: Handset is switched o.
LIGHT FLASHING: Handset is on, but not connected to the machine.
LIGHT ON: Handset is on and connection has been established.
WARNING
NEVER open the handset
unless you have been
instructed to do so by our
support team. Always ensure
you are electrically earthed/
grounded to avoid damaging
the internal components of the
handset.
The handset may only be
opened to replace the lithium
battery within.
1
2
3
3
4
5
6
7
7
7
8

11
HANDSET CHARGING GUIDE
The lithium battery inside the handset is large enough for two rounds of golf, but
it should be charged after every round to ensure sucient power.
Always charge the handset indoors and at room temperature, observing the same ‘DO
and DO NOT’ advice shown on page 9. The charging process can take up to six hours.
1. Ensure the handset is switched o and the indicator light is o.
2. Remove the protective silicone skin.
3. Expose the charging port on the side of the handset by pulling out the black plug.
4. Connect the USB power cable to any 5V USB power outlet.
5. Connect the USB power cable to the handset & switch on power (if applicable).
6. The indicator light on the handset will show RED while charging, and GREEN when
fully charged.
7. Once the indicator light is GREEN, disconnect the power cable from the handset.
8. Return the black plug to the charging port on the side of the handset, then refit the
protective silicone skin.
HANDSET CARE
Using the handset skin and charging port plug means that the handset will be
showerproof (it is not waterproof). Water and electronics are natural enemies and you
must take care to make sure no water ever gets inside the handset.
• Never allow the handset to be immersed in water and don’t wash it.
• If you want to wash the silicone skin, remove it from the handset before washing it,
then dry it thoroughly before replacing it.
• If you use the handset in the rain or other wet conditions, remove the silicone skin
as soon as you have finished playing and wipe both handset and silicone skin dry to
remove any moisture that may have found its way down the edges of the silicone
skin. Allow both to dry fully before refitting the silicone skin.
• Don’t store the handset anywhere that water or moisture might get into it.
• Refer to the DO and DO NOT guide on page 9 for further advice on how to care for
the handset and lithium battery contained within.
LONG TERM STORAGE
If you are not going to use your Q Remote for more than one month, the handset should
be put through a charge cycle at least once every month.
This will avoid the handset battery being completely discharged.
Prior to using the handset again it should be fully charged.
WARNING
The handset should only be charged with the supplied USB power cable. Using
any other cable or power source can damage internal components: this will not
be covered under warranty.

MODES OF OPERATION
Your Q Remote has TWO modes of operation: manual and remote control.
Both make use of the remote control handset, but manual requires you as the user to
hold the handle to control the direction of the trolley. It is your responsibility to choose
the correct steering mode for each situation, please read more for tips on how to make
these decisions.
1. MANUAL OPERATION
Good for: Tight spaces, car parks, bridges, paths.
Before you do anything, make sure you know where the STOP button is and always use
this as the main command to bring the machine to a halt.
If you wish to bring the machine to a more gentle halt then use the Glide Stop button.
When in a car park, crossing a road or negotiating a tight path, you should steer
manually from the handle. You can control the speed of the machine using the speed
up & slow down buttons, or program the cruise control speeds to your walking pace
(see P16).
BEST PRACTICE:
When in tight areas you should physically keep control of the Q Remote by steering
from the handle.
The dual handle allows you to steer with either hand. Either clip the handset to the
handle, or hold it with your other hand.
11
WARNING
Ensure you practice in an
open area away from other
people or objects.
This will allow you to
familiarise yourself with the
remote functions without
risk of damage or injury. Be
aware of your surroundings.
Ensure that you know
the whereabouts of other
players, carts, trees, lakes,
bunkers, streams etc.
Other devices that
transmit/create radio/
magnetic fields can aect
performance.

13

1414
2. REMOTE CONTROL
Good for: On the fairways, around the greens or when you are in the rough.
Not for: Car parks, bridges, paths.
To start the machine moving forwards, press the forward button. Once the machine is in
motion, continually pressing the “speed up” or “slow down” buttons will either speed up
or slow down the machine respectively. You can also use the cruise control buttons to
start the machine.
To reverse the machine press the “reverse” button (it must first be stopped). When
reversing, the speed is fixed and cannot be increased or decreased.
To steer the machine, press and release either the left or right buttons. When in motion
this will change the direction slightly and continue moving. A prolonged press will
tighten the turn. If you press either button with the Q Remote stationary, the machine
will turn on the spot.
BEST PRACTICE:
• The remote has a nominal 50m range. However it is recommended that you keep
the machine within 25m so that you can see obstacles in its way.
• Hold the handset in your hand and position the machine approximately 10m in front
of you and on the line of your ball. Make small adjustments to direction and speed
as you see fit. Do not place the handset in your pocket.
• When you get to your ball, park the machine to the right of your ball (or to the left if
you are left handed). Place the handset on the cradle when taking a shot.
• If you are going to walk any distance away from the machine, keep your handset
with you so you can drive it to your next position rather than walking back to it.
STEERING MODES:
There are two modes of steering: Regular and Glide steering. Regular steering is
suitable for most situations, whereas Glide steering reacts slower.
Regular steering is the default setting and can always be restored by pressing the
STOP button. In Glide steering mode, the machine steers much more gently. To
activate Glide Steering, press the orange GLIDE STOP button and then start the
trolley moving within three seconds.
The machine will default back to the Regular steering mode every time the trolley
stops. If you use the GLIDE STOP, then the ‘STOP’ will engage automatically after six
seconds which will reset the steering to Regular.

IMPORTANT INFORMATION
FUSE:
The 40A fuse fitted to the Q Remote is designed to protect the electronics from
accidental damage in normal use. However, extreme strain caused by failure to use
the machine as advised can blow this fuse: in such cases, replacement of the fuse
will NOT be covered by warranty.
SPEED:
The Q Remote can travel at speeds of upto 6mph but performing delicate
manoeuvres, such as negotiating bridges or steering between obstacles, should
not be performed at top speed and any damage caused will NOT be covered by
warranty. The machine will perform best when being driven at walking speed and
this is what is strongly recommended.

16
OTHER Q REMOTE FEATURES
HANDLE FEATURES
As standard the Q Remote has:
• Built in scorecard and pencil holder.
• Handset cradle.
• Umbrella holder mount.
• Dual handset cradle.
CRUISE CONTROL SPEEDS
Your Q Remote has three Cruise Control speeds, on buttons 1, 2 and 3. You can program these
for your own walking speeds as follows:
1. Use the speed up and slow down buttons to find your desired walking speed.
2. Press and hold either button 1, 2 or 3 for three seconds. The machine will stop to show
that the instruction has been received. Now release the button and the machine will
restart. Your new speed is now stored.
3. To activate the new speed 1, 2 or 3, just press and release the button as normal.
TRIM ADJUSTMENT
If your motors become unbalanced for any reason, your Q Remote may develop a bias. If this
happens, you can adjust the trim as follows:
1. Ensure that your machine is on a flat surface and that your golf bag is balanced
(no heavy items in side pockets).
2. Hold down the lower left two buttons (1 and 3) for three seconds. The machine will start
moving forwards.
3. Use the left and right buttons to fine tune the direction until the machine is travelling in a
straight line. Alternatively press the forward button to restore the factory setting.
4. Press STOP to store the new setting.
QUICK-RELEASE REAR WHEELS
To remove a wheel:
1. Tilt the machine (holding the main support)
so that one wheel is o the floor.
2. Hold the centre of the wheel and press the black
button with your thumb, and pull the wheel away.
FREEWHEEL
The Q Remote has a freewheel setting which allows you to complete your round even in the
unlikely event of a fault. To engage this mode:
1. Tilt the machine so that one wheel is o the floor (hold the main support).
2. Press down on the black button in the wheel centre and slide the wheel 25mm (1”) away
from the motor, but still on the axle.
3. Rotate the wheel 45 degrees, and push it towards the motor until it stops, engaging the
wheel on the outer ring of the axle.
4. Release the black button and the wheel should now be locked on to the shaft, but not
engaged onto the drive dog. You may find it easier to pull the Q Remote than push it
when in freewheel.

17
FAQ
How should I clean the Q Remote?
After your round, clear grass, leaves and dust etc from the machine using a soft cloth/brush or
compressed air. Clean your Q Remote using standard furniture polish and a soft cloth.
NEVER use a hose or pressure washer to clean the Q Remote: faults caused by water ingress
will not be covered by the warranty. Water cannot enter the motors or electronics in normal use.
Is the Q Remote OK to use in the rain?
Yes. The Q Remote is designed for use in all conditions appropriate for golf. The design of the Q
Remote protects the major components from rain, so water ingress cannot occur during normal
use. You should avoid any situation where moisture or water could reach the electronics or
motors. Some examples of this are:
• Driving through puddles or standing water.
• Submerging the machine in a river or lake.
Faults caused by water ingress will not be covered under the warranty.
How do I get the Q Remote up a step or kerb?
Firstly exert downward pressure on the handle to lift the front wheels onto the higher level.
If the natural traction of the rear wheels do not carry the rear of the machine onto the higher
level, lift from the top of the main support.
How many holes will the battery last for?
We expect any genuine Stewart Golf battery to last 18 holes (or 36 if you have the larger
battery) on a ‘normal’ course, with a ‘normal’ weight bag and in ‘normal’ conditions.
However
... a hole of golf can be anywhere between 100 and 600 yards long, so is not a reliable
unit of measurement. Terrain, ground condition, bag weight and a number of other factors can
make a dierence. How you play will also aect power consumption; you’ll cover less ground
shooting 65 than you will shooting 120.
Can I improve the battery life?
Yes, there are a number of things you can do:
• Don’t overload your golf bag.
• Steering is a big source of power consumption, so use Remote steering less if you want to
conserve energy.
• Accelerate slowly, in the same way you would in a car if you were trying to be ecient.
Be sure to download the free smartphone app which will allow you to measure exactly how
much power you use on your round, and try dierent variables to see how much dierence it
makes.
Can I use the Q Remote without the handset?
No. The Q Remote can only be operated via the handset (unless the wheels are in freewheel).
Can the Q Remote cope on hills?
Yes. The Q Remote chassis has been designed with stability in mind. The machine may tip onto
the rear stabiliser wheels, but if this happens don’t worry as that’s what they are designed to do.
Bag weight and weight distribution makes a big dierence here, a light and/or top heavy bag
will not put enough weight on the front wheels and therefore it may tip easily. You will find out
which hills work with your particular setup through experience.
When going down hill using remote control, the Q Remote may speed up under gravity. Hold
the handle if on a path or allow the machine to travel safely away from you, then use the red
‘STOP’ button to apply the brake. Always park at 90 degrees to a slope.

18
WARRANTY INFORMATION
Your Stewart Golf Q Remote is guaranteed to be free from defects in materials or
workmanship for a standard period of two (2) years from delivery.
If you think there may be a problem with your Q Remote, the first thing to check is the
troubleshooting guide opposite. If this does not solve your issue, please contact us or
your local distributor for further advice.
Conditions of warranty:
If notice is received of any breach of this warranty during the relevant period, then we
shall at our own expense and within reasonable time, repair, or at our option, replace the
goods or such parts as are defective or otherwise remedy such defect. If your address is
in the UK we will arrange and pay for collection.
If you are outside the UK, please contact your place of purchase or your local distributor
or dealer. If your address is outside the UK but you do not have a local distributor, we
may still be able to arrange collection but you shall bear the associated costs.
Stewart Golf will authorise the repair, or at our option, replacement of any part found
to be defective due to faulty workmanship or materials. We reserve the right to inspect
these parts. We will not bear any costs incurred (including carriage) due to an item
being returned with a suspected fault, and after inspection no fault can be found, or it is
found that the customer has not fully understood all of the functions of the Q Remote
or the part in question.
Exclusions to the warranty include, but are not limited to: damage during shipment if
not packed in a Stewart Golf designated box or according to Stewart Golf instructions;
wear & tear; results of neglect, misuse or accidents; damage howsoever caused; or
utilisation for any purpose other than carrying a golf bag on a golf course. Q Remote
units, which have been fitted with non-genuine Stewart Golf parts, or have been
modified from the manufacturers specifications, are excluded. Stewart Golf products
used for commercial or rental purposes are excluded. The warranty is not transferable to
a third party.
Both the handset battery and SmartPower battery is covered by a two (2) year
warranty against faulty workmanship and materials. Loss of battery performance owing
to external damage (howsoever caused), misuse and/or abuse, incorrect charging or
other failures not attributable to a manufacturing defect are specifically excluded from
this warranty. The handset and SmartPower batteries must be charged only with the
equipment supplied by Stewart Golf, and the instructions must be followed exactly.
Register your warranty:
stewartgolf.com/warranty
Stewart Golf Ltd
Edison Close, Waterwells Business Park, Quedgeley, Gloucestershire GL2 2FN
Great Britain
+44 (0) 333 800 18 18 | info@stewartgolf.com | www.STEWARTGOLF.com
Stewart Golf LLC
4500 140th Avenue North, Suite 101, Clearwater, FL 33762
United States of America
+1 727 939 6520 | info@stewartgolfusa.com | www.STEWARTGOLFUSA.com

19
TROUBLE-SHOOTING GUIDE
It is dicult to push the Q Remote. Freewheel mode not engaged. Use the quick release system to put the wheels in to the
‘freewheel’ position.
The Q Remote is not responding when I
press a handset button.
1. Rear wheels may be in freewheel.
2. On/O switch on the trolley is o.
3. Handset battery is flat.
4. SmartPower battery is flat.
5. Out of range.
1. Follow the freewheel guide on P15.
2. Turn the switch on the trolley to on (I)
3. Charge the handset.
4. Check the SmartPower status on the app.
5. Move closer to the machine. If your range is consistently
under 25m please contact us.
The Q Remote moves in circles when press-
ing the forward button.
One wheel in freewheel, one in drive. Ensure both wheels are not in freewheel mode.
The Q Remote does not travel in a straight
line.
1. Bag not balanced.
2. Motors have become inbalanced.
1. Ensure your bag is evenly weighted from side-to-side.
2. Follow the guide on ‘trim adjustment’ on P16.
SYMPTOMS POSSIBLE ISSUE POSSIBLE SOLUTION
The handset won’t turn on. Battery not charged.
Charge handset using USB power cable provided.
No power light on trolley. 1. No power from battery.
2. No power connection.
3. Switch / LED not connected.
4. Fuse blown.
1. Check SmartPower app to ensure battery has power.
2. Ensure a connection can be made between SmartPower
battery and trolley. Check terminals are clean and clear.
3. Check connections at either end.
4. Contact Stewart Golf for support.
IF YOUR ISSUE IS NOT RESOLVED AFTER FOLLOWING THIS GUIDE, PLEASE
CONTACT STEWART GOLF OR YOUR LOCAL REPRESENTATIVE.

20
100350
Table of contents
Other Stewart Golf Golf Trolley manuals

Stewart Golf
Stewart Golf X7 Lithium User manual

Stewart Golf
Stewart Golf X3R Guide

Stewart Golf
Stewart Golf F1-S REMOTE Guide

Stewart Golf
Stewart Golf X3R User manual

Stewart Golf
Stewart Golf R1-S PUSH Guide

Stewart Golf
Stewart Golf X Follow Series User manual

Stewart Golf
Stewart Golf Q Series User manual

Stewart Golf
Stewart Golf X9 FOLLOW Guide

Stewart Golf
Stewart Golf X7 Lithium Guide

Stewart Golf
Stewart Golf R1-S PUSH User manual