Stuart Microcentrifuge 8500 User manual

Microcentrifuge 8500
Operator's Manual
RoHS
1065Y17M_Stuart_Microcentrifuge_Manual_ENGLISH.indd 1 01/11/2019 3:26:52 PM

2
Product Description
Thank you for your purchase of the Stuart Microcentrifuge. This centrifuge has been designed for
applications requiring relatively low g-force, such as microfiltration, separation or quick spin downs
of samples. The product is supplied with an 8-Place rotor for 0.5 – 2.0 mL tubes, a 4-Place PCR
rotor that can hold 8 PCR strips and 8, 0.5, tube adapters.
Package Contents
• Stuart Microcentrifuge: 1 Unit
Cole-Parmer Cat. No.: 17414-70
Stuart Cat. No.: SCF4
• 8-Place Rotor for 0.5 - 2.0mL Tubes: 1 Each
Cole-Parmer Cat. No.: 17414-71
Stuart Cat. No.: SCF4/1
• 4-Place, 8 Strip PCR Rotor: 1 Each
Cole-Parmer Cat. No.: 17414-72
Stuart Cat. No.: SCF4/2
• 0.5mL Tube Adapters (8 each): 1 Pack
Cole-Parmer Cat. No.: 17414-73
Stuart Cat. No.: SCF4/V05
• Power Cord: 1 US, 1 EU, 1 UK
• Operator's Manual: 1 each
Catalog Numbers 17414-70, SCF4
Maximum speed 8500 rpm
Maximum G-Force (RCF) 3884
Capacity 8-place rotor for 0.5 – 2.0 mL tubes;4-place, 8-strip PCR rotor
for 0.2 mL tubes
Electrical 100-240 VAC, 50/60 Hz, 1 A Maximum
Dimensions 7.8 x 7.3 x 4.3 in / 198 x 185 x 109 mm
Weight 2.75 lbs / 1.25 kg
Fuse Type: 5x20 mm SLO-BLOW 0.6 A /250 V for 200-265 VAC
Operation 1.0 A/250 V for 85-160 VAC Operation
Noise level (without tubes) <= 60 Db measured at 1 meter from centrifuge
Specifications
Ambient conditions Indoor use only, in well ventilated area
Temperature range 5°C to 40°C
Relative Humidity 10% to 80% (no condensation)
Altitude 0 to 2,000 meters
Power supply Fluctuation not to exceed 10%
Power supply overvoltage Category II
Environment rating Pollution Degree 2
Operating Conditions
1065Y17M_Stuart_Microcentrifuge_Manual_ENGLISH.indd 2 01/11/2019 3:26:52 PM

3
Maintenance, Care and Safety Precautions
Please read the following safety precautions and instruction manual before
operating the Stuart Microcentrifuge.
• NEVER use the Microcentrifuge in a manner not specified in these instructions.
• NEVER use solvents or flammable liquids in or near this equipment.
• NEVER operate in a hazardous or flammable environment.
• NEVER use solvents on the unit that may attack plastic or cause cracks in the rotor.
• NEVER centrifuge materials that in combination or alone are flammable, explosive, are
corrosive or that may cause any other hazard or damage this equipment.
• NEVER use materials with a density greater than 1.2g/cm, as this unit is not intended to
centrifuge very dense materials.
• NEVER immerse the Microcentrifuge in water.
• NEVER move the Microcentrifuge while the unit is in operation.
• NEVER operate the Microcentrifuge with the lid open or removed.
• NEVER fill tubes while they are in the rotor; liquid spills will cause damage to the Microcentrifuge.
• NEVER operate the Microcentrifuge unless the rotor is firmly attached, the tubes are securely
closed and the rotor is balanced.
• NEVER use damaged or cracked rotors.
• NEVER insert non standard tubes or other foreign articles into the rotor.
• NEVER put hand or any object in the rotor area unless the rotor has completely stopped.
• Always only use microcentrifuge tubes and tube strips made from plastic designed to
withstand centrifuged forces of at least 3884 g's (RCF).
• Always only use original rotors, power cord, tube adapters and any other spare parts and
accessories supplied by the centrifuge manufacturer.
• Always remove the power cord from the outlet prior to maintaining or cleaning the
Microcentrifuge.
• Always observe general laboratory safety precautions and regulations when using this product.
• Always use the proper cleaning agents when performing maintenance on the Microcentrifuge.
• Always clean the rotor with a pH-neutral cleaning liquid to ensure the rotor, housing, lid and lid
latches are protected from corrosion and/or mechanical damage.
• Always follow all safety measures from the Safety Data Sheet (SDS) for any reagent you use
with/within the Microcentrifuge.
• Before using any cleaning or decontamination methods, except those recommended in
this manual, please contact Cole-Parmer to ensure that the proposed method will not damage
the equipment.
• If a single level of hazard protection is required, use containers that are tested to Risk Group II or
above and, that more than one level of protection is provided for materials of a higher Risk Group.
• If a hazardous material is spilled in and/or on the product, the user has the responsibility for
carrying out appropriate decontamination.
• The Microcentrifuge is intended to be used indoors (only).
Important Safety Information
1065Y17M_Stuart_Microcentrifuge_Manual_ENGLISH.indd 3 01/11/2019 3:26:52 PM

4
Maintenance, Care and Safety Precautions
• Store the Microcentrifuge in a dry area at room temperature. Do not expose to moisture,
sunlight, or excessive temperatures for extended periods of time.
• The Microcentrifuge is designed for separating aqueous solutions in specific tubes
that are compatible with the G-Force (RCF) of this particular unit.
• Always work and handle this product and/or materials in a manner that DOES NOT endanger
the user, any other person(s) or the environment.
Electrical Requirements
THIS INSTRUMENT MUST BE GROUNDED
Before connection please ensure that the line supply corresponds to
the power requirements below:
Power: 36W Supply requirements: 100 - 240 VAC, 50/60Hz
The unit is provided with a power adaptor and three power cables: a UK 3-pin and a “EU” 2-pin
plug for 230 V installations and a US plug for 120 V installations.
Choose power cable appropriate for your electrical installation and discard the others. Should none of
the cables be suitable for connecting to the power supply, replace the plug with a suitable alternative.
OPERATION SHOULD ONLY BE UNDERTAKEN BY A QUALIFIED ELECTRICIAN.
NOTE: Refer to the equipment rating plate to ensure that the plug and fusing are suitable
for the voltage and wattage stated. The wires in the power cable are as follows:
230V 120V
BROWN - HOT/LIVE BLACK - HOT/LIVE
BLUE - NEUTRAL WHITE - NEUTRAL
GREEN/YELLOW – EARTH GREEN - EARTH
The appropriate power cable should be connected to the instrument BEFORE connection to
the electrical outlet. Should the power cable require replacement, a cable of .75 mm² (AWG18) of
harmonized code H05VV-F connected to an IEC320-C13 plug should be used.
IF IN DOUBT CONSULT A QUALIFIED ELECTRICIAN
WARNING! This product does not contain bio-seals as per IEC/EN/CSA
61010-2-20 nor does it provide any level of containment in the event of a release
and/or spill of radioactive, toxic, or pathogenic micro-organisms; therefore
these types of materials are not recommended for use in this product.
WARNING! Reference Safety Data Sheet (SDS), wear essential
protective equipment and adhere to all applicable local and national
regulations before dispensing and/or disposing of hazardous substances.
WARNING! Your laboratory protocol must state that no person(s)
and/or hazardous substance(s) should be within 12" (30 cm)
of this centrifuge during operation.
WARNING RISK OF EARTH BIOHAZARD
ELECTRIC SHOCK
WARNING RISK OF EARTH
ELECTRIC SHOCK
SYMBOLS DEFINED
1065Y17M_Stuart_Microcentrifuge_Manual_ENGLISH.indd 4 01/11/2019 3:26:52 PM

5
Operating Instructions
1. Remove the Microcentrifuge from the box and examine all of the contents for breakage or miss-
ing parts. Save all packaging and paperwork.
2. Place the Microcentrifuge on a flat, stable surface. The unit should be placed in a
non-hazardous environment and located near an electrical outlet.
3. With the power switch in the off position, attach the power cord to the back of the
Microcentrifuge and to the grounded electrical outlet.
4. Turn the power switch to the "ON" position. The Microcentrifuge will automatically perform a
safety check on the locking mechanism. Open the lid by pressing the illuminated button located
on the front of the unit.
5. Insert your pre-loaded sample tubes into the rotor. Make sure all tubes are filled to equal levels
and the lids are closed. Tubes must be balanced properly.
6. Close the lid and the Microcentrifuge will begin the centrifugation cycle. IMPORTANT:If
there are loud / unusual sounds or excessive vibrations discontinue operation immediately.
See the Troubleshooting section in this manual. If you cannot correct the problem, contact
Cole-Parmer for assistance. DO NOT CONTINUE TO OPERATE!
7. When centrifugation is completed, once again, press the illuminated button on the front of unit to
stop the spin cycle motor and open the lid. Do not open lid until rotor comes to a complete stop!
Remove your samples from the rotor.
8. The Microcentrifuge lid is secured by two locking pins that prevents accidental lid opening during
operation and greater safety for the operator. When the Centrifuge has completed the spin cycle,
an automatic lid unlock will occur. If the lid does not open, press and hold the button on the front
of the unit for one full second, the Centrifuge will unlock the lid again. Should the lid fail to open
by pressing the front button or in the event that the power to the Microcentrifuge is interrupted,
the Microcentrifuge lid can also be opened manually by inserting a flat head screw driver into the
bottom of the unit and moving the release lever to the right. This will release the pins and allow
the lid to open. See Figure 1, page 6.
9. The Microcentrifuge has been designed with an automatic shut-off feature that discontinues
operation after 60 minutes of continuous use. This will prevent the unit from running
continuously if left unattended.
For proper operation, samples must always be loaded into the rotors in a balanced fashion. The
tubes should be filled to the same level, lids closed and placed opposite each other in the rotor.
Tubes and strips must always be loaded symmetrically.
Rotor Installation and Replacement
The Microcentrifuge features snap on rotors that can be installed and removed without an Allen
wrench. There are no set screws to tighten or loosen.
1. Make sure the Microcentrifuge's On/Off switch is in the "Off" position.
2. Line triangular opening on the rotor with the rotor shaft and press down until the rotor snaps in
place. Pull up on the rotor to remove.
3. Turn the unit back to the "On" position, load tubes per the operating instructions and close the lid
to begin centrifugation.
CAUTION: Spin Balanced Loads Only
CAUTION: Do Not Open Lid Until
Rotor has Completely Stopped
1065Y17M_Stuart_Microcentrifuge_Manual_ENGLISH.indd 5 01/11/2019 3:26:52 PM
6
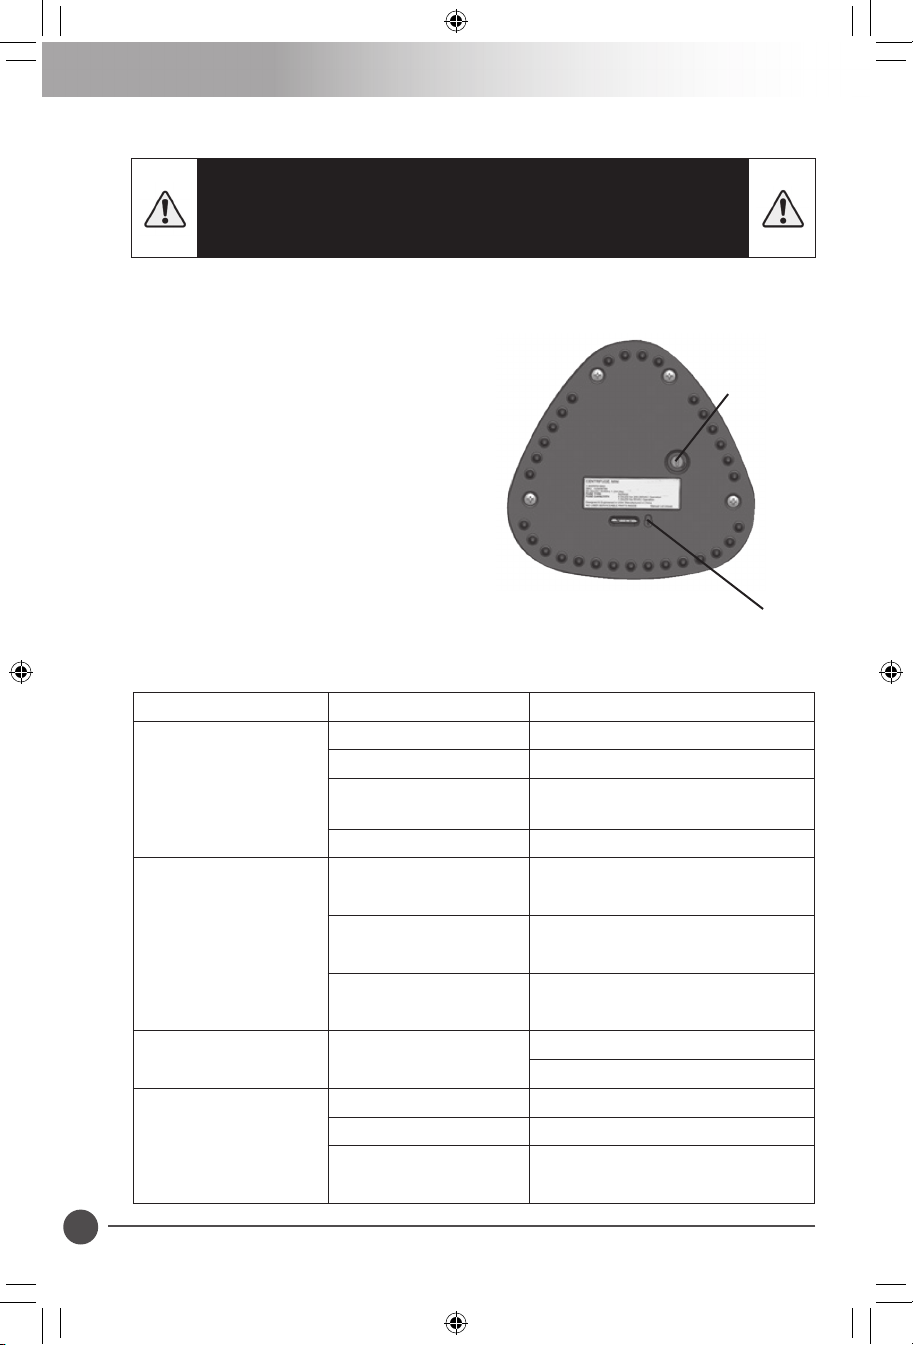
Figure 1
Fuse
Manual lid
release
CAUTION: Disconnect the Microcentrifuge
from the power outlet before cleaning. Never
pour liquid into the unit or submerge in water
Maintenance & Cleaning
The Microcentrifuge is maintenance free other than occasional cleaning. There are
no user serviceable parts inside the housing other than replacing the fuse.
• To replace the fuse, make sure the On/Off switch is in
the "Off'' position, place the unit on its side and insert
a flat head screw driver into the fuse holder found
on the base and turn counter-clockwise until the
fuse is released. Replace the fuse. Reposition
the fuse holder and turn clockwise until fuse
holder is secure, be careful not to over-tighten.
Return the switch to the "On" position and
begin operation.
• To clean, remove the rotors and clean with
isopropyl alcohol. The housing and lid can be
cleaned with a damp cloth and a mild
non-corrosive detergent.
• After cleaning, ensure all parts are dried thoroughly
before attempting to operate the unit.
Troubleshooting
Error Cause Solution
Unit does not operate
Loose cord. Check cord.
On/Off switch. Turn switch to "On" position.
Lid not closed. Close lid until it clicks and locks in
place.
Blown fuse. Replace fuse.
Excessive noise or
vibration
Rotor not balanced. Check tube fluid levels and symmetry.
Rotor not installed
properly. Remove & reinstall rotor per above
instructions.
Foreign object in unit. Check centrifuge bowl for loose tubes
or objects.
Lid will not open when
button is pressed Power is off. See above.
Open lid manually.
Unit stops running
without pressing front
button
Loose cord. Check cord.
Lid not completely closed. Close lid until both pins are locked.
60-minute time limit
expired. Centrifugation cycle is complete.
1065Y17M_Stuart_Microcentrifuge_Manual_ENGLISH.indd 6 01/11/2019 3:26:53 PM

7
Warranty Information
Microcentrifuge 2 Year Warranty
Microcentrifuge is warranted to be free of defects in materials and workmanship for 24 months
from the date of purchase, providing that:
• The unit has not been opened or attempted to be opened by the end user.
• The user ensures that it has been carefully cleaned and decontaminated before returning.
• The unit has been operated according to the instructions and not in any improper way.
• The unit has not been damaged due to negligence, accident or used under abnormal conditions
(temperature, corrosives, unbalanced rotors, lack of cleaning, liquid introduced into housing).
• Normal wear and tear of unit.
In order to qualify for the warranty repair; the customer must submit all warranty information
required to validate proof of purchase. Visit ColeParmer.com/product-warranty-registration
to submit information.
Should warranty service be required, repair or replacement will be provided by Cole-Parmer without
charge. Freight to ship the unit to Cole-Parmer will be the responsibility of the purchaser. There are
no other warranties or guarantees, implied or otherwise expressed including any warranties of
application or merchantability.
In no event will this warranty obligation exceed price of product. This includes liability claims of loss
of use, lost profits or any exemplary or punitive damages.
Repair
Should your Stuart Microcentrifuge require service or repair, please contact Cole-Parmer customer
service. They will issue a return authorization number and advise on the proper packaging and
method of shipment.
Cole-Parmer USA
1-800-323-4340
1-847-549-7600
Please include your return authorization number on the shipping label.
This equipment is labeled with the crossed out wheeled bin symbol to indicate that the
equipment must not be disposed of with unsorted waste. It is your responsibility to
correctly dispose of the equipment by handing it over to an authorized facility for
separate collection and recycling. It is also your responsibility to decontaminate
the equipment in case of biological, chemical or radioactive contamination. so as
to protect from health hazards the persons involved in the disposal or recycling of
products.
For more information about where you can drop off your waste equipment, please
contact your local dealer from whom you originally purchased the product.
By doing so, you will help to conserve our natural resources and you will ensure
that your waste products are recycled in a matter that protects human health and
protects the environment.
Thank you.
Cole-Parmer UK
+44 (0) 1785 812 121
1065Y17M_Stuart_Microcentrifuge_Manual_ENGLISH.indd 7 01/11/2019 3:26:53 PM

8
Cole-Parmer
625 E Bunker Court
Vernon Hills, IL 60061
Toll-free: 1-800-323-4340
Phone: 1-847-549-7600
Fax: 1-847-247-2929
ColeParmer.com
EU Declaration of Conformity
Product Laboratory Equipment
Manufacturer Cole-Parmer
625 East Bunker Court
Vernon Hills
IL 60061
USA
Object of Declaration Microcentrifuge 8500, SCF4
(reference the attached list of catalogue numbers)
The object of the declaration described above is in conformity with the relevant Union Harmonisation Legislation:
References to the relevant harmonised standards used or referen
to which conformity is declared:
This declaration of conformity is issued under the sole responsibility of the manufacturer
Signed for and on behalf of the above manufacturer
Low Voltage Directive
EMC Directive
RoHS Directive 2011/65/EC
Electrical equipment for measurement, control and
laboratory use. EMC requirements.
Part 1: General requirements (Class A).
IEC/EN 61326-1:2013
IEC/EN 61010-1:2010
Safety requirements for electrical equipment for
measurement, control and laboratory use.
Part 1: General requirements.
Particular requirements for laboratory centrifuges.
IEC/EN 61010-2-020:2016
Additional Information
Place of Issue
Date of Issue
Authorised Representative
Title
Signature
Year of CE Marking: 2018
Vernon Hills, IL, USA
December 20, 2018
Pete Hadjis
CPVH Product Development Manager
2014/30/EU
2014/35/EU
s.
This product meets the applicable harmonized standards for radio frequency interference
and may be expected not to interfere with, or be affected by, other equipment with similar
qualifications. We cannot be sure that other equipment used in its vicinity will meet these
standards and so we cannot guarantee that interference will not occur in practice. Where
there is a possibility that injury, damage or loss might occur if equipment malfunctions due to radio
frequency interference, or for general advice before use, contact the manufacturer.
1065Y17M
1065Y17M_Stuart_Microcentrifuge_Manual_ENGLISH.indd 8 01/11/2019 3:26:53 PM
Table of contents
Other Stuart Laboratory Equipment manuals

Stuart
Stuart SBH CONC/1 User manual

Stuart
Stuart STR4 User manual

Stuart
Stuart SC6/100V/50 User manual

Stuart
Stuart SW6 User manual

Stuart
Stuart SMP20 User manual

Stuart
Stuart SWB6D User manual

Stuart
Stuart SMP10 User manual

Stuart
Stuart SRT6 User manual

Stuart
Stuart smp30 User manual

Stuart
Stuart RE300 User manual


