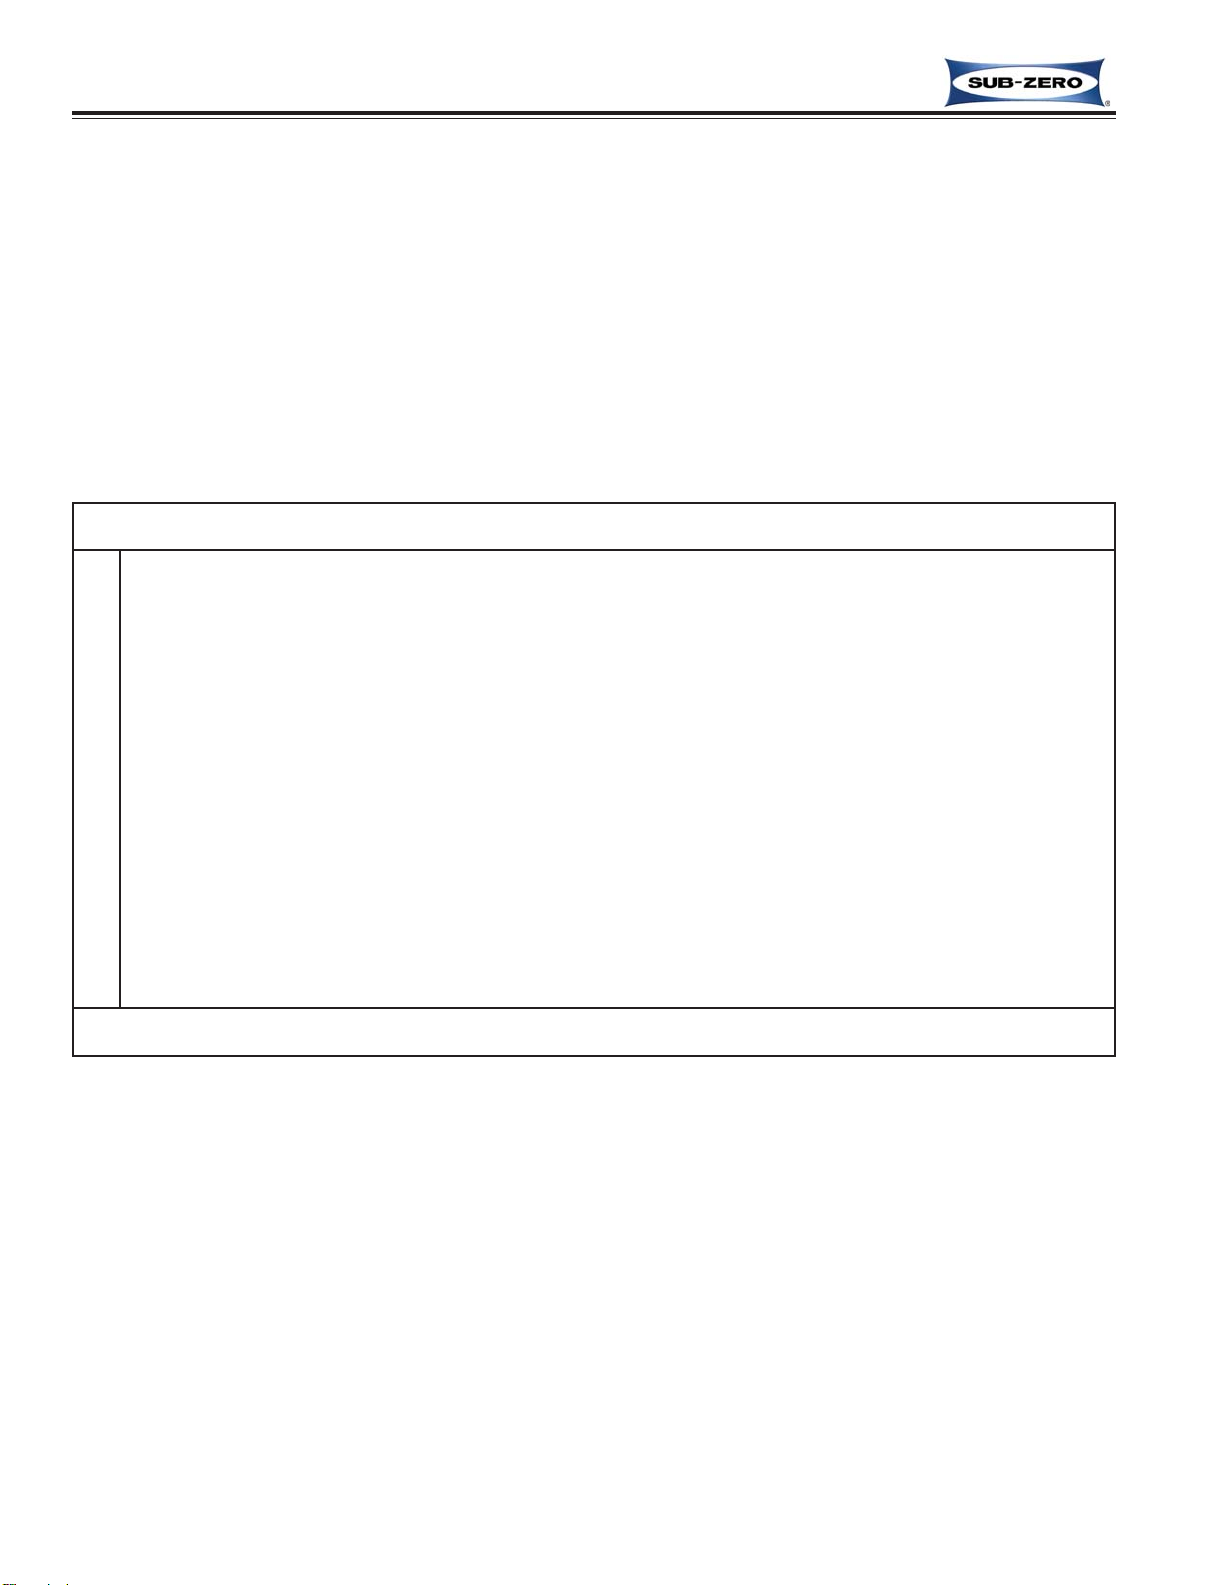
Subzero 400-2 SERIES User manual

Page 2
General Information Wine Storage
Wine Storage (400-
(400-2
2)
)Series
Series
1-2
#3758410 - Revision C - May,2014
IMPORTANT SAFETY INFORMATION
Below are Product Safety Labels used in this manual.
The "Signal Words" used are WARNING or CAUTION.
When reviewing this manual, please note these differ-
ent Product Safety Labels placed at the beginning of
certain sections of this manual. You must follow the
instructions given in the boxes of the Product Safety
Labels in order to avoid personal injury and/or product
damage.
The sample Product Safety Labels below illustrate the
precautions that should be taken when the signal word
is observed.
INTRODUCTION
This Technical Service Manual has been compiled to provide the most recent service information for 400-2 Series
units. This information will enable the service technician to troubleshoot and diagnose malfunctions, perform neces-
sary repairs, and return a unit to proper operational condition.
The service technician should read the complete instructions contained in this manual before initiating any repairs on
a 400-2 Series unit.
INDICATES THAT HAZARDOUS OR UNSAFE PRAC-
TICES COULD RESULT IN SEVERE PERSONAL
INJURY OR DEATH.
Indicates that hazardous or unsafe practices could
result in minor personal injury, and/or product dam-
age, and/or property damage.
In addition, please pay attention to the signal word
“NOTE”, which highlights information that is especially
important for the topic being covered.
This manual is designed to be used by Authorized Service Personnel only. Sub-Zero Freezer Co., Inc.
assumes no responsibility for any repairs made on Sub-Zero refrigeration units by anyone other than
Authorized Service Technicians.
Information and images contained in this manual are the copyright property of Sub-Zero Freezer Company, Inc.
Neither this manual nor any information or images contained herein may be copied or used in whole or in part
without the express written consent of Sub-Zero Freezer Company, Inc.
© Sub-Zero Freezer Company, Inc, all rights reserved.
TECHNICAL ASSISTANCE
If you should have any questions regarding a Sub-Zero
appliance and/or this manual, please contact:
Sub-Zero, Inc.
ATTN: Service Department
P.O. Box 44988
Madison, WI 53744-4988
Customer Assistance
Phone #: (800) 222 - 7820
Facsimile #: (608) 441 - 5887
Technical Assistance
(For Technicians in Customer’s Homes Only)
Phone #: (800) 919 - 8324
Parts / Warranty Claims
Phone #: (800) 404 - 7820
Facsimile #: (608) 441 - 5886
Service Department e-mail Address:
Main Office Hours:
8:00 AM to 5:00 PM Central Time
Monday through Friday
(24/7 Phone Coverage)

Page 3
Wine Storage
Wine Storage (400-
(400-2
2)
)Series
Series General Information
1-5 #3758410 - Revision C - May,2014
Figure 1-2. Serial Tag Layout
Serial Tag LocationControl Panel
Figure 1-1. Serial Tag Location
LISTED HOUSEHOLD
REFRIGERATOR OR FREEZER
REFRIGERANT
SERIAL NUMBER
MADISON, WI
PRODUCT SERVICE 1-800-222-7820
MODEL
115Vac, 60Hz, 1 Phase
TOTAL AMPS
FREEZER CO., INC.
FREEZERREFRIGERATOR
424G / O 2 2191621
0.0 3.5 1.8 R134a
Jan 2005
Model Number Serial Number Manufacture Date
Refrigerant Charge Total Amps Refrigerant Type
WINE
WARRANTY INFORMATION
This page summarizes the 2, 5 & 12 Year Warranty pro-
vided with every 400-2 Series unit, as well as two spe-
cial warranties:
•Non-Residential Warranty - Applies to units installed
in non-residential applications.
•Display/Model Home Warranty - Applies to distribu-
tor or dealer display units, and units in model
homes, sold three years after date of manufacture.
Following the warranty summaries are details and notes
about the warranties.
TWO, FIVE & TWELVE YEAR Warranty
• 2 year TOTAL PRODUCT, *parts and labor.
NOTE: Stainless Steel (Classic, carBon & Platinum)
doors, panels & product frames are covered by a 60
day parts & labor warranty for cosmetic defects.
• 5 Year SEALED SYSTEM, **parts and labor.
• 6th - 12th year LIMITED SEALED SYSTEM, **parts
only.
ONE & FIVE YEAR Non-Residential Warranty
(Example: Office, Yacht, etc.)
• 1 Year TOTAL PRODUCT, *parts and labor.
NOTE: Stainless Steel (Classic, carBon & Platinum)
doors, panels & product frames are covered by a 60
day parts & labor warranty for cosmetic defects.
• 5 Year SEALED SYSTEM, **parts only.
ONE & FIVE YEAR Display/Model Home Warranty
(Display units sold three years after date of manu-
facture)
• 1 Year TOTAL PRODUCT, *parts and labor.
NOTE: Stainless Steel (Classic, carBon & Platinum)
doors, panels & product frames are covered by a 60
day parts & labor warranty for cosmetic defects.
• 5 Year SEALED SYSTEM, **parts only.
Warranty Details
* Includes, but is not limited to the following:
Electronic Control System Components, Fan & Light
Switches, Fan Motors & Blades, Defrost & Drain
Heaters, Defrost Terminator, Drain Pan, Drain Tubes,
Wiring, Light sockets & bulbs, Door hinges, Door
closers & Cams, Compressor Electricals, etc. . .
* Stainless Steel (Classic, Platinum & Carbon) doors,
panels and product frames are covered by a limited 60
day parts and labor warranty for cosmetic defects.
** Includes the following:
Compressors, Condenser, Evaporators, Filter-Driers,
Refrigerant Valve Assembly, Heat-exchangers, All
Tubing that Carries the Freon.
NOTE: Condenser Fan Motors, Freon, Solder and
compressor electricals are NOT considered sealed
system parts.
Warranty Notes
• All warranties begin at unit's initial installation date.
• All Warranty and Service information collected by Sub-
Zero is arranged and stored under the unit serial num-
ber, and the customer's last name.
Sub-Zero requests that you have the model and serial
number available whenever contacting the factory or
parts distributor.
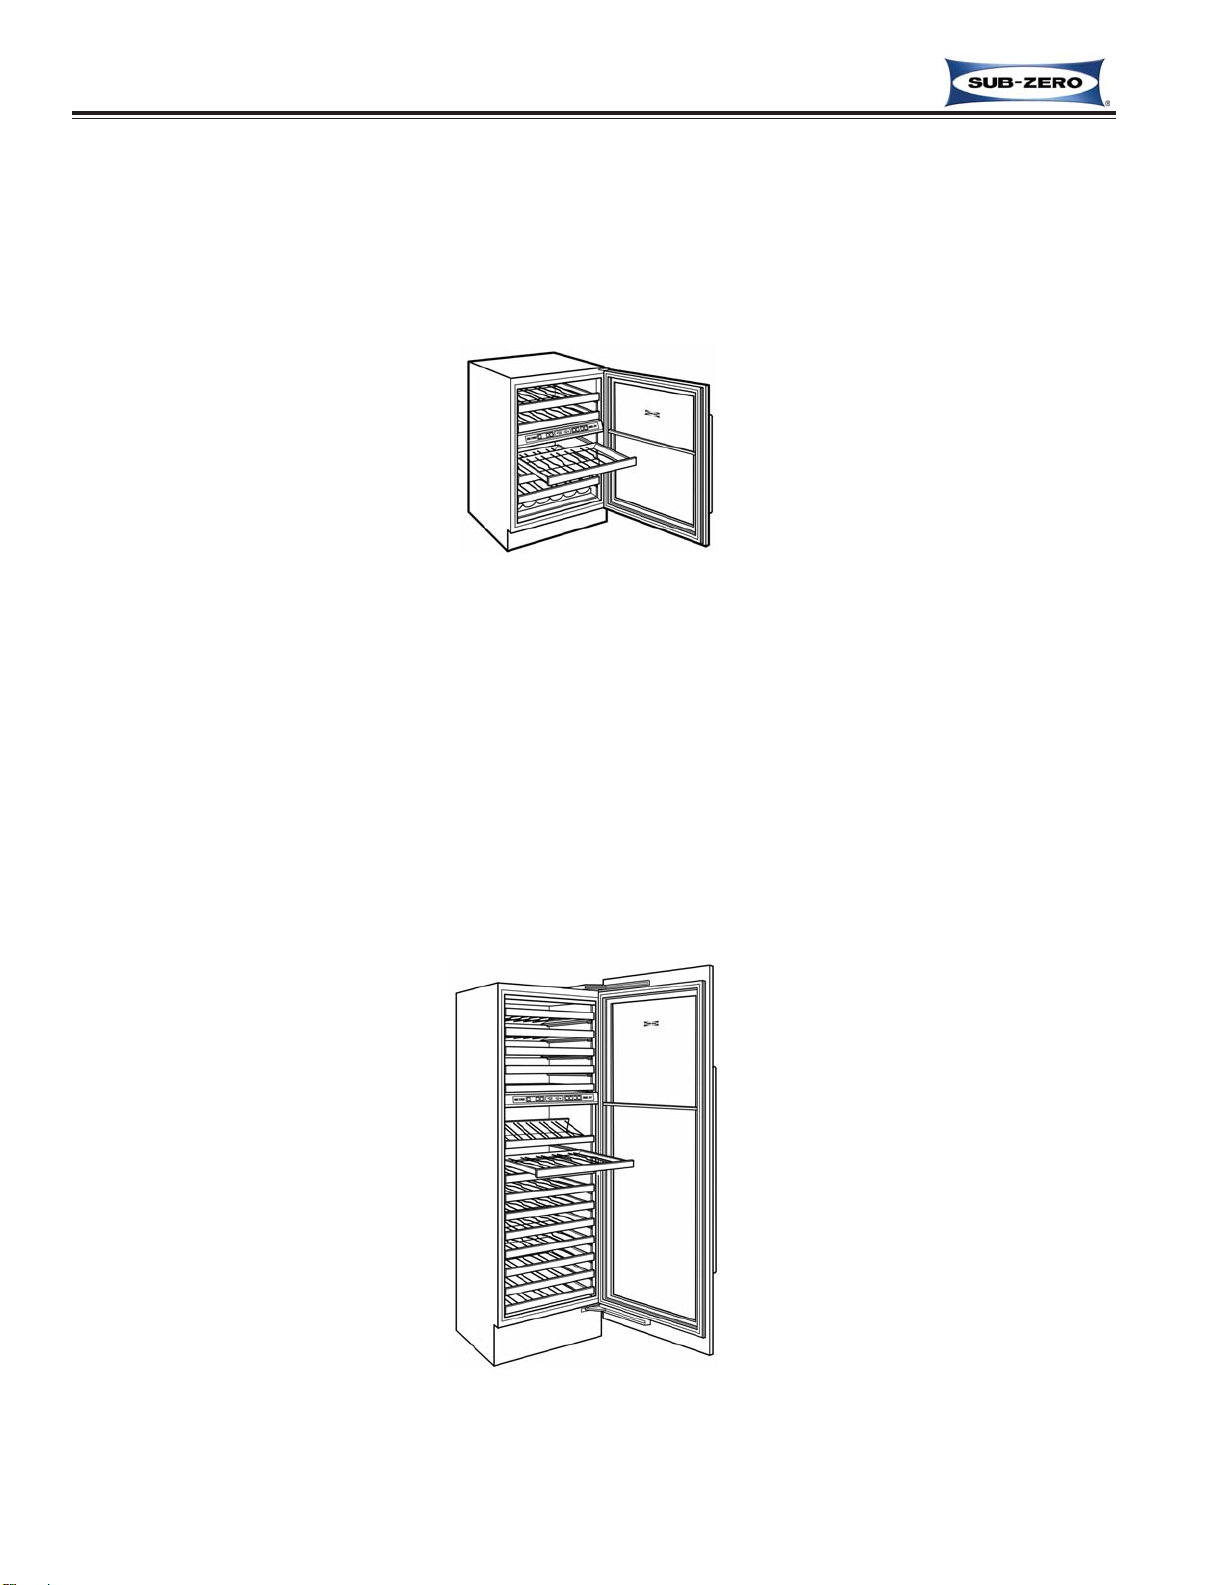
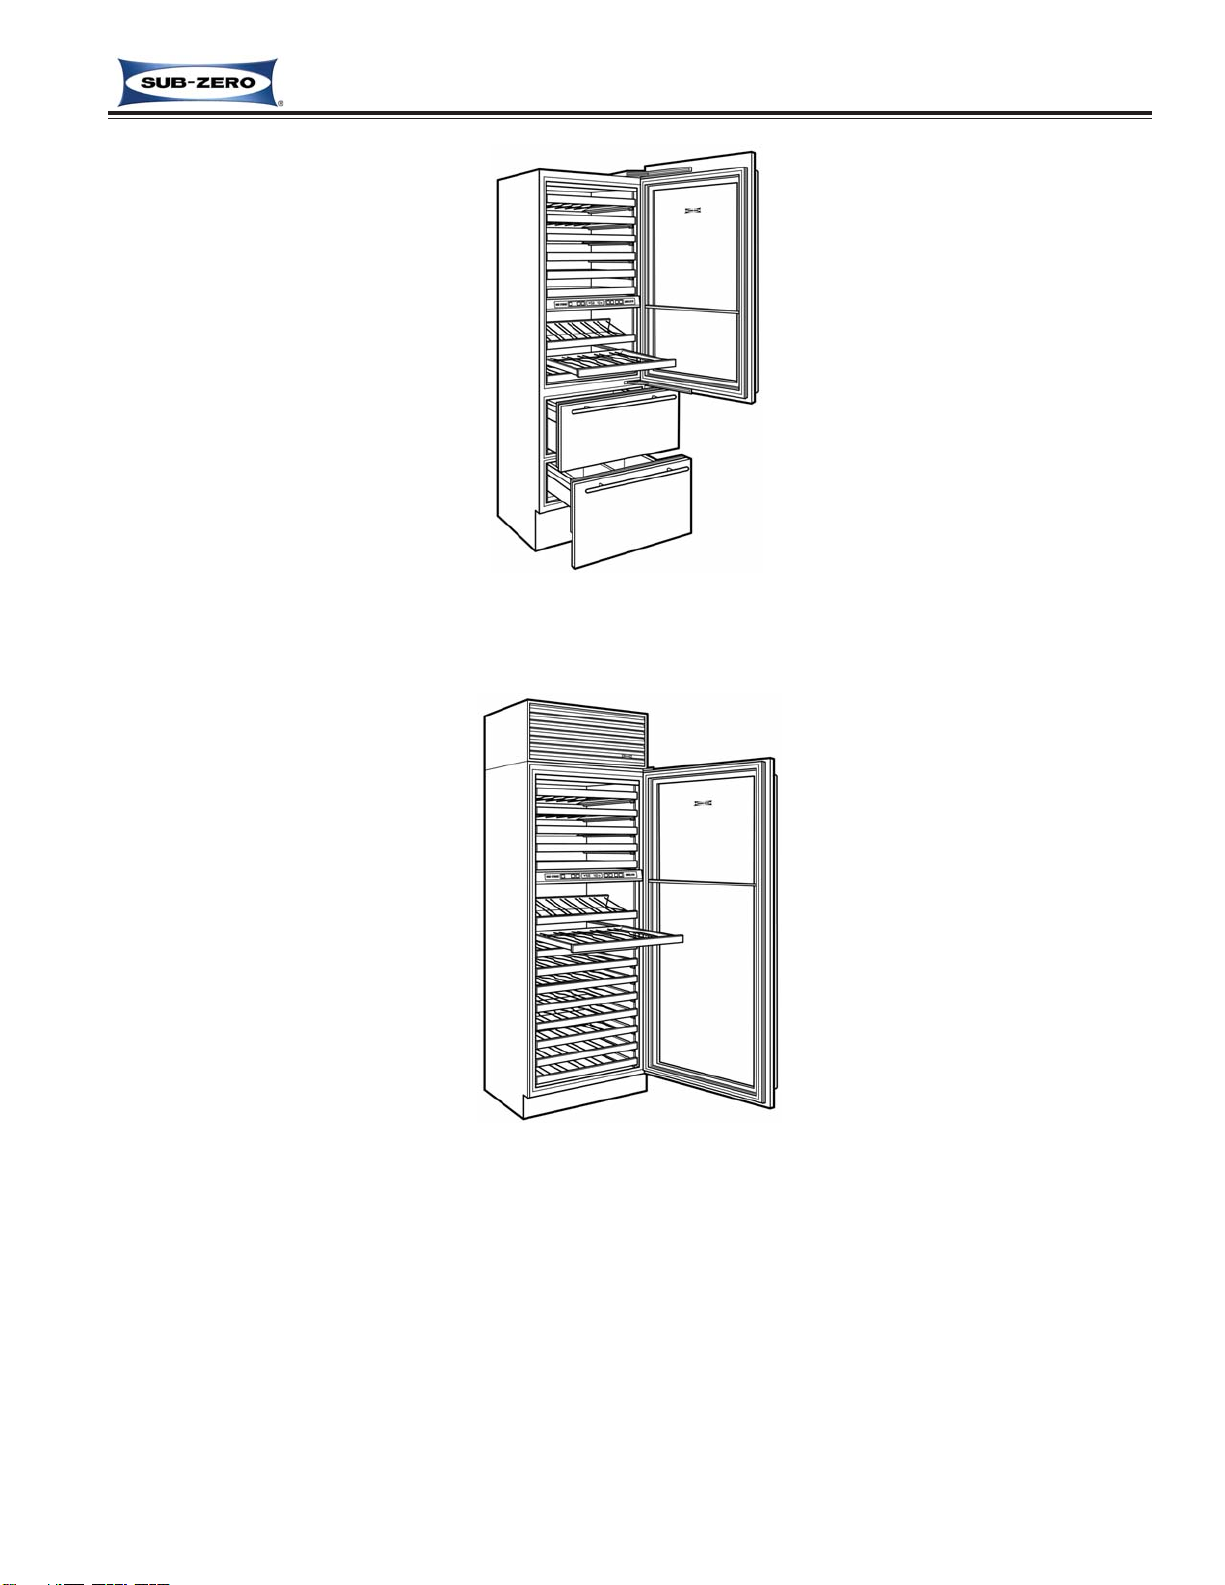
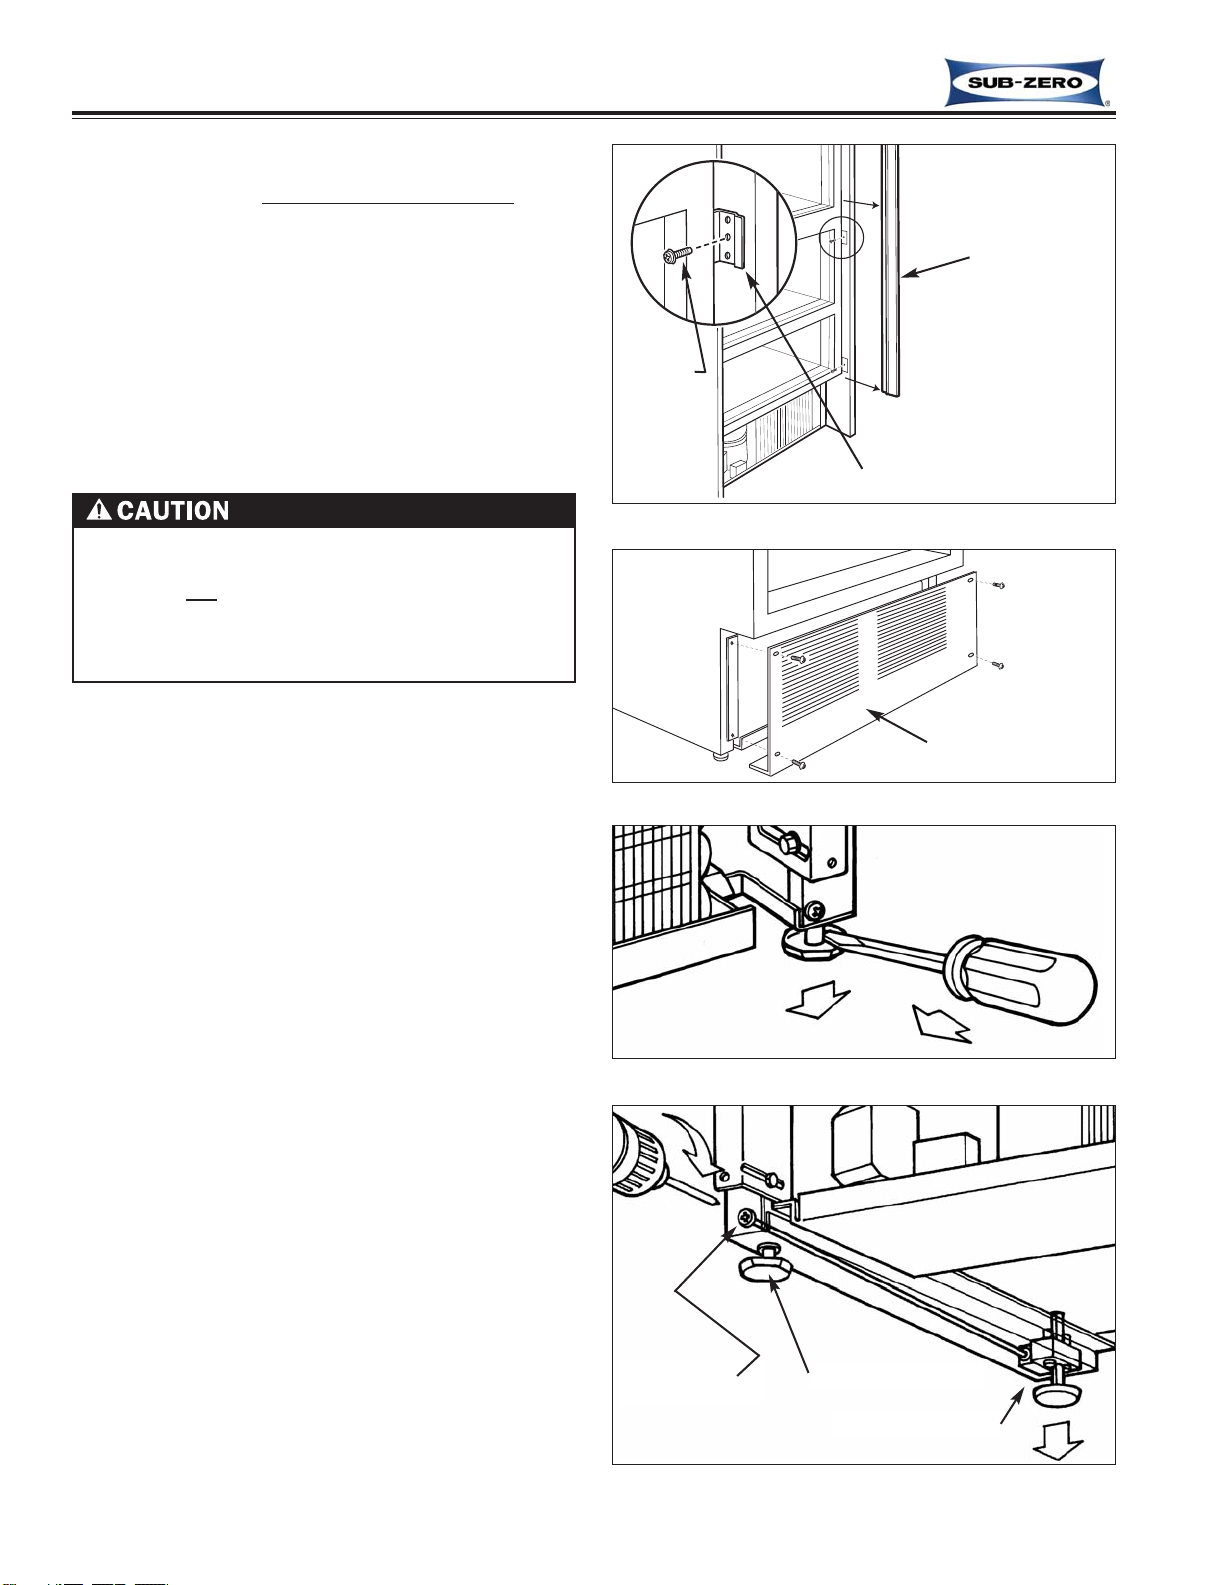
• The serial number tag for models 427-2, 427R-2, and
430-2 is located on the bottom side of the compartment
divider, directly behind the control panel. (See Figures
1-1, 1-2) For model 424-2 it is on the upper compart-
ment ceiling (not shown).

Page 4
General Information Wine Storage
Wine Storage (400-
(400-2
2)
)Series
Series
1-6
#3758410 - Revision C - May,2014
MODEL DESCRIPTIONS
This section briefly describes the models covered in this 400-2 Series Technical Service Manual. There are four
basic model configurations (Models 424-2, 427-2, 427R-2, and 430-2), with esthetic variations of the exterior cos-
metic components. This manual will address the four basic configurations in most cases.
The following diagrams (Figures 1-3 to 1-6) explain the 400-2 Series model numbering system.
424G/B-2 •400 Series - 24” Wide - Glass/CarBon (or Black) Steel Wrapped Door
424HAG/B-2 •400 Series - 24” Wide - High Altitude Glass/CarBon (or Black) Steel Wrapped Door
424G/O-2 •400 Series - 24” Wide - Glass/Overlay Panel Application Door
424HAG/O-2 •400 Series - 24” Wide - High Altitude Glass/Overlay Panel Application Door
424G/P-2 •400 Series - 24” Wide - Glass/Platinum Steel Wrapped Door
424HAG/P-2 •400 Series - 24” Wide - High Altitude Glass/Platinum Steel Wrapped Door
424G/S-2 •400 Series - 24” Wide - Glass/Stainless Steel Wrapped Door
424HAG/S-2 •400 Series - 24” Wide - High Altitude Glass/Stainless Steel Wrapped Door
424S/B-2 •400 Series - 24” Wide - Solid/CarBon (or Black) Steel Wrapped Door
424S/O-2 •400 Series - 24” Wide - Solid/Overlay Panel Application Door
424S/P-2 •400 Series - 24” Wide - Solid/Platinum Steel Wrapped Door
424S/S-2 •400 Series - 24” Wide - Solid/Stainless Steel Wrapped Door
424FS/G-2 •400 Series - 24” Wide - Free Standing - Stainless Steel Wrapped Unit - Glass Door
424FS/HAG-2 •400 Series - 24” Wide - Free Standing - Stainless Steel Wrapped Unit - High Altitude Glass Door
424FS/S-2 •400 Series - 24” Wide - Free Standing - Stainless Steel Wrapped Unit - Solid Door
427G-2 •400 Series - 27” Wide - Glass Door
427HAG-2 •400 Series - 27” Wide - High Altitude Glass Door
427S-2 •400 Series - 27” Wide - Solid Door
Figure 1-3. Model 424-2
Figure 1-4. Model 427-2 NOTE: Door panels for this model sold
separately.

Page 5
Wine Storage
Wine Storage (400-
(400-2
2)
)Series
Series General Information
1-7 #3758410 - Revision C - May,2014
427RG-2 •400 Series - 27” Wide - Refrigerated Drawers - Glass Door on Wine Storage Section
427RHAG-2 •400 Series - 27” Wide - Refrigerated Drawers - High Altitude Glass Door on Wine Section
427RS-2 •400 Series - 27” Wide - Refrigerated Drawers - Solid Door on Wine Storage Section
Figure 1-5. Model 427R-2
Figure 1-6. Model 430-2
430G/B-2 •400 Series - 30” Wide - Glass/CarBon (or Black) Steel Wrapped Door
430HAG/B-2 •400 Series - 30” Wide - High Altitude Glass/CarBon (or Black) Steel Wrapped Door
430G/F-2 •400 Series - 30” Wide - Glass/Framed Panel Application Door
430HAG/F-2 •400 Series - 30” Wide - High Altitude Glass/Framed Panel Application Door
430G/O •400 Series - 30” Wide - Glass/Overlay Panel Application Door
430HAG/O-2 •400 Series - 30” Wide - High Altitude Glass/Overlay Panel Application Door
430G/P-2 •400 Series - 30” Wide - Glass/Platinum Steel Wrapped Door
430HAG/P-2 •400 Series - 30” Wide - High Altitude Glass/Platinum Steel Wrapped Door
430G/S-2 •400 Series - 30” Wide - Glass/Stainless Steel Wrapped Door
430HAG/S-2 •400 Series - 30” Wide - High Altitude Glass/Stainless Steel Wrapped Door
430S/B-2 •400 Series - 30” Wide - Solid/CarBon (or Black) Steel Wrapped Door
430S/F-2 •400 Series - 30” Wide - Solid/Framed Panel Application Door
430S/O-2 •400 Series - 30” Wide - Solid/Overlay Panel Application Door
430S/P-2 •400 Series - 30” Wide - Solid/Platinum Steel Wrapped Door
430S/S-2 •400 Series - 30” Wide - Solid/Stainless Steel Wrapped Door
NOTE: Door panels for this model sold
separately.

Page 6
General Information Wine Storage
Wine Storage (400-
(400-2
2)
)Series
Series
1-8
#3758410 - Revision C - May,2014
Wine Storage Unit Maximum Temperature 65° 18°
Sub-Zero Wine Storage Temperature Range, Recommended Wine Storage Temperatures
and Recommended Wine Serving Temperatures:
Bordeaux 63° 17°
Red Burgundy 61° 16°
Beaujolais 54° 12°
Sherry 52° 11°
Rosés 48° 9°
Dry White Wines 48° 9°
Champagne 46° 8°
Sweet White Wines 43° 6°
Sparkling Wines 41° 5°
Wine Storage Unit Minimum Temperature 38° 3°
Fahrenheit Celsius
The table below shows the temperature range of the Sub-Zero Wine Storage Units. This table also shows the rec-
ommended temperatures for “serving” wines. Serving wines at the recommended temperatures will insure that white
wines maintain their lively and interesting taste, and red wines will maintain their scent and flavor.
NOTE: For “long term storage” of all wines, the ideal temperature is 55°F / 13°C.
NOTE: The temperature range in the refrigerator drawer area of the 427R is 34°F / 1°C to 45°F / 7°C.
Recommended Wine Serving Temperatures

Page 7
Installation Information Wine Storage
Wine Storage (400-
(400-2
2)
)Series
Series
2-2
#3758410 - Revision C - May, 2014
Anti-Tip Components Installation (424-2)
If anti-tip bracket needs to be installed, follow these
steps (See Figure 2-1):
1. Locate and mark two wall studs at back of unit
installation location.
2. Identify and mark proper height to clear unit top.
Space between unit top and bottom of bracket must
NOT be more then 1/4" (6.1 mm)
3. Secure bracket to wall studs, located in step 1, mak-
ing sure screws extend 7/8" (22.2 mm) into each
wall stud. The bracket must extend a minimum of 3"
(76.2 mm) over unit.
4. Refer to Installation Guide provided with unit for any
additional information needed.
Anti-Tip Components Installation
(424FS-2, 427-2, 427R-2)
If anti-tip bracket needs to be installed, follow these
steps (See Figure 2-2):
1. Center anti-tip bracket at back of unit installation
location.
2. Secure bracket to wall studs or flooring, making sure
screws extend 7/8" (22.2 mm) into each wall stud or
flooring.
3. Refer to Installation Guide provided with unit for any
additional information needed.
INSTALLATION CONSIDERATIONS
This section covers common installation issues seen by Service Technicians. Improper installation, though not a
valid service issue, has the potential to lead to a call for service. Installation related complaints could include, but
are not limited to: Unit leveling, unit movement, door misalignment, improper door and drawer sealing, internal frost
or condensation, exterior condensation, warm compartment temperatures, etc.
NOTE: If additional installation information is needed, refer to the complete Installation Guide, or contact Sub-Zero
Service Department.
UNIT COULD TIP UNDER CERTAIN LOAD CONDITIONS. FAILURE TO INSTALL ANTI-TIP COMPONENTS AND
EXTEND FRONT LEVELERS TO FLOOR ACCORDING TO INSTALLATION MANUAL CAN RESULT IN SERIOUS
INJURY OR DEATH.
Figure 2-1. Anti-Tip Components
Wall Stud
Bracket
Figure 2-2. Anti-Tip Components
Bracket

Page 8
Wine Storage
Wine Storage (400-
(400-2
2)
)Series
Series Installation Information
2-3 #3758410 - Revision C - May, 2014
Sub-Zero Unit
Figure 2-3. Anti-Tip Components
Wall Stud
Wood Block
Screws &
L-Bracket
Min. 3”
(76.2 mm)
Anti-Tip Components Installation (430-2)
If anti-tip components (aka wood block / blocking kit)
need be installed, follow these steps (See Figure 2-3):
1. Locate and mark two wall studs at back of unit
installation location.
2. Identify and mark proper height to clear unit top.
Space between unit top and bottom of wood block
must NOT be more then 1/4" (6.1 mm).
3. Using the L-brackets and screws provided, secure
wood block to wall studs, located in step 1, making
sure screws extend 7/8" (22.2 mm) into each wall
stud. The wood block must extend a minimum of 3"
(76.2 mm) over unit.
4. Utilizing front and rear levelers, raise and level unit
until it contacts wood block (See leveling instructions
on following pages).
5. Refer to Installation Guide provided with the unit for
any additional information needed.
Unit Leveling (424-2, 424FS-2)
NOTE: Model 424-2 must be leveled before installing
into rough-in opening. If unit is already installed and
anchored with countertop bracket (See Figure 2-4),
Extract anchor screws before leveling, reinstalled after.
To Level 424-2 - Place it in front of rough-in opening,
then turn each leveling leg clockwise to raise unit, coun-
terclockwise to lower unit (See Figure 2-5).
To Level 424FS-2 - Turn each leveling leg clockwise
to raise unit, counterclockwise to lower unit (See Figure
2-2).
Figure 2-5. Leveling Legs
Figure 2-4. Countertop Bracket
Leveling Legs (4)
Clockwise to raise,
Counterclockwise
to lower
Countertop Bracket

Page 9
Installation Information Wine Storage
Wine Storage (400-
(400-2
2)
)Series
Series
2-4
#3758410 - Revision C - May, 2014
Rear leveling legs will move only 1/16” (2 mm) for
every 18 revolutions of the Phillips-head adjusting
screw. Do not over torque. Use lowest torque set-
ting on any power screwdriver. Do not turn rear lev-
eling legs by hand, doing so will damage rear level-
er assembly.
Figure 2-6. Molding & Brackets
Figure 2-9. Adjusting Rear Levelers
Figure 2-8. Adjusting Front Leveling Legs
Figure 2-7. Kickplate/Grille Removal
Side Molding
Unit to Cabinet Bracket
Kickplate/ Grille
Rear Leveler
Adjusting Screw
Front Leveling Leg
Rear Leveler Assy
Screw
Unit Leveling (427-2 & 427R-2)
NOTE: Unit must be installed before final leveling. If
unit is anchored to cabinets, remove anchor screws
before leveling, reinstalled after (See Figure 2-6).
1. Remove kickplate/grille (See Figure 2-7).
2. To raise front, turn front leveler legs counterclock-
wise, clockwise to lower (See Figure 2-8).
3. At front of unit base is an adjusting screw that reach-
es to rear leveler assembly. To raise rear, use
Phillips-head screwdriver to turn adjusting screw
clockwise, counterclockwise to lower (See Figure 2-
9).
Other manuals for 400-2 SERIES
1
Table of contents
Other Subzero Wine Cooler manuals