INSTRUCTION MANUAL
OPERATION
1. When the Lever/Trigger is depressed, the Throttle Valve is moved down off its seat by the Valve Tube.
Air enters the bottom of the Air Cylinder, forcing the PistonAssembly.As the PistonAssembly rises,
the Plunger Rod forces hydraulic fluid into the upper part of the Hydraulic Section , retracting the
Hydraulic Plunger. Meanwhile, the Jaws grip the mandrel of the rivet, pulling until the rivet is set and
breaking the mandrel in the process.
2. When the Lever/Trigger is released, the Throttle Valve resets and shuts off the air supply. The Valve
Tube Spring then lifts the Valve Tube and exhausts the air through the hollow of the Valve Tube. The
Return Spring returns the Hydraulic Plunger to its original position.This open the Jaws, releases the
mandrel, and retracts the PistonAssembly back to its original static site.
SERVICING PROCEDURES
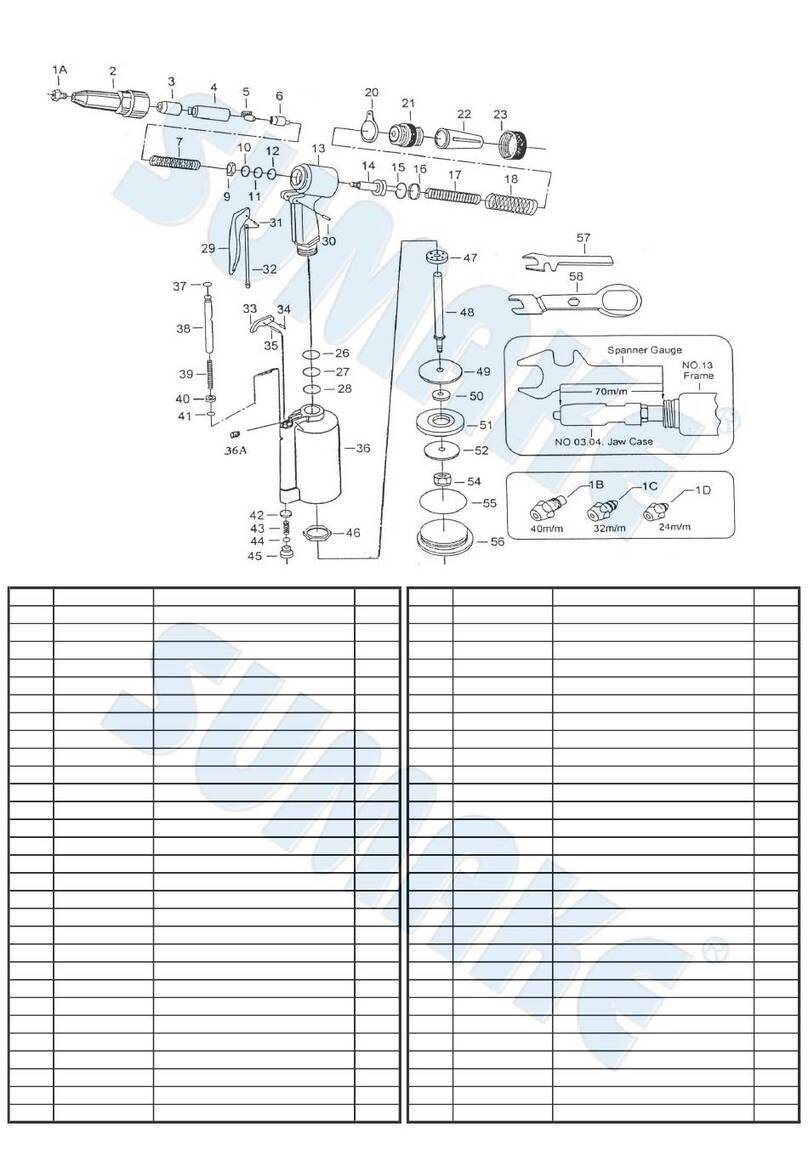
1.CHANGING NOSEPIECES
Hook up the tool to the air line and depress the Lever/Trigger. While continuing to the Lever/Trigger
down, use the Multi-Wrench to remove the unwanted Nosepiece and tighten the new Nosepiece in
place again. When the Lever/Trigger is released and the tool is at rest, a circular opening should be
visible when looking through the Hydraulic Section from the Rear Gland to the Nosepiece.
2.CLEANINGAND CHANGING OF THE JAWS
Disconnect the tool from the air line and then remove the Head with the Multi-Wrench. Hold the Jaw
Housing Coupler firmly and remove the Jaw Housing. Clean the Jaws with either a steel brush or
solvent. If excessive wear is apparent, replace them with new Jaws. Before reassembling, apply a thin
coat of oil to the sliding surface of the Jaws. Reassemble the tool in the reverse order while making sure
that the chamfered end of the Jaw Pusher is in contact with the Jaws properly.
3.JAW OPENING ADJUSTMENT
To obtain the maximum stroke of the tool, proper distance-setting between the Jaw Housing and the
Head is very important. First loosen the Lock Nut.Arivet is then inserted into the Nosepiece which
should be selected to match the rivet size to be set. While screwing or unscrewing the Head to achieve
the minimum opening of the Jaws, check if the rivet mandrel can be removed and inserted freely. Fasten
the Lock Nut after the adjustment.
DAILY CARE
1.Check the tightness of the connections between the Jaw Housing Coupler,Nut,Jaw Housing and the
Hydraulic Plunger, the Nosepiece, the Head and the Lock Nut.
2.If the jaws show excessive wear and / or are dirty, follow the steps provided in the SERVICING
PROCEDURES section.
MALFUNCTION & REPAIR
A. Rivet mandrel is gripped bythe jaws but the rivet can not be set and mandrel can not be broken
CAUSE : Low air pressure or loss of hydraulic fluid.
REMEDY : Increase air pressure to 7 bar ( 100PSI ) maximum at tool. Make sure all fitting including
Rear Gland and Head are tightened. If malfunction persists, add hydraulic fluid as
follows:
Loosening the Lock Nut slightly and turn the tool upside down. Disassemble Air
Cylinder Body from the Hydraulic Section and remove the Head. Next, make sure that
the Hydraulic Plunger is at the bottom of its stroke. If it must be pulled to the bottom of
its stroke, replace the Return Spring.
Before adding hydraulic fluid, also check to see if any leaks appear in the Air Cylinder
Body, Head or Rear Gland, If fluid is found in any of these areas , replace the
appropriate O-Rings . Pour hydraulic fluid slowly into the Hydraulic Section until the
fluid level reaches the top of the Hydraulic Rod Guide. Wait a few seconds to allow any
air bubbles to escape.
Reassemble the tool in reverse order. Use extreme care to avoid damage to O-Rings.A
good rubber lubricant must be applied on the bearing surfaces of Plungers and cylinder
bores before re-assembly .A slow rotational movement coupled with gentle pressure will
aid in reinserting the Plungers.
NOTE: To achieve proper fluid level, Head must be removed when refilling. Use proper
hydraulic fluid
for the best performance of the tool.
B. Mandrel dose not fit completely into Nosepiece or fails to eject
CAUSE: A. Jaw Housing distance incorrect.
B. Jaws are dirty or damaged.
C. Fatigued Jaw Pusher Spring.
D. Fatigued Return Spring.
E.Air leakage in vacuum system.
REMEDY : A. Loosen the Head and check the rated stroke length. If shorter, search for worn or
damaged O- Rings and replace it.
B. Clean or replace the Jaws.
C. Replace the Jaw Pusher Spring.
D. Replace the Return Spring.
E. Search for worn or damaged seals in the vacuum system and replace it.
C. Tool take more than one stroke under ideal conditions to set rivet and break mandrel
CAUSE : A. Insufficient hydraulic fluid.
B. Low air pressure.
C. Loose Nosepiece or improper size of Nosepiece.
D. Rivet Body too long for the thickness of the joint.
REMEDY : A. See Remedy under MALFUNCTION & REPAIR A.
B. Increase air pressure but do not exceed 7 bar ( 100 PSI ) at tool.
C. Tighten Nosepiece or use right size of Nosepiece.
D. The Rivet Body should be 3-6 mm longer than the thickness of the joint.
SAFETY RULES
*Use only dry filtered air regulated to 6.3bar(90 PSI) on the tool inlet. Do not exceed maximum
7bar(100PSI).
* Disconnect the tool from the air supply before any assembly or disassembly
*Do not face the end of the Rear Gland (8) while operating the tool.
*Inspect the Hydraulic Section prior to use. Do not use if cracked. Contact the distributor for repair or
replacement.
*Do not pound on the Nosepiece or the end of the Head or force the rivet into the hole of the Nosepiece
as this will damage the tool.
*Use only genuine replacement parts and proper hydraulic fluid for the maintenance of tools.
*Make sure all parts are correctly and securely fastened.
ST-6674-I-1601B-FP
