SVBONY SV606 User manual

Wireless Microscope
User Manual
(for iOS/Android)
SV606
(EN:1-10)(DE:11-21)(FR:22-32)(IT:33-43)(ES:44-54)(RU:55-66)(JP:67-76)

EU Importer:Address:Uetzenacker 29,38176 wendeburg
Name:Germany Retevis Technology GmbH

1.Parts and Functions
Part No. Function
1 Micro USB charging interface
2 Power switch / LED luminance control
3 LED indicator light / reset
4 Shoot / recording
5 Focal length setting idler wheel
6 LED light source
Specifications
Magnification: 50X-1000X
Photosensitive component: 1/4" 2.0 million pixel CMOS
Connection method: WIFI
Video recording format: AVI
Video resolution: 640x480, 1280*720, 1920*1080
Photo format: JPG
Picture size: 640x480, 1280*720, 1920*1080
1

Number of LEDs: 8 SMD3528 bright white lights (brightness
adjustable)
Focus mode and focus range: manual adjustment, 0~40mm
Working range: 0-10m (open scenes, occluded scenes will
affect the working range)
Support PC system(only Windows): Windos xp, win7, win8.1,
win10 (32, 64 bit)
WiFi working environment: Android4.0 or ios8.0 and above
Support 2.4Ghz (8201.11b/g/n) wireless data transmission
equipment
Power supply: 800mah built-in lithium battery
Charging requirement: DC-5V~1A
Single machine size: 133.5x34x34mm
Product color: black (specific to the actual product)
Supplied Accessories
1. 1x SV606 Wifi Digital Microscope
2. 1x Bracket
3. 1x 1.0 m USB 2.0 Cable
4. 1x CD-ROM
5. 1x Micrometer correction ruler
6. 1x User Manual
1.1 Functions of various parts and operation instructions
Micro USB charge interface: when the device has low power,
please connect it to the charger to charge ;Do not use the
device during charging (it will cause a short circuit and reduce
the battery life of the device).
Power switch / LED luminance adjustment: long press the
key for 2-3s to start the device, and the blue LED indicator light
is normally on (this process lasts for about 3-5s); at the
moment, please open the Wifi of your iOS/Android device to
find a Wifi hotspot (unencrypted) with the prefix of
“Cam-XXXXXX”. Under the working mode, press the key to
adjust the luminance of the LED lights.
LED indicator light / reset: this indicator light is used for
indicating the working state of the device. Under the working
2

state, the blue light is normally on; when the battery is low
power, the blue light starts flickering till the device
automatically goes off. It is also used as hard reset key, and
when the device has abnormality during operation, please press
the key to forcedly turn off the device (note: for starting the
device after shutdown, please long press the Start-up-
/Shut-down key again.)
Shoot / recording: under the working state of the device, click
this key to take a picture and automatically save it. Long press
this key for 2s to enter the recording mode, and loosen it to
keep the recording state; then, long press for 2s and loosen it to
exit from the recording mode and save the video recorded
during this period. Afterwards, you may check the video in your
iOS/Android device.
Focal length setting idle wheel: under the working state of the
device, rotate this idle wheel to adjust the focal length and focus
on the object to be shot.
LED light source: please use the luminance adjustment key to
adjust the luminance of the LED lights in four levels cyclically
from dark level to bright level till this function is turned off; the
default luminance during starting-up is the darkest level.
2.Use of Wifi Digital Microscope in Your IOS/An-
droid Device
2.1Download APP
iOS: search iWeiCamera in the App store, download and install
it; or, scan the following QR code to select iOS version for
installation.
Android: scan the following QR code
to select Android (Google play) version
(international user) or Android (China)
version (Chinese user), download and
install it; or input the following URL in
the browser, download and install it.
ios/Android Downloading QR Code
Or input the following URL in the browser to download the App.
3

https://active.clewm.net/DuKSYX?qru-
rl=http%3A%2F%2Fqr09.cn%2F-
DuKSYX>ype=1&key=bbb57156739
726d3828762d3954299ca7a957b6172
2.2Start the device
Long press the Start-up/Shut-down key of the device for 2-5s to
start the device after the blue light is normally on.
2.3Connect Wifi digital microscope to your iOS/Android
device
Open Wifi setting of the iOS/Android device, and open Wifi to
find the Wifi hotspot (unencrypted) with the prefix of
“Cam-XXXXXX”, and click it for connection, and return to the
main interface of the iOS/Android device after successful
connection.
iOS Android
4(APP Icon) (APP Icon)
iWeiCamera HVCAMWIFI

2.4Introduction to APP interface and application
Open the APP and enter the APP main interface
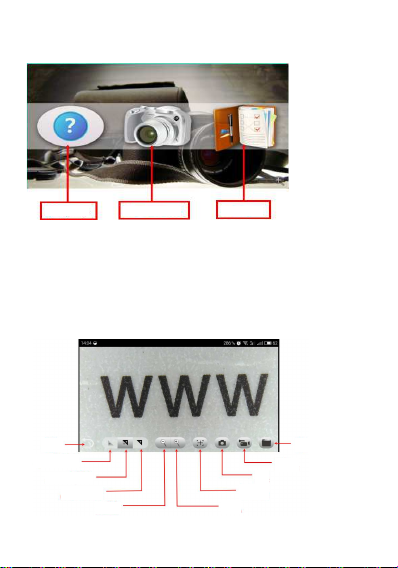
2.4.1APP homepage
Help: click it to check the company information, APP version,
FW version and the product operation manual.
Preview: click it to check the real-time picture of the device and
operate the device.
File: click it to check the existing pictures and video files.
2.4.2Menu interface preview
Help Preview File
Exposure decrease
Automatic Exposure
Exposure increase
Zoom out
File
Recording
Shoot
Central label
Zoom in
Return 5

2.4.3Functional description for the keys
Return: click it to return to the previous interface.
Exposure decrease: click it to reduce exposure (used in bright
light environment).
Automatic exposure: click it for automatic exposure.
Exposure increase: click it to increase the exposure (used in
insufficient light environment).
Zoom out: click it to zoom out the picture (used when the
picture is too large; the default value is the minimum picture).
Zoom in: click it to zoom in the picture (used when the picture
is too small).
Central label: click it to label the central point of the picture by
a cross.
Shoot: click it to take a picture.
Recording: click it to record a video/stop recording.
File: click it to check the shot pictures or videos.
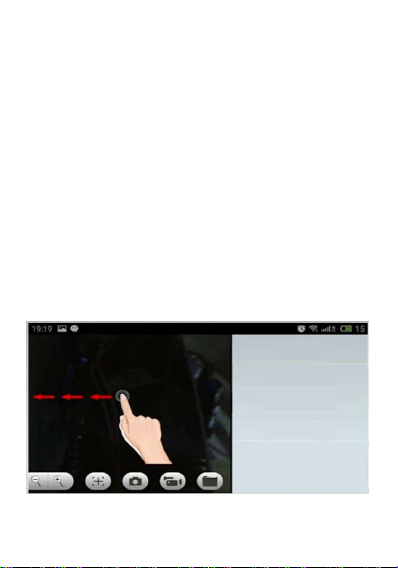
2.4.4Resolution setting and picture contrast mode
In the preview interface, press on the screen and slide leftwards
to drag out the device resolution and picture contrast mode
setting from the right side. 6Resolution
1920*1080
1280*720
640*480

Resolution setting
1920*1080: click to select the resolution as 1920*1080.
1280*720: click to select the resolution as 1280*720.
640*480: click to select the resolution as 640*480.
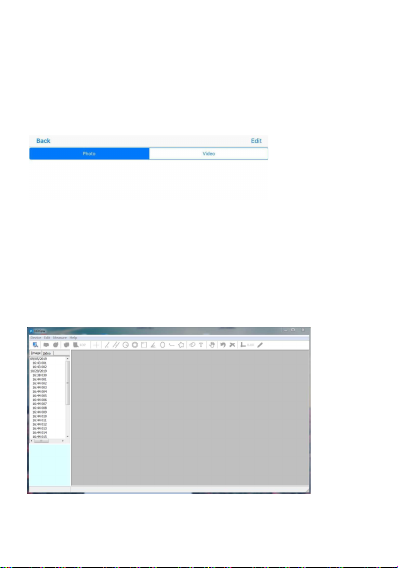
2.4.5File menu
Click the file menu to check or delete the shot pictures or
videos.
PC version software installation and introduction (Only for
Windows system)
2.5.1 PC version measurement software
Use a browser to log in to the SVBONY official website
https://www. svbony. com / Support / Soft Ware-Driver /
And download the Windows version of HiView set1.1. (Only
Windows (32,64-bit) XP/7/8/10).
The software installation interface is shown in the figure below.
7

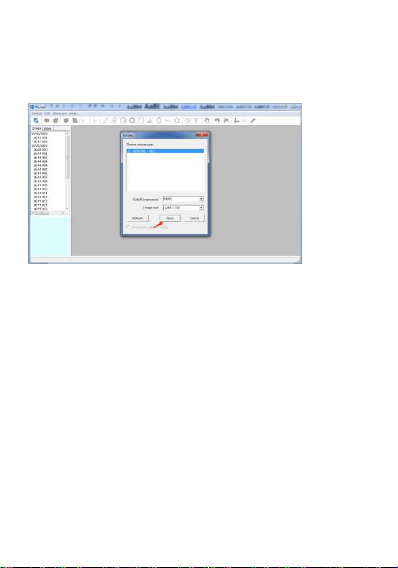
2.5.2 Turn on the device
Click the "Device" option in the upper left corner, then click
"Open". There will be a device selection popup. Select the
device you want to use and then click the "Open" option below
to open the device.
You can use the "Snap a image" / "Capture a video" / "Measure
function" function to operate the software to observe and mark
the specimen.
When using measurement mode, the microscope must be
calibrated before accurate measurement
PC version camera mode software (only camera function)
1.The installation file can be installed using the CD or
downloaded from the official website of SVBONY.
1.SVBONY official download address:https://www.svbony.com/Support/SoftWare-Driver/ Enter the
address from the browser to download and install
2. CD installation:
2.1 Put the CD into the CD-ROM, and the files of the CD will be
automatically displayed on the screen.
Note: If the CD-ROM does not run automatically, please
double-click "CD-ROM", or right-click "open" under the
CD-ROM menu bar 8

After connecting with a genuine data cable, turn on the machine
and automatically enter the PC camera mode, click "amcap" to
open the PC software, select the second item Devices, check
the device name GENERAL-UVC as shown in the
figure: Finally, check the third item "Preview" in
"Options" as shown in the picture:The image can be
displayed. After the machine enters the PC mode, it only
supports the camera function. Only the switch button and the
fill light potentiometer are valid. Other buttons cannot be
used. 9Before using this device, read this guide which
contains important operating instructions for
safe usage and control for compliance with
applicable standards and regulations.
FCC Requirements:
•Products authorized under Part 15 using SDoC or Certification
require a label containing one of the following compliance
statements
(1)Receivers associated with licensed device service operaions:
This device complies with part 15 of the FCC Rules. Operation
is subject to the condition that this device does not cause
harmful interference.
(2)Stand-alone cable input selector switch:
This device complies with part 15 of the FCC Rules for use with
cable television service.
(3)All other devices:
•This device complies with part 15 of the FCC Rules. Operation
is subject to the following two conditions:
(1) This device may not cause harmful interference, and
(2) this device must accept any interference received, including
interference that may cause undesired operation.
CE Requirements:
•(Simple EU declaration of conformity) Hong Kong Svbony
ATTENTION!

10Technology Co.,Ltd declares that the equipment type is in
compliance with the essential requirements and other relevant
provisions of RED Directive 2014/30/EU and the ROHS
Directive 2011/65/EU and the WEEE Directive 2012/19/EU; the
full text of the EU declaration of conformity is available at the
following internet address: www.svbony.com.
•Disposal
The crossed-out wheeled-bin symbol on your product, literature,
or packaging reminds you that in the European Union, all
electrical and electronic products, batteries, and accumulators
(rechargeable batteries) must be taken to designated
collection locations at the end of their working life. Do not
dispose of these products as unsorted municipal waste.
Dispose of them according to the laws in your area.
IC Requirements:
CAN ICES-3(B)/NMB-3(B)
Avoid Choking Hazard
Small Parts. Not for children under 3 years.
Approved Accessories
•This device meets the regulatory standards when
used with the Svbony accessories supplied or
designated for the product.
•For a list of Svbony-approved accessories for your
item, visit the following website:
http://www.Svbony.com
WARNING

1.Teile und Funktionen
Teile-Nr. Funktion
1 Micro-USB-Ladeschnittstelle
2 Netzschalter / LED-Luminanzregelung
3 LED-Kontrollleuchte / Reset
4 Aufnahme / Aufnahme
5 Laufrad zur Einstellung der Brennweite
6 LED Lichtquelle
Spezifikationen
Vergrößerung: 50X-1000X
Lichtempfindliche Komponente: 1/4 "2,0 Millionen Pixel CMOS
Verbindungsmethode: WIFI
Videoaufnahmeformat: AVI
Videoauflösung: 640 x 480, 1280 * 720, 1920 * 1080
Fotoformat: JPG
Bildgröße: 640 x 480, 1280 * 720, 1920 * 1080
11

Anzahl der LEDs: 8 SMD3528 hellweiße Lichter (Helligkeit
einstellbar)
Fokusmodus und Fokusbereich: manuelle Einstellung, 0 ~ 40 mm
Arbeitsbereich: 0-10 m (offene Szenen, verdeckte Szenen
beeinträchtigen den Arbeitsbereich)
PC-System unterstützen (nur Windows): Windows XP, Win7,
Win8.1, Win10 (32, 64 Bit)
WiFi-Arbeitsumgebung: Android4.0 oder ios8.0 und höher
Unterstützt drahtlose Datenübertragungsgeräte mit 2,4 GHz
(8201,11b / g / n)
Stromversorgung: 800mAh eingebaute Lithiumbatterie
Ladeanforderung: DC-5V ~ 1A
Einzelmaschinengröße: 133,5 x 34 x 34 mm
Produktfarbe: schwarz (spezifisch für das tatsächliche Produkt)
Beiliegendes Zubehör
1. 1x SV606 Wifi Digitalmikroskop
2. 1x Halterung
3. 1x 1,0 m USB 2.0-Kabel
4. 1x CD-ROM
5. 1x Mikrometer-Korrekturlineal
6. 1x Benutzerhandbuch
1.1Funktionen verschiedener Teile und Bedienung-
sanleitung
Micro-USB-Ladeschnittstelle: Wenn das Gerät wenig Strom
hat, schließen Sie es zum Laden an das Ladegerät an.
Verwenden Sie das Gerät nicht während des Ladevorgangs
(dies führt zu einem Kurzschluss und verkürzt die Akkulaufzeit
des Geräts).
Einstellung des Netzschalters / der LED-Luminanz: Halten
Sie die Taste 2-3 Sekunden lang gedrückt, um das Gerät zu
starten, und die blaue LED-Anzeigelampe leuchtet normaler-
weise (dieser Vorgang dauert ca. 3-5 Sekunden). Öffnen Sie im
Moment das Wifi Ihres iOS / Android-Geräts, um einen
Wifi-Hotspot (unverschlüsselt) mit dem Präfix „Cam-XXXXXX“ zu
finden. Drücken Sie im Arbeitsmodus die Taste, um die
12

Luminanz der LED-Leuchten einzustellen.
LED-Kontrollleuchte / Reset: Diese Kontrollleuchte dient zur
Anzeige des Betriebszustands des Geräts. Im Arbeitszustand
leuchtet normalerweise das blaue Licht. Wenn der Akku
schwach ist, beginnt das blaue Licht zu flackern, bis das Gerät
automatisch erlischt. Es wird auch als Hard-Reset-Taste
verwendet. Wenn das Gerät während des Betriebs eine Störung
aufweist, drücken Sie bitte die Taste, um das Gerät
zwangsweise auszuschalten (Hinweis: Um das Gerät nach dem
Herunterfahren zu starten, drücken Sie bitte lange auf Start /
Herunterfahren wieder Schlüssel.)
Aufnahme / Aufnahme: Klicken Sie im Arbeitszustand des
Geräts auf diese Taste, um ein Bild aufzunehmen und es
automatisch zu speichern. Drücken Sie diese Taste 2 Sekunden
lang, um den Aufnahmemodus aufzurufen, und lösen Sie sie,
um den Aufnahmestatus beizubehalten. Drücken Sie dann 2
Sekunden lang und lösen Sie es, um den Aufnahmemodus zu
verlassen und das während dieser Zeit aufgenommene Video
zu speichern. Anschließend können Sie das Video auf Ihrem
iOS / Android-Gerät überprüfen.
Leerlaufeinstellung für die Brennweite: Drehen Sie dieses
Leerlaufrad im Arbeitszustand des Geräts, um die Brennweite
anzupassen und sich auf das aufzunehmende Objekt zu
konzentrieren.
LED-Lichtquelle: Verwenden Sie die Luminanz-Einstelltaste,
um die Luminanz der LED-Leuchten in vier Stufen zyklisch von
Dunkel auf Hell einzustellen, bis diese Funktion ausgeschaltet
wird. Die Standardleuchte während des Startvorgangs ist die
dunkelste Stufe.
2.Verwendung eines digitalen Wifi-Mikroskops in
Ihrem IOS / Android-Gerät
13

2.1 APP herunterladen
iOS: iWeiCamera im App Store durchsuchen, herunterladen
und installieren; oder scannen Sie den folgenden QR-Code, um
die iOS-Version für die Installation auszuwählen.
Android: Scannen Sie den folgenden QR-
Code, um die Android-Version (Google Play)
(internationaler Benutzer) oder die Android-
Version (China) (chinesischer Benutzer) au-
szuwählen, laden Sie sie herunter und insta-
llieren Sie sie. oder geben Sie die folgende
URL in den Browser ein, laden Sie sie heru-
nter und installieren Sie sie.
ios / Android QR-Code herunterladen
Ou entrez l'URL suivante dans le navigateur pour
télécharger l'application.
https://active.clewm.net/DuKSYX?qru-
rl=http%3A%2F%2Fqr09.cn%2F-
DuKSYX>ype=1&key=bbb57156739
726d3828762d3954299ca7a957b6172
2.2Démarrer l'appareil
Appuyez longuement sur la touche Démarrage / Arrêt de
l'appareil pendant 2 à 5 secondes pour démarrer l'appareil une
fois que la lumière bleue est normalement allumée.
2.3Connectez le microscope numérique Wifi à votre
appareil iOS / Android
Ouvrez le paramètre Wifi de l'appareil iOS / Android et ouvrez le
Wifi pour trouver le point d'accès Wifi (non chiffré) avec le
préfixe «Cam-XXXXXX», puis cliquez dessus pour la connexion
et revenez à l'interface principale de l'appareil iOS / Android
après connexion réussie. 14(APP Icon) (APP Icon)
iWeiCamera HVCAMWIFI

2.4Einführung in die APP-Schnittstelle und -Anwendung
Öffnen Sie die APP und rufen Sie die APP-Hauptsch- nittstelle
auf.
iOS Android
Hilfe Vorschau Datei
15

2.4.1APP-Homepage
Hilfe: Klicken Sie darauf, um die Unternehmensinformationen,
die APP-Version, die FW-Version und die Produktbetriebsanlei-
tung zu überprüfen.
Vorschau: Klicken Sie darauf, um das Echtzeitbild des Geräts
zu überprüfen und das Gerät zu bedienen.
Datei: Klicken Sie darauf, um die vorhandenen Bilder und
Videodateien zu überprüfen.
2.4.2 Vorschau der Menüoberfläche
Belichtungsreduzierung
Automatische Belichtung
Belichtungserhöhung
Verkleinern
Datei
Aufnahme
Aufnehmen
Zentrale Beschriftung
Vergrößern
Zurück 162.4.3Funktionsbeschreibung der Tasten
Zurück: Klicken Sie darauf, um zur vorherigen Oberfläche
zurückzukehren.
Belichtungsreduzierung: Klicken Sie darauf, um die
Belichtung zu verringern (in Umgebungen mit hellem Licht).
Automatische Belichtung: Klicken Sie darauf, um die
automatische Belichtung zu aktivieren.
Belichtungserhöhung: Klicken Sie darauf, um die Belichtung
zu erhöhen (bei unzureichender Lichtumgebung).
Verkleinern: Klicken Sie darauf, um das Bild zu verkleinern
(wird verwendet, wenn das Bild zu groß ist; der Standardwert ist
das Mindestbild).

Vergrößern: Klicken Sie darauf, um das Bild zu vergrößern
(wird verwendet, wenn das Bild zu klein ist).
Zentrale Beschriftung: Klicken Sie darauf, um den Mittelpunkt
des Bildes mit einem Kreuz zu kennzeichnen.
Aufnehmen: Klicken Sie darauf, um ein Bild aufzunehmen.
Aufnahme: Klicken Sie darauf, um ein Video aufzunehmen /
die Aufnahme zu stoppen.
Datei: Klicken Sie darauf, um die aufgenommenen Bilder oder
Videos zu überprüfen.
2.4.4Auflösungseinstellung und Bildkontrastmodus
Drücken Sie in der Vorschau auf den Bildschirm und schieben
Sie ihn nach links, um die Einstellung für Geräteauflösung und
Bildkontrastmodus von rechts zu ziehen.
Auflösungseinstellung
1920 * 1080: Klicken Sie hier, um die Auflösung als 1920 * 1080
auszuwählen.
1280 * 720: Klicken Sie, um die Auflösung als 1280 * 720
auszuwählen.
640 * 480: Klicken Sie, um die Auflösung als 640 * 480
auszuwählen. 17Resolution
1920*1080
1280*720
640*480

2.4.5Dateimenü
Klicken Sie auf das Dateimenü, um die aufgenommenen Bilder
oder Videos zu überprüfen oder zu löschen.
2.5.2 Schalten Sie das Gerät ein
Klicken Sie oben links auf die Option "Gerät" und dann auf
"Öffnen". Es wird ein Popup zur Geräteauswahl angezeigt.
Wählen Sie das Gerät aus, das Sie verwenden möchten, und
klicken Sie unten auf die Option "Öffnen", um das Gerät zu
öffnen.
Installation und Einführung der PC-Versionssoftware (nur
für Windows-Systeme)
2.5.1 Software zur Messung der PC-Version
Verwenden Sie einen Browser, um sich auf der offiziellen
SVBONY-Website anzumelden.https: // www. svbony. com /
Support / Software-Treiber /Laden Sie die Windows-Version von
HiView set1.1 herunter. (Nur Windows (32,64-Bit) XP / 7/8/10).
Die Softwareinstallationsoberfläche ist in der folgenden
Abbildung dargestellt. 18
Table of contents
Languages:
Other SVBONY Microscope manuals