SwissPhone TRIO User manual

Operating Manual
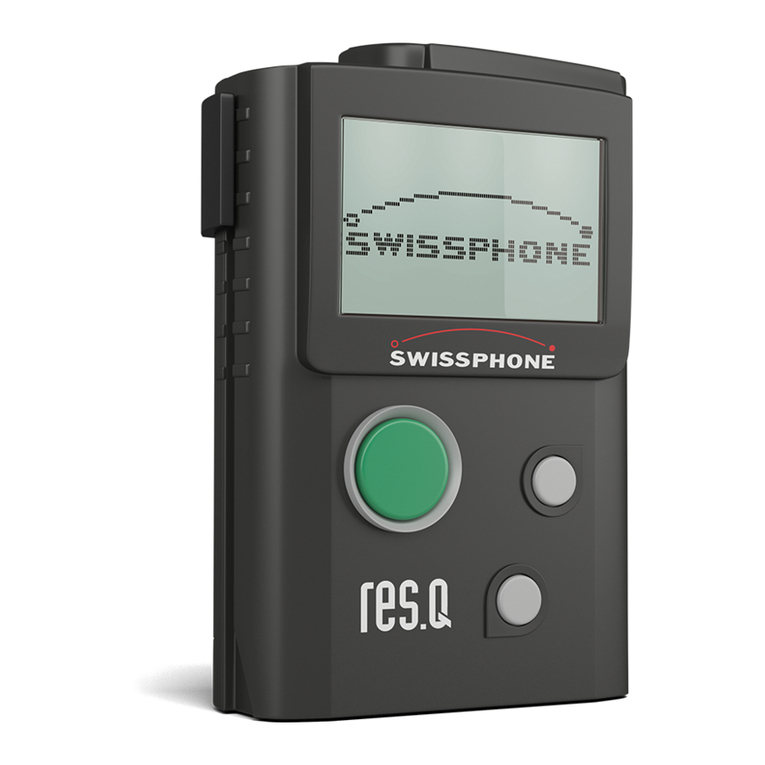
SWISSPHONE TRIO
Emergency device
Please read the safety
instructions before using
the device.

2
Table of Contents
1. Terms and definitions ..................................................................................................... 5
1.1 Emergency call system ................................................................................ 5
1.2 Emergency devices ...................................................................................... 5
1.3 Emergency call platform .............................................................................. 5
1.4 Emergency signal ......................................................................................... 5
1.5 Manual personal alarm................................................................................. 5
1.6 Automatic personal alarm ............................................................................ 5
1.7 Pre-alarm...................................................................................................... 5
1.8 Emergency call system operation................................................................. 6
1.9 Trade association.......................................................................................... 6
1.10 Work safety and health rules of the trade associations 139 (BGR-139)....... 6
2. Scope of delivery ............................................................................................................ 6
3. Technical data................................................................................................................. 6
4. SWISSPHONE TRIO software packages........................................................................... 7
5. Getting started: SIM card, battery, activate..................................................................... 8
6. Overview of devices........................................................................................................ 8
6.1 Control elements .......................................................................................... 8
6.2 Display.......................................................................................................... 9
6.2.1 1st line of the display (status line)................................................................ 9
6.2.2 2nd line of the display (profile display)......................................................... 11
6.2.3 3rd line of the display (info line)................................................................... 11
6.2.4 4th line of the display (date, alarm clock, time)............................................ 11
6.3 Capacity display of the battery..................................................................... 11
6.4 Operator logo................................................................................................ 12
6.5 Device status................................................................................................ 12
7. Menu structure................................................................................................................ 13
7.1 Navigation in the menu................................................................................. 14
7.2 Explanation of the menu items..................................................................... 14
7.2.1 Emergency call test ...................................................................................... 14
7.2.2 Device functional test................................................................................... 15
7.2.3 Update GPS position ..................................................................................... 15
7.2.4 Fall/man down detection.............................................................................. 15
7.2.5 Start/Stop Lifecheck..................................................................................... 15
7.2.6 Restart Lifecheck.......................................................................................... 15
7.2.7 Read last / unread messages....................................................................... 15
7.2.8 Messages...................................................................................................... 15
7.2.8.1 Next .............................................................................................................. 15
7.2.8.2 Protect / unprotect messages ...................................................................... 15
7.2.8.3 Delete messages .......................................................................................... 16
7.2.8.4 Empty Folder................................................................................................. 16
7.2.9 Alarm clock................................................................................................... 16

3
7.2.10 Settings......................................................................................................... 16
7.2.10.1 Device information........................................................................................ 16
7.2.10.2 Detailed status.............................................................................................. 17
7.2.10.3 Emergency call log ....................................................................................... 18
7.2.10.4 Date and time ............................................................................................... 18
7.2.10.5 Display backlight .......................................................................................... 18
7.2.10.6 Contrast ........................................................................................................ 18
7.2.10.7 Alerting ......................................................................................................... 19
7.2.10.8 Melodies ....................................................................................................... 20
7.2.10.9 Key tone........................................................................................................ 20
7.2.10.10 Keypad vibration........................................................................................... 20
7.2.10.11 Key lock ........................................................................................................ 20
7.2.10.12 Language...................................................................................................... 20
7.2.10.13 GPS ............................................................................................................... 21
7.2.11 Activate device ............................................................................................. 21
7.2.12 Switch off ..................................................................................................... 21
8. Emergency call system operation................................................................................... 21
8.1 Start of the functional test............................................................................ 22
8.2 Performing the functional test...................................................................... 23
8.3 Establishing a connection to the emergency call platform........................... 25
8.4 Emergency device in alarm signal system operation................................... 27
8.5 Unexpected failure in the connection to the emergency call platform......... 27
9. Emergency call functions................................................................................................ 28
9.1 Manual personal alarm (trigger emergency signal manually)...................... 28
9.2 Automatic personal alarms........................................................................... 29
9.2.1 Fall detection................................................................................................ 29
9.2.2 Man down detection..................................................................................... 30
9.2.3 Autonom-Lifecheck....................................................................................... 31
9.2.4 Remote-Lifecheck......................................................................................... 32
10. Positioning ...................................................................................................................... 33
10.1 Siren ............................................................................................................. 33
10.2 Outdoor positioning (GPS and A-GPS)........................................................... 33
10.3 In-house positioning (position transmitter) .................................................. 34
11. Emergency status “Emergency call initiated”................................................................. 35
11.1 Initial call and follow-up calls....................................................................... 35
11.2 Continuous subsequent positioning.............................................................. 36
11.3 Emergency call confirmation via emergency call platform to the personal
emergency call device........................................................................... 36
11.4 Unavailable functions in “Emergency status”............................................... 36

4
Information for additional and helpful functions
Warning/important notice
Warning/important notice:
• Do not hold the device close to your ear! The extremely loud acoustic signal can
damage your hearing!
• This product may not be used in explosive environments!
• The device may not be opened!
• Labels may not be removed!
• Pay attention to the applicable Swissphone Business Terms and Conditions!
12. Process messages.......................................................................................................... 37
12.1 Receive and read new messages................................................................. 37
12.2 Send user reply............................................................................................. 37
12.3 Call reminder ................................................................................................ 37
12.4 Read last message ....................................................................................... 38
13. Charging the battery/power supply ................................................................................ 38
14. GSM error code table...................................................................................................... 39
15. Miscellaneous................................................................................................................. 40

5
1. Terms and definitions
1.1 Emergency call system
These are systems for triggering and transferring manual and automatic alarms in cases of
emergency. Emergency call systems consist of emergency devices in connection with an
emergency call platform.
1.2 Emergency devices
These devices should be worn by persons at risk. They trigger a personal alarm in the emer-
gency call platform manually or automatically in case of emergency. Swissphone offers a
comprehensive portfolio of emergency devices. The SWISSPHONE TRIO is one of these emer-
gency devices.
1.3 Emergency call platform
This is an installation in which emergency signals of emergency devices are received, dis-
played and processed enabling emergency assistance measures to be initiated reliably and
immediately.
1.4 Emergency signal
The emergency signal is a signal that triggers a personal alarm in the emergency call platform.
1.5 Manual personal alarm
Is a visual and acoustic signal that is triggered in the emergency call platform by intended
manual activation of the emergency device.
1.6 Automatic personal alarm
Is a visual and acoustic signal that is automatically triggered in the emergency call platform
by the emergency device.
1.7 Pre-alarm
Is a visual and acoustic signal that is displayed on the emergency device prior to triggering a
personal alarm. It is possible to terminate a transfer of the alarm to the emergency call plat-
form for the duration of the pre-alarm. The purpose of the pre-alarm is to avoid false alarms
from being transferred to the emergency call platform.

6
1.8 Emergency call system operation
“Emergency call system operation” is a reliable operating state in which an emergency de-
vice is registered with the headquarters and is monitored. This is indicated on the display of
the SWISSPHONE TRIO with “PNG active” or “BGR-139”, depending on the selected scope of
services.
1.9 Trade association
The trade associations are the statutory accident insurance institutions for the companies of
the German private sector and its employees. Their task is to prevent work-related accidents
and occupational diseases as well as health risks caused by work.
1.10 Work safety and health rules of the trade associations 139 (BGR-139)
The work safety and health rules 139 (BGR-139) refer to the area of “Usage of emergency call
systems”. They compile or complement the following, for example,
• State work safety and health regulations (laws, directives)
• Work safety and health regulations of the trade association
(accident prevention regulations)
• Technical specifications
• The experiences of preventive work by the trade associations
2. Scope of delivery
• SWISSPHONE TRIO
• Battery
• Plug power supply block (consisting of USB charger cable and supply unit)
• Belt clip
• Operating manual
3. Technical data
Temperature range: –10 to +55°C
Relative humidity: 20 to 75 %
IP protection type: IP 52
Dimensions: 80 × 53 × 24 mm
Weight (including battery): 110 g
Off-frequency ranges: dual band
900 MHz (GSM-900 & E-GSM)
1800 MHz (DCS-1800, GSM-1800)
Emergency positioning
detection sensors: 3-axis
Positioning by siren: volume > 88 dB(A) in 30 cm

7
4. SWISSPHONE TRIO software packages
SWISSPHONE TRIO
Software packages Basic Protected Connected BGR-139
Connection type Connected
if needed Connected
if needed
Permanently
connected
(GPRS)
Permanently
connected
(GPRS)
Trigger time for emergency calls 20–40
seconds 20–40
seconds A few
seconds A few
seconds
Manual alerting function
(emergency button)
(mandatory)
Automatic alerting functions –
(Man down mandatory)
Device functional test –
(mandatory)
Transfer of the status information of the
emergency device – –
Transfer of the emergency call function
status of the emergency device – –
Receipt of GSM notifications (GPRS/text
message) in operating condition – –
Warning in case of GSM connection loss
– –
(mandatory)
BGR-139 conformant –––

8
5. Getting started: SIM card, battery, activate
You need to insert the SIM card and the battery in the back of the emergency device to operate
your SWISSPHONE TRIO for the first time. To do so, open the casing on the back and insert the
SIM card into the intended position behind the battery. Pay attention that the card is inserted
correctly and it works, as otherwise the GSM functions (the emergency call transfer, among
other things) are not available.
Make sure that the SWISSPHONE TRIO is configured with the PIN code that corresponds with
the SIM card. We recommend configuring the PIN code in your device first prior to inserting the
SIM card. Use the configuration software, or ask your service provider.
Once the SIM card is inserted correctly, you can insert the battery. Insert the battery on the
back of the SWISSPHONE TRIO and ensure that it locks into place at the top and bottom. The
back side of the battery is a part of the casing, so that this also closes the emergency device.
The SWISSPHONE TRIO will turn on automatically after inserting the battery. Further informa-
tion about the power supply is available in chapter 13 “Charging the battery/power supply”.
Push one of the three buttons and hold until the start screen appears on the display to start
the device. After you have switched on the device, it will be in standby mode, ready to use.
6. Overview of devices
6.1 Control elements
The home screen of the display is divided into four sections:
Confirmation button/emergency
signal button
• Switch on by holding the
button
• Access menu
• Confirm menu selection
• Trigger manual emergency
signal
• Acknowledge pre-alarm for
automatic personal alarms
Top scroll button
• Switch on by holding the button
• Scroll up in the menu
• Change settings
• Return to home screen by holding
the button
• Display of the operator logo (from
home screen)
Bottom scroll button
• Switch on by holding the button
• Scroll down in the menu
• Change settings
• Display device status (from the home
screen)
• If configured, switch to submenu by holding
the button

9
1st line: Status line
2nd line: Profile display
3rd line: Info line
4th line: Date, alarm clock, time
6.2.1 1st line of the display (status line)
The following symbols are displayed in the status line:
Personal alarm system In-house-
operation/fall or man down GSM GPS positioning Key lock
Paging network
Alerting
Profile display
Info line
Weekday
and date
Alarm clock
Battery status
display
Time
(permanently) Alerting loud
(permanently) Alerting quiet
(permanently) Alerting discrete
(permanently) Alerting mute
(permanently) No valid paging signal (including in-house positioning) received within a
defined time (timeout).
(not displayed) A valid paging signal (including in-house positioning) received within a
defined time (timeout).
For details, see chapter 8.2.10.7 “Alerting”.
6.2 Display

10
(permanently) All configured emergency call functions (at least one emergency call function)
are available.
(permanently) This symbol is displayed for the packages “Protected” and “Connected” once
the user has manually deactivated the “Fall/man down detection” on the
emergency device.
(blinking) A general error has occurred. In most cases the error is caused by a missing/
unrecognized SIM card, a false PIN code or a nearly empty battery.
The packages “Protected”, “Connected” and “BGR-139” show this symbol
also in case of a failed or required functional test.
In case of connection loss, this symbol is also shown for the packages “Con-
nected” and “BGR-139”.
(not displayed) All emergency call functions can be deactivated by the configuration settings
in the packages “Basic”, “Protected” and “Connected”. In this case the
symbol is not displayed.
(blinking) Searching for a GSM network.
(permanently) The device is registered on the GSM network and data is being transferred.
(blinking) No SIM card found or the PIN code is false. General error, for example a de-
fective GSM module. Also when the battery capacity falls below the minimum
level required to operate properly.
(not displayed) The GSM module is in hibernation mode.
(blinking) Searching for GPS satellites for outdoor positioning.
(permanently) The device is receiving GPS data and the positioning is being calculated.
(permanently) GPS reception disabled.
(blinking) General error, for example a defective GPS module. Also when the battery
capacity falls below the minimum level required to operate properly. If com-
munication errors occur between the emergency device and the GPS module,
remove the battery and reinsert it.
(not displayed) The GPS module is in hibernation mode.
For details, see chapter 11.2 “Outdoor positioning (GPS and A-GPS)“.
(permanently) SWISSPHONE TRIO connected to a Swissphone position transmitter within the
last 20 seconds (according to the standard configuration).
(not displayed) SWISSPHONE TRIO did not connect to a Swissphone position transmitter
within the last 20 seconds (according to the standard configuration).
For details, see chapter 11.3 “In-house positioning (position sender)”.

11
6.2.2 2nd line of the display (profile display)
This line indicates the currently selected profile.
6.2.3 3rd line of the display (info line)
This line shows notices, warnings and error messages.
6.2.4 4th line of the display (date, alarm clock, time)
This line shows the date and time. In addition, it indicates whether the alarm clock function
is active.
6.3 Capacity display of the battery
80 %–100 % 60 %–80 % 40 %–60 % 20 %–40 % 0 %–20 %
When the device is switched on, the battery symbol on the display is always visible and in-
dicates the available battery capacity. The operating time depends on the supply source, the
network configuration and the programmed operating mode.
When using the Swissphone standard battery (3.7 V/480 mAh), the recommended Swiss-
phone basic configuration and permanent usage (for example 24/7 shift operation), the readi-
ness for operation of the emergency devices is as follows:
• “Basic” package: approx. 100 hours readiness for operation
• “Protected” package: approx. 100 hours readiness for operation
• “Connected” package: approx. 30 hours readiness for operation
• “BGR-139” package: approx. 30 hours readiness for operation
The real operation times are influenced greatly by individual settings such as the frequency of
GPS usage, as well as local conditions such as very low ambient temperatures.
(permanently) Key lock is activated.
(not displayed) Key lock is not activated.
For details, see chapter 8.2.10.11“Key lock”
Battery status display
(permanently)
(permanently) The alarm clock function of the SWISSPHONE TRIO is activated.
(not displayed) The alarm clock function of the SWISSPHONE TRIO is not activated.
For details, see chapter 7.3 “Capacity display of the battery”.
For details, see chapter 8.2.9 “Alarm clock”.

12
If the available battery capacity is nearly empty, the low battery symbol will start blinking. At
the same time, an acoustic signal will sound as a reminder in regular intervals. You then have
approximately two hours of operating time left. You can switch off the acoustic battery alarm
by pressing the confirmation button. The empty battery symbol continues blinking.
Warning/important notice:
• If the battery capacity falls lower than the defined minimum value of the device,
the GPS and GSM module is automatically deactivated. SWISSPHONE TRIO can
still receive paging messages. However, outdoor positioning and emergency
call transmission are no longer given. This state then causes the device to lose
its function as an emergency device.
• SWISSPHONE TRIO requires power also when it is switched off. The standard
battery will be completely empty after approximately 10–14 days in this condi-
tion and without charging the battery.
6.4 Operator logo
When you are on the home screen, hold the top scroll button to see the operator logo of your
SWISSPHONE TRIO.
6.5 Device status
When you are on the home screen, hold the bottom scroll button to check the status of your
SWISSPHONE TRIO. The following information will appear on the screen.
•Battery charging status in percentage
•Date/time of the last GSM connection
•Date/time of the last GPS position

13
Any errors in the GSM connection that occur are also displayed in the device status.
A complete list of the GSM-error codes is available in chapter 14 “GSM error code table”.
7. Menu structure
Information:
Individual menu items within the menu structure can deviate from this standard
setting, depending on the configuration and the programming of your SWISSPHONE
TRIO.
If you need to individually modify the sequence and availability of specific items for
the menu items, inform your responsible Swissphone retailer or partner.
Menu structure in the packages “Protected” and “Connected”:
Level 1 Level 2 Level 3
Emergency call test
Device functional test
GPS update
Fall/man down detection
Start/Stop Lifecheck
Restart Lifecheck
Read last/unread messages
Messages
Alarm clock
Settings
Activate device
Switch off
Back
Inbox
Folder A
Folder B
Back
Next
Protect/unprotect message
Delete message
Empty Folder
Back
Device information
Detailed status
Emergency calllog
Date and time
Display backlight
Contrast
Alerting
Melodies
Key tone
Key vibration
Key lock
Language
GPS
Back

14
Information:
The following menu items are not available in the “Basic” package: “De-
vice functional test”, “Fall/man down detection”, “Start/Stop Lifecheck”
and “Restart Lifecheck”
Information:
The following menu items are not available in the “BGR-139” package: “Fall/man
down detection” and “Activate device”
7.1 Navigation in the menu
Pressing the confirmation button from the home screen will take you to the main menu. You
can scroll down by using the bottom scroll button in the main menu and up by using the upper
scroll button. Pressing the confirmation button again selects the menu item and takes you to
the selected submenu.
By using “Back” you can leave the current menu.
Information:
Holding the top scroll button (from any submenu) will take your directly back to the
home screen.
7.2 Explanation of the menu items
7.2.1 Emergency call test
The emergency call test serves to test emergency call transmission without triggering the res-
cue process in the emergency call platform. This test must be conducted in regular intervals
together with a functional test in order to be able to permanently guarantee the closed system
chain of the Swissphone emergency call system.
You can activate the emergency call test for two minutes by selecting the menu item “Emer-
gency call test”. The display of the SWISSPHONE TRIO will show “Emergency call test” when
the emergency call test is active.

15
7.2.2 Device functional test
See chapter 8.1 “Start of the functional test”.
7.2.3 Update GPS position
If this menu item is selected, SWISSPHONE TRIO will start the GPS module and attempt to
locate an exact position via GPS satellites. If a connection to the GPS satellites is not possible
(within buildings, tunnels or similar objects), the GPS search is terminated after approx. five
minutes.
7.2.4 Fall/man down detection
See chapters 9.2.1 “Fall detection” and 9.2.2 “Man down detection”.
7.2.5 Start/Stop Lifecheck
See chapters 9.2.3 “Autonom-Lifecheck” and 9.2.4 “Remote-Lifecheck”.
7.2.6 Restart Lifecheck
See chapters 9.2.3 “Autonom-Lifecheck” and 9.2.4 “Remote-Lifecheck”.
7.2.7 Read last / unread messages
This section displays all unread messages in chronological order. If no unread messages are
available, the last message is displayed.
7.2.8 Messages
All messages (independent of whether received via POCSAG, GPRS or text message) are saved
in these inboxes. The number of folders available for saving the messages differs depending
on the configuration.
The following folders are offered with the Swissphone standard configuration:
• Inbox
• Folder A
• Folder B
Every folder offers the following functions for processing the messages:
7.2.8.1 Next
Shows the next message.
7.2.8.2 Protect / unprotect messages
“Protect message” puts a delete protection on a message. If you want to delete protected
messages, the delete protection must first be removed with “Unprotect message”.

16
7.2.8.3 Delete messages
Deletes a message. Protected messages cannot be deleted.
7.2.8.4 Empty Folder
Deletes the contents of a folder. Protected messages cannot be deleted.
7.2.9 Alarm clock
This section enables you to configure the settings for the alarm clock function. Activate the
alarm clock by defining the time for the alarm to sound.
If the alarm function is active, the alarm clock symbol will appear on the home screen.
The alarm clock function is available on SWISSPHONE TRIO also when it is switched off. When
the set alarm time is reached, the device is activated and the alarm sounds an acoustic and
visual signal and begins to vibrate.
When the SWISSPHONE TRIO sounds the alarm via the alarm function, you can stop it or acti-
vate the snooze function. The snooze function is seven minutes by default.
7.2.10 Settings
Specific device settings can be made and detailed information can be viewed in this section.
7.2.10.1 Device information
This menu item includes the following information:
• Installed firmware version
• Serial number of the SWISSPHONE TRIO

17
• The IMEI code (“International Mobile Station Equipment Identity”) is a unique 15-digit serial
number that clearly identifies every GSM end device .
• The IMSI code (“International Mobile Subscriber Identity”) serves to clearly identify network
users in GSM networks
7.2.10.2 Detailed status
This section includes detailed information about the following items:
• Power
• POCSAG reception
• GSM
• Last position
• In-house positioning
• Monitoring

18
7.2.10.3 Emergency call log
SWISSPHONE TRIO maintains a log of relevant events such as manual and automatic personal
alarms including emergency call tests. You can view them in the menu item “Emergency call
log” and select them again for the detail view.
The following information is compiled:
• Type of event (“Emergency button” or “Man down”)
• Transmission result (“Success” or “Error” + GSM error code)
A list of all GSM error codes is available in chapter 15 “GSM error code table”.
• Date and time of the event
7.2.10.4 Date and time
Date and time can either be set automatically or manually. SWISSPHONE TRIO has a GPS
module that can be used to update the time and date automatically.
You can choose to have it set automatically via the selected GSM operator. Not all GSM oper-
ators support this function.
If it is not possible to set date and time automatically, they can be set manually via the menu
item “Date and time”.
The automatic setting for time and date is given priority over the previous data due to the
fact that the information is more up-to-date (independent of whether the previous data was
entered manually or automatically).
7.2.10.5 Display backlight
Display backlight can be switched on/off here. Every time a button is touched, the display
backlight is activated (if switched on).
7.2.10.6 Contrast
Select your ideal display contrast. It can be set from 1 (very weak) to 8 (very strong).

19
7.2.10.7 Alerting
The following options are available in this menu item:
• “Loud”:
The alarm melody is played based on your configuration (first the number of quiet cycles
and then the number of loud cycles). In addition, the LEDs blink and the device vibrates
during the alarm.
The standard configuration is as follows: Once quiet, once loud (including LED and vibration)
The call reminder sounds a loud cycle of the alarm melody. In addition, the LEDs blink and
the device vibrates.
The key and confirmation sound is activated in this profile.
A short acoustic signal sounds in regular intervals to indicate when the functional test
needs to be conducted in the packages “Protected”, “Connected” and “BGR-139”.
In the packages “Connected” and “BGR-139” a short acoustic signal sounds in regular in-
tervals to indicate that the connection to the Swissphone emergency call system has been
lost.
• “Quiet”:
Same behaviour as profile “Loud”, only now also the loud cycles are played quietly.
The standard configuration is as follows: Twice quietly (including LED and vibration)
The call reminder plays an acoustic signal. In addition, the LEDs blink and the device vi-
brates.
The key and confirmation sound is activated in this profile.
A short acoustic signal sounds in regular intervals to indicate when the functional test
needs to be conducted in the packages “Protected”, “Connected” and “BGR-139”.
In the packages “Connected” and “BGR-139” a short acoustic signal sounds in regular in-
tervals to indicate that the connection to the Swissphone emergency call system has been
lost.
• “Discrete”:
The LEDs blink and the device vibrates for ten seconds. Subsequently, a short acoustic
signal is sounded.
The call reminder sounds a short acoustic signal. In addition, the LEDs blink and the device
vibrates.
The key and confirmation sound is not activated in this profile.
No acoustic signal is sounded to indicate when the functional test needs to be conducted in
the packages “Protected”, “Connected” and “BGR-139”.
In the packages “Connected” and “BGR-139” no acoustic signal sounds to indicate that the
connection to the Swissphone emergency call system has been lost.

20
• “Mute”:
The LEDs blink and the device vibrates for ten seconds, but no acoustic alarm signal is
sounded in this profile.
The call reminder is also not indicated with an acoustic signal. The LEDs blink and the
device vibrates.
The key and confirmation sound is not activated in this profile.
No acoustic signal is sounded to indicate when the functional test needs to be conducted in
the packages “Protected”, “Connected” and “BGR-139”.
In the packages “Connected” and “BGR-139” no acoustic signal sounds to indicate that the
connection to the Swissphone emergency call system has been lost.
7.2.10.8 Melodies
Here you can assign a melody to every configured alarm address. 16 melodies are available
for selection and can be individually configured.
7.2.10.9 Key tone
You can activate/deactivate the key tone in this menu item. The key tones are not played (inde-
pendent of the key tone setting) if the alarm profile “Discrete” or “Mute” is selected.
7.2.10.10 Keypad vibration
You can activate/deactivate the keypad vibration in this menu item. You will find it when you
“scroll beyond” the top or bottom in the menu in a list selection. When selecting the alarm
profile “Discrete” or “Mute”, the keypad vibration is not active (independent of the keypad
vibration setting).
7.2.10.11 Key lock
The key lock function prevents you from unintentionally activating the device. If you select
“on” in the menu under the item “key lock”, it is automatically activated after one minute of
inactivity.
The key lock can be disabled by pressing and releasing the scroll buttons simultaneously.
7.2.10.12 Language
Select the desired language for displaying text on the SWISSPHONE TRIO in this menu item.
Table of contents
Other SwissPhone Security System manuals