SWIT CL-M100C Mini User manual

Specification
Warning
CL-M100C
100W RGB Mini Size
Studio SMD LED Light
Ver:A
Tel:+86-25-85805753
Fax:+86-25-85805296
http://www.swit.cc
E-mail: [email protected]
USER MANUAL
SWIT Electronics Co.,Ltd.
Thank you for choosing SWIT products. Please read the instructions before using, and keep it for future reference.
1.Please do not disassemble the light or touch its inner part with metal object to avoid damage;
2.Please do not put the light under conditions full of moisture or dust to avoid damage;
3.Only use the light in the temperature range of -10℃~40℃.
Model CL-M100C
LED QTY
White
Light
Color Temperature
Brightness
Illumination
CRI
TLCI
RGB Light
G-M Offset
Half Beam Angle
Mode
Control
Update
Power Power Consumption
Power Supply
Dimension
Weight
RGB LED(170pcs)+Warm White LED(340pcs)
2800K-10000K,Minimum Adjust Step:50K
0%-100%,Minimum Adjust Step:0.1%
3000 Lux@1m / 854Lux@2m / 384Lux@3m
96 Max. ,Avg 94
93 Max. ,Avg 90
RGB+W,Color Gamut,HUE,Saturability adjustment
Continuous adjustment(-1.00~+1.00,Adjust step 0.01)
About 62°
CCT、HSI、RGB、CIE、GEL、EFF、DMX、SYS
Button、DMX、APP
USB:(Format"FAT" or "FAT32")
About 100W
AC 100-240V ,50/60HZ
245mm x 146mm
See Fig.1 & 2
5.1Kg
luminous Surface (LxW)
Full Light(LxWxH)
Fig.1 CL-M100C Front View Fig.2 CL-M100C Side View

Appearance
Installation of safety rope
Maintenance
1. Please use a soft dry cloth to clean the front panel of the product, or use a soft cloth dipped in a neutral detergent solution Wipe with a soft,
dry cloth.
2. Do not use wet cloth,anhydrous alcohol,gasoline or a mixture of anhydrous alcohol and ether etc. to wipe the front LED panel.
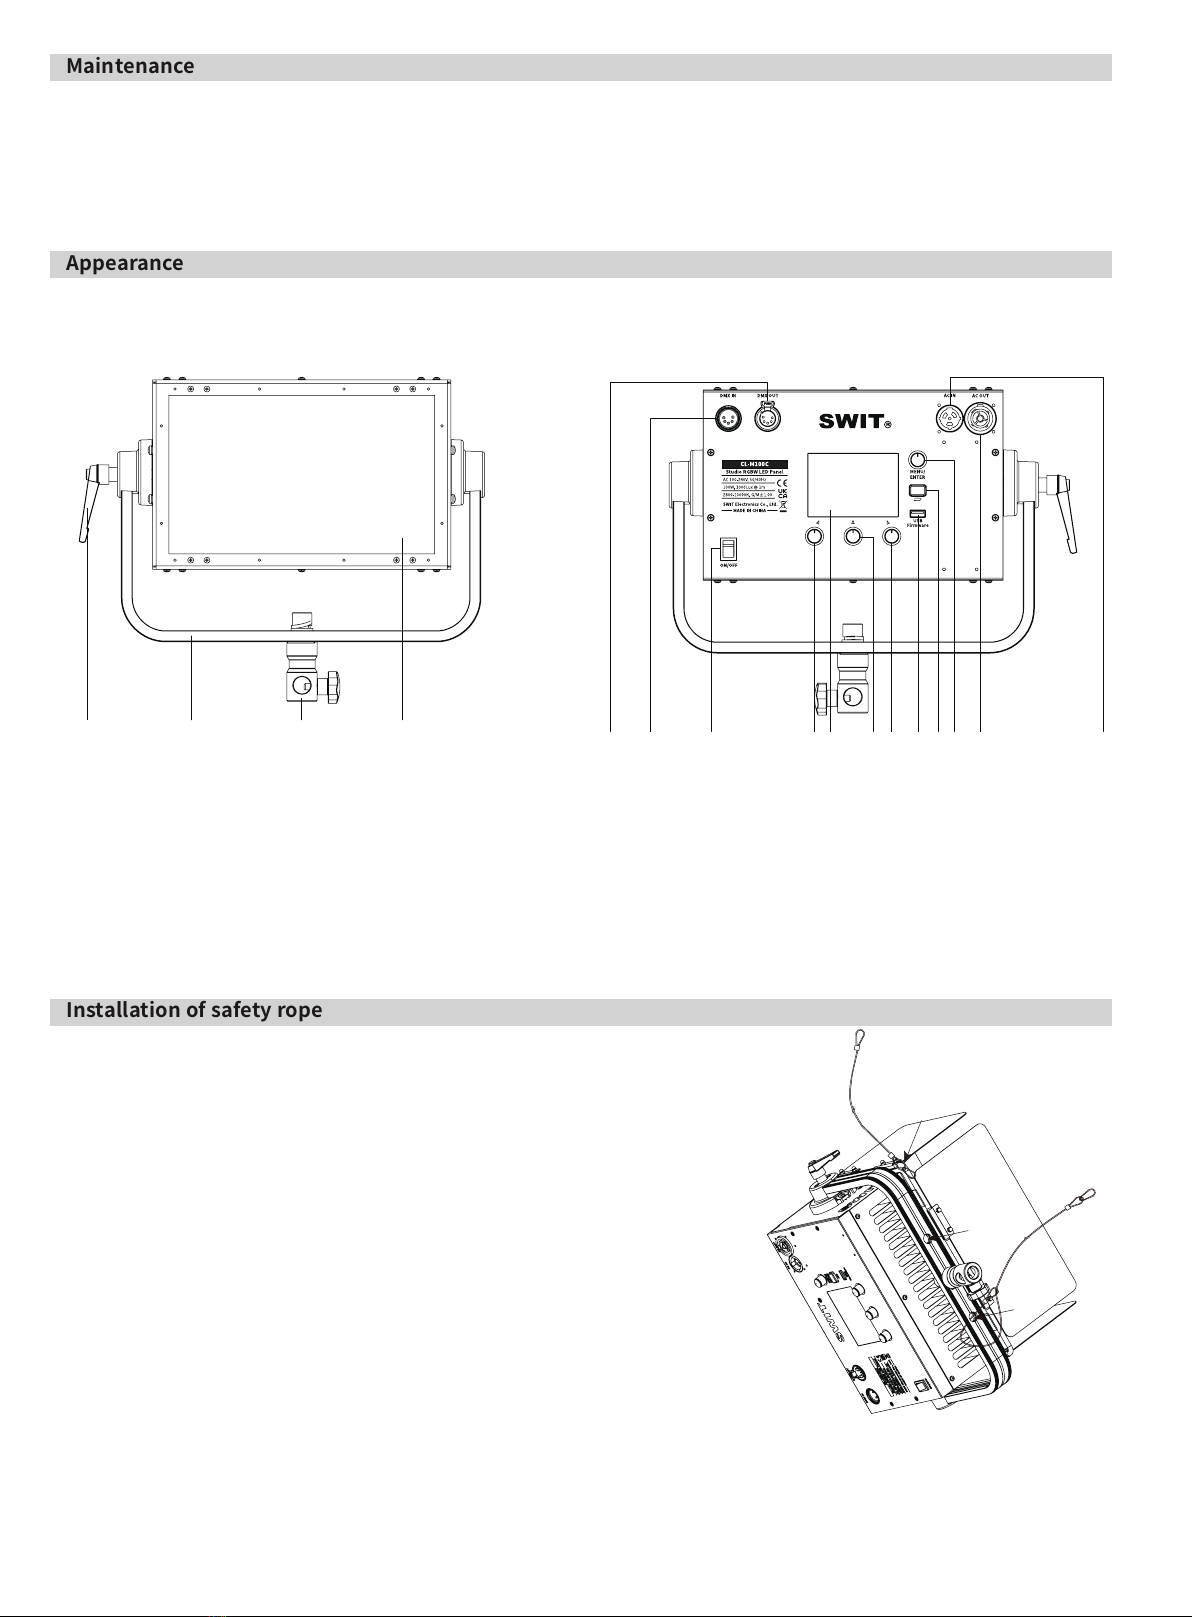
1.Front View: 2.Back View
⑤ ⑥ ⑦ ⑧⑨ ⑩⑪ ⑫ ⑬⑭ ⑮ ⑯
① ② ③ ④
⑴ YOKE TILT LOCK KNOB
⑵ U SHAPE BRACKET
⑶ STAND ADAPTOR
⑷ DIFFUSER
⑸ DMX OUT
⑹ DMX IN
⑺ POWER ON/OFF
⑻ ADJUST KNOB
⑼ LCD
⑽ ADJUST KNOB
⑾ ADJUST KNOB
⑿ USB
⒀“BACK”BUTTON
⒁ MENU/ENTER BUTTON
⒂ AC OUT
⒃ AC IN
Fig.6 Installation diagram of safety rope
When lifting and using the lamps, please pass the safety rope (hereafter referred
to as "safety rope") through the lamp wire hole and the round tube of the barn
door according to the method shown in Fig. 6, so as to establish an effective
connection between the product and the hanging devices such as hinges.
Precautions for use of safety rope are as follows:
1) If you use your own safety rope, please confirm that the load of the safety
rope is greater than that of this product;
2) The safety rope cannot be dragged on the rough surface;
3) Please check carefully before using the safety rope, where the rope strand is
broken or the number of broken wires in one twist distance exceeds 6, the
safety rope shall not be used.Safety rope with obvious wear, corrosion,
deformation and damage caused by heat or arc is not allowed to use;
4) The safety rope is strictly prohibited from contact with any charged body, hot
object or flame;
5) The two safety rope buckles shall not be directly connected with each other,
and D shackle in accordance with the load specifications must be added.
Fig.3 CL-M100C Front View Fig.4 CL-M100C Back View

User control
Fig.7 Main Menu
Form 1 Menu List
CCT HSI RGB CIE GEL
EFF DMX SYS
Fig.8 CCT Mode
>CCT
Color Temp G/M Intensity
CT:
G/M:
I:
06500
+0.00
100.0
No.
1
2
3
Parameter
CT(Color Temp)
G/M
I(Intensity)
Adjustment Step
2800K-10000K
-1.00← +0.00→+1.00
0%-100%
Minimum Step
50K
0.01
0.1%
No.
1
2
3
Parameter
H(Hue)
S(Saturation)
I(Intensity)
Adjustment Step
1°-360°
0%-100%
0%-100%
Minimum Step
1°
1%
0.1%
No.
1
2
3
Parameter
R(Red)
G(Green)
B(Blue)
Adjustment Step
000-255
000-255
000-255
Minimum Step
1
1
1
Fig.9 HSI Mode
>HSI
Hue Saturation Intensity
H:
S:
I:
360
100
100.0
>RGB
Red Green Blue
R:
G:
B:
255
255
255
When the light is working:
▶ User can return back to Menu via" "button(Fig.4 ⑤);
▶ Use "ADJUST KNOB"(Fig.4 ⑻/⑽/⑾)to select different mode;
▶ Use"MENU/ENTER"(Fig.4 ⒁)to enter different mode.
In this mode,User can adjust"CT","G/M","I" via"ADJUST KNOB"
Fig.4 ⑻/⑽/⑾
2.HSI Mode
3.RGB Mode
Form.3 【HSI Mode】
In this mode,User can adjust"H","S","I" via "ADJUST KNOB"
Fig.45 ⑻/⑽/⑾
In this mode,User can adjust"R","G","B" via"ADJUST KNOB" Fig.4
⑻/⑽/⑾
Form.4 【RGB Mode】 Fig.10 RGB Mode
Form.2 【CCT Mode】
No.
1
2
3
4
Menu List
CCT Mode
HSI Mode
RGB Mode
CIE Mode
No.
5
6
7
8
Menu List
GEL Mode
EFF Mode
DMX Mode
SYSTEM
1.CCT Mode

No.
1
2
3
Parameter
X_axis
Y_axis
I(Intensity)
Adjustment Step
0.131-0.708
0.046-0.797
0%-100%
Minimum Step
0.001
0.001
0.1%
Fig.11 CIE Mode
>CIE
X_axis Y_axis Intensity
X:
Y:
I:
0.301
0.591
100.0
>GEL
ROSCO LLEE LFavorites
Fig.14 GEL Mode(LEE) Fig.15 GEL Mode(Favourities)
> GEL
Group Color Temp Intensity
>LEE
Marine Blue Bright Rose
Rose Pink Bright Pink
Ocean Blue Special Lavender
Virgin Blue 723 Lilac Tint
Full C.T Blue Medium Pink
Pale Yellow LEE Fluorescent
Moonlight White Supper Pink
Provence Peacock Blue
100.03200Default
4.CIE Mode
5.GEL Mode
In this mode,User can adjust"X","Y","I"via "ADJUST KNOB" Fig.4
⑻/⑽/⑾
Form.5 【CIE Mode】
Fig.12 GEL Mode Fig.13 GEL Mode(ROSCO)
User can choose different filters and adjust the "Intensity","Color Temp"in this mode:
1)"MENU/ENTER"
▶
Rotate:To choose different selection
▶
Press:Enter into ROSCO/LEE/favourities,put the filters into your facourities.
2)"ADJUST KNOB":Fig.4 ⑻/⑽/⑾,to adjust different parameters.
> GEL
Group Color Temp Intensity
>ROSCO
Ocean Blue
Daylight Blue R6 Blush Pink
Turquoise Blue Green
Surprise Pink Bastard Amber
Alice Blue CalColor 15 Gree
Chocolate Pale Salmon
Virgin Blue E723 Dark Lavender
Light Steel Blue Bright Pink
Daylight Blue E1
100.03200Default
> GEL
NULL Color Temp Intensity
>Favorites
Marine Blue
100.03200NULL
Daylight Blue R6

No.
1
2
3
Adjustment
1.20 kinds of Filters
2.Color temperature:3200K/5600K
3.Intensity:0%-100%,Minimum steps:0.1%
1.20 kinds of Filters
2.Color temperature:3200K/5600K
3.Intensity:0%-100%,Minimum steps:0.1%
1.Color temperature:3200K/5600K
2.Intensity:0%-100%,Minimum steps:0.1%
Selection
ROSCO
LEE
Favorites
Fig.16 EFF Mode
>Effects
Name
CopCar
Speed
01
Intensity
100.0
>DMX
NULL DMX Address DMX Mode
RGB001
R G B
Form.6 【GEL Mode】
6.Effect Mode
7.DMX Mode
User can choose from 12 kinds of effect in this mode "COPCAR"、"
CANDLE","FIREWORK","TELEVISION", "LIGHTNING","PAPARAZZI",
"PARTY","BROKEN LIGHTS","EXPLODE","NEON LIGHT","FIRE"and
"COLORCYCLE".
In this mode,User can select different Effect via "MENU/ENTER" button
(Fig.4 ⑭),adjust"Speed" 、"Intensity" via "ADJUST KNOB" Fig.4
⑻/⑽/⑾.
No.
1
2
3
Parameter
Effect
Speed
Intensity
Adjustment Step
COPCAR,FIREWORKS Etc.
1-10
0%-100%
Minimum Step
/
1
0.1%
No.
1
2
Parameter
DMX Address
DMX Mode
Adjustment Step
001-512
CCT、HIS、RGB、CIE、
CCT&HSI、CCT&CIE、
CCT&RGB
Minimum Step
001
/
Form.7 【Effect Mode】
User need to switch on DMX function in "SYS"-DMX ON/OFF, then user
can adjust"DMX Address","DMX Mode" via "ADJUST KNOB" Fig.4
⑻/⑽/⑾
Fig.17 DMX Mode Form.8 【DMX Mode】
7.1 DMX Address and DMX Mode
The DMX address and DMX Mode can be set in the following two ways:
1)Set in "DMX mode"(Fig.22);
2)Set in "SYS"-"DMX Address"/"DMX Mode".
7.2 DMX Channel Setting
DMX address adjustment range:001-512,suppose the current address is N:

Definition
Intensity:0%-100%
Color Temperature:2800K-10000K
G/M:-1.00→+1.00
Intensity:0%-100%
Hue:1°-360°
Saturation:0%-100%
Red:0-255
Green:0-255
Blue:0-255
Intensity:0%-100%
X_axis:0.131-0.708
Y_axis:0.046-0.797
Intensity:0%-100%
Color Temperature:2800K-10000K
G/M:-1.00→+1.00
Mode Change(CCT→HSI)
Hue:1°-360°
Saturation:0-100%
Intensity:0%-100%
Color Temperature:2800K-10000K
G/M:-1.00→+1.00
Mode Change(CCT→CIE)
X_axis:0.131-0.708
Y_axis:0.046-0.797
Intensity:0%-100%
Color Temperature:2800K-10000K
G/M:-1.00→+1.00
Mode Change(CCT→RGB)
Red:0-255
Green:0-255
Blue:0-255
Channel
N
N+1
N+2
N
N+1
N+2
N
N+1
N+2
N
N+1
N+2
N
N+1
N+2
N+3
N+4
N+5
N
N+1
N+2
N+3
N+4
N+5
N
N+1
N+2
N+3
N+4
N+5
N+6
DMX Mode
CCT
HSI
RGB
CIE
CCT&HSI
CCT&CIE
CCT&RGB
No.
1
2
3
4
5
6
7
Form.9 【DMX Mode】DMX
Fig.18 System
>SYS
Firmware Version V0.0.9R
Hardware Number 40110000006
BlueTooth Name CL-M100C-45578
BlueTooth Reset YES
YES
Update
Flip ON/OFF
DMX ON/OFF
8. SYS(System)
Select【SYS】,press MENU/ENTER to
enter into the sub menu:

8.1 【Firmware Version】&【Hardware Number】
Show the information of the version of the device.
8.2 【Bluetooth Name】
User can rename the Bluetooth of the device via "MENU/ENTER" button.
8.3 【Bluetooth Reset】
In the process of using the APP to control the lamp, if the APP loses control or the target lamp cannot be found, the user can
choose to try to reset the target lamp.
The bluetooth reset steps is as follows: Choose【Bluetooth Reset】-【Yes】 to reset the bluetooth.
8.4 Update
Prepare the update firmware and U-disk(Make sure the format of U-disk is :FAT32),connect U-disk with USB port of the light,
Choose【Update】-【Yes】,after updating,reboot your light to finish the
updating.
Tips:The firmware need to be saved into the root of the U-disk.
8.5 LCD Flip
Choose【Flip ON/OFF】to switch ON/OFF screen flip function.
8.6 DMX Mode
Choose【DMX ON/OFF】to switch ON/OFF DMX function.
8.7 DMX Address
Choose【DMX Address】to set DMX address from 001-512.
8.8 DMX Mode
Choose【DMX ON/OFF】to select from different DMX Mode.
8.9 Light Curve
Choose【Light Curve】to select from different Light Curve.
8.10 Language
Choose【Language】to change language to Chinese or English,reboot your light after choosing the language.
8.11 EFF File Import
Put the Effect files in your U-disk,choose【EFF File Import】,select the Effect files you want to import,choose-【yes】 to import
the Effect files.
Tips:Make sure the Effect files you saved is in the U-Disk CL-M100C
8.12 GEL File Import
Put the GEL files in your U-disk,choose【GEL File Import】,select the GEL files you want to import,choose-【yes】 to import the
GEL files.
Tips:Make sure the filters files you saved is in the U-Disk CL-M100C
8.13 EFF File Delete
Choose【EFF File Delete】,select the Effect files you want to delete,choose【Yes】 to delete the Effect files.
8.14 GEL File Delete
Choose【GEL File Delete】,select the GEL files you want to delete,choose【Yes】 to delete the GEL files.
8.15 All Files Import
User can Import all Effect files and GEL files from the U-disk via this function:
Choose【All Files Import】-【Yes】 to import all Effect and GEL files from your U-disk to the light.
8.16 System Reset
User can do factory reset to reset Bluetooth and Userdata.
8.17 Factory Menu
Not available to users.

APP
Packing list
Fig.19 APP
Content
CL-M100C
AC Power Cable
Safety Rope
AC Loop out Cable
Quantities
X 1
X 1
X 2
Optional
No.
1. APP name and download
1)Name:SWIT Console
2)Download
Android:Scan QR to Install(Fig.19);
IOS:Apple Store
This manual suits for next models
1
Table of contents
Other SWIT Lighting Equipment manuals
Popular Lighting Equipment manuals by other brands

LEVIOR
LEVIOR 37616 manual

Sagitter
Sagitter SDJ SG COBEKIT60C user manual

Lightolier
Lightolier ProSpec 26890 specification

Dust Free
Dust Free BIO-FIGHTER 4Xtreme Installation & operation manual

LIGMAN
LIGMAN ODESSA 13 installation manual

Vision & Control
Vision & Control LDLF60x120-IR850/24V Instructions for use