Sygonix Venice User manual

Die Haustechnik-Marke für das ganze Haus. Mehr Informationen unter www.sygonix.com
D
Bestimmungsgemäße Verwendung
Das Produkt dient zur Beleuchtung im Innenbereich; es darf nur in trockenen, ge-
schlossenen Innenräumen montiert und betrieben werden. Das Produkt ist für die
Einbaumontage in einer abgehängten Raumdecke vorgesehen.
Eine andere Verwendung als zuvor beschrieben, führt zur Beschädigung dieses Pro-
duktes, darüber hinaus ist dies mit Gefahren, wie z.B. Kurzschluss, Brand, elektrischer
Schlag etc., verbunden. Das gesamte Produkt darf nicht geändert bzw. umgebaut
werden!
Die Sicherheitshinweise sind unbedingt zu befolgen!
Dieses Produkt erfüllt die gesetzlichen, nationalen und europäischen Anforderungen.
Alle enthaltenen Firmennamen und Produktbezeichnungen sind Warenzeichen der
jeweiligen Inhaber. Alle Rechte vorbehalten.
Lieferumfang
• Downlight mit externem Konverter (Vorschaltgerät)
• Befestigungsklammern-Set
• Bedienungsanleitung
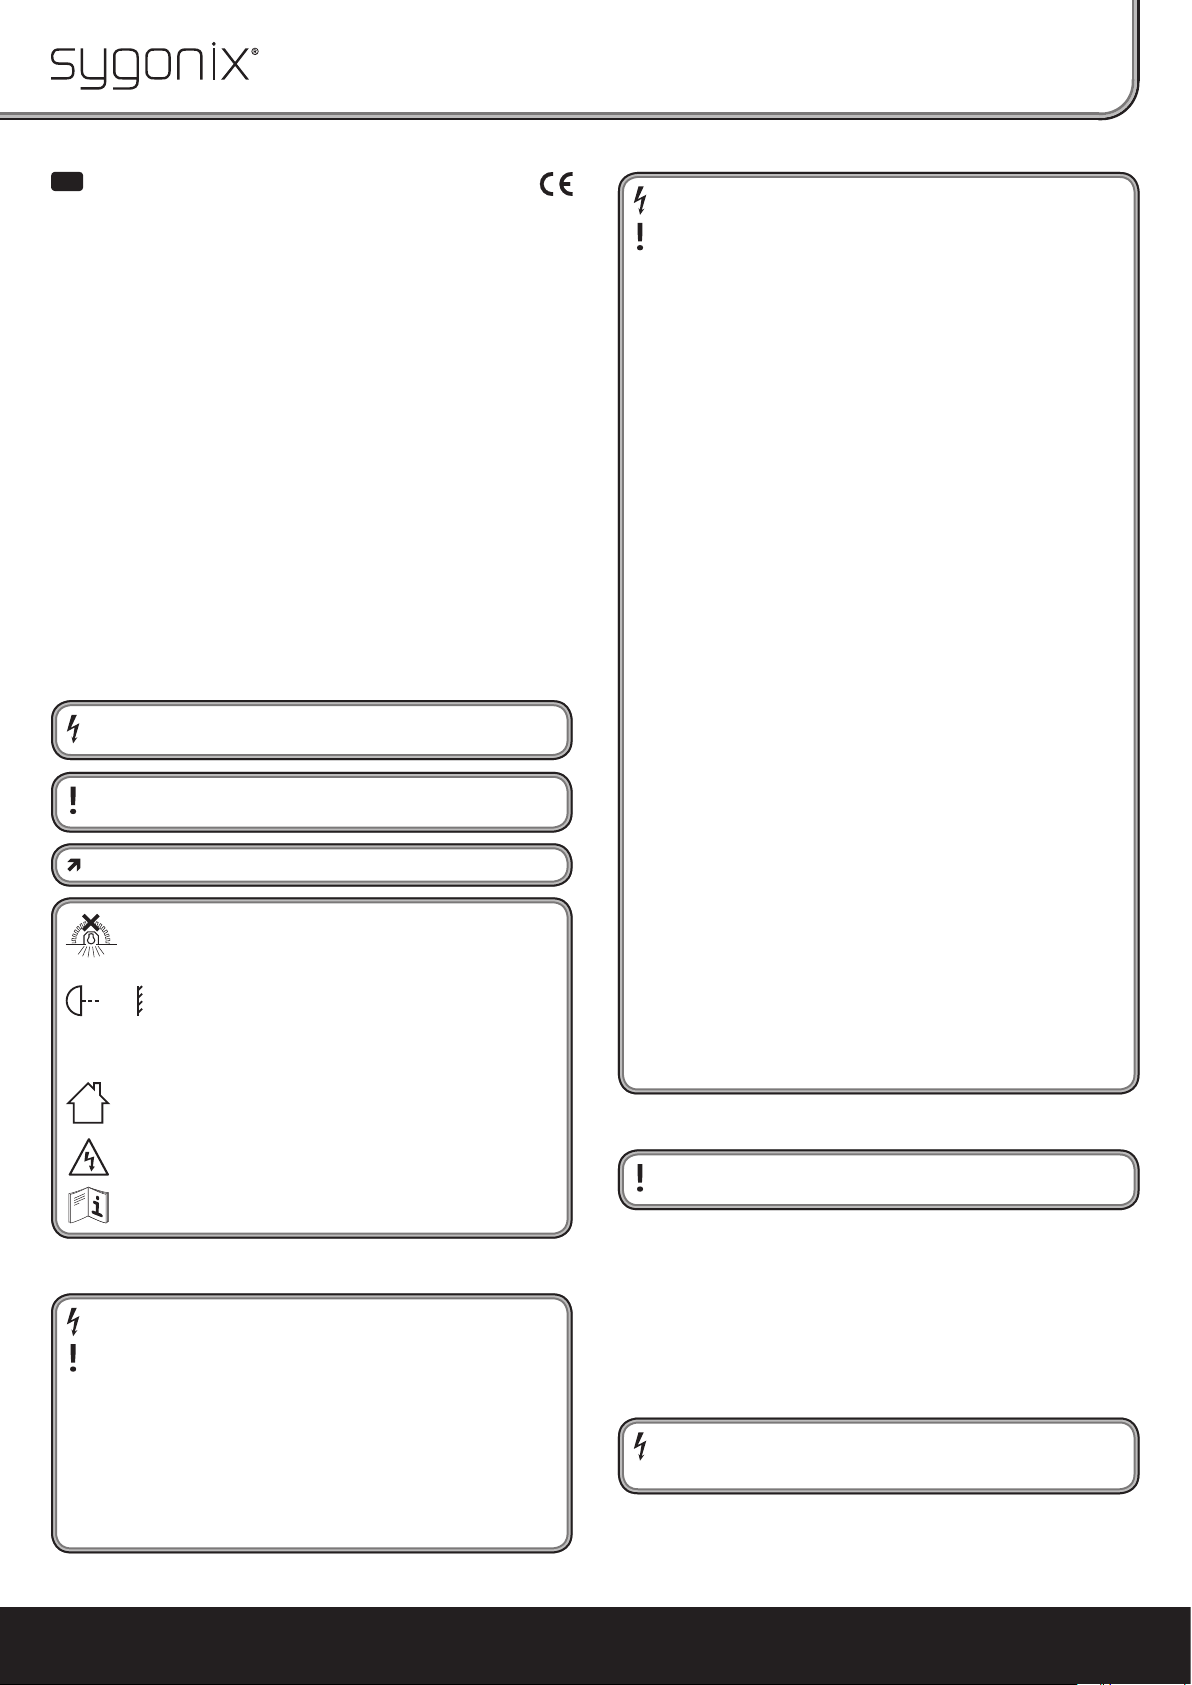
Symbol-Erklärungen, Aufschriften
Das Blitzsymbol wird verwendet, wenn Gefahr für Ihre Gesundheit besteht,
z.B. durch elektrischen Schlag.
Dieses Symbol weist Sie auf besondere Gefahren bei Handhabung, Betrieb
oder Bedienung hin.
Das „Pfeil“-Symbol steht für spezielle Tipps und Bedienhinweise.
Die Leuchte darf bei Montage und Betrieb nicht in Isoliermaterial ein-
gebettet werden, da es hierbei zu einer Überhitzung der Leuchte kom-
men kann. Außerdem besteht Brandgefahr!
Halten Sie einen Mindestabstand zwischen den Lichtaustrittsöff-
nungen und bestrahlten Flächen ein (z.B. leicht brennbare Gegen-
stände wie Vorhänge o.ä.). Der jeweils gültige Mindestabstand
ist auf der Leuchte angegeben (im Beispielbild links beträgt der
Mindestabstand 0,5 m).
Die Leuchte ist ausschließlich zum Einsatz und der Verwendung in tro-
ckenen Innenräumen geeignet, sie darf nicht feucht oder nass werden.
Vorsicht, Hochspannung! Lebensgefahr!
Beachten Sie die Bedienungsanleitung!
Sicherheitshinweise
Lesen Sie zuerst die komplette Bedienungsanleitung durch, sie enthält
wichtige Informationen für die richtige Montage und den Betrieb.
Bei Schäden, die durch Nichtbeachten dieser Bedienungsanleitung ver-
ursacht werden, erlischt die Gewährleistung/Garantie! Für Folgeschä-
den übernehmen wir keine Haftung!
Bei Sach- oder Personenschäden, die durch unsachgemäße Handha-
bung oder Nichtbeachten der Sicherheitshinweise verursacht werden,
übernehmen wir keine Haftung! In solchen Fällen erlischt die Gewähr-
leistung/Garantie!
Achtung!
Die Installation des Produkts darf nur durch eine qualifizierte Elektro-
fachkraft (z.B. Elektriker) erfolgen, die mit den einschlägigen Vorschrif-
ten (z.B. VDE) vertraut ist!
Durch unsachgemäße Arbeiten an der Netzspannung gefährden Sie
nicht nur sich selbst, sondern auch andere!
Haben Sie keine Fachkenntnisse für die Montage, so nehmen Sie die
Montage nicht selbst vor, sondern beauftragen Sie einen Fachmann.
• Aus Sicherheits- und Zulassungsgründen (CE) ist das eigenmächtige Um-
bauen und/oder Verändern des Produkts nicht zulässig.
• Das Produkt ist kein Spielzeug, es gehört nicht in Kinderhände! Es besteht
die Gefahr eines lebensgefährlichen elektrischen Schlages!
• Die Installation und der Anschluss des Produkts darf nur im spannungs-
freien Zustand vorgenommen werden. Gleiches gilt für das Einsetzen bzw.
Wechseln eines Leuchtmittels.
• Der Schutzleiter muss an der Leuchte angeschlossen werden. Bei nicht bzw.
nicht ordnungsgemäß angeschlossenem Schutzleiter besteht im Fehlerfall
Lebensgefahr durch einen elektrischen Schlag!
• Die Leuchte darf nur in trockenen, geschlossenen Innenräumen montiert
und betrieben werden. Die Leuchte darf nicht feucht oder nass werden, Le-
bensgefahr durch einen elektrischen Schlag!
• Verwenden Sie die Leuchte nicht in Räumen oder bei widrigen Umgebungs-
bedingungen, wo brennbare Gase, Dämpfe oder Stäube vorhanden sind
oder vorhanden sein können! Es besteht Explosionsgefahr!
• Die Leuchte darf nur ortsfest montiert betrieben werden.
• Die Leuchte darf keinen extremen Temperaturen, starken Vibrationen oder
starken mechanischen Beanspruchungen ausgesetzt werden.
• Befestigen Sie keine Gegenstände (z.B. Dekomaterial) an oder in der Nähe
der Leuchte, es besteht Brandgefahr!
• Wie bei allen anderen Leuchten/Leuchtmitteln gilt: Blicken Sie nie mit blo-
ßem Auge oder mit optischen Instrumenten in das Licht der Leuchte, Gefahr
von Augenschäden!
• Wenn anzunehmen ist, dass ein gefahrloser Betrieb nicht mehr möglich ist,
so ist das Produkt außer Betrieb zu setzen und gegen unbeabsichtigten Be-
trieb zu sichern. Lassen Sie das Produkt anschließend von einem Fachmann
prüfen.
Es ist anzunehmen, dass ein gefahrloser Betrieb nicht mehr möglich ist,
wenn:
- das Produkt sichtbare Beschädigungen aufweist
- das Produkt nicht oder nicht richtig arbeitet (flackerndes Licht, austreten-
der Qualm bzw. Brandgeruch, hörbare Knistergeräusche, Verfärbungen am
Produkt oder angrenzenden Flächen)
- das Produkt unter ungünstigen Verhältnissen gelagert wurde
- schwere Transportbeanspruchungen aufgetreten sind
• Lassen Sie das Verpackungsmaterial nicht achtlos liegen, dieses könnte für
Kinder zu einem gefährlichen Spielzeug werden.
• In gewerblichen Einrichtungen sind die Unfallverhütungsvorschriften des
Verbandes der gewerblichen Berufsgenossenschaften für elektrische Anla-
gen und Betriebsmittel zu beachten!
• Sollten Sie noch Fragen haben, die in dieser Bedienungsanleitung nicht be-
antwortet werden, so wenden Sie sich bitte an uns oder an einen anderen
Fachmann.
Montage und Anschluss
Beachten Sie die Informationen im Kapitel „Sicherheitshinweise“!
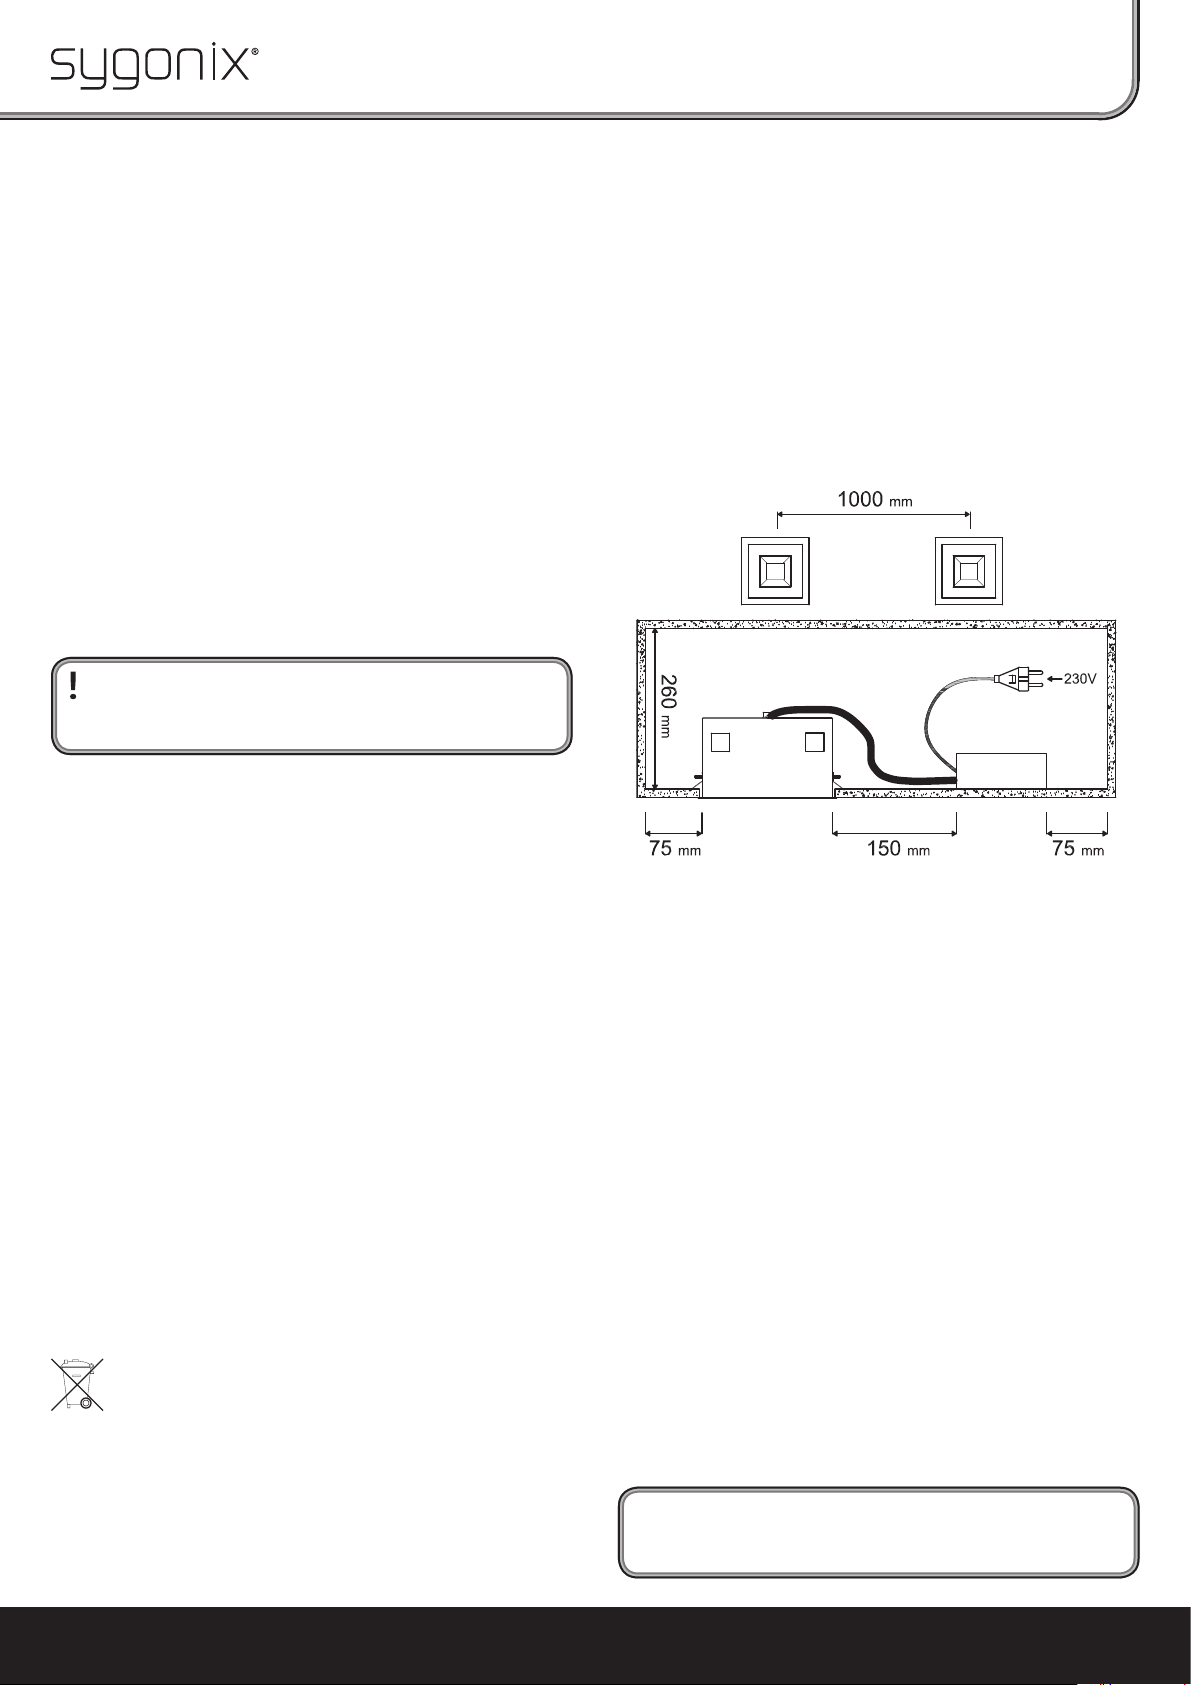
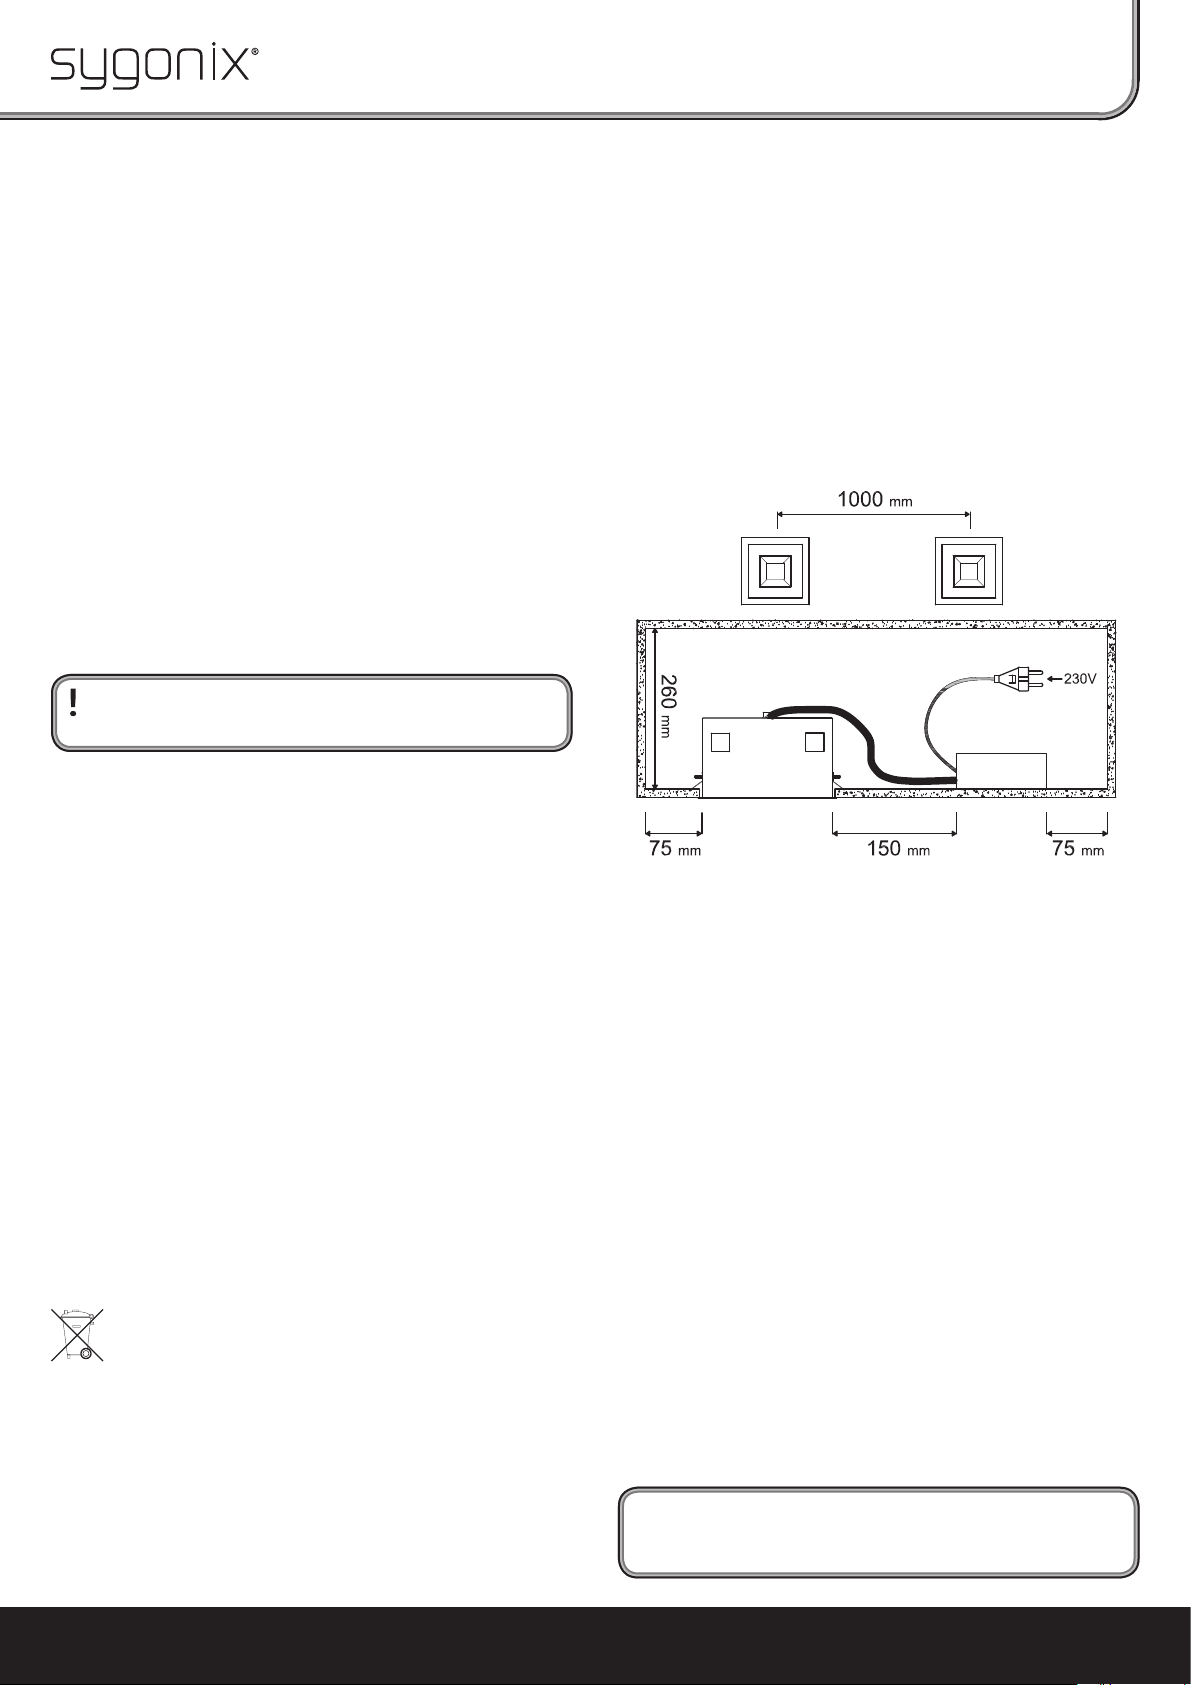
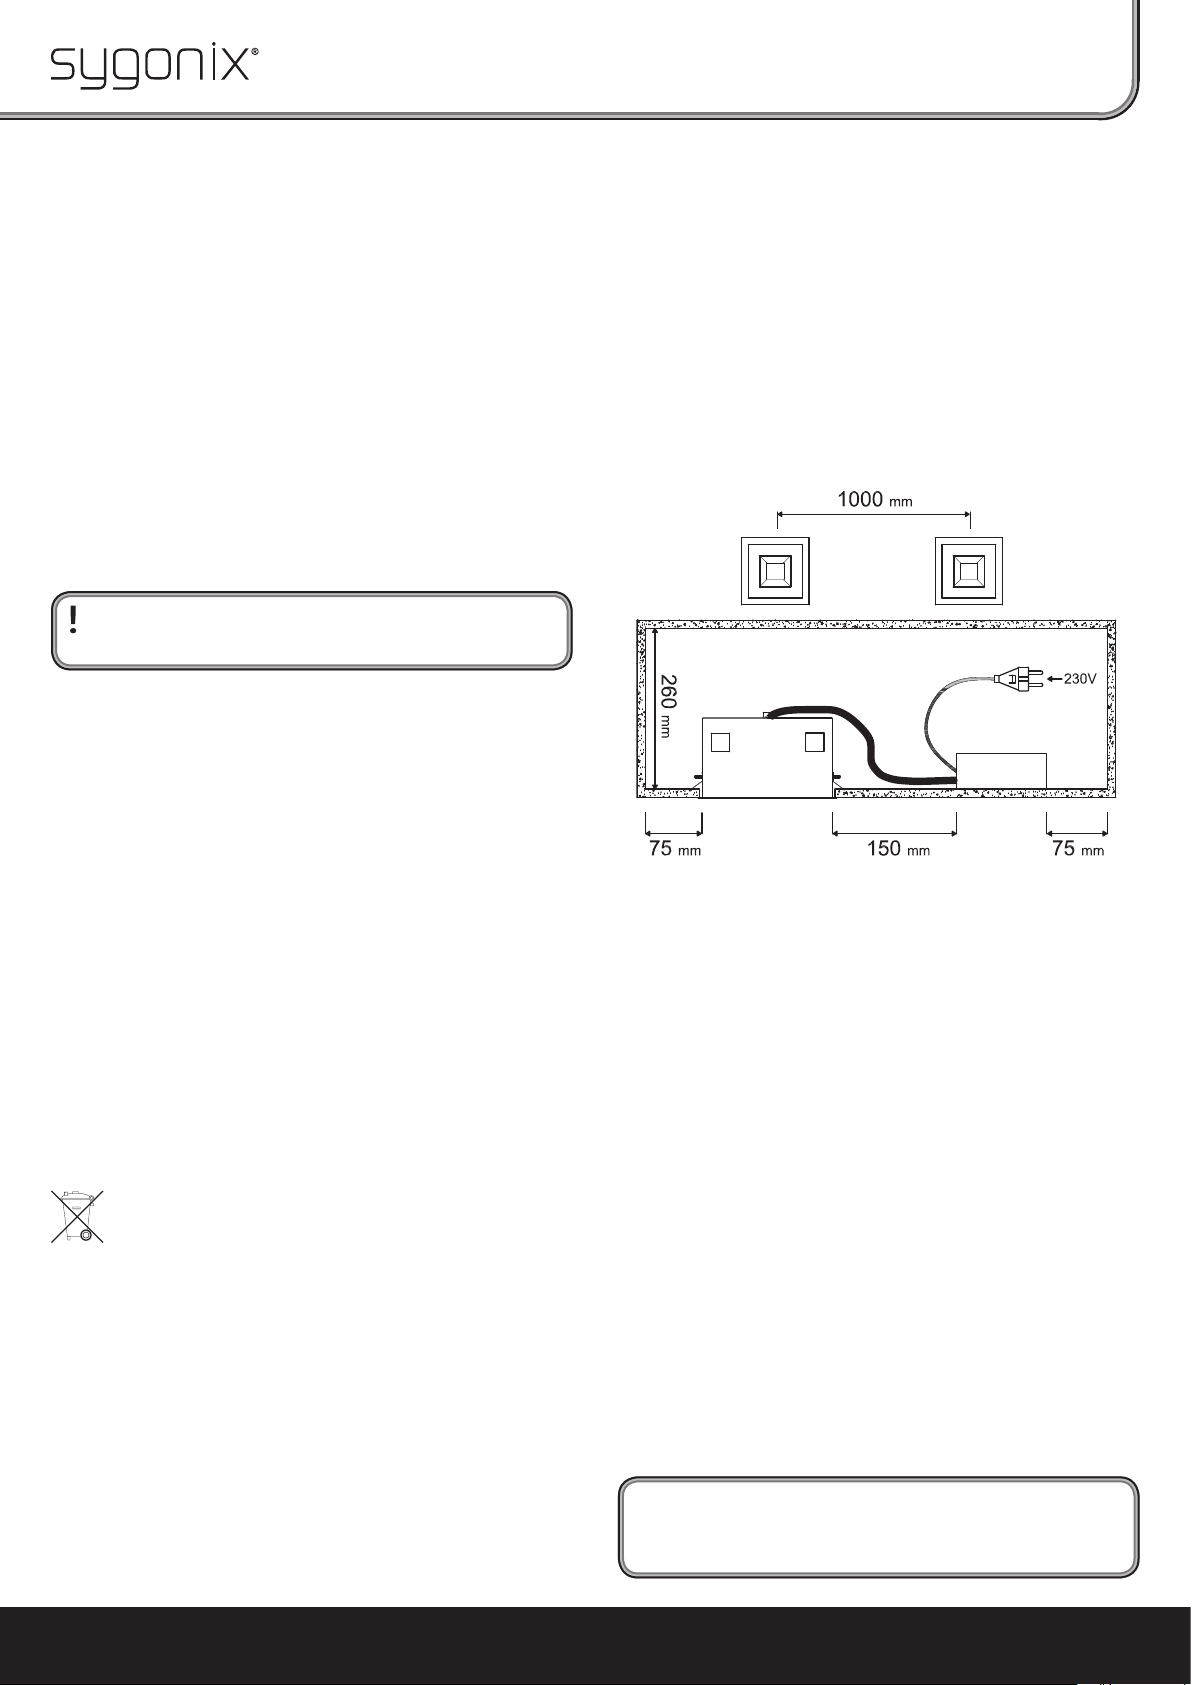
• Das Produkt ist nur zum Einbau in eine abgehängte Raumdecke geeignet. Innerhalb
der abgehängten Raumdecke muss eine Luftzirkulation möglich sein. Beachten Sie
für die Abstände das Kapitel „Technische Daten“.
• Die Installation und der Anschluss des Produkts darf nur im spannungsfreien Zu-
stand vorgenommen werden.
• Für die Montage ist ein entsprechend großer Deckenausschnitt erforderlich. Beach-
ten Sie dazu die Angaben im Kapitel „Technische Daten“.
• Öffnen Sie das Gehäuse, in dem das Vorschaltgerät eingebaut ist. Für den Anschluss
an die Netzspannung finden Sie hier einen leicht lösbaren Stecker, in dem die Netz-
zuleitung festzuschrauben ist.
Der Schutzleiter muss angeschlossen werden. Ein Betrieb der Leuchte ohne
Schutzleiter ist nicht zulässig. Im Fehlerfall besteht ansonsten Lebensgefahr
durch einen elektrischen Schlag!
• Verbinden Sie den Stecker mit der entsprechenden Buchse im Gehäuse des Vor-
schaltgeräts und verschließen Sie danach das Gehäuse. Führen Sie dabei die Netz-
zuleitung durch eine entsprechende Öffnung seitlich am Gehäuse.
Bedienungsanleitung
Downlight „Venice“, 2 x 26 W
0.5m

Impressum
Die Haustechnik-Marke für das ganze Haus. Mehr Informationen unter www.sygonix.com
Diese Bedienungsanleitung ist eine Publikation der Sygonix GmbH, Nordring 98a, 90409 Nürnberg (www.sygonix.com).
Alle Rechte einschließlich Übersetzung vorbehalten. Reproduktionen jeder Art, z. B. Fotokopie, Mikroverfilmung,
oder die Erfassung in elektronischen Datenverarbeitungsanlagen, bedürfen der schriftlichen Genehmigung des
Herausgebers. Nachdruck, auch auszugsweise, verboten. Diese Bedienungsanleitung entspricht dem technischen
Stand bei Drucklegung. Änderung in Technik und Ausstattung vorbehalten. © Copyright 2011 by Sygonix GmbH.
Nr. 34647C - Version 06/11
• Nehmen Sie die Abdeckung der Leuchte ab. Dazu ist die Abdeckung vorsichtig nach
außen zu ziehen und anschließend die beiden Metallfedern links und rechts in der
Leuchte auszuhängen.
• Zur Fixierung der Leuchte in der abgehängten Raumdecke sind vier Metallwinkel er-
forderlich.
Im Lieferumfang befinden sich zwei unterschiedliche 4er-Sets dieser Metallwinkel.
Je nach Materialstärke der vorhandenen Raumdecke ist das entsprechende Set zu
verwenden.
Nach dem Einsetzen des Leuchtengehäuses in den Deckenausschnitt sind die Me-
tallwinkel seitlich in die Führungsschlitze des Leuchtengehäuses einzustecken.
Schieben Sie sie so weit nach unten, bis die Leuchte bündig in der Raumdecke sitzt.
Fixieren Sie die Metallwinkel, drehen Sie die Schrauben fest (mittels der Metallringe
in den Schrauben).
• Setzen Sie zuletzt die beiden Energiespar-Leuchtmittel ein (siehe Abschnitt „Leucht-
mittel einsetzen bzw. wechseln“).
• Bringen Sie die Abdeckung der Leuchte wieder an. Dazu sind die beiden Metallfe-
dern in den Führungsschlitzen links und rechts einzuhängen. Anschließend schie-
ben Sie die Abdeckung in Richtung Leuchtengehäuse, bis sie vollständig im Leuch-
tengehäuse steckt.
• Schalten Sie die Netzspannung zu und überprüfen Sie die Funktion der Leuchte.
Leuchtmittel einsetzen bzw. wechseln
• Bevor Sie ein Leuchtmittel einsetzen oder wechseln, schalten Sie zuerst die Netzzu-
leitung stromlos. Schalten Sie außerdem den zugehörigen FI-Schutzschalter ab, so
dass die Leuchte allpolig von der Netzspannung getrennt ist.
Vorsicht, Verbrennungsgefahr!
Bevor Sie einen Wechsel eines defekten Leuchtmittels durchführen, schalten
Sie die Leuchte aus und warten Sie, bis sich das defekte Leuchtmittel und
auch die Leuchte ausreichend abgekühlt hat.
• Nehmen Sie die Abdeckung der Leuchte ab. Dazu ist die Abdeckung vorsichtig nach
außen zu ziehen und anschließend die beiden Metallfedern links und rechts in der
Leuchte auszuhängen.
• Setzen Sie ein neues Leuchtmittel in den Leuchtensockel ein (Typ und max. Leistung
siehe Kapitel „Technische Daten“).
Achten Sie dabei auf die Form des Leuchtensockels und dem Anschlussstecker des
Leuchtmittels.
Führen Sie den Glaskolben des Energiespar-Leuchtmittels zuerst durch die Öffnung
auf der gegenüberliegenden Seite des Leuchtensockels.
Anschließend stecken Sie das Leuchtmittel in den Leuchtensockel ein. Wenden Sie
dabei keine Gewalt an!
• Bringen Sie die Abdeckung der Leuchte wieder an. Dazu sind die beiden Metallfe-
dern in den Führungsschlitzen links und rechts einzuhängen. Anschließend schie-
ben Sie die Abdeckung in Richtung Leuchtengehäuse, bis sie vollständig im Leuch-
tengehäuse steckt.
• Schalten Sie die Netzspannung zu und überprüfen Sie die Funktion des neuen
Leuchtmittels.
Wartung und Pflege
• Das Produkt ist für Sie bis auf einen Leuchtmittelwechsel wartungsfrei.
• Vor einer Reinigung ist Netzspannung für die Leuchte abzuschalten. Lassen Sie die
Leuchte anschließend vollständig abkühlen.
• Äußerlich sollte die Leuchte nur mit einem sauberen, weichen, trockenen Tuch ab-
gewischt werden. Verwenden Sie auf keinen Fall aggressive Reinigungsmittel oder
chemische Lösungen, da dadurch das Gehäuse angegriffen (Verfärbungen) oder die
Funktion beeinträchtigt werden könnte.
Staub kann sehr leicht mit einem sauberen, weichen Pinsel und einem Staubsauger
entfernt werden.
Entsorgung
Entsorgen Sie das Produkt am Ende seiner Lebensdauer gemäß den gelten-
den gesetzlichen Bestimmungen.
Ein defektes Leuchtmittel darf nicht in den Hausmüll gegeben werden.
Energiespar-Leuchtmittel enthalten eine geringe Menge giftiges, gesund-
heitsgefährliches und umweltschädliches Quecksilber. Geben Sie ein defek-
tes Energiespar-Leuchtmittel deshalb bei entsprechenden Sammelstellen
Ihrer Gemeinde bzw. bei Sondermüll-Sammlungen ab.
Technische Daten
Leuchtmittelanzahl: 2 Energiespar-Leuchtmittel mit je max. 26 W
Leuchtmittelsockel: G24q-3
Betriebsspannung: 230 - 240 V/AC, 50 - 60 Hz
Abmessungen (Leuchte): 200 x 200 x 148 mm (L x B x H)
Abmessungen (Konverter): 166 x 166 x 58 mm (L x B x H)
Einbautiefe: 260 mm
Montageöffnung: 182 x 182 mm
Gewicht: Ca. 2,3 kg (Leuchte mit Konverter)
Schutzklasse: I
Montageort: Nur in trockenen, geschlossenen Innenräumen
Für die Mindestabstände zwischen mehreren Leuchten, zu Mauern, Wänden oder Iso-
liermaterial beachten Sie unbedingt folgende Abbildung:

The home technology brand for the entire house. More information at www.sygonix.com
GB Operating instructions
Downlight „Venice“, 2 x 26 W
Use in accordance with manufacturer's instructions
The product is intended for illuminating indoor areas; it may only be installed and used
in dry, enclosed indoor rooms. The product is intended for installation in suspended
ceilings.
Any other use than that described above may damage the product. Moreover, this
may give rise to hazards such as short-circuiting, fire, electric shock, etc. No part of the
product may be modified or converted!
The safety instructions must be observed at all times!
This product complies with the applicable national and European requirements.
All names of companies and products are the trademarks of the respective owner. All
rights reserved.
Package contents
• Downlight with external converter (ballast)
• Set of attachment clamps
• Operating Instructions
Explanation of Symbols, Inscriptions
The lightning symbol indicates a health hazard, e.g. electric shock.
This symbol indicates specific risks associated with handling, function and
use.
The "arrow" symbol indicates special tips and operating information.
The lamp may not be embedded in the insulating material while being
installed and operated, as this may lead to overheating. Furthermore, it
may cause fire hazard!
Keep a minimum clearance between the light outlet and the illumi-
nated areas (e.g. easily flammable objects such as curtains or the
like). The appropriate minimum distance is specified on the bulb
(in the illustration to the left, the minimum distance is 0.5 m).
The product is only intended to be located and used in dry indoor spac-
es, it must not get damp or wet.
Caution, high voltage! Danger to life!
Observe the operating instructions!
Safety Instructions
Read the complete operating manual carefully before using the product,
as it contains important information about the correct installation and
operation.
The warranty will be void in the event of damage caused by failure to ob-
serve these safety instructions! We do not assume any liability for any
consequential damage!
We do not assume any liability for material and personal damage caused
by improper use or non-compliance with the safety instructions! In such
cases, the warranty will be void!
Caution!
The product may only be installed by a qualified technician (e.g. electri-
cian) who is familiar with the relevant regulations (e.g. VDE, German
electrical wiring regulations)!
Improper work carried out at the mains voltage endangers not only your
life but also the life of others!
If you do not have the expertise required for the installation, do not in-
stall it yourself but entrust a qualified electrician.
• The unauthorised conversion and/or modification of the product is not al-
lowed for safety and approval reasons (CE).
• The product is not a toy and must be kept out of the reach of children! There
is a risk of a lethal electric shock!
• The power must be disconnected during installation and while connecting
the product. The same is true for the insertion or replacement of a bulb.
• The protective earth wire must be connected to the lamp. If the protective
earth wire is not or improperly connected, there is a life-threatening risk by
electric shock in the event of an error!
• The light is only to be installed and used in dry, enclosed indoor rooms. The
light must not be exposed to damp or moisture; danger of a fatal electric
shock!
• Do not use this lamp in spaces or under adverse ambient conditions where
combustible gases, vapours or dust are or may be present! There is a risk of
explosion!
• Only use the product when it is mounted permanently.
• The lamp must not be exposed to extremes of temperature, strong vibra-
tions or heavy mechanical stress.
• Do not attach objects (e.g. decorative material) to the light or in its proxim-
ity, as there is a risk of fire!
• As with all other lamps/light bulbs: Do not look into the light with the naked
eye or with optical instruments; there is the danger of eye injuries!
• If you have reason to assume that safe operation is no longer possible, dis-
connect the product immediately and secure it against inadvertent opera-
tion. Let an expert check the product.
It can be assumed that safe operation is no longer possible if:
- the product shows visible signs of damage,
- the product does not work at all or well (flickering light, leaking smoke or a
smell of burning, the light flickers, audible cracking noises, discolouration
to the product or the adjacent surfaces.)
- the product was stored under unfavourable conditions
- it was exposed to heavy loads during transport
• Do not leave packing materials unattended. They may become dangerous
playthings for children.
• In commercial institutions, the accident prevention regulations of the em-
ployer’s liability insurance association for electrical systems and operating
facilities are to be observed!
• If you have any questions that are not answered in this manual, please con-
tact our technical service or another specialist.
Installation and Connection
Pay attention to the information in the chapter "Safety notes"!
• The product is only intended for installation in a suspended ceiling. It must be pos-
sible for air to circulate inside the suspended ceiling. For more information on dis-
tances, see the chapter "Technical data".
•
The power must be disconnected during installation and while connecting the product.
• A correctly sized cut-out in the ceiling is necessary for installation. Refer to chapter
“Technical data”.
• Open the housing in which the ballast is installed. For the connection to the mains
voltage there is an easily removable connector to which the power supply cord must
be attached.
The protective earth must be connected. Do not use the lamp without con-
necting the earth wire. Otherwise, there is a risk of a potentially fatal electric
shock!
• Connect the plug to the corresponding socket in the housing of the ballast and then
close the housing. In doing this, pass the power supply cord through a correspond-
ing opening on the lateral side of the housing.
0.5m

The home technology brand for the entire house. More information at www.sygonix.com
These operating instructions are a publication by Sygonix GmbH, Nordring 98a, 90409 Nürnberg (www.sygonix.com).
All rights including translation reserved. Reproduction by any method, e.g. photocopy, microfilming, or the capture
in electronic data processing systems require the prior written approval by the editor. Reprinting, also in part, is
prohibited. These operating instructions represent the technical status at the time of printing. Changes in techno-
logy and equipment reserved. © Copyright 2011 by Sygonix GmbH.
Nr. 34647C - Version 06/11Legal notice
• Remove the lampshade. To do this, the lampshade must be carefully pulled out-
wards and then the two metal springs located on the left and right of the lamp must
be unhinged.
• Four metal brackets are required to fasten the lamp to the suspended ceiling.
The package contains two different 4-piece sets of these metal brackets. The rel-
evant set must be used, depending on the material thickness of the existing ceiling.
After inserting the lamp housing into the ceiling recess, the metal brackets are to be
inserted laterally in the guiding slots of the lamp housing. Push them downwards
until the lamp is flush with the ceiling.
Fasten the metal brackets and tighten the screws (using the metal rings in the
screws).
• Insert the two energy-saving bulbs (see "Inserting / replacing bulbs" section).
• Replace the lampshade. For that purpose both metal springs are to be hooked into
the guiding slots. Afterwards, move the lampshade towards the housing until it is
fully enclosed by it.
• Switch on the mains voltage again and make sure that the lamp is working.
Inserting/replacing the bulb
• Switch off the voltage supply before you insert or replace a light bulb. Furthermore,
turn off the earth leakage circuit breaker to disconnect all the poles of the lamp from
the mains voltage.
Attention, risk of burns!
Before you replace a faulty bulb, switch off the lamp and wait until the faulty
bulb and the lamp have cooled down sufficiently.
• Remove the lampshade. To do this, the lampshade must be carefully pulled out-
wards and then the two metal springs located on the left and right of the lamp must
be unhinged.
• Insert a new bulb into the light's socket (type and max. output see chapter "Techni-
cal Data").
In doing this, pay attention to the shape of the light socket and the connection plug
of the light bulb.
First pass the glass bulb of the energy-saving lamp through the opening at the op-
posite side of the light socket.
Afterwards insert the bulb into the lamp socket. Do not use force!
• Replace the lampshade. For that purpose both metal springs are to be hooked into
the guiding slots. Afterwards, move the lampshade towards the housing until it is
fully enclosed by it.
• Finally switch on the mains power and check that the bulb is functioning.
Maintenance and Care
• The product does not need any maintenance except replacement of the light bulb.
• Disconnect the lamp from the mains supply before cleaning. Then allow the lamp to
cool down.
• The exterior of the light should only be wiped with a clean, soft, dry cloth. Do not use
aggressive cleaning agents or chemical solutions that could damage the housing
(discolouring) or impair operation.
Dust can easily be removed using a clean, soft brush and a vacuum cleaner.
Disposal
Dispose of an unserviceable product in accordance with the relevant statu-
tory regulations.
Do not put faulty light bulbs in the household rubbish. Energy-saving bulbs
contain a low amount of toxic mercury which is detrimental to your health
and harmful to the environment. Therefore, dispose of a defect energy-
saving bulb at the corresponding collection points of your community, or at
collection points for hazardous waste.
Technical Data
Number of bulbs: 2 energy-saving bulbs with max. 26 W each
Bulb socket: G24q-3
Operating voltage: 230 - 240 V/AC, 50-60 Hz
Dimensions (lamp): 200 x 200 x 148 mm (L x W x H)
Dimensions (converter): 166 x 166 x 58 mm (L x W x H)
Installation depth: 260 mm
Installation opening: 182 x 182 mm
Weight: Approx. 2.3 kg (lamp with converter)
Protection class: I
Installation location: Only in dry, enclosed indoor spaces
For minimum distances between multiple lights, to walls or insulation material, please
take note of the following illustration:

F
La marque de technique domestique pour toute la maison. Davantage d‘informations sur www.sygonix.com
Notice d‘emploi
Luminaire éclairant vers le bas
„Venice“, 2 x 26 W
Utilisation Conforme
Le produit sert d'éclairage à l'intérieur ; il ne doit être monté et utilisé qu'à l'intérieur
de locaux fermés et secs. Le produit est prévu pour être encastré dans des plafonds
suspendus.
Toute utilisation autre que celle décrite précédemment peut endommager l'appareil.
De plus, elle s'accompagne de dangers tels que court-circuit, incendie, électrocution,
etc. Aucun composant du produit ne doit être modifié ou transformé !
Respectez impérativement les consignes de sécurité !
Cet appareil satisfait aux prescriptions légales nationales et européennes.
Tous les noms d'entreprises et les appellations d'appareils figurant dans ce mode
d'emploi sont des marques déposées des propriétaires correspondants. Tous droits
réservés.
Étendue de la livraison
• Luminaire éclairant vers le bas avec convertisseur externe (ballast)
• Jeu de brides de fixation
• Manuel d'utilisation
Explications des symboles, inscriptions
Le symbole de l'éclair est utilisé pour signaler un danger pour votre santé, par
ex. : une décharge électrique.
Ce symbole attire l'attention sur les risques spécifiques lors du maniement, du
fonctionnement et de l'utilisation du produit.
Le symbole de la flèche précède des conseils et consignes d´utilisation par-
ticuliers.
Lors du montage et lors de l'utilisation, le luminaire ne doit pas être
entouré de matériau isolant, car cela pourrait provoquer une surchauffe
du luminaire. En plus, il y a risque d'incendie !
Respecter une distance minimale entre l'orifice de sortie de la lu-
mière du luminaire et la surface irradiée (par ex. objets facilement
inflammables, tels que rideaux, ou analogues). La distance mini-
male applicable dans chaque cas est indiquée sur la lampe (dans
la figure de l'exemple à gauche, la distance minimale est de 0,5 m).
La lampe est prévue pour l'utilisation exclusive dans des locaux secs à
l'intérieur, elle ne doit pas être mouillée ou humide.
Attention, haute tension ! Danger de mort !
Tenez compte du manuel d'utilisation !
Consignes de sécurité
Lisez intégralement les instructions d'utilisation avant la mise en ser-
vice de l'appareil. Elles contiennent des informations importantes pour
le montage et l'utilisation.
En cas de dommages dus au non-respect de ce manuel d'utilisation, la
validité de la garantie sera annulée ! Nous déclinons toute responsabi-
lité pour les dommages consécutifs !
Nous déclinons toute responsabilité pour d'éventuels dommages maté-
riels ou corporels dus à un maniement incorrect ou au non-respect des
consignes de sécurité ! Dans de tels cas, la garantie prend fin !
Attention !
L'installation du produit ne doit être effectuée que par un technicien
spécialisé (par ex. électricien) connaissant parfaitement les prescrip-
tions spécifiques (par ex. VDE) !
Toute intervention non conforme au niveau de la tension de secteur re-
présente un danger non seulement pour vous-même, mais également
pour autrui.
N'effectuez pas le montage vous-même si vous n'avez pas les connais-
sances spécifiques pour le montage, mais adressez-vous à un spécia-
liste.
• Pour des raisons de sécurité et d'homologation (CE), il est interdit de modi-
fier la construction ou de transformer l'appareil soi-même.
• Le produit n'est pas un jouet ; tenez-le hors de portée des enfants ! Risque
d'électrocution avec danger de mort !
• L'installation et le raccordement de l'appareil ne doivent être effectués que
hors tension. Il en est de même pour la mise en place et le remplacement
d'une ampoule.
• Le conducteur de protection doit impérativement être raccordé à la lampe.
Si le conducteur de protection n'est pas raccordé correctement ou s'il n'est
pas raccordé du tout, il y a, en cas de panne, danger de mort par choc élec-
trique !
• La lampe ne doit être montée et utilisée qu'à l'intérieur de locaux secs et
fermés. La lampe ne doit pas être humide ou mouillée, danger de mort par
électrocution !
• Ne pas utiliser la lampe dans des locaux ou dans des conditions défavo-
rables où il y a risque de présence de gaz, de vapeurs ou de poussière in-
flammables ! Risque d'explosion !
• Le luminaire ne doit fonctionner qu'en position stationnaire.
• La lampe ne doit pas être exposée à des températures extrêmes, des vibra-
tions importantes ou à de fortes sollicitations mécaniques.
• Ne pas suspendre ni fixer d'objets (décorations par ex.) sur le luminaire ou
dans sa proximité, risque d'incendie !
• Comme pour toutes les autres lampes/ampoules : ne jamais fixer la lumière
diffusée par la lampe à l'œil nu ou avec des instruments optiques, risque de
lésions oculaires !
• S'il s'avère qu''une utilisation sans danger n'est plus possible, l'appareil doit
être mis hors service et protégé contre toute utilisation involontaire. Faites
contrôler le produit ensuite par un spécialiste.
Un fonctionnement sans risques n'est plus assuré lorsque :
- l'appareil présente des dommages visibles
- l'appareil ne fonctionne plus ou ne fonctionne pas correctement (lumière
vacillante, fumée épaisse ou odeur de brûlé, crépitements audibles, déco-
lorations du produit ou des surfaces adjacentes)
- l'appareil a été stocké dans des conditions défavorables
- l'appareil a subi des conditions de transport difficiles
• Ne laissez pas le matériel d'emballage sans surveillance ; cela pourrait
constituer un jouet dangereux pour les enfants.
• Dans les installations industrielles il convient d'observer les prescriptions de
prévention des accidents de la fédération des syndicats professionnels pour
les installations et matériels électriques !
• Si vous avez encore des questions après la lecture de ce manuel d'utilisa-
tion, veuillez-nous contacter ou vous adresser à un spécialiste.
Montage et raccordement
Tenez compte des informations dans le chapitre "Consignes de sécurité" !
• Le produit est conçu pour être encastré dans un plafond suspendu. L'air doit pouvoir
circuler à l'intérieur du plafond suspendu. Pour les distances, respectez le chapitre
"Caractéristiques techniques".
• L'installation et le raccordement de l'appareil ne doivent être effectués que hors ten-
sion.
• Une découpe du plafond de taille correspondante est nécessaire pour le montage.
Pour cela, observez les distances indiquées dans le chapitre "Caractéristiques tech-
niques".
• Ouvrez le boîtier contenant le ballast. Vous y trouverez, pour le raccordement à la
tension de service, un connecteur facilement détachable dans lequel vous devez
visser le câble de raccordement.
Raccorder impérativement le conducteur de protection. Il est interdit de faire
fonctionner la lampe sans le conducteur de protection. Sinon il y a danger de
mort par choc électrique !
• Branchez le connecteur dans la douille correspondante dans le boîtier du ballast,
puis refermez le boîtier. Faites passer le câble de raccordement par l'orifice corres-
pondant sur le côté du boîtier.
0.5m

La marque de technique domestique pour toute la maison. Davantage d‘informations sur www.sygonix.com
Information légales Nr. 34647C - Version 06/11
Ce mode d‘emploi est une publication de la société Sygonix GmbH, Nordring 98a, 90409 Nürnberg (www.sygonix.
com). Tous droits réservés, y compris de traduction. Toute reproduction, quelle qu‘elle soit (p. ex. photocopie, mi-
crofilm, saisie dans des installations de traitement de données) nécessite une autorisation écrite de l‘éditeur. Il est
interdit de le réimprimer, même par extraits. Ce mode d‘emploi correspond au niveau technique du moment de la
mise sous presse. Sous réserve de modifications techniques et de l‘équipement. © Copyright 2011 by Sygonix GmbH.
• Enlevez le cache de protection du luminaire. Pour ce faire, tirez le cache de protection
prudemment vers l'extérieur, puis décrochez les deux ressorts métalliques à gauche
et à droite dans le luminaire.
• Quatre équerres métalliques sont nécessaires pour fixer le luminaire dans le plafond
suspendu.
Deux jeux différents de 4 équerres métalliques sont contenus dans l'étendue de la
fourniture. Utilisez le jeu qui correspond à l'épaisseur du matériau du plafond exis-
tant.
Après avoir placé le boîtier du luminaire dans l'ouverture découpée dans le plafond,
insérez les équerres métalliques latéralement dans les fentes de guidage dans le
boîtier du luminaire. Poussez-les jusqu'à ce que le luminaire soit parfaitement encas-
tré dans le plafond.
Fixez les équerres métalliques en serrant les vis (au moyen des bagues métalliques).
• Insérez les deux ampoules économiques (voir chapitre "Mise en place ou remplace-
ment de l'ampoule")
• Replacez le cache de protection du luminaire. Pour ce faire, accrochez les deux res-
sorts métalliques dans les fentes de guidage à gauche et à droite. Ensuite, faites
glisser le cache de protection dans le boîtier du luminaire jusqu'à ce qu'il se trouve
complètement dans le boîtier.
• Appliquez la tension d'alimentation et contrôlez le fonctionnement du luminaire.
Mise en place et remplacement de l'ampoule
• Avant de mettre en place ou de remplacer une ampoule, coupez le câble d'alimen-
tation de la tension de réseau. En plus de cela, coupez le disjoncteur différentiel FI
correspondant de sorte que le luminaire soit coupé de la tension de réseau sur tous
les pôles.
Attention, risque de brûlures !
Avant de remplacer une ampoule défectueuse, éteindre le luminaire et at-
tendre que l'ampoule défectueuse et le luminaire aient suffisamment refroidi.
• Enlevez le cache de protection du luminaire. Pour ce faire, tirez le cache de protection
prudemment vers l'extérieur, puis décrochez les deux ressorts métalliques à gauche
et à droite dans le luminaire.
• Insérez une nouvelle ampoule dans le culot de la lampe (type et puissance maximale
voir chapitre "Caractéristiques techniques")
Tenez compte de la forme du culot de la lampe et du connecteur de l'ampoule.
Passez d'abord l'ampoule en verre à travers l'ouverture face au culot de la lampe.
Puis, introduisez l'ampoule dans le culot de la lampe. Ne pas forcer !
• Replacez le cache de protection du luminaire. Pour ce faire, accrochez les deux res-
sorts métalliques dans les fentes de guidage à gauche et à droite. Ensuite, faites
glisser le cache de protection dans le boîtier du luminaire jusqu'à ce qu'il se trouve
complètement dans le boîtier.
• Appliquez la tension d'alimentation et vérifiez le fonctionnement de la nouvelle am-
poule.
Maintenance et entretien
• Mis à part le remplacement d'ampoule, le produit est sans maintenance.
• Avant tout nettoyage, coupez le luminaire de la tension de réseau. Ensuite laissez
suffisamment refroidir le luminaire.
• L'extérieur du luminaire ne doit être nettoyé qu'avec un chiffon doux, sec et propre.
N'utilisez en aucun cas de détergent agressif ou de solution chimique, car ils pour-
raient détériorer la surface du boîtier (décolorations) ou nuire au bon fonctionne-
ment de l'appareil.
Vous pouvez éliminer les poussières à l'aide d'un pinceau flexible propre et d'un as-
pirateur.
Elimination
Il convient de procéder à l'élimination de l'appareil au terme de sa durée de
vie conformément aux prescriptions légales en vigueur.
Les ampoules défectueuses ne doivent pas être jetées dans les poubelles
ordinaires. Les ampoules économiques contiennent de petites quantités de
mercure toxique présentant un danger pour la santé et pour l'environne-
ment. Déposez les ampoules économiques défectueuses dans un point de
collecte correspondant de votre commune ou un point de collecte de dé-
chets dangereux.
Caractéristiques techniques
Nombre d'ampoules : 2 ampoules économiques de 26 W max. chacune
Culot : G24q-3
Tension de service : 230 - 240 V/AC, 50 - 60 Hz
Dimensions (luminaire) : 200 x 200 x 148 mm (L x l x h)
Dimensions (convertisseur) : 166 x 166 x 58 mm (L x l x h)
Profondeur de montage : 260 mm
Orifice de montage : 182 x 182 mm
Poids : Env. 2,3 kg (luminaire avec convertisseur)
Classe de protection : I
Lieu de montage : Uniquement à l'intérieur de locaux fermés, secs
Pour les distances minimales entre plusieurs lampes et par rapport à des murs ou du
matériau d'isolation, tenez impérativement compte de la figure suivante :

NL
Het merk voor huistechniek voor het hele huis. Kijk voor meer informatie op www.sygonix.com
Gebruiksaanwijzing
Downlight „Venice“, 2 x 26 W
Beoogd gebruik
Het product dient voor verlichting binnenshuis; uitsluitend in droge, gesloten binnen-
ruimten monteren en gebruiken. Het product is bedoeld voor inbouwmontage in een
zwevend, verlaagd plafond.
Een andere toepassing dan hierboven beschreven, leidt tot beschadiging van dit pro-
duct; daarnaast bestaat gevaar van bijv. kortsluiting, brand of een elektrische schok.
Er mag niets aan dit product worden gewijzigd resp.omgebouwd!
Volg de veiligheidsaanwijzingen beslist op!
Dit product voldoet aan de wettelijke, nationale en Europese eisen.
Alle voorkomende bedrijfsnamen en productaanduidingen zijn handelsmerken van de
betreffende eigenaren. Alle rechten voorbehouden.
Omvang van de levering
• Downlight met externe converter (voorschakelapparaat)
• Bevestigingsklemmenset
• Gebruiksaanwijzing
Verklaring van symbolen, opschriften
Het bliksemsymbool geeft aan wanneer er gevaar bestaat voor uw gezond-
heid, bijv. door een elektrische schok.
Dit symbool wijst op bijzondere gevaren bij de hantering, het gebruik en de
bediening.
Het „pijl“-symbool wijst op speciale tips en bedieningsaanwijzingen.
De lamp mag bij montage en gebruik niet in isolatiemateriaal worden
ingebed, omdat het hierbij tot oververhitting van de lamp kan komen.
Er bestaat bovendien brandgevaar!
Houd een minimale afstand aan tussen de openingen waar licht
uit komt en de beschenen oppervlakken (bijv. licht ontvlambare
voorwerpen zoals gordijnen). De betreffende geldige minimumaf-
stand is op de lamp aangegeven (in de voorbeeldafbeelding be-
draagt de minimale afstand 0,5 m).
De lamp is uitsluitend geschikt voor toepassing en gebruik in droge bin-
nenruimten, en mag niet vochtig of nat worden.
Voorzichtig, hoogspanning! Levensgevaarlijk!
Neem de gebruiksaanwijzing in acht!
Veiligheidsaanwijzingen
Lees de volledige gebruiksaanwijzing goed door, deze bevat belangrijke
aanwijzingen voor de juiste manier van monteren en de werking.
Bij schade, veroorzaakt door het niet opvolgen van deze gebruiksaan-
wijzing, vervalt ieder recht op vrijwaring/garantie! Voor gevolgschade
zijn wij niet aansprakelijk!
Bij materiële schade of persoonlijk letsel, veroorzaakt door ondeskun-
dig gebruik of het niet naleven van de veiligheidsaanwijzingen, zijn wij
niet aansprakelijk! In dergelijke gevallen vervalt de waarborg/garantie!
Let op!
Uitsluitend een erkende vakman (bijv. elektricien), die vertrouwd is met
de desbetreffende voorschriften (bijv. KEMA), mag het product instal-
leren!
Door ondeskundige werkzaamheden aan het elektriciteitsnet brengt u
niet alleen uw eigen veiligheid, maar ook die van anderen in gevaar!
Laat het monteren aan een vakman over als u zelf daarvoor niet over de
nodige vakkennis beschikt.
• Om redenen van veiligheid en toelating (CE) is het eigenmachtig ombouwen
en/of wijzigen van het apparaat niet toegestaan.
• Dit product is geen speelgoed, houd het buiten bereik van kinderen! Er be-
staat kans op een levensgevaarlijke elektrische schok!
• Installeer en sluit het product uitsluitend in spanningvrije toestand aan. Het-
zelfde geldt voor het plaatsen resp. vervangen van een lichtbron.
• De aardleiding moet op de lamp worden aangesloten. Bij een niet resp. niet
reglementair aangesloten aardleiding bestaat in geval van storing levensge-
vaar door een elektrische schok!
• Monteer en gebruik de lamp uitsluitend in gesloten, droge ruimten binnens-
huis. Laat de lamp niet vochtig of nat worden. Elektrische schokken zijn le-
vensgevaarlijk!
• Gebruik de lamp niet in ruimtes of onder ongunstige omstandigheden waar-
in brandbare gassen, dampen of stofdeeltjes aanwezig zijn of aanwezig
kunnen zijn! Explosiegevaar!
• Gebruik de lamp uitsluitend permanent gemonteerd.
• Stel de lamp niet bloot aan extreme temperaturen, sterke trillingen of sterke
mechanische belastingen.
• Bevestig geen voorwerpen (zoals decoratiemateriaal) aan of in de buurt van
de lamp, brandgevaar!
•
Zoals bij alle andere lampen/lichtbronnen geldt: Kijk niet met het blote oog
of met optische instrumenten in het licht van de lamp, gevaar voor oogletsel!
• Stel - als aannemelijk is dat gevaarloos gebruik niet langer mogelijk is - het
product buiten bedrijf en borg het tegen onbedoeld gebruik. Laat een vak-
man vervolgens het product controleren.
Ga ervan uit dat veilig gebruik niet langer mogelijk is, als:
- het product zichtbare beschadigingen vertoont
- het product niet of niet langer correct werkt (flikkerend licht, vrijkomende
rook resp. brandlucht, hoorbare knisperingen, verkleuringen van het pro-
duct of aangrenzende vlaktes)
- het product onder ongunstige condities werd opgeslagen
- het apparaat aan zware transportbelastingen onderhevig was
• Laat verpakkingsmateriaal niet achteloos rondslingeren, dit kan voor kinde-
ren gevaarlijk speelgoed zijn.
• Bij industriële voorzieningen dienen de ongevallenpreventievoorschriften
van de bond voor industriële beroepscoöperaties voor elektrische installa-
ties en bedrijfsmiddelen te worden nageleefd!
• Raadpleeg onze technische klantenservice of andere vakmensen als u nog
vragen hebt die niet in deze gebruiksaanwijzing worden beantwoord.
Monteren en aansluiten
Volg de informatie op in het hoofdstuk „Veiligheidsaanwijzingen“!
• Het product is uitsluitend geschikt voor inbouw in een zwevend plafond. Binnen het
zwevende plafond moet luchtcirculatie mogelijk zijn. Raadpleeg voor de vereiste af-
standen het hoofdstuk „Technische gegevens“.
• Installeer en sluit het product uitsluitend in spanningvrije toestand aan.
• Om te kunnen monteren is een voldoende grote opening in het plafond vereist.
Raadpleeg daartoe de informatie in het hoofdstuk „Technische gegevens“.
• Open de behuizing, waarin het voorschakelapparaat is ingebouwd. Voor de aanslui-
ting op het elektriciteitsnet vindt u hier een gemakkelijk los te maken connector,
waarin het netsnoer moet worden vastgeschroefd.
Sluit de aardleiding aan. Het gebruik van de lamp zonder aardleiding is niet
toegestaan. Anders bestaat bij een defect het risico op een elektrische schok!
• Verbind de connector met de betreffende bus in de behuizing van het voorschake-
lapparaat en sluit vervolgens de behuizing. Leid hierbij het netsnoer door een hier-
voor bestemde opening aan de zijkant van de behuizing.
0.5m

Het merk voor huistechniek voor het hele huis. Kijk voor meer informatie op www.sygonix.com
Deze gebruiksaanwijzing is een publicatie van de firma Sygonix GmbH, Nordring 98a, 90409 Nürnberg (www.
sygonix.com). Alle rechten, vertaling inbegrepen, voorbehouden. Reproducties van welke aard dan ook, bij
voorbeeld fotokopie, microverfilming of de registratie in elektronische gegevensverwerkingsapparatuur, ver-
eisen de schriftelijke toestemming van de uitgever. Nadruk, ook van uittreksels, verboden. Deze gebruiks
aanwijzing voldoet aan de technische stand bij het in druk bezorgen. Wijziging van techniek en uitrusting
voorbehouden. © Copyright 2011 by Sygonix GmbH.
Nr. 34647C - Version 06/11Colofon
V1_0611_01_AB
• Neem de kap van de lamp. Trek de kap hiervoor voorzichtig naar buiten toe en hang
vervolgens de beide metalen veren links en rechts in de lamp eruit.
• Er zijn vier metalen hoeken nodig om de lamp in het verlaagde plafond te fixeren.
Bij de levering zijn twee verschillende setjes van 4 van deze metalen hoeken inbe-
grepen. Afhankelijk van de materiaalsterkte van het betreffende plafond wordt de
bijpassende set gebruikt.
Nadat de behuizing van de lamp in de opening in het plafond is geplaatst moeten
de metalen hoeken zijdelings in de gleuven in de behuizing van de lamp worden
geschoven. Schuif ze zover naar beneden, tot de lamp goed aansluit op het plafond.
Fixeer de metalen hoeken, draai de schroeven vast (met behulp van de metalen rin-
gen in de schroeven).
• Plaats uiteindelijk de beide energiebesparende lichtbronnen (zie paragraaf „Plaat-
sen of vervangen van de lichtbron“).
• Zet de kap van de lamp er weer op. Daarvoor moeten de beide metalen veren in de
gleuven links en rechts worden gehangen. Vervolgens schuift u de kap in de richting
van de behuizing van de lamp, tot hij volledig in de behuizing van de lamp zit.
• Schakel de netspanning in en controleer de werking van de lamp.
Plaatsen of vervangen van de lichtbron
• Schakel de stroom uit, voordat u een lichtbron plaatst of vervangt. Schakel boven-
dien de bijhorende aardlekschakelaar uit, zodat de lamp al-polig is losgekoppeld.
Voorzichtig: Gevaar voor verbranden!
Schakel - voordat u een defecte lichtbron vervangt - eerst de lamp uit en wacht
totdat de defecte lichtbron en de lamp voldoende zijn afgekoeld.
• Neem de kap van de lamp. Trek de kap hiervoor voorzichtig naar buiten toe en hang
vervolgens de beide metalen veren links en rechts in de lamp eruit.
• Plaats een nieuwe lichtbron in de lampvoet (type en max. vermogen zie hoofdstuk
„Technische gegevens“).
Let daarbij op de vorm van de lampvoet en de stekker van de lichtbron.
Leid de glazen peer van de energiebesparende lichtbron eerst door de opening aan
de tegenoverliggende kant van de lampvoet.
Vervolgens plaatst u de lichtbron in de lampvoet. Gebruik hierbij geen geweld!
• Zet de kap van de lamp er weer op. Daarvoor moeten de beide metalen veren in de
gleuven links en rechts worden gehangen. Vervolgens schuift u de kap in de richting
van de behuizing van de lamp, tot hij volledig in de behuizing van de lamp zit.
• Zet het licht aan en controleer of de nieuwe lamp het doet.
Service en onderhoud
• Het product vergt - op het vervangen van lichtbronnen na - geen onderhoud.
• Voordat u de lamp schoonmaakt dient u deze van de stroomtoevoer los te koppe-
len. Laat de lamp vervolgens geheel afkoelen.
• Veeg de buitenkant van de lamp uitsluitend schoon met een schone, zachte, en
droge doek. Gebruik in geen geval agressieve schoonmaakmiddelen of chemische
oplossingen, omdat deze de behuizing kunnen aantasten (verkleuringen) of de wer-
king beïnvloeden.
Stof is heel gemakkelijk af te nemen met behulp van een schone, zachte kwast en
een stofzuiger.
Afvoer
Voer het product aan het einde van zijn levensduur af in overeenstemming
met de geldende wettelijke bepalingen.
Voer een defecte lichtbron niet via het huisvuil af. Energiebesparende licht-
bronnen bevatten een geringe hoeveelheid gif, gezondheidschadelijk en
milieuschadelijk kwikzilver. Breng een defecte energiebesparende lichtbron
daarom naar de betreffende verzamelplaats van uw gemeente resp. naar
een verzamelplaats voor gevaarlijk afval.
Technische gegevens
Aantal lichtbronnen: 2 energiebesparende lichtbronnen van elk max. 26 W
Lichtbronvoet: G24q-3
Bedrijfsspanning: 230 - 240 V/AC, 50 - 60 Hz
Afmetingen (lamp): 200 x 200 x 148 mm (l x b x h)
Afmetingen (converter): 166 x 166 x 58 mm (l x b x h)
Inbouwdiepte: 260 mm
Montage-opening: 182 x 182 mm
Gewicht: ca. 2,3 kg (lamp met converter)
Beschermklasse: I
Montageplaats: Uitsluitend in droge, gesloten binnenruimtes
Neem voor de minimale afstand tussen meerdere lampen, ten opzichte van muren,
wanden of isolatiemateriaal de volgende afbeelding in acht:
Table of contents
Languages:
Other Sygonix Lighting Equipment manuals

Sygonix
Sygonix SY-5225288 User manual

Sygonix
Sygonix Terni User manual

Sygonix
Sygonix 1437987 User manual

Sygonix
Sygonix 2585412 User manual

Sygonix
Sygonix 2336850 User manual

Sygonix
Sygonix 1326052 User manual

Sygonix
Sygonix 2361019 User manual

Sygonix
Sygonix 1290407 User manual

Sygonix
Sygonix 2361025 User manual

Sygonix
Sygonix 2622935 User manual

Sygonix
Sygonix 2361005 User manual

Sygonix
Sygonix Novara User manual

Sygonix
Sygonix SY-4722046 User manual

Sygonix
Sygonix Maido User manual

Sygonix
Sygonix 2373341 User manual

Sygonix
Sygonix 2266354 User manual

Sygonix
Sygonix 2361019 User manual

Sygonix
Sygonix 2380483 User manual

Sygonix
Sygonix SY-4697892 User manual

Sygonix
Sygonix Fano User manual