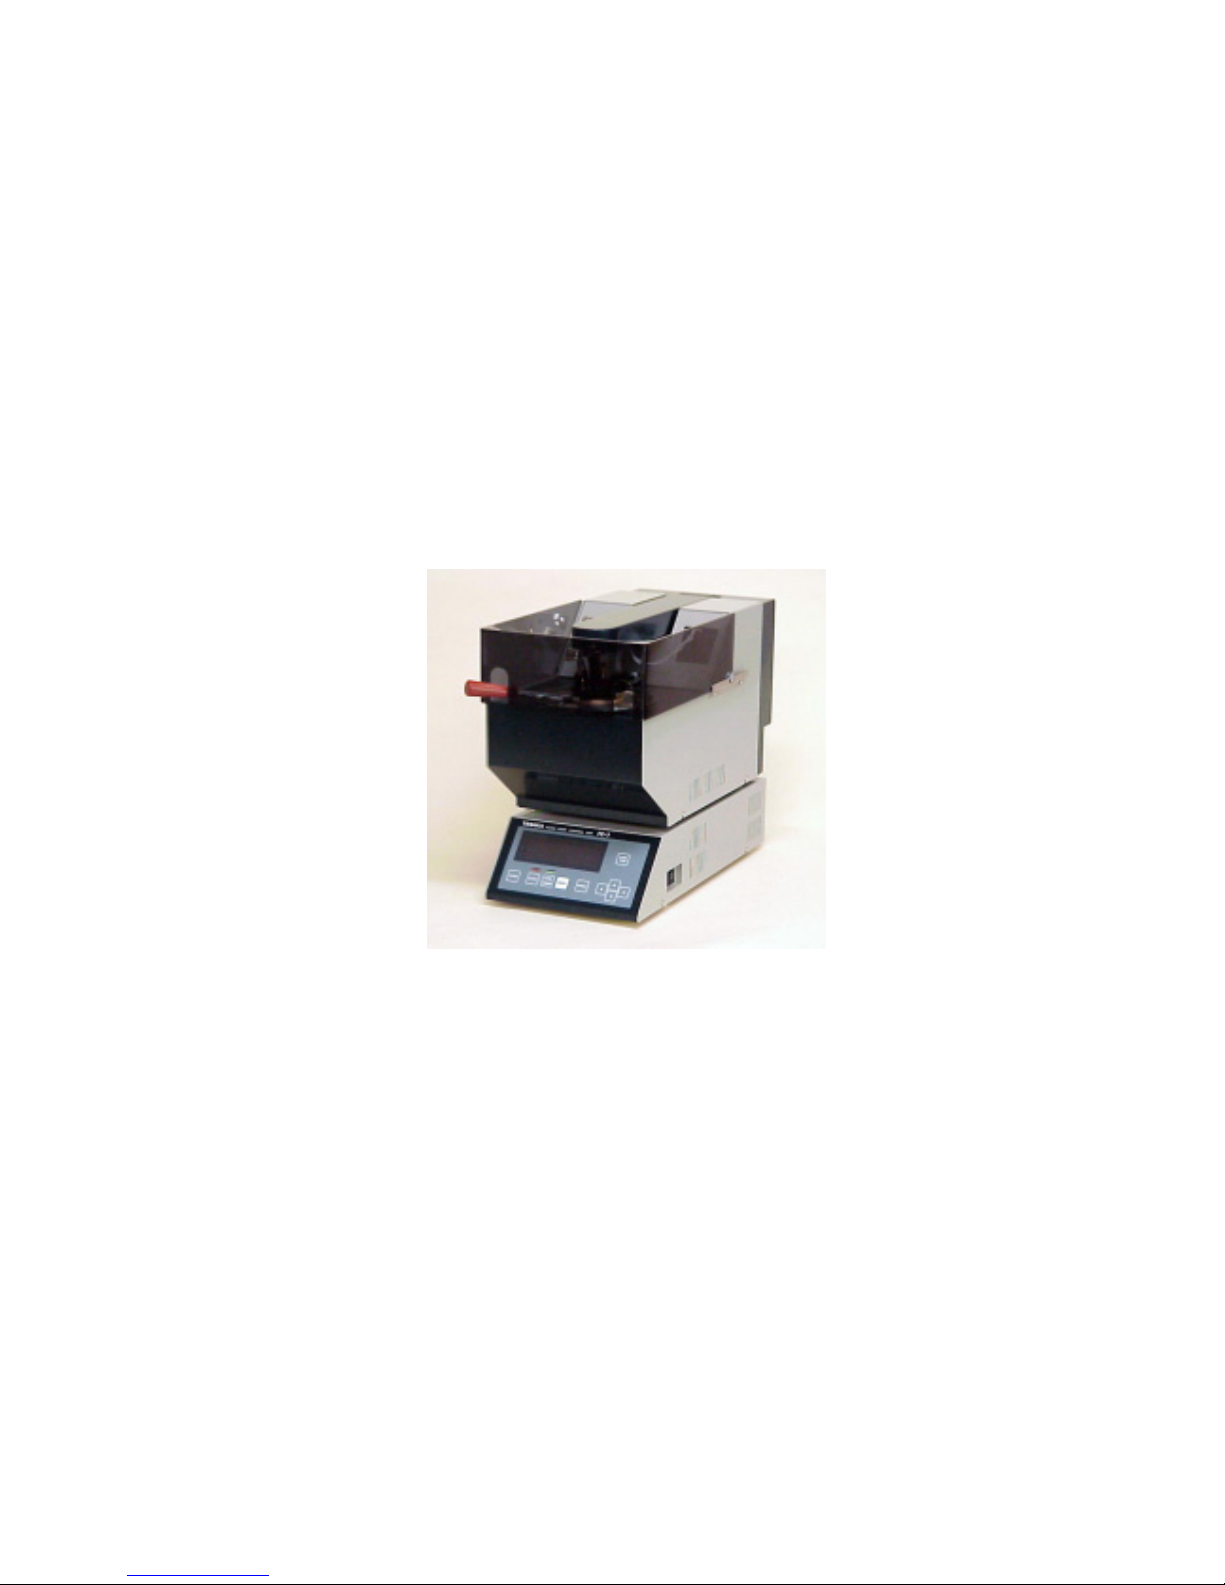
Tanaka APM-7 User manual

Pensky-Martens Closed Cup
Automatic Flash Point Tester
Model APM-7
Maintenance Manual
Ver 2.0 100501
Tanaka Scientific Limited

1
Foreword
Thank you for purchasing the APM-7 Automated Flash Point Tester, manufactured by
Tanaka Scientific Limited.
This manual contains all necessary information for the proper maintenance of the
APM-7 unit (possible readjustments, treatment of malfunctions, exchange of parts, etc.).
Before performing any maintenance on the APM-7, read this manual carefully and make
sure that you fully understand the instructions given herein.
In order to ensure safe operation of the APM-7 Flash Point Tester, this manual makes
use of warnings and caution messages such as those below. To avoid personal injury
and/or equipment damage, strictly observe these important safety precautions at all
times.
・Warning:
Improper use and/or negligence may result in serious
personal injury or death.
・Caution:
Improper use and/or negligence may result in personal
injury or equipment damage.
About this Manual
● This manual addresses all users of the APM-7 Automated Flash Point Tester. It is
presumed that the user is familiar with related ISO and ASTM standards, and has
experience in working with potentially dangerous articles.
● Contents of this manual such as specifications of functions and performance
properties of the device may be changed without notice.
● If this manual is lost or damaged, please contact the manufacturer or an authorized
distributor to order a replacement.
● Although this manual has been written and edited with the utmost care and attention,
users are kindly asked to report possible misspellings and omissions, as well as
other errors in the text (inaccuracies or missing parts) to the manufacturer or an
authorized distributor.
!
!

2
Before starting Maintenance Work
● Before performing any maintenance work on the APM-7, thoroughly read this manual
and ensure that you fully understand all the instructions given herein. If you are
unclear or have questions, even if seemingly insignificant, always contact the
manufacturer or an authorized distributor.
● Store the manual in a safe and convenient location (preferably near the equipment)
for future reference.
● Always strictly observe the work instructions given in this manual.
● When reading the manual, pay special attention to the sections that are indicated
with “Warning” and “Caution”. Please ensure that you fully understand the
instructions given and strictly observe these precautions at all times.
Safety Precautions (“Warning” and “Caution” indicators)
Strictly observe the instructions for safe use of the equipment at all times.
Negligent disregard of the safety precautions outlined below may not only
lead to equipment damage, but also result in serious personal injury or
death.
Tanaka Scientific Limited will not be liable for any damage or injury resulting
from user negligence.
・Warning:Never touch the ignition coil and/or any electric components of
the equipment when performing gas leak inspection. Touching
any of the above components may cause serious burns or
electrical shock, as the unit is powered during gas leak
inspection.
・Warning:Take extra care to avoid naked flames, sparks, etc. when
performing gas leak inspection.
Extreme danger of fire and/or explosion.
・Warning:Never touch heating elements of the APM-7 with bare hands
when operating the device. These parts produce extreme heat
and may cause serious burns.
!
!
!

3
・Warning:If the equipment makes strange noises or exhibits abnormal
behavior during operation, stop operation at once and turn off
the main switch. Cease using the APM-7 and immediately
contact the manufacturer or an authorized distributor.
・Warning:Never use bare hands to remove a test cup after completion of a
test sequence. A danger of serious burns remains even after
equipment has cooled down.
・Warning:Refrain from assessing equipment malfunction yourself, even in
apparently trivial cases. Always contact the manufacturer or an
authorized distributor if equipment does not function properly.
・Warning:Repairs and maintenance work other than described in this
manual may be performed only by certified service personnel.
・Warning:Always turn off the main switch and remove the power plug from
the wall socket before exchanging spare parts.
Exchanging spare parts while the unit is powered up may result
in electrical shock or equipment breakdown.
・Warning:Never use consumables, accessories and/or spare parts other
than genuine articles provided by the manufacturer, or products
specified as suitable by the manufacturer.
!
!
!
!
!
!

4
Contents
<Preface>
Foreword ........................................................................... 1
About this Manual .................................................................... 1
Before starting Maintenance Work ...................................................... 2
Safety Precautions (“Warning”and “Caution”indicators) .................................. 2
1Periodic Inspections ............................................................ 6
1.1Cleaning of Test Cup and Test Cover.......................................... 6
1.2Confirmation of temperature correction value ................................... 6
1.3Confirmation of displayed temperature......................................... 6
1.4Gas Leak Inspection ........................................................ 6
2Adjustments ................................................................... 9
2.1Filament Output Settings .................................................... 9
2.2Parameter Settings ........................................................ 11
2.3Displaying Temperature Unit and Temperature Correction....................... 12
2.3.1Displaying Temperature Unit ............................................ 12
2.3.2Temperature Calibration ................................................ 12
2.3.3Displaying Temperature Correction....................................... 13
2.4External Output Settings .................................................... 14
2.4.1RS-232C Setting....................................................... 15
2.4.2Sample ID (appears when selected Printer only) ........................... 19
2.5Time settings (appears when RS_232C setting is Printer, and valid when built in clock is
equipped) ........................................................................ 20
2.6Barometric Pressure Sensor Calibration (appears when built-in barometric pressure
sensor is equipped)................................................................20
2.7Optional Mode Settings..................................................... 21
2.7.1User Mode Settings .................................................... 21
2.7.2Simulated TAG Mode................................................... 23
2.8Safety Practice ............................................................ 23
3Troubleshooting ............................................................... 24
3.1Trouble Message and Treatment ............................................ 24
3.2Trouble Shooting for Each Unit .............................................. 26
3.2.1Control Unit ........................................................... 26
3.2.2Test Unit.............................................................. 27
4Replacement of Spare Parts .................................................... 29
4.1Replacement of Control Unit Components..................................... 29
4.1.1CPU Board ........................................................... 30

5
4.1.2ROM ................................................................. 30
4.1.3Internal Battery ........................................................ 30
4.1.4Barometric Pressure Sensor (option) ..................................... 30
4.1.5Built-in Clock board (option) ............................................. 30
4.2Replacement of Test Unit Components ....................................... 31
4.2.1Temperature Sensor ................................................... 31
4.2.2Flash Detector......................................................... 32
4.2.3Heater Block .......................................................... 32
4.2.4Photo Micro Sensor .................................................... 34
4.2.5Electric Igniter ......................................................... 34
4.2.6Interchange of the Ignition Source (Gas ÆElectric)......................... 35
Appended Fig. 1 Control Unit Parts Position
Appended Fig. 2 Test Unit Parts Position
Appended Fig. 3 Control Unit Wiring Diagram
Appended Fig. 4 Test Unit Wiring Diagram

6
1 Periodic Inspections
In order to maintain accurate performance of the APM-7 and to guarantee safe oparation of the
device, periodic inspections must be performed at regular intervals.
1.1 Cleaning of Test Cup and Test Cover
Caution: Do not bend the tip of the flash detector when cleaning test cover.
If the tip of the flash detector is bent, sensitivity deteriorates and
thus flash detection may be missed.
(1) Clean Test Cup using some solvents if there is some deposit in the cup. Use wire brush if the
deposit can not be removed by solvent. Wrong results may be obtained if some deposit in
the cup.
(2) Clean Test Cover using some solvents once in a week. If some sample sticks to the test
cover, the function of the shutter and ignition source application may be wrong, and it causes
wrong results. Clean the cover using some solvents by pushing arm rod which is for manual
application. Dry the cover well before the next test.
1.2 Confirmation of temperature correction value
(once per month)
Confirm temperature correction value is right or not by the procedure described in section 2.3.
3.
1.3 Confirmation of displayed temperature
(perform once per 3-months)
Confirm displayed temperature is agree with mercury thermometer or not by the procedure
described in section 2.3.1to 2.3.3.
1.4 Gas Leak Inspection
(once per 3-month for outside and once per year for inside the tester if using gas ignition)
・ Warning: Never touch the ignition coil and/or any electric components of
the equipment when performing gas leak inspection. Touching
any of the above components may cause serious burns or
electrical shock, as the unit is powered during gas leak
inspection.
!
!

7
・ Warning: Take extra care to avoid naked flames, sparks, etc. when
performing gas leak inspection.
Extreme danger of fire and/or explosion.
Follow the instructions below to check the gas lines of the APM-7 unit for possible leaks.
(1) Turn OFF the main switch and remove the power plug from the wall socket.
(2) Remove windscreen.
(3) Remove signal connecting cable and power connecting cable from the test unit.
(4) Remove rear cover and then side covers of the test unit. See Fig. 1.
Rear Cover
Fixed Screws
Side Cover
Fixed Screws
Side Cover
Lift up then slide back
to remove
Slide back to remove
Windscreen
Fig. 1 Removing Rear Cover and Side Covers
(5) Re-connect signal connecting cable and power connecting cable to the test unit.
(6) Reinsert the power plug to the wall socket and turn ON the main switch.
(7) Press the Up-Down key and RESET key, then consecutively release the RESET key and
then the Up-Down key. The following I/O Checking Screen will appear.
Fig. 2 I/O Checking Screen
APM
HE GV CL FL NZ KA KB
Gas flame of of of of of of of
Temp Detect Fuse NZ_Stop Arm
23.5 3.5 * *
!

8
(8) Press Right key twice to blink the of under the GV.
(9) Pressing Up key will open the solenoid valve and start gas flow.
(10) Use a soft brush to apply soapy water to each of the gas line joints and check for bubbles.
Bubbles appearing at any of the gas line joints indicate the presence of a gas leak. Cease
using the APM-7 and contact the manufacturer or an authorized distributor for repairs.
(11) After completion of the inspection, press the RESET key. This will shut the solenoid valve.
(12) Turn OFF the main switch and remove the power plug from the wall socket.
(13) Remove signal connecting cable and power connecting cable from the test unit.
(14) Attach side covers and then rear cover to the test unit.
(15) Re-connect signal connecting cable and power connecting cable to the test unit.
(16) Reinsert the power plug into the wall socket to conclude gas leak inspection.

9
2 Adjustments
Adjustment of Indicated temperature correction, Initial heat value and some another parameter is
done by pressing panel keys. The operation procedure is as follows.
Press the FUNCTION key and RESET key, then consecutively release the RESET key and then
the FUNCTION key. The following MENU Screen will appear.
Fig. 3 MENU Screen
By pressing Right-Left key to select item, then press FUNCTION key to display each setting
screen. For the changing value, press Right key to blink the first character, then press Right-Left
key/ Up-Down key. Press RESET key after setting is completed.
Record changed value to “Appended Table 1 APM-7 Setting Table”. It will be required when
built-in battery goes dead (approx. 5 to 7 years).
2.1 Filament Output Settings
Caution: Adjust filament output when a new igniter is installed. If
filament output value is high, the electric ignitor may be burnt
out in a short time.
Tanaka Scientific Limited will not be liable for burnt out
igniter, if appropriate adjustment was not carried out by the
user.
Each piece of igniter has a slightly different resistance and thus when a new piece is installed
supplied electric power needs to be adjusted. For the replacing procedure, see 4.2.5 on page 34.
Press Right-Left key to select Filament (blinking) from the MENU Screen, then press
FUNCTION key. The following Filament Output Setting Screen will appear.
Press Right-Left key to select Set output (output value is blinking), then change the output
value by pressing Up-Down key. The provisional values are as follows. If the AMP-7 is now in
APM
Ver x.xF
Filament Para set Temp cal
Ext. out Time set Baro cal
appears when selected Printer only
See page 15 2.4and page 21 2.
5.
appears when built-in Barometric
Pressure Sensor is equipped. See page
21 2.6.
!

10
electric ignition configuration, enter provisional output value or 10% lower than the present setting.
Table 1 Filament Output Values
Provisional Output ValueActual AC
Source Gas Ignition Electric Ignition
100V 30% 65%
110V 25% 60%
115V 25% 55%
120V 20% 50%
220V 30% 65%
230V 25% 60%
240V 20% 55%
- Gas Ignition: After entering new output value, push START key to confirm the gas can be
ignited by filament within a minute. If the tester is not used for a long time, it may take a few
minutes to bleed the air out of the gas piping. If the gas is coming out but not ignited by
filament, increase output value.
- Electric Ignition: After entering new output value, run a test using CRMs. Increase set output
value if the obtained flash point was higher than expected; decrease it if lower than expected.
If the obtained flash point was within a range, decrease the set output value by 5%, and then
run a test again. The lowest output when the obtained flash point is still within the acceptable
range is the best setting for the extended life of the igniter.
Fig. 4 Filament Output Setting Screen
By selecting Ignit (off is blinking), and pressing Up-Down key to turn ignition on, electric igniter
will be lighting and actual output (A) can be seen.
Fig. 5 Filament Output Setting Screen (lighting)
APM
Filament Ignit.source
Gas flame
Set output Ignit
40 % off
APM
Filament Ignit. sourc
Gas flame
Set output Ignit Current
40 % on 3.8(A)

11
2.2 Parameter Settings
Press Right-Left key to select Para set (blinking) from the MENU Screen, then press
FUNCTION key. The following Parameter Setting Screen will appear.
Press Right-Left key to select items (each value is blinking), then change the value by pressing
Up-Down key.
The explanations of each item are as follows.
(1) I.heat (Initial Heat)
Standard Value is as follows.
Table 2 Initial Heat Values
AC Source 100V 110V 115V 120V 220V 230V 240V
Standard Value 26 24 22 20 22 20 18
Too strong an initial heat would cause hunching of temperature rise rate. Too weak an initial
heat could not reach the set rate. Please input an even number (every 2%).
(2) Cool (Cooling Time)
Cooling time can be change from 00min (No Cooling) to 99min(Continuous Cooling).
(3) First appl (First Application Temperature below EXP.FP)
For APM-7, the temperature of first application of ignition source is changeable. The range is
18 oC (32 oF) to 28 oC (50 oF) bolow the expected flash point.
Fig. 6 Parameter Setting Screen
APM
Para set
First
I.heat Cool appl
22% 10min 22
o
C

12
2.3 Displaying Temperature Unit and Temperature Correction
2.3.1 Displaying Temperature Unit
APM-7 is capable of displaying temperature in degree C and degree F. When APM-7 is shipped
out, temperature unit is set to degree C as default, and it can be switched to degree F as follows:
(1) Press Right-Left key to select Temp cal (blinking) from the MENU screen, then press
FUNCTION key. The following Temperature Calibration Screen will appear.
(2) Press Right-Left key to brink the temperature unit, then change the unit by pressing
Up-Down key.
(3) Press RESET key to return.
Fig. 7 Temperature Correction Screen
2.3.2 Temperature Calibration
(1) Preparation
(a) Prepare ASTM-9C and 10C mercury-in-glass thermometer. (Use ASTM 9F and 10F when
the temperature unit setting is oF, and convert following temperature value to degree F.)
(b) loosen 4 screws, then lift Arm Cover upward.
(c) Remove the Flash Detector from Test Cover carefully and keep it away from the Cover.
Note that the tip of Flash Detector is easily broken.
(d) Set a standard glass thermometer (ASTM 9C) through the Flash Detector Collar so that
the tip of thermometer positioned 43 - 46 mm away from inner wall of Test Cover. A silicon
stopper is useful to fit the thermometer.
(e) Record present filament output value, then set it to “0”. See 2.1.
(2) Temperature Data Recording
(a) Pour gas oil into sample cup then set it to the APM-7.
(b) Set Expected Flash Point at 100oC.
(c) Press “START” key to start a calibration.
(d) Record displayed temperature at every 10 oC of thermometer readings.
(e) Press the “COOL” key to stop heating after complete the recording.
(f) change the sample to salad oil, and the thermometer to ASTM 10C, set Expected Flash
APM
Temp cal
Temp unit(oC)
Temp(oC) POS 0 40 80
Offset +0.0 +0.0 +0.0 +0.0

13
Point at 370℃, then repeat the procedure (c) to (e).
(3) Calculate new correction values.
(4) Input new correction values by the manner of chapter 2.3.3.
(5) Repeat (2) again and check the displayed temperature after inputted new correction values.
(6) Return the filament output to previous value which is recorded in (1)(e).
2.3.3 Displaying Temperature Correction
(1) Multi Point Correction
This tester has temperature correction point every 40oC between 0 oC to 400 oC.
The relationship between actual value of the temperature sensor and the displaying
temperature is shown in Fig. 8.
Display Temperature = Actual Value of the temperature sensor + Offset Value of each
correction point
Correction between each of the temperature correction points (e.g. at 36oC) are determined by
linear interpolation.
APM
Temp cal
Temp unit(oC)
Temp(oC) POS 0 40 80
Offset +0.0 +0.0 +1.0 -1.0
80oC
79oC
41oC
40oC
0oC
0oC40
oC80
oC
A
ctual Value of the Temperature Senso
r
Display Temperature
Fig. 8 Multi-Point Correction
(2) Correction by POS
This tester is able to perform correction by POS in addition to correction by each of the
temperature correction points. This is a correction value for the entire temperature range.
The relationship between actual value of the temperature sensor and the displaying
temperature is shown in Fig. 9.
Display Temperature = Actual Value of the temperature sensor + Offset Value of each
correction point + POS Offset Value

14
APM
Temp cal
Temp unit(oC)
Temp(oC) POS 0 40 80
Offset +1.0 +0.0 +1.0 -1.0
80oC
42oC
41oC
40oC
0oC
0oC40oC 80oC
Actual Value of the Temperature Sensor
1oC
Previous curve
Fig. 9 Correction by POS
(3) Entering Correction Value
(a) Press Right-Left key to select Temp cal (blinking) from the MENU screen, then press
FUNCTION key. The Temperature Correction Screen shown in Fig. 7 will appear.
(b) Press FUNCTION key once. (only when the optional software is installed)
(c) Press Right-Left key to select correction point (each value is blinking), then change the
offset value by pressing Up-Down key. For the next temperature range, press
FUNCTION key.
(d) Press RESET key to return.
2.4 External Output Settings
Press Right-Left key to select Ext.out (blinking) from the MENU screen, then press
FUNCTION key. The following External Output Setting Screen will appear.
Press Right-Left key to select items (each value is blinking), then change the settings.
The explanations of each item are as follows.
Fig. 10 External Output Setting Screen
(1) RS_232C
Computer: Data will be transmitted to connected PC after detecting flash point by free run
method. (EXP.FP, FP, etc.) See 2.4.1.
Printer: Data will be transmitted to connected printer (*1) after detecting flash point.
(EXP.FP, FP, Sample ID, Time, etc.)
APM
Ext.out RS_232C
Computer
Inst No. Test No.
95 0037

15
*1: Use printer BS2-80TS (option). For date/time verification, we recommend that optional
Built-in Clock Board be purchased with this Printer.
(2) Inst No.(Instrument No.)
Consist of 2 digits. Outputted when a PC or a printer is connected. This number can be
changed by pressing Up-Down key.
(3) Test No.(Test Counter)
Consist of 4 digits and increase by 1 every time a normal flash point is detected. Outputted
when a PC or a printer is connected. If set at 0000 initially, the first tests prints 0001.
2.4.1 RS-232C Setting
(1) Specification
- half-duplex start-stop transmission
- baud rate: 1200, 2400, 4800, or 9600 bps
- data length: 7 bits
- parity check: even number parity
- character code: ASCII code
- start bit: 1 bit
- stop bit: 2 bits
(2) How to change Baud Rate
The factory setting is 9600bps. To alter this, remove the cover of the control unit, and then
change the setting on DIP switch (SW3) on the MAIN board.
MAIN B
oa
r
d
Loosen cover fixing
Control unit
Pull up

16
Table 3 Baud Rate
DIP SW No.1 DIP SW No.2 DIP SW No.3 DIP SW No.4
1200 bps OFF OFF ON ON
2400 bps OFF ON OFF ON
4800 bps ON OFF OFF OFF
9600 bps ON OFF ON OFF
(3) Connection
The connection to a computer is through the 25 pin or 9 pin D-Sub type connector located at
the back of the control unit. An extreme care should be taken when making pin-to-pin
connections, since the tester is a DTE device.
(4) Pin Assignment
The pin assignment is as follows:
Table 4 Pin Assignment
Pin # Signal Function Direction
1 GND (FG) Frame Ground
2 TXD (SD) Transmitting Data Tester ÆComputer
3 RXD (RD) Receiving Data Computer ÆTest er
4 RTS (RS) (Connect w/pin #5)
5 CTS (CS) (Connect w/pin #4)
6 DSR (DR) (See note-1) Computer ÆTester
7 GND (SG) Signal Ground
20 DTR (ER) (See note-2) Tester ÆComputer
Note-1: When starting data communication, switch this signal line to “0” logic (3V to 12V).
Note-2: This signal line turns to “0” when the tester detects a flash; then turns “1” (-12V)
when press RESET key. This signal is provided for user’s convenience.
(5) Signal Voltages
Input Voltages “0”: 3V to 12V
“1”: -3V to –12V
Output Voltages “0”: 12V
“1”: -12V

17
(6) Example for Connection
As an example for the connection, connection with IBM/AT compatible is as illustrated below.
FG
TXD
RXD
RTS
CTS
DSR
DTR
SG
20
2
1
3
4
5
6
7
FG
TXD
RXD
RTS
CTS
DSR
DTR
SG
20
2
1
3
4
5
6
7
Tester(25P) Computer(25P)
TXD
RXD
RTS
CTS
DSR
DTR
SG
20
2
3
4
5
6
7
RXD
TXD
DTR
GND
DSR
CTS
RTS
8
2
3
4
5
6
7
Tester(25P) Computer(9P)

18
(7) Transmitted Data
The data consists of ASCII coded 39 characters. It starts with “STX” and ends with “ETX”.
STX A P M 7 5 4 CR LF 0 0 0 0 0 1
CR LF
0 8 5 . 0
CR LF 0 9 0 . 0
CR LF
0 1 6 . 0
CR LF ETX
Instrument No.: The first 4 characters represent the model; last 2 the serial number.
Test No.: A six digit number which is increased one by one as a test is executed
properly.
Flash Point: The number is a 4 digit number including 1 digit after decimal point.
In case of the following situation, this number is replaced by character
strings:
Trouble during a test.
“TRBL_” (4 letters plus 1 space)
The flash point is detected during the first application.
“UNDER” (5 letters)
The actual flash point exceeded the safety cut temperature.
“OVER_” (4 letters plus 1 space)
No. of applications: The number of ignition source applications when the flash point is
detected. (If the flash point is detected at the 10th application, the value is
“010.0”.)
(8) Operation
The tester automatically transmits data as long as it is connected to a computer as described
above; no other operation is necessary unless the baud rate needs to be changed. Since the
tester is a stand-alone device, whether it is connected to a computer does not make any
difference in its operation.
Instrument No. (6 ltrs) Test No. (6 ltrs)
Flash Point (5 ltrs) EXP.P.P (5 ltrs)
No. of
A
pp
lications

19
2.4.2 Sample ID (appears when selected Printer only)
Y: Sample ID function is active. Consists of 8 digits and can be entered on the Sample ID
Entering Screen.
N: Sample ID function is inactive.
Fig. 11 Sample ID Function Selecting Screen
After selected Sample ID Y, press RESET key to return MAIN screen, press FUNCTION
key twice, the following Sample ID Entering Screen will appear.
Fig. 12 Sample ID Entering Screen
Press Right-Left key to move cursor, and then change the character by pressing Up-Down
key. It consists of Arabic numerals (0 to 9), alphabet (A to Z) and some characters (space !
“ # $ % & ‘ ( ) * + - . / ).
APM
Ext.out RS_232C
Printer
Inst No. Test No. Sample ID
95 0037 Y
Sample
AAAAAAAA
Other manuals for APM-7
1
Table of contents
Other Tanaka Test Equipment manuals
Popular Test Equipment manuals by other brands

Kyoritsu Electrical Instruments Works, Ltd.
Kyoritsu Electrical Instruments Works, Ltd. 4200 instruction manual

Tektronix
Tektronix ST112 user manual

Shineway Tech
Shineway Tech GET-100 user manual

Sealey
Sealey TA320 manual

Unit
Unit UT677A operating manual

Chauvin Arnoux
Chauvin Arnoux 10141 Getting started guide