Tarter BOX BLADE User manual

American-made quality farm and
ranch products since 1945.
TARTERUSA.COM
For more information and questions, please contact:
Tarter Customer Service
1-800-RED-GATE (1-800-733-4283)
(Tarter products are sold through Authorized Retailers.)
BOX BLADE: OPERATION AND ASSEMBLY MANUAL
(PART NUMBER: BB5, BB6 & BBSC4)

2
TO THE OWNER:
Read this manual before operating your equipment. Keep this manual handy for ready reference. Require all operators to
read this manual carefully and become acquainted with all adjustments and operating procedures before attempting to
operate the equipment. Replacement manuals can be obtained from your selling dealer.
The equipment you have purchased has been carefully engineered and manufactured to provide dependable and satisfactory
use. Like all mechanical products, it will require cleaning and upkeep. Lubricate the unit as specied. Please observe all safety
information in this manual and safety decals on the equipment.
Use only genuine service parts. Substitute parts will void the warranty and may not meet the required standards for safe and
satisfactory operation.
Throughout this manual, the term IMPORTANT is used to indicate that failure to observe procedures can cause damage to
equipment. The terms CAUTION, WARNING and DANGER are used in conjunction with the Safety-Alert Symbol, (a triangle
with an exclamation mark), to indicate the degree of hazard for items of personal safety.
INTRODUCTION
This Safety-Alert Symbol indicates a hazard and means ATTENTION!
BECOME ALERT! YOUR SAFETY IS INVOLVED!
Indicates an imminently hazardous situation that, if ignored, will
result in death or serious injury.
Indicates a potentially hazardous situation that, if ignored, could
result in death or serious injury, and includes hazards that are exposed
when guards are removed.
Indicates a potentially hazardous situation that, if ignored, may
result in minor or moderate injury.
Indicates that failure to observe can cause damage to equipment.
Indicates helpful information.
IMPORTANT
NOTE
CAUTION
WARNING
DANGER

3
INTRODUCTION
It is the Purchaser and/or Operator’s responsibility to...
• Read and understand the information contained in this manual.
• Operate, assemble and maintain the equipment in accordance with all instructions and safety procedures in this
manual.
• Inspect the equipment and replace or repair any parts that are damaged or worn, which under continued operation
would cause damage, wear to other parts, or cause a safety hazard.
• Return the equipment or parts to the authorized dealer from where it was purchased for service or replacement of
defective parts that are covered by warranty. (Manufacturer may inspect equipment or parts before warranty claims
are honored.)
• Pay all costs incurred by the dealer for traveling to or transporting the equipment for warrany inspection and/or claims.

4
TABLE OF CONTENTS
Introduction ..............................................................................................................................4
Safety.....................................................................................................................................5-6
Preparation ..............................................................................................................................6
Description................................................................................................................................7
Operating and Transportation...................................................................................................8
Maintenance and Storage....................................................................................................9-10
Parts .......................................................................................................................................11
Warranty.................................................................................................................................12
General Information
All information, illustrations and specications in this manual are based on the latest information available at the time of
publication. We reserve the right to make changes at any time without notice.
To the Purchaser:
This manual contains valuable information about your new Box Blade. It has been carefully prepared to give you helpful
suggestions for operating, adjusting, servicing and ordering repair parts.
Keep this manual in a convenient place for quick and easy reference. Study it carefully. You have purchased a dependable
and sturdy Box Blade, but only with proper care and operation can you expect to receive the service and long life designed
and built into it.
Sometime in the future your Box Blade may need new parts to replace those that are worn or broken. If so, go to your dealer
and provide them with the model and part number.
INTRODUCTION
Customer Information
Name:
Purchased From:
Date Purchased:
Model No.:

5
(Safety Rules continued on next page)
Safety-Alert Symbols
Throughout this manual, the term IMPORTANT is used to indicate that failure to observe procedures can cause damage to
equipment. The terms CAUTION, WARNING, and DANGER are used in conjuction with the Safety-Alert Symbol (a triangle
with an exclamation mark) to indicate the degree of hazard for items of personal safety.
HAZARD symbol this Safety-Alert Symbol indicates a hazard and means ATTENTION! BECOME
ALERT! YOUR SAFETY IS INVOLVED!
DANGER Symbol Indicates an imminently hazardous situation that, if not avoided, will result in
death or serious injury.
WARNING Symbol Indicates a potentially hazardous situation that, if not avoided, could result in
death or serious injury.
CAUTION Symbol Indicates a potentially hazardous situation that, if not avoided, may result in
minor or moderate injury.
IMPORTANT Indicates that failure to observe can cause damage to equipment.
NOTE Indicates helpful information.
SAFETY

6
SAFETY AND INSTRUCTION DECALS
TRAINING AND PREPARATION
Training
Safety is a primary concern in the design and
manufacturing of our product. Unfortunately, our efforts
to provide safe equipment can be wiped out by a single
careless act of an operator or bystander.
In addition to the design and conguration of equipment,
hazard control and accident preventation are dependent
upon the awareness, concern, prudence and proper
training of personnel involved in the operation, transport,
maintenance and storage of this equipment.
It has been said, “the best safety device is an informed,
careful operator.” We ask you to be that kind of operator.
It is the operator’s responsibility to read and understand
all safety and operating instruction in the manual and to
follow them. Accidents can be avoided.
Working with unfamiliar equipment can lead to careless
injuries. Read this manual, and the manual for your tractor,
before assembly or operating, to acquaint yourself with
the machines. If this machine is used by any person other
than you, or is loaned or rented, it is the Box Blade owner’s
responsibiity to make certain that this manual be available
prior to operating and that the operator:
1. Reads and understands the manual.
2. Is instructed in safe and proper use.
Know your controls and how to stop the tractor engine and
Box Blade quickly in an emergency.
Train all new personnel and review instructions frequently
with existing workers. Be certain only a properly trained
and physically able person will operate the machinery. A
person who has not read and understood all operating and
safety instructions is not qualied to operate the machine.
An untrained operator exposes himself and bystanders to
possible serious injury or death. If the elderly are assisting
with farm work, their physical limitations need to be
recognized and accommodated.
PREPARATION
Personal protection equipment including hard hat, safety
glasses, safety shoes, and gloves are recommended during
installation, operation, adjustment, maintenance, repairing,
removal, or moving the implement. Do not allow long hair,
loose tting clothing, or jewelry to be around the equipment.
PROLONGED EXPOSURE TO LOUD NOISE MAY CAUSE
PERMANENT HEARING LOSS! Tractors with or without
Box Blades attached can often be noisy enough to cause
permanent or partial hearing loss. We recommend that you
wear hearing protection on a fulltime basis if the noise in the
operator’s position exceeds 80 db. Noise over 80 db. on a
long-term basis can cause severe hearing loss. Noise over
90 db. adjacent to the operator over a long-term basis may
cause permanent, total hearing loss.
NOTE: Hearing loss from loud noise (from tractors, chain
saws, radios, and other sources close to the ear) is
cumulative over a lifetime without hope of natural recovery.
Operate the Box Blade only with a tractor that is equipped
with an approved Roll-Over-Protective System (ROPS).
Always wear your seat belt. Serious injury or even death
could result from falling off the tractor - particularly during a
turnover when the operator could be pinned under the ROPS
or the tractor.
• Never allow riders on tractor or Box Blade. There is no
safe place for riders.
• Operate only in daylight or good articial light.
• Ensure Box Blade is in good operating condition.
7
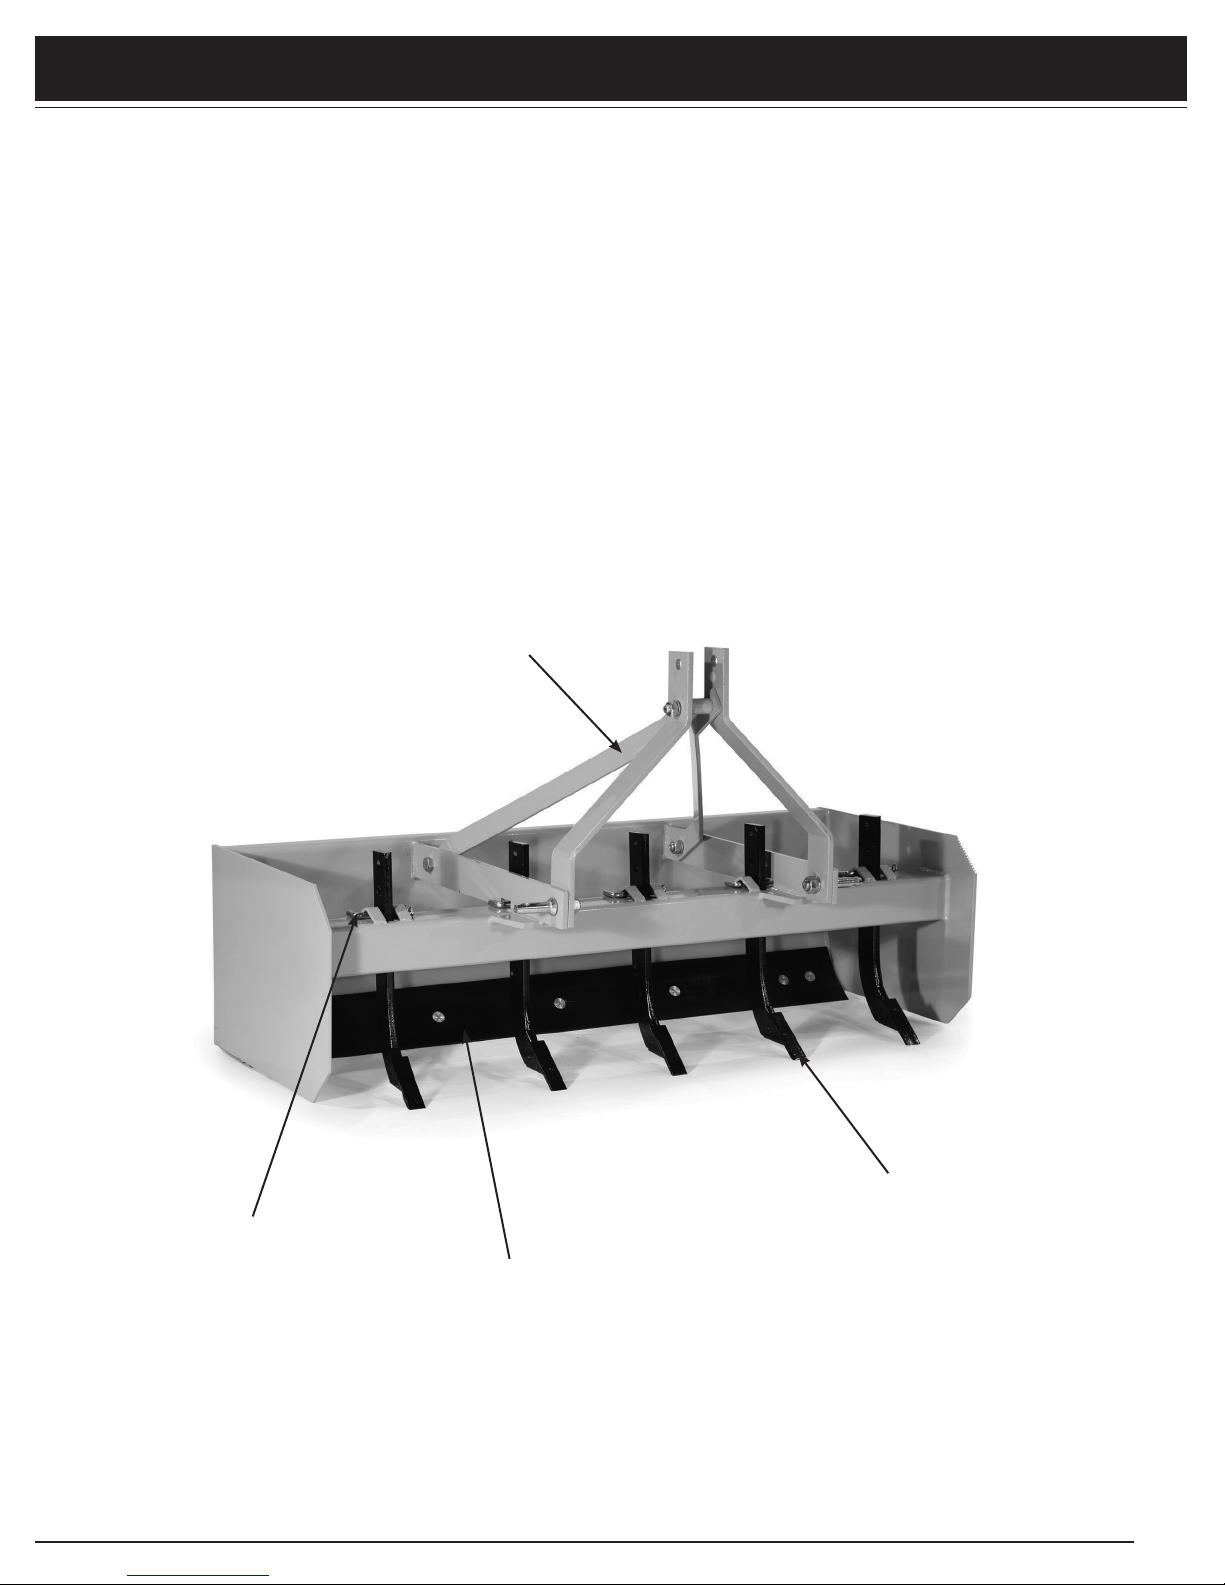
Your Box Blade has been carefully designed for working gravel, topsoil, mulch, manure and much more. This manual
provides operation and maintenance instructions for keeping your box blade in excellent operating condition. Please read
this manual thoroughly. Understand the purpose of the controls and how to use them.
MAJOR COMPONENTS
A-Frame
Cutting Edge
Cotter Pin
Ripper Shank
DESCRIPTION

8
OPERATING AND TRANSPORTATION
Using the Equipment
The use of this equipment is subject to certain hazards
that cannot be protected against by the mechanical means
or product design. All operators of this equipment must
read and understand the entire manual, paying particular
attention to safety and operation instructions prior to
using. If there is something in this manual that you do not
understand, ask your supervisor or your dealer to explain it
to you.
Accidents are most likely to occur with machines that are
loaned or rented to someone who has not read the owner’s
manual and is not familiar with a Box Blade.
Before dismounting, come to a complete stop, lower
3-point hitch and all raised components to the ground,
set parking brake, stop engine, remove ignition key and
unfasten seat belt. Never leave equipment unattended
with the tractor running.
Never place hands or feet under Box Blade with tractor
engine running or before you are sure all motion has
stopped.
Do not reach or place any part of your body under
equipment until it is blocked securely.
Stop Box Blade and tractor immediately upon striking an
obstruction. Turn engine off, remove key, inspect and
repair any damage before resuming operation. Stay alert
for uneven terrain, holes, rocks, and roots and other hidden
hazards. Keep away from drop-offs and hazards that could
cause roll over.
For mounted units, add wheel weights, ballast in front tires,
and/or front tractor weight to enhance front-end stability.
A minimum 20% of tractor and equipment gross weight
must be on a tractor front wheels. Without this weight,
tractor could tip over, causing personal injury or death.
When adding weight, you must not exceed the ROPS
weight certication. Weigh the tractor and equipment. Do
not guess or estimate!
Transportation
Comply with state and local laws governing highway safety
and movement of farm machinery on public roads.
The use of ashing amber lights is acceptable in most
localities. However, some localities prohibit their use.
Local laws should be checked for all lighting and marking
requirements.
At all times, when driving the tractor and equipment on
the road or highway under 20 mph (32 kph) use ashing
amber lights and a slow moving vehicle (SMV) identication
emblem. Do not exceed 20 mph (32 kph). Reduce speed on
rough roads on surfaces.
Always install transport locks, pins or brackets before
transporting.
Do not drink and drive.
Be a safe and courteous driver. Always yield to oncoming
trafc in all situations, including narrow bridges,
intersections, etc. Watch for trafc when operating near or
crossing roadways.
Turn on curves or go up or down hills only at a low speed
and at a gradual steering angle. Slow down on rough or
uneven surface. Always check tractor manual for proper use
on slopes.
Use extreme care when operating close to ditches or fences.
Be careful when turning sharp corners.
Never allow riders on either tractor or Box Blade.

9
MAINTENANCE AND STORAGE
(continued on next page)
MAINTENANCE
Good maintenance is your responsibility. Poor
maintenance is an invitiation for trouble.
Follow good shop practices. Keep service area clean
and dry. Be sure electrical outlets and tools are properly
grounded. Use adequate light for the job at hand.
Make sure there is plenty of ventilation. Never operate
the tractor in a closed building. Exhaust fumes may cause
asphyxiation.
Never work under equipment unless it is blocked securely.
Always use personal protection devices such as eye, hand
and hearing protectors, when performing any service or
maintenance.
Frequently check shanks. They should be sharp and free of
nicks and cracks.
Periodically tighten all bolts, nuts, and screws and check
that all pins are properly installed to ensure unit is in safe
condition.
Do not allow debris, grease or oil to build up on blades and
shanks.
When replacement parts are needed, genuine factory
replacement parts must be used to restore your equipment
to original specications.
The manufacturer will not be responsible for injuries
or damages caused by use of unapproved parts and/or
accessories.
A re extinguisher and rst aid kit should be kept
readily accessible while performing maintenance on this
equipment.
STORAGE
Following operation or when unhooking the Box Blade, stop
the tractor, set the brake, shut off the engine and remove
the ignition keys.
Do not park equipment where it can be exposed to direct
Working with Box Blade
The Box Blade is designed to help you quickly and efciently
move dirt and other materials.
Operating
Cutting Edge Blades
• The Box Blade uses two 3/8” x 6” (9.53 x 152 mm)
cutting edges. These blades are reversible and
replaceable.
• The front and back blades allow the operator to gather
material and cut going both forward and in reverse.
• The cutting edge of the blades extends down beyond the
box itself.
Adjusting Top Link
• The Box Blade is leveled by adjusting the length of the
tractor’s top link.
• Shortening the top link will deepen ripper shanks
penetration.
• Lengthening the top link will provide a better scraping
and leveling action.
• Experience will let the operator determine the best
setting for the intended application.
Connecting to Tractor
Your Box Blade is compatible with Category 1, 3-point
tractors with side swing-type lower lift arms.
• To avoid interference with the Box Blade, adjust the
tractor drawbar to the shortest and highest position.
• Attach the tractor’s lower lift arms to the Box Blade and
secure with a Category 1 lift pin and a lynch pin.
• Attach the tractor’s top link to the top of the Box
Blade’s mast and secure with a heavy-duty top link pin
and the retaining pin supplied with the top link.
Note: The 3/4” bolt and sleeve in the lower hole provide the
attachment point for a Category 1 quick coupler. Do not
remove this bolt and sleeve when operating the Box Blade.
• Unhook Box Blade from tractor on level ground, so
tractor arms pull out easily from the Box Blade.
contact to livestock for long periods of time. Damage and
livestock injury could result.

10
(continued from previous page)
(continued on next page)
ASSEMBLY
• Lower the Box Blade and drive the tractor ahead to
begin operation.
• Further adjust the depth of the shanks by tilting the
unit with the tractor top link.
Scraping
• Raise or remove shanks. Lower the Box Blade and
drive forward to move material.
• To change the blade level, shorten or lengthen the
tractor lift arm tilt link for the correct slope.
• Spread material by gradually raising the Box Blade
as tractor moves forward.
Backlling
• Raise or remove shanks.
• Lower blade to the ground and back up into ll
materials.
• To control how much the blade digs in, raise the
cutting blade by shortening the top link.
Leveling
• Raise or remove shanks
• Shorten top link so cutting edge clears the ground
• With Box Blade in this position, drive forward and loose
material will be leveled.
Cleaning and Servicing
Cleaning
• It is very important to clean after each use.
• Remove large debris, including clumps of dirt, grass or
crop residue.
• Check Box Blade and replace worn or damaged parts
(blades, shanks) as well as any safety decals that are
not readable or are missing.
Servicing
• To service the Box Blade when attached to the tractor, it
must be blocked up off the ground.
• Place two 4” by 4” blocks under each end of Box Blade
(4 blocks in total)
Lower Box Blade onto blocks.
• Do not block the Box Blade any higher than needed for
removing shanks or cutting edge blades.
• To remove shanks, remove clip pin (1) and “L” pin (2)
Servicing/Replacing Cutting Edge
• To service or replace cutting edge while attached
to tractor, it must be blocked up off the ground.
• Remove bolt set from blade. Turn cutting edge
over and use new edge or replace if both edges
have been used.
• Attach cutting edge to Box Blade and secure with
plow bolt and hex nuts previously removed.
• Use torque plow bolts to specications shown in
Bolt Torque Chart.
PARTS
Bolt Torque Chart
• Always tighten hardware to these values unless a
different torque value or tightening procedure is
listed for a specic application.
• Fasteners must always be replaced with same grade
as specied in manual parts list.
• Always use the proper tool for tightening hardware:
SAE for SAE hardware; Metric for Metric hardware.
• Ensure fastener threads are clean, and you start
thread engagement properly.
• All torque values are provided to specications used
on hardware dened by SAE J1701 and J1701MJUL
96.
Bolt Size Chart
• Chart shows bolt thread sizes and corresponding
head (wrench) sizes for standard SAE and Metric
bolts.
11
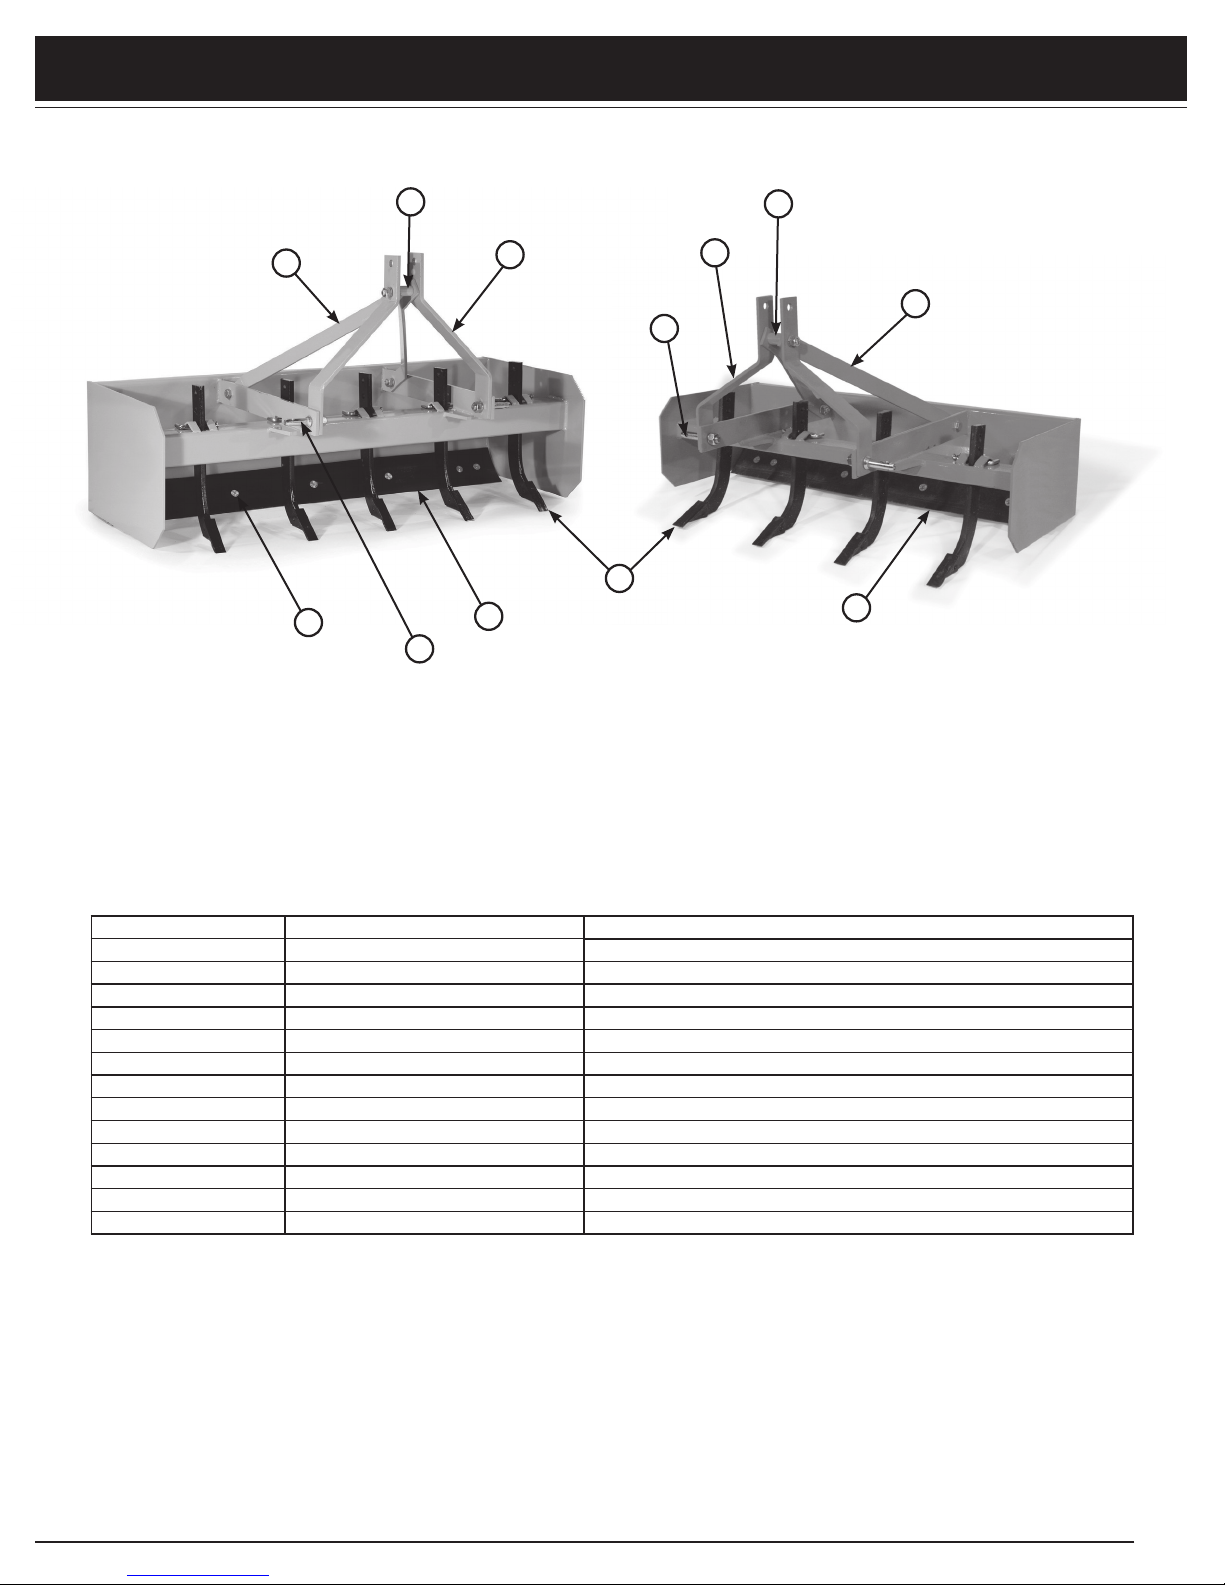
Parts Overall View - Box Blade & Sub-Compact Box Blade
BB5, BB6, & BBSC4
5
Because we are always striving to improve our products, this diagram could differ slightly from actual equipment. Specications are subject to change
without notice.
Item Number Part Number Description
1 C1L Category 1 Lift Pin
2RB4 48” Cutting Edge (BBSC4)
2RB5 60” Cutting Edge (BB5)
2RB6 72” Cutting Edge (BB6)
34HS RIpper Shank w/ 4 Holes
4LCP124 1/2” x 4” Pin w/ Cotter Pin (2pk)
5BCEM Bolt Set for Cutting Edge Mounting (6pk)
6BBVBY BB5 & BB6 Verticle Brace Lift Arm (2pk) (Yellow)
6BBVBO BBSC4 Verticle Brace Lift Arm (2pk) (Orange)
7BBABY BB5 & BB6 Angle Brace Back (Yellow)
7BBABO BBSC4 Anbel Brace Back (Orange)
8LASY Lift Arm Spacer (Yellow)
8LASO Lift Arm Spacer (Orange)
PARTS
22
3
1
7
8
6
1
6
8
7
BB5& BB6
BBSC4

12
WARRANTY
MANUFACTURER’S LIMITED WARRANTY
Manufacturer warrants to the original purchaser that the purchased product is free from defects in material and
workmanship for a period of one (1) year commencing on the date of original purchase, as evidenced by the original receipt,
and will, at its option, repair, replace, or issue credit for any product or part found to be defective.
This limited warranty shall only apply if this product has been operated and maintained in accordance with the Operator’s
Manual furnished with the product, and has not been subject to misuse, abuse, commercial or industrial use, neglect,
improper maintenance, alteration or accident, or which has been used for a purpose for which the product was not designed.
Damage resulting from the installation or use of any part, accessory, or attachment not approved by manufacturer, for use
with the product covered by the owner’s manual, shall void the warranty as to any resulting damage.
This limited warranty is extended solely to the original purchaser of the product. Should the original purchaser sell or
otherwise transfer this product to a third party, this warranty does not transfer to the third party in any manner.
HOW TO MAKE A CLAIM:
To obtain warranty service through a local authorized dealer a customer must present the following within thirty (30) days of
product failure:
1. Proof of purchase within one (1) year of purchase date.
2. Photographs of or return of the actual product in question.
After receipt of the above information, if the product is alleged to be defective, manufacturer will process the claim and issue
a Return Manufacturers Authorization number (RMA). Once a RMA number is issued, manufacturer will pick up the product
from the authorized dealer and return to its facility for inspection. Manufacturer will replace, repair, or issue credit for any
product, upon examination by manufacturer at manufacturer’s facility, determined to be defective due to defects in material
and workmanship.

13
WARRANTY
WARRANTY DISCLAIMER:
This limited warranty is in lieu of, and manufacturer disclaims and excludes any express and implied warranties with respect
to the product including, without limitation, merchantability and tness for a particular purpose. No other express warranty,
whether written or oral, given by any person or entity, including a dealer or retailer, with respect to any product, shall bind
manufacturer.
Manufacturer’s exclusive liability for breach of the limited warranty, as set forth above, on the product shall be to repair or
replace the product within the warranty period in accordance with the terms of this limited warranty. The choice of remedy
shall belong solely to manufacturer. In no event shall manufacturer be liable for any loss or damages of any other kind,
whether direct, incidental, consequential including lost prots, exemplary, special or otherwise, including without limitation,
expenses incurred for substitute or replacement product or for rental expenses to temporarily replace a warranted product.
Under no circumstance shall recovery, of any kind, be greater than the amount of the purchase price of the product
purchased. Customer assumes all risk and liability for loss, damage, or injury to customer or customer’s property and/or the
property of others arising out of the misuse or inability to use the product.
LEGAL RIGHTS:
This limited warranty gives you specic legal rights, and you may also have other rights which may vary from state to state.
Some states do not allow any limitation on how long an implied warranty lasts or the exclusion or limitation of incidental or
consequential damages, so the above limitations may not apply to you.
KEEP FOR YOUR RECORDS
Record the model number, serial number, and the date of purchase with original sales receipt. This information will be helpful
to your dealer if parts or service are required.
MODEL NUMBER __________________________________
SERIAL NUMBER __________________________________
DATE OF PURCHASE ________________________________
DEALER _________________________________________

(REV 1) 072418
Table of contents
Other Tarter Farm Equipment manuals

Tarter
Tarter CBFG User manual

Tarter
Tarter ATVCPDC User manual

Tarter
Tarter RT104BL User manual

Tarter
Tarter CBFG User manual

Tarter
Tarter CattleMaster 120 User manual

Tarter
Tarter RC104BL User manual

Tarter
Tarter CBFG User manual

Tarter
Tarter RT205BL User manual

Tarter
Tarter CattleMaster 12 Series Parts list manual

Tarter
Tarter VALUE 90 SWEEP TUB 90ST Manual
Popular Farm Equipment manuals by other brands

Schaffert
Schaffert Rebounder Mounting instructions

Stocks AG
Stocks AG Fan Jet Pro Plus 65 Original Operating Manual and parts list

Cumberland
Cumberland Integra Feed-Link Installation and operation manual

BROWN
BROWN BDHP-1250 Owner's/operator's manual

Molon
Molon BCS operating instructions

Vaderstad
Vaderstad Rapid Series instructions


