Teac LX-100 Series User manual

TEAC Corporation Oct. 2007 D00986400A
RECORDING UNIT
LX-100 Series
Instruction Manual
Please read t is manual before using t e product
and keep t e manual andy.

SAFETY INSTRUCTIONS
i
CAUTION:
Read all of these Instr ctions.
Save these Instr ctions for later se.
Follow all Warnings and Instr ctions marked on the prod ct.
1) Read instr ctions -- All the safety and operating instr ctions sho ld be read before the prod ct is operated.
2) Retain instr ctions -- The safety and operating instr ctions sho ld be retained for f t re reference.
3) Heed Warnings -- All warnings on the prod ct and in the operating instr ctions sho ld be adhered to.
4) Follow instr ctions -- All operating and se instr ctions sho ld be followed.
5) Cleaning -- Unpl g this prod ct from the wall o tlet before cleaning. Do not se liq id cleaners or aerosol cleaners. Use a damp
cloth for cleaning.
6) Attachments -- Do not se attachments not recommended by the prod ct man fact rer as they may ca se hazards.
7) Water and Moist re -- Do not se this prod ct near water -- for example, near a bath t b, wash bowl, kitchen sink, or la ndry
t b; in a wet basement; or near a swimming pool; and the like.
8) Accessories -- Do not place this prod ct on an nstable cart, stand, tripod, bracket, or table. The prod ct may fall, ca sing
serio s inj ry to a child or ad lt, and serio s damage to the prod ct. Any mo nting of the prod ct sho ld follow the
man fact rer ユs instr ctions, and sho ld se a mo nting accessory recommended by the man fact rer.
9) Ventilation -- Slots and openings in the cabinet are provided for ventilation and to ens re reliable operation of the prod ct and
to protect it from overheating, and these openings m st not be blocked or covered. The openings sho ld never be blocked by
placing the prod ct on a bed, sofa, r g, or other similar s rface. This prod ct sho ld not be placed in a b ilt-in installation s ch as
a bookcase or rack nless proper ventilation is provided or the man fact rer ユs instr ctions have been adhered to.
10) Power So rces -- This prod ct sho ld be operated only from the type of power so rce indicated on the marking label. If yo
are not s re of the type of power s pply to yo r home, cons lt yo r prod ct dealer or local power company. For prod cts intended
to operate from battery power, or other so rces, refer to the operating instr ctions.
11) Gro nding or Polarization -- This prod ct may be eq ipped with a polarized alternating-c rrent line pl g (a pl g having one
blade wider than the other). This pl g will fit into the power o tlet only one way. This is a safety feat re. If yo are nable to insert
the pl g f lly into the o tlet, try reversing the pl g. If the pl g sho ld still fail to fit, contact yo r electrician to replace yo r
obsolete o tlet. Do not defeat the safety p rpose of the polarized pl g.
12) Power-Cord Protection -- Power-s pply cords sho ld be ro ted so that they are not likely to be walked on or pinched by items
placed pon or against them, paying partic lar attention to cords at pl gs, convenience receptacles, and the point where they exit
from the prod ct.
13) Lightning -- For added protection for this prod ct d ring a lightning storm, or when it is left nattended and n sed for long
periods of time, npl gs it from the wall o tlet. This will prevent damage to the prod ct d e to lightning and power-line s rges.
14) Overloading -- Do not overload wall o tlets, extension cords, or integral convenience receptacles as this can res lt in risk of
fire or electric shock.
15) Object and Liq id Entry -- Never p sh objects of any kind into this prod ct thro gh openings as they may to ch dangero s
voltage points or short-o t parts that co ld res lt in a fire or electric shock. Never spill liq id of any kind on the prod ct.
16) Servicing -- Do not attempt to service this prod ct yo rself as opening or removing covers may expose yo to dangero s
voltage or other hazards. Refer all servicing to q alified service personnel.

SAFETY INSTRUCTIONS
ii
17) Damage Req iring Service -- Unpl g this prod ct from the wall o tlet and refer servicing to q alified service personnel nder
the following conditions:
a) when the power-s pply cord or pl g is damaged.
b) if liq id has been spilled, or objects have fallen into the prod ct.
c) if the prod ct has been exposed to rain or water.
d) if the prod ct does not operate normally by following the operating instr ctions. Adj st only those controls that are
covered by the operating instr ctions as an improper adj stment of other controls may res lt in damage and will often
req ire extensive work by a q alified technician to restore the prod ct to its normal operation.
e) if the prod ct has been dropped or damaged in any way.
f) when the prod ct exhibits a distinct change in performance -- this indicates a need for service.
18) Replacement Parts -- When replacement parts are req ired, be s re the service technician has sed replacement parts
specified by the man fact rer or have the same characteristics as the original part. Una thorized s bstit tions may res lt in fire,
electric shock, or other hazards.
19) Safety Check -- Upon completion of any service or repairs to this prod ct, ask the service technician to perform safety checks
to determine that the prod ct is in proper operating condition.
20) Heat -- The prod ct sho ld be sit ated away from heat so rces s ch as radiators, heat registers, stoves, or other prod cts
(incl ding amplifiers) that prod ce heat.

SAFETY INSTRUCTIONS
iii
FCC Part 15
This eq ipment has been tested and fo nd to comply with the limits for a Class A digital device, p rs ant to
Part 15 of the FCC R les. These limits are designed to provide reasonable protection against harmf l
interference when the eq ipment is operated in a commercial environment. This eq ipment generates, ses,
and can radiate radio freq ency energy and, if not installed and sed in accordance with the instr ction
man al, may ca se harmf l interference to radio comm nications. Operation of this eq ipment in a
residential area is likely to ca se harmf l interference in which case the ser will be req ired to correct the
interference at his own expense.
Caution
Changes or modifications to this eq ipment not expressly approved by TEAC CORPORATION for compliance
co ld void the ser's a thority to operate this eq ipment.
For the customers in Europe
WARNING
This is a Class A prod ct. In a domestic environment, this prod ct may ca se radio interference in which case
the ser may be req ired to take adeq ate meas res.
Pour les utilisateurs en Europe
AVERTISSEMENT
Il s'agit d' n prod it de Classe A. Dans n environnement domestiq e, cet appareil pe t provoq er des
interférences radio, dans ce cas l' tilisate r pe t être amené à prendre des mes res appropriées.
Für Kunden in Europa
Warn ng
Dies ist eine Einricht ng, welche die F nk-Entstör ng nach Klasse A besitzt. Diese Einricht ng kann im
Wohnbereich F nkstör ngen vers rsachen ; in diesem Fall kann vom Betrieber verlang werden,
angemessene Maßnahmen d rchz führen nd dafür a fz kommen.
DISCLAIMER
TEAC disclaims all warranty, either expressed or implied, with respect to this prod ct and the accompanying
written materials. In no event shall TEAC be liable for any damages whatsoever (incl ding, witho t
limitation, damages for loss of b siness profits, b siness interr ption, loss of b siness information or other
loss) arising o t of the se of or inability to se this prod ct.
This prod ct is not an approved medical device.
The names of prod cts that appear in this doc ment are registered trademarks of the respective
holders.
Specifications are s bject to change witho t notice

LICENSE AGREEMENT AND LIMITED WARRANTY
iv
MPORTANT:
PLEASE CAREFULLY READ THE LICENSE AGREEMENT HEREIN BEFORE USING THE SOFTWARE. THE RIGHT TO USE THE
SOFTWARE IS GRANTED ONLY ON THE CONDITION THAT YOU AGREE TO THE LICENSE AGREEMENT. IN CASE YOU DO NOT
AGREE TO THE LICENSE AGREEMENT, DO NOT INSTALL THE SOFTWARE. IF YOU HAVE ALREADY INSTALLED THE SOFTWARE,
STOP THE USE AND UNINSTALL THE SOFTWARE. IF YOU DO NOT AGREE TO THE LICENSE AGREEMENT, YOU MAY RETURN THE
PACKAGE FOR A REFUND. UNAUTHORIZED REPRODUCTION OR DISTRIBUTION OF THE SOFTWARE, OR ANY PORTION OF IT,
MAY RESULT IN SEVERE CIVIL AND CRIMINAL PENALTIES, AND WILL BE PROSECUTED TO THE MAXIMUM EXTENT POSSIBLE
UNDER LAW.
This License Agreement with limited warranty is a legal agreement between yo (either an individ al or a single entity) and TEAC
Instr ments Corporation ("TEAC") for the SOFTWARE, which incl de comp ter software and electronic doc mentation.
1. GRANT OF LICENSE
TEAC grants to yo the right to se the SOFTWARE only in combination with the TEAC recording nit LX Series.
2. COPYRIGHT
All title and copyrights in and to the SOFTWARE and any copies thereof are owned by TEAC or a s pplier to TEAC. The SOFTWARE
is protected by Japanese copyright laws, international treaty provisions, and all other applicable national laws.
3. RESTRICTIONS
Yo may not distrib te copies of the SOFTWARE to third parties.
Yo may not reverse engineer, decompile, or disassemble the SOFTWARE, except and only to the extent that applicable law
notwithstanding this limitation expressly permits s ch activity.
Yo may not rent or lease the SOFTWARE.
Yo may not reprod ce the SOFTWARE except for archival p rpose.
4. TERMINATION
Yo r rights nder this Agreement terminate pon the disposal of all copies of the SOFTWARE, or witho t prej dice to any other
rights, TEAC may terminate this Agreement if yo fail to comply with the terms and conditions of this Agreement. In s ch event,
yo m st destroy all copies of the SOFTWARE.
5. LIMITED WARRANTY
TEAC warrants that the SOFTWARE will be sable for the p rpose expressed on TEAC's doc ment when properly installed on a
comp ter. TEAC does not warrant that the operation of the SOFTWARE will be ninterr pted or error free, and that the
SOFTWARE is fit for any partic lar p rpose.
6. NO LIABILITY FOR CONSEQUENTIAL DAMAGES
TO THE MAXIMUM EXTENT PERMITTED BY APPLICABLE LAW, IN NO EVENT SHALL TEAC BE LIABLE FOR ANY SPECIAL
INCIDENTAL, INDIRECT, OR CONSEQUENTIAL DAMAGES WHATSOEVER (INCLUDING, WITHOUT LIMITATION, DAMAGES FOR
LOSS OF BUSINESS PROFITS, BUSINESS INTERRUPTION, LOSS OF BUSINESS INFORMATION, OR ANY OTHER PECUNIARY
LOSS) ARISING OUT OF THE USE OF OR INABILITY TO USE THE SOFTWARE, EVEN IF TEAC HAS BEEN ADVISED OF THE
POSSIBILITY OF SUCH DAMAGES. BECAUSE SOME STATES AND JURISDICTIONS DO NOT ALLOW THE EXCLUSION OR
LIMITATION OF LIABILITY FOR CONSEQUENTIAL OR INCIDENTAL DAMAGES, THE ABOVE LIMITATION MAY NOT APPLY TO YOU.
7. MISCELLANEOUS
This agreement is governed by the laws of Japan.
Sho ld yo have any q estions concerning this Agreement, or if yo desire to contact TEAC for any reason, please write to the
address set forth below:
TEAC INSTRUMENTS CORPORATION
83 Imaikami-cho, Nakahara-k , Kawasaki-shi,
Kanagawa 211-0067, Japan
E-mail: [email protected]
Fax: +81-44-711-5240

Index
v
Section 1 Preface ............................................................................................................................1
Overview............................................................................................................................................................. 2
Features.............................................................................................................................................................. 3
About TAFFmat................................................................................................................................................... 5
Notes on Usage .................................................................................................................................................. 6
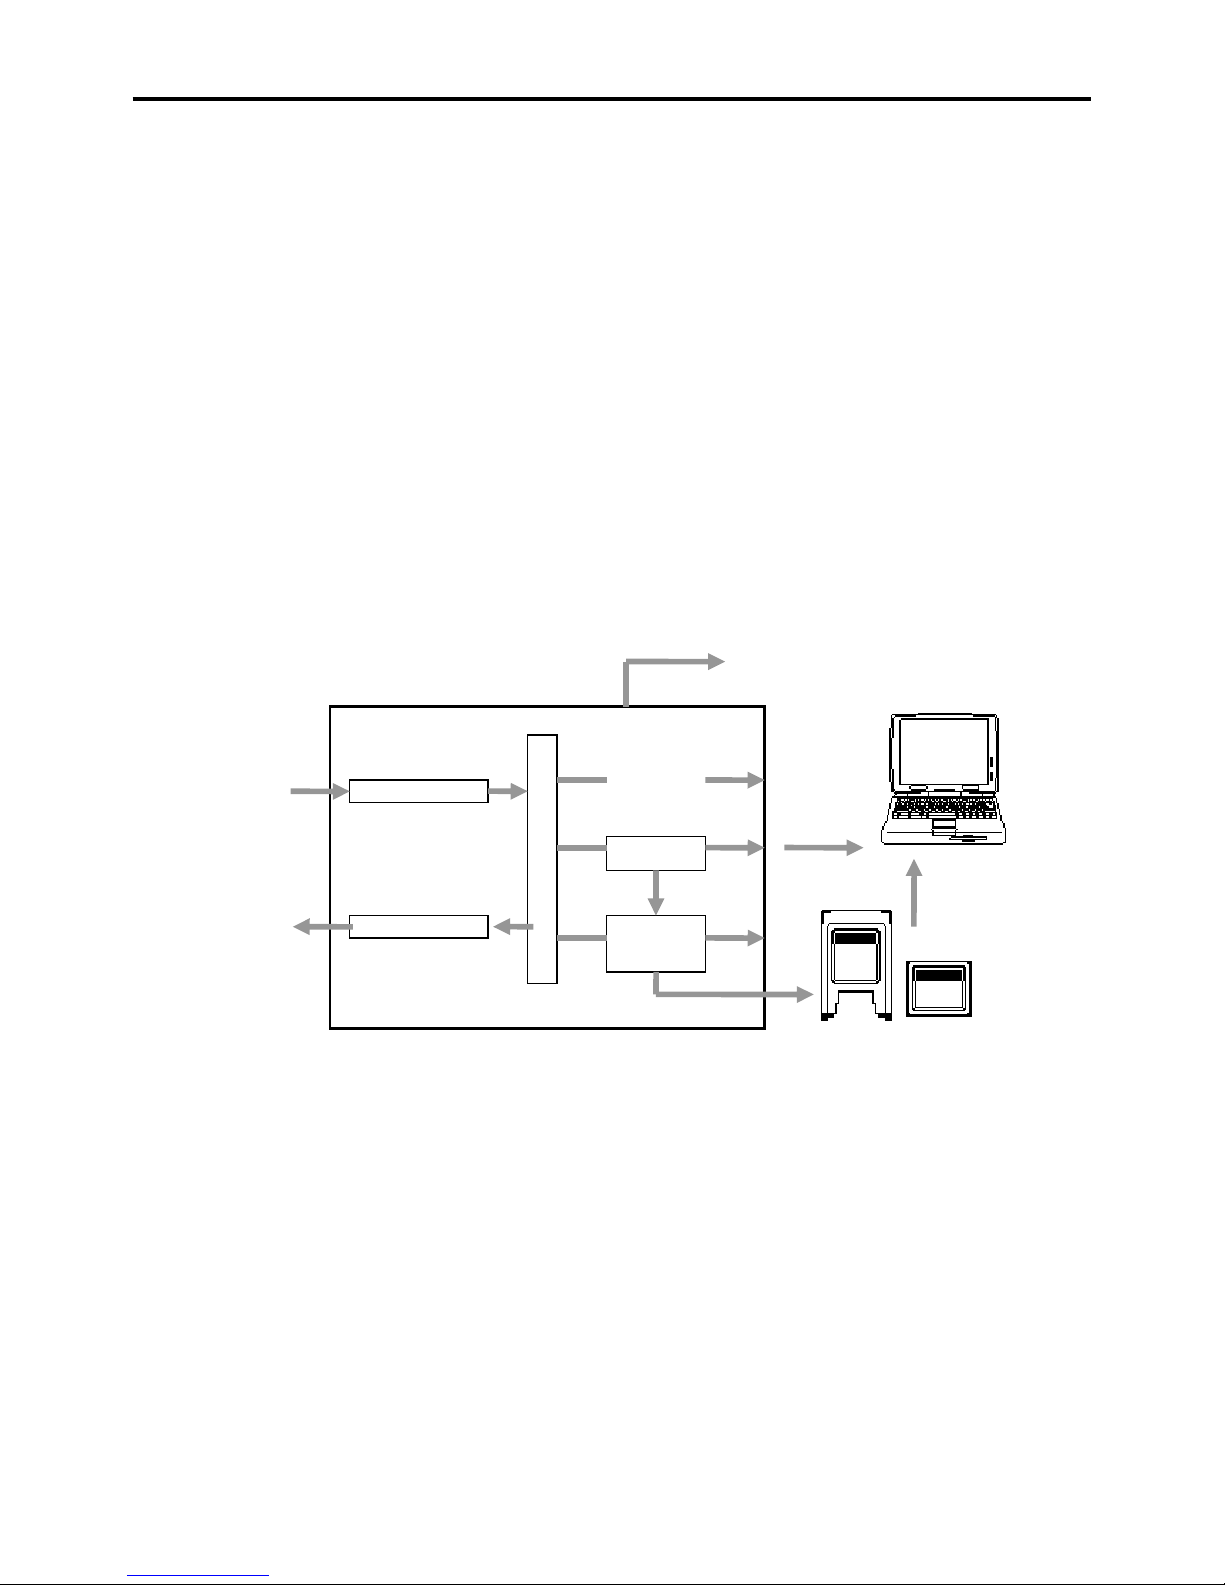
Names and Parts ................................................................................................................................................ 8
Front........................................................................................................................................................... 8
Rear ......................................................................................................................................................... 1
Recording time.................................................................................................................................................. 12
Sampling Frequency and Number of Channels ................................................................................................ 13
Section 2 Installation ......................................................................................................................1
Connections........................................................................................................................................................ 2
Notes of Connections................................................................................................................................. 3
PC Requirements....................................................................................................................................... 3
Installing LX-1 Series (IEEE 1394 model)....................................................................................................... 4
Installing Interface Card.............................................................................................................................. 4
Installing OHCI Driver................................................................................................................................. 5
Install LX-1 Series Device Driver............................................................................................................ 6
Download the 1394 Storage Supplement Program .................................................................................... 8
Installing LX Navi...................................................................................................................................... 1
Installing LX-1 Series (LAN model)............................................................................................................... 11
Installing LX Navi...................................................................................................................................... 11
About IP Address Settings........................................................................................................................ 12
Starting Program............................................................................................................................................... 13
Start to run Navi directly without displaying the LX Network dialogue ...................................................... 17
Inserting and Ejecting Media............................................................................................................................. 18
Inserting Media......................................................................................................................................... 18
Ejecting Media.......................................................................................................................................... 19
About Data on Media................................................................................................................................ 19
About Expansion Unit ....................................................................................................................................... 2
About Slot Settings................................................................................................................................... 2
About Maximum Sampling Frequency When Using an Expansion Unit ................................................... 2
Section 3 Introduction to LX Navi....................................................................................................1
Outline of Main Window...................................................................................................................................... 2
Initializing Settings .............................................................................................................................................. 5
Overview of Steps in Recording and Reproduction............................................................................................. 6
Section 4 Settings...........................................................................................................................1
System Settings.................................................................................................................................................. 2
Input Amp Settings.............................................................................................................................................. 6
DC Amp AR-LXDC1 ............................................................................................................................... 6
PA Amp AR-LXPA1 ................................................................................................................................. 7
ST Amp AR-LXST1 ............................................................................................................................... 1
Sensitivity Setting Using TEDS Functions ........................................................................................................ 12
Auto Offset........................................................................................................................................................ 14
Calibration By Using Calibrator......................................................................................................................... 15
Zero Balance .................................................................................................................................................... 16
Setting Tachometer Pulse Inputs ...................................................................................................................... 17
Output Amp Settings......................................................................................................................................... 19
Outline of Trigger Recording............................................................................................................................. 2
Repeat Mode............................................................................................................................................ 2
Interval Mode............................................................................................................................................ 21
Repeat Mode Settings ...................................................................................................................................... 22
Level Trigger Settings ....................................................................................................................................... 25
Interval Mode Settings ...................................................................................................................................... 26
Saving and Loading Settings ............................................................................................................................ 27
Saving Settings ........................................................................................................................................ 27
Loading Settings....................................................................................................................................... 28
Section 5 Operations ......................................................................................................................1
Specifying Recording Devices and File Names .................................................................................................. 2
Recording to Memory ................................................................................................................................. 4
Recording to Media (PC Card) ................................................................................................................... 6
Recording to PC......................................................................................................................................... 8
Notes for reproducing a PC-recorded file by the LX main unit ................................................................... 9
Operations to control recording......................................................................................................................... 1
Exchanging Media.................................................................................................................................... 11
Copying............................................................................................................................................................. 12
Reproducing ..................................................................................................................................................... 13
Operations to control reproduction ........................................................................................................... 14

Index
vi
Moving Reproducing Point (Skip) ............................................................................................................. 14
Advanced search...................................................................................................................................... 15
Convenient Features......................................................................................................................................... 16
Displaying Waveform................................................................................................................................ 16
Channel Property ..................................................................................................................................... 17
Displaying Bar Meter ................................................................................................................................ 18
Displaying Digital Values .......................................................................................................................... 18
Viewing Header Information ..................................................................................................................... 18
Changing Modes ...................................................................................................................................... 2
Stopping Fan ............................................................................................................................................ 21
Listening to Data by Sound ...................................................................................................................... 21
Contents of Displayed Message ....................................................................................................................... 22
LX Stand-alone Operations............................................................................................................................... 25
Recording to Media .................................................................................................................................. 26
Recording to Memory ............................................................................................................................... 27
Reproducing............................................................................................................................................. 28
Recording Synchronization ............................................................................................................................... 29
Settings and Recording Operations.......................................................................................................... 3
Connecting Recording Synchronization Cables and Turning on Power ................................................... 3
Operations................................................................................................................................................ 31
Others ...................................................................................................................................................... 36
Section 6 Specifications.................................................................................................................1
Main Unit Specifications...................................................................................................................................... 2
External Dimensions .................................................................................................................................. 3
Block Diagram............................................................................................................................................ 4
Setting Tachometer Pulse Inputs ........................................................................................................................ 5
Generator Output Specifications......................................................................................................................... 6
Expansion Unit Specifications............................................................................................................................. 7
External Dimensions .................................................................................................................................. 8
DC Input Amp Specifications............................................................................................................................... 9
Block Diagram.......................................................................................................................................... 1
PA Amp Specifications ...................................................................................................................................... 11
ST Amp Specifications ...................................................................................................................................... 12
Output Amp Specifications................................................................................................................................ 14
Block Diagram.......................................................................................................................................... 15
File Format........................................................................................................................................................ 16
Type of Files............................................................................................................................................. 16
File name.................................................................................................................................................. 16
Directory Structure on Media.................................................................................................................... 17
Data File................................................................................................................................................... 18
Data File When Turning on Tachometer Pulse Inputs............................................................................... 19
Converting Data to Physical Quantities .................................................................................................... 21
Header File............................................................................................................................................... 22
Connector Specifications .................................................................................................................................. 25
DIGITAL CONTROL connector................................................................................................................. 25
AQ-VU synchronization connector ........................................................................................................... 26
Recording Synchronization Specifications ........................................................................................................ 27
Section 7 Appendix.........................................................................................................................1
Troubleshooting .................................................................................................................................................. 2
Supplied Accessories and Options ..................................................................................................................... 3
Supplied Accessories ................................................................................................................................. 3
Optional parts ............................................................................................................................................. 3


1-1
Section 1 Preface

Overview
1-2
Overview
The LX-100 series instr mentation data recorders can record and reprod ce signals of a maxim m of 48 kHz
sampling freq ency via 8 channels onto PC card media in the case of 16bit AD. Recorded data on the media
is stored as PC files. The maxim m n mber of inp t channels is 32 by sing the selectable types of the 8-
channel inp t cards and the optional channel expansion nit. Yo can choose the recording media from
among the followings: Recording to the internal memory or to a PC card. Also, yo can save the recorded
data as PC files by connecting to a PC. The file format is TEAC's proprietary TAFFmat format. TAFFmat files
can be loaded into commercially available analysis software.
From a PC yo can se the s pplied LX Navi software to set recording conditions s ch as the inp t range or
sampling freq ency. The interface with a PC is hot-pl ggable and compatible with IEEE 1394. So, after the
set p, yo can disconnect the LX while the power is still on, and start or stop recording by sing control
b ttons on the main nit. Yo can choose the 100BASE-TX Ethernet interface as an alternative. Yo can also
se LX Navi to record or reprod ce while connected to a PC.
An optional color LCD remote control nit is available to set recording conditions, to record and reprod ce,
and to monitor by se of bar meters.
LX-1 series
Remote Control Unit
Input Amp
Output Amp
Record
Reproduce
Direct
Memory
PC Card
IEEE1394
Or LAN
Test 1.da
t
PC Card slot
PC Card adapter +Compact Flash
System Diagram

Features
1-3
Features
■ Inp t/O tp t Amps
The LX main nit is eq ipped with two slots and the optional expansion nit provides an additional two slots
for installing the inp t amps and/or the o tp t amps. The inp t/o tp t amp provides 8-channel
inp ts/o tp ts from the selections below.
DC inp t amp card: Use to connect voltages and/or to connect signals of external amplifiers.
PA amp inp t card: In addition to voltages, a voltage o tp t accelerometer inp t providing an A/C
weighting filter can be connected directly.
ST amp inp t card: Use to connect strain ga ges (f ll bridge) and/or gage-type sensors, and also
voltages.
Analog o tp t amp card: Use to reprod ce analog signals.
■ Recording Modes
Yo can se the PC card drive for data recording onto a removable media.
Memory recording: Recording p to 64MB (add p to 576MB as an option) of internal memory.
Stored data can be transferred to the removable media or the PC.
PC card recording: Stored data on the PC card (Compact Flash + PC card adapter) can be loaded into the
PC by sing the PC card slot. By s pporting FAT32, yo can se a PC card with a
maxim m of 8GB as a media.
PC recording: Recording directly to the PC.
Yo can also transfer data to a PC while recording to memory or the media, or a tomatically save to the
media after recording to memory.
■ Q antization Bits
Either conventional 16 bits A/D or 24 bits A/D, providing a dynamic range of 100db, can be selected.
■ Sampling Freq ency Series
In addition to the LX-110, which provides two series of sampling freq ency - a 96 kHz sampling freq ency
and a low-speed sampling, the LX-120 enables one to select as five series of sampling freq ency - 102.4 kHz,
100 kHz, 96 kHz, 65.536 kHz and a low-speed sampling.
■ Interface with PC
Either IEEE1394 for high-speed data transfer or 100BASE-TX LAN for network environment can be selected.
■ Real Time Monitor
Yo can monitor the data as formats of waveforms, bar graphs, and digital displays on the PC display while
recording. And, yo can reprod ce the recorded data in the internal memory or the media.
■ A Variety of Recording Triggers
Man al: Starts recording man ally.
Level Trigger: Starts recording by detecting level changes in a specified channel.
External Trigger: Starts recording by sing an external signal as the trigger.
Pre-trigger: A pre-trigger can record the data that was read into a b ffer before a recording-start
condition (based on a level trigger or external trigger) is satisfied.
Post-trigger: Contin es to record for a set period even after a recording-stop condition (based on a
level trigger or external trigger) has been satisfied.

Features
1-4
■ Event Marks
Yo can mark the data d ring recording. Then yo can search for s ch event marks when yo want to
reprod ce some recorded data.
■ Recording and Reprod cing Voice Memos
A microphone amp and a speaker are b ilt in so that yo can record and reprod ce (listen to) voice memos.
■ Synchronization recording of m lti nits (optional)
An optional synchronization recording can be made in maxim m of 4 nits (one for a master nit, three for
slave nits).
■ Synchronization recording of camera pict res (optional)
A synchronization recording can be made with pict res by connecting the Vis al Recorder “AQ-VU”, providing
a recording of 4ch camera pict res.

About TAFFmat
1-5
About TAFFmat
TAFFmat (an acronym for Teac Data Acq isition File Format) is a file format composed of the following: 1)
A data file containing A/D (analog to digital) converted data that is in binary format with the extension dat.
2) A header file containing information, s ch as recording conditions, that is in text format with the
extension hdr.
This doc ment ses the term ID to refer to a collection of data collected from the start of recording on the LX
series ntil the recording is stopped or pa sed. For each ID, one data file and one header file is recorded. A
voice memo is recorded as a WAV file with the extension wav.
The above files share a common file name, to which is appended an ID n mber. When a new file name is
specified, this ID n mber becomes 1. Each time recording starts, this n mber advances by 1.
A/D-converted data is recorded as 2-byte integers between -32768 and +32767 in the case of 16 bits A/D
and also recorded as 4-byte integers between –8388608 and +8388607 in the case of 24 bits A/D. Negative
n mbers are expressed as complements of 2. The byte order is from the lower bytes to the higher bytes. The
seq ence of data is as follows: first sampling channel order, second sampling channel order, ....., last
sampling channel order.
In LX-100 series, ±100% of the inp t range is eq ivalent to ±25000 of 16 bits A/D or ±6400000 of 24
bits A/D
This doc ment ses the term “scan” to refer to a collection of data res lting from one sampling. A data file
consists of scan repetitions.
Example: The data of 1 scan when the sampling freq ency is 6 kHz:
Standby
REC
Start
FWD
Pa se
PAUSE
Res me
FWD
Stop
STOP
Aaaaa001.dat
Aaaaa001.hdr
Aaaaa002.dat
Aaaaa002.hdr
ch 1
ch
2
ch
3
ch
4
ch
5
ch
6
ch
7
ch
8
Data seq ence
1/6000 sec

Notes on Usage
1-6
Notes on Usage
Use of an UPS is Recommended
We recommend that yo se an UPS (Uninterr ptible Power S pply) whenever yo se an AC adapter. This
can protect important data d ring a power stoppage. If the power is t rned off while a media is in a drive,
data recorded on that media might become nreadable.
Use an optional battery nit to back p the operation on power stoppages.
Use Specified Media Only
Use PC cards checked by TEAC in advance (contact s for information). Other media might be nable to
record or reprod ce correctly.
Compact Flash Cards Checked by TEAC for Correct Operations (as of J ly 2007)
SanDisk Corp. Lexar Media, Inc. B ffalo Technology, Inc.
128MB SDCFB-128-801 Professional RCF-G series
SDCFB-1000-801 1GB CF1GB-80-380 256MB RCF-G256M
1GB SDCFB-1024-J60 4GB CF1GB-133-380 1GB RCF-G1G
2GB SDCFB-2048-J60 RCF-G series
4GB SDCFB-4096-J60NS Hagiwara Sys-Com 2GB RCF-R2G
ltra Z-Pro series
128MB SDCFB-128-801 1GB HPC-CF1GZP
512MB SDCFB-512-801 2GB HPC-CF1GZP
ltraⅡ
256MB SDCFH-256-903 I-O DATA DEVICE, INC.
1GB SDCFH-1024-903 CFX シリーズ
2GB SDCFH-2048-903 256MB CFX-256M
ExtremeⅢ CF40 シリーズ
1GB SDCFX3-1024-903 1GB CF40-1G
2GB SDCFX3-2048-903 CF115 シリーズ
4GB SDCFX3-4096-903 8GB CF115-8G
8GB SDCFX3-8192-903
■ T rn off the power after yo eject the media
Remove the PC card before powering off the LX. If the power is t rned off d ring writing, data recorded on
the media might become nreadable. Also, eject the media before moving the LX main nit. F rther, remove
the media before moving the LX main nit. Moving the nit while the media is inserted might res lt in
damage.
■ Remove Media
Insert or eject the media after confirming that “MEDIA READY” is displayed on the nit that is in the STOP
state of the REC mode.
■ Never Remove a Recorded File, Never Rename the File/Folder Name of a Recorded File By a Windows
Operation
Do not remove a recorded file or rename a file/folder name of a recorded file by a Windows operation. If yo
manip late the recorded files on the media by a Windows operation, s ch as partially removing the file, or
renaming the file/folder name, the link between the data file and the header file will be lost or the writing
speed to the media to s pport the specifications cannot be ass red. Also, the data might be nreadable
when s ch media is re-inserted in the LX.
When reprod cing the file recorded on the PC by the main nit of LX, refer to “Notes for reprod cing a
PC-recorded file by the LX main nit” on page 9 in Section 5.

Notes on Usage
1-7
■ Handling PC Card
To discharge static electricity from yo r body, to ch a metallic s rface near yo before handling the nit.
Never to ch the PC card being inserted into the PC card slot while recording and playing back.
■ Ca tions for recording data on a PC Card
The recognized file system is FAT16 or FAT32. NTFS and FAT12 are not available. (By formatting media
of 16MB or less the file system will normally become FAT12.)
Before sing a PC Card on LX, format it in FAT16 or FAT32 by Windows PC. A PC Card that is not
formatted cannot be formatted by the LX main nit.
It might take a long time to recognize or save data when sing a FAT32 formatted PC Card on LX. In
s ch a case, the sit ation might be improved by re-formatting on the LX main nit.
In yo are sing a PC Card that has been repeatedly sed for saving or removing data, yo might not be
able to record data on the PC Card that is s pposed to have s fficient free space remaining. In s ch a
case, re-format the PC Cards again after backing p the data to another media.
The maxim m amo nt of free space on a PC Card, which is displayed on LX Navi, etc., is 4GB. “%”
displayed on the nit means the val e is correct.
The maxim m file size of the PC card available on LX is 2GB in FAT16 or 4GB in FAT32. However, the
act al file size will be red ced, depending on the nit of data.
When contin ing to record data exceeding the maxim m size, another new file will be made to keep on
recording a tomatically. At this time, the header file or the voice file will be moved onto a new file.
These gro ps (data, header, and voice) of files are recorded separately as above, and can be
reprod ced independently.
If the recording condition meets either of the followings, the maxim m size of the contin o s recorded
data wo ld be 4GB in total. (It might exceed the val e, altho gh this is not g aranteed)
1. Synchronization recording (master or slave setting)
2. Timer [recording start time, specified recording time, timeo t] recording
3. Trigger [level, external trigger] recording
If so many files are saved on the PC Card, it might take a long time to get the file table of data
reproduced. In s ch a case, reformat the PC Cards again after backing p the data to another media.
The maxim m n mber of folder or data files that can be made and operated correctly is 10,000.
The n mber of files exceeding 10,000 can be recorded, b t not copied or reprod ced.
When sing a PC Card with a low writing speed, the recording might be stopped since the data writing
speed does not keep p with it. Use the recommended card only.
■ B tton operations of LX main nit
In case yo operate the b ttons of the LX main nit that is connected with s pplied LX Navi software, the LX
might not operate correctly. (Operate the LX Navi first when connected to the LX Navi)
■ Abo t the model witho t the PC Card drive installed
The drive is not installed. Nat rally, the f nctions concerning the recording to the media are disabled.
■ Abo t No O tp t Amp Model
The o tp t amplifier is not installed. Nat rally, the f nctions concerning the o tp t amp are disabled.
However, yo can view the reprod ced data on a PC.

Names and Parts
1-8
1 2 3
4
5
6 7 8
9 1
11
12
Names and Parts
Front
1 Drive
Opening the cover reveals the disk slot.
2 Inp t level LED
When the inp t signal for a channel is larger than +/- 10 % of a set inp t range, the LED glows green. When
the signal exceeds +/- 115 % of the range, the LED glows red.
3 Inp t connector
Inp ts the signal to be meas red.
4 Power switch
P shing the switch p t rns on the power. P shing the switch down t rns off the power.
5 Vol me knob
Adj st the vol me for reprod cing voice memos.
6 EARPHONE jack
Connects to an earphone when yo are sing the earphone to listen to voice memos. When an earphone is
inserted, so nd does not come from the speaker.
7 MEMO IN jack
Connects to a microphone sed for voice memos.
8 USAGE LEDs
Indicates the sage rate of the recording device. D ring recording to memory, these LEDs indicate what
percentage of the total memory is being sed. D ring recording to a media, these LEDs indicate what
percentage of the total media capacity is being sed. D ring recording to a PC, these LEDs indicate what
percentage of memory is being sed as the b ffer for transmitting data. From the left, the LEDs indicate
percentages of 5, 10, 20, 35, 50, 70, 90, and 100%.
These LEDs also f nction as a low-voltage alarm, and blink when the power voltage falls to 11 V or less.
At this time, recording and reprod cing will be stopped.

Names and Parts
1-9
9 O tp t connector (When the analog playback amp card is installed in the slot.)
O tp ts the reprod ced signal. O tp ts the inp t signal d ring recording-standby stat s or d ring recording.
Yo can set the o tp t range in 0.1 V steps, from 1 V to 5 V.
10 O tp t level LED (When the analog playback amp card is installed in the slot.)
When the o tp t signal for a channel is larger than +/-10% of a set o tp t range, the LED glows green.
When the signal exceeds +/-115% of the range, the LED glows red.
11 P LOCK b tton
Pressing this b tton for 3 seconds ca ses the lamp to glow and disables the five b ttons on the left: STOP,
REC, FWD, PAUSE, and EVENT. To release the lock, again press the b tton for 3 seconds.
12 Recording/reprod ction control b ttons
B ttons sed for recording or reprod ction. Details are given later.

Names and Parts
1-10
Rear
LX-110 IEEE 1394 Version
The LX-110LAN model has an interface (at 7) shown below.
LX-120 LAN Model
The LX-120 IEEE 1394 version has an interface (at 11) shown above.
1 2 3 4 4 5 6
10 7
12
8 8
9
11
RECORDING UNIT
12-28V ,
LX-110
6.0-2.6A
TEAC CORPORATION
BATTERY UNIT:BU-81
SERIAL NO.
MADE IN JAPAN
SERIAL NO.
MADE IN JAPAN
RECORDING UNIT
12-28V ,
TEAC CORPORATION
LX-120
6.5-2.8A
BATTERY UNIT:BU-81

Names and Parts
1-11
1 FG terminal
Connects the gro nding wire.
2 MON OUT connector
O tp ts in analog format the signal of a channel d ring recording-standby stat s, recording, or reprod ction.
Yo se the s pplied LX Navi software to select the channel yo want to monitor. Yo can set the o tp t
range in 0.1 V steps, from 1 V to 5 V. The same filter as sed for the o tp t is applied to this monitor o tp t.
(Not available for analog o tp t sing low-speed sampling freq ency series)
O tp ts the generator o tp t signal at the LX-120.
3 EXT TRIGGER IN connector
Inp ts the trigger signal when sing an external contact signal as the trigger to start recording.
4 Cooling fan
Exha st fans sed for cooling the main nit. Do not cover the o tlet vent.
5 BU-81 connector (optional)
Used to connect the optional battery nit.
6 DC IN connector
Inp ts power in the range of +11 to 30 V.
7 IEEE 1394 connector (for IEEE 1394 model)
Connects to a PC. Use a recommended interface card on the PC.
8 Connector for recording synchronization (optional)
It is sed for recording synchronization.
9 AQ-VU synchronization connector (optional)
Used to control record start/stop and time setting.
10 DIGITAL CONTROL connector
Used when sing a contact signal to control recording or reprod ction.
11 100BASE-TX connector (for LAN model)
Connects to a PC. The LED-side of the connector flashes while comm nicating.
12 PULSE IN A/B connector (LX-120 model)
Connects tachometer p lse inp ts.

Recording time
1-12
Recording time
■ Recording to Memory, 8 channels, 16 bits A/D, 64 MB standard memory (when not recording voice
memos)
■ Recording to PC Card, 8 channels, 16 bits A/D, 1 GB PC Card (when not recording voice memos)
* This recording time at a 48 kHz sampling freq ency is the val e when sing a PC Card on which nothing is
recorded after formatting.
■ Media recording time can be calc lated as follows (res lt for approximate times)
Recording Time (seconds)
= (Media Capacity (Bytes) x 0.9) / [(N mber of Analog Inp t Channels + N mber of Tachometer Inp t
Channels) x Sampling Freq ency (Hz) x AD (width) + 8000]
Media Capacity x 0.9: Considering recording overhead of the media and an additional capacity needed for
the header files, m ltiply 0.9 (90%) for the sed capacity for data files.
AD width 2 for 16 bits A/D, 4 for 24 bits A/D
Refer to the tables later for a combination of the Sampling Freq ency vs. the n mber of analog inp t
channels that can be selected in each recording mode.
The n mber of tachometer inp t channels in 16 bits A/D: se "2" in 16 bits mode, "2" for 32 bits/1 channel
mode, or "4" for 32 bits/2 channels mode. In 24 bits A/D: not available in 16 bits mode, "1" for 32 bits/1
channel mode, or "2" for 32 bits/2 channels mode. Tachometer inp t channels are available for LX-120 only.
Use "0" instead of 8000 when the memo voice recording t rns to OFF.
Sampling freq ency (
Val e in brackets is the recording
bandwidth with tolerances of +/-0.5 dB) Recording time
96 kHz (40 kHz) 40 sec
48 kHz (20 kHz) 80 sec
24 kHz (10 kHz) 160 sec
12 kHz (5 kHz) 320 sec
6 kHz (2.5 kHz) 640 sec(approx. 10 min)
3 kHz (1.25 kHz) 1,280 sec(approx. 21 min)
1.5 kHz (625 Hz) 2,560 sec(approx. 42 min)
Sampling freq ency (Val e in brackets is t
he recording
bandwidth with tolerances of +/-0.5 dB) Recording time
48 kHz (20 kHz) 1,230 sec(approx.20 min)※
24 kHz (10 kHz) 2,470 sec(approx.41 min)
12 kHz (5 kHz) 4,940 sec(approx.82 min)
6 kHz (2.5 kHz) 9,890 sec(approx.164 min)
3 kHz (1.25 kHz) 19,790 sec(approx.329 min)
1.5 kHz (625 Hz) 39,360 sec(approx.11ho r)
This manual suits for next models
2
Table of contents
Other Teac Recording Equipment manuals

Teac
Teac AD-RW900 User manual

Teac
Teac HD-R1 Instruction Manual

Teac
Teac LX Series User manual

Teac
Teac CD-RW890 User manual

Teac
Teac AD-RW900 User manual

Teac
Teac Tascam Series User manual

Teac
Teac CD-RW2000 Owner's manual

Teac
Teac TASCAM 388 STUDIO 8 Troubleshooting guide

Teac
Teac TC-SR 5KN-G3 User manual

Teac
Teac LP-R660USB User manual