Teesa TSA3221 User manual

TSA3221
HU
DE
NL
EN
PL
FR
RO
GR
SK
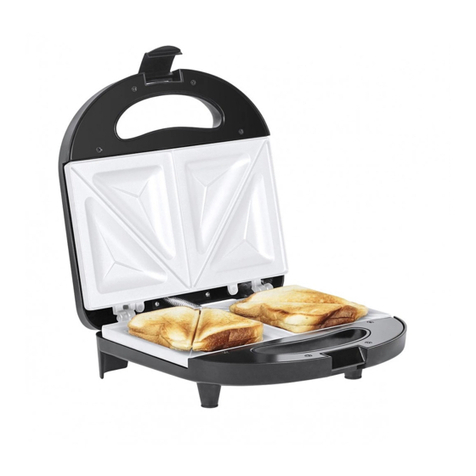
Sandwich maker 3-in-1
with ceramic plates
Instrukcja obsługi
Manuel d’utilisation
Manual de utilizare
Εγχειρίδιο χρήσης
Gebruiksaanwijzing
Owner’s manual
Návod na použitie
Használati utasítás
Bedienungsanleitung

DE
Bedienungsanleitung2
SICHERHEITSANLEITUNGEN
Danke für den Kauf des TEESA Gerätes. Bitte lesen Sie diese Bedienung-
sanleitung sorgfältig und bewahren diese auf für späteres Nachschlagen.
Der Vertreter übernimmt keine Haftung für Schäden, die durch unsach-
gemäße Handhabung und Verwendung des Produkts verursacht werden.
Um die Gefahr von Feuer, Stromschlag oder anderen Verletzungen zu
vermeiden, befolgen Sie die grundlegenden Sicherheitsvorkehrungen bei
der Verwendung elektrischer Geräte, einschließlich der folgenden:
• Lesen Sie diese Bedienungsanleitung sorgfältig, auch wenn Sie mit dem
Gerät vertraut sind. Heben Sie die Bedienungsanleitung auf für späteres
nachschlagen.
• Vor dem Anschluss des Gerätes an die Netzsteckdose, stellen Sie sicher,
dass die auf dem Gerät angegebene Spannung mit der Spannung der
Steckdose übereinstimmt.
• Um eine Gefährdung durch unbeabsichtigtes Zurücksetzen des
thermischen Schutzschalters zu vermeiden, darf dieses Gerät nicht über
eine externe Schalteinrichtung wie z.B. einen Zeitgeber versorgt oder an
einen Schaltkreis angeschlossen werden, der vom Versorger regelmäßig
ein- und ausgeschaltet wird.
• Stellen Sie das Gerät auf eine ache, stabile Oberäche.
• Reinigen Sie das Gerät gemäß den in Kapitel “Reinigung und Wartung”
aufgeführten Anweisungen.
• Schalten Sie das Gerät IMMER aus und trennen es von der Stromversorgung:
- Wenn es nicht richtig funktioniert,
- Wenn es ein seltenes Geräusch bei der Verwendung gibt,
- Vor dem Zerlegen des Gerätes,
- Vor der Reinigung,
- Bei Nichtgebrauch.
• Ziehen Sie beim Trennen des Netzkabels vom Gerät am Stecker und nicht
am Kabel.
• Halten Sie das Gerät außerhalb der Reichweite von Kindern. Lassen Sie
Kinder nicht unbeaufsichtigt mit dem Produkt.
• Das Gerät kann von Kindern benutzt werden, die älter als 8 Jahre alt
sind und von Personen mit eingeschränkten physischen, sensorischen
oder geistigen Fähigkeiten oder Mangel an Erfahrung und Wissen,
wenn sie von einer Person beaufsichtigt und geleitet werden, die für
ihre Sicherheit zuständig ist, in einer vorsichtigen Art und Weise und die
alle Sicherheitsvorkehrungen verstanden hat und befolgen wird. Kinder
sollten nicht mit diesem Gerät spielen. Kinder sollten nicht die Reinigung
und Wartung des Gerätes ohne Aufsicht durchführen.

Bedienungsanleitung 3
DE
• Das Netzkabel darf nur von einem autorisierten Kundendienst ersetzt werden.
• Halten Sie das Gerät und sein Kabel fern von Hitze, Wasser, Feuchtigkeit,
scharfen Kanten und andere Faktoren, die das Gerät oder das Netzkabel
beschädigen könnten.
• Stellen Sie das Gerät nicht ins Wasser oder andere Flüssigkeiten;
verwenden Sie es nicht mit nassen oder feuchten Händen.
• Das Produkt nicht für andere Zwecke verwenden, als in dieser
Bedienungsanleitung angegeben.
• Lassen Sie das Gerät nicht unbeaufsichtigt, wenn es funktioniert.
• Der Hersteller dieses Produkts ist nicht verantwortlich für Schäden, die durch
unsachgemäßeHandhabungundVerwendungdesGerätsverursachtwerden.
• IMMER das Gerät von der Stromversorgung trennen, wenn es nicht
verwendet wird.
• NIEMALS dieses Gerät verwenden, wenn das Netzkabel oder der Stecker
beschädigt ist, oder wenn das Gerät defekt ist.
• Versuchen Sie nicht, dieses Gerät selbst zu reparieren, nur autorisiertes
und qualiziertes Personal darf dieses Produkt reparieren. Keine vom
Benutzer zu wartende Teile im inneren.
• Verwenden Sie kein unautorisiertes Zubehör.
• Das Gerät ist nur für den Innenbereich bestimmt.
• Bewegen Sie das Gerät nicht, wenn es in Betrieb ist.
• Dieses Gerät ist ausschließlich zur Zubereitung von Speisen geeignet.
Stellen Sie nichts anderes als Lebensmittel in das Gerät.
• Das Gerät ausschalten bevor Sie die Heizplatten einlegen oder entfernen.
PRODUKTBESCHREIBUNG
1
2
3
4
5
6
7
8 9 10

DE
Bedienungsanleitung4
1. Rote Kontrollleuchte (Stromversorgung)
2. Grüne Kontrollleuchte (Heizung)
3. Deckel
4. Handgri
5. Haken
6. Freigabetasten
7. Keramische Wechselplatten
8. Heizplatten für Sandwich
9. Heizplatten für Waeln
10. Heizplatten zum grillen
Entfernen:
1. Önen Sie den Deckel des Sandwichmaker.
2. Ziehen Sie an den Freigabetasten um die obere und untere Platte
freizugeben und entfernen diese.
Einsetzen:
1. Setzen Sie die ausgewählte Platte in das obere und untere Gehäuse und
drücken diese aufs Gehäuse, bis sie einrasten. Stellen Sie sicher, dass die
Heizplatten korrekt installiert sind.
Warnung! Bevor Sie die Heizplatten entfernen oder einsetzen, stellen Sie
sicher, dass das Gerät nach dem Betrieb abgekühlt ist. Ersetzen Sie nie die
Platten, wenn das Gerät noch heiß ist.icie ostygło. Nie należy wymieniać
wkładów, jeśli urządzenie jest gorące.
EINSETZEN UND ENTFERNEN DER HEIZPLATTEN
BEDIENUNG
1. Nehmen Sie das Gerät aus der Verpackung und entfernen alle Etiketten.
2. Stellen Sie das Gerät auf eine trockene und ebene Oberäche.
3. Vergewissern Sie sich, dass sich die Steckdose in der Nähe bendet.
4. Önen Sie den Deckel und tragen eine Schicht aus Panzenöl oder Butter
auf die Platten auf, mit einem Küchentuch oder Pinsel für Teig.
5. Falls nötig, überschüssiges Öl abwischen.
6. Schließen Sie den Deckel und stecken Sie den Stecker in die Steckdose.
Die roten und grünen Anzeigen leuchten auf.
7. Warten Sie, bis das grünes Licht erlischt; Es bedeutet, dass die Heizplatten
die Toasttemperatur erreicht haben. Der Sandwichmaker ist nun
gebrauchsfertig.

Bedienungsanleitung 5
DE
SANDWICHZUBEREITUNG
Hinweis:
• Es ist normal, dass sich das grüne Licht ein- und ausschaltet, während das Gerät
in Betrieb ist. Das bedeutet, dass der Sandwichmaker die Toasttemperatur hält.
• HeißerDampfkannwährenddesBetriebesvomDeckeldesSandwichmaker
austreten. Bitte Vorsicht walten lassen.
• Zuerst kann aus dem Gerät ein Geruch austreten. Dies ist eine normale
Reaktion, die durch eine anfängliche Erwärmung der Platten verursacht
wird und nicht wieder auftritt.
1. Stellen Sie sicher, dass die Heizplatten für Sandwichs in das Gerät
eingesetzt sind.
2. Stecken Sie den Stecker in die Steckdose und wärmen das Gerät vor.
3. Bereiten Sie Ihr Sandwich.
4. Wenn das Gerät betriebsbereit ist (grünes Licht erlischt), önen Sie den
Deckel und legen Ihre Sandwichs auf die untere Platte.
5. Schließen Sie den Sandwichmaker mit dem Haken.
Hinweise:
• Wennesschwierigist,dasGerätzuschließen,entfernenSieüberschüssiges
Material von Ihrem Sandwich.
• Schließen Sie das Gerät nicht mit Gewalt.
• Berühren Sie nicht das Gerät während des Betriebs.
• Önen Sie nicht den Deckel während des Kochvorgangs.
6. Önen Sie den Deckel nach etwa 4 bis 5 Minuten (oder länger, wenn Sie es
bevorzugen, abhängig vom Rezept oder dem Vorlieben des Benutzers) und
entfernen vorsichtig das Sandwich.
WAFFELN
1. Stellen Sie sicher, dass die Heizplatten fürWaeln in das Gerät eingesetzt sind.
2. Önen Sie den Deckel und tragen eine Schicht aus Panzenöl oder Butter auf
die Platten auf, mit einem Küchentuch oder Pinsel für Teig.
3. Den Teig auf die Mitte der unteren Waelplatte auegen und gleichmäßig
auf die ganze Platte verteilen.
4. Schließen Sie den Deckel, aber den Haken nicht verriegeln (das Verriegeln
würde es den Waeln nicht erlauben dass sie wachsen).
5. Die Waeln etwa 7 bis 10 Minuten backen.
Hinweis: Sandwichmaker nicht während des Backens önen!
6. Önen Sie den Deckel und entfernen vorsichtig die Waeln.

DE
Bedienungsanleitung6
GRILL
1. Stellen Sie sicher, dass die Heizplatten für Grill in das Gerät eingesetzt sind.
2. Önen Sie den Deckel und tragen eine Schicht aus Panzenöl oder Butter auf
die Platten auf, mit einem Küchentuch oder Pinsel für Teig.
3. Legen Sie das Produkt auf die untere Platte und schließen den Deckel.
Hinweis: Benutzen Sie keine Gewalt um das Gerät zu schließen.
4. Önen Sie den Deckel nach einigen Minuten (abhängig vom Rezept oder
demVorlieben des Benutzers) und entfernen vorsichtig das gegrillte Produkt.
Hinweise:
• Wenn der Sandwichmaker verwendet wird, um fertige Waeln oder
Sandwichs zu toasten, stellen Sie bitte sicher, dass diese in die Heizplatten
passen.Wenn nicht, schneiden Sie bitte diese, damit sie in die Platten passen.
• Fertige Waeln / Sandwichs müssen außen gebuttert werden.
• Verwenden Sie keine synthetischen oder fettarmen Aufstriche, da diese
dazu neigen, bei einer niedrigeren Temperatur zu überhitzen und bilden
einen dunkelbraunen Rückstand, der dazu führen kann, dass das geröstete
Sandwich an den Platten haftet.
SICHERHEIT BEIM ENTFERNEN VON PRODUKTEN AUS DEM SANDWICHMAKER
REINIGUNG UND WARTUNG
• Fertige Produkte vom Sandwichmaker sorgfältig entfernen, da die
Heizplatten heiß sind.
• Verwenden Sie Holz- oder Kunststoutensilien, um die Oberäche der
Heizplatten nicht zu beschädigen.
• Denken Sie daran, den Stecker aus der Steckdose ziehen, nachdem Sie
den Sandwichmaker verwendet haben.
• Denken Sie daran, dass die vom Sandwichmaker entfernten Produkte heiß
sind. Achten Sie darauf, sich beim Essen nicht zu verbrennen.
1. Ziehen Sie den Netzstecker aus der Steckdose und lassen das Gerät
abkühlen, bevor Sie es reinigen.
2.Wischen Sie die Platten ab mit einem in heißem Seifenwasser gedämpften
Tuch.
3. Trocknen Sie die Platten mit einem sauberen, trockenen Tuch oder einem
Küchentuch.
4. Verwenden Sie keine Scheuermittel oder chemische Mittel, um dieses
Produkt zu reinigen.

Bedienungsanleitung 7
DE
Deutsch
Korrekte Entsorgung dieses Produkts
(Elektromüll)
(Anzuwenden in den Ländern der Europäischen Union und anderen europäischen Ländern mit
einem separaten Sammelsystem)
Die Kennzeichnung auf dem Produkt bzw. auf der dazugehörigen Literatur gibt an, dass es nach seiner
Lebensdauer nicht zusammen mit dam normalen Haushaltsmüll entsorgt werden darf. Entsorgen Sie
dieses Gerät bitte getrennt von anderen Abfällen, um der Umwelt bzw. der menschilchen Gesundheit
nicht durch unkontrollierte Müllbeseitigung zu schaden. Recyceln Sie das Gerät, um die nachhaltige
Wiederverwertung von stoichen Ressourcen zu fördern. Private Nutzer sollten den Händler, bei dem
das Produkt gekauft wurde, oder die zuständigen Behörden kontaktieren, um in Erfahrung zu bringen,
wie sie das Gerät auf umweltfreundliche Weise recyceln können. Gewerbliche Nutzer sollten sich an
Ihren Lieferanten wenden und die Bedingungen des Verkaufsvertrags konsultieren. Dieses Produkt darf
nicht zusammen mit anderem Gewerbemüll entsorgt werden.
Hergestellt in China für Lechpol Electronics Leszek Sp.k., ul. Garwolińska 1, 08-400 Miętne.
TECHNISCHE DATEN
5. Nach jedem Gebrauch die angesammelten Krümel entfernen und die
Oberäche der Heizplatten mit einem Papiertuch abwischen, um das
während des Bratens angesammelte Fett aufzusaugen und zu entfernen.
6. Es wird empfohlen, das Gerät in der Originalverpackung aufzubewahren,
um es vor Staub und Feuchtigkeit zu schützen.
• Betriebsanzeige
• Heizanzeige
• Hitzebeständiger Gri
• Keramische Beschichtung
• Wechselbare Platten:
- Grill
- Waffeleisen
- Sandwichmaker
• Überhitzungsschutz
• Edelstahldeckel
• Thermostatkontrolle
• Rutschfeste Basis
• Senkrechte Aufbewahrung
• Max. Leistung: 800 W
• Spannung: 220 ~ 240 V; 50/60 Hz
• Abmessungen: 240 x 235 x 102 mm
• Kabellänge: 90 cm
• Gewicht: 1,67 kg

EN
Owner’s manual8
SAFETY INSTRUCTIONS
Thank you for purchasing TEESA appliance. Please read this operation
instruction carefully before use, and keep it for future use. Distributor does
not take responsibility for damages caused by inappropriate handling and
use of the product.
In order to reduce the injuries or damages, follow basic safety precautions
applied when using any electrical device, including the following:
• Read this instruction manual carefully, even if you are familiar with the
appliance. Keep the manual for future reference.
• Before connecting the device to power supply socket, make sure the
voltage indicated on the appliance corresponds to the voltage in the
power supply socket.
• In order to avoid a hazard due to inadvertent resetting of the thermal
cutout,thisappliancemustnotbesuppliedthroughan externalswitching
device, such as a timer, or connected to a circuit that is regularly switched
on and o by the utility.
• Place the device on at, stable surface.
• Clean this device in accordance to instructions listed in“Cleaning”section.
• ALWAYS turn o the device and disconnect it from the mains supply:
- if it’s not operating correctly
- if there’s an uncommon voice when using
- before disassembling the device
-before cleaning
-before servicing
• When you disconnect the power cord of the device, grasp and pull the
plug, not the cord/cable.
• Keep the device out of the reach of children. Do not leave children
unsupervised with the product.
• This appliance may be used by children who are above 8 years old and
by persons with reduced physical, sensory or mental capabilities, or lack
of experience and knowledge, if they are supervised and guided by a
person who is responsible for their safety in a cautious manner, and all
the safety precautions are understood and followed. Children should not
play with this device. Children should not perform cleaning and servicing
of the device unsupervised.

Owner’s manual 9
EN
• Fixed power cable may only be replaced in an authorized service point.
• Keep the device and its cord/cable away from heat, water, moisture, sharp
edges and any other factor which may damage the appliance or its cord.
• Do not place the appliance in water or any liquid; nor handle/use it with
wet or moist hands.
• Do not use the product for purposes dierent from displayed in this
operating manual.
• Do not leave the appliance unattended when it’s working.
• Producer of this product is not responsible for damages caused by
inappropriate handling and using of the device.
• DO NOT use this device if the cord or the plug is damaged, or the
appliance is broken.
• Do not attempt to repair this appliance yourself. Only authorized and
qualied personnel may repair this device. There are no user-serviceable
parts inside the device, never disassemble this product.
• Do not use unauthorized accessories.
• Appliance for indoor use only.
• Make sure the power cord does not touch any hot or sharp elements.
• Do not move the appliance while it is operating.
• This appliance is suitable exclusively for food preparation. Do not place
anything but food in the appliance.
• Switch o the appliance before tting and removing the attachment.
PRODUCT DESCRIPTION
1
2
3
4
5
6
7
8 9 10

EN
Owner’s manual10
1. Red pilot light (power)
2. Green pilot light (heating)
3. Cover
4. Handle
5. Hook
6. Releasing buttons
7. Ceramic interchangeable plates
8. Heating plates for sandwiches
9. Heating plates for waes
10. Heating plates for grilling
Removing:
1. Open the cover of the sandwich maker.
2. Pull the releasing buttons to release upper and lower plates and remove
them.
Inserting:
1. Place the selected plate in the upper and lower casing and press them
toward corresponding cases until they click in place. Make sure the
heating plates are installed correctly.
Warning! Before removing or inserting heating plates make sure the device
has cooled down after operating. Never replace the plates when the device
is still hot.
ASSEMBLING AND DISASSEMBLING OF HEATING PLATES
OPERATION
1. Remove the device from the packaging and peel o any labels.
2. Place the device on dry and at surface.
3. Make sure the power supply socket is nearby.
4. Open the cover and apply a layer of vegetable oil or butter on the plates
using kitchen towel or brush for dough.
5. If necessary wipe o any excess oil.
6. Close the cover and insert the plug into supply socket. Red and green
indicators turn on.
7. Wait until green light goes o; it means that heating plates reached the
toasting temperature. Sandwich maker is now ready to be used.

Owner’s manual 11
EN
PREPARATION
Note:
• It is normal for the green light to go on and o while the device is operating.
It means that the sandwich maker keeps the toasting temperature.
• Hot steam can emit from the cover of the sandwich maker during
operation. Please exercise caution.
• Initially, the appliance may release an odor. This is a normal reaction
caused by initial heating of the plates and should not reoccur.
SANDWICHES
1. Make sure the heating plates for sandwiches are inserted into the device.
2. Insert the plug into power supply socket and preheat the device.
3. Prepare your sandwich.
4. When the device is ready to be used (green light goes o), open cover
and place your sandwiches on the lower plates.
5. Use the hook to close the sandwich maker.
Notes:
• If it is dicult to close the device, remove any excess from your sandwich.
• Do not use force while closing the device.
• Do not touch the device while it is operating.
• Do not open the cover during the cooking process.
6. Open the cover after about 4 to 5 minutes (or longer if you prefer; it depends
on the recipe or user’s preferences) and carefully remove the sandwich.
WAFFLES
1. Make sure the heating plates for waes are inserted into the device.
2. Apply a layer of vegetable oil or butter on the plates using kitchen towel or
brush for dough.
3. Pour the dough on the center of the lower wae plate and distribute it
evenly on the whole plate.
4. Close the cover but do not lock the hook (locking it would not allow the
waes grow).
5. Bake the waes for about 7 to 10 minutes.
Note: Do not open the sandwich maker during baking!
6. Open the cover and carefully remove the waes.

EN
Owner’s manual12
GRILL
1. Make sure the heating plates for grill are inserted into the device.
2. Apply a layer of vegetable oil or butter using brush for dough on both plates.
3. Put the product on the lower plate and close the cover.
Note: Do not use force while closing the device.
4. After some minutes (it depends on the recipe or user’s preferences) open
the cover and carefully remove grilled products.
Notes:
• If the sandwich maker is used to toast ready-made waes or sandwiches,
please make sure they t the heating plates. If not, please cut them to t
the plates.
• Ready-made waes/sandwiches must be buttered on the outside.
• Do not use synthetic or low fat spread as it tends to overheat at a lower
temperature forming dark brown residue that can cause the toasted
sandwich to stick to the plates.
SAFETY DURING REMOVING PRODUCTS FROM THE SANDWICH MAKER
CLEANING AND MAINTENANCE
• Remove ready products from the sandwich maker carefully as the heating
plates are hot.
• Use wooden or plastic utensils not to damage the surface of the heating
plates.
• Remember to pull out the plug from power supply socket after using the
sandwich maker.
• Remember that products removed from the sandwich maker are hot. Be
careful not to get burned while eating them.
1. Remove the plug from the power supply socket and let the device cool
down before cleaning.
2. Wipe the plates with a cloth damped in hot, soapy water.
3. Dry the plates with a clean, dry cloth or a kitchen towel.
4. Do not use any abrasives or chemical agents to clean this product.
5. After each usage remove the accumulated crumbs and wipe the surface
of the heating plates with a paper towel to absorb and remove the fat
accumulated during roasting.
6. It is recommended to store the device in the original packaging to
preserve it from dust and humidity.

Owner’s manual 13
EN
SPECIFICATION
• Power light
• Heating light
• Heatproof grip
• Ceramic coating
• Interchangeable plaits:
- grill
- wae iron
- sandwich maker
• Overheating protection
• Stainless steel cover
• Thermostat control
• Anti-slip base
• Upright storage
• Max. Power: 800 W
• Voltage: 220 ~ 240 V; 50/60 Hz
• Dimensions: 240 x 235 x 102 mm
• Cable length: 90 cm
• Weight: 1,67 kg
English
Correct Disposal of This Product
(Waste Electrical & Electronic Equipment)
(Applicable in the European Union and other European countries with separate collection
systems) This marking shown on the product or Its literature, indicates that It should not be disposed
with other household wastes at the end of its working life. To prevent possible harm lo the environment
or human health from uncontrolled waste disposal, please separate this from other types of wastes and
recycle it responsibly to promote the sustainable reuse of material resources. Household users should
contact either the retailer where they purchased this product, or their local government oce, for details
of where and how they can take this item for environmentally safe recycling. Business users should
contact their supplier and check the terms and conditions of the purchase contract This product should
not be mixed with other commercial wastes for disposal.
Made in China for Lechpol Electronics Leszek Sp.k., ul. Garwolińska 1, 08-400 Miętne.

FR
Manuel d’utilisation14
SAFETY INSTRUCTIONS
Merci d’avoir acheter l’appareil TEESA. Avant l’utilisation de l’appareil, lire
attentivement le mode d’emploi et le garder pour une consultation ultérieure.
Le fabricant n’est pas responsable d’une utilisation inappropriée du produit.
Pour éviter les dommages et les blessures, respecter les consignes de
sécurité essentielles appliquées pour l’utilisation des appareils électriques,
y compris celles détaillées ci-après:
• Avant l’utilisation, lire attentivement le mode d’emploi, même si un
appareil similaire a déjà été utilisé. Garder le mode d’emploi pour le
consulter ultérieurement.
• Avant de brancher l’appareil, vérier la conformité de la tension de
courant dans la prise secteur avec la tension de l’appareil.
• Il est interdit de brancher l’appareil à l’alimentation électrique en
utilisant des rallonges, des adaptateurs, des interrupteurs horaires, etc. le
brancher directement à une prise d’alimentation.
• Placer l’appareil sur une surface stable et plane.
• Nettoyer l’appareil conformément aux consignes indiquées dans la
rubrique « Nettoyage ».
• Toujours éteindre l’appareil et le débrancher de l’alimentation électrique:
- si l’appareil ne fonctionne pas correctement,
- si le bruit produit par l’appareil n’est pas typique pour son
fonctionnement ou témoigne d’une anomalie,
- avant le démontage,
- avant le nettoyage,
- si l’appareil n’est pas utilisé.
• Pour débrancher l’appareil de l’alimentation, saisir et tirer par la che. Ne
jamais tirer par le câble.
• Entreposer l’appareil dans un endroit hors de portée des enfants. L’utilisation
de l’appareil par des enfants sans surveillance des adultes est interdite.
• Cet appareil peut être utilisé par des enfants âgés d’au moins 8 ans et par
des personnes ayant des capacités physiques, sensorielles ou mentales
réduites ainsi que par des personnes ne possédant pas d’expérience ni
de connaissances, si ces personnes sont surveillées ou si des instructions
concernant l’utilisation de l’appareil en toute sécurité leur ont été
fournies, de manière à ce que tous les risques encourus soient compris.

Manuel d’utilisation 15
FR
Informer les enfants que cet appareil n’est pas un jouet. Le nettoyage et
la maintenance de l’appareil ne doivent pas être réalisés par des enfants
sans surveillance.
• Le câble d’alimentation inséparable peut être remplacé uniquement
dans un service agréé.
• Garder l’appareil et le câble d’alimentation loin des sources de chaleur,
d’eau, d’humidité, de bords tranchants et d’autres facteurs qui pourraient
endommager l’appareil ou le câble.
• Ne pas plonger l’appareil dans l’eau ni l’utiliser avec les mains mouillées.
• Ne pas utiliser l’appareil à d’autres ns que celles décrites dans le présent
mode d’emploi.
• Ne pas laisser l’appareil sans surveillance lors de son fonctionnement.
• Le fabricant n’est pas responsable des dommages causés par l’utilisation
incorrecte de l’appareil.
• Ilest interditd’utiliserl’appareil,silecâbled’alimentationestendommagé
ou si l’appareil ne fonctionne pas correctement.
• Il est interdit de réparer l’appareil par vous-même. Seule une personne
autorisée et qualiée peut eectuer les réparations. L’appareil ne possède
pas de pièces qui peuvent être réparées par l’utilisateur lui-même.
• Ne pas utiliser d’accessoires qui ne sont pas d’origine.
• L’appareil est exclusivement destiné à une utilisation en intérieur.
• Veiller particulièrement à ce que le câble d’alimentation ne touche pas
les bords tranchants / les surfaces chaudes.
• Ne pas déplacer l’appareil lors de son fonctionnement.
• L’appareil est uniquement destiné à la préparation d’aliments. Ne placer
rien d’autres dans l’appareil que les aliments.
• Avant de monter/démonter les accessoires, éteindre l’appareil.

FR
Manuel d’utilisation16
1. Témoin lumineux d’alimentation
(rouge)
2. Témoin lumineux de thermostat
(vert)
3. Couvercle
4. Poignée
5. Crochet
6. Boutons de déverrouillage
7. Inserts céramiques remplaçables
8. Inserts pour sandwichs
9. Inserts pour gaufres
10. Inserts pour grillades
DESCRIPTION DU PRODUIT
Retrait :
1. Ouvrir le couvercle du croque gaufre gril.
2. Tirer les boutons de déverrouillage de l’insert supérieur et inférieur et le
sortir.
Installation:
1. Placer l’insert choisi dans le couvercle supérieur ou inférieur du croque
gaufre gril, presser ensuite jusqu’à entendre un clic. S’assurer que les
inserts sont correctement installés.
Attention ! Avant de changer les insets, s’assurer que l’appareil est
complètement froid. Ne pas changer les inserts, si l’appareil est chaud.
MONTAGE/DÉMONTAGE DES INSERTS
1
2
3
4
5
6
7
8 9 10

Manuel d’utilisation 17
FR
PREPARATION
Remarques :
• Lors du fonctionnement de l’appareil, le témoin vert s’allume et s’éteint.
Ceci indique que le croque gaufre gril assure une température adéquate.
• Lors du traitement des produits alimentaires, de la vapeur chaude peut se
dégager d’en-dessous du couvercle. Faire très attention.
• Lors de la première utilisation, le croque gaufre gril peut dégager une
odeur d’usine. C’est une réaction normale, liée au premier réchauement
des plaques. Ceci ne devrait plus se produire par la suite.
SANDWICHS
1. S’assurer que les inserts pour sandwichs sont placés dans le croque gaufre
gril.
2. Brancher l’appareil à la prise d’alimentation électrique et le chauer.
3. Préparer les sandwichs.
4. Lorsque l’appareil est prêt à être utilisé (le témoin vert s’éteint), ouvrir le
couvercle et placer les sandwichs sur les inserts du couvercle inférieur.
5. Fermer l’appareil en utilisant le crochet.
Remarques :
• Si la fermeture de l’appareil n’est pas possible, retirer du sandwich les
ingrédients de trop.
• Ne pas forcer pour fermer l’appareil.
UTILISATION
1. Sortir l’appareil de l’emballage et enlever les étiquettes.
2. Placer l’appareil sur une surface stable et plane.
3. S’assurer que la prise d’alimentation électrique se trouve à proximité.
4. Ouvrir le couvercle du croque gaufre gril et appliquer une couche d’huile
végétale ou de beurre sur les inserts, à l’aide d’un essuie-tout ou d’un
pinceau pâtissier.
5. Si nécessaire, éliminer l’excès de graisse.
6. Ensuite, fermer le couvercle et brancher l’appareil à la prise d’alimentation
électrique. Les témoins lumineux rouge et vert s’allument alors.
7. Attendre que le témoin vert s’éteigne, ce qui indique que les plaques
chauantes ont atteint la température permettant de griller les aliments.
Le croque gaufre gril est prêt à être utilisé.

FR
Manuel d’utilisation18
• Ne pas toucher l’appareil lorsqu’il est en marche.
• Ne pas ouvrir le couvercle lors du fonctionnement de l’appareil.
6. Ouvrir le couvercle après environ 5 minutes (ou après une plus longue
période, la durée de la grillade dépend de la recette et des préférences de
l’utilisateur) et sortir avec précaution les sandwichs.
GAUFRES
1. S’assurer que les inserts pour gaufres sont placés dans le croque gaufre gril.
2. Appliquer une couche d’huile végétale sur les inserts, à l’aide d’un essuie-
tout ou d’un pinceau pâtissier.
3. Ensuite, verser la pâte au milieu de l’insert inférieur et étaler uniformément.
4. Fermer le couvercle, sans fermer le crochet (si le crochet est fermé, la pâte des
gaufres ne lèvera pas).
5. Cuire les gaufres pendant environ 7-10 minutes.
Attention : Ne pas ouvrir l’appareil lors de son fonctionnement!
6. Ensuite, ouvrir le couvercle et sortir avec précaution les gaufres.
GRIL
1. S’assurer que les inserts pour gril sont placés dans le croque gaufre gril.
2. Appliquer une couche d’huile végétale sur les inserts, à l’aide d’un essuie-
tout ou d’un pinceau pâtissier.
3. Ensuite, placer l’aliment sur l’insert inférieur et fermer l’appareil.
Attention : Ne pas forcer pour fermer l’appareil.
4. Après quelques minutes (la durée dépend de la recette et des préférences
de l’utilisateur), ouvrir le couvercle et sortir avec précaution l’aliment
préparé.
Remarques:
• Si l’appareil est utilisé pour chauer des gaufres ou des sandwichs déjà
cuits, s’assurer qu’ils rentrent dans l’appareil. Si ce n’est pas le cas, les
couper de manière à ce qu’ils rentrent dans l’appareil.
• Beurrer les gaufres/sandwichs déjà cuits.
• Ne pas utiliser de margarine synthétique ou allégée pour préparer les
aliments, car, à faibles températures, elle chaue trop et forme des
dépôts noirs qui peuvent faire coller les aliments aux inserts.

Manuel d’utilisation 19
FR
RETRAIT DES ALIMENTS DE L’APPAREIL ET SÉCURITÉ
NETTOYAGE ET MAINTENANCE
• Retirer avec précaution les aliments préparés, car les inserts sont chauds.
• Pour retirer les aliments de l’appareil, utiliser des ustensiles en plastique
ou en bois, pour ne pas endommager la surface des inserts.
• Veiller à débrancher l’appareil de la prise d’alimentation après son utilisation.
• Ne pas oublier que les aliments retirés de l’appareil sont chauds. Veiller à
ne pas se brûler.
1. Avant le nettoyage, débrancher l’appareil de la prise d’alimentation et
attendre que l’appareil refroidisse complètement.
2. Essuyer les inserts avec un chion imbibé d’eau tiède et avec du détergent
doux.
3. Après le nettoyage, sécher soigneusement les inserts à l’aide d’un chion
sec ou d’un essuie-tout.
4. N’utilisez pas de produits chimiques ou de détergents pour nettoyer
l’appareil.
5. Après chaque utilisation de l’appareil, éliminer des inserts les miettes et
les restes de nourriture et essuyer à l’aide d’un essuie-tout la surface des
inserts, pour qu’il absorbe la graisse accumulée pendant la grillade.
6. Il est recommandé d’entreposer l’appareil dans son emballage d’origine,
pour le protéger contre la poussière et l’humidité.

FR
Manuel d’utilisation20
France
Élimination appropriée du produit
(déchets d’équipements électriques et électroniques)
Les marquages apposés sur le produit ou dans les textes y correspondants indiquent que
l’appareil, une fois le délai d’usage passé, doit être éliminé avec les autres déchets ménagers. Pour
éviter les eets néfastes sur l’environnement et la santé humaine, suite à une élimination de déchets
non contrôlée, veuillez séparer le produit des autres déchets et recycler de manière responsable, pour
promouvoir la réutilisation des matériaux comme une pratique durable. Pour de plus amples informations
concernant le lieu et le recyclage en toute sécurité du produit, les utilisateurs dans les ménages doivent
contacter le distributeur chez qui ils ont acheté le produit ou une autorité locale compétente dans le
domaine. Les utilisateurs dans les entreprises doivent contacter leur fournisseur et vérier les conditions
du contrat d’achat. Ne pas éliminer le produit avec d’autres déchets commerciaux.
Fabriqué en RPC pour Lechpol Electronics Leszek Sp.k., ul. Garwolińska 1, 08-400 Miętne.
DONNÉES TECHNIQUES
• Témoin d’alimentation
• Témoin prêt à l’utilisation
• Poignée qui ne se chaue pas
• Couche céramique
• Inserts remplaçables:
- gril
- gaufres
- sandwichs
• Protection contre la surchaue
• Couvercle en acier inoxydable
• Sécurité thermostatique
• Socle antidérapant
• Entreposage en position verticale
• Puissance maximale : 800 W
• Alimentation : 220 ~ 240 V; 50/60 Hz
• Dimensions : 240 x 235 x 102 mm
• Longueur du câble : 90 cm
• Poids : 1,67 kg
Other manuals for TSA3221
1
Table of contents
Languages:
Other Teesa Kitchen Appliance manuals

Teesa
Teesa TSA4003 User manual

Teesa
Teesa TSA3221 User manual

Teesa
Teesa TSA8048 User manual

Teesa
Teesa TSA3231 User manual

Teesa
Teesa TSA3229B User manual

Teesa
Teesa AROMA F30 User manual

Teesa
Teesa SUPREME User manual

Teesa
Teesa TSA3222 User manual

Teesa
Teesa TSA3547 User manual

Teesa
Teesa TSA3020 User manual
Popular Kitchen Appliance manuals by other brands

Sanyo
Sanyo HPS-MC3 - Versatile Cooker For Grilling Griddling... instruction manual

Electrolux
Electrolux 601443 (CT6U) Specification sheet

Fagor
Fagor WC-28DZ instruction manual

U-Line
U-Line U-2224RINT-00A User guide & service manual

Franke
Franke FFD090X5S user manual

KitchenAid
KitchenAid KSM45 Series manual