manuals.online logo
Brands
  1. Home
  2. •
  3. Brands
  4. •
  5. Tektronix
  6. •
  7. Test Equipment
  8. •
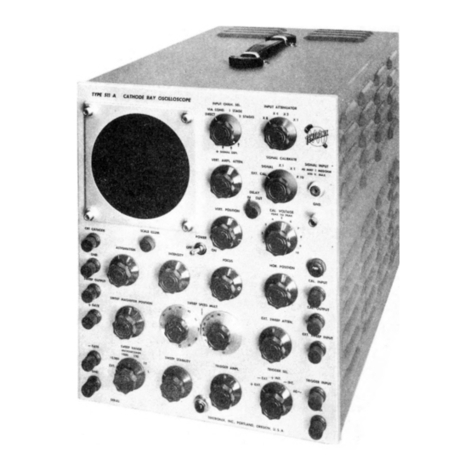
  9. Tektronix 519 User manual

Tektronix 519 User manual

INSTRUCTION
MIAN
UAL
IMPORTANT
Before
operating
this
instrument,
be
sure
to
remove
the
plastic
shipping
clamps
from
the
shock
mounts
of
the
amplifier
chassis.
These
clamps
should
be
saved
and
reinstalled
as
shown
in
the
sketch
if
the
instrument
is
to
be
shipped.
Be
sure
the
tongue
is
inserted
next
to
the
chassis
to
prevent
damage
to
the
shock
mount.
The
clamp
should
be
on
the
same
side
of
the
shock
mount
as
the
nut.
SHIPPING
CLAMP
~<a——
WITH
TONGUE
TOWARD
CHASSIS
RUBBER
MOUNT
CHASSIS
Tektronix,
Inc.
S.W.
Millikan
Way
@
P.
O.
Box
500
@
Beaverton,
Oregon
97005
@
Phone
644-0161
@
Cables:
Tektronix
070-243
rvice
rts
or
se
7S
°
wo
Ww
+
ice
.
s
and
pr
@i
Type
519
nTENSITY
ASTIGMATION:
SCALE
JLLUM.
WME
BASE
=
DELAY
nanosec
fom
"
&
sarenon
se
net
FOCUS
108
204,
‘a
Cod
1900,
RATE
GENERATOR
EXCL
ESISES
xeon?
a
-
STEP
GENERATOR
CALIBRAT
oe:
co
exten
REE
outs
Type
519
TRIGGER
PULSE
AMBLATUOE
on
SINE:
ng
id
vee
eco
SeeTeh
Pad
TYPE
S19
OSCILLOSCOPE
SERIAL
PRC
TRONI
INC,
CONTLANTD,
ORD
8
A
a
pret
AMPLITRDE
08
SNE
.
seveng
aoe
ba
HE
SYNE
FONETSOM
apy
aa
ene
a
mE
A
General
Information
The
Tektronix
Type
519:
Oscilloscope
is
a
wide-band
laboratory
instrument
designed
expressly
for
the
observation
and
measurement
of
high-frequency
phenomena.
Fast
linear
sweeps,
high
CRT
accelerating
potential,
excellent
triggering
sensitivity,
wide-band
trigger
system,
and
vertical
bandwidth
well
beyond
1000
megacycles
permit
accurate
repetitive
and
single-shot
displays
to
be
observed
and
photographed
from
fractional-nanosecond
signals.
An
inter-
nal
delay
line
in
the
vertical
channel
of
the
instrument
permits
display
of
the
leading
edge
of
the
signal
triggering
the
oscilloscope.
Sweep
delay
control
through
35
nano-
seconds
permits
viewing
signals
before
and
after
the
main
signal
event.
The
Type
519
incorporates
two
internal
waveform
gen-
erators.
An
adjustable
repetition-rate
fast-rise
pulse
gen-
erator
and
a
fast-rise
calibration-step
generator
supply
waveforms
which
can
be
used
to
check
the
calibration
of
the
oscilloscope
itself,
or
to
drive
external
devices.
These
wave-
form
generators
meet
most
requirements
to
complete
a
test
setup.
VERTICAL-DEFLECTION
SYSTEM
Vertical
Deflection
Factor
With
Type
T519P-A
CRT,
less
than
10
volts
per
cm.
Exact
CRT
deflection
factor
indicated
on
CRT
face
mask
of
each
instrument.
Passband
With Type
T519P-A
CRT,
dc
to
1000
megacycles
minimum
at
3-db
down.
Risetime
With
Type
T519P-A
CRT,
less
than
0.35
nanosecond
*
Input
Impedance
125
ohms.
*
1
nanosecond—=10°?
seconds.
®
SECTION
1
CHARACTERISTICS
Maximum
Allowable
Input
Power
to
Vertical
Channel
1.8
watts,
corresponding
to
15
volts
de
or
rms.
Maximum
Allowable
Peak
Signal
Amplitude
+100
volts.
Repeated
pulses
of
higher
voltage
may
dam-
age
the
125-ohm
signal
termination
resistor.
Internal
Signal
Delay
Approximately
45
nanoseconds,
fixed.
Voltage
Standing
Wave
Ratio
Nominally
1.25:1
to
1000
mc.
TRIGGER
Triggering
Signal
Sources
Internal
from
=
applied
signals,
internal
from
the
Rate
Gen-
erator,
internal
from
the
Calibration-Step
Generator,
and
external
from
-
trigger
inputs.
External
Triggering
Signal
Requirements
Pulse
amplitude:
20
millivolts.
Duration:
1
nanosecond
or
longer.
Maximum
permissible
external
triggering
signal:
+10
volts
peak, higher
with
external
attenuators.
Repeti-
tion
rate:
to
1000
mc.
Internal
Triggering
Signal
Requirements
Pulse
amplitude:
sufficient
signal
to
produce
a
2
trace-
width
deflection
on
the
screen
(approximately
200
mv).
Dur-
ation:
1
nanosecond
or
longer.
Repetition
rate:
to
1000
mc.
Countdown
A
sweep
is
obtained
for
each
trigger
signal
at
trigger
signal
frequencies
below
the
maximum
sweep
repetition
rate.
Trig-
gering
circuits
countdown
for
trigger
signal
frequencies
1-1
Characteristics—Type
519
higher
than
the
maximum
sweep
repetition
rate.
Sine-wave
trigger
requirements:
1
mc
to
1000
mc,
20
mv
peak-to-peak
external
trigger
input,
or
200
mv
peak-to-peak
signal
to
verti-
cal
input.
Pulse
Amplitude
or
Sync
Single
control
adjusts
pulse
triggering
level
or
high-fre-
quency
sync.
An
additional
control
provides
vernier
sync.
Delay
Sweep-start
delay
over
a
range
of
35
nanoseconds.
Per-
mits
waveform
to
be
positioned
horizontally
within
the
sweep,
to
display
a
selected
time
interval.
TIME
BASE
Sweep
Rates
Nine
Ranges:
2,
5,
10,
20,
50,
100,
200,
500,
and
1000
nano-
seconds
per
centimeter.
Accuracy
Typically
within
2%
of
indicated
rate on
all
ranges
except
the
2-nanosecond
range,
which
is
within
3%.
These
specifi-
cations
apply
to
the
entire
sweep
except
for
the
first
2
nano-
seconds
or
2
mm
(whichever
is
larger).
Single
Sweeps
Normal
or
single
sweeps
selected
by
front-panel
switch.
+
Trigger
Output
Greater
than
1-volt
pulse
into
50
ohms
upon
triggering.
Delayed
+
Gate
Greater
than
1-volt
gate
into
50
ohms
during
sweep;
delayed
with
respect
to
+
Trigger
Output
depending
on the
setting
of
the
sweep-delay
control.
RATE
GENERATOR
Risetime
Less
than
0.8
nanosecond
(0.5
nanosecond
typical).
Pulse
Repetition
Rate
3
cps
to
30
kc,
continuously
variable.
1-2
Pulse
Duration
10
nanoseconds
+
or
—
20%
at
the
50%
amplitude
points.
Output
Impedance
50
ohms.
Amplitude
Approximately
+15
volts.
CALIBRATION-STEP
GENERATOR
Risetime
Approximately
0.1
nanosecond.
Repetition
Rate
Adjustable
from 400
to
850
step
waveforms
per
second;
normally
operated
near
reed-switch
resonant
frequency
at
approximately
750
steps
per
second.
Output
Impedance
125
ohms.
Amplitude
Into
125
ohms,
0
to
10
volts.
Into
50
ohms
through
T50/T125
adapter,
0
to
1
volt.
Voltages
applied
to
both
impedances
are
continuously
variable
and
calibrated.
Uncalibrated
volt-
ages
up
to
50 volts
into
125
ohms.
Polarity
The
ouput
polarity
can
be
selected
by
a
front-panel
switch.
CATHODE
RAY
TUBE
Type
T519P-A
Phosphors
Type
P11
phosphor
standard
(recommended
for
single-shot
photographic
recording
at
fastest
sweep
rate).
Other
phos-
phors
available
only
on
special
request.
Usable
Viewing
Area
Two
centimeters
vertical,
six
centimeters
horizontal.
Accelerating
Voltage
24
kv.
Spot
Diameter
0.004
inch
(approximately
0.1
mm)
at
normal
intensity.
Deflection
Electrostatic.
Vertical
deflection
system
is
125-ohm
dis-
tributed-constant
delay
line.
Conventional
horizontal
deflec-
tion
plates.
CONSTRUCTION
AND
POWER
REQUIREMENTS
Construction
Single-unit
construction
with
light-weight
aluminum-alloy
chassis
and
four-piece
vinyl-finish
cabinet.
Side
panels,
top
and
bottom
panels
are
separately
removable.
Ventilation
Filtered
forced
air
with
protective
thermal
cutout
insures
safe
operating
temperatures.
Dimensions
Approximately
221%,"
high,
1434,”
wide,
and
251%,”
long.
Characteristics—Type
519
Power
Requirements
105
to
125
or
210
to
250
volts,
50
to
60
cycles,
approxi-
mately
650
watts.
ACCESSORIES
Information
on
accessories
for
use
with
this
instrument
is
included
at
the
rear
of
the
mechanical
parts
list.
1-3
Operating
Information—Type
519
INTENSITY
ASTIGMATISM
SCALE
ILLUM.
TYPE
S19
OSCILLOSCOPE
SERIAL
TEKTRONIX,
INC.
PORTLAND,
OREGON.
U.S.
A,
POSITIONING
VERTICAL
HORIZONTAL
AXIS
ROTATION
yas
TIME
BASE
NANOSEC
/CM
OPREK,
HI
O8ELT
1990.
20
NIN
sooo!
uate:
DELAYED
+
GATE
son
SINGLE
end
normat
ME
Sweer
one
RATE
GENERATOR
MULTIPLIER
CYCLES/SEC
RMULT
¢
I1@
xt
ee
gio
KIGOO
9
RATE
son
PULSE
AMPLITUDE
an
SYNC
TRIGGER
SOURCE
ra
TRIGGER
TRIGGER
OPERATION
PULSE
AMPLITUDE
OR
SYNC
vunctian
OR
HFS
2.
BEST
PULSE
SENESTIITY
JUST
EFORE
ARROW,
VERNIER
SYNC
FUNCTION
@witct
TH
APRROKOMATELY
FOG
RES
mare,
SYNC
BIOME
sa
KEN,
HP
SYNG
ror
unsE
ro
x
taacyenes.
FUNCTION
GAIN
SwiTcH
pene
Pee
NALS
EXUEEDING
820
VOLTS
Of
pasty
TRIGRENE
EXQEKOING
£2
VOLTS.
XS
OM
KES
POR
SMALL
AMPLITUDE
TemGERS
ue
TO
some,
POWER
oie
on
atti.
till
STEP
nes
Hehe
RET
turn
to
STANDBY
to
exrens
eee
VARIABLE
ed
cLesune
POLARITY
*
DRIVE
INPUTS
REED
SWITCH
FREQUENCY
EXTERNAL.
TRIGGER
128
4
Iv
MAX.
PEAK
SxCEPY
BDV
MAK.
PEAK
YS
KE
TREER
GIR
BEY
MAR
DEO
TORS,
ORF
MAR.
ROLE
2-0
Fig.
2-1.
Type
519
Oscilloscope
front
panel.
Introduction
The
Type
519
Oscilloscope
is
a
high
speed
laboratory
instrument
designed
for
observing,
measuring,
and
photo-
graphically
recording
phenomena
in
the
nanosecond
(milli-
microsecond)
domain.
However,
before
the
instrument
can
be
used
successfully,
it
is
important
for
you
to
have
an
un-
derstanding
of
the
operation
of
each
control.
This
section
of
the
Instruction
Manual
is
intended
to
help
you
acquire
this
understanding.
Much
of
the
familiarity
with
the
controls
will
come
only
with
actual
use
of
the
instrument.
A
brief
description
of
each
of
the
front-panel
controls
follows.
Front-
panel
markings
are
shown
in
Fig.
2-1.
FUNCTION
OF
CONTROLS
CRT
FOCUS
Used
in
conjuction
with
the
ASTIGMATISM
control
to
focus
the
oscilloscope
trace.
INTENSITY
Adjusts
the
brightness
of
the
trace.
ASTIGMATISM
—
Used
in
conjunction
with
the
FOCUS
con-
trol to
obtain
a
round
spot
and
a
sharply
focused
trace.
SCALE
ILLUM.
Adjusts
the
brightness
of
the
graticule
markings.
Graticule
A
knurled
knob
located
below
the
center
Control
of
the
graticule
permits
graticule
to
be
moved
down
out
of
the
viewing
area.
TIME
BASE
NANOSEC/CM
_
Selects
the
desired
time
base.
DELAY
Determines
the
delay
of
the
start
of
the
sweep
with
respect
to
the
trigger
signal
input.
NORMAL-SINGLE
Selects
either
normal
or
single-sweep
SWEEP
operation.
RATE
GENERATOR
CYCLES/SEC
Used
in
conjunction
with
the
MULTIPLIER
control
to
set
the
Rate
Generator
out-
put
frequency.
SECTION
2
OPERATING
INFORMATION
MULTIPLIER
Multiplier
for
the
CYCLES/SEC
control.
Should
be
set
to
OFF
position
when
Rate
Generator
is
not
being
used.
CALIBRATION-STEP
GENERATOR
RANGE
Selects
full-scale
amplitude
of
the
cali-
brated
steps,
a
variable
uncalibrated
step
amplitude,
or
a
standby
condition.
Should
be
set
to
STANDBY
when
Calibration-Step
Generator
is
not
being
used.
VARIABLE
Permits
the
step
waveform
to
be
preset
to
an
arbitrary
desired
amplitude
up
to
about
50
volts
into
a
125-ohm
load.
VOLTS
Sets
the
output
voltage
of
the
calibration-
step
waveform
in
the
10V
and
1
V
posi-
tions
of
the
RANGE
switch.
REED
SWITCH:
DRIVE
Adjusts
the
reed-switch
magnetic
excita-
tion
for
proper
closures
or
permits
single
reed
operation.
FREQUENCY
=
Controls
frequency
of
the
reed-switch
mag-
netic
excitation
to
help
minimize
contact
bounce.
TRIGGER
PULSE
AMPLI-
=
Selects
triggering
signal
amplitude
re-
TUDE
OR
SYNC
*
quired
to
operate
triggering
circuits,
or
ad-
justs
synchronization.
VERNIER
SYNC
Used
in
conjunction
with
PULSE
AMPLI-
TUDE
OR
SYNC
control
to
synchronize
the
sweep.
FUNCTION
*
Permits
choice
of
triggered
or
synchronized
displays.
GAIN
*
Selects
proper
gain
or
attenuation
for
the
triggering
signal.
TRIGGER
Selects
the
triggering
signal
source
and
SOURCE
polarity.
*
Also
see
TRIGGER
OPERATION
section
of
front-panel,
Fig.
2-1.
2-1
Operating
Information—Type
519
POSITIONING
VERTICAL
Adjusts
the
vertical
position
of
the
trace.
AXIS
ROTA-
Aligns
the
trace
parallel
to
the
horizontal
TION
graticule
lines.
HORIZONTAL
—
Adjusts
the
horizontal
position
of
the
trace.
POWER
DIM
ADJ.
Used
to
adjust
the
brightness
of
pilot
light
after
45-second
warm-up
period.
ON
AC
line
switch.
PRELIMINARY
INSTRUCTIONS
Cooling
A
blower
maintains
safe
operating
temperature
in
the
Type
519
Oscilloscope
by
drawing
air
through
a
filter
and
circulating
it
over
the
components.
Therefore,
the
instru-
ment
must
be
placed
so
that
the
air
intake
and
cabinet
ventilating
holes
are
not
blocked.
The
air
filter
must
be
kept
clean
to
permit
adequate
air
flow.
A
thermal
cutout
switch
disconnects
the
dc
power
if
the
instrument
becomes
overheated.
The
pilot
lamp
will
re-
turn
to
full
brightness
in
the
event
that
dc
power
is
lost.
Brown-Yellow-Green
Lo
B
beats
Black-White
117-VOLT
OPERATION
Brown-Yellow-Green
Brown-Yellow-
Brown
Black-White
234-VOLT
OPERATION
If
this
happens,
check
immediately
for
proper
airflow
into
the
instrument. The
blower
continues
to
cool
the
interior
and
reduces
the
time
the
thermal
switch
remains
open.
DC
power
will
be
restored
when
the
temperature
drops
to
a
safe
value.
Power
Requirements
The
regulated
power
supplies
in
the
Type
519
Oscillo-
scope
will
operate
with
line
voltages
from
105
to
125
volts
(117
nominal)
or
from
210
to
250
volts
(234
nominal).
The
line
voltage
for
which
your
instrument
is
wired
at
the
factory
is
indicated
on
a
metal
tag
fastened
to
the
rear
panel
near
the
power
receptacle.
Transformer
connections
may
be
changed
for
either
117-
or
234-volt
operation
by
using
the
information
given
in
Fig.
2-2.
The
power
trans-
former
is
wound
with
two
117-volt
primaries
which
are
connected
in
parallel
for
117-volt
operation
and
in
series
for
234-volt
operation.
Since
the
blower
motor
is
connected
across
only
one
of
the
transformer
primaries,
no
change
in
the
motor
lead
connections
is
required.
When
the
trans-
former
connections
are
changed,
the
voltage
indicated
on
the
metal
tag
should
be
covered
with
another
tag
which
conforms
to
the
new
operating
voltage.
For
maximum
dependability
and
long
life,
the
line
voltage
applied
to
the
Type
519
Oscilloscope
should
be
near
the
voltage
indicated
on
the
metal
tag
located
near
the
power
receptacle
at
the
rear
of
the
instrument.
If
the
line
voltage
exceeds
the
operating
limits,
or
has
a
poor
waveform
(dis-
torted
sine
waves),
unstable
power-supply
operation
may
Fig.
2-2.
Power
transformer
connections
for
operation
of
the
Type
519 Oscilloscope
at
117
or
234
volts.
result.
Check
for
proper
line
voltages
and
waveform
before
checking
for
other
causes
of
unstable
operation.
Fuse
Requirements
When
the
Type
519
Oscilloscope
is
connected
for
117-
volt
operation,
use
a
7-amp
slow-blowing
type
fuse.
When
the
instrument
is
connected
for
234-volt
operation,
use
a
4-amp
slow-blowing
type
fuse.
Time
Delay
A
time
delay
relay
used
in
the
Type
519
delays
operation
of
the
instrument
for
approximately
45
seconds
after
the
instrument
is
switched
on.
The
relay
allows
a
brief
tube-
warmup
period
before
the
dc
operating
voltages
are
applied.
When
the
ac-power
pilot
light
dims,
the
instrument
is
ready
for
use.
If
the
ac-power
is
interrupted
for
only
an
instant,
the
normal
45-second
delay
will
occur
before
the
instrument
returns
to
full
operation.
Dim
Adjustment
The
DIM
ADJ.
control
is
a
screwdriver
adjustment
which
controls
the
brightness
of
the
ac-power
pilot
light
after
the
45-second
warm-up
period.
Normally,
it
is
adjusted
to
a
setting
which
will
reduce
glare
from
the
pilot
light
when
waveform
observations
are
being
made
in
a
darkened
room.
Camera
Bezel
When
one
of
the
Tektronix
cameras
is
used
with
the
Type
519
the
bezel
supplied
on
the
oscilloscope
must
be
used.
The
bezel
supplied
with
the
camera
will
not
take
the
graticule
assembly
properly.
FIRST-TIME
OPERATION
To
place
the
Type
519
in
operation
for
the
first
time,
the
following
procedure
is
suggested:
1.
Set
the
front-panel
controls
as
follows
(controls
not
mentioned
may
be
placed
in
any
position):
POWER
Off
DIM
ADJ.
Centered
INTENSITY
Fully
counterclockwise
NORMAL-SINGLE
SWEEP
NORMAL
NANOSEC/CM
5
DELAY
Centered
MULTIPLIER
X1000
CYCLES
/SEC
10
RANGE
STANDBY
TRIGGER
SOURCE
RATE
GEN.
GAIN
NORMAL
FUNCTION
PULSE
PULSE
AMPLITUDE
Fully
counterclockwise
OR
SYNC
VERTICAL
Centered
HORIZONTAL
Fully
clockwise
Operating
Information—Type
519
2.
(The
line
voltage
for
which
the
instrument
is
wired
at
the
factory
is
indicated
near
the
power
cord
receptacle.)
Connect
the
power
cord
to
the
rear
of
the
instrument
and
to
the
source
of
power.
3.
Set
the
POWER
switch
to
ON.
4.
Allow
about
45
seconds
for
the
pilot
lamp
to
dim,
indicat-
ing
that
dc
operating
voltages
are
applied
and
the
instru-
ment
is
ready
for
use.
CAUTION
Do
not
turn
the
intensity
so
high
that
a_
bright
glow
surrounds
the
spot.
Excessive
brightness
of
a
stationary
spot
may
damage
the
screen
in
a
few
seconds.
Advance
the
INTENSITY
control
until
a
visible
spot
appears
near
the
left
center
of
the
screen.
6.
Adjust
the
FOCUS
and
ASTIGMATISM
controls
to
produce
a
small
round
spot.
7.
Advance
the
PULSE
AMPLITUDE
OR
SYNC
control
fully
clockwise
to
obtain
a
horizontal
sweep
across
the
screen.
Readjust
the
INTENSITY
control
for
suitable
trace
bright-
ness.
mn
8.
Rotate
the
HORIZONTAL
positioning
control
to
position
the
start
of
the
trace
at
the
left
marking
of
the
graticule.
9.
Adjust
the
AXIS
ROTATION
control
until
the
trace
is
parallel
to
the
horizontal
markings
of
the
graticule.
10.
Connect
a
T50/N125
adapter
to
the
+-RATE
50Q
con-
nector
making
certain
that
the
50-ohm
connectors
are
mated.
If
the
wrong
impedance
connectors
are
mated,
the
signal
path
remains
open
and
the
connections
will
not
seat
fully.
11.
Connect
a
2-nsec
125-ohm
cable
from
the
125-ohm
end
of
the
adapter
to
the
SIGNAL
125
connector.
12.
Rotate
the
PULSE
AMPLITUDE
OR
SYNC
control
slowly
counterclockwise
and
adjust
the
DELAY
control
until
a
stable
display
of
the
Rate
Generator
pulse
is
obtained.
Locate
the
waveform
vertically
using
the
VERTICAL
positioning
control.
13.
Adjust
the
FOCUS,
INTENSITY,
and
ASTIGMATISM
controls
until
a
sharp
trace
with
adequate
intensity
is
ob-
tained.
These
controls
are
slightly
interdependent.
An
exter-
nal
signal
and/or
trigger
may
now
be
applied
to
the
input
connectors.
If
external
triggers
are
used,
set
the
TRIGGER
SOURCE
switch
to
+
or
—
EXT.
If
internal
triggering
from
the
input
signal
is
used,
set
the
TRIGGER
SOURCE
switch
to
+
or
—
INT.
CRT
CONTROLS
AND
GRATICULE
Intensity
The
INTENSITY
control
is
used
to
adjust
the
brightness
of
the
oscilloscope
display.
Compensation
can
be
made
for
changes
in
brightness
resulting
from
changes
in
the
trigger-
ing
rate
or
time
base.
The
INTENSITY
control
is
rotated
clockwise
to
increase
brightness
and
counterclockwise
to
decrease
brightness.
Care
must
be
taken
when
using
the
INTENSITY
control
that
the
brightness
is
not
turned
up
to
the
point
where
the
phosphor
on
the
face
of
the
cathode
2-3
Operating
Information—Type
519
ray
tube
(CRT)
becomes
permanently
damaged.
The
intensity
of
the
beam
should
never
be
turned
up
to
the
point
where
a
bright
halo
forms
around
a
stationary
spot.
The
FOCUS
and
ASTIGMATISM
controls
permit
a
sharp,
clearly
defined
spot
or
trace
to
be
obtained.
Perhaps
the
best
way
to
adjust
the
FOCUS
and
ASTIGMATISM
controls
is
to
display
a
waveform
on
the
oscilloscope
and
then
adjust
the
FOCUS
and
ASTIGMATISM
controls
alternately
for
the
best
overall
focus
of
the
trace.
It
may
be
necessary
to
make
a
new
adjustment
of
the
controls
if
the
intensity
of
the
trace
is
changed.
The
disappearing
graticule
used
with
the
Type
519
Oscilloscope
is
accurately
marked
with
6
horizontal
and
2
vertical
1-centimeter
divisions.
The
minor
division
markings
on
the
horizontal
centerline
are
5
millimeters
apart;
those
on
the
vertical
centerline
are
2
millimeters
apart.
The
grati-
cule
markings
allow
accurate
time
and voltage
measure-
ments
to
be
made
from
the
oscilloscope
screen.
To
move
the
graticule
out
of
the
viewing
area
of
the
screen,
loosen
the
knurled
knob
located
just
below
the
graticule
and
slide
it
downward
the
full
length
of
the
slot.
Tighten
the
knob.
To
return
the
graticule
to
functioning
position,
reverse
the
process.
The
graticule
cover
and
mask
assembly
is
held
securely
in
place
by
four
slotted
graticule
nuts
and
is
provided
with
hinge
fittings
for
mounting
the
viewing
hood.
In
addition,
the
hinge
fittings
allow
quick
removal
of
the
viewing
hood
so
that
a
Tektronix
Model
C-12
or
C-19
camera
may
be
mounted.
The
Model
C-19
camera
is
especially
designed
to
photograph
the
fast
sweeps
of
the
Type
519
Oscillo-
scope.
When
the
camera
is
not
being
used,
it
can
be
unlatched
and
swung
away
from
the
CRT
screen.
Graticule
IIlumination
The
graticule
is
illuminated
by
two
lamps
located
at
the
top
edge
of
the
graticule.
The
SCALE
ILLUM.
control,
located
below
the
oscilloscope
screen,
is
rotated
clockwise
to
brighten
the
graticule
markings
and
counterclockwise
to
dim
them.
Camera
Jack
A
camera
jack,
marked
6.3V
CAMERA,
provides
a
6.3-volt
source
for
use
with
a
camera.
When
the
camera
plug
is
inserted
in
the
jack,
the
SCALE
ILLUM.
control
and
oscil-
loscope
graticule
lights
are
automatically
disconnected.
POSITIONING
Two
controls,
VERTICAL
and
HORIZONTAL,
are
used
to
position
the
trace
to
the
desired
point
on
the
oscilloscope
screen.
A
third
positioning
control,
AXIS
ROTATION,
is
used
to
align
the
trace with
the
horizontal
markings
of
the
graticule.
The
VERTICAL
position
control
has
sufficient
range
to
allow
the
trace
to
be
positioned
completely
off
the
top
or
bottom
of
the
screen,
or
to
any
intermediate
point.
The
trace
2-4
moves
up
when
the
control
is
rotated
clockwise
and
down
when
the
control
is
rotated
counterclockwise.
The
HORIZONTAL
position
control
causes
the
trace
to
move
to
the
right
when
it
is
rotated
in
the
clockwise
direction
and
to
the
left
when
it
is
rotated
counterclockwise.
The
total
horizontal
positioning
range
of
the
control
is
about
2
centi-
meters.
The
AXIS
ROTATION
control
is
a
screwdriver
adjustment
located
between
the
VERTICAL
and
HORIZONTAL
controls.
This
adjustment
permits
the
trace
to
be
rotated
about
an
axis
through
the
center
of
the
screen.
VERTICAL-DEFLECTION
SYSTEM
Signal
Input
Connection
The
electrical
signal
to
be
observed
is
applied
externally
through
a
125-ohm
coaxial
cable
to
the
SIGNAL
125
con-
nector.
If
the
impedance
of
the
signal
source
is
other
than
125
ohms,
corresponding
cables
and
a
suitable
adaptor
should
be
used
to
prevent
mismatches
and
resulting
reflec-
tions.
The
signal
passes
internally
first
through
a
trigger
takeoff,
then
through
a
45-nsec
delay
cable
to
the
distributed
vertical
deflection
system
of
the
CRT.
The
signal
causes
the
spot
to
be
deflected
vertically.
The
spot traces
out
the
sig-
nal
waveform
on
the
screen
as
the
spot
is
deflected
hori-
zontally
by
the
horizontal
sweep
circuits.
The
vertical
size
of
the
display
form
can
be
adjusted
to
a
suitable
amplitude
by
inserting
external
attenuators
or
an
amplifier
in
series
with
the
signal-carrying
cable.
Or,
if
the
Cali-
bration-Step
Generator
is
being
used
as
the
signal
source,
the
vertical
amplitude
of
the
waveform
can
be
adjusted
by
means
of
the
Calibration-Step
Generator
front-panel
con-
trols.
The
vertical
sensitivity
of
the
Type
519
Oscilloscope
is
dependent
on
the
CRT
mounted
in
the
instrument
and
on
the
adjustment
of
the
high
voltage.
The
risetime
and
sensitivity
of
each
Type
519
CRT
is
measured
at
the
factory.
These
measurements
are
then
recorded
on
the
CRT
face
mask.
The
sensitivity
measurement
can
be
checked
at
any
time
by
using
the
Calibration-Step
Generator.
To
check
the
measurement,
connect
a
125-ohm
cable
from
the
OUTPUT
1250
connector
to
the
SIGNAL
1250
con-
nector.
Set the
(CALIBRATION-STEP
GENERATOR)
RANGE
switch
to
10V
TO
1250
and
rotate
the
VOLTS
control
to
10.00.
Adjust
the
oscilloscope
front-panel
controls
for
a
stable
presentation
of
the
step
waveform.
Adjust
the
VOLTS
control
until
the
portion
of
the
waveform
located
2
nsec
after
the
rise
is
exactly
one
centimeter
high.
The
vertical
sensitivity
in
volts
per
centimeter
can
be
read
directly
from
the
VOLTS
dial.
For
example,
if
the
VOLTS
dial
shows
a
reading
of
8.70,
the
vertical
deflection
factor
is
8.7
volts
per
centimeter.
When
connecting
the
oscilloscope
to
any
signal
source,
the
connections
should
be
made
directly
through
125-ohm
cables
or
through
suitable
impedance
matching
devices
to
the
SIGNAL
125
connector.
However,
when
impedance
®
matching
devices
are
used,
you
must
consider
possible
signal
voltage
changes
produced
by
the
devices.
If
the
signal
amplitude
is
too
great,
it
will
be
necessary
to
attenuate
the
signal
to
a
usable
level
before
applying
it
to
the
SIGNAL
125Q
connector.
This
can
be
done
by
inserting
a
1250
attenuator
(of
known
attenuation
factor)
between
the
signal
source
and
the
SIGNAL
1250
connector.
Attenuators
may
be
used
individually
or
may
be
‘“'stacked’
(connected
in
series).
If
the
signal
amplitude
is
too
low
to
produce
sufficient
vertical
deflection,
an
external
amplifier
can
be
inserted
between
the
signal
source
and
the
SIGNAL
125
Q
connector.
However,
if
the
amplifier
does
not
provide
the
correct
input
and
output
impedance,
severe
waveform
distortion
may
result.
In
addition,
if
the
amplifier
stages
have
limited
band-
width,
or
do
not
operate
linearly,
the
signal
will
not
be
reproduced
faithfully
on the
CRT.
In
general,
to
obtain
an
accurate
waveform
display
and
to
prevent
unwanted
reflection
of
high-frequency
waveforms
or
of
fast-rise
pulses,
all
cables
should
be
terminated
in
their
characteristic
impedances.
An
exception
is
described
under
Accessories,
part
(4)
Adaptor
N50/N125
(page
2-11).
Delaying
the
Signal
The
Type
519
Oscilloscope
contains
a
fixed
45-nanosecond
signal-delay
line
which
allows
sufficient
time
for
the
trigger
circuits
to
process
the
trigger
signal
and
start
the
sweep
before
the
leading
edge
of
the
input
signal
arrives
at
the
CRT.
The
internal
delay
cable
provides
about
10
nano-
seconds
extra
delay
after
sweep
start
and
before
display
of
the
triggering
signal.
At
the
slower
sweep
rates
the
trig-
gering
signal
will
appear
very
near
the
start
of
the
trace.
If
you
wish
the
signal
to
appear
farther
to
the
right,
you
may
insert
additional
125-ohm
delay
cable,
but
at
the
ex-
pense
of
risetime.
The
extra
delay
cable
must
be
added
after
the
trigger
takeoff
point
to
increase
the
signal
delay.
The most
common
point
of
insertion
is
at
the
CRT
end
of
the
fixed
delay
line.
The
DELAY
control
provides
a
35-nanosecond
adjust-
ment
in
sweep
starting
time
with
respect
to
the
triggering
signal.
Within
this
range
of
adjustment,
the
DELAY
control
can
be
used
to
select
the
display
time
and
thus
apparently
position
the
waveform
horizontally
on
the
screen
with
re-
spect
to
the
trace.
For
triggered
sweep
operation
with
externally-derived
trigger
signals,
the
time
relationship
of
the
external
trigger
signal
to
the
input
signal
must
fall
within
the
adjustment
range
of
the
DELAY
control.
If,
for
example,
too
much
de-
lay
is
introduced
by
using long
cables
to
couple
the
trigger
signal
to
the
EXTERNAL
TRIGGER
125
connector,
the
in-
put
signal
will
arrive
at
the
vertical
deflection
plates
be-
fore
the
sweep
is
triggered.
The
signal
input
waveform,
having
arrived
early,
will
not be
displayed
on the
screen.
To
offset
external
delay
of
this
type,
shorten
the
external
trigger
cable,
if
possible.
If
this
is
not
possible,
cable
can
be
added
into
the
signal-carrying
circuits,
but
only
with
loss
of
bandwidth
due
to
high-frequency
attenuation
in
the
cable.
The
delay
provided
by
a
typical
125-ohm
cable
such
as
the
RG-63/U
cables
shipped
with
the
oscilloscope
is
approxi-
mately
1.2
nsec
per
foot.
If
any
portion
of
the
input
wave-
form
is
displayed
on the
screen,
the
amount
of
delay
which
®
Operating
Information—Type
519
24
n
aoe
rl
n
T
T
—
T T
Tt
=
“4
~
(a)
4
j
Se
|
1
1
t
ee
any
|
1
Fig.
2-3.
Typical
waveforms
resulting
from
incorrect
signal
or
trig-
gering
signal
delays.
Waveform
(a)
results
from
either
too
much
triggering
delay
or
too
little
signal
delay.
Waveform
(b)
results
either
from
too
little
triggering
delay
or
too
much
signal
delay.
must
be
added
or
subtracted
to
display
the
waveform
pro-
perly
on
the
screen
can
be
determined
by
the
sweep
rate
and
the
number
of
divisions
that
the
display
must
be
moved.
If
the
display
must
be
moved
to
the
right,
less
delay
in
the
trigger
cable
is
required.
Fig.
2-3
shows
displays
resulting
from
incorrect
signal
or
trigger
delays.
When
30-megacycle
or
higher
repetition-rate
signals
of
identical
shape
and
amplitude
are
being
displayed,
the
DE-
LAY
control
will
always
permit
display
of
the
complete
waveform.
If
all
waveforms
are
uniform,
it
is
not
important
which
one
is
displayed.
The
internal
delay
line
may
be
bypassed
by
direct
connections
to
the
CRT
if
desired,
at
the
sacrifice
of
internal
triggering
from
the
signal.
Triggering
(or
Synchronizing)
the
Sweep
In
most
applications
it
is
desirable
for
a
repetitive
wave-
form
to
appear
stationary
on
the
oscilloscope
screen
so
that
the
characteristics
of
the
waveform
can
be
examined
in
de-
tail.
As
a
necessary
condition
for
this
type
of
display,
the
start
of
each
horizontal
sweep
must
be
time-related
to
a
characteristic
of
the
input
waveform.
In
the
Type
519
Oscil-
loscope
this
is
accomplished
either
by
triggering
or
syn-
chronizing
the
sweep
with
the
displ
or
with
another
waveform
bearing
a
definite
time
relationship
to
the
pl
More
information
about
the
horizontal
sweep.
is
given
in
the
Time
Base
portion
of
this
section
of
the
manual.
The
following
paragraphs
outline
the
operation
of
the
various triggering
controls
in
the
TRIGGER
section
of
the
front
panel,
in
the
order
normally
encountered.
Usually,
the
TRIGGER
SOURCE
switch
would
be
set
first,
GAIN
switch
second,
and
FUNCTION
switch
third.
Finally,
the
PULSE
AMPLITUDE
OR
SYNC
control
is
adjusted
to
obtain
a
stable
display
for
‘triggered’
sweep
operation.
For
2-5
Operating
Information—Type
519
“synchronized”
sweep
operation,
both
the
PULSE
AMPLI-
TUDE
OR
SYNC
and
VERNIER
SYNC
controls
may
be
ad-
justed
to
obtain
a
stable
display.
Selecting
the
Trigger
Source
The
sweep
can
be
either
triggered
or
synchronized
(de-
pending
upon
the
setting
of
the
FUNCTION
switch)
from
the
following
sources:
(1)
displayed
waveform,
(2)
exter-
nally-derived
waveform,
(3)
Calibration-Step
Generator,
or
(4)
Rate
Generator.
The
trigger
source
selection
is
by
means
of
the
TRIGGER
SOURCE
switch.
Each
trigger
source
has
advantages
for
certain
applications.
(1)
Displayed
Waveform.
Triggering
from
the
displayed
waveform
is
the
method
most
commonly
used.
Triggering
is
from
the
displayed
waveform
with
the
TRIGGER
SOURCE
switch
set
to
either
the
-+-INT.
or
—INT.
position.
Internal
triggering
is
convenient,
since
no
external
triggering
signals
or
connections
are
required.
A
displayed
waveform
that
produces
at
least
two
trace-widths
of
vertical
deflection
with
a
time
duration
of
one
nanosecond
or
more
is
sufficient
for
reliable
triggering.
(2)
Externally-Derived
Signal.
To
trigger
the
sweep
from
an
external
signal,
connect
the
triggering
signal
to
the EX-
TERNAL
TRIGGER
125Q
input
connector.
The
external
triggering
signal
must
be
at
least
20
millivolts
in
amplitude,
with
a
time
duration
of
1
nanosecond
or
more.
The
maxi-
mum
amplitude
should
not
exceed
-2
volts
peak
except
when
the
GAIN
switch
is
set
to
X.2.
In
the
X.2
position
the
external
trigger
should
not
exceed
+10
volts.
Larger
trig-
gers
may
be
attenuated
externally.
External
triggering
sig-
nals
can
be
used
when
the
TRIGGER
SOURCE
switch
is
set
to
either
+EXT.
or
—EXT.
External
triggering
signals
preferably
should
be
disconnected
from
the
EXTERNAL
TRIGGER
1250
connector
when
some
other
mode
of
trig-
gering
is
used
to
reduce
the
possibility
of
stray
triggering.
External
triggering
provides
definite
advantages
over
other
methods
of
triggering
in
certain
applications.
With
external
triggering,
the
triggering
signal
usually
remains
constant
in
amplitude
and
shape
(depending
upon
the
source).
Also,
time
and
phase
relationships
between
wave-
forms
at
different
points
in
a
circuit
can
be
seen.
If,
for
ex-
ample,
the
external
triggering
signal
is
derived
from
the
waveform
at
the
input
to
a
device
under
test,
it
is
possible
to
observe
the
shaping,
jitter,
amplification,
or
delay
of
the
signal
through
the
device
without
resetting
the
oscillo-
scope
triggering
controls
for
each
observation.
(3)
Calibration-Step
Generator.
In
the
+CAL.
or
—CAL.
positions
of
the
TRIGGER
SOURCE
switch,
the
triggering
sig-
nal
is
obtained
internally
from
the
Calibration-Step
Gen-
erator.
The
signal
is
derived
through
the
use
of
a
trigger
takeoff
circuit
inserted
near
the
termination
of
the
gener-
ator.
Therefore,
it
is
necessary
to
keep
in
mind
that the
con-
trols
which
adjust
the
output
amplitude
of
the
Calibra-
tion-Step
Generator
also
affect
the
amplitude
of
the
trig-
gering
signal
available
at
the
+CAL.
and
—CAL.
posi-
tions
of
the
TRIGGER
SOURCE
switch.
These
two
positions
of
the
TRIGGER
SOURCE
switch
are
used
to
observe
a
wave-
form
which
is
time-related
to
the
output
waveform
of
the
Calibration-Step
Generator.
It
is
then
possible
to
observe
and
accurately
measure
shaping,
jitter,
amplification,
or
delay
at
various
points
in
the
device
under
test.
In
2-6
addition,
the
internal-trigger
requirement
for
a
minimum
signal
height
and
duration
can
be
circumvented.
When
the
step
generator
is
not
being
used,
it
should
be
set
on
STAND-
BY.
(4)
Rate
Generator.
The
RATE
GEN.
position
of
the
TRIG-
GER
SOURCE
switch
provides
triggering
signals
which
can
be
varied
to
cover
a
continuous
repetition-rate
range
from
3cps
to
30kc. These
signals
can
then
be
used
to
trigger
the
sweep
at
a
known
repetition
rate
within
the
above
range.
To
select
the
Rate
Generator
trigger,
set
the
TRIGGER
SOURCE
switch
to
RATE
GEN.
Then
set
the
MULTIVIBRATOR
switch
and
CYCLES/SEC
control
to
the
desired
repetition
rate.
Selecting
the
Trigger
Polarity
The
horizontal
sweep
can
be
triggered
on
either
the
ris-
ing
(+slope)
or
falling
(—slope)
portion
of
the
triggering
waveform
as
determined
by
the
position
of
the
TRIGGER
SOURCE
switch.
In
many
applications
the
triggering
polarity
is
important
since
triggering
on
the
wrong
slope
will
make
it
impossible
to
display
the
portion
of
the
waveform
which
is
of
interest.
In
many
other
cases,
however,
such
as
high-frequency
repeti-
tive
waveforms,
the
triggering
signal
polarity
is
usually
not
important.
Selecting
the
Trigger
Gain
A
four-position
GAIN
switch
permits
incoming
trigger
sig-
nals
to
be
attenuated
or
amplified
as
necessary
for
proper
triggering
or
synchronization.
The
four
gain
settings
are:
X.2,
NORMAL,
X5,
and
X20.
To
aid
in
determining
which
GAIN
switch
setting
to
use
for
reliable
triggering,
Table
2-1
is
included.
Additional
information
is
given
in
the
PULSE
AMPLITUDE
OR
SYNC
control
description.
TABLE
2-1
TRIGGER
SOURCE
Approximate
GAIN
Switch
Settings
Switch
Setting
X.2
NORMAL
|
X5t
X20t
RATE
GEN.
Always
set
in
this
position.
+CAL.
*
8v
to
50v|1.5v
to}
0.5v
to
50
v
50v
EXT.
lvtol0v
0.2
v
to
2v|0.04v
to}
0.01
v
to
(peak)
(peak)
2v
2v
EINT.
**
10
v
(pulse)
to]2v
to
20v|0.4v
to
|
0.1
v
to
100
v
(pulse)
(pulse)
20
v
20
v
+
Used
for
small
amplitude
triggers
up
to
200
mc.
*
Calibration-Step
Generator
output
step
amplitudes
are
listed.
Approximately
2.5%
of
the
step
amplitude
is
coupled
to
the
+
CAL.
and
—CAL.
positions
of
the
TRIGGER
SOURCE
switch.
**
Voltage
ranges
of
signals
applied
to
the
SIGNAL
125
{2
con-
nector
are
given.
Approximately
10%
of
the
signal
amplitude
is
picked
off
and
coupled
to
the
--INT.
and
—INT.
positions
of
the
TRIGGER
SOURCE
switch.
Selecting
the
Trigger
Function
Three
functions
or
modes
of
operation
are
provided
in
the
Type
519
Oscilloscope
to
cover
a
wide
range
of
trig-
gering
conditions:
They
are:
PULSE,
SYNC,
and
HF
SYNC.
To
determine
the
best
trigger
mode
for
a
particular
appli-
cation,
it
is
best
to
have
some
understanding
of
all
three
before
making
a
selection.
Each
of
the
triggering
modes
is
designed
to
provide
sta-
ble
triggering
from
a
certain
type
of
waveform.
For
many
applications,
however,
more
than
one
mode
will
work
well.
For
such
applications,
the
triggering
mode
selected
is
simply
a
matter
of
choice.
The
PULSE
mode
permits
choice
of
a
free-running
sweep
or
a
sweep
triggered
by
signals
at
random
or
uniform
repeti-
tion
rates
up
to
50
mc.
The
upper
repetition-rate
limit
varies,
depending
upon
the
regularity
of
the
pulse
period.
The
PULSE mode,
when
used
in
conjunction
with
the
SINGLE
SWEEP
feature,
permits
photographs
to
be
made
of
single
events
at
any
setting
of
the
NANOSEC/CM
switch.
The
SYNC
mode
permits
stable
displays
of
waveforms
occurring
at
a
constant
repetition
rate~up
to
approximately
150
mc.
To
select
this
mode,
place
the
FUNCTION
switch
in
the
SYNC
position.
The
HF
SYNC
mode
permits
the
sweep
to
be
synchronized
from
high-frequency
signals
in
the
range
from
approximately
100
mc
to
more
than
2kmc.
To
use
the
high-frequency
syn-
chronization
mode,
place
the
FUNCTION
switch
in
the
HF
SYNC
position.
Triggering
or
Synchronizing
the
Sweep
The
last
controls
normally
operated
in
the
TRIGGER
sec-
tion
of
the
front
panel
are
the
PULSE
AMPLITUDE
OR
SYNC
and
VERNIER
SYNC
controls.
These
controls
are
used
for
two
functions:
pulse
amplitude
selection
and
synchroniza-
tion,
depending
upon
the
setting
of
the
FUNCTION
switch.
If
the
FUNCTION
switch
is
set
to
the
PULSE
position,
the
PULSE
AMPLITUDE
OR
SYNC
control
determines
the
level
a
signal
must
reach
to
initiate
the
sweep.
All
triggers
below
the
set
level
are
rejected.
In
order
for
the
control
to
oper-
ate
properly
within
its
rotational
range,
sufficiently
large
triggers
must
be
available
as
explained
earlier
under
Select-
ing
the
Trigger
Gain.
Triggering
on
small
signals
is
best
when
the
control
is
set
just
short
of
the
point
where
the
sweep
free
runs.
The
sweep
normally
free
runs
when
the
PULSE
AMPLITUDE
OR
SYNC
control
is
rotated
clockwise
past
the
RECURRENT
arrow.
|
T
Pry
VOLTAGE
—nneneie
A
pigs
fi
TT
TIME
>
Fig.
2-4.
The
usual
oscilloscope
display
is
a
graphical
presentation
of
voltage
versus
time.
©1
Operating
Information—Type
519
If
the
FUNCTION
switch
is
set
to
either
the
SYNC
or
the
HF
SYNC
position,
the
PULSE
AMPLITUDE
OR
SYNC
con-
trol
is
used
for
making
the
coarse
synchronization
adjust-
ment.
Final
adjustment
may
be
made
with
the
VERNIER
SYNC
control.
The
sweep
repetition
rate
will
synchronize
at
the
frequency
of
the
triggering
signal
or
at
some
sub-
multiple
frequency.
The
VERNIER
SYNC
control
is
normally
set
at
midrange
until
the
coarse
adjustment
is
made,
then
the
VERNIER
SYNC
control
is
adjusted
to
obtain
a
stable
display.
TIME
BASE
Horizontal
Sweep
The
Type
519
Oscilloscope
graphically
presents
instantane-
ous
signal
voltage
versus
time
(see
Fig.
2-4).
The
signal
volt-
age
produces
vertical
deflection
of
the
trace;
time
is
repre-
sented
through
horizontal
deflection.
The
horizontal
sweep
is
also
known
as
the
time
base,
since
horizontal
deflection
of
the
spot
bears
a
definite
relationship
to
time
and
provides
the
means
for
making
time
measurements
from
the
screen.
The
NANOSEC/CM
switch
selects
the
desired
sweep
rate
from
one
of
nine
accurately
calibrated
rates
available.
Time
base
steps
range
from
2
nanoseconds
per
centimeter
to
1000
nanoseconds
(1
psec)
per
centimeter.
The
sweep
gen-
erator
has
been
designed
to
provide
long-term
stability
of
sweep
calibration
and
linearity.
Single
Sweep
Operation
The
Type
519
Oscilloscope
permits
a
single-sweep
pres-
entation
to
be
obtained
and
eliminates
all
subsequent
sweeps
so
the
signal
can
be
clearly
recorded
without
con-
fusion
resulting
from
multiple
traces.
The
single-sweep
fea-
ture
is
selected
by
placing
the
NORMAL-SINGLE
SWEEP
switch
in
the
SINGLE
SWEEP
position.
The
RESET
button
must
be
actuated
to
‘arm’
the
time
base
and
permit
a
sin-
gle-trigger
event.
When
the
FUNCTION
switch
is
placed
in
the
PULSE
posi-
tion
and
the
PULSE
AMPLITUDE
OR
SYNC
control
is
set
fully
clockwise
(past
the
RECURRENT
arrow
or
line),
a
sin-
gle
sweep
runs
immediately
each
time
the
RESET
button
is
depressed.
When
the
PULSE
AMPLITUDE
OR
SYNC
control
is
set
for
triggered
sweep
operation,
the
single
sweep
does
not
neces-
sarily
occur
immediately
after
the
RESET
button
is
depressed.
Instead,
the
READY
lamp
lights
to
indicate
that
the
sweep
is
armed
and
ready
to
be
triggered.
When
a
trigger
is
re-
ceived,
the
sweep
runs
once
and
the
READY
light
goes
out.
Each
time
the
RESET
button
is
depressed
the
procedure
is
repeated.
When
the
FUNCTION
switch
is
placed
either
in
the
SYNC
or
HF
SYNC
position,
a
single
sweep
runs
immediately
each
time
the
RESET
button
is
depressed
regardless
of
the
set-
tings
of
the
PULSE
AMPLITUDE
OR
SYNC
control.
The
time
base
may
also
be
reset
externally,
using
the
3-conductor
plug
supplied
in
the
accessory
kit
and
a
normal-
ly
open
push-button
switch.
Connect
the
two
center
terminals
of
the
plug
through
a
cable
to
the
two
terminals
on
the
push-
button
switch
and
insert
the
plug
into
the
EXTERNAL
RESET
jack
on
the
rear
panel.
With
the
NORMAL-SINGLE
SWEEP
switch
in
the
SINGLE
SWEEP
position,
the
push-button
switch
may
be
used
to
arm
the
sweep.
2-7
Operating
Information—Type
519
{1)
Recurrent
sweep.
{2)
Triggered
sweep.
See
(1)
=a)
TIME
BASE
(1)
“SO
NORMAL
Output
from
+TRIGGER
50
{7
tor
or
DELAYED
+
GATE
50
or
+
RATE
50
©
connector
are
RATE
GENERATOR
\
\
|
|
|
OPTIONAL
Output
from
external
circuit
directly
to
crt
if
less
delay
is
required
'
Circuit
to
be
triggered
=
or
synchronized
\
aap
cirevit
to
oscilloscope
input.
Fig.
2-5.
Using
the
Type
519
Oscilloscope
to
drive
an
external
circuit.
the
oscilloscope
for
display.
Synchroscope
Operation
In
the
usual
oscilloscope
application,
the
sweep
is
trig-
gered
or
synchronized
by
the
input
waveform.
However,
in
some
applications
it
may
be
more
desirable
to
reverse
the
process
and
drive
an
external
circuit
from
the
oscilloscope.
In
this
‘‘synchroscope”
application,
the
sweep
is
caused
to
free
run
or
to
be
triggered
by
the
Calibration-Step
Generator
or
the
Rate
Generator.
The
output
signal
from
the
+TRIGGER
500,
the
DELAYED
+GATE,
the
+
RATE
50,
or
the
OUTPUT
125
connector
is
used
to
in-
itiate
the
input
waveform
(see
Fig.
2-5).
The
sweep
can
be
made
to
free
run
in
any
position
of
the
FUNCTION
switch.
If
the
PULSE
position
of
the
FUNCTION
switch
is
used,
the
PULSE
AMPLITUDE
OR
SYNC
control
must
be
rotated
fully
clockwise
past
the
RECURRENT
arrow.
The
sweep
free runs
at
all
times
when
the
FUNCTION
switch
is
in
either
the
SYNC
or
HF
SYNC
positions.
The
number
of
free-running
sweeps
per
second
is
determined
by
the
settings
of
the
NANOSEC/CM
switch
(refer
to
Table
2-2).
A
free-running
sweep
also
provides
a
convenient
refer-
ence
trace
on
the
oscilloscope
screen
without
requiring
an
input
signal.
The
trace
can
then
be
positioned
to
a
desired
point
on
the
oscilloscope
screen
or
can
be
used
to
establish
a
zero-voltage
reference
line.
Delayed
Trigger
A
delayed
triggering
pulse
is
produced
at
the
DELAYED
+GATE
50
connector
of
the
oscilloscope
at
approximately
2-8
Output
from
a.
ff
lr
le
aie
se
ee
ee
ke
oe
ne
ee
ae
in
The
output
of
the
external
circuit
is
then
applied
to
the
input
of
TABLE
2-2
NANOSEC/CM
SWEEP
REPETITION
RATES
|
Switch
Settings
|
(Recurrent
Rates)
2
|
Adjusted
to
400
kc
5
200
ke
nominal
10
100
ke
nominal
20
50
ke
nominal
50
20
kc
nominal
100
10
ke
nominal
200
5
ke
nominal
500
2ke
nominal
1000
1
ke
nominal
the
time
of
sweep
start.
The
delay
of
the
delayed
trigger-
ing
pulse
with
respect
to
the
time
that
the
trigger
is
accepted
and
a
pulse
is
produced
at
the
+TRIGGER
500
connector
can
be
adjusted
over
a
range
of
approximately
35
nanosec-
onds
by
means
of
the
DELAY
control.
RATE
GENERATOR
The
output
pulse
from
a
transistor
operating
in
the
ava-
lanche
mode
is
coupled
to
the
RATE
GEN.
position
of
the
TRIGGER
SOURCE
switch
and
to
the
+RATE
500
con-
nector.
The
pulse
risetime
is
less
than
0.8
nanosecond,
ampli-
tude
is
nominally
+15
volts,
and
duration
is
approximately
10
nanoseconds.
A
typical
Rate
Generator
waveform
as
displayed
on
the
Type
519
is
shown
in
Fig.
2-6.
To
use the
®
eI
bit
Tie
2
NSEC/CM
Fig.
2-6.
Typical
Rate
Generator
output
waveform
as
displayed
on
the
Type
519
Oscilloscope.
Rate
Generator,
set
the
TRIGGER
SOURCE
switch
to
RATE
GEN.
Then
adjust
the
CYCLES/SEC
and
MULTIPLIER
controls
for
the
desired
repetition
rate.
Any
frequency
be-
tween
3cps
and
30kc
can
be
selected
within
an
accuracy
of
10%.
Since
the
sweep
can
be
triggered
at
the
repetition
rate
set
by
the
Rate
Generator
from
3cps
to
30kc,
this
fea-
ture
can
be
used
for
applications
such
as
those
described
previously
under
the
headings
‘Selecting
the
Trigger
Source’,
and
‘“Synchroscope
Operation”.
When
the
Rate
Generator
is
not
used,
it
should
be
turned
off
by
placing
the
MULTIPLIER
switch
to
the
OFF
position
to
reduce
the
possibility
of
stray
triggering.
CALIBRATION-STEP
GENERATOR
Step
Waveform
The
step
waveform
from
the
Calibration-Step
Generator
is
generated
by
discharging
a
charged
coaxial
line
into
LOO
e*
O82
ge
ions
g
eeeeeees”
9
6
80
ee
eee
e.
Soe
eer
by
goss
¥,
o%
5098
<
“fe0oe
WY
A;
ry)
Soest
66
ay,
ss
OIL
pee
aet
Trigger
Takeoff
Line-Charging
Network
(The
complete
Trigger
(Can
be
disconnected
so
Takeoff
can
be
disconnect-
that
=
additional
charge
ed
from
the
Type
519
and
cable
may
be
added.)
used
in
other
125-ohm
sys-
tems.)
Fig.
2-7.
Locations
of
the
Calibration-Step
Generator
line
charging
network
and
trigger
takeoff.
®
Operating
Information—Type
519
an
external
load
through
a
magnetically-operated
dry-
reed
switch.
The
physical
length
of
the
charged
line
determines
the
duration
of
the
output
step
waveform.
In
the
Type
519,
with
no
external
charge
line
added,
the
duration
of
the
constant-amplitude
portion
of
the
step
is
equal
to
twice
the
transit
time
of
the
built-in
1.5-nsec
charge
line.
(Transit
time
of
the
charge
line
is
the
time
required
for
a
signal
to
pass
from
one
end
of
the
line
to
the
other.)
For
the
1.5-nsec
charge
line,
then,
the
duration
of
the
output
pulse
is
3
nsec.
To
obtain
a
longer
duration
step
waveform,
an
additional
length
of
charge
line
(cable)
may
be
added
to
the
Charge
Line
Connector
located
next
to
the
Trigger
Takeoff
(see
Fig.
2-7).
When
an
additional
charge
line
is
added,
the
charging
network
and
the
charging
voltage
must
be
disconnected.
They
must
then
be
connected
to
the
open
end
of
the
added
charge
line.
A
typical
display
of
the
Calibration-Step
Generator
waveform
as
seen
on the
Type
519
Oscilloscope
appears
in
Fig.
2-8.
it
+
“ae.
ELS
et
LEA
ES
2
i
2
NSEC/CM
Fig.
2-8.
Typical
Calibration-Step
Generator
waveform
as
displayed
on
the
Type
519
Oscilloscope.
It
is
not
always
possible
to
com-
pletely
eliminate
reed
switch
multiple
contact
bounce.
Extraneous
traces,
therefore,
sometimes
will
occur
in
the
display.
Polarity
Step
polarity
is
selected
by
the
POLARITY
switch.
The
polarity
of
the
step
at
the
output
connector
is
the
same
as
the
polarity
of
the
charge
voltage.
The
setting
of
the
TRIG-
GER
SOURCE
switch
should
agree
with
the
setting
of
the
POLARITY
switch
for
normal
triggering.
Amplitude
The
step
amplitude
is
dependent
upon
the
amount
of
charging
voltage
used.
The
charge
voltage
obtained
from
the
charging
source
at
the
instant
of
reed
switch
closure
is
2
times
the
step
voltage
present
at
the
OUTPUT
1250
connector
when
driving
an
external
125-ohm
load.
The
step
voltage
reading
is
accurately
indicated
by
the
settings
of
the
RANGE
and
VOLTS
controls.
When
the
VOLTS
control
is
set
to
10.00,
the
RANGE
switch
permits
a
choice
of
two
full
scale
step
amplitudes,
10
volts
or
1
volt.
When
the
RANGE
switch
is
placed
in
the
10V
TO
1250
position,
10
volts
is
produced
across
a
125-
ohm
load.
When
the
RANGE
switch
is
set
in
the
1V
TO
50
position,
a
T50/T125
adapter
must
be
properly
con-
nected
to
the
OUTPUT
125
connector
to
obtain
a
1-volt
step
into
a
50
ohm
load.
The
scale
of
the
VOLTS
control,
when
used
with
either
of
the
two
above
RANGE
switch
positions,
indicates
the
step
2-9
Operating
Information—Type
519
amplitude.
The
VOLTS
control
is
the
0
to
1
multiplier
for
the
two
ranges.
When
the
RANGE
switch
is
set
to
the
VARIABLE
position,
the
step
amplitude
may
be
preset
by
the
VARIABLE
con-
trol
to
any
uncalibrated
amplitude
from
0
to
approximately
50
volts
when
driving
a
125-ohm
load.
To
determine
the
amplitude
of
the
step
for
any
setting
of
the
VARIABLE
con-
trol,
apply
the
step
waveform
from
the
OUTPUT
1250
connector
through
a
125-ohm
cable
(and
attenuator,
if
needed)
to
the
SIGNAL
12509
connector.
Measure
the
amplitude
of
the
vertical
deflection
in
centimeters
and
multiply
the
distance
measured
by
the
sensitivity
of
the
oscilloscope
(and
attenuation
if
used).
Adjusting
the
Drive
and
Frequency
Two
front-panel
controls,
DRIVE
and
FREQUENCY,
con-
trol
the
movement
of
the
dry-reed
switch.
These
controls
are
adjusted
to
cause
the
reed
to
make-and-break
contact
with
a
minimum
of
contact
bounce.
To
adjust
the
two
controls,
they
must
first
be
preset
fully
counterclockwise.
Then
advance
the
DRIVE
control
until
the
reed
vibrates
(makes
a
buzzing
sound).
Advance
the
FRE-
QUENCY
control
until
the
reed
fails
to
operate
and
then
rotate
the
control
slightly
counterclockwise
to
start
the
reed
operating
again.
Slowly
rotate
the
DRIVE
control
counter-
clockwise
while
rotating
the
FREQUENCY
control
back
and
forth
to
find
the
resonant
frequency
of
the
reed.
The
reso-
nant
frequency
is
found
when
the
drive
is
decreased
to
a
point
where
the
reed
will
vibrate
in
only
one
small
rota-
tional
area
of
the
FREQUENCY
control
range.
For
optimum
operation
the
DRIVE
and
FREQUENCY
controls
are
then
adjusted
to
obtain
the
most
stable
waveform
near
the
reso-
nant
frequency
of
the
reed.
When
adjusting
the
DRIVE
con-
trol,
use
enough
drive
to
get
solid
closures
of
the
reed
contacts.
The
resonant
frequency
of
most
reeds
is
usually
within
the
range
of
700
to
800
cps.
NOTE
The
reed
switches
used
in
the
Type
519
are
chosen
to
produce
the
best
possible
waveform.
The
high
requirements
of
these
switches
frequently
result
in a
short
lifetime.
To
extend
the
life
of
the
reed
switch
set
the
RANGE
switch
to
STANDBY
when
the
Calibration-Step
Generator
is
not
being
used.
ACCESSORIES
The
following
information
pertains
to
the
accessories
which
are
included
with
the
Type
519
Oscilloscope.
Other
optional
accessories
which
are
available
are
accompanied
by
specific
application
notes.
See
also
Section
7,
Acces-
sories.
(1)
125
Q
Termination
The
125Q
Termination
(Fig.
2-9)
is
supplied
as
a
spare
for
the
T519P-A
CRT
termination
or
to
terminate
any
125-
ohm
cable.
*
The
letter
‘‘T’’
in
an
adaptor
type
means
‘'Terminated";
‘‘N"
means
‘‘Not
Terminated".
2-10
A
we
\
2
125
Q
DISC-TYPE
|
|
150
91
SHUNT
RESISTOR
|
CONNECTOR™
| |
sa
i
NS
ee
ee
per
Fig.
2-9.
Construction
of
the
12592
Termination.
TYPE
519
OSCILLOSCOPE
CALIBRATION-STEP
GENERATOR
our
T
SIGNAL
1
12,
PA
O
125
Q
CABLE
O
RANGE
control
set
to
1
V
to
50
50Q
CONNECTOR
1T50/T125
ADAPTOR
125
2
CONNECTOR
502
150/T125
DEVICE
ADAPTOR
UNDER
TEST
1252
50
&
CABLE
CONNECTOR
502
50
9
INPUT
CONNECTOR
502
125
Q
CONNECTOR
CONNECTOR
(64.6
Q
DISC-TYPE
96.8
©
SERIES
*
ISHUNT
RESISTOR™
S
RESISTOR
Vv
{
I
a
1
/
;
Py
ONAL
Fig.
2-10.
Construction
of
the
T50/T125
Adaptor.
Also
shown
are
two
typical
applications
for
this
adaptor.
(2)
Adaptor
T50/T125*
This
adaptor
(Fig.
2-10)
is
commonly
known
as
a
mini-
mum
loss
matching
pad.
Designed
to
match
between
a
50-ohm
line
and
125-ohm
line,
the
attenuator
presents
minimum
loss
and
reflections.
It
contains
a
network
com-
posed
of
a
shunt
and
a
series
resistor.
Though
the
attenu-
ator
presents
a
correct
impedance
match
“in
either
direc-
tion’,
the
signal
voltage
transmission
factor
of
0.225
in
going
from
125
ohms
to
50
ohms
is
less
than
the
N50/N125
adaptor
described
later.
In
going
from
50
ohms
to
125
ohms,
the
signal
voltage
transmission
factor
is
approximately
0.564.
The
primary
advantage
of
the
T50/T125
adaptor
is
that
it
receives
signals
into
either
end
without
producing
reflections.
(3)
Adaptor
T50/N125
This
adaptor
is
usually
called
a
50-ohm
termination
adaptor
and
the
internal
circuitry
is
shown
in
Fig.
2-11.
In
actual
use
the
83.3-ohm
resistor
is
shunted
by
the
125-ohm
input
impedance
of
the
load.
The
combined
resistances
present
a
total
input
impedance
of
50-ohms
to
the
signal
source.
2
Q
50
e
EXTERNAL
To
Type
519
PULSE
OR
CW
[-}—202
CABLE
AY
1
95[
Je
SIGNAL
125
2
GENERATOR
(ANY
LENGTH)
Connector
125
Q
50
Q
eanateme
iia
Hoi
Rae
Se
a)
\,
83.3
2
DISC-TYPE
\
|
SHUNT
RESISTOR
\
i
fet
;
2.
$
|
vi
}
howe
sien
sm
sm
it
te
ste
on
Fig.
2-11.
Construction
of
the
T50/N125
Adaptor.
A
typical
appli-
cation
for
this
adaptor
is
also
shown.
The
adaptor.
is
designed
to
handle
pulse
or
continuous-
wave
signals
originating
from
a
50-ohm
source.
It
is
not
generally
used
to
handle
a
signal
traveling
in
the
125-ohm
to
50-ohm
direction,
since
it
does
not
provide
a
termination
for
the
125-ohm
connector.
When
a
T50/N125
is
used
to
connect
a
50-ohm
signal
to
the
519
signal
input
con-
nector,
the
signal
voltage
is
unchanged
and
the
signal
cable
is
fully
terminated.
The
vertical
deflection
system
has
50
nsec
of
delay
before
it
is
terminated
in
125
ohms.
Any
reflections
from
the
CRT,
its
connections,
or
termination,
would
return
through
the
delay
fine
and
reflect
from
the
nonterminating
end
of
the
T50/N125
to
reappear
at
the
CRT
90
to
100
nanoseconds
after
the
original
signal.
(4)
Adaptor
N50/N125
Also
called
an
unterminated
adaptor,
this
accessory
(Fig.
2-12)
is
a
straight-thru
connector
which
connects
a
50-ohm
line
directly
to
a
125-ohm
line.
This
unit
is
used
primarily
for
pulse
applications.
If
a
pulse
from
50
ohms
is
applied
to
the
50-ohm
end
of
the
adaptor,
the
pulse
amplitude
increases
1.43
times
at
the
125-ohm
end
due
to
the
reflec-
tion
at
the
end
of
the
50-ohm
system.
In
going
from
125
to
50
ohms,
approximately
a
0.572
transmission
factor
results.
This
is
more
than
for
any
of
the
other
adaptors.
Since
it
is
a
nonterminating
unit,
it
will
produce
a
high
VSWR
when
used
with
high-frequency
sine
waves.
502
50
*
EXTERNAL
‘0
Type
519
TEST
PULSE
LENGTH
OF
4 0
pasos
Lee
siGNal
125.0
GENERATOR
50
2
CABLE
onnector
RG-8A/U
;
T=
Pulse
Duration
|
‘
;
|
T
a
Cable
Length=
->
CONNECTOR,
Soe
os
oe
CONNECTOR
‘i
\
\
Li
|
oT
|
4
}
Ne
/
<<"
SIGNAL
Fig.
2-12.
Construction
of
the
N50/N125
Adaptor.
Also
shown
is
a
typical
application
for
the
adaptor.
®
Operating
Information—Type
519
When
the
adaptor
is
used
for
pulses,
the
abrupt
discon-
tinuity
inherent
in
the
unit
causes
a
reflection
to
occur
which
may
interfere
with
the
displayed
form
unless
certain
precautionary
measures
are
taken.
To
prevent
a
reflection
from
occurring
on
the
displayed
waveform,
make
the
electrical
length
of
the
cable
supplying
the
adaptor
equal
to
or
more
than
T/2,
where
T
is
the
length
of
the
pulse
to
be
observed.
The
reflection
will
then
appear
after
the
displayed
waveform.
TABLE
2-3
SIGNAL
VOLTAGE
TRANSMISSION
FACTORS
SIGNAL
SIGNAL
DIRECTION
ADAPTOR
DIRECTION
500
to
1250
TYPE
1259
to
500
564
T50/T125
.225
1.000
T50/N125
Not
Used
Not
Used
N50/T125
400
1.43
N50/N125
572
1.58
Theoretical
633
Maximum
Power
Transfer
(5)
125
Insertion
Unit
This
unit
is
a
hollow
tube
with
125-ohm
connectors
on
each
end
and
access
holes
located
on
each
side
to
permit
small
components
to
be
mounted
inside.
A
snap-on
sleeve
cover
permits
adequate
shielding
of
components
and
pro-
vides
minimum
discontinuity
in
the
line.
The
unit
facilitates
125-ohm
(or
50-ohm,
if
desired)
connections
for
pulse
testing
components
such
as
diodes
or
transistors.
It
can
also
be
used
for
testing
or
design
of
networks
such
as
filters,
attenu-
ators,
impedance-matching
circuits,
etc.,
and
measurements
on
amplifiers
and
many
other
devices.
The
device
makes
it
unnecessary
to
use
a
chassis
with
long
leads
and
poor
impedance
matching.
Instead,
the
components
or
circuit
can
be
mounted
in
the
small
insertion
unit
and
used
as
part
of
the
125-ohm
system.
For
series
tests,
the
effective
impedance
of
the
test
cir-
cuit
is
2Zo.
For
shunt
tests,
the
effective
test
circuit
imped-
ance
is
Z)/2.
Thus,
for
tests
using
125-ohm
cable,
a
series
measurement
is
with
250
ohms
equivalent
series
resistance
while
a
test
from
center
conductor
to
ground
is
with
a
62.5-ohm
equivalent
source
resistance.
The
above
condi-
tions
assume
proper
termination
impedances
in
both
direc-
tions
from
the
test
point.
(6)
125
©
Coupling
Capacitor
The
125Q
Coupling
Capacitor
connector
contains
a
silvered-ceramic,
wafer-type
capacitor
connected
in
series
with
the
inner
conductor.
‘A
slight
amount
of
compensating
inductance
is
supplied
by
the
conductors
butt-soldered
to
the
capacitor.
(See
Fig.
2-13).
This
unit
is
normally
used
for
ac-coupling
high-frequency
signals
to
the
Type
519
Oscilloscope
with
minimum
reflec-
tions.
Low-frequency
signals
and
dc
are
blocked.
Its
char-
acteristics
are:
;
Coupling
Capacitance:
0.01
uf
+20%,
0.0082
uf
GMV.
2-11
Operating
Information—Type
519
CENTER
CONDUCTOR
BUTT-SOLDERED
125
Q
TO
CAPACITOR
125
Q
CONNECTOR
SILVERED
CERAMIC
WAFER-TYPE
CAPACITOR
Fig.
2-13.
Construction
of
the
1252
Coupling
Capacitor.
400
volts.
Negligible.
Voltage
Rating:
Reflections:
Low-Frequency
Cutoff
in
125
Q:
Approximately
65
kc.
(7)
125
Q
1
KMC
Timing
Standard
The
1259
1KMC
Timing
Standard
is
a
Sweep
Calibrator
which
can
be
used
to
make
periodic
sweep
calibration
checks
of
the
2-
and
5-nanosecond/cm
rates.
Refer
to
the
Calibration
Procedure
section
of
this
manual.
2-12
(8)
125
QO
Delay
Cables
Different
length
cables
are
supplied
for
use
in
coupling
the
signal
and/or
trigger
to
the
appropriate
input
connectors
on
the
front
panel
of
the
Type
519
Oscilloscope.
The
loss
per
foot
of
RG-63/U
cable
is
0.06db
at
1kmc.
The
delay
time
marked
on
each
cable
is
the
time
required
for
a
signal
to
travel
from one
end
of
the
cable
to
the
other.
(9)
125
Q
Cable
Connector
Parts
(a)
Double
Button
Assembly.
Used
for
replacing
a
dam-
aged
or
worn
insert
in
any
of
the
125-ohm
front-panel
connectors
or
cable
connectors.
(b)
Panel
Adaptor
Assembly.
Replacement
for
any
of
the
front-panel
125-ohm
connectors.
(c)
125Q
Cable
Connector.
Replacement
for
any
of
the
cable
connectors.
(10)
Reed
Switch
Two
spare
reed
switches
are
included
as
replacements
for
the
reed
switch
used
in
the
Calibration-Step
Gen-
erator.
To
replace
the
reed
switch
refer
to
the
Mainte-
nance
section
of
this
manual.

Other manuals for 519

2

Other Tektronix Test Equipment manuals
Tektronix TBS1000B-EDU Series Operating and maintenance manual

Tektronix

Tektronix TBS1000B-EDU Series Operating and maintenance manual

Tektronix MSO44B Instruction manual

Tektronix

Tektronix MSO44B Instruction manual

Tektronix ST2400A User manual

Tektronix

Tektronix ST2400A User manual

Tektronix 067-1002-99 User manual

Tektronix

Tektronix 067-1002-99 User manual

Tektronix 2440 User manual

Tektronix

Tektronix 2440 User manual

Tektronix P6109B User manual

Tektronix

Tektronix P6109B User manual

Tektronix MTS400 Series User manual

Tektronix

Tektronix MTS400 Series User manual

Tektronix 7603 User manual

Tektronix

Tektronix 7603 User manual

Tektronix TDS 520 Operating instructions

Tektronix

Tektronix TDS 520 Operating instructions

Tektronix 4 Series Installation and maintenance instructions

Tektronix

Tektronix 4 Series Installation and maintenance instructions

Tektronix ST112 User manual

Tektronix

Tektronix ST112 User manual

Tektronix TDS3012C-NV User manual

Tektronix

Tektronix TDS3012C-NV User manual

Tektronix MTS415 Use and care manual

Tektronix

Tektronix MTS415 Use and care manual

Tektronix WVR5250 User manual

Tektronix

Tektronix WVR5250 User manual

Tektronix 466 User manual

Tektronix

Tektronix 466 User manual

Tektronix Keithley 1754 User manual

Tektronix

Tektronix Keithley 1754 User manual

Tektronix 7B70 User manual

Tektronix

Tektronix 7B70 User manual

Tektronix 442 User manual

Tektronix

Tektronix 442 User manual

Tektronix 2235 User manual

Tektronix

Tektronix 2235 User manual

Tektronix 321 A User manual

Tektronix

Tektronix 321 A User manual

Tektronix TBS2102 User manual

Tektronix

Tektronix TBS2102 User manual

Tektronix TCP202 User manual

Tektronix

Tektronix TCP202 User manual

Tektronix TDS 340A User manual

Tektronix

Tektronix TDS 340A User manual

Tektronix TDS1000B Series User manual

Tektronix

Tektronix TDS1000B Series User manual

Popular Test Equipment manuals by other brands

Van Der Stahl PTT-100 V operating instructions

Van Der Stahl

Van Der Stahl PTT-100 V operating instructions

MCS Charm DT-MRLBLRFTET manual

MCS

MCS Charm DT-MRLBLRFTET manual

HTA Instrumentation HD 2020 manual

HTA Instrumentation

HTA Instrumentation HD 2020 manual

Viavi 7200 Series Operation manual

Viavi

Viavi 7200 Series Operation manual

Sanwa U-50D Operator's manual

Sanwa

Sanwa U-50D Operator's manual

Actron CP9680 AutoScanner Plus quick start guide

Actron

Actron CP9680 AutoScanner Plus quick start guide

National Instruments PXIe-5164 Getting started guide

National Instruments

National Instruments PXIe-5164 Getting started guide

LEYRO LCB 30 manual

LEYRO

LEYRO LCB 30 manual

AEMC K100 user manual

AEMC

AEMC K100 user manual

Agilent Technologies Medalist x6000 Operator instructions

Agilent Technologies

Agilent Technologies Medalist x6000 Operator instructions

Valen 612 Operation manual

Valen

Valen 612 Operation manual

Rothenberger ROTEST GW 150/4 Instructions for use

Rothenberger

Rothenberger ROTEST GW 150/4 Instructions for use

Alcolock LR max instruction manual

Alcolock

Alcolock LR max instruction manual

Hioki 9261 instruction manual

Hioki

Hioki 9261 instruction manual

Clinton DC-1 instruction manual

Clinton

Clinton DC-1 instruction manual

Viso Systems LabFlicker user manual

Viso Systems

Viso Systems LabFlicker user manual

Rohde & Schwarz RTP Series user manual

Rohde & Schwarz

Rohde & Schwarz RTP Series user manual

Fluke 5520A Service Operator's manual

Fluke

Fluke 5520A Service Operator's manual

manuals.online logo
manuals.online logoBrands
  • About & Mission
  • Contact us
  • Privacy Policy
  • Terms and Conditions

Copyright 2025 Manuals.Online. All Rights Reserved.