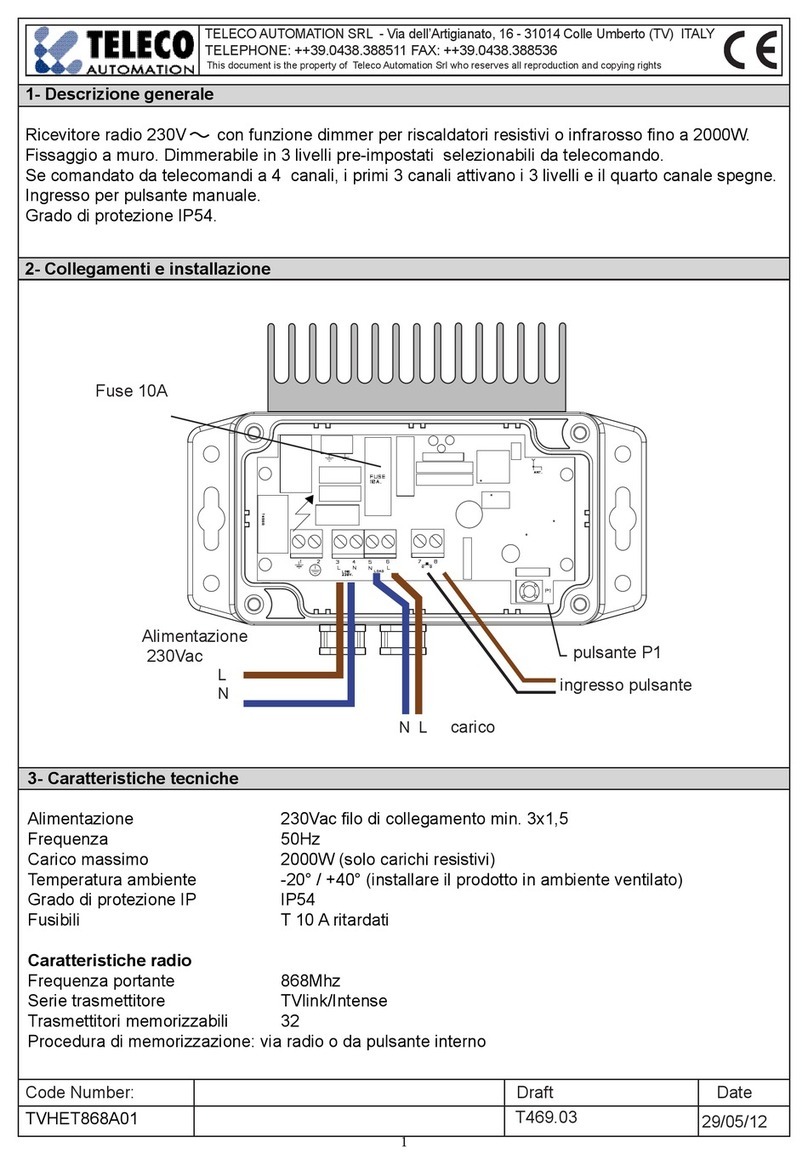
manuals.online logo
Brands
  1. Home
  2. •
  3. Brands
  4. •
  5. TELECO AUTOMATION
  6. •
  7. Receiver
  8. •
  9. TELECO AUTOMATION TRPRD868G01T User manual

TELECO AUTOMATION TRPRD868G01T User manual

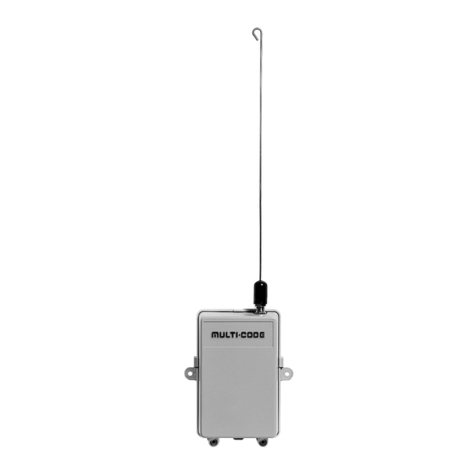
IT - RICEVITORE RADIO PER IL CONTROLLO DI UN MOTORE 110-230VAC, CON FINECORSA INTEGRATO E
POTENZA MASSIMA 350W
EN  RADIO RECEIVER CONTROLLING A 110230VAC MOTOR, WITH INTEGRATED LIMIT SWITCH AND MAXIMUM
POWER 350W
FR - RÉCEPTEUR RADIO POUR LA COMMANDE D’UN MOTEUR 110-230VAC, AVEC FIN DE COURSE INTÉGRÉE
ET PUISSANCE MAXIMALE DE 350W
DE  FUNKEMPFÄNGER ZUR STEUERUNG EINES 110230VMOTORS MIT INTEGRIERTER ARRETIERUNG UND
MAXIMALLEISTUNG VON 350W
Antenna/Aerial
Antenne/Antenne
P1
L
Marrone/Brown
Marron/Braun
Blu/Blue
Bleu/Blau
Grigio/Grey
Gris/Grau
Nero/Black
Noir/Schwarz
M
Ac ~
COM
N
P1
L
Marrone/Brown
Marron/Braun
Blu/Blue
Bleu/Blau
Grigio/Grey
Gris/Grau
Nero/Black
Noir/Schwarz
M
COM
N
Arancione/Orange
Orange/Orange
Ac ~
1234
5
7
6
IT - Codice prodotto EN - Product code FR - Code du produit DE - Artikelnummer
IT - Pulsante APRE - STOP - CHIUDE
EN - OPEN - STOP - CLOSE Push-button
FR - Bouton-poussoir OUVRE - STOP - FERME
DE - Taster AUF - STOP - ZU
TRPRD868G01T (868.3Mhz) TRPRD916G01T (916Mhz)
Alimentazione
Power supply
Alimentation
Stromversorgung
TELECO AUTOMATION SRL
Via dell’Artigianato, 16 - 31014 Colle Umberto (TV) ITALY
TELEPHONE: +39.0438.388511 - www.telecoautomation.com
DOC.: T1030.01
TRPRDxxxG01T (external push button double function) DATE: 01/03/23
This document is the property of Teleco Automation Srl, which reserves all reproduction and copyrights
IT EN FR DE
1ALIMENTAZIONE (FASE) POWER SUPPLY (LIVE) ALIMENTATION (PHASE) STROMVERSORGUNG (PHASE)
2ALIMENTAZIONE (NEUTRO) POWER SUPPLY (NEUTRAL) ALIMENTATION (NEUTRE) STROMVERSORGUNG (NEUTRAL)
3SALITA MOTORE MOTOR UP MONTÉE MOTEUR MOTOR AUF
4DISCESA MOTORE MOTOR DOWN DESCENTE MOTEUR MOTOR AB
5COMUNE MOTORE MOTOR COMMON COMMUN MOTEUR GEMEINSAN ANSCHLUSS MOTOR
6PULSANTE PUSH-BUTTON BOUTON-POUSSOIR TASTER
7COMUNE PULSANTE PUSH-BUTTON COMMON BOUTON COMMUN GEMEINSAMER ANSCHLUSS TASTER
P1 TASTO DI
PROGRAMMAZIONE PROGRAMMING BUTTON BOUTON DE PROGRAMMATION PROGRAMMIERUNGSTASTE
2
IT - DISPOSITIVI DI COMANDO SENZA FILI EN  WIRELESS COMMAND DEVICES
FR  DISPOSITIFS DE COMMANDE SANS FIL DE - DRAHTLOSE STEUERUNGSGERÄTE
IT - Trasmettitore 3 canali
EN - 3 channels transmitter
FR - Émetteur à 3 canaux
DE - 3-Kanal Sender
IT - Trasmettitore sensori vento/sole/pioggia
EN - Wind/sun/rain sensors transmitter
FR - Émetteur avec capteurs de vent/luminosité/pluie
DE - Sender mit Wind/Sonne/Regen-Sensoren
IT - Trasmettitore crepuscolare
EN - Dusk/dawn transmitter
FR - Émetteur avec capteur crépusculaire
DE - Dämmerungssender
IT - Trasmettitore con sensore luce integrato
EN - Transmitter with integrated light sensor
FR - Émetteur avec capteur de lumière intégré
DE - Sender mit integriertem Lichtsensor
TVANLUX868SWR Eos
Green Mouse
Screen
IT - Prodotti correlati EN - Correlated products FR - Produits connexes DE - Ergänzende Produkte
(STOP)
(STOP)
(STOP)
(STOP)
STOP
CH1
CH2
CH3
CH4
CH5
CH6
CH7
STOP
CH5
CH6
CH7
IT - Trasmettitore 7 canali
EN - 7 channels transmitter
FR - Emetteur à 7 canaux
DE - 7-Kanal Sender
IT - Canale singolo di comando con funzione
APRE, CHIUDE, STOP oppure APRE/STOP/CHIUDE
EN - Single command channel with function
OPEN, CLOSE, STOP or OPEN/STOP/CLOSE
FR - Canal individuel de commande avec fonction
OUVRE, FERME, STOP ou OUVRE/STOP/FERME
DE - Einzel- Kanal für Befehle mit Funktion
AUF, ZU, STOP oder AUF/STOP/ZU
IT - Trasmettitore 2/4 canali
EN - 2/4 channels transmitter
FR - Emetteur à 2/4 canaux
DE - 2/4-Kanal Sender
CH1
CH2
CH3
CH4
CH1
CH2
CH1
CH2
(STOP)
(STOP)
CH1
CH2
CH3
CH4
CH1
CH2
CH1
CH2
CH3
CH4
(STOP)
(STOP)
(STOP)
(STOP)
3
IT - MEMORIZZAZIONE CODICI RADIO EN  RADIO CODES MEMORIZATION
FR  MÉMORISATION DES CODES RADIO DE - EINLERNUNG SENDEKANÄLE
1.11.1
*IT - Il buzzer emette un bip ad ogni pressione. EN - The buzzer will make a beep each press. FR - L’avertisseur sonore émet un bip à chaque appui. DE - Das Gerät quittiert jeden Druck mit einem Ton.
IT - TIPO DI MEMORIZZAZIONE (vedere p.2)
EN - TYPE OF MEMORIZATION (see p. 2)
FR - TYPE DE MÉMORISATION (voir p. 2)
DE - EINLERNUNGSART (siehe S.2)
P1
IT - 1 tasto APRE
EN - 1 button OPEN
FR - 1 bouton OUVRE
DE - 1 Taste AUF
*
x1
IT - Premere il tasto del trasmettitore
relativo al codice da memorizzare.
EN - Press the button of the transmitter
relative to the code to memorize.
FR - Appuyer sur le bouton de
l’émetteur concernant le code à
mémoriser.
DE - Drücken Sie die Sendertaste
die auf den zu speichernden Code
bezogen ist.
IT - 1 tasto CHIUDE
EN - 1 button CLOSE
FR - 1 bouton FERME
DE - 1 Taste ZU
*
x2
IT - 1 tasto STOP
EN - 1 button STOP
FR - 1 bouton STOP
DE - 1 Taste STOP
*
x3
IT - 1 tasto APRE-STOP-CHIUDE
EN - 1 button OPEN-STOP-CLOSE
FR - 1 bouton OUVRE-STOP-FERME
DE - 1 Taste AUF-STOP-ZU
*
x4
IT - 2 tasti:
EN - 2 buttons:
FR - 2 boutons:
DE - 2 Tasten: *
x5
IT - 3 tasti:
EN - 3 buttons:
FR - 3 boutons:
DE - 3 Tasten:
...
tenere premuto
keep it pressed
maintenir appuyé
gedrückt halten
suono continuo
continuous sound
son continu
Dauerton
suono intermittente
intermittent sound
son intermittent
intermittierender Ton
/
/
4
*IT - Il buzzer emette un bip ad ogni pressione. EN - The buzzer will make a beep each press. FR - L’avertisseur sonore émet un bip à chaque appui. DE - Das Gerät quittiert jeden Druck mit einem Ton.
1.2 IT - CANCELLAZIONE CODICI RADIO EN  RADIO CODES DELETION
FR  SUPPRESSION DES CODES RADIO DE - LÖSCHUNG VON SENDEKANÄLEN
IT - TIPO DI CANCELLAZIONE
EN - TYPE OF DELETION
FR - TYPE DE SUPPRESSION
DE - LÖSCHUNGSART
P1
IT - Singolo codice radio
EN - Single radio code
FR - Un seul code radio
DE - Einzelner Sendekanal
*
x6
IT - Premere il tasto del trasmettitore relativo al codice da cancellare.
EN - Press the button of the transmitter relative to the code to delete.
FR - Appuyer sur le bouton de l’émetteur concernant le code à
supprimer.
DE - Drücken Sie die Sendertaste die auf den zu löschenden Code
bezogen ist.
IT - Tutti i codici radio
EN - All the radio codes
FR - Tous les codes radio
DE - Alle Sendekanäle
*
x7
suono continuo
continuous sound
son continu
Dauerton
suono intermittente
intermittent sound
son intermittent
intermittierender Ton
( 10 s)
tenere premuto
keep it pressed
maintenir appuyé
gedrückt halten
IT - 1 tasto FEEDBACK
EN - 1 button FEEDBACK
FR - 1 bouton FEEDBACK
DE - 1 Taste FEEDBACK
*
x8
IT - Premere il tasto del trasmettitore
relativo al codice da memorizzare.
EN - Press the button of the transmitter
relative to the code to memorize.
FR - Appuyer sur le bouton de
l’émetteur concernant le code à
mémoriser.
DE - Drücken Sie die Sendertaste
die auf den zu speichernden Code
bezogen ist.
IT - 2 tasti FEEDBACK
EN - 2 buttons FEEDBACK
FR - 2 boutons FEEDBACK
DE - 2 Tasten FEEDBACK
*
x9
...
suono intermittente
intermittent sound
son intermittent
intermittierender Ton
FEEDBACK
FEEDBACK
...
...
suono intermittente
intermittent sound
son intermittent
intermittierender Ton
5
IT - Cambiare la funzione del
pulsante esterno:.
EN - Change the external push
button function
FR - Changer la fonction du
bouton extérieur
DE - Änderung der Funktion
des externen Tasters
*
x10
IT - 16 bip veloci : Funzione doppio pulsante (apre/chiude) (schema 2)
3 bip lenti: Funzione singolo pulsante apre-stop-chiude (schema 1)
EN - 16 fast beeps: Two push buttons function (open/Close) (picture 2).
3 slow beeps: Single push button function open-stop-close (picture 1).
FR - 16 bips rapides : fonction double bouton (ouvre/ferme) (schéma 2)
3 bips lents : fonction bouton individuel ouvre/stop/ferme (schéma 1)
DE - 16 schnelle Pieptöne: Funktion doppelter Taster (auf/ zu) (siehe Bild 2)
3 langsame Pieptöne: Funktion einzelner Taster (auf/ stop/ zu) (siehe Bild 1)
L
Marrone/Brown
Marron/Braun
Blu/Blue
Bleu/Blau
Nero/Black
Noir/Schwarz
N
Arancione/Orange
Orange/Orange
M
Bianco/White
Blanc/weiß
Blu/Blue
Bleu/Blau
N
Apre/Open
Ouvre/Auf
Chiude/Close
Ferme/Zu
L
Marrone/Brown
Marron/Braun
Blu/Blue
Bleu/Blau
N
Arancione/Orange
Orange/Orange
M
V1(*)
(*) Diodo V1 non incluso. Da richiedere separatamente
V1 Diode not included. Must be requested separately
Diode V1 non inclus. Doit être demandé séparément
Diode V1 nicht enthalten. Muss separat angefordert werden
*IT - Il buzzer emette un bip ad ogni pressione. EN - The buzzer will make a beep each press. FR - L’avertisseur sonore émet un bip à chaque appui. DE - Das Gerät quittiert jeden Druck mit einem Ton.
1.3 IT - FUNZIONE PULSANTE ESTERNO EN  EXTERNAL PUSH BUTTON FUNCTION
FR  FONCTION DU BOUTON EXTÉRIEUR DE - FUNKTION EXTERNER TASTER
( 2 s)
IT - Pulsante APRE - STOP - CHIUDE
EN - OPEN - STOP - CLOSE Push-button
FR - Bouton-poussoir OUVRE - STOP - FERME
DE - Taster AUF - STOP - ZU
1 2
6
IT - Premere il tasto P3 del trasmettitore memorizzato. Premere il tasto relativo ad un codice memorizzato. Premere il tasto relativo
al nuovo codice. EN - Press the button P3 of the memorized transmitter. Press the button relative to a memorized code. Press
the button relative to the new code. FR - Appuyer sur le bouton P3 de l’émetteur mémorisé. Appuyer sur le bouton concernant un
code mémorisé. Appuyer sur le bouton concernant le nouveau code. DE - Drücken Sie die Taste P3 des gespeicherten Senders.
Drücken Sie die auf den gespeicherten Code bezogene Taste. Drücken Sie die auf den neuen Code bezogene Taste.
IT - MEMORIZZAZIONE REMOTA DI ULTERIORI CODICI RADIO EN  REMOTE MEMORIZATION OF FURTHER RADIO CODES
FR  MÉMORISATION À DISTANCE D’AUTRES CODES RADIO DE - FERN- SPEICHERUNG VON WEITEREN SENDEKANÄLEN
2.1
1 s< 5 s
suono continuo
continuous sound
son continu
Dauerton
suono intermittente
intermittent sound
son intermittent
intermittierender Ton
...
P3
memorizzato
memorized
mémorisé
gespeichert
memorizzato
memorized
mémorisé
gespeichert
< 5 s
suono continuo
continuous sound
son continu
Dauerton
nuovo
new
nouveau
neu
IT - Il tasto P3 si trova all’interno del trasmettitore.
Il codice radio aggiunto avrà le stesse funzioni del
codice usato per l’inserimento. La procedura è
compatibile con qualsiasi tipo di trasmettitore.
EN - P3 button is located inside the transmitter. The
added radio code will have the same functions of the
code used for the memorization. This procedure is
compatible with any type of transmitter.
FR - Le bouton P3 se trouve à l’intérieur de l’émetteur.
Le code radio ajouté aura les mêmes fonctions que
le code utilisé pour la mémorisation. La procédure
est compatible avec n’importe quel type d’émetteur.
DE - Die Taste P3 bendet sich im Inneren des
Senders. Der hinzugefügte Sendekanal wird
dieselben Funktionen des Codes haben welcher für
die Einlernung verwendet wurde. Die Prozedur kann
mit allen Arten von Sendern durchgeführt werden.
IT - CANCELLAZIONE REMOTA DI UN CODICE RADIO EN  REMOTE DELETION OF A RADIO CODE
FR  SUPPRESSION À DISTANCE D’UN CODE RADIO DE - FERN- LÖSCHUNG EINES SENDEKANALS
2.2
IT - Il tasto P3 si trova all’interno del trasmettitore.
EN - P3 button is located inside the transmitter.
FR - Le bouton P3 se trouve à l’intérieur de
l’émetteur.
DE - Die Taste P3 bendet sich im Inneren des
Senders.
IT - Premere tre volte il tasto P3 del trasmettitore memorizzato. Premere il tasto relativo al codice da cancellare.
EN - Press three times the button P3 of the memorized transmitter. Press the button relative to the code to delete.
FR - Appuyer trois fois sur le bouton P3 de l’émetteur mémorisé. Appuyer sur le bouton concernant le code à supprimer.
DE - Drücken Sie drei mal die Taste P3 des gespeicherten Senders. Drücken Sie die auf den zu löschenden Code bezogene Taste.
x 3
1 s
suono continuo
continuous sound
son continu
Dauerton
suono intermittente
intermittent sound
son intermittent
intermittierender Ton
...
P3
memorizzato
memorized
mémorisé
gespeichert
< 5 s
7
PASSO
STEP
ÉTAPE
SCHRITT
P1
*
x5
IT - premere contemporaneamente i tasti 2 e
3di Green Mouse
EN - press at the same time the buttons 2
and 3 of Green Mouse
FR - appuyer en même temps sur le boutons
2 et 3 du Green Mouse
DE - Drücken Sie gleichzeitig die Tasten 2
und 3 der Green Mouse
IT - Premere cinque volte P1 e tenere premuto; premere contemporaneamente i tasti 2 e 3 di Green Mouse.
EN - Press ve times P1 and keep it pressed; press at the same time the buttons 2 and 3 of Green Mouse.
FR - Appuyer cinq fois P1 et le maintenir appuyé; appuyer en même temps sur le boutons 2 et 3 du Green Mouse.
DE - P1 fünfmal drücken und gedrückt halten; Drücken Sie gleichzeitig die Tasten 2 und 3 der Green Mouse.
IT - Vedere le istruzioni del prodotto per dettagli; EN - See the product’s instructions for details;
FR - Voir les notices du produit pour plus d’informations; DE - Siehe Anleitung des Produkts für Details.
PASSO
STEP
ÉTAPE
SCHRITT
P1
*
x6
IT - premere il tasto 2o 3di Green Mouse
EN - press the button 2or 3of Green Mouse.
FR - appuyer sur le bouton 2ou 3du Green
Mouse.
DE - Drücken Sie die Taste 2oder 3der
Green Mouse
IT - Premere cinque volte P1 e tenere premuto; premere il tasto 2o 3di Green Mouse.
EN - Press ve times P1 and keep it pressed; press the button 2or 3of Green Mouse.
FR - Appuyer cinq fois P1 et le maintenir appuyé; appuyer sur le bouton 2ou 3du Green Mouse.
DE - P1 fünfmal drücken und gedrückt halten; Drücken Sie die Taste 2oder 3der Green Mouse.
1
suono continuo
continuous sound
son continu
Dauerton
...
2
3
suono intermittente
intermittent sound
son intermittent
intermittierender Ton
tenere premuto
keep it pressed
maintenir appuyé
gedrückt halten
2
2
3
suono continuo
continuous sound
son continu
Dauerton
tenere premuto
keep it pressed
maintenir appuyé
gedrückt halten
...
suono intermittente
intermittent sound
son intermittent
intermittierender Ton
IT - MEMORIZZAZIONE DI GREEN MOUSE SCREEN EN  MEMORIZATION OF GREEN MOUSE SCREEN
FR  MÉMORISATION DU GREEN MOUSE SCREEN DE - EINLERNUNG DER GREEN MOUSE SCREEN
3
8
(IT) AVVERTENZE: LEGGERE ATTENTAMENTE IL PRESENTE MANUALE PRIMA DI
INSTALLARE O METTERE IN SERVIZIO ILPRODOTTO. CONSERVARE LE ISTRUZIONI
PER FUTURA CONSULTAZIONE.
INSTALLAZIONE DEL PRODOTTO
Il prodotto in oggetto deve essere installato, messo in servizio e controllato periodicamente solo da personale tecnico
qualicato nel rispetto delle normative vigenti riguardanti le apparecchiature elettriche. Il prodotto deve essere posizionato
all’interno di una scatola di derivazione elettrica idonea. L’installazione non conforme, l’errata regolazione o l’alterazione
del prodotto possono essere causa di incendio, shock elettrico e lesioni personali anche gravi. Il produttore declina
qualsiasi responsabilità in caso di danni derivanti da errata installazione o utilizzo non conforme del dispositivo. La
ricezione radio del dispositivo può essere disturbata se si hanno nell’ambiente emissioni elettromagnetiche provenienti da
altre apparecchiature che trasmettono sulla stessa frequenza oppure se il dispositivo viene schermato da parti metalliche.
CONNESSIONI ELETTRICHE
Tutti i collegamenti devono essere previsti per un’alimentazione generale monofase 110-230Vac ed il relativo
collegamento di Terra. Per la disconnessione dalla rete utilizzare un interruttore onnipolare esterno (max.16A) con
un’apertura dei contatti di almeno 3,5 mm, installato in un luogo facilmente accessibile. Predisporre tutti i dispositivi
di sicurezza necessari ed utilizzare materiali di collegamento idonei secondo le attuali normative sulla sicurezza
elettrica. I cavi di collegamento devono avere una sezione adeguata al carico applicato.
SMALTIMENTO DEL PRODOTTO
Alla ne dalla vita utile, l’apparecchio non deve essere smaltito come riuto domestico, ma conferito in un centro di raccolta
riuti elettrici ed elettronici. L’utente è l’unico responsabile dello smaltimento dell’apparecchio a norma di legge, alla ne della
vita utile del medesimo. L’inadempienza è punibile ai sensi della legge applicabile in materia di smaltimento dei riuti.
Con la presente Teleco Automation s.r.l. dichiara che il prodotto è conforme ai requisiti essenziali, ed alle altre disposizioni
pertinenti, stabilite dalla direttiva 1999/5/CE. La dichiarazione di conformità può essere consultata sul sito: www.
telecoautomation.com/ce. Nell’ottica di un continuo sviluppo dei propri prodotti, il produttore si riserva il diritto
di apportare modiche a dati tecnici e prestazioni senza preavviso.
(EN) WARNING: READ CAREFULLY THIS INSTRUCTIONS BEFORE INSTALLING
AND COMMISSIONING THE PRODUCT. SAVE THESE INSTRUCTIONS FOR FUTURE
REFERENCE.
PRODUCT INSTALLATION
The product at issue must be installed, commissioned and maintained only by licensed and authorised people, respecting
the laws concerning the electrical installations. The product must be placed inside a suitable ush mounting box. Not
conforming installations, wrong adjustments or product alterations may cause re, electric shock, or personal injuries. The
manufacturer is not responsible for any damage due to wrong installation or improper use. The radio signal reception of
the device could be disturbed by the presence of electrical disturbances being transmitted by other appliances working
on the same frequency or if the product is somehow shielded by metal parts.
ELECTRICAL CONNECTIONS
All the connections must be rated for a single-phase 110-230Vac power supply, with the relative Earth connection. For
the disconnection from the power line, use an external all-pole switch (max.16A) with contacts having a dimension of
at least 3,5mm, installed in an easy accesible place. Arrange all the necessary safety devices and use only materials
complying with the standard of electrical installations. The cable must have a section properly rated according to the
load connected.
PRODUCT DISPOSAL
At the end of this product’s useful life, it must not be disposed of as domestic waste, but must be taken to a collection centre
for waste electrical and electronic equipment. It is the user’s responsibility to dispose of this appliance through the appropriate
channels at the end of its useful life. Failure to do so may incur the penalties established by laws governing waste disposal.
Hereby Teleco automation s.r.l. declares that the product complies with the essential requirements and other relevant
provisions, established by the Directive 1999/5/EC. The declaration of conformity can be consulted on the web site:
www.telecoautomation.com/ce. In the view of a constant development of their products, the manufacturer reserves
the right for changing technical data and features without prior notice.
(FR)AVERTISSEMENTS: LISEZATTENTIVEMENT CE MANUELAVANT D’INSTALLER OU
DE METTRE EN FONCTION L’APPAREIL. CONSERVEZ LES NOTICES POUR TOUTE
CONSULTATION FUTURE.
INSTALLATION DU PRODUIT
Le produit en objet doit être installé, mis en service et vérié périodiquement seulement par des techniciens qualiés,
conformément aux normes en vigueur pour les appareillages électriques. Le produit doit être installé dans une boîte
d’encastrement appropriée. Une installation pas conforme, un mauvais réglage ou une altération inadéquate du produit
pourraient entraîner des incendies, chocs électriques et blessures graves. Le fabricant décline toute responsabilité en
cas de dommages qui pourraient survenir à cause d’une mauvaise installation ou d’une utilisation pas conforme du
produit. La réception radio du dispositif peut être perturbée si dans l’environnement il y a des perturbations radioélectrique
créées par d’autres appareils qui transmettent sur la même bande de fréquence ou si l’appareil se trouve dans un
boîtier avec parties métalliques.
BRANCHEMENTS ÉLECTRIQUES
Tous les branchements doivent être prévus pour une alimentation générale en monophasé 110-230Vac et pour le
raccordement de terre. Pour la déconnexion du réseau, utiliser un interrupteur omnipolaire externe (max.16A) avec une
ouverture des contacts de min. 3,5 mm, installé dans un endroit facilement accessible. Installer tous les dispositifs
de sécurité requis et utiliser des matériaux de branchement aptes à garantir une isolation conforme aux normes de
sécurité électrique. Les câbles de connexion doivent avoir une section adéquate à la charge appliquée.
ÉLIMINATION DU PRODUIT
À la n de la durée de vie utile de ce produit, il ne doit pas être éliminé comme tout autre déchet domestique. En e󰀨et, il doit
être déposé dans un centre de collecte des déchets d’équipements électriques et électroniques. Il est de la responsabilité de
l’utilisateur de se débarrasser de cet appareil par les voies appropriées à la n de sa vie utile. Ne pas respecter cette consigne
peut vous soumettre à des sanctions établies par les lois régissant l’élimination des déchets.
La Société TelecoAutomation s.r.l. déclare que le produit est conforme aux conditions essentielles, et aux autres dispositions
applicables, établies par la directive 1999/5/CE. La déclaration de conformité peut être consultée sur le site internet
www.telecoautomation.com/ce. Dans l’optique d’un développement continu de ses produits, le constructeur se
réserve le droit d’apporter sans préavis des modications aux données techniques et aux prestations.
(DE) ACHTUNG: BITTE LESEN SIE DIESE ANLEITUNG SORGFÄLTIG VOR DER
INSTALLATION ODER INBETRIEBNAHME DES GERÄTS. BETRIEBSANLEITUNG FÜR
ZUKÜNFTIGE VERWENDUNG AUFBEWAHREN.
INSTALLATION DES PRODUKTS
Das Produkt darf nur von qualiziertem technischen Personal unter Einhaltung der geltenden Gesetze bezüglich
elektrischer Geräte installiert, in Betrieb gesetzt und regelmäßig gewartet werden. Das Produkt muss in eine geeignete
Anschlussdose platziert werden. Eine unsachgemäße Installation, Einstellung oder Modikation des Produkts kann
zu Brandfällen, elektrischem Schock und schweren Verletzungen führen. Der Hersteller haftet nicht für Schäden, die
durch unsachgemäßer Installierung und Gebrauch verursacht werden. Der Funkempfang des Geräts kann durch
Funkstörungen durch andere Geräte in der Umgebung, die auf der gleichen Frequenz senden oder durch Abdeckung
oder Abschirmung des Geräts durch Metallteile beeinträchtigt werden.
ELEKTRISCHE ANSCHLÜSSE
Alle Verbindungen müssen auf einphasigen Wechselstrom mit 110-230Vac und dem jeweiligen Masseanschluss
ausgelegt sein. Zur Netztrennung ist ein separater allpoliger Abschalter (max.16A) mit einer Schaltö󰀨nung von mindestens
3,5mm vorzusehen, welcher in einem leicht zugänglichen Platz zu installieren ist. Für den Anschluss sind geeignete
Materialien zu verwenden, die eine Isolierung entsprechend den geltenden elektrischen Sicherheitsbestimmungen
gewährleisten. Der Querschnitt der Verbindungskabel muss für die entsprechende Last geeignet dimensioniert sein.
ENTSORGUNG DES GERÄTS
Nach dem Ablauf der Nutzungszeit des Gerätes darf es nicht ohne Weiteres im Hausmüll entsorgt werden, sondern muss
zu einer entsprechenden Entsorgungsstelle für elektronische Geräte gebracht werden. Es unterliegt der Verantwortung
des Endverbrauchers, dieses Gerät nach dem Ablauf der Nutzungszeit entsprechend zu entsorgen. Falls dies nicht
befolgt wird, kann dies zu Strafen führen, die im Entsorgungsgesetz festgelegt sind.
Hiermit erklärt Teleco Automation s.r.l., dass das Produkt den Anforderungen und den einschlägigen Bestimmungen
der Richtlinie 1999/5/CE entspricht. Die Konformitätserklärung kann im Internet unter www.telecoautomation.com/ce
eingesehen werden. Im Zuge einer kontinuierlichen Weiterentwicklung der Produkte behält sich der Hersteller
das Recht vor technische Daten und Funktionen ohne vorherige Ankündigung zu ändern.
Alimentazione - Power supply - Alimentation - Stromversorgung 110-230Vac 50/60Hz
Potenza massima uscita - Max. output power
Puissance maximale de sortie - Max. Ausgänge Leistung
350W @ 230Vac
170W @ 110Vac
Temperatura di funzionamento - Operating temperature range
Température de fonctionnement - Umgebungstemperatur im Betrieb -20° / +50°C
Tempo lavoro - Working time - Temps de travail - Arbeitszeit 90 s
Grado di protezione - Protection rating - Degré de protection - Schutzart IP20
Frequenza ricezione - Reception frequency
Fréquence de réception - Empfangsfrequenz
868.3 MHz (TRPRD868G01T)
916 MHz (TRPRD916G01T)
Capacità memoria radio (trasmettitori) - Radio memory capability (transmitters)
Capacité mémoire radio (émetteurs) - Speicherbare Sender 42
IT - SPECIFICHE TECNICHE EN  TECHNICAL SPECIFICATIONS
FR  SPÉCIFICATIONS TECHNIQUES DE - TECHNISCHE DATEN
48
50
25
IT - DIMENSIONI E MONTAGGIO EN  DIMENSIONS AND MOUNTING
FR  DIMENSIONS AND FIXATION DE - ABMESSUNGEN UND MONTAGE
TELECO AUTOMATION OCEANIA PTY LTD
AUSTRALIA
Tel. +61.(07)5502.7801
info@telecoautomation.com.au
TELECO AUTOMATION BENELUX SPRL
BELGIUM
Tel. +32.67561967
info@telecoautomation.be
This document is the property of Teleco Automation Srl, which reserves all reproduction and copyrights
TELECO AUTOMATION S.R.L.
ITALY
Tel. +39.0438.388511
info@telecoautomation.com
TELECO AUTOMATION FRANCE
FRANCE
Tel. +33.(0)472.145080
info@telecofrance.com
TELECO AUTOMATION GMBH
GERMANY
Tel. +49.(0)8122.9563024
info.de@telecoautomation.com
TELECO AUTOMATION IBÉRICA S.L.
SPAIN
Tel. +34.966.16.82.24
jv.lopez@telecoautomation.com

This manual suits for next models

1

Other TELECO AUTOMATION Receiver manuals

TELECO AUTOMATION T474.02 User manual

TELECO AUTOMATION

TELECO AUTOMATION T474.02 User manual

TELECO AUTOMATION TVHET868A01 User manual

TELECO AUTOMATION

TELECO AUTOMATION TVHET868A01 User manual

TELECO AUTOMATION TVPRS868A04B User manual

TELECO AUTOMATION

TELECO AUTOMATION TVPRS868A04B User manual

TELECO AUTOMATION TVRCD868A01 User manual

TELECO AUTOMATION

TELECO AUTOMATION TVRCD868A01 User manual

TELECO AUTOMATION TVHET868A02 User manual

TELECO AUTOMATION

TELECO AUTOMATION TVHET868A02 User manual

TELECO AUTOMATION TVLink RS868 User manual

TELECO AUTOMATION

TELECO AUTOMATION TVLink RS868 User manual

TELECO AUTOMATION TVLSTRD868SI24G User manual

TELECO AUTOMATION

TELECO AUTOMATION TVLSTRD868SI24G User manual

TELECO AUTOMATION TVHET868A07 User manual

TELECO AUTOMATION

TELECO AUTOMATION TVHET868A07 User manual

TELECO AUTOMATION TVDLC868A01 User manual

TELECO AUTOMATION

TELECO AUTOMATION TVDLC868A01 User manual

TELECO AUTOMATION TVSTRD868NT24 User manual

TELECO AUTOMATION

TELECO AUTOMATION TVSTRD868NT24 User manual

TELECO AUTOMATION TVDLC868A01 User manual

TELECO AUTOMATION

TELECO AUTOMATION TVDLC868A01 User manual

TELECO AUTOMATION TVHET868B01 User manual

TELECO AUTOMATION

TELECO AUTOMATION TVHET868B01 User manual

TELECO AUTOMATION TVRGBDU868NT24 User manual

TELECO AUTOMATION

TELECO AUTOMATION TVRGBDU868NT24 User manual

TELECO AUTOMATION TVRGBDSY868A01 User manual

TELECO AUTOMATION

TELECO AUTOMATION TVRGBDSY868A01 User manual

TELECO AUTOMATION TRRCL868A60 User manual

TELECO AUTOMATION

TELECO AUTOMATION TRRCL868A60 User manual

TELECO AUTOMATION TVRRL868GS02 User manual

TELECO AUTOMATION

TELECO AUTOMATION TVRRL868GS02 User manual

TELECO AUTOMATION TVVTL868A01 User manual

TELECO AUTOMATION

TELECO AUTOMATION TVVTL868A01 User manual

TELECO AUTOMATION TVHET A06 Series User manual

TELECO AUTOMATION

TELECO AUTOMATION TVHET A06 Series User manual

TELECO AUTOMATION TVPRS868A01 User manual

TELECO AUTOMATION

TELECO AUTOMATION TVPRS868A01 User manual

TELECO AUTOMATION TVRGBDU868NT24 User manual

TELECO AUTOMATION

TELECO AUTOMATION TVRGBDU868NT24 User manual

TELECO AUTOMATION TVSTRD868SI24G User manual

TELECO AUTOMATION

TELECO AUTOMATION TVSTRD868SI24G User manual

Popular Receiver manuals by other brands

Pioneer Elite VSX-55TXi Service manual

Pioneer

Pioneer Elite VSX-55TXi Service manual

Kenwood DDX6706S quick start guide

Kenwood

Kenwood DDX6706S quick start guide

Sealey STW292.V2 quick start guide

Sealey

Sealey STW292.V2 quick start guide

Bosch WE800EV2 RF quick start guide

Bosch

Bosch WE800EV2 RF quick start guide

Denon AVR-1506 Brochure & specs

Denon

Denon AVR-1506 Brochure & specs

AUREL RX-4MHCS user manual

AUREL

AUREL RX-4MHCS user manual

DirecTV ProScan DSS Receiver user manual

DirecTV

DirecTV ProScan DSS Receiver user manual

Novatel ProPak6 quick start guide

Novatel

Novatel ProPak6 quick start guide

Marantz SR7005 user guide

Marantz

Marantz SR7005 user guide

RTI VHR-1 Quick reference guide

RTI

RTI VHR-1 Quick reference guide

Crypto ReDi 270 user manual

Crypto

Crypto ReDi 270 user manual

Topfield TF 7710 HTCI user guide

Topfield

Topfield TF 7710 HTCI user guide

TechniSat HDFS specification

TechniSat

TechniSat HDFS specification

Philips DSR2015/00 manual

Philips

Philips DSR2015/00 manual

Azuretec WR200 series installation guide

Azuretec

Azuretec WR200 series installation guide

Yamaha R-N602 owner's manual

Yamaha

Yamaha R-N602 owner's manual

Kinetik KLIR-SMR1 quick start guide

Kinetik

Kinetik KLIR-SMR1 quick start guide

Kramer 670T user manual

Kramer

Kramer 670T user manual

manuals.online logo
manuals.online logoBrands
  • About & Mission
  • Contact us
  • Privacy Policy
  • Terms and Conditions

Copyright 2025 Manuals.Online. All Rights Reserved.