manuals.online logo
Brands
  1. Home
  2. •
  3. Brands
  4. •
  5. TELECO AUTOMATION
  6. •
  7. Receiver
  8. •
  9. TELECO AUTOMATION TVLink RS868 User manual

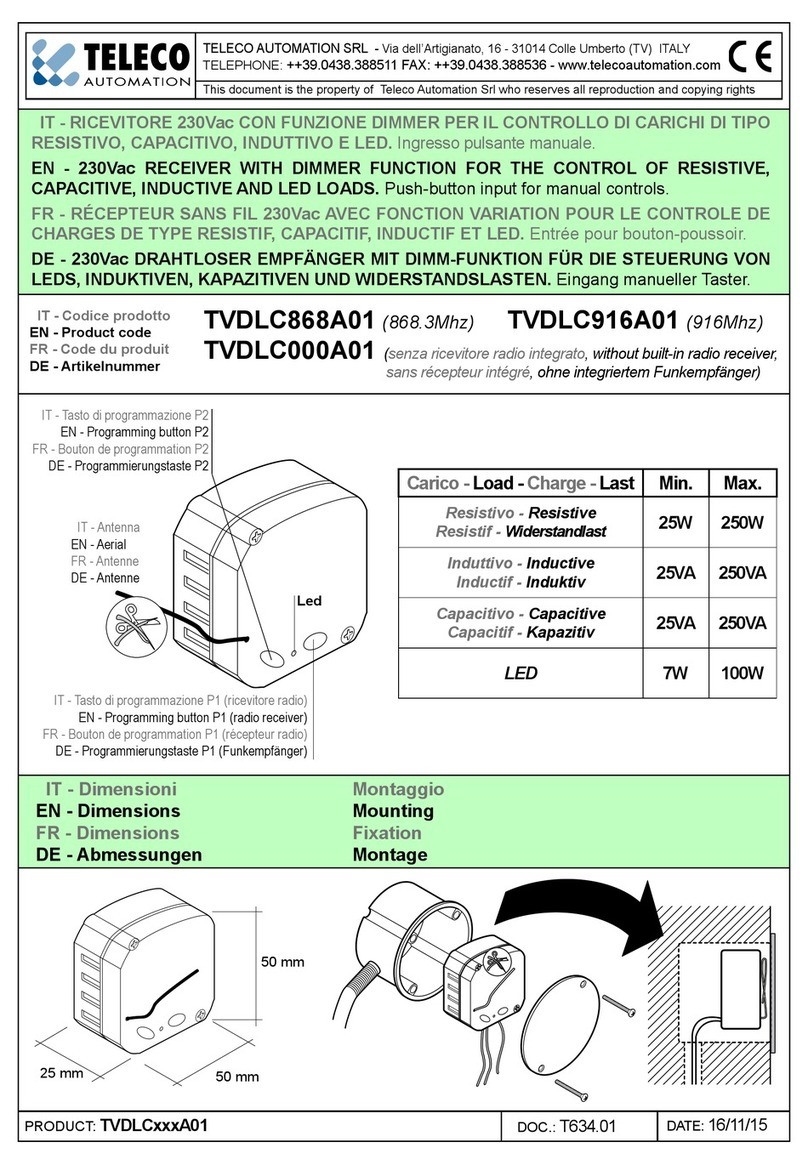
TELECO AUTOMATION TVLink RS868 User manual

DateCode Number: Series Model number Draft
TVLink RS868
TELECO AUTOMATION SRL -
Viale del Lavoro, 5 - 31014 Colle Umberto (TV) ITALY
TELEPHONE: ++39.0438.388511 FAX: ++39.0438.388536
This document is the property of Teleco Automation Srl who reserves all reproduction and copying rights
T271.03 15-11-07
TVRGBD868
RECEIVER TVRGB868 CONTROLLING RGB LEDS WITH DIMMING FUNCTION
Attention!
Connect the power supplier and the LED RGB in a correct way to
the receiver before connecting the power supplier to the
electricity network.
A faulty connection of the LED diodes (polarity inversion) could
damages them, therefore pay attention during their connection
by respecting the polarity.
GENERAL DESCRIPTION
Electronic for the scenes regulation with LED RGB via radio and
with external push buttons. Possibility to create scenes, ON/OFF
control, automatic cycles of light variation with adjustment of
the cycle time and the direction of the colours rotation.
Possiblity to dimmer the selected light from the transmitter.
(see point 8)
- Separate 24 Vdc power supplier.
- Possibility to connect three different LEDs (RGB) with
connection on 6 or 4 wires with common cathode.
Models:
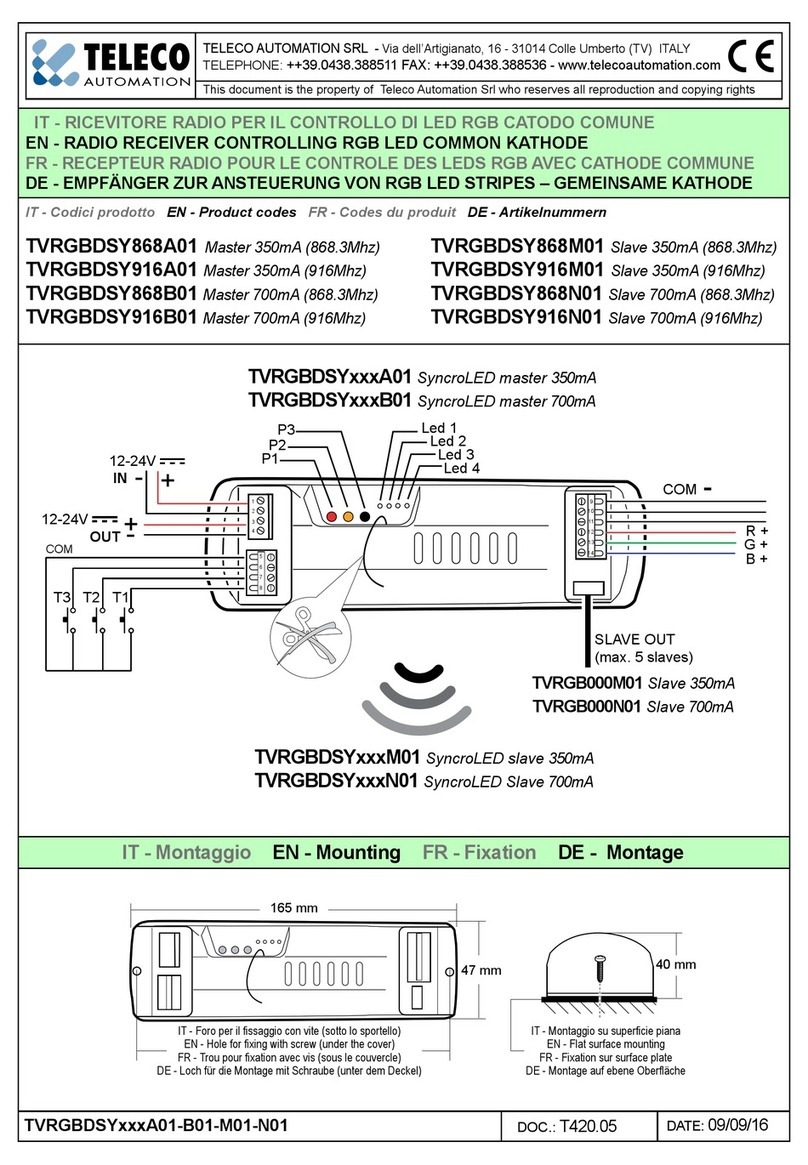
TVRGBD868A01 Master for 350mA Leds
TVRGBD868B01 Master for 700mA Leds
TVRGB868M01 Slave for 350mA Leds
TVRGB868N01 Slave for 700mA Leds
- Functioning:
a) by means of a 7- channel transmitter, or 1-channel transmitters.
b) by means of manual push buttons.
Functions of transmitter channels
It is possible to memorise the channels of the transmitters individually
or completely.
- Individually:
1) The channels of the transmitter are memorised individually, the
colour changes at each impulse between the 8 pre-programmed colours.
To turn off the colour, press the push button for more than 2 sec.
At each turning-on will restart the colour that has been previously
selected.
2) The channel of the transmitter operates only on the white light, with
short impulses (<300 ms.) it turns the light on and off, by holding it
pressed, increases or decreases the intensity.
At each turning-on will restart the intensity of white light that has been
previously selected.
- Completely: This memorisation requires the utilisation of 7-channel
transmitters, the functions of the push buttons are described on the
pictures here below.
1- Functioning with 7-channel transmitters
a) The 4 first control channels can control up to 8 pre-programmed
base colours which are changeable.
1= red, 2=green, 3=blue, 4=white, 5=light-blue, 6=yellow, 7= magenta,
8=orange
b) The first push button Ch5 selects the first 4 colours or the second 4
colours.
c) The push button Ch6 activates the automatic cycle of colour
variation (point 2).
d) The push button Ch7 carries out the turning-off function.
2-Fonctionning of automatic sequence mode
This sequence activates automatically a colour variation, both in
clockwise, both in anti-clockwise direction. The starting colour
will be the last selected colour or the colour which is active in
that moment.
Procedure to activate rotation
- Press the central push button Ch6, the turning-off and returning-on of
the lights indicates that you have entered the mode, release the push
button to start the sequence with rotation in clockwise direction.
- To change the rotation direction, anti-clockwise, push again Ch6, the
control is signalised by the turning-off and returning-on of the lights.
When the sequence will be activated, the scanning speed between a
colour and another one is taken from the last setting or of a default
value of 4 sec., when you are in rotation mode it is possible to vary the
scanning speed by pressing one of the channel push buttons with the
following function:
Schedule 1:
Ch1= 4 sec. cycle, 1 sec. stationary on the light value
Ch2= 16 sec. cycle, 6 sec. stationary on the light value
Ch3= 28 sec. cycle, 10 sec. stationary on the light value
Ch4= stop the movement at the current light value/ restart the
movement.
To turn off the sequence press the push button Ch7
Each selection is signalised by the turning-off and turning-on of the
lights.
3- How to change the light value of one of the 8 pre-programmed
on the transmitter
1- Press the channel with the colour which is to be modified, the light
will turn-on on its value.
2- Press and hold down the automatic cycle- push button Ch6 for more
than 4 sec., the light will turn off and return on one time after 2 sec. and
a second time after 4 sec. which indicates that you have entered the
new-colour-memorisation-mode.
After you have entered the mode, the colour variation will start with a
speed of 4 sec. between a colour and the next one and a pause of 1 sec.
at each colour, by pressing again the Ch6 push button it is possible to
change immediately the rotation direction.
3- Press for 3 sec. one of the 8 colour push buttons in order to
memorise the new light value, the light will turn off and return on for
confirmation, afterwards you will turn back to the standard mode.
1
+
1
2
3
4
5
6
7
8
Ch1
Ch2
Ch3
Ch4
Ch5
Ch6
Ch7
Ch6
Ch7 OFF push-button
push to start the
moving sequence
in clock-wise
direction, push
again to invert the
direction.
Ch5 shift push-
button to select
the push-buttons
from 1 to 4 and
from 5 to 8
1- Red
2- Green
3- Blue
4- White
5- Light-blue
6- Yellow
7- Magenta
8- Orange
Ch7 OFF push-button
Ch6
During the sequence the
colour speed can be set as
follows:
1 = 4 seconds fade, 1 second stable
2 = 16 seconds fade, 6 seconds stable
3 = 28 seconds fade, 10 seconds stable
4 = freeze/unfreeze movement
1
5
2
6
3
7
4
8
Ch1
Ch2
Ch3
Ch4
+
Ch5 shift push-
button to select
the push-buttons
from 1 to 4 and
from 5 to 8
push to start the
moving sequence
in clock-wise
direction, push
again to invert the
direction.
Procedure to memorise 7-channel transmitters
1- press one time the push button T1 and hold it down, the buzzer will
make a bip and then sound continuously.
2- Press the channel, of the 7-channel transmitter, which has to be
memorised, the memorisation is indicated by the intermittently sound of
the buzzer. The memorisation of the channel activates automatically
the other channels.
Procedure to memorise transmitters with single channels with
color function.
The channels of the transmitter are memorised individually, the colour
changes at each impulse between the 8 pre-programmed colours. To turn
off the colour, press the push button for more than 2 sec.
At each turning-on will restart the colour that has been previously
selected.
1- Press two times the push button T1 and hold it down, the buzzer will
make a bip at each pressure and then sound continuously.
2- Press the channel of the transmitter which has to be memorised, the
memorisation is indicated by the intermittently sound of the buzzer.
Procedure to memorise transmitters with single channels with
white ligh function.
The channel of the transmitter operates only on the white light, with
short impulses (<300 ms.) it turns the light on and off, by holding it
pressed, increases or decreases the intensity. At each turning-on will
restart the intensity of white light that has been previously selected.
1- Press three times the push button T1 and hold it down, the buzzer will
make a bip at each pressure and then sound continuously.
2- Press the channel of the transmitter which has to be memorised, the
memorisation is indicated by the intermittently sound of the buzzer.
Procedure to delete a channel of the transmitter
1- Press four times and hold down the push-button T1, the buzzer will
make a bip at each pressure and then sound slowly and intermittently.
2- Press the channel which has to be cancelled, the delete is indicated by
the continuously sound of the buzzer. The delete of a channel of a 7-
channel transmitter deactivates also the other channels.
Procedure to delete the whole memory
1- Press five times the push-button T1 and hold it down, the buzzer will
make a bip at each pressure and than sound quickly and intermittently.
2- Hold down the push button for 10 sec., after this 10 sec. the buzzer
will sound continuously by indicating that the whole memory has been
cancelled.
8- Dimmer function from the transmitter
By pressing one of the eight colours, when the light is turned-on, it is
possible by holding pressed the colour selection push-button, increase or
decrease the intensity.
Attention: it is possible that, for particular colour values, by decreasing
the intensity the colour changes sensibly.
4- If you want to leave the mode without memorising the new colour,
press the turning-off push button Ch7.
4- Functioning with manual push buttons
- Arrange three manual push buttons for a wire-control with the
following functions:
a) Push button Ch1
It turns on the lights at the value previous the turning-off, when the
lights are turned on, you can select with impulses in sequence one of the
8 colour values.
By pressing the pushbutton Ch3 the lights will turn off.
b) Push button Ch2
Activates an automatic cycle in clockwise direction.
-Press the push button Ch2, the turning-off and returning-on of the
lights indicates that you have entered the mode, release the push button
in order to start the sequence, clockwise direction.
- By re-pressing it, you will stop the rotation direction at the present
colour value.
- By re-pressing it you will reactivate the rotation direction.
- By re-pressing it for more than 2 sec. you will change the rotation
direction, anti-clockwise.
To turn off press Ch3.
c) Push button Ch3
Turning-off
Procedure to modify the scanning speed by means of push
buttons:
The modification is only possible in colour scanning mode. The default
speed is 4 sec. with a pause of 1 sec. between a colour and the next one.
To modify the speed:
Press the push button P1 as many times as the desired speed value.
1 time = 4 sec. cycle, 1 sec. stationary on the light value, the light will
turn off and than re-turn on.
2 times = 16 sec. cycle, 6 sec. stationary on the light value, the light will
turn off and than turn on two times.
3 times = 28 sec. cycle, 10 sec. stationary on the light value, the light
will turn off and than turn on three times.
5-How change by means of push buttons one of the 8 pre-
programmed light colours.
1- Select with short impulses on Ch1 the colour value which is to be
modified.
2- Press and hold down the push button Ch2 for more than 4 sec., the
light will turn off and turn on a first time after 2 sec. and a second time
after 4 sec. by indicating that you have entered the new colour
memorisation mode.
The colour variation will now start with a speed of 4 sec,. between a
colour and the next one and a pause of 1 sec. at each colour, by pressing
again the push button Ch2 it is possible to change the rotation direction.
3- Press the push button Ch1, the present light value will be memorised
and the light will turn off and turn on at its new value.
4- If you want to leave the mode without memorising the new colour,
press the push button Ch3.
6- At the power- on- reset the condition previous the turning-off will be
resumed.
7- It is possible to connect SLAVE devices which will take the same
control of the MASTER device; each SLAVE can control unlimited
other SLAVEs.
Programming push buttons on the box
T1- Push button for the programming and delete of the transmitters
T2- Push button for LED-outputs functioning test, by pressing the push
button the turned off lights will turn on with a white light.
T3- Push button for colours reset, by pressing this push button for 2
sec., the 8 default colours will be reset, after the 2 sec. the LEDs will
indicate with an intermittence the reset.
TECHNICAL SPECIFICATIONS
TVRGBD868A01 TVRGBD868B01
TVRGB868M01 TVRGB868N01
-Power supply 24 V dc, 21 W 24 V dc, 45 W
-Current on the RGB outputs 350 mA 700 mA
-Max. power for each output 7 W 15 W
-N° LED connectable for
each output 1 to 5 1 to 5
-Cable sections in input and output 1,5 mm 1,5 mm
-Reception frequency 868.3 MHz
-Intermediate frequency IF 10.7 MHz
-Sensibility (finely tuned signal) 1 µ V
-Operating temperature range -20° - +60°C
In the view of a constant development of their products, the manufacturer reserves the right for
changing technical data and features without prior notice.
2
9
10
11
12
13
14
1
2
3
4
9
10
11
12
13
14
Led reception RF commands
Led reception IR commands
T1 Memorisation/delete transmitter
T2 Light test
T3 Reset light programming
1
2
3
4
9
10
11
12
13
14
Output for slave
24V dc Power supply
Power on led
P1
P2P3
+ R
+ G
+ B
-
-
-
Common
BGR
Red
Green
Blue
Uscita per lo slave
Sortie pour slave
Output for slave
Uscita per lo slave
Sortie pour slave
Led réception commands RF
Led réception commands IR
Led ricezione comandi IR
Led ricezione comandi RF
5
6
7
8
Attention to the leds polarity
Attention pour la polarité des leds
Attenzione alla polarità dei led
T1 Mémorisation/effacement émetteur
T2 Test lumière
T3 Reset programmation lumières
T1 Memorizzazione/cancellazione trasmettitori
T2 Test luci
T3 Reset programmazione luci
T1 Memorisation/delete transmitter
T2 Light test
T3 Reset light programming

This manual suits for next models

5

Other TELECO AUTOMATION Receiver manuals

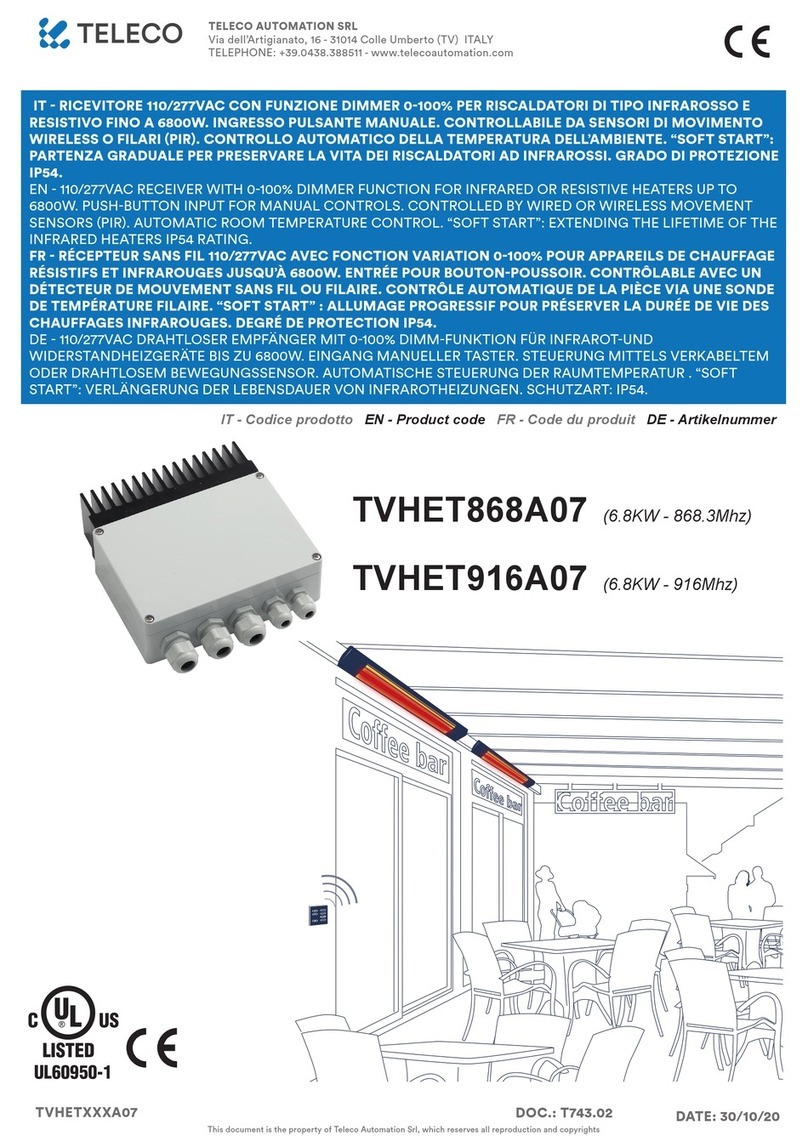
TELECO AUTOMATION TVHET868A02 User manual

TELECO AUTOMATION

TELECO AUTOMATION TVHET868A02 User manual

TELECO AUTOMATION TVSTRD868SI24G User manual

TELECO AUTOMATION

TELECO AUTOMATION TVSTRD868SI24G User manual

TELECO AUTOMATION TVHET868B01 User manual

TELECO AUTOMATION

TELECO AUTOMATION TVHET868B01 User manual

TELECO AUTOMATION TRPRD868G01T User manual

TELECO AUTOMATION

TELECO AUTOMATION TRPRD868G01T User manual

TELECO AUTOMATION TVSTRD868NT24 User manual

TELECO AUTOMATION

TELECO AUTOMATION TVSTRD868NT24 User manual

TELECO AUTOMATION TVRRL868GS02 User manual

TELECO AUTOMATION

TELECO AUTOMATION TVRRL868GS02 User manual

TELECO AUTOMATION TVHET868A07 User manual

TELECO AUTOMATION

TELECO AUTOMATION TVHET868A07 User manual

TELECO AUTOMATION TVHET A06 Series User manual

TELECO AUTOMATION

TELECO AUTOMATION TVHET A06 Series User manual

TELECO AUTOMATION T474.02 User manual

TELECO AUTOMATION

TELECO AUTOMATION T474.02 User manual

TELECO AUTOMATION TVPRS868A04B User manual

TELECO AUTOMATION

TELECO AUTOMATION TVPRS868A04B User manual

TELECO AUTOMATION TVRGBDU868NT24 User manual

TELECO AUTOMATION

TELECO AUTOMATION TVRGBDU868NT24 User manual

TELECO AUTOMATION TVHET868A01 User manual

TELECO AUTOMATION

TELECO AUTOMATION TVHET868A01 User manual

TELECO AUTOMATION TVDLC868A01 User manual

TELECO AUTOMATION

TELECO AUTOMATION TVDLC868A01 User manual

TELECO AUTOMATION TVLSTRD868SI24G User manual

TELECO AUTOMATION

TELECO AUTOMATION TVLSTRD868SI24G User manual

TELECO AUTOMATION TVRCD868A01 User manual

TELECO AUTOMATION

TELECO AUTOMATION TVRCD868A01 User manual

TELECO AUTOMATION TVVTL868A01 User manual

TELECO AUTOMATION

TELECO AUTOMATION TVVTL868A01 User manual

TELECO AUTOMATION TVDLC868A01 User manual

TELECO AUTOMATION

TELECO AUTOMATION TVDLC868A01 User manual

TELECO AUTOMATION TVRGBDU868NT24 User manual

TELECO AUTOMATION

TELECO AUTOMATION TVRGBDU868NT24 User manual

TELECO AUTOMATION TVRGBDSY868A01 User manual

TELECO AUTOMATION

TELECO AUTOMATION TVRGBDSY868A01 User manual

TELECO AUTOMATION TRRCL868A60 User manual

TELECO AUTOMATION

TELECO AUTOMATION TRRCL868A60 User manual

TELECO AUTOMATION TVPRS868A01 User manual

TELECO AUTOMATION

TELECO AUTOMATION TVPRS868A01 User manual

Popular Receiver manuals by other brands

RCA NRD412NA owner's manual

RCA

RCA NRD412NA owner's manual

Dakota Alert DCR-4000-ANZ user guide

Dakota Alert

Dakota Alert DCR-4000-ANZ user guide

Clarke-tech C-Tech One manual

Clarke-tech

Clarke-tech C-Tech One manual

AEO RX14 Series instruction manual

AEO

AEO RX14 Series instruction manual

Pioneer MVH-290BT owner's manual

Pioneer

Pioneer MVH-290BT owner's manual

Metrica 61326 manual

Metrica

Metrica 61326 manual

Gleim Publications KA11AIR Operation manual

Gleim Publications

Gleim Publications KA11AIR Operation manual

Kenwood R-600 instruction manual

Kenwood

Kenwood R-600 instruction manual

Uniden BCD96P2 owner's manual

Uniden

Uniden BCD96P2 owner's manual

Aiwa CR-LA35 operating instructions

Aiwa

Aiwa CR-LA35 operating instructions

Sony STR-DN1060 Parts and controls

Sony

Sony STR-DN1060 Parts and controls

IOGear Bluetooth Audio Transport GBMH221W6 quick start guide

IOGear

IOGear Bluetooth Audio Transport GBMH221W6 quick start guide

LG LHRH1260HTS owner's manual

LG

LG LHRH1260HTS owner's manual

Onkyo HT-R430 Service manual

Onkyo

Onkyo HT-R430 Service manual

Broadata Communications LinkBridge LBC-HDBT-R-DG user manual

Broadata Communications

Broadata Communications LinkBridge LBC-HDBT-R-DG user manual

Nice OXIBD Instructions for the fitter

Nice

Nice OXIBD Instructions for the fitter

Shinubow ANI-WHDI42 user manual

Shinubow

Shinubow ANI-WHDI42 user manual

ALTUS APS-3 quick start guide

ALTUS

ALTUS APS-3 quick start guide

manuals.online logo
manuals.online logoBrands
  • About & Mission
  • Contact us
  • Privacy Policy
  • Terms and Conditions

Copyright 2025 Manuals.Online. All Rights Reserved.