TeleEye DM338 User manual

Before using the product, please read this manual carefully.
USER MANUAL
TeleEye DM338


Notice:
Signal Communications Limited reserves the right to make improvements to the product
described in this manual at any time and without prior notice.
This manual is copyrighted. All rights are reserved. This manual may not be copied, reproduced
or translated in whole or part without prior consent from Signal Communications Limited.
Tele Eye is a trademark of Signal Communications Limited and is registered in China, Hong
Kong, US and other countries.
TeleEye's products are sold under the brand name of CAMERIO in Australia, Japan, Korea, New
Zealand, Taiwan and Argentina.
CAMERIO is a trademark of Signal Communications Limited and is registered in Australia,
Japan, Korea, New Zealand, Taiwan and Argentina. All other trademarks are the property of
their respective owners
Copyright (c) 2006 Signal Communications Limited (A Member of TeleEye Group). All rights
reserved.
Version 1.0
Limits of Liability and Disclaimer of Warranty
Signal Communications Limited has taken care in preparation of this manual, but makes no
expressed or implied warranty of any kind and assume no responsibility for errors or omissions.
No liability is assumed for incidental or consequential damages in connection with or arising out
of the use of the information or accessories contained herein.
Features and specifications are subject to change without prior notice.
2

Precautions
1Transportation
TeleEye DM338 Vandal Proof P/T Dome Camera is sophisticated product and should be
protected against extremes of pressure, temperature, vibration and humidity during
storage and transportation.
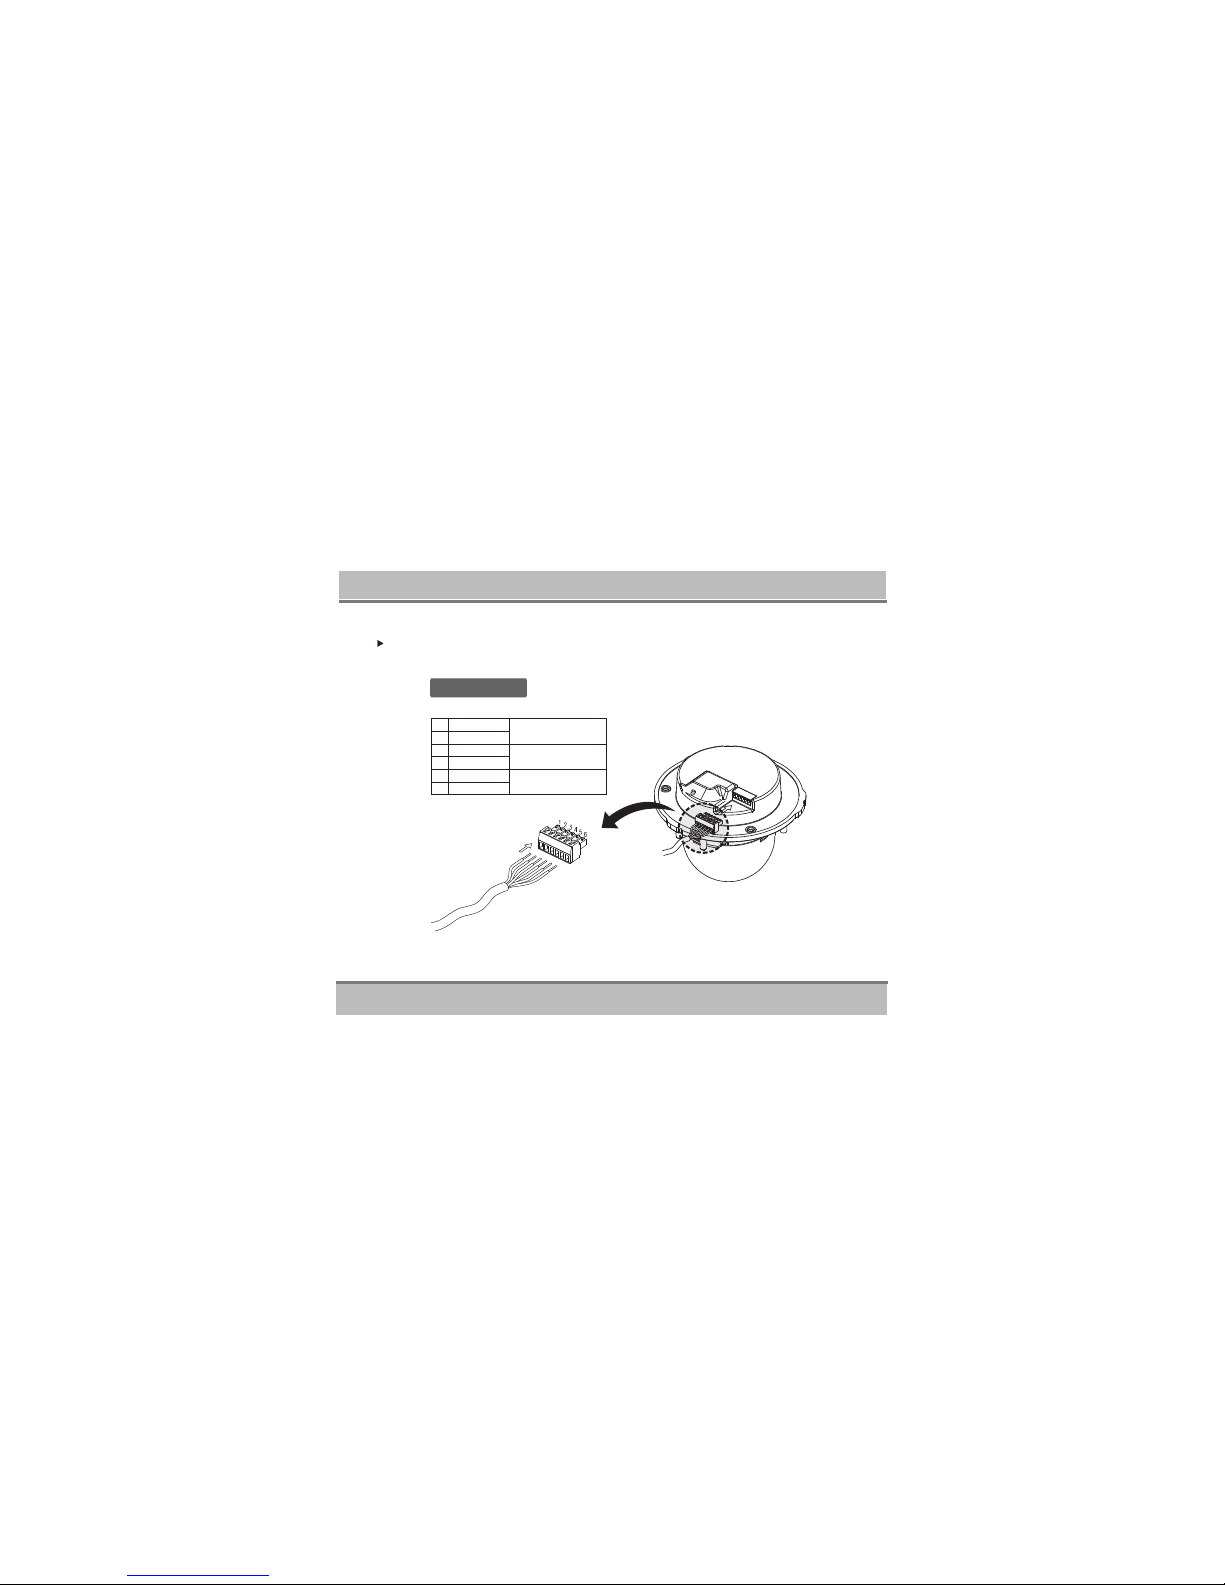
2 Do not disassemble the dome module
There is no user serviceable part or setting inside. Failure to observe this instruction could
result in damage to TeleEye DM338 and loss of warranty. Only suitably qualified and
authorized personnel may undertake repairs.
3 Installation
TeleEye DM338 is designed for ceiling mount only. Do not install it in any other
orientations. Failure to comply with this requirement will result in damage to the product.
4 Cleaning
In order to get clear image, down cover should be cleaned periodically. Be careful when
cleaning, only hold down cover edge, avoid direct touching down cover, acid matter in the
fingers will corrupt down cover plating surface. Hard material scratching down cover will
lead to vague image. Please use soft clean cloth or other substitution to clean interior and
exterior surface. Neutral detergent as well as any high-grade furniture detergent can be
used to clean down cover
5 Environment
The operation temperature of TeleEye DM338 is -10 ~50 , input power supply is DC
12V/600mA. Do not use it in circumstances where temperature, humidity or power supply
variations fall outside the range of specified values.
6 Excessive light
It is important that TeleEye DM338 is not left in a position where it is pointing directly at the
sun or other extremely bright light source. This may result in CCD damage and poor image
quality.
7 Do not install Tele Eye DM338 in the outdoor environment
℃ ℃
3

Contents
NOTICE..........................................................................2
PRECAUTIONS...............................................................3
CONTENTS.....................................................................4
PRODUCT OUTLINE AND FEATURES ..............................5
DESIGNATION AND FUNCTION.....................................6-9
TABLE FOR CAMERA ID............................................10-12
SPECIFICATION AND DIMENSION..................................13
CONTROLLER...............................................................14
CABLE CONNECTIONS FOR CONTROLLER...................15
FUNCTION SETUP....................................................16-19
CAMERA INSTALLATION...........................................20-21
EX) CAMERA INSTALLATION..........................................22
CABLE CONNECTION...............................................23-24
SPECIFICATION............................................................25
SETUP FOR CAMERA FUNCTIONS.................................26
4

PRODUCT OUTLINE AND FEATURES
2. Features
1.Product Outline
1)
2) Fast speed ( Max. 93 degree per second)
3) 64 PRESET, Staying time in each position can be selected
4) Remote control available (by RS-485 controller)
5) Compatible with various DVRs (Protocol supplied)
6) Simple remote control available (option)
7
8) Impact - resistant material(Aluminum & Poly Carbornate)
Panning
(
Modern & stylish design
Thermal sensor and cooling fan built-in.
This camera can be moved by simple special controller or DVR to up and
down, left and right.
Poly CarbornateAs this dome is made of aluminum and , it can resist water,
dust and external impact easily.
5

DESIGNATION AND FUNCTION 1
RUBBER PAD
BASE CASE
BOLT
BASE SEAL RING
MID CASE
SEAL RING
COVER ASSEMBLY
CAMERA & P/T MODULE ASSEMBLY
AccessoryDesignation and function
M3x8 WASHER SCREW x 3
4x25 COUNT SINK SCREW x 4
WRENCH TORX T10 x 1
TERMINAL BLOCK x 1
6

Cable
Cable connection
1
Pin array
12V DV12V, 600mA input
Connected to monitor.
Connected to controller or
DVR
GND
VIDEO
GND
RS485A
RS485B
2
3
4
5
6
7

1. Termination Switch : Used for communication
ON - Apply to terminal unit when communicated with PC or remote
control in 1:1 or in multi-communication.
OFF - Apply to all the cameras except terminal unit in
multi-communication.
RS-485
DESIGNATION AND FUNCTION 2
DESIGNATION AND FUNCTION 2 Detail "A"
TE RM IN AT IO N
ON O FF
8

1. ID setup
- Use it when you use many cameras or if you want to use special
camera ID.
- You can set up Max. 255 units.
(Please refer to the table for camera ID setup at page11)
- Optional remote control can control upto 99pcs of camera.
DESIGNATION AND FUNCTION 3
B
ADDRES S SWIT CH
Detail "B"
9

TABLE FOR CAMERA ID
Camera ID
10

11

The rest is omitted.
12

Model No: DM338
Power DC 12V
urrent onsumption Max 600mA
peration temp 10 50 C
reservation temp 20 60 C
Dimension 150 x 134 3
Weight approx 1 2kg
Remote control RS 485
:
: .
: - ~
: - ~
: .
: . .
: -
C C
O
P
Camera ID setup
Moving angle- PAN Tilt
Moving speed- PAN 9 Tilt 9 66
Shifting speed between Preset positions
Max.114 /s
Max. Position Memory : 64 Points
Formula for position operating
Option Small sized remote control
: 1~255
: 0 ~ 350 : 5 ~ 90
: /s~93 /s : /s ~ /s
:
1. Auto Pan. (approx. 20 /s)
2. Sequential Pan.
3. Random Pan.
:
SPECIFICATION AND DIMENSION
100 150.1
50
134.3
13

1. Turn on the power switch on the right side of the
controller.
2. First "0" is shown on the display.
3. Choose camera ID 1~99 as below.
4. You can move the camera to the direction you want
to watch.
Cam.( ) + + Entercamera number
*Thecontrollerisadeviceforcontrollingtheconnectedcameras,itcancontrolMax.
99unitsofcamera.
CONTROLLER
DISPLAY
14

CABLE CONNECTIONS FOR CONTROLLER
Detailed drawing of "C"
Power lnp ut
DC12V, 100mA
RS 485 A(Red)
RS 485 B(Wh ite)
Connect the communication connectors, RS-485 A,B with A,B
connectors of the dome camera.
After connecting cables, please isolate two cables.
- - - +
C
15

FUNCTION SETUP
1. Position Initializing
Use it when initialization of camera is need by external impact or other reasons.
In this case, memorized positions are not erased.
Cam.( ) + Cam.( ) + Enter
(Initializing time : About 16 seconds)
2.Speed Control
There are 10 steps of speed. Button 1 on the left is slowest and button 0 on the
right is fastest. You can select the speed as below.
1) Select the camera. (Refer to page14)
2) Press below buttons to setup the speed ("Enter" button is not needed)
Speed( ) + Selected speed(1~0) Reference) F1, F2.........F0(Fastest)
16

3. Position Memorizing
Positions can be memorized up to 64 points (1~64).
1) Place the camera to the position you want.
2)After placing, press the buttons as below.
4. Position Cancelation
The memorized positions can be canceled as below.
5. Moving to memorized positions.
You can move the camera to the memorized positions as below.
1) ERASE( ) + + Enter : Erasing one positionPOSITION NO
Step
F1 F2 F3 F4 F5 F6 F7 F8 F9 F10
Speed( /sec)
* REFERENCE) Max. speed table per every step.
SAVE( () + + EnterPOSITION NO
2) ERASE( ) + ERASE( ) + Enter : Erasing all the memorized positions
9 15 20 30 40 50 5858 66 78 93
17

18
6.Sequential Pan
1) Goto( ) + POSITION NO + Enter
You can move the camera to the memorized positions one by one.
*Save more than two positions before using this function.
1) Seq( ) + Enter : Staying for 5 seconds in each position.
2) Seq( ) + (sec) + Enter : Staying for 5 seconds or longer by time setting.staying time
*
*
The staying time is 5 seconds basically, and it will be stayed for longer time(5+0 ~ 5+99sec)
at the memorized position.
Press ENTER button to stop sequential panning.
1) Seq( ) + Seq( ) + E n ter : Stayi n g f o r 5 seconds
2) Seq( ) + Seq( ) + s t aying time ( s e c) + Enter : Sta y i ng for 5 secon d s o r longer by t i m e s etting
* Press ENTER button to stop se uenti l panning.q a
*Save more than three positions before using this function.
1) Auto( ) + Enter : 0 ~ 350
7.Random Pan
You can move the camera to the memorized positions randomly.
8.Auto Pan
You can make the camera panning automatically at the fixed speed.

2) Auto( ) + + Auto( ) + + Enter
:From one position to the other position.
POSITION NO POSITION NO
* Save more than two positions to use Auto Pan(2) function.
* Press ENTER button to stop sequential panning.
* The Auto Panning speed is fixed at about 8/ seconds. If you want faster panning, you can use
sequential panning after setting up two positions.
9.Digital Zoom
10.Enter
Used to stop Auto Pan, Random Pan and Sequential Pan or to stop
camera movement.
And to make functions working with other buttons.
When used alone, it stops all the functions and make it ready.
1) Tele : digital zoom in.
2) Wide : digital zoom out.
19
Table of contents
Other TeleEye Security Camera manuals

TeleEye
TeleEye DM860 User manual

TeleEye
TeleEye MX151E-HD User manual

TeleEye
TeleEye DM720 Series User manual

TeleEye
TeleEye DM870 User manual

TeleEye
TeleEye MX873-HD User manual

TeleEye
TeleEye MX810-HD User manual

TeleEye
TeleEye MX751-HD User manual

TeleEye
TeleEye MX677-HD User manual

TeleEye
TeleEye DM597 User manual

TeleEye
TeleEye MX810-HD User manual

TeleEye
TeleEye NX288 User manual

TeleEye
TeleEye DM860 User manual

TeleEye
TeleEye DM 569 User manual

TeleEye
TeleEye DM587 User manual

TeleEye
TeleEye NF610 III Plus NF Series User manual

TeleEye
TeleEye MX600 User manual

TeleEye
TeleEye DM870 User manual

TeleEye
TeleEye MX833-HD User manual

TeleEye
TeleEye MX125E-HD User manual

TeleEye
TeleEye MS1120L User manual