TeraBee TB-3DCAM-8060-USB User manual

User Manual for
Terabee 3Dcam 80x60
Technical support: [email protected]
Sales and commercial support: [email protected]

Table of contents
1 .Introduction 3
1.1 About Terabee 3Dcam 80x60 3
1.2 Technical Specifications 4
2. Package contents 5
3. Mechanical integration 6
3.1 Mechanical design and mounting 6
4. Installation guide 9
4.1 Hardware setup 9
4.2 Software setup for Windows 9
4.2.1 SDK installation 10
4.2.2 Streaming depth data on Windows 11
4.3 Software setup for Linux (Debian-based) 12
4.3.1 SDK installation 12
4.3.2 Streaming depth data on Linux 13
5. Switching between range modes 15
6. Start developing your application 16
6.1 OpenNI 2 C++ sample code 16
6.2 OpenNI 2 Python sample code 16
6.3 ROS package 16
7. Compliance 16
Copyright ©Terabee 2019
Terabee, 90 Rue Henri Fabre
01630, St Genis-Pouilly, France (next to CERN)
2/17

1 .Introduction
The purpose of this document is to give guidelines for installation, use and integration
of Terabee 3Dcam 80x60 depth camera. This user manual includes camera setup
instructions on Windows and Linux OS, installation of the SDK and visualization tool
(NIViewer) for streaming depth data on your PC.
1.1 About Terabee 3Dcam 80x60
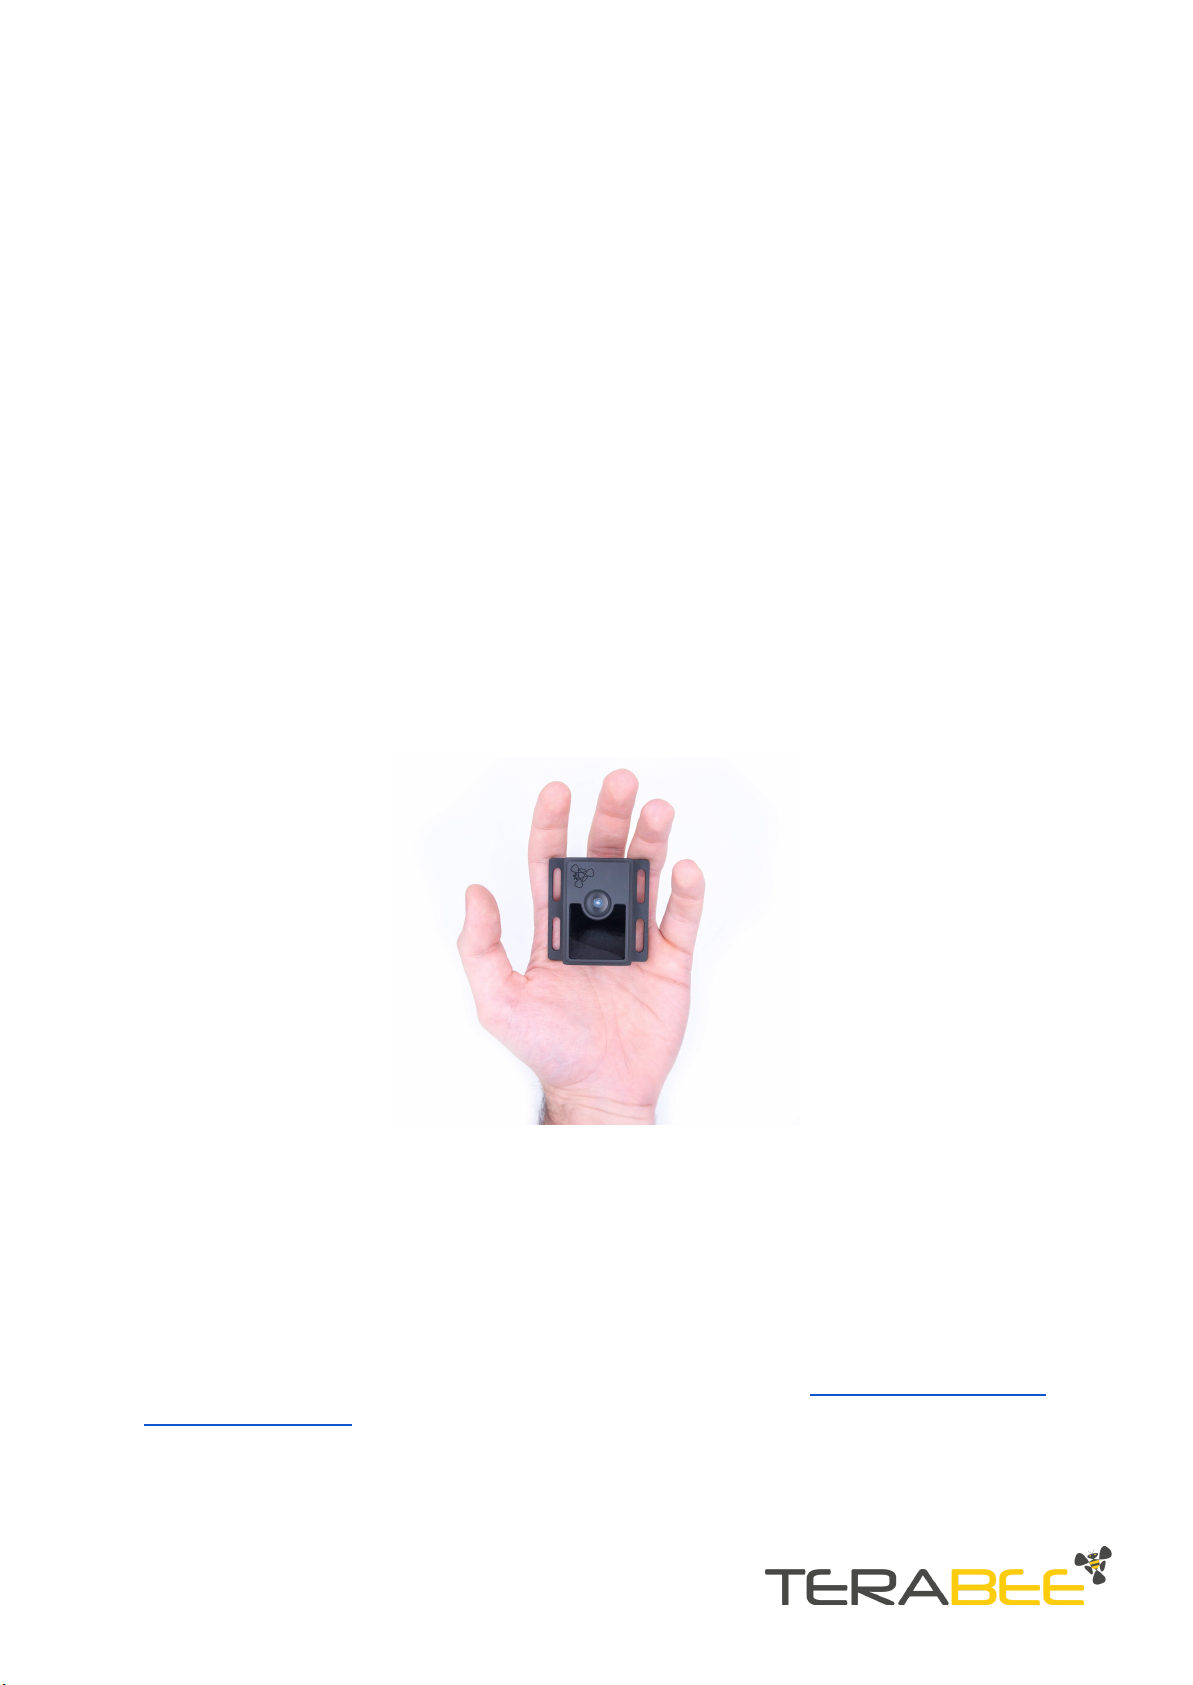
The 3D Time-of-Flight (ToF) camera is designed to support research projects, application
software developers and system integrators in the fields of Smart Buildings, Automation
and Robotics. Enable the third dimension with the cameras 80x60 pixel resolution over
a 74°x 57°Field of View. Benefit from the cameras robust aluminum casing while still
offering a compact (83 grams) and discreet design. Developed for indoor use, the
camera features two operating range modes. For close range applications such as hand
gesture recognition choose close-range mode and capture depth data as close as 20
centimeters. Switch to standard mode with its 4 meter range for volume measurement,
people and movement monitoring and robot navigation applications.
Figure 1. Terabee 3Dcam 80x60
Our compact ToF camera comes with an SDK containing all logic to operate your
camera, and a visualization tool for quick tests on your PC. Setup your Terabee 3Dcam
80x60 in no time and stream depth data via USB interface on Windows or Linux OS. An
SDK and OpenNI framework code library is available to kick-start your application
development.
For more information on Terabee 3Dcam 80x60 please visit the official product page of
the Terabee website.
Copyright ©Terabee 2019
Terabee, 90 Rue Henri Fabre
01630, St Genis-Pouilly, France (next to CERN)
3/17

1.2 Technical Specifications
Part Number
TB-3DCAM-8060-USB
Technology
Infrared Time-of-Flight
Resolution
80 x 60 pixels
Range
Close range mode: 0.2m to 1.2m
Standard mode: 1m to 4m
Field of View (H x V)
74° x 57°
Frame Rate
30 fps
Depth Resolution
1% of distance
Supply Voltage
5V DC (USB powered)
Power Consumption (max.)
4W
Operating Temperature
0°C to 40°C
Storage Temperature
-20°C to 60°C
Interfaces
USB 2.0 Micro-B
Weight
83g
Use Environment
Indoors
Dimensions
54 x 53 x 24mm
Supporting OS
Windows, Linux
Software
Terabee SDK OpenNI 2.2 based, C/C++, Python, ROS
package
Conformity
CE; RoHS
Copyright ©Terabee 2019
Terabee, 90 Rue Henri Fabre
01630, St Genis-Pouilly, France (next to CERN)
4/17

2. Package contents
The product package (Figure 2) contains the following items:
●Terabee 3Dcam 80x60 camera
●USB 2.0 Micro-B (Y cable)
●Software development kit (available for download on the Terabee 3Dcam 80x60
product page, Downloads section)
Figure 2. Product package contents
Copyright ©Terabee 2019
Terabee, 90 Rue Henri Fabre
01630, St Genis-Pouilly, France (next to CERN)
5/17

3. Mechanical integration
3.1 Mechanical design and mounting
For increased robustness, Terabee 3Dcam 80x60 offers an anodized aluminum casing.
Figure 3 illustrates external dimensions of the camera.
Figure 3. External dimensions of Terabee 3Dcam 80x60
The bottom casing (flat) part includes four slots for mounting the camera using M4
screws. You can mount the Terabee 3Dcam 80x60 using the following two methods: (1)
front-panel mount using the long M4 screw slots or (2) for a more discreet and
integrated look use the back-panel mounting shoulder in the front side of the camera.
The 3mm ledge offers users the possibility to mount the camera behind a surface (e.g
panel), ideally with a 3mm thickness. See figures 4 and 5 for visualizations. Please note
that mounting components (e.g. screws) are not included in the product package. For
more information on mounting, please contact us at teraranger@terabee.com.
Copyright ©Terabee 2019
Terabee, 90 Rue Henri Fabre
01630, St Genis-Pouilly, France (next to CERN)
6/17

Figure 4. Front-panel mounting example
Figure 5. Back-panel mounting example
Copyright ©Terabee 2019
Terabee, 90 Rue Henri Fabre
01630, St Genis-Pouilly, France (next to CERN)
7/17

When choosing a place for mounting, please consider the following recommendations:
●Terabee 3Dcam 80x60 is developed for use in indoor environments, using the
camera in outdoor conditions (in direct sunlight) can reduce its performance
●Choose a place which is in accordance with the optical constraints listed below
●Mounting close to sources of heat or strong electromagnetic fields can decrease
the sensing performance
●Do not mount anything directly in front of the camera
●It is better to avoid having other sources of continuous wave or modulated IR
light close to the sensor
●Please consider that dust, dirt and condensation can affect the sensor
performance.
●It is not advised to add an additional cover in front of the camera - please note
that this may reduce its performance
Please consult figure 6 for correct camera position when mounting to a surface or
hand-testing the device. This also translates into a correctly oriented and visualized data
output (depth image).
Figure 6. Correct camera position
Copyright ©Terabee 2019
Terabee, 90 Rue Henri Fabre
01630, St Genis-Pouilly, France (next to CERN)
8/17

4. Installation guide
4.1 Hardware setup
The Terabee 3Dcam 80x60 is shipped with a USB 2.0 Micro Y cable to provide an
appropriate amount of power to the camera. Please note that using only one cable may
affect camera performance.
Connect the Micro USB cable
(micro B side) into the camera's USB port.
Plug the other two ends of Micro USB cable into your
PC USB port.
You've successfully completed the hardware setup.
Copyright ©Terabee 2019
Terabee, 90 Rue Henri Fabre
01630, St Genis-Pouilly, France (next to CERN)
9/17

4.2 Software setup for Windows
4.2.1 SDK installation
An SDK is available for download on the Terabee website, providing users with drivers
for communicating with the camera, OpenNI code library and a visualization tool.
Terabee 3Dcam 80x60 SDK is compatible with OpenNI 2.2 frameworks.
Please download the SDK installation file by following this link: Terabee 3Dcam 80x60
SDK (available in the downloads section of the Terabee 3Dcam 80x60 product page on
the Terabee website).
After downloading, please unzip the SDK and open the exe file. The package contains
OpenNI2.2 versions of the SDK for both x32 and x64 architectures. For the purposes of
this guide, the OpenNI 2.2 (x64) driver is used.
A window will open offering to proceed with SDK installation on your PC. To proceed,
click Install. During installation of the GUI, you might receive a notification from
Windows about an unknown application trying to start. In the “Windows protected your
PC” screen select More info > Run anyway to proceed with SDK installation and please
be advised that running this application will not put your PC at risk.
As a last step to complete your installation, please select the option to restart your PC
and click Finish.
Copyright ©Terabee 2019
Terabee, 90 Rue Henri Fabre
01630, St Genis-Pouilly, France (next to CERN)
10/17

4.2.2 Streaming depth data on Windows
The OpenNI SDK comes with a visualization tool: NiViewer. This tool is a generic data
visualizer of OpenNI compatible devices, including depth, RGB and IR cameras. Hence
some of the functionality/features might not be supported for the Terabee 3Dcam
80x60. In order to stream depth data on your PC, please launch NIViewer in the newly
created TerabeeDemo folder. NIViewer 2.2 (x64) is used for the purposes of this demo.
A window will now open on your PC with the depth data streamed real time in the top
left corner of your screen.
Optional: To activate infrared image provided by the camera, right click on the interface
and select Device > Streams > Color > On/Off.
Press “p” on your keyboard to activate pointer mode. An interactive color/distance
scale will now open on the bottom of your screen to represent the distance value of the
red pointer. This allows to target a specific pixel in the depth image and obtain its
distance measure in cm (displayed under “pointer value”).
To display cameras depth image in full screen press “1” on your keyboard.
Copyright ©Terabee 2019
Terabee, 90 Rue Henri Fabre
01630, St Genis-Pouilly, France (next to CERN)
11/17

Press “?” on your keyboard to display all shortcut keys and their corresponding
functions.
4.3 Software setup for Linux (Debian-based)
4.3.1 SDK installation
The Terabee 3Dcam 80x60 SDK is compatible with OpenNI 2.2 frameworks. Please
download the SDK installation file by following this link: Terabee 3Dcam 80x60 SDK
(available in the downloads section of the Terabee 3Dcam 80x60 product page on the
Terabee website).
The package contains the OpenNI2.2 version of the SDK for both x64 and x86
architectures. The Linux version of the SDK is compatible with most of the debian-based
distributions including : Debian (up to Stretch), Ubuntu 16.04, 18.04, Linux-Mint,
Elementary OS (0.3).
After the download is complete, please extract the desired version that corresponds to
your system architecture and save in your chosen installation location. The SDK folder
content should contain the following:
Copyright ©Terabee 2019
Terabee, 90 Rue Henri Fabre
01630, St Genis-Pouilly, France (next to CERN)
12/17

Next, in the SDK folder, launch the install script with sudo permissions. For this, please
open a terminal in that directory and type: sudo ./install.sh
After successful installation, the terminal output should display the following data:
OpenNI and the Terabee 3Dcam driver are now installed on your PC. As a next step,
please install dependencies as described in the following paragraph, in order for the
SDK to function.
●OpenCV 3.4.1. For your convenience instructions are available on GitHub here
In order for NiViewer to function, the following dependency is required:
●Freeglut (please use this command: sudo apt-get install freeglut3)
After successful installation of mentioned dependencies, you are now ready to go and
start streaming depth data.
4.3.2 Streaming depth data on Linux
The OpenNI SDK comes with a visualization tool: NiViewer. This tool is a generic data
visualizer of OpenNI compatible devices, including depth, RGB and IR cameras. Hence
some of the functionality / features might not be supported for the Terabee 3Dcam
80x60. In order to stream depth data on your PC This tools is available in the following
directories:
Copyright ©Terabee 2019
Terabee, 90 Rue Henri Fabre
01630, St Genis-Pouilly, France (next to CERN)
13/17

●For OpenNI 2.2: <root of the sdk>/Tools
To activate the tool, right-click on the directory and click Run. You can also open a
terminal and type ./NiViewer. A window will now open on your PC with the depth data
streamed real time in the top left corner of your screen, alongside with cameras
infrared data on the top left corner.
Press “p” on your keyboard to activate pointer mode. An interactive color / distance
scale will now open on the bottom of your screen to represent the distance value of the
red pointer. This allows to target a specific pixel in the depth image and obtain its
distance measure in cm (displayed under “pointer value” field).
Press “1” on your keyboard to display cameras depth image in full screen.
Press “?” on your keyboard to display all shortcut keys and their corresponding
functions.
Copyright ©Terabee 2019
Terabee, 90 Rue Henri Fabre
01630, St Genis-Pouilly, France (next to CERN)
14/17

This photo corresponds to the depth images shown.
5. Switching between range modes
Terabee 3Dcam 80x60 offers 2 operating range modes. You can select between:
●Close range mode (0.2m to 1.2m)
●Standard mode (1.2m to 4m)
Standard mode is set as default. To switch between operating range modes, you will
need to edit the “ModuleConfig.json” file. Depending on your operating system, this file
will be located in the following directories:
●Windows: C:\Program Files\TERABEEToF\ModuleConfig.json
●Linux: /usr/etc/TERABEE/lib
To edit the file in Windows please locate and run the text editor with elevated privileges
- this can be done with “right-click” > “Run as administrator”. Next, in the top bar
menu select File > Open.. (or Ctrl+O) and import the “ModuleConfig.json” file.
To edit the file in Linux, please launch your text editor with elevated privileges with the
“sudo” command.
As a final step to select an operating range mode, please use a text editor tool to update
the “lens_mode” parameter with following values:
●1 for “Standard mode“
●0 for “Close range mode”
Copyright ©Terabee 2019
Terabee, 90 Rue Henri Fabre
01630, St Genis-Pouilly, France (next to CERN)
15/17

6. Start developing your application
Once the SDK installation is completed, you're now ready to kick-off your application
development. The following sections provide instructions on how to get started
developing of Terabee 3Dcam 80x60 applications using different software
environments.
6.1 OpenNI 2 C++ sample code
To get you started, Terabee has made available a list of C++ sample codes available on
GitHub. These samples will illustrate how to initialize Terabee 3Dcam 80x60 and access
depth data from it using OpenNI 2.2 frameworks. Here is a list of available Terabee
3Dcam 80x60 sample code repositories on GitHub:
OpenNI 2 Linux sample code:
●https://github.com/terabee/linux_openni2_samples
OpenNI 2 Windows sample code:
●https://github.com/terabee/windows_openni2_samples
Each repository comes with a README file (displayed on the front page of the
repository), explaining the different steps necessary to compile and run sample codes.
6.2 OpenNI 2 Python sample code
In order to allow fast code prototyping we also provide Python3 samples, which are
compatible with both Windows and Linux OS. Please follow the link below to access the
Python3 sample code repository on GitHub, including instructions on how to run them.
●https://github.com/Terabee/python_openni2_samples
Note: These Python3 samples are based on the “openni” python module which is only
compatible with OpenNI 2.
6.3 ROS package
In order to use the Terabee 3Dcam 80x60 in ROS environment, we also provide a
modified version of the official ROS OpenNI2 package. The ROS Package and
instructions are available in the link below:
●https://github.com/terabee/openni2_camera
7. Compliance
Copyright ©Terabee 2019
Terabee, 90 Rue Henri Fabre
01630, St Genis-Pouilly, France (next to CERN)
16/17

Yes
Yes
Copyright ©Terabee 2019
Terabee, 90 Rue Henri Fabre
01630, St Genis-Pouilly, France (next to CERN)
17/17
Table of contents
Other TeraBee 3D Camera manuals