FF-MM-344-REV - 05
Page 9
Operation and Maintenance Guide DP 75 Metal Series
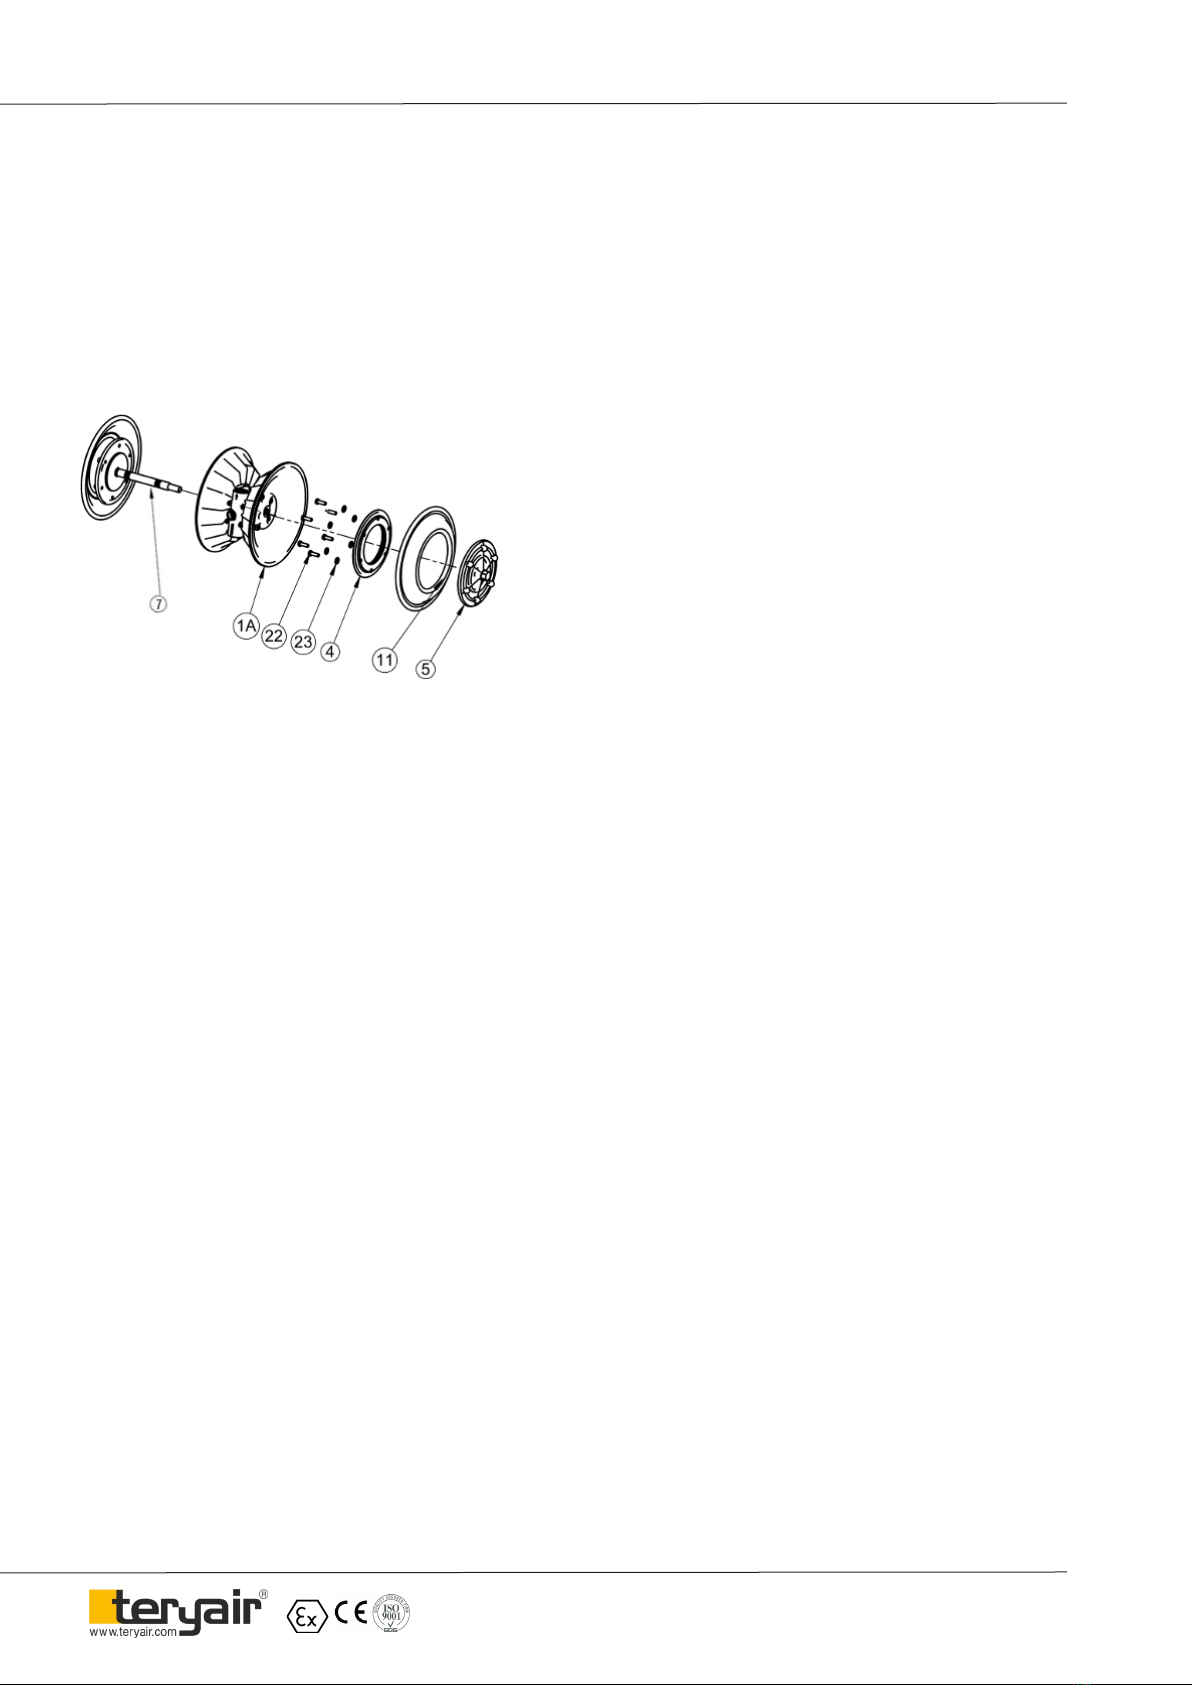
diaphragm orientation is correct, i.e. For ALB/ ALN/ALV
the sticker side of the diaphragm (11) to be located in the
outer chamber (6). Now assemble the outer ange (5) in re-
verse manner and remove the half sha assembly from vice.
* Refer g. A for ALT & SST model the convex side of outer
ring PTFE diaphragm (11A) to be located in outer chamber
(6). For the backup diaphragm (11) the larger side of outer
ring to be located in air disc (1A) & small in the concave
groove of PTFE diaphragm (11A).
* For ALS/ ALH model AIR SIDE marking to be located
toward the air disc (1A)
f. Lubricate the edge of the sha with specied
lubricant. Slowly insert the sha with rotating motion. Care
should be taken not to damage the rod seal (8).
g. Once the half sha open portion comes out of the
bush, follow the procedure in reverse manner as described in
part (a) & (b) and assemble the pump.
2) Replacement of Shaft O rings
a. For removing the rubber rings from bush, rst
follow the step a, b & c from the diaphragm replacement.
b. Now remove the seals with the help of needle Nose
pliers. Care should be taken not to damage the inner face of
bush.
c. Once all the old seals are have been removed, the
inside of the bushing should be cleaned to ensure no debris
is le that may damage to new seals (Pressurized air is pref-
erable).
d. ese following tools can be used to aid in the
installation of new seals:
• Needle Nose pliers
• Phillips Screwdriver
• Electrical Tape
e. Wrap electrical tape around each leg of the needle
nose pliers (heat shrink may also be used) . is is done to
prevent damaging the inside portion of the new seals.
f. With a new seal in hand, place the two legs of the
nose pliers inside the seal ring. Open the pliers as wide as
the seal diameter will allow, then two ngers pull down on
the top portion of the seal to form kidney bean shape.
g. Lightly clamp the pliers together to hold the seal
into the kidney shape. Be sure to pull the seal into as tight of
a kidney shape as possible, this will allow the seal to travel
down the bushing bore easier.
h. With the seal clamped in the pliers, insert the seal
into the bushing bore and position the bottom of the seal
into the correct groove. Once the bottom of the seal is seated
in the groove, release the clamp pressure on the pliers. is
will allow the seal to partially snap back to its original shape.
i. Aer the pliers are removed, you will notice a slight
bump in the seal shape. Before the seal can be properly
resized, the bump in the seal should be removed as much
as possible. is can be done with either the Phillips screw
driver or your nger, apply light pressure to the peak of the
bump. is pressure will cause the bump to be almost com-
pletely eliminated.
j. Lubricate the edge of the sha with specied lubri-
cant.
k. Slowly insert the sha with rotating motion. is
will complete the re sizing of the seals.
l. Perform these steps for the remaining seals.
3) Replacement of Ball seat & Ball
a) Follow the step (a) of diaphragm replacement.
Replace the ball (12) & seat (13) with new one.
* For ALT, SST series change the valve seat
(13) & oring (13A) with new one.
4) Replacement of air valve and oring
of end cap
a) Unscrew socket head bolt (27) from the centre
piece (1)& remove the air valve assembly. Now remove the
circlips (20) from both ends. Now with the help of bolt (31)
pull the end cap (17) & (19) from both ends. Now slide out
the air valve (16). Change the oring (18) of both end caps.
b) While assembly rst put the end cap with pin (19)
in air valve body (14). Make sure the notch of end cap (19)
matches with the drill hole of body. Push the end cap with
oring (18) gently. Now t the circlip (20). Now slide the air
valve from other side ensuring the drill portion located in
the pin of end cap (18). Now push the end cap (17) with
oring (18) from the other end and t the circlip.
c) You can also change the gasket for air valve body
(14) & Gasket (15). Now assemble the air valve assembly in
reverse manner.


