Tescoma Accura 634490 User manual

1
Instructions for use / Návod k použití
Istruzioni per l‘uso / Instrucciones de uso
Instruções de utilização / Gebrauchsanleitung
Mode d‘emploi / Instrukcja użytkowania
Návod na použitie / Инструкция по использованию
Digital oven thermometer, with timer
Digitální teploměr do trouby, sminutkou
Termometro digitale da forno, con timer
Termómetro de horno digital, con temporizador
Termómetro digital p/forno, com temporizador
Digitales Backofenthermometer, mit Kurzzeitwecker
Thermomètre numérique pour four avec minuteur
Cyfrowy termometr do piekarnika, zminutnikiem
Digitálny teplomer do rúry, sminútkou
Цифровой термометр для духовки, с таймером

2 3
A Instructions for use 6
S Návod k použití 11
G Istruzioni per l‘uso 16
H Instrucciones de uso 21
J Instruções de utilização 26
D Gebrauchsanleitung 31
F Mode d‘emploi 36
K Instrukcja użytkowania 41
L Návod na použitie 46
P Инструкция по использованию 51
dWährend des Backvorgangs im Backofen wird die Innentemperatur im
Fleisch, Fisch, Geügel, Kuchen usw. überwacht, der Temperaturbereich
beträgt 0 bis 300 °C, die Signalisierung der erzielten Soll-Temperatur
erfolgt akustisch. Mit einem Kurzzeitwecker zur genauen Zeitmessung,
Display mit großen Zahlen. Hitzebeständige Sonde aus Edelstahl ist für
alle Arten von Backöfen geeignet. Mit Magneten zur leichten Befestigung
auf die Metalläche in der Küche, 1,5V-Batterien AAA im Lieferumfang.
3 Jahre Garantie.
f Mesure la température à l’intérieur de la viande, des poissons, de la
volaille, des gâteaux, etc. pendant la cuisson au four ; la plage de mesure
est comprise entre 0 et 300 °C ; lorsque la température atteint le degré
de cuisson désiré, un signal sonore retentit. Doté d’un minuteur pour une
mesure précise du temps ; écran avec gros chires. La sonde en inox réfrac-
taire convient pour tous les types de four. Le dispositif est aimanté pour
une xation facile sur les surfaces métalliques de la cuisine ; fourni avec
des piles AAA 1,5V. Garanti 3 ans.
kMierzy temperaturę w przedziale od 0 do 300 °C wewnątrz mięsa, ryb,
drobiu, ciast itp. podczas pieczenia w piekarniku. Sygnalizuje dźwiękiem
osiągnięcie odpowiedniego stopnia wypieczenia. Termometr posiada
minutnik do dokładnego odmierzania czasu oraz wyświetlacz zdużymi
cyframi. Żaroodporny czujnik ze stali nierdzewnej jest odpowiedni do
wszystkich rodzajów piekarników.Termometr został wyposażony w mag-
nesy do łatwego zamocowania na metalowych powierzchniach w kuchni.
W zestawie zbateriami AAA 1,5V. Gwarancja 3- letnia.
lMeria teplotu vo vnútri mäsa, rýb, hydiny, múčnikov a pod. Počas
pečenia vrúre vrozsahu od 0 do 300 °C, dosiahnutie požadovaného stupňa
prepečenia zvukovo signalizuje. Sminútkami na presné meranie času,
displej s veľkými číslicami. Žiaruvzdorná nerezová sonda je vhodná do
všetkých typov rúr na pečenie. Smagnetmi pre jednoduché uchytenie na
kovové plochy vkuchyni, dodávaný sbatériami AAA 1,5V. 3 roky záruka.
pИзмеряет температуру внутри мяса, рыбы, птицы, выпечки
и т.п. во время их запекания в духовке в диапазоне от 0 до 300 °C –
по достижении требуемой степени готовности прозвучит звуковой
сигнал. С таймером для точного измерения времени, дисплей
с большими цифрами. Термостойкий зонд из нержавеющей стали
подходит для всех типов духовок. С магнитами, благодаря которым
термометр легко прикрепится к металлическим поверхностям на
кухне. Поставляется с батареями AAA 1,5 В. 3-летняя гарантия.

4 5
1d 1e
1a
3a
1c
3b
2b 2c 2a
1b
2d 2e 4
Legend / Popis / Legenda / Descripción / Legenda
Beschreibung / Description / Opis / Popis / Описание www.tescoma.com/video/634490

6 7
a Instructions for use
Legend
Display
1a. Set temperature (SET TEMP)
1b. Current temperature (CURRENT TEMP)
1c. Timer
1d. Type of meat
1e. Degree of doneness
Control panel
2a. Switching on the thermometer
2b. Selecting doneness / temperature setting
2c. Selecting type of meat
2d. Starting and stopping the timer
2e. Timer setting (H= hours, M= minutes)
Rear panel
3a. Selecting between °C/°F
3b. Battery cover
4. Heat-resistant probe with cord
Measurement range
0–300 °C, 32–572 °F
Before rst use
Remove the transport insert from the inserted batteries.
Switching on the thermometer
Press the button; the set temperature (SET TEMP), current tem-
perature (CURRENT TEMP) and the reset timer will appear on the
display.
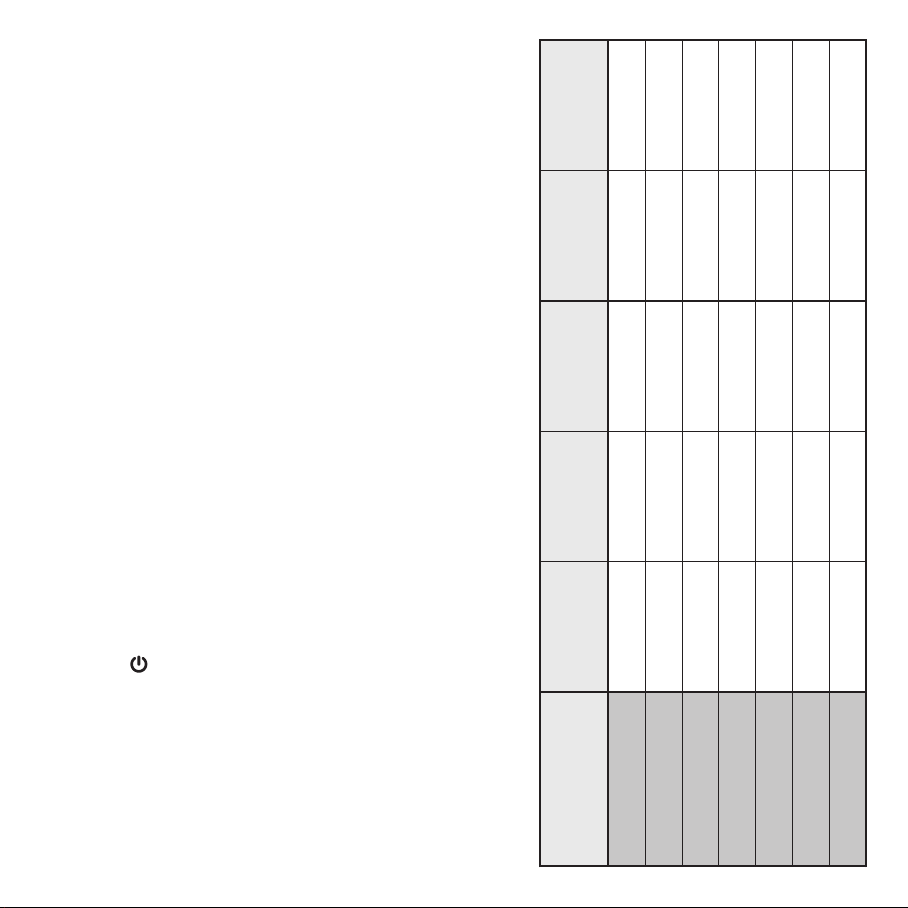
Overview of the set temperatures
Oven thermometer ACCURA makes it possible to pre-set the required
temperatures inside beef, lamb, pork, sh, turkey and chicken. In ad-
dition, various degrees of doneness can be set for beef, lamb and pork.
DEGREE OF DONENESS WELL M-WELL MEDIUM M-RARE RARE
TYPE OF MEAT
BEEF 77 °C /170 °F 74 °C /165 °F 71 °C /160 °F 66 °C /150 °F 63 °C /145 °F
LAMB 77 °C /170 °F 74 °C /165 °F 71 °C /160 °F 66 °C /150 °F 63 °C /145 °F
PORK 77 °C /170 °F 74 °C /165 °F 71 °C /160 °F ––
FISH 63 °C /145 °F ––––
TURKEY 74 °C /165 °F ––––
CHICKEN 74 °C /165 °F ––––
OVERVIEW OF TEMPERATURES AND DEGREES OF DONENESS OF MEAT

8 9
Selecting type of meat
Repeatedly press the button and select the required type
of meat in the top line of the display.
Doneness selection
Repeatedly press the button and select the required degree of
doneness. Note: Degree of doneness can be selected only for beef,
lamb and pork.
Notice
The pre-set temperatures are indicated for meat baked as awhole.
For preparing small servings of meat, e.g. beef steaks, English roast
beef, chicken breasts, sh llets, cakes, etc., use the manual tem-
perature setting.
Manual temperature setting
To set temperature manually, repeatedly press the button
until the top line of the display with the chosen type of meat and
degree of doneness disappears. Use the button to increase or
decrease temperature (SET TEMP) to the required value; the digits
change faster when the button is held down.
Placing the probe in afood
Punch the heat-resistant probe into meat in its highest point so that
the tip of the probe is as close to the centre of the food as possible
and not near fat or bone.
Placing food with the probe into the oven
Place food into the oven so that the probe and the cord do not touch
the walls of the oven; place the cord loosely over the top of the door
and close the oven.
Placing the thermometer
Attach the thermometer to the outer metal surface of the oven or
near the oven using the magnets, or set it onto aat surface. Warn-
ing! Never place the thermometer into the oven.
Measuring temperature inside food
The thermometer continuously shows temperature inside meat
while baking. As soon as the temperature inside the food reaches the
pre-set value, the audible indication is sounded. Finish baking and
turn o the audible indication by pressing any button.
Removing the probe from food
Removetheprobefrom the foodandsetitasideontoaheat-resistant
pad.Warning! Use an oven mitt or heatproof mat when removing the
stainless steel probe – both the probe and the cord will be hot.
Timer
Measuring the set time - countdown
Press to set hours, press to set minutes; the digits change faster
when the button is held down. Time in the range from 00:01:00 to
23:59:00 hcan be set in 1-minute increments.
Press the button and the timer will start measuring the set time,
giving asound indication lasting one minute when the set time in-
terval has expired.You can turn o the sound indication by pressing
any button.
Measuring time
Press and the timer starts measuring time from 0:00:00 to
23:59:59 h, giving asound indication lasting one minute when the
set time interval has expired.
Pausing the timer
You can stop the timer and start it again at any time by pressing .
Resetting the timer
Press the and buttons at the same time.
Selecting between °C/°F
Press on the bottom of the thermometer. An will appear
on the display and the thermometer will measure temperature in
degrees Fahrenheit.When switched on again, the thermometer will
be set to measure in the units last used.
Switching o the thermometer
Switch the thermometer o after each use by holding down the
button.

10 11
Battery replacement
Digital oven thermometer ACCURA comes with 2 inserted AAA bat-
teries 1.5V. As soon as the display shows the symbol of adead bat-
tery, remove the cover and replace both batteries with new ones.Use
exclusively high-quality AAA batteries 1.5V. If you do not use the
thermometer for along time, remove the batteries and store them
separately. Do not discard used batteries or the product in domestic
waste - dispose of them at arecycling site.
Maintenance and storage
Leave the stainless steel probe and the cord to cool after use – wipe
them with amoistened dishcloth and dry. Do not wash in dishwash-
er! If necessary, wipe the thermometer with amoistened dishcloth
and dry. Do not wash in dishwasher! Store with the cord wound
around the thermometer; insert the stainless steel probe into the
grip on the bottom of the thermometer.
Notice
Do not expose the thermometer to high temperatures, steam
and/or moisture.
The tip of the stainless steel probe is sharp. Handle it with extra
care – risk of injury. Store out of the reach of children.
Do not use the thermometer near appliances producing an elec-
tromagnetic eld, such as amicrowave oven, mobile phone, etc. If
the thermometer malfunctions due to electromagnetic radiation,
remove the source of interference and switch the thermometer o
and then on again.
Do not repair the thermometer yourself – contact your retailer or
aTESCOMA service centre.
3-year warranty
A3-year warranty period applies to this product from the date of
purchase.The warranty never covers defects: Due to improper use in-
compatible with the Instructions for use. Resulting from an impact,
fall or mishandling. Due to unauthorised repairs of, or alterations to,
the product.
s Návod kpoužití
Popis
Displej
1a. Nastavená teplota (SET TEMP)
1b. Aktuální teplota (CURRENT TEMP)
1c. Minutka
1d. Druh masa
1e. Stupeň propečení
Ovládací panel
2a. Zapnutí teploměru
2b. Volba stupně propečení / nastavení teploty
2c. Volba druhu masa
2d. Spuštění azastavení minutky
2e. Nastavení minutky (H= hodiny, M= minuty)
Zadní panel
3a. Volba °C/°F
3b. Kryt baterií
4. Žáruvzdorná sonda spropojovacím kabelem
Rozsah měření
0–300 °C, 32–572 °F
Před prvním použitím
Zvložených baterií odstraňte přepravní pojistku.
Zapnutí teploměru
Stiskněte tlačítko , displej zobrazí nastavenou teplotu (SET
TEMP), aktuální teplotu (CURRENT TEMP) avynulované minutky.
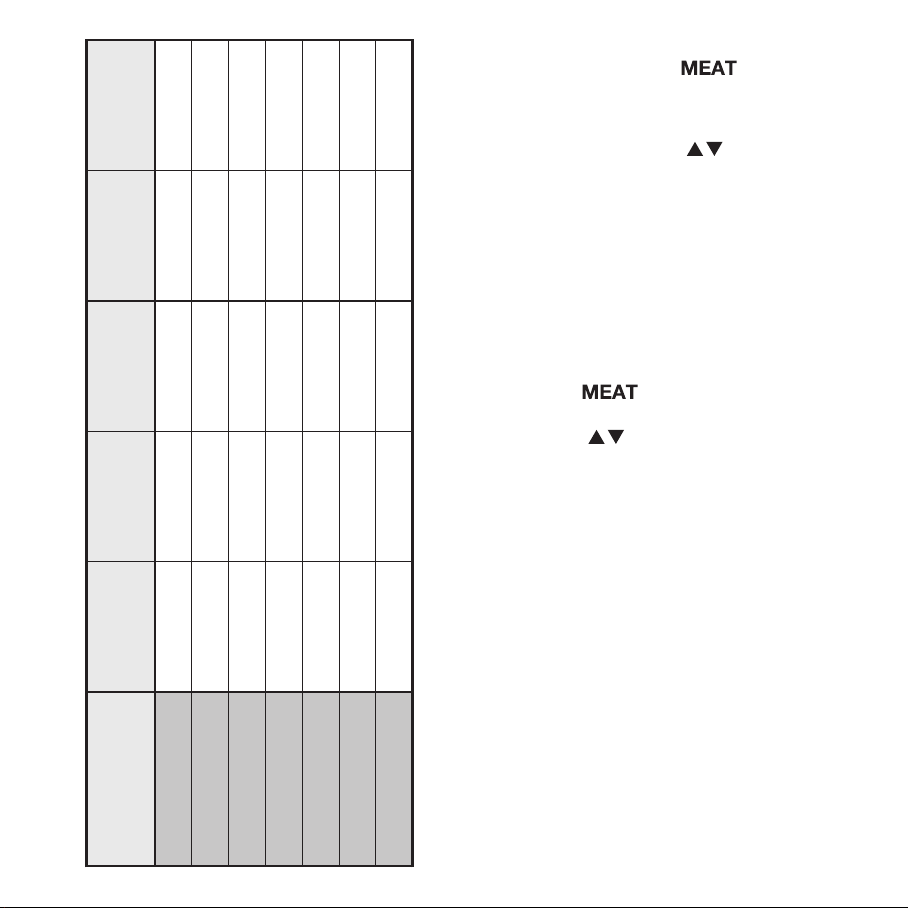
Přehled nastavených teplot
Teploměr do trouby ACCURA nabízí možnost předem nastavit poža-
dované teploty uvnitř hovězího, jehněčího avepřového masa, ryb,
krůty akuřete. Uhovězího, jehněčího avepřového masa lze nastavit
irůzné stupně jeho propečení.

12 13
STUPEŇ PROPEČENÍ WELL
Velmi dobře
propečené
M-WELL
Dobře propečené MEDIUM
Propečené M-RARE
Málo propečené
RARE
Velmi málo
propečené
DRUH MASA
HOVĚZÍ / BEEF 77 °C /170 °F 74 °C /165 °F 71 °C /160 °F 66 °C /150 °F 63 °C /145 °F
JEHNĚČÍ / LAMB 77 °C /170 °F 74 °C /165 °F 71 °C /160 °F 66 °C /150 °F 63 °C /145 °F
VEPŘOVÉ / PORK 77 °C /170 °F 74 °C /165 °F 71 °C /160 °F ––
RYBA / FISH 63 °C /145 °F ––––
KRŮTA / TURKEY 74 °C /165 °F ––––
KUŘE / CHICKEN 74 °C /165 °F ––––
PŘEHLED TEPLOT ASTUPNĚ PROPEČENÍ MASA
Volba druhu masa
Stiskněte opakovaně tlačítko avhorním řádku displeje
vyberte požadovaný druh masa.
Volba stupně propečení
Stiskněte opakovaně tlačítko a zvolte požadovaný stupeň
propečení. Pozn.: Stupeň propečení lze volit pouze uhovězího, jeh-
něčího avepřového masa.
Upozornění
Předem nastavené teploty jsou uvedeny pro maso pečené vcelku. Pro
přípravu menších porcí masa, např. hovězích steaků, anglického rost-
bífu, kuřecích prsou, rybích letů, moučníků apod. použijte manuální
nastavení požadované teploty.
Manuální nastavení teploty
Pro manuální nastavení teploty stiskněte opakovaně tlačítko
, dokud horní řádek displeje se zvoleným druhem masa
astupněm propečení nezmizí. Tlačítkem zvyšte nebo snižte
teplotu (SET TEMP) na požadovanou hodnotu, přidržením tlačítka
se změna číslic zrychlí.
Umístění sondy do pokrmu
Žáruvzdornou sondu zapíchněte do masa vjeho nejvyšším místě tak,
aby byla špička jehlice co nejblíže středu pokrmu anenacházela se
vblízkosti tuku nebo kosti.
Umístění pokrmu se sondou do trouby
Pokrm umístěte do trouby tak, aby se sonda ani kabel nedotýkaly
stěn trouby, propojovací kabel položte volně přes horní okraj dvířek
atroubu zavřete.
Umístění teploměru
Teploměr uchyťte magnety na vnější kovovou část trouby nebo po-
blíž trouby, případně postavte na rovnou plochu. Pozor! Teploměr
nikdy nedávejte do trouby.
Měření teploty uvnitř pokrmů
Teploměr průběžně zobrazuje teplotu uvnitř masa během pečení.
Jakmile teplota uvnitř pokrmu dosáhne předem nastavené hodnoty,

14 15
ozve se zvuková signalizace. Pečení pokrmu ukončete a zvukovou
signalizaci vypněte stisknutím kteréhokoliv tlačítka.
Vyjmutí sondy zpokrmu
Sondu vyjměte zpokrmu aodložte na žáruvzdornou podložku. Po-
zor! Při vyjímání nerezové sondy používejte kuchařskou rukavici nebo
chňapku, sonda ikabel jsou horké.
Minutka
Měření nastaveného času – odpočítávání
Stiskněte anastavte hodiny, stiskněte anastavte minuty, přidr-
žením tlačítek se změna číslic zrychlí. Čas vrozmezí od 00:01:00 do
23:59:00 hod. lze nastavit vminutových krocích.
Stiskněte tlačítko a minutka začne měřit nastavený čas, jeho
uplynutí ohlásí minutu trvajícím zvukovým signálem. Zvukovou sig-
nalizaci vypněte stisknutím kteréhokoliv tlačítka.
Měření času
Stiskněte aminutka začne měřit čas od 00:00:00 do 23:59:59
hod., uplynutí ohlásí minutu trvajícím zvukovým signálem.
Pozastavení minutky
Minutku můžete kdykoliv zastavit aznovu spustit stisknutím .
Vynulování minutky
Stiskněte současně tlačítka a .
Volba měření °C/°F
Stiskněte na spodní straně. Na displeji se zobrazí ateplo-
měr bude měřit teplotu ve stupních Fahrenheita. Při dalším zapnutí
bude teploměr nastavený pro měření vnaposledy používaných jed-
notkách.
Vypnutí teploměru
Teploměr vypněte po každém použití přidržením tlačítka .
Výměna baterií
Digitální teploměr do trouby ACCURA je dodáván s2 vloženými bate-
riemi AAA 1,5V. Jakmile displej zobrazí symbol vybité baterie, sejmě-
te kryt aobě baterie vyměňte za nové. Používejte výhradně kvalitní
AAA baterie 1,5V. Pokud teploměr delší dobu nepoužíváte, baterie
vyjměte askladujte samostatně. Použité baterie avýrobek nepatří
do domovního odpadu, ale na místo zpětného odběru.
Údržba askladování
Nerezovou sondu apropojovací kabel nechte po použití vychladnout,
otřete vlhkou utěrkou aosušte, nemyjte vmyčce! Teploměr vpřípadě
potřeby otřete vlhkou utěrkou aosušte, nemyjte vmyčce! Skladuj-
te spropojovacím kabelem navinutým okolo teploměru, nerezovou
sondu zasuňte do úchytu na jeho spodní straně.
Upozornění
Teploměr nevystavujte vysokým teplotám, páře avlhkosti.
Hrot nerezové sondy je ostrý, manipulaci věnujte zvýšenou pozor-
nost, nebezpečí poranění. Skladujte mimo dosah dětí.
Teploměr nepoužívejte v blízkosti spotřebičů vyzařujících elektro-
magnetické pole, např. mikrovlnné trouby, mobilního telefonu apod.
V případě poruchy funkce vlivem elektromagnetického záření od-
straňte zdroj rušení, teploměr vypněte aznovu zapněte.
Teploměr sami neopravujte, obraťte se na prodejce, ukterého jste
výrobek zakoupili nebo na některé ze servisních středisekTESCOMA.
3 roky záruka
Na tento výrobek je poskytována záruka 3 roky, počínaje dnem pro-
deje.Zárukase zásadně nevztahuje natyto případy:Výrobek bylpou-
žíván vrozporu sNávodem kpoužití. Závady byly způsobeny úderem,
pádem či neodbornou manipulací. Na výrobku byly provedeny neau-
torizované opravy azměny.
16 17
g Istruzioni per l‘uso
Legenda
Display
1a. Impostazione della temperatura (SET TEMP)
1b. Temperatura corrente (CURRENT TEMP)
1c. Timer
1d. Tipo di carne
1e. Grado di cottura
Pannello di controllo
2a. Accensione del termometro
2b. Selezione del grado di cottura / impostazione della temperatura
2c. Selezione del tipo di carne
2d. Avvio e arresto del timer
2e. Impostazione del timer (H= ore, M= minuti)
Pannello posteriore
3a. Selezione di °C/°F
3b. Coperchio della batteria
4. Sensore resistente al calore con cavo
Intervallo di misurazione
0–300 °C, 32–572 °F
Prima del primo utilizzo
Rimuovere l‘inserto isolante dalle batterie.
Accensione del termometro
Premere il tasto ; la temperatura impostata (SET TEMP), la tem-
peratura corrente (CURRENT TEMP) e il timer azzerato appariranno
sul display.
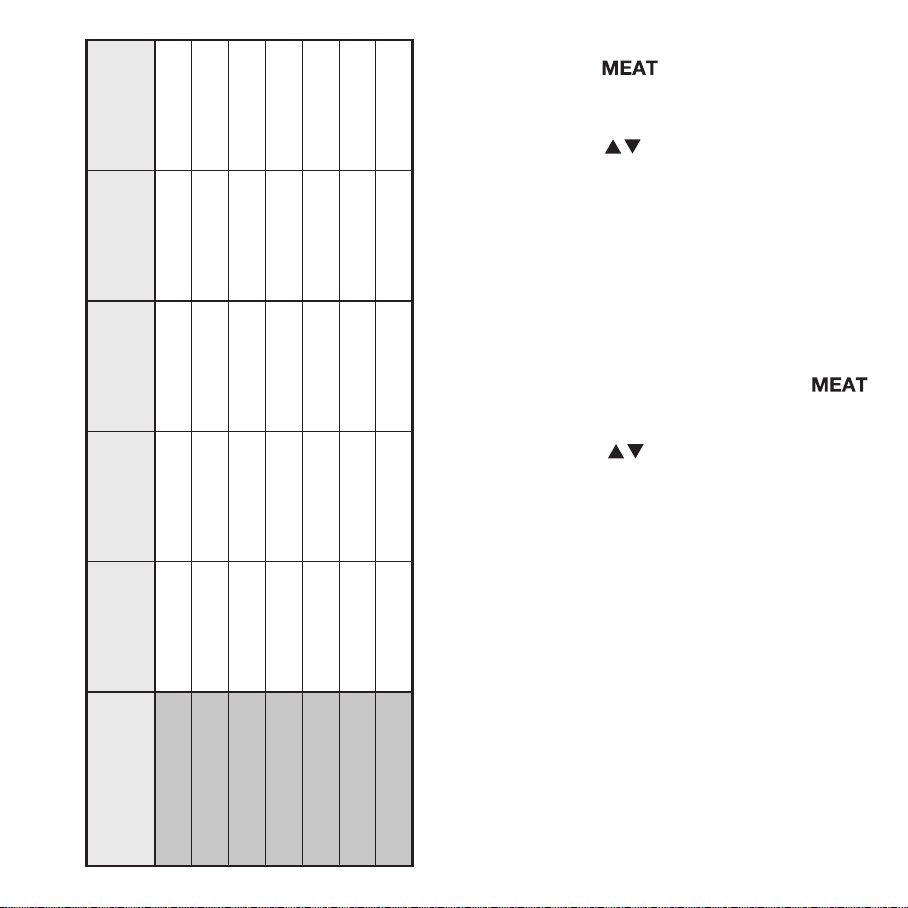
Controllo delle temperature impostate
Il termometro da forno ACCURA permette di preimpostare la tempe-
ratura richiesta per manzo, agnello, maiale, pesce, tacchino e pollo.
Inoltre, è possibile impostare diversi gradi di cottura per manzo,
agnello e maiale.
GRADO DI COTTURA WELL
Ben cotta M-WELL
Media ben cotta MEDIUM
Media M-RARE
Media al sangue RARE
Al sangue
TIPO DI CARNE
MANZO / BEEF 77 °C /170 °F 74 °C /165 °F 71 °C /160 °F 66 °C /150 °F 63 °C /145 °F
AGNELLO / LAMB 77 °C /170 °F 74 °C /165 °F 71 °C /160 °F 66 °C /150 °F 63 °C /145 °F
MAIALE / PORK 77 °C /170 °F 74 °C /165 °F 71 °C /160 °F ––
PESCE / FISH 63 °C /145 °F ––––
TACCHINO / TURKEY 74 °C /165 °F ––––
POLLO / CHICKEN 74 °C /165 °F ––––
CONTROLLO DELLE TEMPERATURE E DEI GRADI DI COTTURA

18 19
Selezione del tipo di carne
Premere ripetutamente il tasto e selezionare il tipo di car-
ne desiderato nella linea superiore del display.
Selezione del grado di cottura
Premere ripetutamente il tasto e selezionare il grado di cot-
tura desiderato. Nota: Il grado di cottura può essere selezionato solo
per manzo, agnello e maiale.
Avvertenza
Le temperature preimpostate sono indicate per la cottura di carni
intere. Per preparare porzioni più piccole, per esempio bistecche di
manzo, roast beef, petti di pollo, letti di pesce, torte, ecc., utilizzare
l‘impostazione manuale della temperatura.
Impostazione manuale della temperatura
Per impostare manualmente la temperatura, premere ripetutamen-
te il tasto no aquando la linea superiore del display con
il tipo di carne scelto e il grado di cottura non sparirà. Utilizzare il
tasto per aumentare odiminuire la temperatura (SET TEMP)
al valore desiderato; inumeri scorrono più velocemente se si tiene
premuto il tasto.
Inserire il sensore in un alimento
Inlzare la carne con il sensore in acciaio nel suo punto più alto,
facendo in modo che la punta si trovi più vicino possibile al centro
dell‘alimento e possibilmente non vicino agrasso oossa.
Infornare un alimento con la sonda inserita
Posizionare l‘alimentoinfornoin modo che lasondaeil cavonon toc-
chino le pareti del forno; lasciare uscire il cavo dalla parte alta dello
sportello e chiudere il forno.
Posizionare il termometro
Applicare il termometro alla supercie metallica esterna del forno
oaccanto al forno utilizzando la calamita, oappoggiarlo su una super-
cie piana. Attenzione! Non mettere il termometro nel forno.
Misurare la temperatura interna degli alimenti
Il termometro rileva continuamente la temperatura interna agli ali-
menti in cottura. Quando la temperatura raggiunge il valore preim-
postato, viene emesso un segnale acustico. Terminare la cottura
e interrompere il segnale acustico premendo qualunque tasto.
Rimuovere la sonda dall‘alimento
Rimuovere la sonda dall‘alimento e mettere da parte, su un sotto-
pentola resistente al calore. Attenzione! Utilizzare un guanto da for-
no ouna presina per rimuovere la sonda – sonda e cavo potrebbero
scottare.
Timer
Misurazione del tempo preimpostato – conto alla rovescia
Premere per impostare le ore, premere per impostare iminu-
ti; inumeri scorrono più velocemente se si tiene premuto il tasto.
Il tempo, da 00:01:00 a23:59:00 h, può essere impostato con scatti
di 1 minuto.
Premere il tasto e il timer inizierà amisurare il tempo preimpo-
stato, emettendo un segnale acustico della durata di un minuto allo
scadere del tempo. Il segnale acustico può essere spento premendo
qualunque tasto.
Misurazione del tempo
Premere e il timer inizierà a misurare il tempo da 0:00:00
a23:59:59 h, emettendo un segnale acustico della durata di un
minuto allo scadere del tempo preimpostato.
Mettere in pausa il timer
Il timer può essere arrestato e riavviato in qualunque momento
premendo .
Azzerare il timer
Premere itasti e contemporaneamente.
Selezione di °C/°F
Premere sul fondo del termometro. Una apparirà sul di-
splay e il termometro misurerà la temperatura in gradi Fahrenheit.
All‘utilizzo successivo, il termometro si accenderà impostato sull‘ul-
tima scala di misurazione utilizzata.

20 21
Spegnimento del termometro
Spegnere il termometro dopo ogni utilizzo premendo il tasto .
Sostituzione delle batterie
Il termometro digitale da forno ACCURA è fornito con 2 batterie AAA
1,5V. Quandosul display appareil simbolo di batteriascarica,togliere
il coperchio e sostituire con batterie nuove. Utilizzare esclusivamente
pile AAA 1,5V di alta qualità. Togliere le batterie dal termometro e
conservarle separatamente in caso di inutilizzo prolungato. Non
smaltire le pile con iriuti domestici – gettarle negli appositi con-
tenitori.
Manutenzione e conservazione
Lasciare rareddare il sensore e il cavo dopo l‘uso – passarli con un
panno umido ed asciugare. Non lavare in lavastoviglie! Se necessario,
pulire il termometro con un panno umido e asciugare. Non lavare in
lavastoviglie! Avvolgere il cavo attorno al termometro; inserire il sen-
sore nell‘impugnatura del termometro.
Avvertenza
Non esporre il termometro ad alte temperature, vapore e/oumidità.
L‘estremità della sonda in acciaio inox è appuntita. Maneggiare con cura –
rischio di infortunio. Conservare lontano dalla portata dei bambini.
Non utilizzare il termometro vicino aelettrodomestici che produca-
no campi elettromagnetici, come il forno amicroonde, un telefono
cellulare, ecc. Se il termometro dovesse funzionare male acausa di
un‘interferenza elettromagnetica, rimuovere la fonte dell‘interferen-
za, quindi spegnere e riaccendere il termometro.
In caso di guasto non provare ariparare il termometro – contattare il
proprio rivenditore oun centro servizi TESCOMA.
Garanzia 3 anni
Una garanzia di 3 anni si applica al prodotto apartire dalla data di
acquisto. La garanzia non copre idifetti: Dovuti ad un uso improprio
oincompatibile con le Istruzioni per l‘uso. Derivanti da un impatto,
caduta omaltrattamento. Provocati da riparazioni non autorizzate
omodiche al prodotto.
h Instrucciones de uso
Descripción
Pantalla
1a. Selección de temperatura (SET TEMP)
1b. Temperatura actual (CURRENT TEMP)
1c. Temporizador
1d. Tipo de carne
1e. Grado de cocción
Panel de control
2a. Encender el termómetro
2b. Selección del grado de cocción / ajuste de temperatura
2c. Selección del tipo de carne
2d. Iniciar y parar el temporizador
2e. Ajuste de tiempo (H = horas, M= minutos)
Panel trasero
3a. Seleccionar entre °C/°F
3b. Tapa de la pila
4. Sonda con cordón resistente al calor
Rango de medición
0–300 °C, 32–572 °F
Antes del primer uso
Retirar la protección de transporte de las pilas.
Encender el termómetro
Presionar el botón ; la temperatura seleccionada (SET TEMP), la
temperatura actual (CURRENT TEMP) y el temporizador de reinicio
aparecerá en la pantalla.
Perspectiva de la selección de temperaturas
El termómetro para horno ACCURA hace possible preseleccionar la
temperatura deseada en el interior de la carne de vacuno, cordero,
cerdo, pescado, pavo y pollo. Además, se pueden seleccionar varios
grados de cocción para vacuno, cordero y cerdo.
22 23
Selección del tipo de carne
Presionar repetidamente el botón y seleccionar el tipo re-
querido de carne en la primera línea de la pantalla.
Selección del grado de cocción
Presionar repetidamente el botón y seleccionar el grado de
cocción requerido. Nota: El grado de cocción se puede seleccionar
solo para ternera, cordero y cerdo.
Aviso
La temperatura preestablecida está indicada para piezas de carne
horneada entera. Para preparar pequeñas raciones de carne, por
ejem. letes de ternera, roast beef, pechugas de pollo, letes de pes-
cado, pasteles, etc., utilizar el ajuste de temperatura manual.
Ajuste de temperatura manual
Para selecionar la temperatura manualmente, presionar repetida-
mente el botón hasta que la primera línea de la pantalla
con el tipo de carne seleccionada y grado de cocción desaparezca.
Utilizar el botón para aumentar odisminuir la temperatura
(SETTEMP)al valor deseado; los dígitos cambian más rápido cuando
el botón se mantiene presionado.
Colocar la sonda en un alimento
Pinchar la sonda resistente al calor en el punto más alto del alimento
de forma que la punta de la sonda esté lo más cerca posible del cen-
tro de los alimentos y no cerca de la grasa ohueso.
Colocar los alimentos con la sonda en el horno
Colocar los alimentos en el horno de forma que la sonda y el cordón
no toquen las paredes del horno; colocar el cordón holgadamente
por encima de la puerta y cerrar el horno.
Colocar el termómetro
Fijar el termómetro ala supercie metálica exterior del horno ocerca
del horno utilizando los imanes, osobre una supercie plana. ¡Pre-
caución! No colocar nunca el termómetro dentro del horno.
Medir la temperatura interior del alimento
El termómetro muestra continuamente la temperatura interior de la
carne durante el horneado. Tan pronto como la temperatura interior
GRADOS DE COCCIÓN WELL
Muy hecho
M-WELL
Bien hecho
MEDIUM
Al punto
M-RARE
Poco hecho
RARE
Crudo
TIPO DE CARNE
TERNERA / BEEF 77 °C /170 °F 74 °C /165 °F 71 °C /160 °F 66 °C /150 °F 63 °C /145 °F
CORDERO / LAMB 77 °C /170 °F 74 °C /165 °F 71 °C /160 °F 66 °C /150 °F 63 °C /145 °F
CERDO / PORK 77 °C /170 °F 74 °C /165 °F 71 °C /160 °F ––
PESCADO / FISH 63 °C /145 °F ––––
PAVO / TURKEY 74 °C /165 °F ––––
POLLO / CHICKEN 74 °C /165 °F ––––
PERSPECTIVA DETEMPERATURAS Y GRADOS DE COCCION

24 25
del alimento alcance el valor preestablecido, emitirá una indicación
acústica. Finalización del horneado y apagado de la indicación acús-
tica presionando cualquier botón.
Retirar la sonda del alimento
Retirar la sonda del alimento y dejar aun lado sobre una supercie
resistente al calor. ¡Precaución! Utilizar una manopla o agarrador
para retirar la sonda de acero inoxidable – tanto el cordón como la
sonda estarán calientes.
Temporizador
Medición de un tiempo establecido – cuenta atrás
Presionar el botón para seleccionar las horas, presionar para
seleccionar los minutos; los dígitos cambian más rápido cuando se
mantiene el botón pulsado. El tiempo en el intervalo de 00:01:00
a 23:59:00 h se puede ajustar en incrementos de 1 minuto.
Presionar el botón y el temporizador comenzará amedir el tiem-
po establecido, emitiendo una indicación acústica durante un minu-
to cuando el intervalo de tiempo establecido ha nalizado. Podrá
apagar la indicación acústica presionando cualquier botón.
Medición del tiempo
Presionar el botón y el temporizador comenzará amedir el tiem-
po desde 0:00:00 a23:59:59 h, emitiendo una indicación acústica
durante un minuto cuando el intervalo de tiempo establecido ha
nalizado.
Parar el temporizador
El temporizador se puede parar y encender de nuevo en cualquier
momento pulsando .
Reiniciar el temporizador
Presionar los botones y al mismo tiempo.
Selección entre °C/°F
Presionar en la parte inferior del termómetro. Una apa-
recerá en la pantalla y el termómetro medirá en grados Fahrenheit.
Cuando encienda de nuevo, el termómetro tendrá seleccionada la
última unidad de medida utilizada.
Apagar el termómetro
Apagarel termómetrodespués de cada usomanteniendopresionado
el botón .
Cambiar las pilas
El termómetro digital ACCURA viene con 2 pilas AAA 1,5V incluidas.
Tan pronto como el símbolo de pila gastada aparezca en la pantalla,
retirar la tapa y sustituir las 2 pilas por unas nuevas. Utilizar exclusi-
vamente pilas de alta calidad AAA 1,5V. Si no utiliza el termómetro
durante un largo periodo de tiempo, retirar las pilas y guardarlas por
separado. No desechar las pilas usadas en desechos domésticos –
deshacerse de ellas en puntos de reciclaje.
Mantenimiento y limpieza
Dejar enfriar la sonda de acero inoxidable y el cordón después de
cada uso – limpiarlos con un paño húmedo y secar. ¡No lavar en
el lavavajillas! Si es necesario, limpiar el termómetro con un paño
húmedo y secar. ¡No lavar en el lavavajillas! Guardar con el cordón
enrollado alrededor del termómetro; introducir la sonda de acero
inoxidable en el asa inferior del termómetro.
Aviso
No exponer el termómetro aaltas temperaturas, vapor y/ohumedad.
La punta de la sonda de acero inoxidable es alada. Manejarla con
extremo cuidado – riesgo de lesiones. Guardar fuera del alcance de
los niños.
No utilizar el termómetro cerca de electrodomésticos con emisión
de radiación electromagnética, como microondas, teléfonos mó-
viles, etc. Si el termómetro no funciona debido aradiación electro-
magnética, retirar la fuente de interferencia, apagar el termómetro
y encenderlo de nuevo.
No reparar el termómetro usted mismo – contactar con su distribui-
dor ocon un centro de servicio TESCOMA.
Garantía de 3 años
Un periodo de garantía de 3 años se aplica aeste producto desde la
fecha de compra. La garantía nunca cubre defectos: Debidos aun uso
inapropiado incompatible con las Instrucciones de uso. Resultado de
un impacto, caída omanipulación. Debidos areparaciones no autori-
zadas, oalteraciones en el producto.

26 27
j Instruções de utilização
Legenda
Mostrador
1a. Programar atemperatura (SET TEMP)
1b. Temperatura actual (CURRENT TEMP)
1c. Temporizador
1d. Tipo de carne
1e. Grau de cozedura
Painel de controle
2a. Ligar otermómetro
2b. Seleccionar ograu de cozedura/programar atemperatura
2c. Seleccionar otipo de carne
2d. Iniciar e parar otemporizador
2e. Programar otemporizador (H= horas, M= minutos)
Painel traseiro
3a. Seleccionar entre °C/°F
3b. Tampa da pilha
4. Sonda com o resistente ao calor
Variação da medida
0–300 °C, 32–572 °F
Antes da primeira utilização
Retirar aprotecção de transporte inserida nas pilhas.
Ligar otermómetro
Pressionar o botão , a temperatura programada (SET TEMP),
atemperatura atual (CURRENT TEMP) e otemporizador vão apa-
recer no mostrador.
Visão geral das temperaturas denidas
Otermómetro de forno ACCURA permite predenir as temperaturas
necessárias no interior da carne de vaca, cordeiro, porco, peixe, peru
e frango. Além disso vários graus de cozedura podem ser estabeleci-
dos para carne de vaca, cordeiro e porco.
GRAUS DE COZEDURA
BEM MÉDIO MAL WELL
Bem passado M-WELL
Quase bem passado MEDIUM
Ao ponto
M-RARE
Um pouco mal
passado
RARE
Mal passado
TIPOS DE CARNE
VACA / BEEF 77 °C /170 °F 74 °C /165 °F 71 °C /160 °F 66 °C /150 °F 63 °C /145 °F
CORDEIRO / LAMB 77 °C /170 °F 74 °C /165 °F 71 °C /160 °F 66 °C /150 °F 63 °C /145 °F
PORCO / PORK 77 °C /170 °F 74 °C /165 °F 71 °C /160 °F ––
PEIXE / FISH 63 °C /145 °F ––––
PERÚ / TURKEY 74 °C /165 °F ––––
FRANGO / CHICKEN 74 °C /165 °F ––––
VISÃO GLOBAL DE TEMPERATURAS E GRAUS DE COZEDURA
28 29
Seleccionar otipo de carne
Repetidamente pressionar obotão e seleccionar otempo
necessário do tipo de carne escolhido na linha superior do mostrador.
Selecção de cozedura
Repetidamente pressionar obotão e seleccionar ograu de
cozedura necessário. Atencão: Ograu de cozedura só pode ser se-
leccionado para carne de vaca, cordeiro e porco.
Atenção
As temperaturas pré-denidas são indicadas para acarne cozinhada
como um todo. Para preparar pequenas porções de carne, p. exemplo
bifes de carne, rosbife, peitos de frango, letes de peixe, bolos, etc.,
usar oajuste manual da temperatura.
Ajuste manual da temperatura
Para ajustar atemperatura manualmente, pressione repetidamente
obotão até alinha superior do mostrador com otipo de
carne escolhido e ograu de cozedura desaparecer. Use obotão
para aumentar ou diminuir atemperatura (SET TEMP) para ovalor
desejado. Os dígitos mudam mais rápidamente quando obotão está
pressionado.
Colocar asonda no alimento
Colocar asonda resistente ao calor na carne no ponto mais alto, de
modo aque aponta da sonda esteja omais próximo possível do cen-
tro do alimento e não perto de gordura ou osso.
Colocar os alimentos com asonda no forno
Colocar os alimentos no forno de forma aque asonda e oo não
toquem as paredes do forno. Coloque oo sobre aparte superior da
porta e fechar oforno.
Colocar otermómetro
Anexar otermómetro à superfície metálica externa do forno ou per-
to do forno usando os ímãs, ou colocar sobre uma superfície plana.
Atenção! Nunca colocar otermômetro no interior do forno.
Medir atemperatura no interior do alimento
Otermómetro mostra continuamente atemperatura no interior da
carne durante acozedura. Assim que atemperatura dentro do ali-
mento atingir ovalor predenido, osinal sonoro soa. Terminar aco-
zedura e desligar osinal sonoro pressionando qualquer botão.
Retirar asonda dos alimentos
Retirar asonda dos alimentos e colocar de lado sobre uma base re-
sistente ao calor. Atenção! Usar uma luva de forno ou uma base para
quentes ao remover asonda de aço inoxidável – tanto asonda como
oo carão quentes.
Temporizador
Medir otempo denido – contagem decrescente
Pressionar o para denir as horas, pressionar o para denir
os minutos. Os dígitos mudam mais rapidamente quando obotão
épressionado. Otempo no intervalode 00:01:00 a23:59:00 h pode
ser ajustado em incrementos de 1-minuto.
Pressionar obotão e otemporizador vai começar amedir otem-
po denido, dando um sinal sonoro durante um minuto quando
ointervalo de tempo denido expirar. Pode desligar osinal sonoro
pressionando qualquer botão.
Tempo de medição
Pressionar e otemporizador vai começar amedir otempo desde
0:00:00 a23:59:59 h, dando um sinal sonoro durante um minuto
quando ointervalo de tempo denido expirar.
Pausar otemporizador
Pode pausar otemporizador e iniciar acontagem de tempo sempre
que necessário pressionando .
Reiniciar otemporizador
Pressionar os botões e ao mesmo tempo.
Seleccionar entre °C/°F
Pressionar no botão do termómetro. Um vai aparecer
no mostrador e otermómetro vai medir a temperatura em graus
Fahrenheit. Quando ligar novamente o termómetro vai estar
congurada atemperatura utilizada na última vez.

30 31
Desligar otermómetro
Desligar otermómetro após cada utilização pressionando obotão
.
Substituição das pilhas
Otermómetro digital para forno ACCURA vem com 2 pilhas AAA de
1,5V. Assim que omostrador avisar osímbolo de pilhas gastas, retire
atampa e substitua ambas as pilhas por novas. Utilize exclusivamen-
te pilhas AAA de 1,5V de alta qualidade. Se não utilizar otermómetro
durante muito tempo, retire as pilhas e guarde-as separadamente.
Não colocar as pilhas gastas ou oproduto no lixo doméstico – colocar
num ponto de reciclagem.
Mantenção e armazenagem
Deixar asonda em aço inoxidável e oo arrefecerem após ouso –
limpar com um pano húmido e secar. Não lavar na máquina de lavar
louça! Se necessário, limpar o termómetro com um pano húmido
e secar. Não lavar na máquina de lavar louça! Guardar com oo enro-
lado ao redor do termómetro. Colocar asonda em aço inoxidável na
parte inferior do termómetro.
Atenção
Nãoexporotermómetro aaltastemperaturas, vapor e/ou humidade.
Aponta da sonda em aço inoxidável é aada. Manusear com muito
cuidado – risco de dano. Guardar fora do alcance das crianças.
Não usar otermómetro perto de aparelhos que produzam um campo
eletromagnético, como omicroondas, telemóvel, etc. Se otermóme-
tro funcionar mal por radiação eletromagnética, remover afonte de
interferência e desligar otermómetro e voltar aligar.
Não fazer reparações no termómetro por sua iniciativa – contactar
oseu revendedor ou um centro de atendimento TESCOMA.
Garantia de 3 anos
Um período de garantia de 3 anos se aplica aeste producto desde
adata da sua compra. Agarantia nunca cobre defeitos: Derivados
de uso inapropriado incompatível com as Instruções de utilização.
Resultado de um impacto, queda ou manipulação. Derivados de re-
parações não autorizadas, ou alterações no produto.
d Gebrauchsanleitung
Beschreibung
Display
1a. Soll-Temperatur (SET TEMP)
1b. Ist-Temperatur (CURRENT TEMP)
1c. Kurzzeitwecker
1d. Fleischsorte
1e. Garstufe
Bedienfeld
2a. Thermometer einschalten
2b. Garstufe wählen / Temperatur einstellen
2c. Fleischsorte wählen
2d. Kurzzeitwecker starten und stoppen
2e. Kurzzeitwecker einstellen (H= Stunden, M= Minuten)
Rückseite
3a. Umschaltbar °C/°F
3b. Verriegelung der Batterien
4. Hitzebeständige Sonde mitVerbindungskabel
Messbereich
0–300 °C, 32–572 °F
Vor dem ersten Gebrauch
DieTransportsicherung bei Batterien entfernen.
Thermometer einschalten
Die Taste drücken, das Display zeigt die eingestellte Soll-Tempe-
ratur (SETTEMP), die Ist-Temperatur (CURRENT TEMP) und den auf
Null gesetzten Kurzzeitwecker.
Tabelle der eingestellten Temperaturen
Im Backofenthermometer ACCURA können die Soll-Innentemperatu-
ren für Rind-, Lamm- und Schweineeisch, für Fisch, Pute und Hähn-
chen voreingestellt werden. Bei den Fleischsorten Rind,- Lamm- und
Schweineeisch kann auch die Garstufe eingestellt werden.
32 33
Fleischsorte wählen
Mehrmals die Taste drücken, die gewünschte Fleischsorte
in der oberen Zeile des Displays wählen.
Garstufe einstellen
Mehrmals die Taste drücken, die gewünschte Garstufe wäh-
len. Anmerk.: Die Garstufe kann nur bei Rind-, Lamm- und Schwei-
neeisch eingestellt werden.
Hinweis
Die voreingestellten Temperaturen gelten als Temperaturen für das
Garen von größeren Fleischbraten, bzw. für das im Ganzen gegarte
Fleisch vorgesehen. Beim Garen von kleineren Fleischstücken wie
z.B. Rindsteaks, Roastbeefs, Hühnerbrust, Fischlet, Kuchen usw. ist
die Soll-Kerntemperatur manuell einzustellen.
Kerntemperatur manuell einstellen
Um die Temperatur manuell einzustellen, ist die Taste
mehrmals zu drücken, wobei die obere Displayzeile mit der einge-
stellten Fleischsorte und der Garstufe verschwinden soll. Durch die
Betätigung derTaste kann dieTemperatur auf die gewünschte
Soll-Temperatur erhöht, bzw. verringert werden (SET TEMP), wenn
dieTaste gedrückt gehalten wird, laufen die Minuten, bzw. die Stun-
den schneller.
Sonde ins Gargut anbringen
Die hitzebeständige Sonde in die eischigste Stelle einstechen, wo-
bei die Spitze der Nadel möglichst knapp im Kern des Bratens und
nicht in der Nähe des Fettgewebes, bzw. des Knochens liegen soll.
Gargut mit der Sonde in den Backofen einlegen
Das Gargut in den Backofen einlegen, die Sonde sowie das Verbin-
dungskabel dürfen die Ofenwände nicht berühren, das Verbin-
dungskabel über den oberen Rand der Ofentür legen, den Backofen
schließen.
Das Thermometer anbringen
Das Thermometer mit den Befestigungsmagneten an die Außen-
Metallseite des Backofens, bzw. in die Nähe des Backofens befesti-
gen oder auf eine ebene Fläche aufstellen. Achtung! Das Thermo-
meter nie in den Backofen geben.
GARSTUFE WELL
Durchgebraten M-WELL
Halbrosa MEDIUM
Rosa M-RARE
Halbblutig RARE
Blutig
FLEISCHSORTE
RINDFLEISCH / BEEF 77 °C /170 °F 74 °C /165 °F 71 °C /160 °F 66 °C /150 °F 63 °C /145 °F
LAMMFLEISCH / LAMB 77 °C /170 °F 74 °C /165 °F 71 °C /160 °F 66 °C /150 °F 63 °C /145 °F
SCHWEINEFLEISCH / PORK 77 °C /170 °F 74 °C /165 °F 71 °C /160 °F ––
FISCH / FISH 63 °C /145 °F ––––
PUTE/ TURKEY 74 °C /165 °F ––––
HÄHNCHEN / CHICKEN 74 °C /165 °F ––––
TABELLE TEMPERATUREN UND GARSTUFEN

34 35
Die Kerntemperatur messen
Das Thermometer zeigt die Kerntemperatur beim Kochvorgang.
Erreicht die Kerntemperatur den voreingestellten Wert, ertönt der
akustische Signal. Der Kochvorgang ist zu beenden; um das Piepen
zu stoppen, kann man jedeTaste drücken.
Die Sonde aus dem Gargut herausziehen
Die Sonde aus dem Gargut herausziehen, auf eine hitzebeständige
Unterlage legen. Achtung! Den Ofenhandschuh, bzw. den Topap-
pen beim Herausziehen der Sonde aus Edelstahl verwenden, die
Sonde sowie dasVerbindungskabel sind heiß.
Kurzzeitwecker
Die eingestellte Zeit messen – Rückwärtszählen
Die Taste drücken, um die Stunden einzustellen, die Taste , um
die Minuten einzustellen, wenn die Taste gedrückt gehalten wird, lau-
fen die Minuten, bzw. die Stunden schneller. Die Zeit im Bereich von
00:01:00 bis 23:59:00 Stunden kann nach einer Minute eingestellt
werden. Die Taste drücken, der Kurzzeitwecker startet. Nach dem
Ablauf der eingestellten Kochzeit piept der Kurzzeitwecker eine Mi-
nute lang. Man kann jede Taste drücken, um das Piepen zu stoppen.
Stoppuhr
Die Taste drücken, der Kurzzeitwecker zählt vorwärts von
00:00:00 bis 23:59:59 h, nach dem Ablauf piept der Kurzzeitwe-
cker eine Minute lang.
Kurzzeitwecker pausieren lassen.
Mit der Betätigung derTaste kann der Kurzzeitwecker jederzeit
gestoppt und wieder gestartet werden.
Den Kurzzeitwecker auf Null setzen
DieTasten und gleichzeitig drücken.
Umschalten zwischen °C/°F
Die Taste auf der Unterseite drücken. Im Display wird an-
gezeigt, das Thermometer ist bereit, die Temperatur in Grad Fahren-
heit zu messen. Bei der nächsten Einschaltung ist das Thermometer
zur Messung in der letzten Gewichtseinheit eingestellt.
Das Thermometer ausschalten
Nach dem Gebrauch dieTaste gedrückt halten, das Thermometer
ausschalten.
Batterie wechseln
Das digitale Backofenthermometer ACCURA ist mit 2 eingelegten
1,5V-Batterien AAA lieferbar. Wenn das Display das Symbol der
leeren Batterie zeigt, ist die Abdeckung zu entfernen, die Batteri-
en durch neue Batterien zu ersetzen. Ausschließlich hochwertige
1,5V-Batterien AAA verwenden. Beim längeren Nichtgebrauch sind
die Batterie herauszunehmen und separat aufzubewahren. Die lee-
ren Batterien und das Produkt dürfen nicht dem normalen Hausmüll
beigefügt werden, sondern müssen fachgerecht entsorgt werden –
Rückgabe von gebrauchten Batterien.
Wartung und Lagerung
Die Sonde aus Edelstahl und das Verbindungskabel nach dem Ge-
brauch abkühlen lassen, mit feuchtemTuch abwischen und abtrock-
nen, im Geschirrspüler nicht spülen! Im Bedarfsfalle dasThermome-
ter mit feuchtemTuch abwischen und abtrocknen, im Geschirrspüler
nicht spülen! Das Verbindungskabel um das Thermometer aufwi-
ckeln, die Sonde in die Grie auf der Unterseite des Thermometers
einschieben.
Hinweis
Das Thermometer höheren Temperaturen, dem Dampf und der
Feuchtigkeit nicht aussetzen. Die Spitze der rostfreien Sonde ist
scharf, Bei der Handhabung auf erhöhte Aufmerksamkeit achten,
es droht Verletzungsgefahr. Außer Reichweite von Kindern aufbe-
wahren. Das Thermometer nicht in der Nähe der emittierenden
elektrischen Geräte verwenden – z.B. Mikrowelle, Handys usw. Im
Störfall infolge der emittierenden elektromagnetischen Felder die
Störungsquelle beseitigen, das Thermometer aus- und wieder ein-
schalten. Reparieren Sie selbst das Produkt nicht, wenden Sie sich an
dem Händler, bei dem Sie das Produkt gekauft haben, bzw. an eine
der Servicestellen TESCOMA.
3 Jahre Garantie
Für dieses Produkt wird eine Garantiefrist von 3 Jahren ab Verkaufs-
datum gewährt. Die Garantie erstreckt sich grundsätzlich nicht auf
folgende Fälle: Produktnutzung, die den Angaben in der Gebrauchs-
anleitung nicht entspricht. Stoß-, Sturzbeschädigungen, unsachge-
mäße Handhabung. Nichtautorisierte Reparaturen und Änderungen
am Produkt.
36 37
f Mode d’emploi
Description
Écran
1a. Température réglée (SET TEMP)
1b. Température actuelle (CURRENT TEMP)
1c. Minuteur
1d. Type de viande
1e. Degré de cuisson
Panneau de commande
2a. Activation du thermomètre
2b. Sélection du degré de cuisson / réglage de la température
2c. Sélection du type de viande
2d. Démarrage et arrêt du minuteur
2e. Réglage du minuteur (H= heures, M= minutes)
Panneau arrière
3a. Sélection °C/°F
3b. Cache piles
4. Sonde réfractaire avec câble de raccordement
Plage de mesure
0–300 °C, 32–572 °F
Avant la première utilisation
Supprimez la protection située au niveau des piles.
Activation du thermomètre
Appuyez sur la touche ; l’écran ache la température réglée
(SET TEMP), la température actuelle (CURRENT TEMP) et le minu-
teur à zéro.
Aperçu des températures réglées
Le thermomètre pour four ACCURA permet de prérégler les tempéra-
tures désirées à l’intérieur de la viande de bœuf, d’agneau et de porc,
de dinde, de poulet et des poissons. Pour la viande de bœuf, d’agneau
et de porc, il est possible de régler diérents degrés de cuisson.
DEGRÉ DE CUISSON WELL
Très cuit M-WELL
Bien cuit MEDIUM
À point M-RARE
Rosé RARE
Bleu
TYPE DE VIANDE
BŒUF / BEEF 77 °C /170 °F 74 °C /165 °F 71 °C /160 °F 66 °C /150 °F 63 °C /145 °F
AGNEAU / LAMB 77 °C /170 °F 74 °C /165 °F 71 °C /160 °F 66 °C /150 °F 63 °C /145 °F
PORC / PORK 77 °C /170 °F 74 °C /165 °F 71 °C /160 °F ––
POISSON / FISH 63 °C /145 °F ––––
DINDE / TURKEY 74 °C /165 °F ––––
POULET / CHICKEN 74 °C /165 °F ––––
APERÇU DES TEMPÉRATURES ET DES DEGRÉS DE CUISSON

38 39
Choix du type de viande
Appuyez à plusieurs reprises sur la touche et sélectionnez
la viande désirée sur la première ligne sur l’écran.
Choix du degré de cuisson
Appuyez à plusieurs reprises sur la touche et sélectionnez le
degré de cuisson désiré. Remarque : Le degré de cuisson peut être
déni pour la viande de bœuf, d’agneau et de porc.
Avertissement
Les températures préréglées sont indiquées pour des morceaux de
viandes entiers. Pour de petites portions de viande, par exemple des
steaks de bœuf, un rôti de bœuf, des escalopes de poulet, des lets
de poisson, des desserts, etc., réglez la température manuellement.
Réglage manuel de la température
Pour régler la température manuellement, appuyez à plusieurs
reprises sur la touche , jusqu’à ce que la première ligne de
l’écran indiquant le type de viande et le degré de cuisson choisis dis-
paraisse. À l’aide de la touche augmentez ou diminuez la tem-
pérature (SET TEMP) pour atteindre la valeur désirée ; les chires
délent plus rapidement si vous maintenez la touche appuyée.
Introduction de la sonde dans les plats
Introduisezlasonderéfractairedanslaviande à l‘endroit où elle estla
plus épaisse, an que la pointe de la sonde se trouve au plus près du
centre de l’aliment, mais pas à côté de la graisse ou d‘un os.
Mise en place du plat avec la sonde dans le four
Placez le plat dans le four de sorte que ni la sonde ni le câble ne
touche les parois du four ; posez le câble sur le bord supérieur de la
porte du four et refermer.
Mise en place du thermomètre
Fixez le thermomètre à l’aide des aimants sur le côté extérieur métal-
lique du four à côté du four, ou éventuellement sur une surface plane.
Attention ! N‘introduisez jamais le thermomètre dans le four !
Mesure de la température à l’intérieur des plats
Le thermomètre ache en continu la température de la viande pen-
dant la cuisson. Lorsque la température du plat atteint la valeur pré-
réglée, un signal sonore retentit. Achevez la cuisson du plat et arrêtez
le signal sonore en appuyant sur une touche.
Retrait de la sonde
Retirez la sonde du plat et posez-la sur un support réfractaire. Atten-
tion ! Lorsque vous retirez la sonde en inox, utilisez une manique ou
un gant de cuisine car la sonde et le câble sont chauds.
Minuteur
Mesure du temps réglé – compte à rebours
Appuyez sur pour régler l’heure, sur pour régler les minutes ;
les chires délent plus rapidement si vous maintenez les touches
appuyées. La durée comprise entre 00:01:00 et 23:59:00 heures
peut être réglée par tranches de plusieurs minutes.
Appuyez sur la touche ; le minuteur commence à mesurer la
durée réglée. Lorsque le temps s’est écoulé, un signal sonore reten-
tit pendant une minute. Le signal sonore peut être désactivé en
appuyant sur n’importe quelle touche.
Mesure du temps
Appuyez sur ; le minuteur commence à mesurer le temps de
00:00:00jusqu’à 23:59:59 heures. Lorsque le temps s’est écoulé, un
signal sonore retentit pendant une minute.
Pause
Le minuteur peut être arrêté et redémarré à tout moment en ap-
puyant sur .
Remise à zéro du minuteur
Appuyez simultanément sur les touches et .
Sélection de la mesure en °C/°F
Appuyez sur sur la partie inférieure du thermomètre. L’écran
ache ; le thermomètre indique désormais la température en
degrés Fahrenheit. Lors de l’activation suivante, le thermomètre sera
paramétré pour acher la mesure dans la dernière unité utilisée.
Arrêt du thermomètre
Éteignez le thermomètre après chaque utilisation en maintenant
appuyée la touche .
Table of contents
Languages:
Other Tescoma Thermometer manuals

Tescoma
Tescoma Delicia User manual

Tescoma
Tescoma gradius User manual

Tescoma
Tescoma Accura User manual

Tescoma
Tescoma Accura User manual

Tescoma
Tescoma gradius User manual

Tescoma
Tescoma Gradius User manual

Tescoma
Tescoma PRESTO 420910 User manual

Tescoma
Tescoma gradius 636154 User manual

Tescoma
Tescoma Delicia User manual


