TESTING 1.0205 User manual
TESTING Bluhm & Feuerherdt GmbH
Manufacturing and distribution
of building materials testing equipment
Motzener Str. 26b
12277 Berlin
Tel. +49(0)30/7109645-0
Fax +49(0)30/7109645-98
www.testing.de
Operating instructions
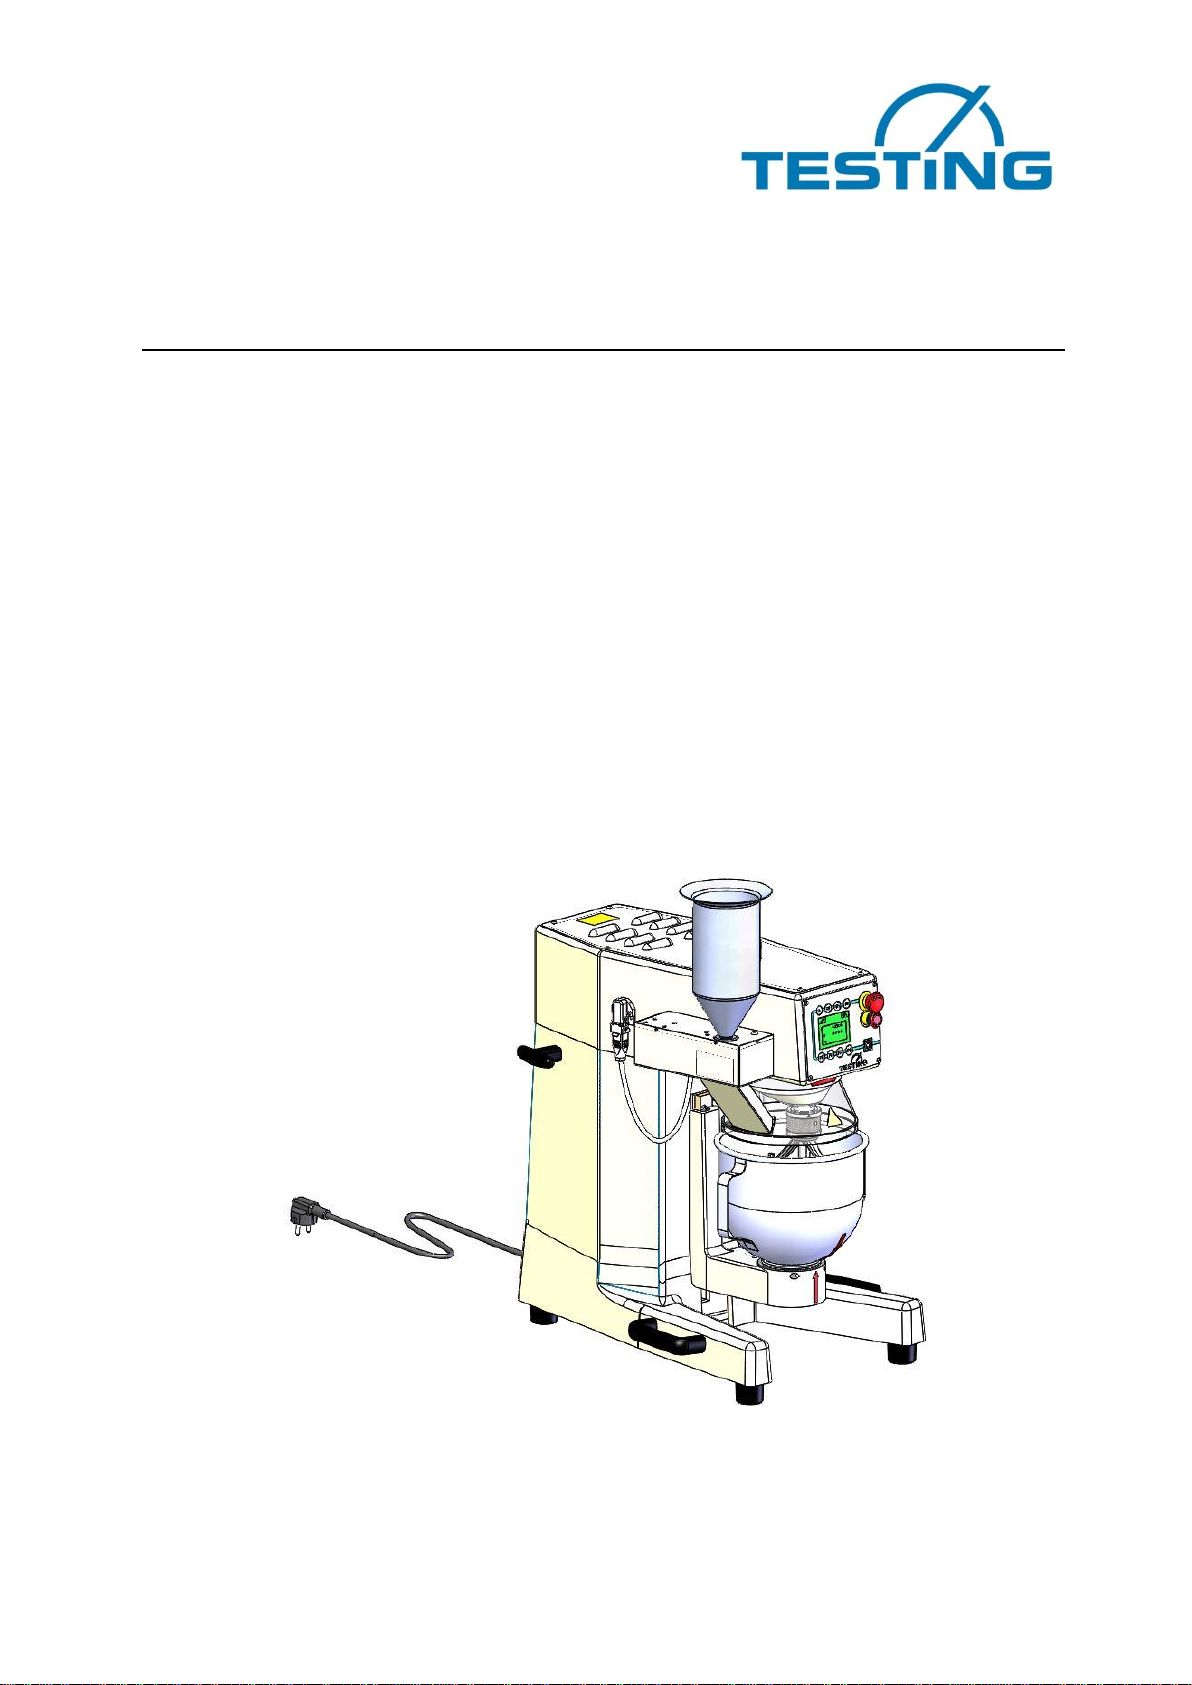
Laboratory mortar mixer
with sand feed
and
program mode
Model 1.0205

Laboratory mortar mixer
1.0205
2
Importance of the operating instructions
Before operating the laboratory mortar mixer, the operating instructions must be read
and understood.
Contents Page
1. Reception, transport ..............................................................................................5
1.1 Reception..........................................................................................................5
1.2 Transport...........................................................................................................5
1.3 Removing the transport packaging....................................................................5
1.4 Transport by hand.............................................................................................6
2. Scope of delivery....................................................................................................6
3. Basic safety instructions.......................................................................................7
3.1 Obligations of the operator.....................................................................................7
3.2 Requirements for the operating personnel.............................................................7
3.3 Obligations of the operating personnel...................................................................7
3.4 Workplace..............................................................................................................7
3.5 Danger when handling the mortar mixer................................................................8
4. Basic notes.............................................................................................................8
4.1 Intended use..........................................................................................................8
4.2 Improper use..........................................................................................................9
4.3 Information on the CE symbol..............................................................................10
4.4 Obligation of the operator.....................................................................................10
4.5 General safety instructions...................................................................................11
4.6 Protective clothing................................................................................................13
4.7 Periodic inspection...............................................................................................13
5. Description of the mortar mixer..........................................................................13
5.1 Mechanical design ...............................................................................................13
5.2 Electrical design...................................................................................................14
5.3 Safety devices......................................................................................................15
6. Preparations for commissioning ........................................................................16
6.1 Installation location/ambient conditions................................................................16
6.2 Electrical connection............................................................................................16
6.3 Lowering and removing the mixing bowl ..............................................................17
6.4 Loosening and removing the mixer......................................................................17
6.5 Inserting and tightening the mixer........................................................................17
6.6 Inserting and tightening the mixing bowl ..............................................................17
6.7 Placing the mixing bowl in the mixing position .....................................................17
6.8 Adjusting the distance between the mixing bowl and mixer .................................18
7. Sand feed mechanism..........................................................................................19
7.1 Assembly .............................................................................................................19
7.2 Electrical connection............................................................................................19
8. Technical details ..................................................................................................20
9. Operation ..............................................................................................................21
9.1 Switching on the mortar mixer..............................................................................21
9.2 Explanation of the control unit..............................................................................22

Laboratory mortar mixer
1.0205
3
9.3 Key symbol ..........................................................................................................23
9.4 Start conditions ....................................................................................................24
9.5 Basic settings in the service menu.......................................................................24
9.6 Setting the language............................................................................................27
9.7 Setting the display brightness ..............................................................................28
9.8 Setting the soft start.............................................................................................29
9.9 Selection of standardized or variable speed (optional).........................................29
9.9.1 Setting the variable speeds .........................................................................30
9.9.2 Working with the variable speeds................................................................30
9.9.3 Finish working with the variable speeds ......................................................31
9.9.4 Setting the normalized speeds.....................................................................31
9.10 Setting the signal................................................................................................31
10. Preselection of a standard according to EN or ASTM........................................32
10.1 Saved mixing processes ....................................................................................32
10.2 Description for the selection of the standard......................................................32
11.Starting the mortar mixer manually.................................................................34
11.1. Selecting/stopping low speed............................................................................35
11.2. Selecting/stopping high speed ..........................................................................35
11.3. Selecting pause.................................................................................................36
11.4. Activating the sand feed manually.....................................................................38
12. Starting the mortar mixer with the automatic program .................................39
12.1. Selecting a program.....................................................................................40
12.2. Display at the end of the program................................................................41
12.3. Return to the operating mode selection.......................................................42
13. Error messages in the display.........................................................................43
14. Switching off the mortar mixer........................................................................44
15. Warranty...........................................................................................................44
16. Issue date of the operating instructions.........................................................44
17. Copyright...........................................................................................................45
18. Address of the manufacturer...........................................................................45
19.Cleaning and maintenance ..............................................................................45
19.1 Cleaning the mortar mixer...............................................................................45
19.2 Maintenance of the mortar mixer.....................................................................46
19.3 Control and adjustment...................................................................................46
19.4 Decommissioning the mortar mixer.................................................................46
20. Spare parts - supply and customer service....................................................47
21. Scrapping, disposal..........................................................................................47
22. I/O board............................................................................................................48
23. Circuit diagram .................................................................................................49
24. Diagram representation of the mixing programs...........................................50
according to EN...........................................................................................................50
24.1 Mixing program 1 according to EN 196-T1 / EN 413-T2..................................50
24.2 Mixing program 2 according to EN 480-T1......................................................51
24.3 Mixing program 3 according to EN 196-T3......................................................52
24.4 Mixing program 4 according to EN 196-T9......................................................53

Laboratory mortar mixer
1.0205
4
25. Diagram representation of the mixing processes..........................................54
according to ASTM......................................................................................................54
25.1 Mixing program 1 according to ASTM-C305 ...................................................54
25.2 Mixing program 2 according to ASTM-C451 ...................................................55
25.3 Mixing program 3 according to ASTM-C305 paste (with start.........................56
delay).........................................................................................................................56
25.4 Mixing program 4 according to ASTM-C305 paste (without start....................57
delay).........................................................................................................................57
Annex documents:
Test protocol mechanics
Test and measurement record for the electrical system
The notes have the following meaning:
Caution
This warning applies to all procedures that must be carried out with
caution in order to avoid damage to the device.
Danger
This warning applies to all procedures that pose a risk to the opera-
tor if the procedures are not carried out with caution.
Note
Provides practical information on operation

Laboratory mortar mixer
1.0205
5
1. Reception, transport
1.1 Reception
Check the visible external condition of the delivered shipment. If the condition is correct,
the shipment can be accepted by the carrier (parcel service or freight forwarder).
If there is no objection or any transport damages detected, the completeness of the ship-
ment must be checked against the delivery note.
If any transport damages occur after a successful acceptance, a production log with an
exact report and a photo about the extent of the damage must be immediately prepared.
Please send us the production log immediately by fax. Absolutely no changes may be
made to the delivered shipment.
On the basis of this production log, we should be able to assess whether the damage can
be remedied
- by the delivery of spare parts or
- by sending a skilled technician or only
- by returning the device.
1.2 Transport
The mortar mixer is supplied in suitable cardboard packaging, standing on a pallet.
The weight of the mortar mixer is approx. 62 kg.
The mortar mixer can be moved to its intended location in the delivery packaging, by
means of a pallet truck or other suitable floor-level conveyors that must be able to reach
under the pallet.
Wrapping with ropes or similar lifting gear is only permissible if it is ensured that no lateral
forces are exerted on the packaging and therefore also possibly on parts of the mortar
mixer.
1.3 Removing the transport packaging
To remove the transport packaging, proceed as follows:
Open the lid of the transport packaging
Remove the cardboard or polystyrene transport protection (inserts)
Side panels should be cut open at the vertical edges
Cut side panels at the horizontal bottom edges
Laboratory mortar mixer
1.0205
6
Danger
The packaging materials (plastic, polystyrene, screws, nails, wood,
etc.) must be kept away from children. They must be
disposed of properly.
Caution
Before you dispose of the packaging, please check if accessories,
instructions, documents and spare parts
remain inside the packaging.
After unpacking the device, make sure that the mortar mixer has not been damaged in
any obvious way during transport. If in doubt, do not plug in the device and contact your
seller.
1.4 Transport by hand
The mortar mixer can be transported to its intended destination by hand.
Its weight is about 62 kg.
To lift the mortar mixer, the lower handles, which are attached to the side of the load
centre, are designed for a 40 kg load capacity.
Lateral T-handles attached on the upper rear area serve to stabilise the load during car-
rying.
If taken by hand, the mortar mixer can be conveniently transported to its final location and
set down.
The handles are exclusively used for transporting the mortar mixer by hand. They are not
attachments to be used for transport by lifting equipment.
2. Scope of delivery
Pos.
Amount
Description
Serial number
1.
1
Mortar mixer (including operating instructions)
1.0205
2.
1
Stainless steel stirrer
1.0203.02EN
3.
1
Stainless steel bowl
1.0203.03EN
4.
1
Feed hopper for liquid or powder aggregates
8.0144
5.
1
Sand feed (including 2 cylinder screws with
hexagon socket and tool)
1.0203-05

Laboratory mortar mixer
1.0205
7
3. Basic safety instructions
3.1 Obligations of the operator
The operating instructions are to be kept in the immediate vicinity of the mortar mixer.
Only suitably qualified operating personnel may work with the mortar mixer. The operating
personnel must be trained before using the mortar mixer. Check that the operating per-
sonnel have read and understood the operating instructions. Establish exact responsibil-
ities for the operating personnel. Personal protective equipment must be provided to all
operating personnel.
The operator must take care not to put themselves or anyone else in danger.
If the operational safety is compromised due to defects or damage to the mortar mixer,
the mortar mixer must be taken out of operation immediately and must only be used again
after all potential hazards have been eliminated.
3.2 Requirements for the operating personnel
The mortar mixer may only be operated by suitably qualified specialist personnel who
have been assigned and trained by the operator. The minimum age for the operator is
18 years. Under 18 years of age, the mortar mixer may only be operated under the su-
pervision of a qualified specialist. The operator is responsible for the work area of third
parties.
3.3 Obligations of the operating personnel
Before handling the mortar mixer, read the operating instructions carefully. Please ob-
serve the safety regulations. When handling the mortar mixer, personal protective
equipment must be worn.
3.4 Workplace
The workplace is located on the control panel in front of the mortar mixer. The work-
place is determined by the customer-connected peripherals. It must therefore be de-
signed by the operator in order to be safe. The design of the workplace also depends on
the applicable requirements of the BetrSichV (Industrial Safety Regulation) and the risk
analysis of the workplace.

Laboratory mortar mixer
1.0205
8
3.5 Danger when handling the mortar mixer
The mortar mixer is built according to state-of-the-art and recognised technical rules.
Nevertheless, danger to the user's life or that of third parties or damage to machine parts
or other property may occur during its use.
The mortar mixer is only to be used
for the intended use
and in a flawless condition in terms of safety.
Any faults that may affect safety must be immediately resolved.
4. Basic notes
4.1 Intended use
This description contains the necessary information for the intended use of the products
described therein. It is intended for technically qualified personnel. The operator must
clearly establish the area of responsibility of their personnel.
Qualified personnel are persons who have been authorised by the person responsible for
the safety of the machine to carry out the necessary activities due to their training, expe-
rience, instruction and knowledge of relevant standards, regulations, accident prevention
regulations and operating conditions, thereby being able to recognise and avoid possible
dangers (Definition for qualified specialist according to IEC 364).
The requirements and limit values stated in these operating instructions, as well as the
safety instructions provided, must be complied with. Any use beyond this scope shall be
considered to be an intentional misuse. If special work practices or conditions are re-
quired, the manufacturer's consultation and approval should be acquired.
The manufacturer accepts no liability for damages caused as a result of a failure to ob-
serve these "safety and operating instructions".
The mortar mixer is used exclusively for the mechanical mixing of mortars and cement
paste for the production of test specimens according to different standards.

Laboratory mortar mixer
1.0205
9
Intended use includes the following applications:
MANUAL - Operation with selectable mixing speeds
The requirements and limit values, as well as the safety instructions pro-
vided in these operating instructions, must be complied with in all cases.
Sand feed - for feeding standard sand (1350 g) according to EN 196-1
Note
The mortar mixer is designed for operation in dry spaces.
Any use beyond this scope shall be considered to be an intentional misuse. If special
work practices or conditions are required, the manufacturer's consultation and approval
should be acquired.
Note
The operating instructions indicated in these instructions only apply
to the correct use of the mortar mixer. In order to perform the opera-
tion correctly, the user must observe the specific standards for the
test.
These operating instructions are intended for the forwarding agent, the installer,
the operator, the maintenance technician and the disposal company.
Please read these instructions carefully, because they describe how the mortar
mixer is safe to operate.
These operating instructions shall be considered to be part of the product and only
apply to the mortar mixer that they are supplied with.
Keep the operating instructions in a suitable condition throughout the entire oper-
ating period, so that they can be consulted if necessary.
If the mortar mixer is to be sold, the operating instructions and the attachments
must be handed over with it.
The manufacturer assumes no liability for any damage caused resulting from an
improper use of the device.
Subject to change without notice: The manufacturer reserves the right to modify
the technical descriptions and the parts that they refer to without prior notice.
4.2 Improper use
The mortar mixer may only be operated in a technically perfect condition.

Laboratory mortar mixer
1.0205
10
Only use the mortar mixer for the described use, any improper use shall result in the loss
of the warranty claim.
Manipulations and modifications to the mortar mixer (electrical, mechanical changes, etc.)
that have not been authorised in a written agreement with the manufacturer are consid-
ered to be prohibited and the manufacturer does not accept any claims for damages.
We recommend only using original spare parts and accessories; otherwise the manufac-
turer assumes no liability.
Ensure that no hazardous situations occur during the work. The mortar mixer must be
switched off immediately if it does not work properly and the manufacturer or their author-
ised service personnel must be notified immediately.
Not intended use and therefore not permissible are the following:
the mixing of substances other than those specified in 4.1
overfilling the mixing bowl
the installation and operation of the mixer in ambient conditions other than those
specified in 6.1
4.3 Information on the CE symbol
TESTING Bluhm & Feuerherdt test equipment bear the CE symbol.
The CE marking confirms the conformity of the product with the EC directives to be taken
into account for the product and compliance with the "essential requirements" defined
therein, the generally applicable level of protection. The conformity assessment proce-
dure has been carried out in accordance with the applicable EC directives. The Council
Decision 93/465/EEC on the modules to be used in the technical harmonisation directives
for the different phases of the conformity assessment procedures and the rules for the
affixing and use of the CE marking shall be taken into account.
4.4 Obligation of the operator
The operator must ensure that they do not put themselves or any others at risk. Only
persons who have been instructed in the operation are allowed to operate the device
independently.
If the operating safety is compromised by faults or damage to the device, it must be taken
out of operation immediately and must only be used again after the elimination of all haz-
ards.
Check that the indication on the nameplate matches your mains voltage.
If the device or the connection cable is damaged, pull out the mains plug immediately.
Laboratory mortar mixer
1.0205
11
Danger
Take the necessary precautionary measures when mixing, in order to
prevent dust from getting into the eyes, mouth and nose from when
mixing.
The use, lifting, installing, waiting and scrapping of the mortar mixer may only be car-
ried out by qualified personnel. Qualified employees are persons who are authorised
to work with the machine on the basis of their experience and knowledge concerning
the operation of the mortar mixer and the directives, regulations and handling. The
user must be carefully trained, in order to operate the machine and safety equipment
with which the machine is equipped, in order to avoid an incorrect use. Safety equip-
ment must always be installed and checked daily.
Manipulations and modifications to the machine (electrical, mechanical changes, etc.)
that have not been authorised in a written agreement by the manufacturer are consid-
ered to be prohibited and the manufacturer does not accept any claims for damages.
Ensure that no hazardous situations occur during the work. Stop the machine imme-
diately if it does not work properly, and immediately notify the manufacturer or their
authorised service personnel.
Do not insert any wires or tools into the existing openings.
4.5 General safety instructions
Caution
All instructions must be read. Failure to comply with the instructions
below may result in electrical shock, fire, and/or serious injury.

Laboratory mortar mixer
1.0205
12
1) Workplace
Keep your work area clean and tidy. Disorder and unlit work areas may result in
accidents.
Do not work with the mortar mixer in hazardous environments where there are
flammable liquids, gases or powders. Electrical tools produce sparks that may ig-
nite the powder or vapours.
Keep children and other persons away from the device during use. If you are dis-
tracted, you may lose control of the device.
2) Electrical safety
The connector plug of the mortar mixer (Schuko) must fit into the intended Schuko
socket. The plug must not be changed in any way. Do not use adapter plugs to-
gether with protective earthing devices. Unchanged plugs and suitable sockets re-
duce the risk of electrical shock.
Avoid bodily contact with grounded surfaces, such as pipes, heaters, stoves and
refrigerators. There is an increased riskof electrical shock if your body isgrounded.
Keep the device away from rain or moisture. The penetration of water into an elec-
trical appliance increases the risk of electrical shock.
Do not use the cable to carry the device, to hang it, or to pull the plug out of the
socket. Keep the cable away from heat, oil, sharp edges or moving parts. Dam-
aged or entangled cables increase the risk of electrical shock.
3) Safety of persons
Be attentive, pay attention to what you do, and work rationally. Do not use the
device if you are tired or under the influence of drugs, alcohol or medication. A
moment of carelessness during use of the device may result in serious injury.
Wearpersonal protective equipment and always wear protective goggles.Wearing
personal protective equipment, such as a dust mask, non-slip safety shoes, re-
duces the risk of injury.
Remove adjusting tools or wrenches before turning the mortar mixer on. A tool or
key that is in a rotating part of the device can cause injury.
Wear suitable clothing. Do not wear loose clothing or jewellery. Keep hair, clothing
and gloves away from moving parts. Loose clothing, jewellery or long hair can be
caught in moving parts.

Laboratory mortar mixer
1.0205
13
4) Careful handling and use of power tools
Unplug the power plug before unplugging the power cable or changing any acces-
sories. This precautionary measure prevents an unintentional turning on of the de-
vice.
Keep unused power tools out of reach of children. Do not allow persons to use the
device who are unfamiliar with the device or who have not read the instructions.
Power tools are dangerous when used by inexperienced persons.
Maintain the device with care. Check whether movable parts of the device are
functioning properly and do not jam, whether parts arebroken or damaged, in such
a way that the function of the device is compromised. Have damaged parts of the
device repaired before use. Many accidents are caused by poorly maintained ma-
chines.
Use power tools, accessories, insertion tools, etc. according to these instructions
and as required by this particular type of device. Take into account the working
conditions and the work to be carried out. The use of power tools for applications
other than the intended ones can result in dangerous situations.
5) Service
Only let your device be repaired with original spare parts and byqualified specialist
personnel. This ensures that the safety of the device is maintained.
4.6 Protective clothing
The operator must ensure that the personnelwear the necessary protective clothing,e.g.:
Safety shoes
Suitable outer clothing
Protective gloves
Facial protection
Respiratory protection
4.7 Periodic inspection
The mortar mixer must be checked at regular intervals for its operational safety. There
are national regulations that must be complied with.
5. Description of the mortar mixer
5.1 Mechanical design
The housing of the mortar mixer is made of stable light metal casting.

Laboratory mortar mixer
1.0205
14
The mixer is made of stainless steel and is coupled with the planetary gear by a snap
closure. It rotates on its own axis and is moved by an electric motor at 2 fixed speeds in
a planetary motion around the bowl axis. Mixer and gear head move in opposite direc-
tions.
The mixing bowl consists of NIROSTA steel and can be removed from the working posi-
tion after lowering.
The contours of the mixer and mixing bowl are in accordance with the EN 196-1 standard
and guarantee a distance of 3.0 ± 1.0 mm between mixing bowl and mixer.
The distance in vertical height can be readjusted as described in section 6.9.
The electromechanical sand feed is made of steel plate. In the housing of the sand feed
there is an electromagnet that moves the locking plate via a piston rod. The locking plate
is secured by a spring and can be opened at a standstill or during low speed.
5.2 Electrical design
The supply voltage/frequency for the mixer can be 110-240 volts, 50-60 Hz.
The mains connection is made by a 2-pin Schuko plug, with potential equalisation.
The main switch, which separates the mixer from the mains, is located on the right side
of the mortar mixer.
1) Components in the rear of the mortar mixer
I/O board, power supply, frequency inverter with line filter, fuse
After disassembling the back wall, the fuses for the short circuit protection of the
mixer are accessible.
2) Components in the headspace of the mortar mixer
Coloured display and operating unit
8 function buttons
Buzzer
Unlockable emergency stop button
Programming interface
Side mounted main switch
The display and operating unit is connected to the I/O board on thefold-out mount-
ing frame by means of a shielded control cable that can be plugged in on both
sides.

Laboratory mortar mixer
1.0205
15
5.3 Safety devices
The mortar mixer is equipped with the following safety devices:
1. Emergency stop switch
When the EMERGENCY STOP switch is pressed, the drive motor is disconnected
from the supply network by the safety module.
To reactivate the control, the EMERGENCY STOP switch must be returned to its
basic position by turning it in the direction of the arrow. Then press the R button to
confirm the operational readiness.
2. Inductive electronic proximity switch
The proximity switch in the mixing bowl holder is damped by the bottom flange of
the mixing bowl and monitors its correct fit in the holder.
If the mixing bowl is not inserted into theholding fixture, the safety module prevents
operation of the mortar mixer. Confirmation via the display and operating unit.
3. Inductive electronic proximity switch
The proximity switch in the mixing bowl lifting device is damped when the mixing
position is reached and monitors the correct mixing position.
If the mixing bowl is not in the mixing position, the operation of the mortar mixer is
prevented by the safety module. Confirmation via the display and operating unit.
4. Fixed protective cover
The mixing bowl is covered in the mixing position by a solid protective cover sur-
rounding the mixer on all sides.

Laboratory mortar mixer
1.0205
16
6. Preparations for commissioning
6.1 Installation location/ambient conditions
Caution
The operation of the mortar mixer is only permissible in
dry spaces!
The following limit values apply:
Ambient temperature DIN EN 60204-1, 4.4.2 +5C up to +40C
Humidity DIN EN 60204-1, 4.4.3 30% up to 95%
Note
Place the mortar mixer on a stable, level surface.
6.2 Electrical connection
A protective connection socket 110-240 volts 1Ph+1N+1PE, 50-60 Hz must be used for
the mains connection of the mortar mixer.
The fuse should be fused with a maximum of 16 A. A residual current circuit breaker is
recommended.
Insert the Schuko plug, the mains cable of the mortar mixer, into the mains connection
socket.
Caution
Safety advice!
Work on electrical equipment may only be carried out by qualified
personnel!

Laboratory mortar mixer
1.0205
17
6.3 Lowering and removing the mixing bowl
Loosen the right hand lever at the right side of the mortar mixer and push it to the front
as far as it will go. The mixing bowl lowers.
The container holder is in the lowered position. Turn the mixing pot on the side handles
anti-clockwise until the two arrows on the mixing pot and on the container holder are
perpendicular to each other. Lift the mixing pot upwards and slightly tilted forward until
the clamping jaw is no longer in the container holder. Now tilt the mixing pot backwards
and pull it out.
6.4 Loosening and removing the mixer
Use the left hand to hold the mixer and firmly hold the cord ring of the mixer attachment
with the right hand.
Release the cord ring anti-clockwise until it can be moved upwards. Now pull the mixer
downwards.
6.5 Inserting and tightening the mixer
Insert the mixer into the snap closure of the mixer with a slight rotary motion until the stop
is detected. Hold the mixer with the left hand and turn the cord ring until it drops approx.
10 mm downwards. Now tighten the cord rings by turning them clockwise with the right
hand.
6.6 Inserting and tightening the mixing bowl
The container holder is in the lowered position. Use the side handles to use the mixing
pot. The red arrow must point forwards. The mixing pot must be inserted in such a way
that both arrows on the mixing pot and on the container holder are placed one above
the other. Let it lean forward slightly and allow the mixing pot to slide easily. To lock, the
mixing pot is tightened clockwise.
6.7 Placing the mixing bowl in the mixing position
Move the hand lever to the right, then backwards until it stops and lock to the left.
The mixing bowl is locked in the mixing position.
Laboratory mortar mixer
1.0205
18
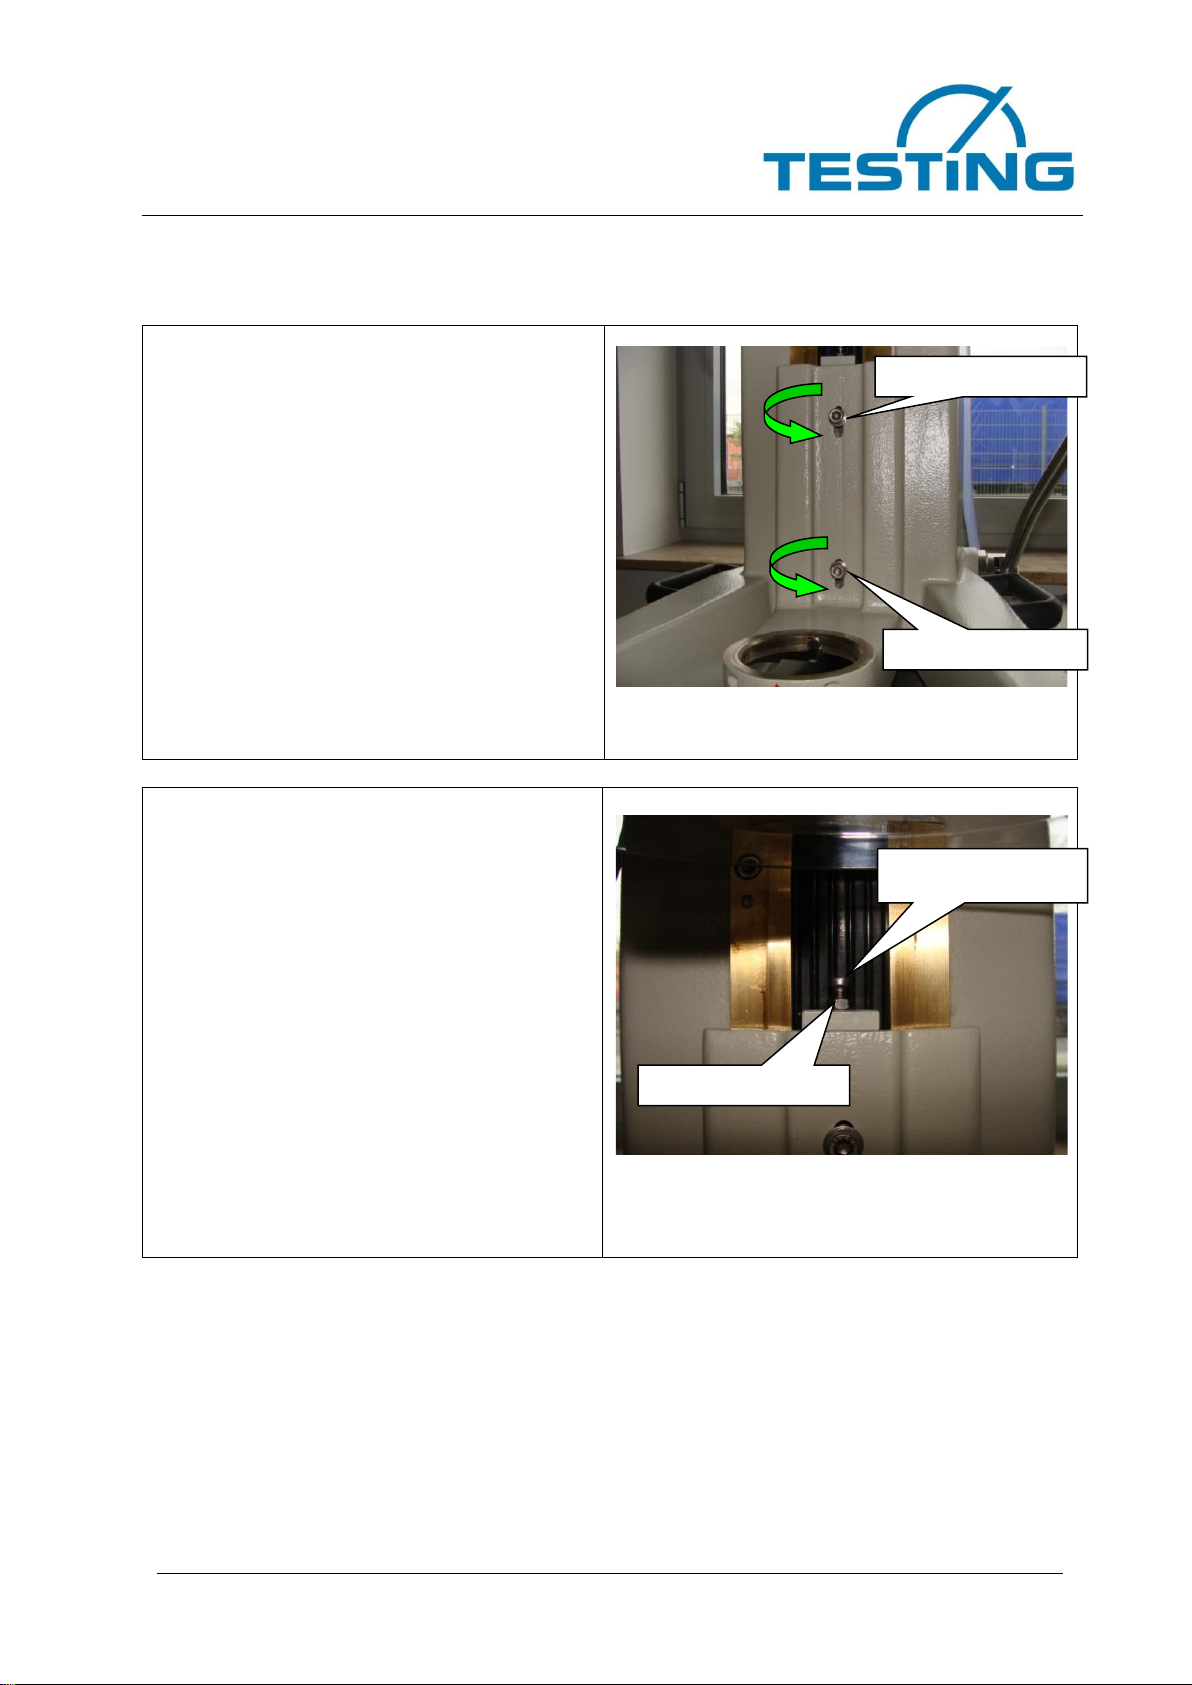
6.8 Adjusting the distance between the mixing bowl and mixer
If the distance between the mixing bowl
and mixer is bigger than the applicable
standard, this can be adjusted.
First, the mixing bowl must be lowered
and removed
(see point 6.3).
Then loosen and remove the mixer (see
point 6.4)
Now the two clamping screws (see Figure
1), on the holder for the mixing bowl can
be loosened by approx. 1 rotation.
Figure 1
Now loosen the lock nut of the adjusting
screw (see Figure 2), at the upper end of
the mixing bowl holder.
Then use the adjusting screw to set the
distance.
Turning the adjusting screw clockwise
will lessen the distance.
Turning the adjusting screw anti-clock-
wise will increase the distance.
For checking, the distance template
(TESTING Art. No.: 1.0203.07) can be
used to check the distance between the
mixer and the bowl.
Figure 2
If the distance is correctly set, the lock nut, the adjusting screw and the two clamping
screws must be firmly tightened on the bracket for the mixing bowl. The contact protec-
tion must be re-assembled, the mixing bowl and the mixer can now be used.
Clamping screw
Clamping screw
Lock nut
Adjusting screw

Laboratory mortar mixer
1.0205
19
7. Sand feed mechanism
The sand feed mechanism has been developed for the intake and allowance of 1350 g of
EN standard sand into the mixing trough.
7.1 Assembly
The sand feed mechanism for standard sand is assembled from the front on the left side
of the mortar mixer above the mixing bowl, with 2 cylinder screws with hexagon socket
M6 on the threaded holes provided for this purpose.
7.2 Electrical connection
The electrical connection between the sand feed mechanism and the mortar mixer is
made by a 3-pin plug-in connection, which is also assembled on the left side of the mixer.
After the electrical connection has been made and locked, the sand feed mechanism is
ready for operation. The control takes place from the front, by means of the operating and
signalling unit.
Laboratory mortar mixer
1.0205
20
8. Technical details
Available space
approx.415x590 mm
Power consumption
0.37 kW/ 0,55 kW
Height
approx. 590 mm
Alternating current
110-240 V
Weight
approx. 62 kg
Frequency
50-60 Hz
Number of phases
1
Speeds of the mortar mixer according to DIN EN 196-1
Rotation
(min-1)
Planetary movement
(min-1)
low
speed
140 ± 5
62 ± 5
high
speed
285 ± 10
125 ± 10
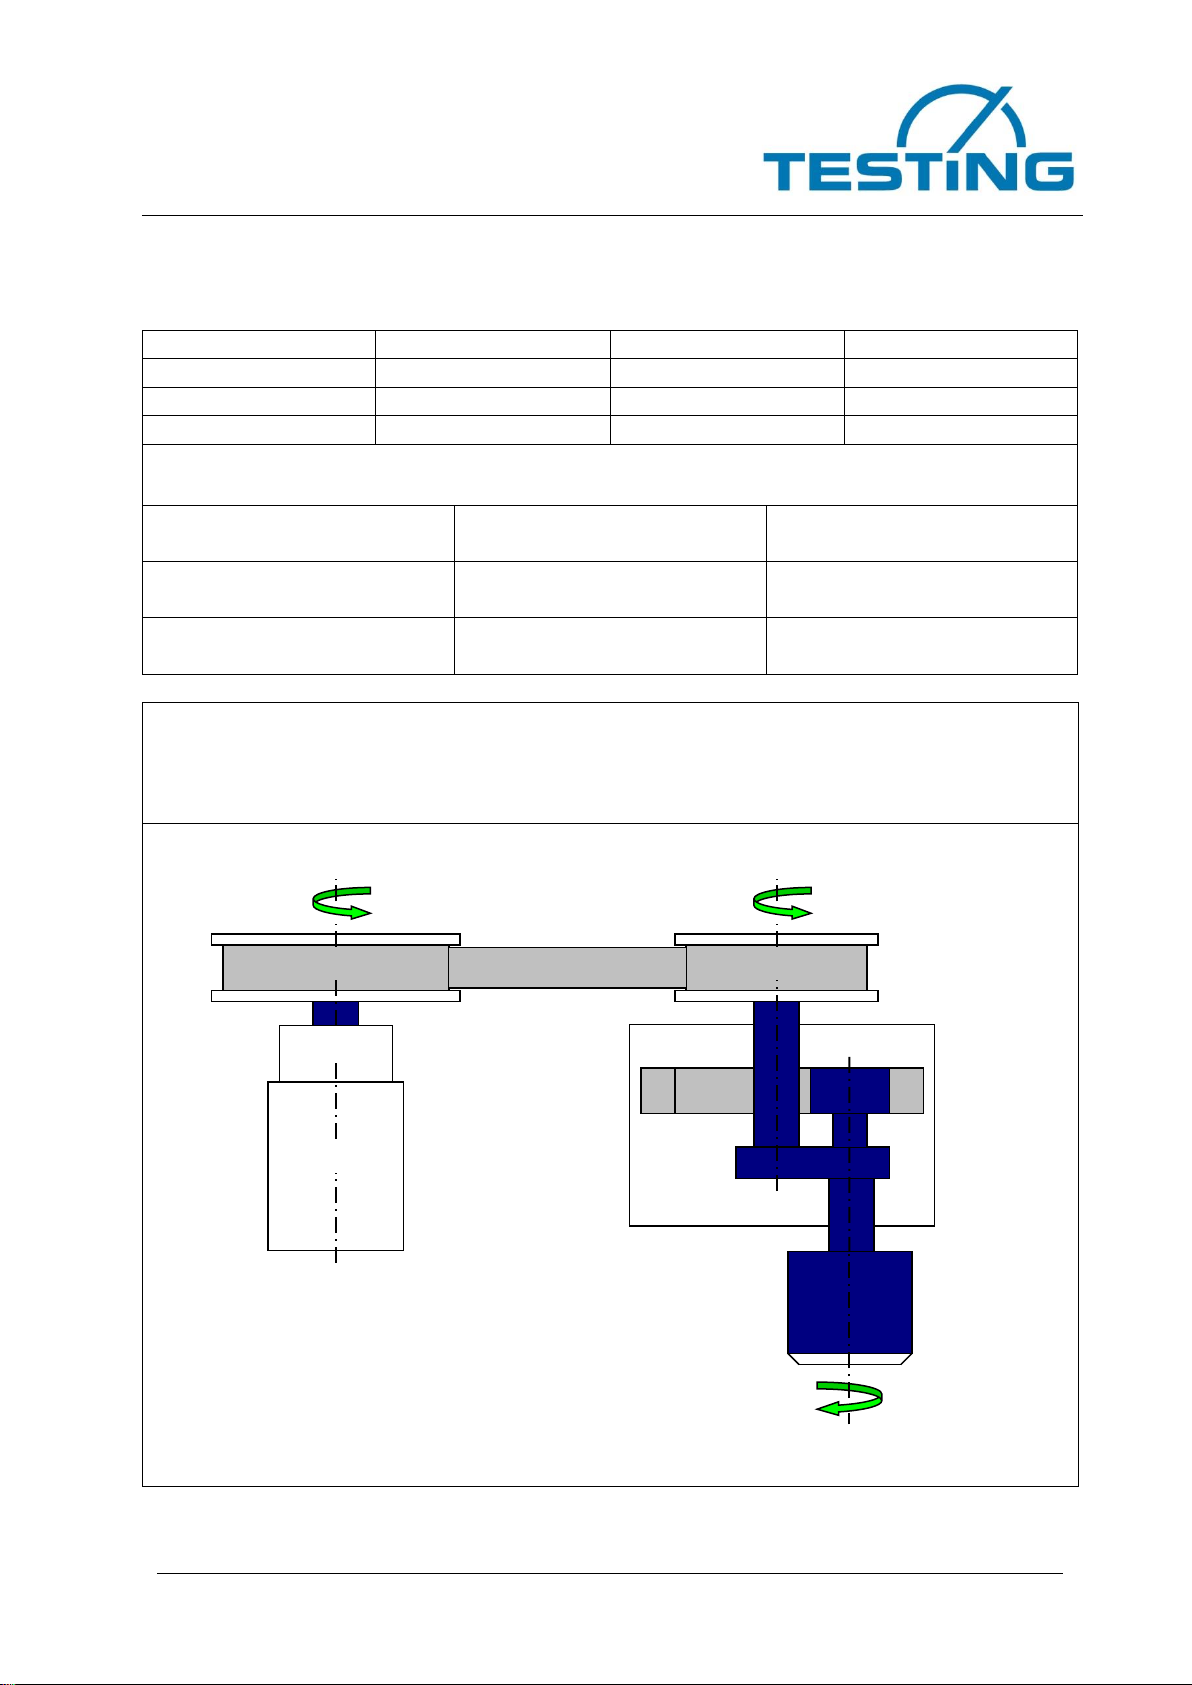
Diagram of the drive components
(Counter-rotating direction of the gear head to the mixer)
E-Motor
Synchronous wheel
Planetary
gear unit
Synchronous
wheel
Synchronous belt
Gear unit
Table of contents
Other TESTING Laboratory Equipment manuals


Popular Laboratory Equipment manuals by other brands

Klein Tools
Klein Tools TI220 instruction manual

Spectradyne
Spectradyne nCS1 Operation manual

Hach
Hach TitraLab AT1000 Series Basic user manual

Powerfiller
Powerfiller Powermax 3+ user manual

Beckman Coulter
Beckman Coulter Airfuge instruction manual

Cleaver Scientific
Cleaver Scientific OmniPAGE Series instruction manual


The Snell Group
The Snell Group FLIR E30 quick start

Antec Scientific
Antec Scientific ROXY Exceed user manual

MyGo
MyGo MINI PCR3208 user guide

Commodity Axis
Commodity Axis ViaAqua Terminator UVS 5 quick start guide

Conrad
Conrad Ai202 operating instructions

Ralco
Ralco R 221 ACS DHHS Series instruction manual