TESTO 318 Series User manual

Bedienungsanleitung
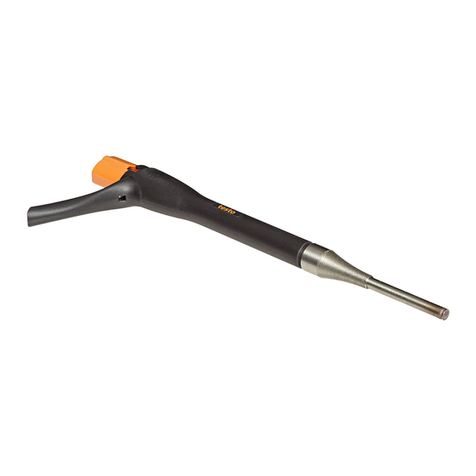
Endoskop
Beleuchtungsschalter
Batteriefach (für
Beleuchtung)
Flexible, wasserdichtes Rohr
Linsenspitze mit
integrierter Beleuchtung
Fokussierring
KomfortgriffOkular
testo 318-2 457mm/18” (10mm/0.4” Spitze) 0632.0319
testo 318-2S 457 mm/18” (5.8 mm/0.23” Spitze) 0632.3182
testo 318-1 914 mm/36” (10 mm/0.4” Spitze) 0632.0318
testo 318-1S 914 mm/36” (5.8 mm/0.23” Spitze) 0632.3181
testo 318-6* 1.8 m/72” (10mm/0.4” Spitze) 0563.3186
Lieferumfang: Tragetasche, Halogenlampe, Batterien und
Bedienungsanleitung. *Ersatzlampe und Spiegel werden mitgeliefert.
testo 318 Serie
Messgerät konform zu
EN 50 081-1 + EN 50 082-1
Technische Daten testo 318
Pixelanzahl : 6,000
Sichtfeld: 40 °
Min. Fokusentfernung : 19 mm (¾ inch )
Betriebs- und Lager- -23 bis + 49°C
temperatur: -10 to + 120°F
Durchmesser Rohrspitze: Siehe links
Lichtquelle: Halogenleuchte (600 fc, 3220 K)
Gehäuse: ABS (schwarz)
Abmessungen: 152 x 36 x 62 mm
(ohne Rohr) 6.0 x 1.4 x 2.43 "
Gewicht : testo 318-1 oder 1S Ca. 318g (11 oz)
testo 318-2 oder 2S Ca. 227 g (8 oz)
testo 318-6 Ca. 500 g (18 oz)
(ohne Batterien)
Batterietyp: 2 AA
Garantie: 2 Jahre
Diese Garantie deckt keine Schäden, die durch Missbrauch,
Unfälle oder Änderungen am Produkt verursacht wurden.
Garantie erlischt bei Öffnung des Griffs durch den Benutzer.
Wichtiger Hinweis:
Obwohl das Rohr mit Tausenden von Fasern gefüllt ist, kann
es ohne Schäden wiederholt bis zu einem Radius von 203
mm (8") gebogen werden.
Ersatzteile/Zubehör
Ersatz-Halogenleuchte 0213.0017
Aufsetzbarer 45°-Spiegel (0.4” ∅) 0554.1320
Aufsetzbare Magnetspitze 0554.1321
Aufsetzbarer 45°-Spiegel (0.23” ∅) 0554.1325
Aufsetzbare Magnetspitze (0.23” ∅) 0554.1324
Bitte vor Gebrauch lesen
• Nie auf oder in der Nähe spannungsführender Teile
verwenden
• Nie in explosiven Umgebungen verwenden
• Nicht für medizinische oder veterinärische Zwecke
geeignet
• Rohr nicht knicken
• Garantieverlust bei Knicken des Rohres
• Griff niemals öffnen
• Enthält keine Serviceteile
• Garantieverlust bei Öffnung des Griffes
• Griff nicht in Flüssigkeiten eintauchen
• Rohr niemals über längere Zeit Lösungsmitteln
aussetzen
Inbetriebnahme:
1 Okularschärfe einstellen. Zielen Sie dazu auf ein
Objekt im Raum und stellen Sie dieses mit Hilfe des
Fokussierrings scharf.
2 Rohr im zu prüfenden Bereich einsetzen.
3 Beleuctungsschalter drücken falls zur genaueren
Überprüfung Ausleuchtung benötigt wird.
Halogen Lamp Replacement: Batteriefach am Rohrende des
Griffs öffnen. Unterteil der Lampe wird über den Batterien
sichtbar (suchen Sie nach einer kleinen Metallplatte).
Lampenende fassen und herausziehen (zum einfacheren Lösen
ein dünnes Messer o.ä. verwenden). Neue Birne - mit dem
Glasende voraus - in die Öffnung einführen. Funktioniert die neue
Birne bei Betätigung des Schalters nicht, biegen Sie den der
Lampe gegenüberliegenden Metallstreifen (an der
Batteriefachtür) vorsichtig heraus, um einen besseren Kontakt zu
gewährleisten.
Vor dem Einsatz an einer unzugänglichen Stelle muß der
Spiegel/Magnet stets fest an das Rohrende angebracht sein.
KEINE aggressiven Reinigungsmittel oder rauhe Tücher auf der
Spiegeloberfläche verwenden. Kratzer vermindern die Bildqualität.
Lampe kann nach längerer Benutzung HEISS sein.
Die Lampe ist ZERBRECHLICH! Bitte vorsichtig handhaben.
NICHT fallen lassen!
Spiegel-/Magnetaufsatz Halogenlampen-Austausch
Bildführung
Lichtführung
Spiegel/Magnet
Rohr
Birne
Batterien
(AA)
Gehäuse
Spiegel oder Magnetspitzen-Aufsatz: Halten Sie das Rohr in
der Nähe der Spitze fest. Drücken Sie die offene Seite des Clips
auf das Metall des Rohrs. Dann Clip auf das schwarze Teil des
Rohrs schieben. Der Clip muß fest auf dem Rohr sitzen. Falls
der Clip zu lose ist, einfach entfernen und die Clipfläche mit
einer Zange leicht zusammendrücken, um einen festeren Sitz
zu erreichen.
HINWEIS! Nur für Spiegel: Für eine optimale Sicht mit dem
Spiegel, diesen bitte an der Spiegeloberfläche direkt über der
Bildführung ausrichten und so nah wie möglich an das
Rohrende bringen (siehe Bild rechts). Für beste Bildqualität
Spiegeloberfläche immer sauber halten.
Austausch der Batterie:
Öffnen Sie das Batteriefach am Rohrende des Griffes. Batterien
in gleiche Richtung weisend einsetzen. Batteriefachverschluss
wieder einrasten. Immer neue Batterien verwenden, um beste
Leistung zu gewährleisten. Es ist ein Clip zur Lagerung einer
Ersatzbirne auf der Innenseite des Batteriefachs vorhanden.
0973.3181/T/wh/PC_pp/06.03

Instruction Manual
Fiberscope
Momentary lamp switch
Battery/lamp compartment
Flexible, waterproof shaft
Illuminated lens tip
Focus adjustment ring
Eyepiece
testo 318 Series
Technical data on testo 318
Number of pixels: 6,000
Field of view: 40 degrees
Min. focus distance: ¾ inch (19 mm)
Operating and storage -10 to + 120 F
temperature: -23 to + 49 C
Shaft tip diameter: see chart on left
Light source: Halogen lamp (600 fc, 3220 K)
Housing: ABS (black)
Dimensions: 6.0 x 1.4 x 2.43 inches
(exclusive of shaft) 152 x 36 x 62 mm
Weight: testo 318-1 or 1S Approx 11 oz (318g)
testo 318-2 or 2S Approx 8 oz (227 g)
testo 318-6 Approx 18 oz (500 g)
(exclusive of batteries)
Battery type: 2 AA
Warranty: 2 years
This warranty excludes damage caused by misuse, accidents
or modifications to the product. Warranty is void if the user
opens the handle for any reason.
Important note:
Although the shaft is filled with thousands of fibers, it can be
bent repeatedly to a radius of 8" (203 mm) without damage.
Spare parts/accessories
Replacement Halogen lamp 0213.0017
Clip on 45 degree mirror (0.4” dia.) 0554.1320
Clip on Magnetic Tip (0.4” dia.) 0554.1321
Clip on 45 degree mirror (0.23” dia.) 0554.1325
Clip on Magnetic Tip (0.23” dia.) 0554.1324
Comfort grip handle
testo 318-2 18” /457mm (0.4”/10mm tip) 0632.0319
testo 318-2S 18” /457 mm (0.23”/5.8 mm tip) 0632.3182
testo 318-1 36” /914 mm (0.4”/10mm tip) 0632.0318
testo 318-1S 36”/914 mm (0.23”/5.8 mm tip) 0632.3181
testo 318-6* 72”/1.8 m (0.4”/10mm tip) 0563.3186
All products ship with carry case, halogen lamp, batteries and
instruction manual. 48” and 96” versions available in North
America. *Comes with spare lamp and mirror.
Please read before operation
• Never use on or near live parts
• Never use on or near live electrical circuits
• Never use in explosive atmospheres
• Not intended for medical or veterinary use
• Avoid over-bending the shaft
• Over bending will void the warranty
• Do not open the handle for any reason
• No user serviceable parts inside
• Opening handle will void the warranty
• Do not submerse the handle in any liquid
• Do not immerse the shaft in any solvent for extended
periods of time
Basic Operation:
1 Set eyepiece focus. Look through eyepiece at an
object across the room and focus eyepiece ring.
2 Insert shaft end into area to be examined.
3 Depress the lamp button if illumination is required for
proper inspection.
Battery Replacement:
To install the Batteries lift the door at the shaft end of the handle
to reveal the Battery compartment. Batteries must be inserted
with both contacts facing the same direction. Snap the
compartment door closed.Always use fresh batteries for best
performance. If you wish, a spare lamp may be stored inside
the clip on the battery door.
Mirror/Magnet Attachment Halogen Lamp Replacement
Halogen Lamp Replacement: Open the battery door on the
shaft end of the handle. You will see the base of the lamp (above
the batteries), which looks like a small metal disk. Grasp the end
of the lamp and pull it straight out. (A thin blade may be required
to free it.) Insert the new lamp into the hole - glass end first. If the
new lamp does not function when you push the lamp switch,
carefully bend out the metal strip opposite to the lamp (on the
battery door) to make better contact.
Mirror or the Magnetic Tip Attachment: Grasp the shaft of the
fiberscope firmly near the tip. Press the open side of the clip
against the metal portion of the shaft, then slide the clip back on
to the black portion of the shaft. The clip should grip the shaft
firmly. If the clip is loose, simply remove it and squeeze the clip
area slightly with pliers to tighten the fit.
NOTE For Mirror Only To provide optimum viewing with the
mirror, please orient it with the mirror surface directly above the
image guide and as close to the end of the shaft as possible
(see figure). Clean the mirror surface to provide the best image
quality.
Always be sure the mirror/magnet is securely attached to the
end of the shaft before placing it into an in accessible area.
DO NOT use abrasive cloths or cleaners on the mirror surface.
Scratches will reduce your the image quality.
Lamp may be HOT to touch after prolonged operation. Lamp is
FRAGILE! Please handle with care and DO NOT drop.
0973.3181/T/wh/PC_pp/06.03
This manual suits for next models
5
Table of contents
Languages:
Other TESTO Analytical Instrument manuals
Popular Analytical Instrument manuals by other brands

Vigor Equipment
Vigor Equipment V7500/2 operating instructions

geo-FENNEL
geo-FENNEL FVE 150 user manual

National Instruments
National Instruments AT-MIO E Series Programmer's manual

Vividia
Vividia Ablescope VA-400i manual

Teledyne
Teledyne 3020P operating instructions

Teledyne
Teledyne 3000TA-XL-EU quick start guide