The Splash Lab TSL-470 Maintenance and service guide

TSL-470
soap dispenser
installation + maintenance
3Box Contents
3Technical Data
4Before You Install
5How to Install
7Commissioning
7 Operation
8 Maintenance
8 Cleaning
8 Soap
9 Refilling
10 Warranty
11 Contact Details
contents
2TSL-470 SOAP DISPENSER MANUAL
TSL-470 SOAP DISPENSER MANUAL 3
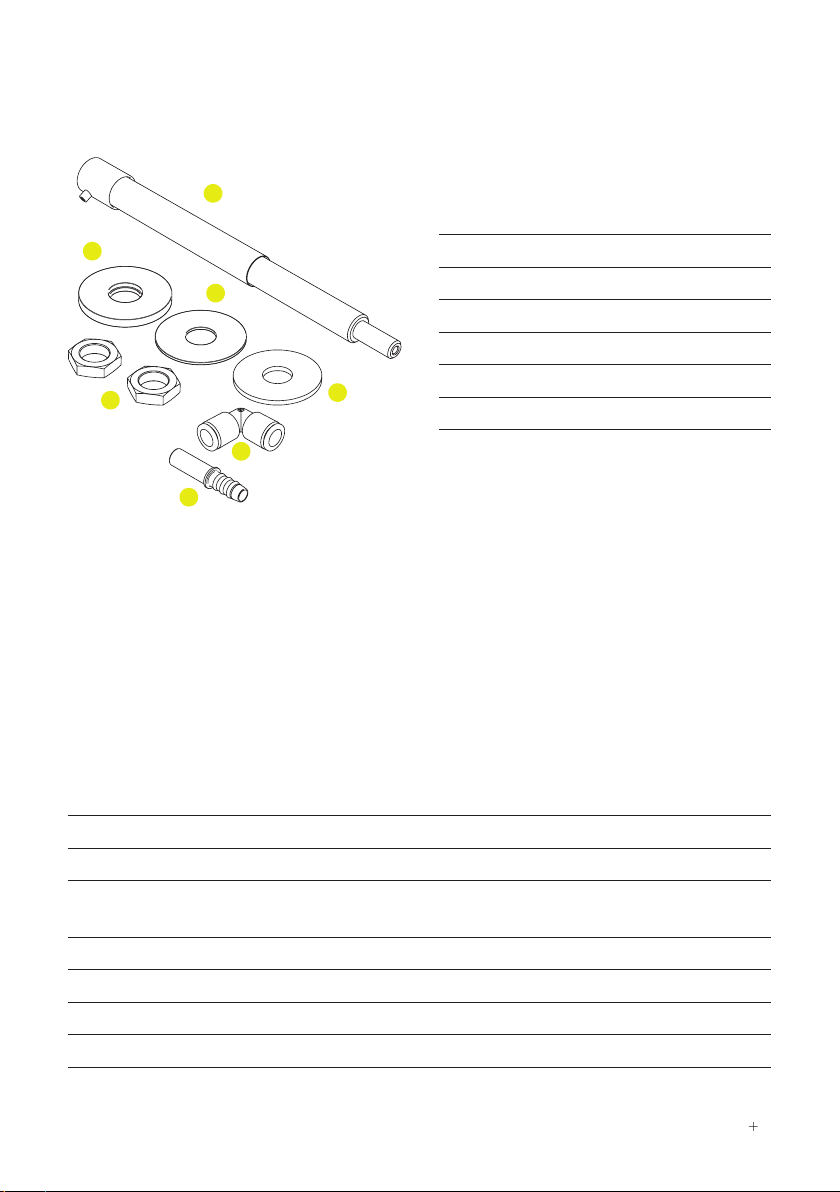
box contents
ADispenser mechanism
BWall flange - large
CRubber backing disc
DSteel backing disc
EFixing nuts
FPushfit elbow pipe connector
GStraight push-in pipe connector
A
B
C
F
G
ED
Finishes TSL-470CS Brushed stainless steel
TSL-470CP Brushed copper
TSL-470BK Brushed black
TSL-470BZ Brushed bronze
TSL-470BR Brushed brass
Weight 1 lb 5oz
Body 316 AISI Stainless steel
Recommended soap viscosity 100 to 3800cPs Liquid soap only. Not for use with
foam soap, alcohol gel or hand sanitizer
Recommended soap system L-ST series, to be specified separately
Feed pipe connection 8mm push-fit connector to L-ST series feed system
Tested to 2,000,000 depressions
Standard discharge 0.03 fl oz
technical data

4TSL-470 SOAP DISPENSER MANUAL
Location
The TSL-470 dispenser is normally mounted in the wall panelling above a basin or
counter-top. As a guide, we would recommend that a minimum distance of 4" between
the dispenser and any adjacent tap, but this is ultimately only a guide measurement.
It is important that the reservoir is mounted below the dispenser, otherwise there is
a risk that the soap in the reservoir will syphon out of the reservoir. The dispenser is
designed for the soap to be drawn from a reservoir mounted below the level of the
dispenser.
NOTE: The L470 soap dispenser needs to be used with one of The Splash Lab’s Liquid
soap feed systems listed below (to be specified separately)
LMT1 Single feed soap system – 1 litre reservoir
LST1 Single feed soap system – 5 litre reservoir
LST2 Multi-feed soap system – dual feed – 5 litre reservoir
LST3 Multi-feed soap system – triple feed – 5 litre reservoir
LST4 Multi-feed soap system – four feed – 5 litre reservoir
before you install
5-3/8"
O
3/8"
O
1-15/16"
3-11/16"
1"
3/16"
5/8"
O
13/16"
O
11/16"
WALL CUT-OUT
SIDE
5-3/8"
O
3/8"
O
1-15/16"
3-11/16"
1"
3/16"
5/8"
O
13/16"
O
11/16"
WALL CUT-OUT
FRONT
CUT-OUT

TSL-470 SOAP DISPENSER MANUAL 5
how to install
1
Mark the dispenser position and drill
11/16" Ø hole to accept the brass
dispenser tail.
2
Assemble the wall flange to the
dispenser ensuring the finished face will
not be against the wall.
Tools Required
Drill
11/16" drill bit
1" open-ended wrench

6TSL-470 SOAP DISPENSER MANUAL
how to install
5
Once the dispenser is secure & correctly
orientated, assemble the second locknut.
Use 2 wrenches (one on each nut) and
firmly lock the nuts together. Ensure you
maintain the correct orientation of the
dispenser during this operation.
6
Press the elbow connector onto the
straight pipe connector at the rear of
the dispenser. Insert the pipe-barb into
the PVC hose, and this connector can
then be pressed into the previously fitted
elbow connector.
3
Pass the dispenser tail through the
mounting hole and place the rubber
backing disc and steel disc over the
dispenser tail.
4
Assemble the 1st brass locknut onto the
dispenser tail ensuring that the outlet
nozzle is pointing downwards. Tighten the
nut by hand against the backing disc, and
then tighten using a wrench 1 full turn.
Tighten the nut only suciently enough
to secure the dispenser – over-tightening
may damage both the dispenser and the
building fabric.

TSL-470 SOAP DISPENSER MANUAL 7
commissioning
Fill the reservoir with soap and operate the dispenser until soap is dispensed from the
spout.
operation
The cap is depressed by the user, which draws a measured amount of soap
0.03 fl oz along the feed pipe from the reservoir, then through the pump, and the soap
is dispensed from the spout onto the user’s hands.
7
Place the soap reservoir within 6 feet
of the dispenser and run the pipe
from the dispenser to the reservoir
ensuring there are no kinks in the
pipe. For single-feed systems, place
the tube-support cap onto the soap
reservoir and screw on by hand
(no tools are required for this). For
multi-feed pipe-sets, simply place the
manifold in to the neck of the soap
reservoir ensuring that the ends of the
soap pipes are in the soap.

8TSL-470 SOAP DISPENSER MANUAL
maintenance
Occasionally purge the dispenser by pumping warm water (hand warm) through the
unit. This will remove any congealed soap.
cleaning
The dispenser should be cleaned with a soft cloth and a mild solution of soapy water as
part of the regular cleaning regime. Do not use abrasive or cream cleaners as these will
damage the surface finish.
soap
A good quality liquid soap of viscosity 100 – 3800 cPs units should be used. Hand
cleaners containing abrasive particles should not be used as this will cause damage to
the pump mechanism. The dispenser mechanism is not compatible with alcohol gels or
hand sanitisers.

TSL-470 SOAP DISPENSER MANUAL 9
refilling
Single feed piped system
The cap with the soap feed pipe attached is unscrewed from the jerry-can type bottle.
Liquid soap can now be poured into the bottle until the desired level is reached, and
the cap re-fitted.
Alternatively, the feed pipe can be inserted into a replacement container of soap.
Multi-feed piped system
The multiple feed pipe and the support clips are to be removed from the neck of the
soap reservoir, and the soap can be poured in until the desired level is reached. The
feed pipes can now be replaced into the reservoir, ensuring the ends of the soap pipes
are beneath the surface of the soap.
Alternatively, the feed pipe can be inserted into a replacement container of soap
The dispenser should now be operated to ensure that soap is dispensed.
The level of soap in the reservoirs should be checked regularly to ensure the soap feed
pipes are always dipped into the soap. If it does happen that the soap level is allowed
to fall below the minimum required, there will be an airlock introduced into the pipe,
which will then need to be re-primed. Priming of the system is achieved by depressing
the pump until soap is dispensed consistently.
THE SOAP DISPENSERS CONTAIN NO USER-SERVICABLE PARTS.

10 TSL-470 SOAP DISPENSER MANUAL
warranty
We believe the future is personal. With a global mindset, we challenge conventional
restroom norms via product innovation to create considered washroom solutions for
corporate and educational spaces. We use rich raw materials, cutting-edge automation
and considered washroom design to powerfully and positively influence the lives of
people. We are The Splash Lab.
Demonstrating our commitment to quality and our belief in the strength of our designs,
we can offer the following warranties.
The Splash Lab will warrant that its products will be free of manufacturing and material
defects during normal use and environmental conditions as detailed below:
Soap & paper dispensers 1 year
If a defect is found in normal use, The Splash Lab will, at their discretion, repair, provide
a replacement part or product, or make appropriate adjustments. Damage caused by
accident, misuse, or abuse is not covered by this warranty. Improper care and cleaning
will void the warranty.
Non-operation of the product due to environmental conditions beyond our control,
installation error, incorrect maintenance, water quality, fair wear and tear, incorrect or
inappropriate installation, misuse and abuse is not covered by the warranty.
Proof of purchase (original sales receipt) must be provided to The Splash Lab with all
warranty claims.
The above warranty is valid for goods supplied within the United Kingdom.
For goods supplied outside of the United Kingdom, The Splash Lab will honour the
above stated warranty periods for the parts only.
THE SPLASH LAB DISCLAIM ANY LIABILITY FOR SPECIAL, INCIDENTAL OR
CONSEQUENTIAL DAMAGES.

TSL-470 SOAP DISPENSER MANUAL 11
contact
General information
+1 310 410 5008
Technical support
technical@thesplashlab.com
For further contact information visit:
www.thesplashlab.com

TSL-470 US REV 1-14/05/18
This manual suits for next models
6
Table of contents
Other The Splash Lab Dispenser manuals

The Splash Lab
The Splash Lab TSL.R.010 Series Maintenance and service guide

The Splash Lab
The Splash Lab TSL.R.010 Series Maintenance and service guide

The Splash Lab
The Splash Lab TSL.420 Maintenance and service guide

The Splash Lab
The Splash Lab TSL.R.010 Series Maintenance and service guide

The Splash Lab
The Splash Lab TSL.410 Maintenance and service guide
Popular Dispenser manuals by other brands

Tork
Tork Xpressnap N4 Loading Instructions

Arktic
Arktic 425206 user manual

Knight
Knight Multi-Flow Installation & Programming Instruction Manual

PEGAS
PEGAS CRAFTAP Operation manuals

diversey
diversey IntelliCare Hybrid quick start guide

Coastwide Professional
Coastwide Professional J Series Instruction guide


