manuals.online logo
Brands
  1. Home
  2. •
  3. Brands
  4. •
  5. Theben
  6. •
  7. Thermostat
  8. •
  9. Theben ramses 721 User manual

Theben ramses 721 User manual

310579 03
RAMSES 721
7210030
D Bedienungsanleitung
Uhrenthermostat
G Operating Instructions
Clock thermostat
F Mode d’emploi
Thermostat à horloge
O Gebruiksaanwijzing
Klokthermostaat
I Istruzioni d’uso
Cronotermostato
RAMSES 721_310 579 03_RAM 721 D_F_GB_NL_I 15.10.14 08:31 Seite 1
Information / Information / Information /
Informatie / Informazioni
Technische Daten / Technical data /
Caractéristiques techniques /
Technische gegevens / Dati tecnici
Heizzeit programmieren (Tagesprogramm) /
Programming heating time (day program) /
Programmation des périodes de chauffe (pro-
gramme journalier) / Programering van de ver-
warmingsperiodes (dagprogramma) /
Programmazione della temperatura
Aktuelle Uhrzeit einstellen/ korrigieren /
Setting/correcting actual time / Réglage de
l’heure/correction / Instelling/correctie van de
actuele kloktijd / Avvertenze/correzione
programmazione dell’ora selezionata
Temperatur einstellen / Manual switching /
Dérogation manuelle / Manuele afwijking /
Programmazione temperatura Handschaltung / Setting temperature /
Réglage de la température / Tempera-
tuur instellen /Programmazione ma-
nuale
Sicherheitshinweise / Safety instruc-
tions / Conseils de sécurité /
Veiligheidsaanwijzing / Avvertenze
Sommer-/ Winterzeitkorrektur / Summer/Winter
time adjustment / Changement d’heure été/
hiver / Zomer-/wintertijdomschakeling /
Correzione ora legale/solare
Montage / Installation / Montage /
Montage / Installazione
Anschluss / Connection /
Raccordement / Aansluiting /
Collegamento
Arbeitspunkt anpassen / Adjustment
of operating point / Etalonnage du
seuil de commutation / Ijking van
schakeldrempel / Punto di lavoro
regolabile
Verwendung: Der Uhrenthermostat ist geeignet zur Temperaturregelung von Wohn-
und eschäfts räumen, jedoch nicht für Räume mit starker Schmutzentwicklung
(Mon tage hallen). So wird während der Bürozeiten auf Normaltemperatur und bei
Büroende auf reduzierte Temperatur (Energiesparprogramm) geregelt. Beginn und
Ende der Normal- und Energiespartemperatur können durch Steckreiter oder
Seg mente frei programmiert werden.
Use: The clock thermostat is suitable for temperature control of domestic and business
rooms, but not for rooms with major dirt generation (assembly units). For
exam ple during office hours normal temperature or (energy saving program).
Saving temperature can be selected by means of tappets.
Application: Le thermostat à horloge convient pour la régulation de température de
locaux d’habitations ou professionnels, mais ne convient pas pour les locaux très pous-
siéreux (halls de fabrication) ou humides (piscines, salles de bain, saunas etc.).
Par exemple, durant les heures de bureau, on assure une température confort; à la fin
des heures de bureau, une température réduite. Le début et la fin du régime de tempéra-
ture confort ou réduite est programmable librement par les cavaliers disposés autour
du cadran de l’horloge.
Toepassing: De klokthermostaat is geschikt voor de temperatuurregeling van woon-
of beroepsruimten, echter niet voor zeer stoffige media (fabriekshallen) of vochtige me-
dia (zwembaden, badkamers, sauna’s enz.). Bijvoorbeeld, gedurende de kantoortijden
wordt op comforttemperatuur geregeld, op het einde van de kantoortijden op verlaag-
de temperatuur. Het begin en het einde van de comfort- of verlaagde periodes kan vrij
geprogrammeerd worden d.m.v. de ruitertjes , die zich rond de klokschijf bevinden.
Il cronotermostato è stato studiato per la regolazione di unità abitative o uffici.
Esempio: Durante l’orario di ufficio sarà regolata la temperatura normale permanen-
te, al termine dell’orario d’ufficio il cronotermostato ridurrà la temperatura (program-
ma a risparmio di energia). Sia la temperatura iniziale che quella finale dei programmi
normale e a risparmio di energia potranno essere liberamente programmate con i ca-
valieri.
2
RAMSES 721_310 579 03_RAM 721 D_F_GB_NL_I 15.10.14 08:31 Seite 2
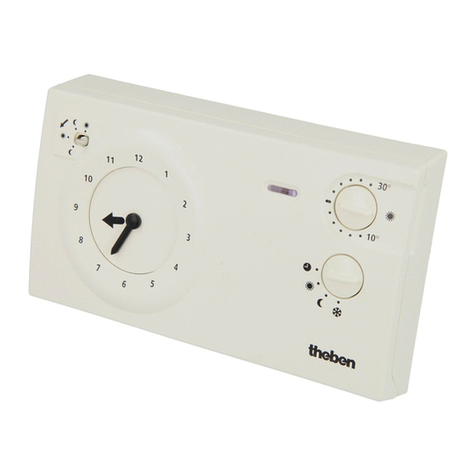
1 RAMSES 721 Tagesprogramm mit Steckreiter
2Handschalter und Anzeige Normal- roder
Energiesparbetrieb m(Nacht)
3Verschluss zur erätebefestigung
4Einstellung der Normaltemperatur r(Tag)
5Lüftungsschlitze im Sockel
6Temperaturabgleich zur Anpassung an die örtlichen egebenheiten
7Ersatzreiterfach
1 RAMSES 721 day programm with tappets
2Manual switch and display normal ror
energy saving operation m(night)
3Seal for product security
4Setting normal temperature r(day)
5Ventilation apertures in the base
6Temperature compensation for adjustment to the localised conditions
7Spare tappets draw
2
1
3
5
4
6
7
3
RAMSES 721_310 579 03_RAM 721 D_F_GB_NL_I 15.10.14 08:31 Seite 3
1 RAMSES 721 programme journalier avec cavaliers amovibles.
2Dérogation manuelle et affichage du régime en cours, confort rou
réduit m(nuit).
3Fermeture pour la fixation de l’appareil.
4Réglage de la température confort r(jour).
5Fentes d’aération dans le socle.
6Etalonnage pour l’adaption aux particularités du local .
7Logement pour cavaliers de réserve.
1 RAMSES 721 dagprogramma met versteekbare ruiters
2Manuele afwijking en weergave van de actieve periode, comfort rof
verlaagd m(nacht).
3Vergrendeling voor de bevestiging van het apparaat
4Instelling van de comforttemperatuur r(dag).
5Ventilatieopeningen in de sokkel
6Ijking ter aanpassing aan de plaatselijke omstandigheden .
7Vakje met extra ruiters
1 RAMSES 721 Programma giornaliero a cavalieri estraibili
2Interruttore manuale e segnalatore di energia normale ro risparmio di
energia m(notte)
3Coperchio di protezione dell’apparecchio
4Regolazione della temperatura Comfort r
5Zona ventilazione sonda temperatura
6Punto di lavoro regolabile all’atto dell’installazione
7Scala orologio
4
RAMSES 721_310 579 03_RAM 721 D_F_GB_NL_I 15.10.14 08:31 Seite 4
Setting actual time or adjusting Summer/ Winter time
-> Turn the big hand in a clock-wise or anti clock-wise direction until the
actual time is displayed.
Note: e.g. 14 hours, not 2.00 hours!
Aktuelle Uhrzeit einstellen oder Sommer-/ Winterzeitkorrektur
-> Drehen Sie den großen Zeiger im oder gegen den Uhrzeigersinn,
bis die aktuelle Uhrzeit angezeigt wird.
Beachten: z. B. 14°° Uhr, nicht 2°° Uhr!
Réglage de l’heure ou changement d’heure été/ hiver
-> Tournez la grande aiguille, dans le sens horlogique ou anti-horlogique, jus-
qu’á ce que l’heure correcte apparaisse.
Attention: ex.: 14h00 et non 02h00!
Actuele kloktijd instellen of zomer-/ wintertijdomschakeling
-> Verdraai de grote wijzer met of tegen wijzerzin, tot de actuele tijd wordt
aangeduid.
Opgelet: vb.: 14.00 h en niet 02.00 h!
Sincronizzazione dell’orario attuale o modifica dell’ora legale/solare
-> Fate ruotare la lancetta grande in senso orario o antiorario fino a che non
avrete sincronizzato l’orario attuale.
Avvertenze: ad esempio 1400 e non 200
z.B./ p.ex./ e.g./ p.es.: 14°°
14°°
2 °°
14
5
RAMSES 721_310 579 03_RAM 721 D_F_GB_NL_I 15.10.14 08:31 Seite 5
Stecken Sie den roten Reiter auf 6°° Uhr, und den blauen Reiter auf 22°° Uhr
Beachten: Drücken Sie alle Steckreiter ganz nach unten!
Beispiel: täglich von 6°° Uhr bis 22°° Uhr Normalprogramm r
Insert the red tappet into 6.00 hours and the blue tappet into 22.00 hours
Note: Press all tappets fully down.
Example: daily from 6.00 to 22.00 hours normal program r
Enfichez le cavalier rouge sur 6h00 et le cavalier bleu sur 22h00.
Attention: enfichez le cavalier à fond.
Exemple: régime confort rtous les jours de 6h00 à 22h00
De rode ruiter insteken op 6.00 h en de blauwe ruiter op 22.00 h.
Opgelet: de steekruiters helemaal tot op de bodem indrukken.
Voorbeld: comfortperiode ralle dagen van 6.00 tot 22.00 h.
Posizionate il cavaliere rosso in corrispondenza delle 6:00 ed il cavaliere blu in
corrispondenza dell 22.00.
Avvertenze: Assicurate viche tutti i cavalieri siano ben fissati a fondo!
Esempio:
Programma giornaliero dalle 6.00 alle 22.00 temperatura normale permanente r
5 Min.
20 Min.
theben Nr.
9 343 111
theben Nr.
9 343 236
6
RAMSES 721_310 579 03_RAM 721 D_F_GB_NL_I 15.10.14 08:31 Seite 6
Normalprogramm
Programme normal
Régime confort
Comfortperiode
Temperatura normale
Beim Energiesparprogramm wird die Temperatur um 5 °C gegenüber der
Normaltemperatur abgesenkt.
Beispiel: 20 °C Normaltemperatur s. Abb 4 = 15 °C Energiespartemperatur.
The temperature is lowered by 5 °C compared to the set normal
temperature.
Example: Illustration 4: 20 °C normal temperature = 15 °C energy saving
temperature.
La température est abaissée de 5 °C par rapport à la température confort
réglée.
Ex.: figure 4: 20 °C = température confort, 15 °C = température réduite.
De temperatuur wordt 5 °C verlaagd in verhouding tot de ingestelde com-
forttemperatuur.
Vb: beeld 4: 20 °C = comforttemperatuur, 15 °C = verlaagde temperatuur.
La temperatura sarà abbassata di 5° C rispetto alla programmazione
normale.
Esempio Fig. 4: 20 °C temperatura normale = 15 °C temperatura risparmio.
2
20 °C
4
2
Handschalter/ Schaltungsvorwahl in Stellung
2= r, Einstellung an Drehknopf 4 rbestimmt die Temperatur
2 = m, die Temperatur wird um 5 °C gegenüber der eingestellten Normaltemperatur
abgesenkt.
Beachten Sie: 1 rad Temperaturreduzierung, bedeutet ca. 6 % Energieeinsparung.
Manual switching/ override switch in place
2= r, Setting with rotary knob 4 rdetermines the temperature
2 = m, The temperature is lowered by 5 °C compared to the set normal temperature
Note: Temperature reduction of 1° C means approx. 6 % energy saving
Sélecteur manuel pour le choix des régimes
2= r, le réglage au bouton 4 rdétermine la température.
2= m, la température est abaissée de 5° C par rapport à la température confort réglée.
Attention: la réduction de température d’un degré (1° C) correspond à une économie
d’énergie d’environ 6 %
Manuele keuzeschakelaar
2= r, de instelling met de instelknop 4 rbepaalt de temperatur
2 = m, de temperatuur wordt 5 °C verlaagd in verhouding tot de ingestelde comfort-
temperatuur
Opgelegt: één temperatuurverlaging van één graad (1 °C) stemt overeen met één energie-
besparing van ca. 6 %.
Interruttore manuale/collegamento di preselezione in posizione
2= r, Predisposizione della temperatura tramite la manopola 4r
2 = m, La temperatura si abbasserà di 5 °C rispetto alla temperatura normale programmata.
Avvertenza: Se programmerete la riduzione di temperatura die 1 °C risparmierete
circa il 6 % di energia. 7
RAMSES 721_310 579 03_RAM 721 D_F_GB_NL_I 15.10.14 08:31 Seite 7
Der Anschluss und die Montage elektrischer eräte dürfen nur durch eine Elektro-
fachkraft erfolgen. Werden Uhrenthermostate mit anderen eräten in einer Anlage
verwendet, achten Sie darauf, dass die gesamte Anlage keine Funkstörung verur-
sacht. Die nationalen Vorschriften und die jeweiligen Sicherheitsbestimmungen sind
zu beachten. Eingriffe und Veränderungen am erät haben den Verlust des aran-
tieanspruchs zur Folge.
The connection and the installation of electrical products may be effected only by
a qualified electrician. If clock thermostats are used in a lay-out with other
products, attention must be given to ensure that the whole system does not
cause radio interference. National directives and relevant safety regulations must
be observed. Interference with and changes to the product will result in the loss of
the guarantee.
Le montage et le raccordement ne peuvent être effectués que par un professionnel.
Si le thermostat à horloge est utilisé avec d’autres appareils dans une installa-
tion, il faut veiller à ce que l’installation dans son ensemble ne provoque pas de
perturbation électrique. Les normes nationales et les prescriptions de sécurité doi-
vent être respectées. Des interventions dans l’appareil ou des modifications de ce-
lui-ci entraînent la perte de la garantie.
De montage en de aansluiting mogen enkel door één elektro-installateur uitgevo-
erd worden. Indien de klokthermostaat in één installatie met andere apparaten ge-
bruikt wordt, moet men erop letten dat de ganse installatie geen elektrische sto-
ring veroorzaakt. De nationale voorschriften en de lokaal geldende veiligheidsbe-
palingen dienen in acht genomen te worden.
Ingrepen of wijzigingen aan het apparaat hebben het verlies van de garantie ten
gevolge.
Il collegamento ed il montaggio di apparecchi elettrici può essere fatto solo da un
elettricista esperto. Se il cronotermostato dovesse entrare in contatto con altri ap-
parecchi dell’impianto, dovrete tenere presente che l’intero impianto non subirà al-
cun disturbo. Sono da tenere in considerazione le prescrizioni nazionali e le dispo-
sizioni di sicurezza corrispondenti in materia.
Qualsiasi intervento o modifica all’apparecchio farà immediatamente
decadere ogni garanzia.
Anschluss nur durch Elektrofachkraft/ Only for qualified electrician/ Pour l’
elec-
tricien professionnel seulement/ Aansluiting enkel door één bevoegd vakman/
Indicazioni per l’elettricista
8
RAMSES 721_310 579 03_RAM 721 D_F_GB_NL_I 15.10.14 08:31 Seite 8
3
Achten Sie bei Montage- und Demontage des Uhrenthermostaten darauf, dass
die Anschlussleitung spannungsfreigeschalten ist.
Montage: Nur zur Montage auf nicht leitenden und ebenen Untergrund geeignet.
1. Klappen Sie den Frontdeckel nach unten.
2. Drehen Sie mit einem Schraubendreher den Verschluss 3 in Pos.
3. Heben Sie den grauen Sockel vom Reglerteil ab.
4. Ziehen Sie die Anschlussdrähte durch den Sockel
Der Raumtemperaturregler darf nicht auf einen leitenden Untergrund
montiert werden.
5. Befestigen Sie den Sockel an der Wand, ca. 1,5 m über dem
Fußboden, möglichst an einer Innenwand, an der die Luft
ungehindert zirkulieren kann
6. Schließen Sie den Sockel entsprechend dem zutreffenden
Anschlussbild an.
7. Drücken Sie die Anschlussleitungen flach in den Sockel.
8. Setzen Sie den Uhrenthermostaten auf den verdrahteten Sockel.
9. Drehen Sie mit einem Schraubendreher den Verschluss 3 in Pos.
Beachten: Halten Sie die Lüftungsschlitze 5im Sockel frei; keine Farbe, Tapete o.ä.
5
9
Ensure that when installing and dismantling the clock thermostat that the vol-
tage in the connecting lead is switched off.
Mounting: Do not mount the device on an even conductive base.
1. Lower the front cover
2. With a screwdriver turn the seal 3to position
3. Lift the grey plinth from the control section
4. Pull the connecting wires through the plinth
Controller of room temperature may not be mounted on conductive
ground.
5. Fix the plinth to the wall approx. 1.5M above the floor, if possible on an
internal wall, against which air can circulate without hindrance
6. Connect the plinth in accordance with the applicable circuit diagram
7. Press the connecting leads flat into the plinth
8. Fit the clock thermostat to the wired plinth
9. Turn the seal 3 into position with a screwdriver
Note: Keep the ventilation apertures 5 in the plinth free,
no paint, wallpaper or other such material.
OK
RAMSES 721_310 579 03_RAM 721 D_F_GB_NL_I 15.10.14 08:31 Seite 9
Lors du montage et du démontage du thermostat à horloge, veillez à ce que les
fils de raccordement soient hors tension.
Montage: L’appareil doit etre monté sur une surface plane et non conductrice.
1. Basculez le couvercle vers le bas.
2. Avec un tournevis, orientez la fermeture 3 en position
3. Enlevez le socle gris de la partie thermostat.
4. Faites passer les fils de raccordement par les ouvertures du socle.
le thermostat ne peut, en aucun cas, être monté sur un support électri-
quement conducteur.
5. Fixez l’appareil sur le mur, à 1,5 m de hauteur, si possible, sur un mur
intérieur, à un endroit où l’air peut circuler librement.
6. Raccordez le socle selon le schéma de raccordement approprié.
7. Mettez les câbles à plat dans le socle.
8. Adaptez le thermostat à horloge sur le socle câblé.
9. Avec un tournevis, orientez la fermeture 3 en position
Attention: veillez à ce que les fentes d’aération 5 dans le socle ne soient pas
bouchées par de la peinture, du papier peint, du plafonnage, etc.
10
Bij de montage en demontage van de klokthermostasat dient erop
gelet te worden dat de aansluitdraden spanningsloos zijn.
Monteer: Het apparaat niet op een stromgeleidende onderground.
1. Het deksel naar beneden doen kantelen.
2. Draai met één schroevendraaier het vergrendeling 3 in positie
3. De grijze sokkel verwijderen van het thermostaatgedeelte.
4. De aansluitdraaden door de openingen van de sokkel trekken
de thermostat mag in geen geval op één elektrisch geleidende basis
gemonteerd worden.
5. Bevestig het apparaat op de muur, op 1,5 m hoogte, zo mogelijk op één
binnenmuur, waar de lucht ongehinderd kan circuleren.
6. De sokkel aansluiten in overeenkomst met het aansluitschema.
7. De aansluitkabels platdrukken in de sokkel.
8. De klokthermostaat op de bedrade sokkel bevestigen.
9. Draai met één schroevendraaier het vergrendeling 3 in positie
Opgelet: de ventilatieopeningen 5 van de sokkel mogen niet verstopt worden door
verf, behangpapier, pleisterwerk, enz.
Fate attenzione di conseguenza affinche’ durante il montaggio e lo smontaggio
del cronotermostato l’apparecchiatura sia scollegata da fonti d’energia eletrica
Installazione: Non installare l’apparecchio su superficie conducttiva.
1. Aprite lo sportellino frontale tirandolo verso il basso.
2. irate con l’aiuto di un cacciavite la manopala 3 in pos.
3. Rimuoveta la base posteriore dall’apparecchio.
4. Fate passare il filo di collegamento attraverso la base.
Assicurate la base al muro ad un’altezza di circa 1,5 m dal pavimento
preferibilmente ad una parete interna, in modo che possa circolare
lieramente l’aria.
5. Fissate la basetta in corrispondenza della dima dell’apparecchio.
6. Premete a fondo corsa il guscio fissandolo saldamente alla basetta.
7. Posizionata il cronotermostato sulla basetta collegata.
8. irate con l’aiuto di un cacciavite la manopola 3 in pos.
Avvertenze: Assicurate Vi che esista una libera circolazione dell’aria.
RAMSES 721_310 579 03_RAM 721 D_F_GB_NL_I 15.10.14 08:31 Seite 10
Regelung über Umwälzpumpe, Warmluft
und Speicherheizung
e.g. Control via circulation pump, war
air and storage heating
Regelung über das Motor - Mischventil
The connecting leads must conform to
national regulations
Commande de vannes méangeuses
motoris
ées
Besturing van gemotoriseerde meng-
kranen
Comando valvola di miscelazione
motorizzata
Control via the oil-/ gas furnance relay
Commande du relais des brûleurs
(gaz ou fuel)
Comando relay del bruciatore a gas o a
nafta
Besturing van branderrelais
(gas of stookolie)
Commande de la pompe de circulation,
chauffage à accumulation et air chaud pul-
s
e
Besturing van circulatiepomp, accumulatiever-
warming en luchtverwarming
Comando pompa di circolatione, e impianti
di riscaldamento ad accumulo e ad aria
calda
Anschluss nur durch Elektrofachkraft/ Only for qualified electrician/ Pour l’
elec-
tricien professionnel seulement/ Aansluiting enkel door één bevoed vakman/
Indicazioni per l’elettricista
Regelung über Öl-/ asfeuerungsrelais Regelung über thermischen Stellantrieb1
1
Control via the thermal mixing valve
Commande d’une vanne électrothermique
(vanne de zone)
Besturing van elektrothermische kraan
(zoneventiel)
Comando valvola di miscelazione thermica1
1
theben Nr:
907 0 261 1
1
Beachten Sie die Anschlussvorschriften des Herstellers / Please state manu-
facture and type no / Observer les prescription de raccordement du fabricant des re-
lais / De aansluitvoorschriften van de fabrikant in acht nemen / Attenersi alle istru-
zioni del produttore per collegamento
*
11
RAMSES 721_310 579 03_RAM 721 D_F_GB_NL_I 15.10.14 08:31 Seite 11
Sind mehr als 3 Adern verlegt, so ist auch ein anderer Außenleiter für die
Betriebsspannung des erätes erlaubt.
If more than 3 leads are run, another external conductor is also permitted for
the mains voltage of the product. The relay contact is floating.
Si on utilise plus de 3 fils pour le raccordement, on peut poser plusieurs câbles
séparés.
Indien men voor de aansluiting meer dan 3 draden gebruikt, kan men
meerdere gescheiden kabels leggen.
Comando pompa di circolazione e impianti di riscaldamento ad accumulo e ad
aria calda.
Anschluss nur durch Elektrofachkraft/ Only for qualified electrician/
Pour l’
electricien professionnel seulement/ Aansluiting enkel door één
bevoegd vakman/ Indicazioni per l’elettricista
z. B. Regelung über Umwälzpum-
pe, Warmluft und Speicherheizung
f.ex. Control via the circulation
pump, storage and hot air heating
Ex.: régulation par pompe de
circulation, chauffage à air chaud
ou chauffage à accumulation
Vb: regeling via circulatiepomp, lucht-
verwarming of accumualtiever-
warming
Comando pompa di circulatione,
e impianti di riscaldamento ad
accumulo e ad aria calda
12
RAMSES 721_310 579 03_RAM 721 D_F_GB_NL_I 15.10.14 08:31 Seite 12
Einstellung durch den Fachmann/ Only for qualified electrician/ Réglage par le
professionnel seulement
/ Instelling enkel door één bevoegd vakman/
Indicazioni per l’elettricista
6
13
unto di lavoro regolabile all’atto dell’installazione
Il cronotermostato è regolato in fabbrica. Durante la fase d’installazione, ad
esempio una parete fredda, potrebbe rivelarsi necessaria una registrazione
della temperatura. Potrà così essere corretto il valore della temperatura rilevata.
Esempio: Regolazione piú alta della temperatura:
Ruotate la manopola 6nel senso della freccia (vedi figura), eventualmente ri-
petete.
Come il temperatura di unità abitative e stabilizzato, ripete si nessesario.
Anpassung des Arbeitspunktes:
Der Uhrenthermostat ist werksseitig justiert. Sollte durch den Montageort, z.B.
eine kalte Betonwand, eine Nachstellung notwendig sein, so kann am Poti 6 die ge-
messene Temperaturabweichung korrigiert werden.
Bsp.: Geregelte Temperatur zu hoch:
Drehen Sie den Drehknopf 6 in Pfeilrichtung s. Abb.
Nach Stabilisierung der Raumtemperatur ggf. wiederholen.
Adjustment of the operating point:
The clock thermostat is adjusted in the factory. If re-setting is necessary due to the
place of installation e.g. a cold cement wall, the measured temperature deviation
can be corrected with the pentiometer 6.
Example: Controlled temperature too high: Turn the potentiometer (rotary switch)
see illustration in anti-clockwise direction.
After the roomtemperature is stabilized, repeat if necessary.
Etalonnage du seuil de commutation:
Le thermostat à horloge est étalonné en usine.
Si l’endroit de montage, par exemple, un mur de béton froid, rendait un nouveau
réglage nécessaire, l’écart de température constaté peut être corrigé au bouton de
réglage 6.
Ex.: température régulée trop élevée:
Tournez le bouton 6 légèrement dans le sens anti-horlogique,
Répéter lopération si besoin est, après stabilisation de la température ambiante.
Remarque: veillez à ce qu’il n’y ait pas de courant d’air froid au dos de l’appareil. Au
besoin, obturez les canalisations électriques avec du silicone.
Ijking van de schakeldrempel:
De klokthermostaat wordt in de fabriek geijkt. Indien vanwege de montageplaats,
bv. één koude betonnen muur, één bijstelling noodzakelijk zou zijn, kan het vastge-
stelde temperatuurverschil gecorrigeerd worden met de instelknop 6.
Vb.: geregelde temperatuur te hoog:
Verdraai de instelknop 6één weinig tegen wijzerzin, zo nodig herhalen.
Opmerking: koude luchtstroom aan de rugzijde van het apparaat moet ver-
meden worden. Zo nodig, de elektrische leidingen met silicone afdichten.
RAMSES 721_310 579 03_RAM 721 D_F_GB_NL_I 15.10.14 08:31 Seite 13
Weitere technische Daten, siehe Typenschild am erät.
Considérer toutes autres informations techniques marquées sur l’appareil.
Ensure the technical data on the rating plate.
Alle op het apparaat vermelde technische daten in acht nemen.
Fate attenzione alle data technici sull’apparecchio.
• Nach sachgemäßer Montage werden die Anforderungen der Schutzklasse II erfüllt.
• Verschmutzungsgrad 2
• Bemessungsstoßspannung: 4 kV
• After proper installation, the requirements of protection class II will be fulfilled.
• Pollution degree: 2
• Rated impulse withstand voltage: 4 kV
• En cas de montage conforme à l'usage prévu, les exigences de la classe de
protection II sont remplies.
• Degré de pollution : 2
• Tension assignée de tenue aux chocs: 4 kV
• Na deskundige montage wordt voldaan aan de eisen van beschermingsklasse II.
• Vervuilingsgraad: 2
• Ontwerpstootspanning: 4 kV
• In caso di montaggio conforme vengono soddisfatti i requisiti della classe di
protezione II.
• rado di inquinamento: 2
• Sovratensione transitoria nominale: 4 kV
~ 1,5 K
6 A/ 250 V~ (cos ϕ= 1)
1 A/ 250 V~ (cos ϕ = 0,6)
RAMSES 721
+/– 4 K
EN 60730-2-7
EN 60335 II nach Einbau
EN 60529 IP 20
RS TYP 2 B nach EN 60730-1
14
RAMSES 721_310 579 03_RAM 721 D_F_GB_NL_I 15.10.14 08:31 Seite 14
15
G Environmental information
The equipment that you bought has required the extraction and use of natural resources for
its production. It may content hazardous substances for the health and the environment. In
order to avoid the dissemination of those substances in our environment and to diminish the
pressure on the natural resources, we encourage you to use the appropriate take-back sy-
stems. Those systems will reuse or recycle most of the materials of your end life equipment in
a sound way. The crossed-bin symbol invites you to use those systems. If you need more in-
formation on the collection, reuse and recycling systems, please contact your local or regio-
nal waste administration. You can also contact us for more information on the environmental
performances of our products.
F Information relative à l’environnement
La production de l’appareil que vous avez acheté a nécessité l’extraction et l’utilisation de
ressources naturelles. Il peut contenir des substances dangereuses pour la santé et l’environ-
nement. Pour éviter la disspersion de ces substances dans notre environnement et réduire la
consommation des ressources, nous vous encourageons à utiliser les systèmes de collecte
appropriés lorsque vous devrez vous débarrasser de votre appareil en fin de vie. Ces systè-
mes permettront de réutiliser ou recycler de manière saine la plupart des matières. Le symbo-
le de la poubelle barrée vous invite à utiliser ces systèmes de collecte. Si vous désirez des in-
formations complémentaires sur ces systèmes de collecte, de remploi et de recyclage, prenez,
s’il vous plaît, contact avec l’administration locale ou régionale de gestion des déchets.
O Milieu-informatie
Het apparaat dat u heeft aangekocht noodzaakte de extractie en het ge-bruik van natuurlijke
rijkdommen voor zijn productie. Het kan gevaarlijke stoffen voor de gezondheid en het milieu
bevatten. Dit product moet worden ingeleverd bij een aangewezen, geautoriseerd inzamel-
punt, bijvoorbeeld wanneer u een nieuw gelijksoortig product aanschaft, of bij een geautori-
seerd inzamelpunt voor hergebruik van elektrische en elektronische apparatuur. Bovendien
werkt u door een juiste afvoer van dit product mee aan het effectieve gebruik van natuurlijke
hulpbronnen. Het symbool van de doorkruiste vuilnisbak nodigt u uit dit verzamelsysteem te
gebruiken. Voor meer informatie over waar u uw afgedankte apparatuur kunt inleveren voor
recycling kunt u contact opnemen met het gemeentehuis in uw woonplaats, de reinigings-
dienst, of het afvalverwerkingsbedrijf.
RAMSES 721_310 579 03_RAM 721 D_F_GB_NL_I 15.10.14 08:31 Seite 15
Theben AG
Hohenbergstr. 32
72401 Haigerloch
DEUTSCHLAND
Fon +49 7474 692-0
Fax +49 7474 692-150
Service
Fon +49 7474 692-369
Fax +49 7474 692-207
[email protected]
Addresses, telephone numbers etc. at
www.theben.de
RAMSES 721_310 579 03_RAM 721 D_F_GB_NL_I 15.10.14 08:31 Seite 16

Other Theben Thermostat manuals

Theben RAMSES 818 top User manual

Theben

Theben RAMSES 818 top User manual

Theben RAMSES 784 HF User manual

Theben

Theben RAMSES 784 HF User manual

Theben RAM 722 User manual

Theben

Theben RAM 722 User manual

Theben RAM 712 KNX User manual

Theben

Theben RAM 712 KNX User manual

Theben RAMSES 722 User manual

Theben

Theben RAMSES 722 User manual

Theben VARIA Series User manual

Theben

Theben VARIA Series User manual

Theben RAMSES 814 BLE UP User manual

Theben

Theben RAMSES 814 BLE UP User manual

Theben RAMSES 850 top2 OT User manual

Theben

Theben RAMSES 850 top2 OT User manual

Theben RAMSES 813 top2 HF User manual

Theben

Theben RAMSES 813 top2 HF User manual

Theben RAMSES 831 top User manual

Theben

Theben RAMSES 831 top User manual

Theben RAMSES 820 KRISTALL top User manual

Theben

Theben RAMSES 820 KRISTALL top User manual

Theben TR 030 top TERMINA User manual

Theben

Theben TR 030 top TERMINA User manual

Theben RAM 785 User manual

Theben

Theben RAM 785 User manual

Theben RAMSES 725 User manual

Theben

Theben RAMSES 725 User manual

Theben RAMSES 811 top2 User manual

Theben

Theben RAMSES 811 top2 User manual

Theben Timeguard ProgramaStat TRT036 Product guide

Theben

Theben Timeguard ProgramaStat TRT036 Product guide

Theben RAMSES BLE OT User manual

Theben

Theben RAMSES BLE OT User manual

Theben ramses 812 top User manual

Theben

Theben ramses 812 top User manual

Theben RAMSES 811 top3 User manual

Theben

Theben RAMSES 811 top3 User manual

Theben RAMSES 850 top2 OT User manual

Theben

Theben RAMSES 850 top2 OT User manual

Theben KNX Ramses 712 User manual

Theben

Theben KNX Ramses 712 User manual

Theben RAMSES 366/1 top2 User manual

Theben

Theben RAMSES 366/1 top2 User manual

Theben RAMSES 797 B User manual

Theben

Theben RAMSES 797 B User manual

Theben RAMSES 850 top3 OT User manual

Theben

Theben RAMSES 850 top3 OT User manual

Popular Thermostat manuals by other brands

Lennox LXTFZ01M manual

Lennox

Lennox LXTFZ01M manual

Comelit Minitouch Installer manual

Comelit

Comelit Minitouch Installer manual

Regulus TP44 RF Installation and operation manual

Regulus

Regulus TP44 RF Installation and operation manual

Vantage Controls STAT OPERATING AND INSTALLATION Manual

Vantage Controls

Vantage Controls STAT OPERATING AND INSTALLATION Manual

AMG Insta-Therm instruction manual

AMG

AMG Insta-Therm instruction manual

Salus VS10WRF Full user manual

Salus

Salus VS10WRF Full user manual

Sencor SDC 1200 user manual

Sencor

Sencor SDC 1200 user manual

Saswell T19 Series manual

Saswell

Saswell T19 Series manual

ENGO CONTROLS E901RF quick start guide

ENGO CONTROLS

ENGO CONTROLS E901RF quick start guide

Hunter 44920 installation guide

Hunter

Hunter 44920 installation guide

Mi-Heat TH213 manual

Mi-Heat

Mi-Heat TH213 manual

Coronado CCRC30F-KIT owner's manual

Coronado

Coronado CCRC30F-KIT owner's manual

Conrad 61 88 88 operating instructions

Conrad

Conrad 61 88 88 operating instructions

Gree WK-010PN owner's manual

Gree

Gree WK-010PN owner's manual

Honeywell RTH5160 Series Quick installation guide

Honeywell

Honeywell RTH5160 Series Quick installation guide

DELTA DORE D10 W RF installation instructions

DELTA DORE

DELTA DORE D10 W RF installation instructions

ritetemp 6022 Operation guide

ritetemp

ritetemp 6022 Operation guide

Salus Quantum SQ610 Full user manual

Salus

Salus Quantum SQ610 Full user manual

manuals.online logo
manuals.online logoBrands
  • About & Mission
  • Contact us
  • Privacy Policy
  • Terms and Conditions

Copyright 2025 Manuals.Online. All Rights Reserved.