Thermo Scientific Orion Star A113 User manual

Thermo Scientific Orion Star A113 Benchtop and
Star A123 Portable Dissolved Oxygen Meters
Reference Guide

Ross and the COIL trade dress are trademarks of Thermo Fisher Scientific, Inc. and
its subsidiaries.
AQUAfast, AQUASensors, BOD AutoEZ, ionplus, KNIpHE, LogR, No Cal, ORION, perpHect,
PerpHecT, pHISA, pHuture, Pure Water, Sage, ROSS, ROSS Ultra, Sure-Flow, Titrator PLUS, and
TURBO2 are registered trademarks of Thermo Fisher Scientific, Inc. and its subsidiaries.
A+, All in One, Aplus, AUTO-BAR, AUTO-CAL, Auto-ID, AUTO-READ, AUTO-STIR,
Auto-Test, AutoTration, CISA, digital LogR, DuraProbe, EZ Startup, ISEasy,
Low Maintenance Triode, Minimum Stir Requirement, MSR, NISS, Optimum Results, Orion Dual
Star, Orion Star, SAOB, SMART AVERAGING, SMART STABILITY, Star LogR, Star Navigator 21,
Stat Face, Triode are trademarks of Thermo Fisher Scientific, Inc. and its subsidiaries.
Guaranteed Success and The Technical Edge are service marks of Thermo Fisher Scientific, Inc.
and its subsidiaries.
© 2011 Thermo Fisher Scientific Inc. All rights reserved. All trademarks are the property of
Thermo Fisher Scientific, Inc. and its subsidiaries.
The specifications, descriptions, drawings, ordering information and part numbers within this
document are subject to change without notice.
This publication supersedes all previous publications on this subject.

Thermo Scientific Orion Star A113 Benchtop & Star A123 Portable Dissolved Oxygen Meters
Table of Contents
Chapter 1 Introduction ..........................................................1
Chapter 2 Meter Overview.......................................................3
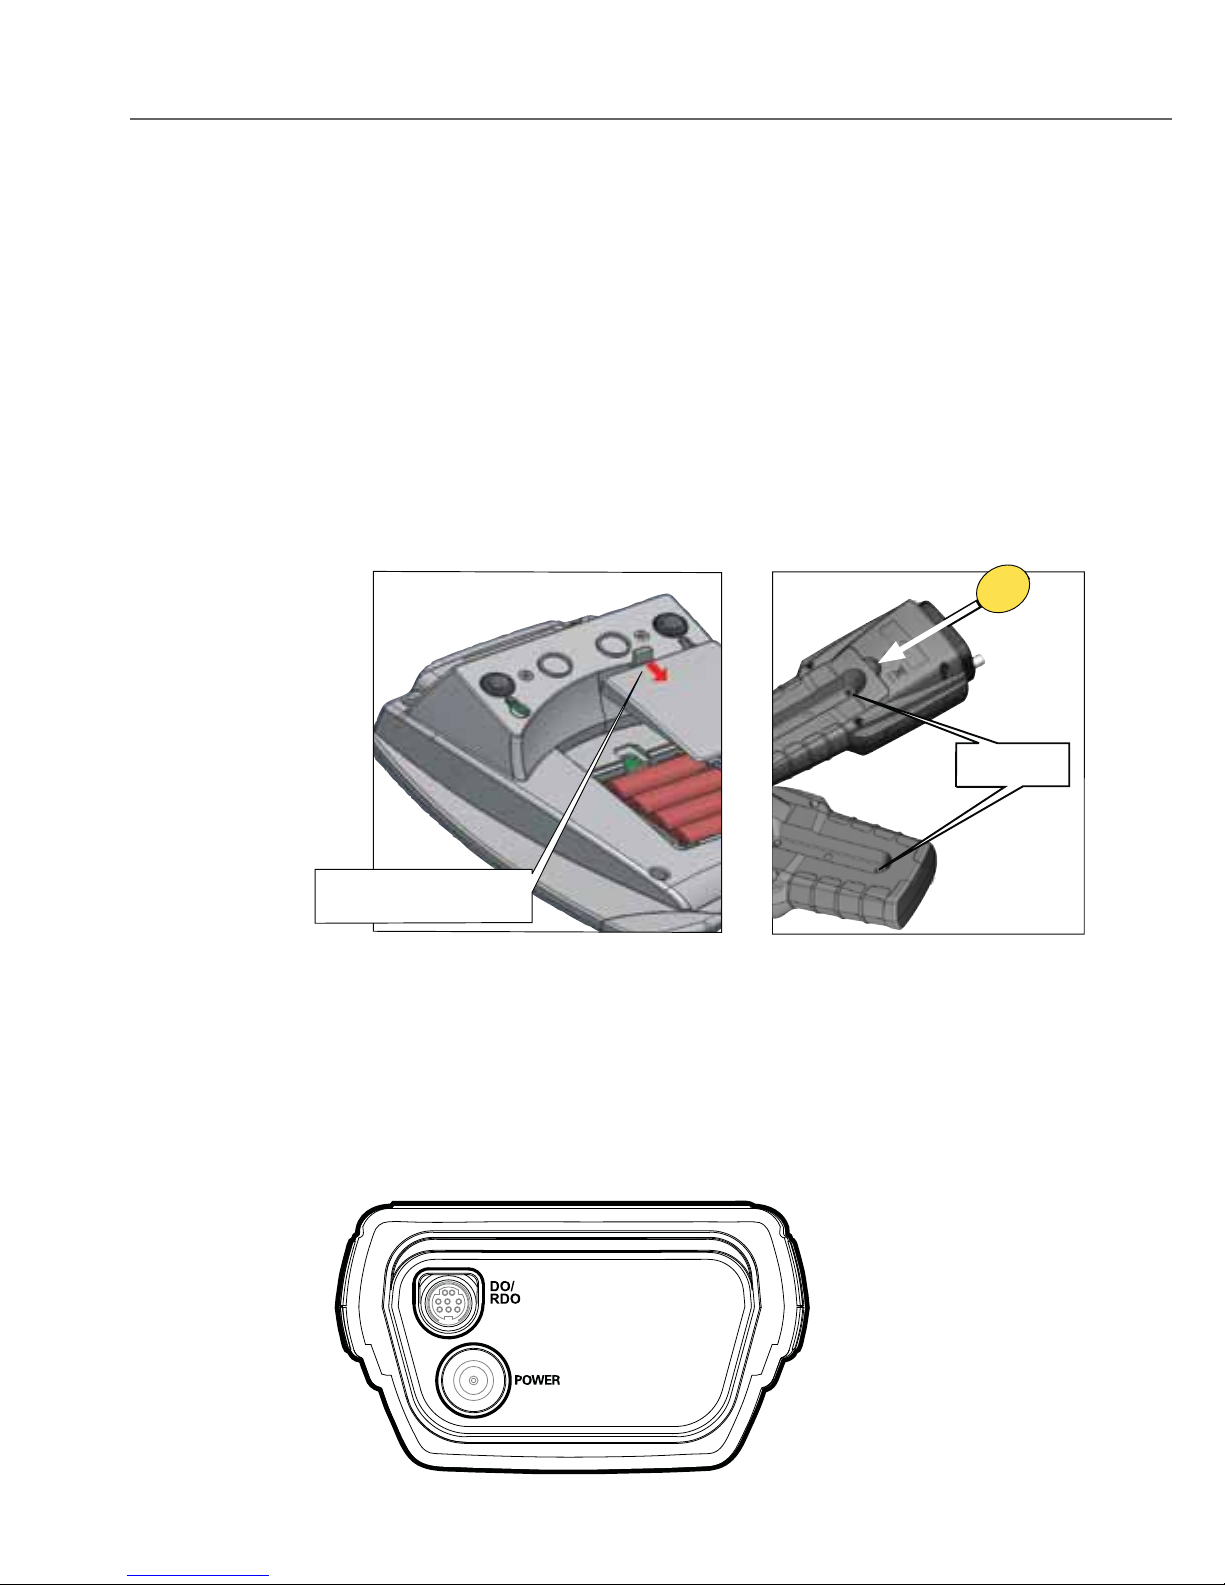
Connections.......................................................... 3
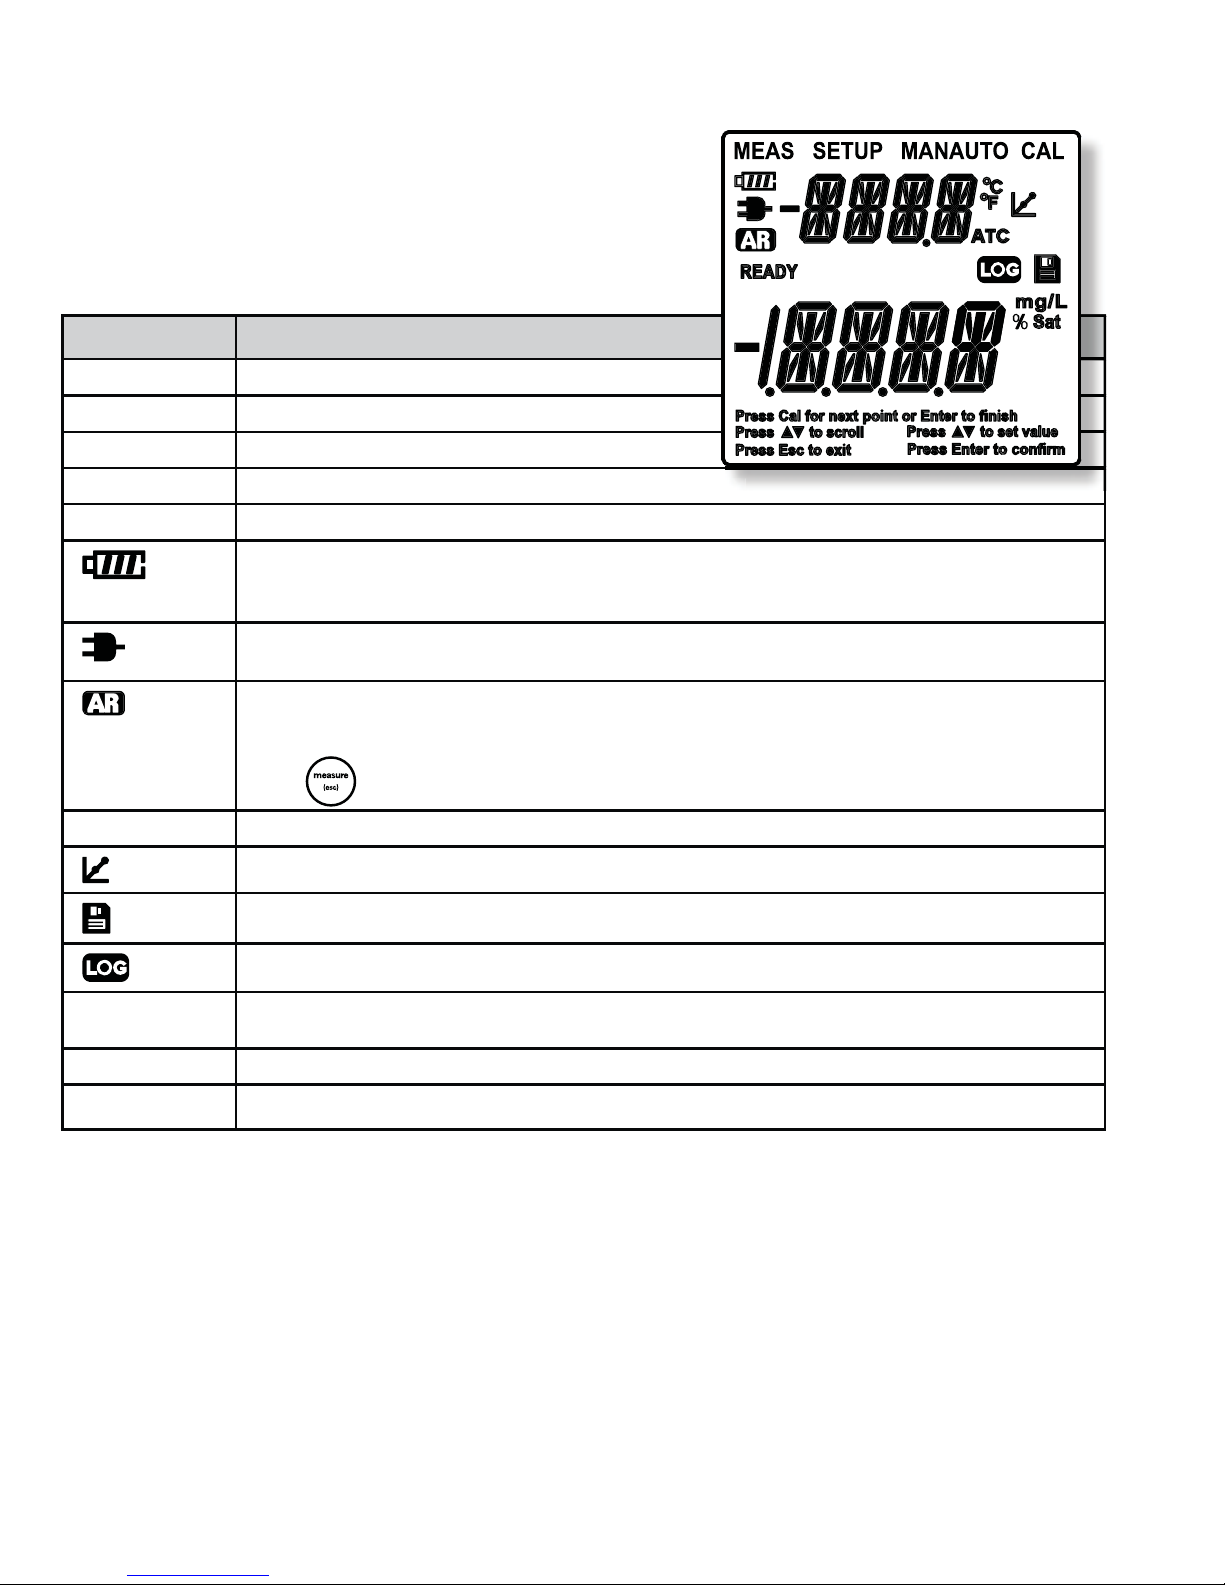
DisplayInformation ................................................... 4
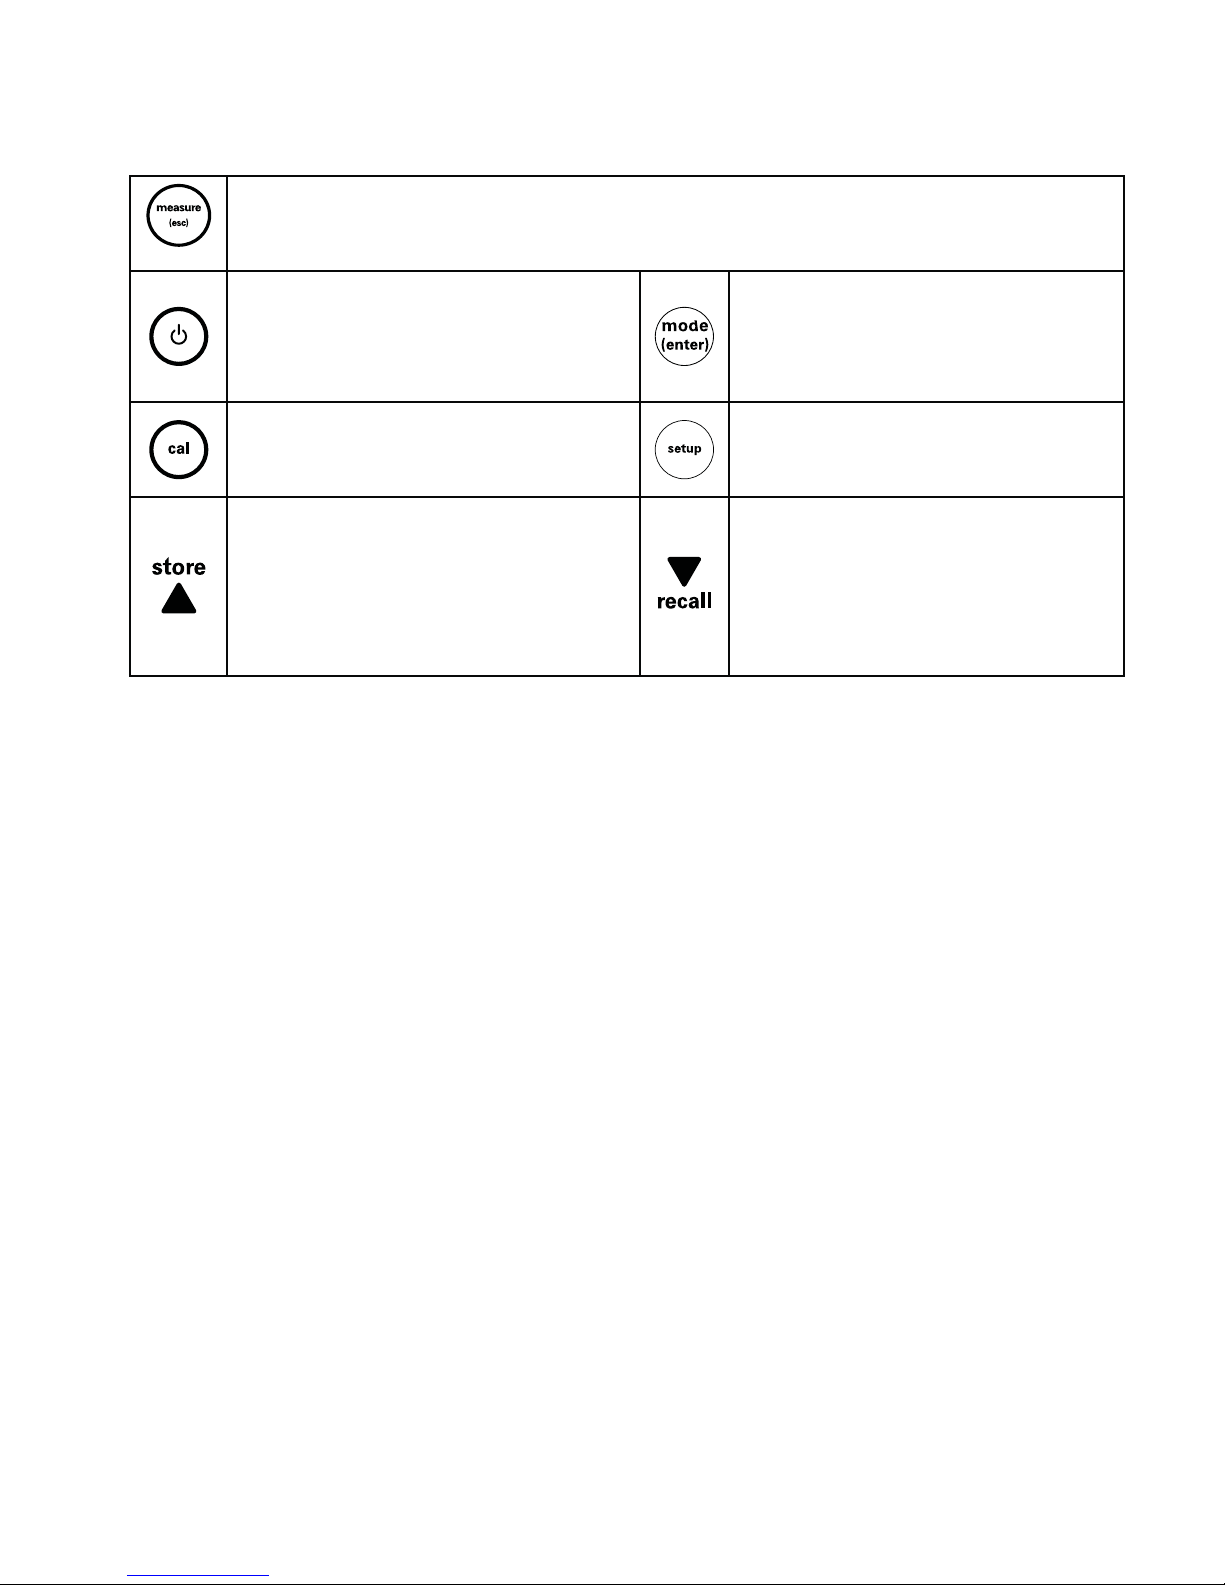
KeypadInformation ................................................... 5
MeterMaintenance................................................... 5
Chapter 3 Meter Setup ..........................................................7
NavigatingtheSetupMenu ............................................ 7
SetupExamples....................................................... 9
DO Calibration Selection . . . . . . . . . . . . . . . . . . . . . . . . . . . .9
ReadTypeSelection..............................10
Chapter 4 Calibration and Measurement .........................................11
DOCalibrationandMeasurement...................................... 11
EnteringBarometricPressure.......................11
Entering Salinity Correction Value ....................11
DOCalibration...................................12
Water-SaturatedAirCalibration..............12
ManualCalibration(WinklerTitration)..........12
DOMeasurement................................13
Temperature Measurement and Calibration ............................. 13
TemperatureMeasurement.........................13
TemperatureCalibration ...........................14
Chapter 5 Data Storage and Review .............................................15
Automatic Datalog with AUTO-READ™Mode........................... 15
Manual Datalog with Continuous Read Mode ........................... 15
ViewingStoredReadings(theDataLog) ............................... 15
Chapter 6 Customer Services ...................................................17
MeterErrorCodes.................................................... 17
TroubleshootingGuide................................................ 18
Assistance . . . . . . . . . . . . . . . . . . . . . . . . . . . . . . . . . . . . . . . . . . . . . . . . . . . . . . . . . . 18
Warranty and Registration ............................................ 18
WEEECompliance ................................................... 18
Declaration of Conformity ............................................. 19
MeterSpecifications................................................. 20
OrderingInformation................................................. 21
Chapter 7 Appendix............................................................23
SalinityCorrection................................23
Notes............................................................... 24

This page intentionally left blank.

1
Thermo Scientific Orion Star A113 Benchtop & Star A123 Portable Dissolved Oxygen Meters
Chapter 1 Introduction
Thank you for your purchase of the Orion Star A113 benchtop dissolved oxygen (DO) or Star A123 portable dissolved
oxygen (DO) meter. These meters are capable of measuring dissolved oxygen levels in % saturation or mg/L units,
and temperature of the solution and the membrane. These meters are to be used with Orion’s Polarographic dissolved
oxygen probe (sold separately).
The Orion Star A113 benchtop DO meters are IP54-rated. The Orion Star A123 portable DO meters feature a
waterproof, IP67-rating.
Please read this reference guide thoroughly. Any use outside of these instructions may invalidate your warranty and
cause permanent damage to the meter

This page intentionally left blank.

3
Thermo Scientific Orion Star A113 Benchtop & Star A123 Portable Dissolved Oxygen Meters
Chapter 2 Meter Overview
Connections
1. Power source:
a. Power adapter (included with Orion Star A113 benchtop DO meters, sold separately for Star A123
portable DO meters) – Select the appropriate wall socket plug. Slide off the clear plastic cover, and slide
on the plug plate into the groove on the back of the adapter.
b. Batteries (included with and factory-installed on Star A123 portable DO meters, sold separately for Star
A113 benchtop DO meters) – Select four AA batteries. Confirm that the meter is off and remove the
battery compartment cover. On the Star A123 portable meter, to remove the battery compartment cover:
i. Loosen the screws.
ii. Release the top portion of the battery compartment from the meter (using a coin or your finger.)
iii. Release the bottom portion of the battery compartment (using a coin or your finger). Insert batteries
as shown in the battery compartment housing.
Push down on tab and lift the
battery cover
Orion Star A113 Benchtop
Remove screws
Orion Star A123 Portable
Figure 1
2. Prepare the DO probe according to the probe instructions. In general:
a. Unscrew the membrane cap from the DO probe, fill the membrane cap about ¾ full with polarographic
electrolyte solution and screw the membrane cap onto the DO probe.
b. Connect the DO probe to the meter and allow the probe to polarize for about 30 to 60 minutes.
Note: A DO reading of zero and no change in temperature indicates that the DO probe is not fully
connected to the meter. Disconnect the DO probe and then firmly reconnect the DO probe to the meter.
3. Connect the appropriate item as labeled on the meter and as shown in figure 1:

4Thermo Scientific Orion Star A113 Benchtop & Star A123 Portable Dissolved Oxygen Meters
Display Information
Display Icon Description
MEAS Indicates that the meter is in the measurement mode.
SETUP Indicates that the meter is in setup mode.
CAL Indicates that the meter is the calibration mode.
MAN Shown when a manual calibration (Winkler titration) is being done.
AUTO Shown during water-saturated air calibration. Default setting.
Shows the battery status (more bars = more power remaining).
Blinks when power is low and the battery needs to be changed.
(Batteries included and factory-installed with the portable meter Orion Star A123 DO meter.)
Shown when the meter is running on AC power. (Adapter included with the benchtop meter
Orion Star A113 DO meter.)
Shown when the meter is on AUTO-READ mode. Default setting. AR and unit of measurements will blink until the
reading is stable. When the reading is stable it is held on the screen and AR is lit.
Press to take a new reading.
READY Unit of measure will blink until the reading is stable. When the reading is stable, READY is lit.
Appears during calibration and after a calibration is done.
Displayed when a reading is stored into the memory.
Displayed when viewing stored readings.
Secondary
display Upper display which shows temperature reading in measurement mode and setup menu in setup mode.
Primary display Lower, larger display showing measured value in selected mode.
Instructions Located below the primary display. These phrases aid in the setup menu and calibration modes.
ne

5
Thermo Scientific Orion Star A113 Benchtop & Star A123 Portable Dissolved Oxygen Meters
Keypad Information
Meter Maintenance
For routine meter maintenance, dust and wipe the meter with a damp cloth. If necessary, warm water or a mild water-
based detergent can be used. Meter maintenance can be performed on a daily, weekly or monthly basis, as required by
the environment in which the meter is operated. Immediately remove any spilled substance from the meter using the
proper cleaning procedure for the type of spill.
In the measurement screen: Press to take a measurement.
In the setup screen: Press to escape the setup menu.
In the calibration screen: Press to abort calibration.
Press to turn the meter on or off.
In the measurement screen:
Press to switch between modes.
In the setup screen:
Press to confirm the selection.
Press to enter the calibration mode. Press to enter the setup mode.
In the measurement screen:
Press to store the data on the screen in continuous
read mode and with data logging on.
In the setup screen:
Press to scroll up in the list of options.
In the measurement screen:
Press to see the stored data.
In the setup screen:
Press to scroll down in the list of options.

6Thermo Scientific Orion Star A113 Benchtop & Star A123 Portable Dissolved Oxygen Meters
This page intentionally left blank.

7
Thermo Scientific Orion Star A113 Benchtop & Star A123 Portable Dissolved Oxygen Meters
Chapter 3 Meter Setup
Pressing will take you to the setup menu.
Navigating the Setup Menu
A complete chart showing the main setup levels and submenus is shown after these steps.
1. In the setup menu, press or until the desired main setup level is shown on the top (secondary display) line.
2. Press to enter into the submenu options.
3. For main setup options with more than one submenu:
1.0 Configuration
5.0 Datalog Clear
a. Press or until the desired submenu is shown.
b. Press to enter into the submenu.
c. Press or until the desired option is shown.
d. Press to save your selection.
For main setup options with one submenu:
2.0 General Meter Setup
3.0 Temperature Settings
4.0 Read Type
6.0 Calibration Data
7.0 Factory Reset
a. Press or until the desired option is shown.
b. Press to save your selection.
4. Press to exit the setup menu and return to measurement mode.

8Thermo Scientific Orion Star A113 Benchtop & Star A123 Portable Dissolved Oxygen Meters
Meter Setup
Setup Menu
Level
Secondary
Display
Primary
Display
Description Information
Main 1.0 CONF Configuration Select resolution, barometric pressure correction value, salinity
correction factor and calibration type.
Submenu SRES 0.1, 1 Percent Saturation Unit
Resolution
0.1 is the default.
Submenu CRES 0.01, 01 Concentration Unit
Resolution
0.01 is the default.
Submenu PRES 450.0 to
850.0
Value for Manual Barometric
Pressure Correction
The default value is 760.0 mm Hg.
Submenu SALT 0 to 45 Value for Manual Salinity
Correction Factor
The default value is 0 ppt.
Submenu CALT AIR,
MAN
DO Calibration Type AIR is for water-saturated air. MAN is for a manual calibration
(Winkler titration). The default is AIR.
Main 2.0 GEN General Meter Setup Automatic meter shut-off
Submenu AUTO ON, OFF Automatic Meter Shut-Off To save battery life, the meter will turn off after
15 minutes without button presses.
On is the default setting.
Note: The meters will supply a polarization current even when the
meter is powered off.
Main 3.0 TEMP Temperature Settings Select temperature units and the temperature used for manual
temperature compensation
Submenu UNIT DEGC,
DEGF
Temperature Unit The default setting is for temperature readout to be displayed in °C.
Main 4.0 READ Read Type
Submenu READ AUTO,
CONT
AUTO is for AUTO-READ.
CONT is for continuous read.
In AUTO-READ mode, the meter will display the measurement as
it stabilizes and lock and hold the measurement when it is stable.
Press to take a new measurement.
In Continuous read mode, the meter will continuously measure
and update the display. The unit of measure will flash. When the
reading has been stable, “READY” will appear.
The default setting is AUTO-READ.
Main 5.0 LOG Datalog Clear
Submenu DATA ON, OFF To enable data storage The default is off.
Submenu DEL LAST,
ALL, NO
Clears stored readings in the
datalog.
The default is no.
"NO" does not delete any readings.
"LAST" deletes only the last reading.
"ALL" deletes all of the logged data.
Main 6.0 CAL Calibration Data
Submenu CLR NO, YES Clears the calibration data. The default is no.
Main 7.0 RST Factory Reset
Submenu RST NO, YES Returns all meter settings
to the factory defaults and
deletes all stored data
(calibration and datalog).
The default is no. Before selecting yes, please
make sure any data that you would like to keep
has been recorded.

9
Thermo Scientific Orion Star A113 Benchtop & Star A123 Portable Dissolved Oxygen Meters
Setup Examples
DO Calibration Selection
This meter can be calibrated using water-saturated air or the Winkler titration method for a manual
calibration. Air calibration is the default setting on the meter.
1. In measurement mode, press .
2. Press five times so that the top line reads “CALT”.
3. Press to select the calibration type as AIR for water-saturated air calibration or
MAN for a manual calibration (Winkler titration).
a. AIR – An air calibration is performed in water-saturated air using the calibration sleeve.
This is the simplest and most accurate calibration. Due to the inherent differences
between water-saturated air and air-saturated water, 102.3% will be displayed when the
calibrations reading is stable.
i. For the highest accuracy, the calibration temperature should be the same as the
measuring temperature.
ii. Use distilled water to moisten the sponge in the calibration sleeve. Insert the probe into
the sleeve without touching the sponge.
b. MAN – A manual calibration is performed using a water sample with a known
concentration of dissolved oxygen. This method can be used to calibrate the dissolved
oxygen probe to the value achieved by a Winkler titration.
i. A manual calibration involves performing a Winkler titration and using that sample as
a calibration standard. The oxygen level result from the titration is entered in a manual
calibration as the dissolved oxygen value.
4. Press to save configuration and to return measurement mode.

10 Thermo Scientific Orion Star A113 Benchtop & Star A123 Portable Dissolved Oxygen Meters
Read Type Selection
1. In measurement mode, press .
2. Press in setup until “4.0” is shown on the top line and “READ” is shown on the lower
line. Press .
3. Press or to select the measurement mode:
CONT = Continuous
AUTO = AUTO-READ™
Note: In AUTO-READ mode, the meter will display the measurement as it stabilizes and lock and hold the
measurement when it is stable. AR and unit of measure will blink until the reading is stable. When the reading
is stable it is held on the screen and AR is lit.
Press to take a new measurement.
In Continuous read mode, the meter will continuously measure and update the display. The unit of measure
will flash. When the reading has been stable, “READY” will appear. This read type is useful when performing
an experiment that requires continuous measurements to be taken, regardless of the measurement stability.
4. Press to save selection. Press the key to return to measurement mode.

11
Thermo Scientific Orion Star A113 Benchtop & Star A123 Portable Dissolved Oxygen Meters
Chapter 4 Calibration and Measurement
DO Calibration and Measurement
Entering Barometric Pressure
Dissolved oxygen readings are dependent on barometric pressure. This needs to be entered manually as mm Hg.
1 mm Hg = 0.03937 inch Hg = 1.3332 hPA (mBar) = 0.01934 PSI.
1. In DO measurement mode, press .
2. Press three times so that the top line reads “PRES”.
3. Press or to enter the barometric pressure.
Note: Holding the button down will make the value change faster.
4. Press to save configuration and to return measurement mode.
Entering Salinity Correction Value
Since the presence of dissolved salts limits the amount of oxygen that can dissolve in water, the relationship between
oxygen concentration and partial pressure varies with sample salinity. The meter default has a salinity correction factor
of 0. To compensate for variations in ionic concentration, enter the salinity of the sample in parts per thousand (ppt). A
table of conductivity versus salinity can be found in the appendix.
1. In DO measurement mode, press .
2. Press four times so that the top line reads “SALT”.
3. Press or to enter the salinity in ppt.
Note: Holding the button down will make the value change faster.
4. Press to save configuration and to return measurement mode.

12 Thermo Scientific Orion Star A113 Benchtop & Star A123 Portable Dissolved Oxygen Meters
DO Calibration
This meter can be calibrated using water-saturated air or the Winkler titration method for a manual calibration. This is
dependent on the calibration type chosen in the setup menu.
Water-Saturated Air Calibration
1. In DO measurement mode, press to display the unit "% Sat" or "mg/L".
2. Make sure the DO probe is connected to the meter and fully polarized.
3. Prepare the calibration sleeve or BOD bottle.
i. For the calibration sleeve, remove the cap from the sleeve and remove the sponge from the cap. Wet
the sponge with distilled water and squeeze out excess water. Reassemble the calibration sleeve and
insert the DO probe.
ii. For a BOD bottle, fill the bottle with about 50 mL of distilled water. Insert the DO probe into the BOD
bottle. Use a Thermo Scientific Orion BOD bottle adapter if the DO probe does not fit directly into the
bottle. Make sure that the probe is suspended about half an inch above the distilled water and there is
no water on the surface of the DO probe membrane.
4. Insert the DO probe and wait five minutes for equilibrium. Press .
5. “CAL” will appear in the upper right of the display. Wait for “READY” to appear and % Sat to stop blinking. The meter
will display 102.3 % saturation and will proceed to the measurement mode.
Manual Calibration (Winkler Titration)
1. In DO measurement mode, press to display unit "% Sat" or "mg/L".
2. Make sure the DO probe is connected to the meter and fully polarized.
3. Insert the DO probe and wait five minutes for equilibrium. Press .“CAL” will appear in the upper right of the
display. Wait for “READY” to appear and mg/L to stop blinking.
4. Press or to change the display to match the titrated value.
5. Press to confirm the value. The meter will display slope and will proceed to the measurement mode.

13
Thermo Scientific Orion Star A113 Benchtop & Star A123 Portable Dissolved Oxygen Meters
DO Measurement
1. Check the barometric pressure and if needed, change value for barometric pressure correction in setup menu 1.0.
2. Press to display DO readings in % saturation or mg/L (units of measure).
3. Rinse the DO probe with distilled water and blot dry. Place the probe into the sample and stir gently.
4. If the meter is in AUTO-READ mode (meter default), press .
If the meter is in continuous read mode, the meter will immediately start taking readings.
Record the DO result and temperature of the sample when “READY” is displayed and the unit of measurements
stops blinking.
Note: If in AUTO-READ mode and memory storage is enabled, the reading will automatically be stored when the “AR”
appears. If in continuous read mode and memory storage is enabled, press to store into the meter’s memory.
5. Remove the DO probe from the sample, rinse with distilled water and blot dry. To continue taking measurements,
place the probe into the next sample and repeat steps 4 and 5.
6. When finished measuring all samples, store probe according to the probe instructions.
Temperature Measurement and Calibration
The Orion Star A113 benchtop dissolved oxygen (DO) and Star A123 portable dissolved oxygen (DO) meter can show the
temperatures of the solution or the membrane. To read only temperature and see the temperature on the primary, lower
display, follow the instructions below.
Temperature Measurement
1. In the measurement mode, press to display the solution temperature value on the primary display. (The
temperature value at the top, secondary display will match that of the lower, primary display field.)
To view the membrane temperature/electrolyte solution temperature, press . The number will have “m” in
front of it.
2. Rinse with probe with distilled water , blot dry and place into the sample. If the meter is in AUTO-READ mode (meter
default),
press .If the meter is in continuous read mode, the meter will immediately start taking readings.
Note: If in AUTO-READ mode and memory storage is enabled, the reading will automatically be stored when the “AR”
appears. If in continuous read mode and memory storage is enabled, press to store into the meter’s memory.
3. Remove the probe from the sample, rinse with distilled water and blot dry. To continue taking measurements, place
the probe into the next sample and repeat steps 2 and 3.
4. When finished measuring all samples, store electrode according to electrode instructions.

14 Thermo Scientific Orion Star A113 Benchtop & Star A123 Portable Dissolved Oxygen Meters
Temperature Calibration
The meter temperature display has a relative accuracy of ± 0.1 °C. The temperature sensors on the DO probe
may have varying temperature accuracies, usually ± 0.5 °C to ± 2 °C. Use this function only if it is necessary to
calibrate the temperature readings. Since the temperature offset calculated during the calibration is applied to all
future temperature measurements, recalibrate if a different probe is used.
1. In the measurement mode, press to display the solution temperature or the membrane temperature,
denoted by a “m” is front.
2. Rinse the probe and NIST-traceable thermometers with distilled water, blot dry and place into a solution with
a known, stable temperature.
Note: It is recommended that two NIST-traceable thermometers be used to measure and verify the temperature
of the solution.
Press .
3. Wait for the readings to stabilize (about 5 to 10 minutes) and “READY” to stop flashing.. The meter will display
the original temperature read by the probe. Press or keys to enter the temperature value read by
the thermometer.
Note: The calculated offset will be applied to all future temperature readings. To abort, press to end without
saving and return to the measurement mode.
4. When finished, press to save and end calibration.

15
Thermo Scientific Orion Star A113 Benchtop & Star A123 Portable Dissolved Oxygen Meters
.
Chapter 5 Data Storage and Review
Orion Star A113 benchtop dissolved oxygen and A123 portable dissolved oxygen meters have a 50 point datalog memory.
Automatic Datalog with AUTO-READ™Mode
1. In measurement mode, press .
2. Press three times in setup until “4.0” is shown on the top line and “READ” is shown on the lower line.
Press .
3. Press the or to show “AUTO” on the second line. Press to save selection.
4. Press to show “5.0” on the top line and “LOG” on the lower line. Press .
5. Press to show “ON” on the second line. Press to save selection.
6. Press to return to measurement mode. Each time the reading is locked onto the screen with the “AR” icon.
The reading will automatically be stored in the datalog.
Manual Datalog with Continuous Read Mode
1. In measurement mode, press .
2. Press three times until “4.0” is shown on the top line and “READ” is shown on the lower line. Press .
3. Press or to show “CONT” on the second line. Press key to save selection.
4. Press to show “5.0” on the top line and “LOG” on the lower line. Press .
5. Press to show “ON” on the second line. Press to save selection.
6. Press to return to measurement mode.
7. In the measurement mode, press to store the reading into the meter’s memory.
Viewing Stored Readings (the Data Log)
1. In measurement mode, press .
2. Press or to scroll through the memory points.
3. Press to review the reading stored at that point.

16 Thermo Scientific Orion Star A113 Benchtop & Star A123 Portable Dissolved Oxygen Meters
This page intentionally left blank.
Other manuals for Orion Star A113
1
This manual suits for next models
1
Table of contents
Other Thermo Scientific Analytical Instrument manuals
Popular Analytical Instrument manuals by other brands

Bühler technologies
Bühler technologies GAS 222.35 Ex1 Installation and operation instruction

Casio
Casio DT-700 Service manual

Bühler technologies
Bühler technologies GAS 222.35 Ex2 Installation and operation instruction

Trotec
Trotec BO21 operating manual

Geodimeter
Geodimeter 600 Pro user manual

Agilent Technologies
Agilent Technologies 89410A Installation and Verification