manuals.online logo
Brands
  1. Home
  2. •
  3. Brands
  4. •
  5. Thermo Scientific
  6. •
  7. Industrial Equipment
  8. •
  9. Thermo Scientific Pierce 22834 User manual

Thermo Scientific Pierce 22834 User manual

Select Pre-Programmed Methods in the Main Menu.
Select the number of gels and gel size (mini or midi) for transfer:
a. 1 mini-gel b. 2 mini-gels or 1 midi-gel
c. 3 mini-gels d. 4 mini-gels or 2 midi-gels
Select the appropriate program to run:
a. Low MW (< 25kDa)
b. Mixed Range MW (25-150kDa)
c. High MW (>150kDa)
d. Std Semi-Dry
e. 1.5mm thick gels or if unknown
Note: For fast-blotting programs (program a, b, c and e) use
Pierce 1-Step Transfer Buffer. Transfer time may be increased to
12 minutes for high molecular-weight proteins (> 200kDa). Do not
use the Std Semi-Dry transfer program (program d) with Pierce
1-Step Transfer Buffer.
Select the Start button to begin transfer.
Pierce 1-Step Transfer Buffer is a highly concentrated salt solution.
Thoroughly wash the anode and cathode after each use by rinsing
the unassembled cassette under hot water while removing any salt
residue with a gloved hand. Rinse with deionized water and stand
parts in a rack to dry. For more thorough cleaning, immerse the un-
assembled cassette top (cathode) and bottom (anode) in hot water
and use a gloved hand or clean sponge to remove salt residue.
Rinse with deionized water and stand parts in a rack to dry.
Note: Failure to keep cassette
top and bottom clean can result
in sticking of movable parts and
lead to poor transfer efficiency.
IMPORTANT Review and implement guidelines for proper set-up
before installation. For detailed instructions refer to the manual at
www.thermoscientific.com/pierce-power-system.
Using the supplied power cord, connect the Pierce Power Station to an
electrical outlet.
Press the Power Button (located at the rear) to turn ON the Pierce
Power Station.
IMPORTANT: For first use, refer to “Using the Pierce Power
Station for First Time” section. If you currently use a Pierce Power
Station for staining and are adding blotting functionality, refer to
“Using the Pierce Power Blot Cassette for First Time” section.
Upgraded Pierce G2 Fast Blotter/Stainer Control Units do not require
any special activation in order to recognize the Power Stain Cassette
or the Power Blot Cassette.
For each gel, use four sheets of ~0.83mm thick Western blotting filter
paper and one sheet of nitrocellulose or PVDF membrane cut to the
same size.
Equilibrate filter paper and membrane in Thermo Scientific™ Pierce™
1-Step Transfer Buffer for at least 5 minutes. Use sufficient buffer to
cover filter paper and membrane [~50mL per mini-sized (7cm x 8.4cm)
sandwich and ~100mL per midi-sized (8cm x 13.5cm) sandwich].
Note: PVDF membrane must be wetted with methanol or ethanol
before equilibration in Pierce 1-Step Transfer Buffer.
After electrophoresis, remove gel(s) from cassette(s) and briefly place
into tray containing deionized water or transfer buffer. This will ensure
even wetting, facilitate proper gel placement and improve gel contact
with membrane.
Assemble and center sandwich(es) on the anode (see figure below)
to ensure even pressure. When transferring two gels allow for 10mm
spaces between sandwiches. Use a blot roller to remove any trapped
air bubbles.
Lock top of the cassette (cathode) into place and slide the assembled
cassette into the Pierce Power Station.
Select Begin Blotting.
1
2
3
4
5
6
7
8
10
Quick Start Guide
Thermo Scientific Pierce Electrophoretic Blotting
11
9
12
Thermo Scientific™Pierce™Power Blotter (# 22834), Thermo Scientific™Pierce™Power System (# 22830),
or Thermo Scientific™Pierce™G2 Fast Blotter (# 62291 upgraded with # 62287), and Thermo Scientific™Pierce™Power Blot Cassette (# 22835)
13
Cathode (-)
2 sheets of pre-wet filter paper (combined
thickness not to exceed 1.8mm)
Gel
Membrane
2 sheets of pre-wet filter paper (combined
thickness not to exceed 1.8mm)
Anode (+)
Choose Program
1 mini-gel Back
Low MW
6 V 1.3 A 5:00
Mid-Range MW
11 V 1.3 A 7:00
High MW
18 V 1.3 A 10:00
Select Gel Number and Size Back
Blot Cassette
WARNING After running at high current, the anode and cathode plates can become
hot. Use caution when separating the gels and stacks from the plates. When continu-
ously processing multiple samples allow the cassette to cool for 30 minutes or use
multiple cassettes to avoid excessive cassette heating.
WARNING Stainer use outside of the workflows described in this manual may put the
operator at risk of dangerous exposure to electrical shock. Do not use this instrument for
any purposes or in any configurations not described in this manual.
WARNING The Pierce Power Station can contain dangerous electricity and is not
designed to be opened by the user. Disconnect all power to the Pierce Power Station
before maintenance by a qualified technician.
WARNING Do not overfill the cassette with liquid. Excess liquid can overflow into the
base unit and possibly cause electric shock. Follow the appropriate instructions for
reagent amounts and empty any remaining liquid in the cassette upon run completion.
NOTE A grounded circuit capable of delivering the appropriate current and voltage is required for instal-
lation. Electrical requirements can be located on the rear panel of the blotter base. The blotter electrical
system will adjust to the proper voltage for the respective country. Connect the blotter power cord to the
rear left side panel of the device and plug into a grounded power outlet.
ENVIRONMENTALLY FRIENDLY DISPOSAL
According to EU directive 2002/96/EC on electric and electronic equipment and its
implementation into national law, all electric equipments must be separately collected
and environmentally friendly recycled. Alternative disposal: If the owner of the electric
equipments does not return it to the manufacturer, he is responsible for proper disposal
at a designated collection point that prepares the device for recycling according to na-
tional recycling laws and regulations. This does not include accessories and tools without
electric or electronic components.
Life Science Research
Africa /Belgium/Europe/Middle East
+32 53 85 71 84
France 0 800 50 82 15
Germany 0228 9125650
Netherlands 076 50 31 880
Switzerland 0800 56 31 40
UK 0800 252 185
Email: perbio.euromarketing@thermofisher.com
thermoscientific.com/pierce
For other regions, visit
thermoscientific.com/piercedistributors
USA +815-968-0747 or +800-874-3723
Customer Assistance
E-mail:Pierce.CS@thermofisher.com
thermoscientific.com/pierce
China 800 810 5118 or 400 650 5118
Customer Assistance
E-mail: bioscience.china@thermofisher.com
2162583-A 09/14 Printed in USA
thermoscientific.com/pierce
© 2014 Thermo Fisher Scientific Inc. All rights reserved. Facebook is a registered trademark of Facebook, Inc. All other trademarks are the property of
Thermo Fisher Scientific Inc. and its subsidiaries.
Related Thermo Scientific™Products
84731 Pierce™1-Step Transfer Buffer
84783 Pierce™Western Blotting Filter Paper, 7cm x 8.4cm,
100 sheets (0.83mm thick)
84784 Pierce™Western Blotting Filter Paper, 8cm x 13.5cm,
100 sheets (0.83mm thick)
22840 Pierce™Mini Gel Power Staining Kit
22830 Pierce™Power System
22838 Pierce™Power Station
22834 Pierce™Power Blotter
22835 Pierce™Power Blot Cassette
22833 Pierce™Power Stainer
22836 Pierce™Power Stain Cassette
84747 Western Blot Roller
22841 Midi Gel Incubation Trays, 10 ea
22843 Mini Gel Incubation Trays, 10 ea
Blotter Electrical Parameter Rating
Supply Voltage (VAC) 100-240
Frequency (Hz) 50/60
Maximum Power Rating (W) 168
Fuse (Power Center) T3AL, 250V, 3A
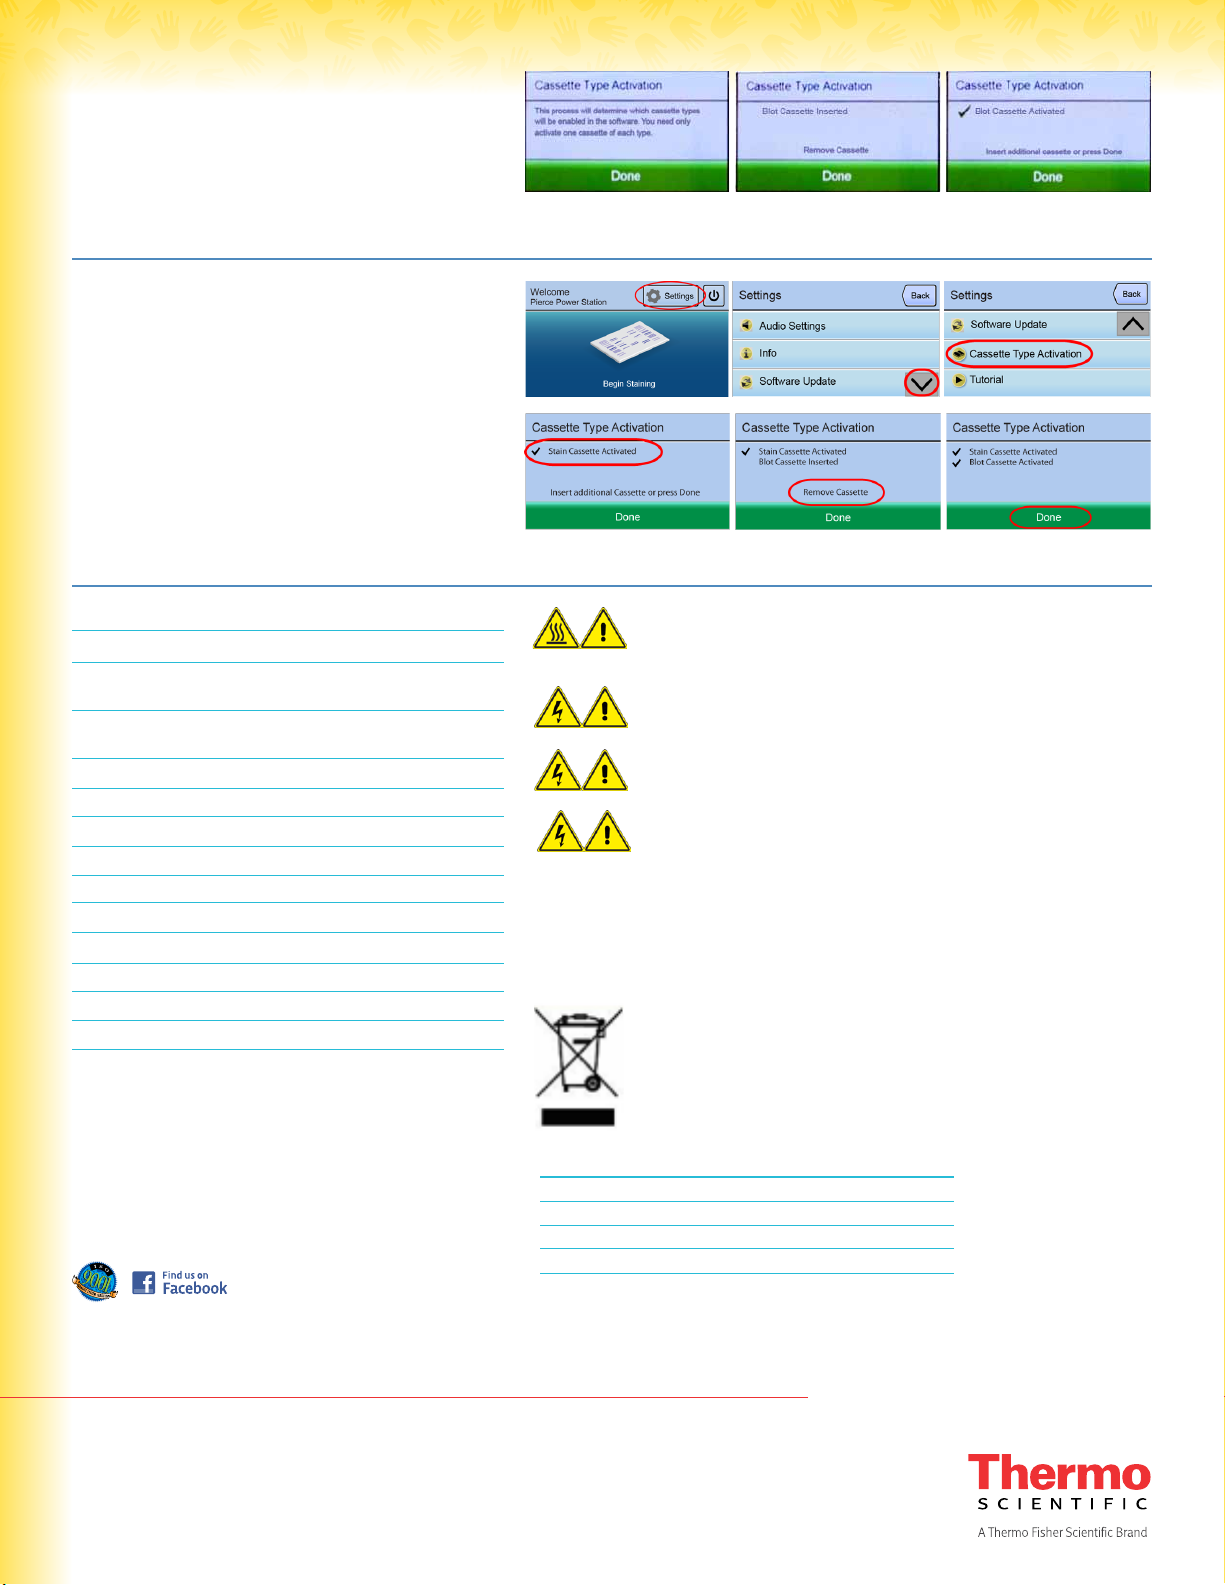
Using the Pierce Power Station for the First Time
When turning on the Pierce Power Station for the first time, you
will see the “Cassette Type Activation” screen. Follow the direc-
tions on the screen and insert the Power Blot Cassette into the
Power Station to activate the Blot Cassette and staining software.
Remove the Power Blot Cassette and insert another cassette
type to activate other cassette and software application (e.g.,
blotting), or select “Done”.
Using the Pierce Power Blot Cassette for the First Time
First you must activate the blotting software. To do so, press
the “Settings” button on the Welcome screen. Press the down
arrow to view more menu options, and select the “Cassette
Type Activation” button. Previously activated cassette types will
appear on the screen with a check mark to the left. To activate
the Blot Cassette and blotting software, insert the Power Blot
Cassette into the Power Station and remove when instructed.
Press “Done” or activate an additional cassette type in the
same manner. For detailed instructions refer to the manual at
www.thermoscientific.com/pierce-power-system. The Pierce
Power Station will recognize G2 Fast Blotter Cassettes as
Power Blot Cassettes.

This manual suits for next models

4

Other Thermo Scientific Industrial Equipment manuals

Thermo Scientific DensityPRO User guide

Thermo Scientific

Thermo Scientific DensityPRO User guide

Thermo Scientific 500 User manual

Thermo Scientific

Thermo Scientific 500 User manual

Thermo Scientific Odalog G20 User manual

Thermo Scientific

Thermo Scientific Odalog G20 User manual

Thermo Scientific System IV Owner's manual

Thermo Scientific

Thermo Scientific System IV Owner's manual

Thermo Scientific Sarasota ID900 User manual

Thermo Scientific

Thermo Scientific Sarasota ID900 User manual

Thermo Scientific DHX Series User manual

Thermo Scientific

Thermo Scientific DHX Series User manual

Thermo Scientific System I Owner's manual

Thermo Scientific

Thermo Scientific System I Owner's manual

Thermo Scientific thermoscientific HyPerforma Smartainer 3.0 User manual

Thermo Scientific

Thermo Scientific thermoscientific HyPerforma Smartainer 3.0 User manual

Thermo Scientific 2112 Series User manual

Thermo Scientific

Thermo Scientific 2112 Series User manual

Thermo Scientific CryoExtra CE8100 Series Operating instructions

Thermo Scientific

Thermo Scientific CryoExtra CE8100 Series Operating instructions

Thermo Scientific CTS Xenon User manual

Thermo Scientific

Thermo Scientific CTS Xenon User manual

Thermo Scientific NESLAB System IV Manual

Thermo Scientific

Thermo Scientific NESLAB System IV Manual

Thermo Scientific HyPerforma S.U.B. TK User manual

Thermo Scientific

Thermo Scientific HyPerforma S.U.B. TK User manual

Popular Industrial Equipment manuals by other brands

MULTILANE AT4025 user manual

MULTILANE

MULTILANE AT4025 user manual

Huawei FDT2108D-288 Quick installation guide

Huawei

Huawei FDT2108D-288 Quick installation guide

JUKI RS-1 Repacking guide

JUKI

JUKI RS-1 Repacking guide

ABB HT577377 Operation manual

ABB

ABB HT577377 Operation manual

ABB HT592133 Operation manual

ABB

ABB HT592133 Operation manual

Kobelt 7085-S owner's manual

Kobelt

Kobelt 7085-S owner's manual

JessEm Tool Mast-R-Slide 7500 user manual

JessEm Tool

JessEm Tool Mast-R-Slide 7500 user manual

Dorner ERT 150 Installation, maintenance & parts manual

Dorner

Dorner ERT 150 Installation, maintenance & parts manual

Kilews KP-AUXA Operation and maintenance manual

Kilews

Kilews KP-AUXA Operation and maintenance manual

CITO RSP System 2.0 operating manual

CITO

CITO RSP System 2.0 operating manual

Aventics IO-Link 580 Technical manual

Aventics

Aventics IO-Link 580 Technical manual

Vestil EM1-200 owner's manual

Vestil

Vestil EM1-200 owner's manual

FCS Multilog LX2 Installation and setup

FCS

FCS Multilog LX2 Installation and setup

Redarc SBI12-BLD Install manual

Redarc

Redarc SBI12-BLD Install manual

Walther prazision 91489 Working Instruction

Walther prazision

Walther prazision 91489 Working Instruction

Edwards CDP instruction manual

Edwards

Edwards CDP instruction manual

ALENCON PODD Installation, operation and maintenance manual

ALENCON

ALENCON PODD Installation, operation and maintenance manual

Weh TK16 H2 operating instructions

Weh

Weh TK16 H2 operating instructions

manuals.online logo
manuals.online logoBrands
  • About & Mission
  • Contact us
  • Privacy Policy
  • Terms and Conditions

Copyright 2025 Manuals.Online. All Rights Reserved.