manuals.online logo
Brands
  1. Home
  2. •
  3. Brands
  4. •
  5. Thetford
  6. •
  7. Plumbing Product
  8. •
  9. Thetford Tecma Silence 2G-RV User manual

Thetford Tecma Silence 2G-RV User manual

98304A(06.02.2018)
P.O. Box 1285
Ann Arbor, MI 48106
www.norcold.com
Service Kit
Ensemble deréparation
Juegode servicio 98303
T000150A
A
K1
K2
K3.1
K3.2
K3.3
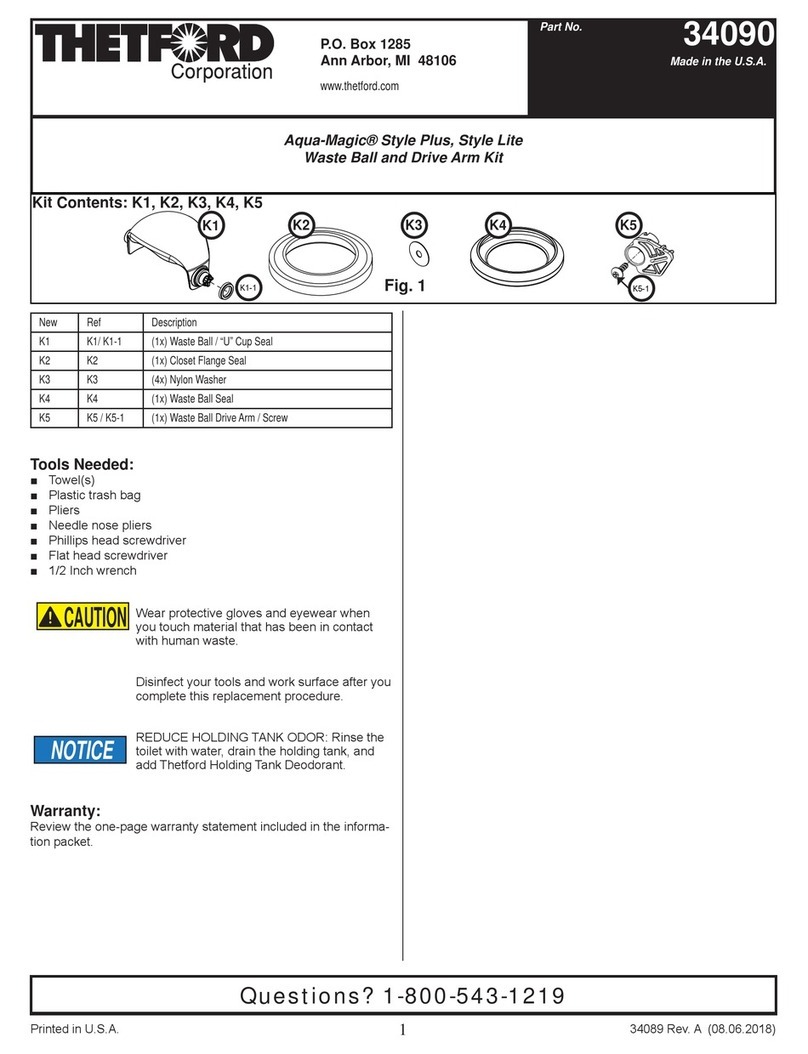
New Ref. Description
K1 K1 (1x) Vacuum Breaker
K2 K2 (1x) Flush Tube
K3 K3 (4x) Clamps
K4 K4 (1x) Inlet Tube
K5 K5 (1x) Tie
NI A Nozzle
NI B Toilet
NI Not Included
Tools Needed:
■Towel(s)
■Plastic trash bag
■Pliers
■Phillips Screwdriver
Thetford Corporation recommends that only a trained and
qualified technician service this product and plumbing
and electrical work be performed by a licensed tradesper-
son. Local permit and code compliance is required.
Thetford Corporation accepts no responsibility or liability
for damage to equipment, injury, or death that may
result from the system’s improper installation, service, or
operation.
PREPARE
• Read all instructions completely.
• Reduce holding tank odor: Rinse toilet with water, drain holding
tank, and add Thetford Holding Tank Deodorant.
• Wear protective gloves, glasses, long sleeves, and nose/face
mask to avoid contact with human waste.
• Wash entire toilet thoroughly.
REMOVE TOILET
1. Turn off RV water supply.
2. Flush toilet to drain.
3. Place towel(s) behind toilet under water connection to catch
water.
4. Disconnect RV water supply from water valve.
5. Remove toilet mounting screws.
NOTICE
AVIS
AVISO
CAUTION
!
ATTENTION
!
ATTENTION
ATTENTION
!
ATENCIÓN
ATTENTION
!
DANGER
Tecma® Silence 2G-RV / Silence Plus 2G-RV, High / Low
Vacuum Breaker
6. Disconnect B from sewer line (not shown) in floor.
7. Lift toilet from floor and place on trash bag.
8. Cover open sewer line (in floor) with rag or towel to reduce
holding tank odor
REMOVE PART
USE OLD PARTS
1. If K5 is present, cut and remove.
2. With pliers, slide clamp K3.1 down K4; disconnect from K1.
3. Slide
K3.2 on K2, remove K1.
4. If K2 is damaged, remove and discard.
5. Discard old parts K1, K3 (3x).
REPLACE PART
USE NEW PARTS
1. Slide K3.2 onto K2. Position K3.2 with loop on top.
2. Slide K3.3 over K2
3. Slide K2 over A; secure with K3.3.
4. Install
K3.1 onto A.
5. Slide K4 onto K1; secure with K3.1.
6. Secure
K1 by threading K5 through Band K3.2 as shown.
Pull K5 to tighten.
REINSTALL TOILET
1. Clean bottom of toilet removing all old caulk; add a fresh
bead of caulk.
2. Place toilet on floor; align mounting holes to mounting brack-
ets.
3. Tighten toilet mounting screws until toilet is secure. Do not
overtighten.
4. Connect RV water supply line.
5. Turn on RV water supply.
6. Flush test toilet, checking for leaks at all connections.
Kit Contents: K1 - K5
Questions? 1-800-543-1219
K3
K1
K2 K4
K5
K5
B
K1
K4 K3.2
98304A(06.02.2018)
P.O. Box 1285
Ann Arbor, MI 48106
www.norcold.com
Service Kit
Ensemble deréparation
Juegode servicio 98303
Nouvelle pièce Réf. Description
K1 K1 (1x)Anti-siphon
K2 K2 (1x) Tuyau d’évacuation
K3 K3 (4x) Colliers
K4 K4 (1x) Tube d’admission
K5 K5 (1x)Attache
NI A Embout
NI B Toilette
NI Non inclus
Outils requis :
■Serviette(s)
■Sac à ordures en plastique
■Pinces
■Tournevis cruciforme
Thetford Corporation recommande que seul un
technicien compétent et dûment formé effectue la
révision de ce produit et que les travaux de plomberie et
d’électricité soient exécutés par un professionnel muni
d’une licence. Un permis local et le respect du code
sont exigés.
Thetford Corporation décline toute responsabilité en cas
de dommages matériels, blessures ou décès découlant
d’une installation, d’une réparation ou d’une utilisation
incorrecte de ce système.
PRÉPARATION
• Lisez les instructions au complet.
• Pour réduire l’odeur du réservoir d’eaux usées : Rincez
la toilette avec de l’eau, videz le réservoir et ajoutez le
désodorisant de réservoir d’eaux usées Thetford.
• Portez des gants et des lunettes de protection, des manches
longues et un écran facial pour éviter tout contact avec des
déchets humains.
• Lavez soigneusement toute la toilette.
NOTICE
AVIS
AVISO
CAUTION
!
ATTENTION
!
ATTENTION
ATTENTION
!
ATENCIÓN
ATTENTION
!
DANGER
Nueva pieza Ref. Descripción
K1 K1 (1x) Ruptor de vacío
K2 K2 (1x) Tubo de descarga
K3 K3 (4x)Abrazaderas
K4 K4 (1x) Tubo de entrada
K5 K5 (1x)Atadura
NI A Boquilla
NI B Inodoro
NI No se incluye
Herramientas necesarias:
■Toalla(s)
■Bolsa plástica para basura
■Alicates
■Destornillador Phillips
Thetford Corporation recomienda que las labores de
servicio de este producto estén a cargo exclusivamente
de técnicos capacitados y calificados, y que las labores
eléctricas y de plomería estén a cargo exclusivamente
de personal técnico con licencia. Se deben cumplir los
códigos y permisos municipales.
Thetford Corporation no admite ninguna obligación o
responsabilidad por daño al equipo, lesiones o muerte
que pudieran ser causados por la instalación, la
reparación o el manejo incorrectos de este sistema.
PREPARAR
• Leer todas las instrucciones por completo.
• Para disminuir el olor del tanque de retención: enjuagar el
inodoro con agua, vaciar el tanque de retención y aplicar el
desodorante de tanques de retención Thetford.
• Ponerse lentes y guantes protectores, mangas largas y una
mascarilla para la nariz/careta facial para evitar el contacto
con los desechos humanos.
• Lavar minuciosamente el inodoro por completo.
ATTENTION
!
PELIGRO
L’ensemble contient : K1 - K5
Contenido del juego: K1 - K5
Anti-siphon haut-bas Silence 2G-RV /
Tecma® Silence Plus 2G-RV Ruptor de vacío alto/bajo Silence 2G-RV /
Tecma® Silence Plus 2G-RV
Des questions? / ¿Preguntas? 1-800-543-1219
T000150A
A
K1
K2
K3.1
K3.2
K3.3
K3
K1
K2 K4
K5
K5
B
K1
K4 K3.2
3
98304A(06.02.2018)
ENLÈVEMENT DE LA TOILETTE
1. Fermez le robinet d’arrivée d’eau du VR.
2. Vidangez le contenu de la toilette.
3. Disposez une ou plusieurs serviettes derrière la toilette sous le
raccord de la conduite d’eau.
4. Débranchez la conduite d’arrivée d’eau du VR.
5. Enlevez les vis de montage de la toilette.
6. Débranchez B de la conduite d’égout (non illustrée) dans le
plancher.
7. Soulevez la toilette et placez-la sur un sac à ordures.
8. Couvrez la conduite d’égout ouverte dans le plancher (non
illustrée) avec un chiffon ou une serviette pour réduire les
odeurs.
DESMONTAR EL INODORO
1. Cerrar el suministro de agua del vehículo de recreo.
2. Descargar el inodoro para drenarlo.
3. Poner toallas detrás del inodoro, debajo de la conexión de
agua, para que atrapen el agua.
4. Desconectar el suministro de agua del vehículo de recreo de
la válvula de agua.
5. Sacar los tornillos de montaje del inodoro.
6. Desconectar B de la tubería de desagüe del piso (no se
muestra).
7. Levantar el inodoro del piso y colocarlo sobre una bolsa
de basura.
8. Para reducir el olor del tanque de retención, cubrir la tubería
de desagüe del piso (no se muestra) con un trapo o toalla.
RETIRAR LA PIEZA
EMPLEAR LAS PIEZAS USADAS
1. Si hay una atadura K5, cortarla y quitarla.
2. Con un alicate, deslizar la abrazadera K3.1 hacia abajo de
K4; desconectar de K1.
3. Deslizar K3.2 en K2, quitar K1.
4. Si
K2 está dañado, quitarlo y desecharlo.
5. Desechar las piezas usadas K1, K3 (3x).
REEMPLAZAR LA PIEZA
EMPLEAR LAS PIEZAS NUEVAS
1. Deslizar
K3.2 en K2. Colocar K3.2 con el lazo en la parte
superior.
2. Deslizar
K3.3 por K2.
3. Deslizar K2 por A; afianzar con K3.3.
4. Instalar K3.1 en A.
5. Deslizar
K4 en K1; afianzar con K3.1.
6. Asegurar K1 ensartando K5 a través de By K3.2, como se
muestra. Halar K5 para apretar.
REINSTALAR EL INODORO
1. Limpiar el fondo del inodoro sacándole toda la masilla
vieja; añadir un nuevo cordón de masilla.
2. Poner el inodoro en el piso; alinear los orificios de montaje con
los soportes de montaje.
3. Apretar los tornillos de montaje del inodoro hasta dejarlo bien
firme. No apretar en exceso.
4. Conectar el tubo de suministro de agua del vehículo de recreo.
5. Abrir el suministro del agua del vehículo de recreo.
6. Hacer una descarga de prueba, revisando todas las
conexiones para comprobar que no haya fugas.
RETRAIT DE LA PIÈCE
UTILISEZ LES ANCIENNES PIÈCES
1. Si une attache K5 est présente, coupez et enlevez-la.
2. Avec des pinces, abaissez le collier K3.1 sur K4; débranchez
K4 de K1.
3. Glissez K3.2 sur K2, et enlevez K1.
4. Si K2 est endommagé, enlevez-le et jetez-le.
5. Jetez les vieilles pièces K1, K3 (3x).
REMPLACEMENT DE LA PIÈCE
UTILISEZ LES NOUVELLES PIÈCES
1. Glissez
K3.2 sur K2. Positionnez K3.2 avec la boucle en
haut.
2. Glissez
K3.2 sur K2.
3. Glissez K2 sur A; fixez-le avec K3.3.
4. Installez K3.1 sur A.
5. Glissez K4 sur K1; fixez-le avec K3.1.
6. Fixez K1 en enfilant K5 à travers Bet K3.2, tel qu’illustré.
Tirez sur K5 pour serrer.
RÉINSTALLATION DE LA TOILETTE
1. Nettoyez le dessous de la toilette afin d’enlever l’ancien
calfeutrant; apliquez un nouveau boudin de calfeutrant.
2. Placez la toilette sur le plancher; alignez les trous de montage
sur les supports de fixation.
3. Serrez la vis de montage de la toilette jusqu’à ce qu’elle soit
bien fixée. Ne serrez pas trop.
4. Rebranchez la conduite d’arrivée d’eau du VR.
5. Réouvrez l’alimentation d’eau du VR.
6. Essayez la chasse de la toilette et vérifiez que les raccords ne
comportent aucune fuite.

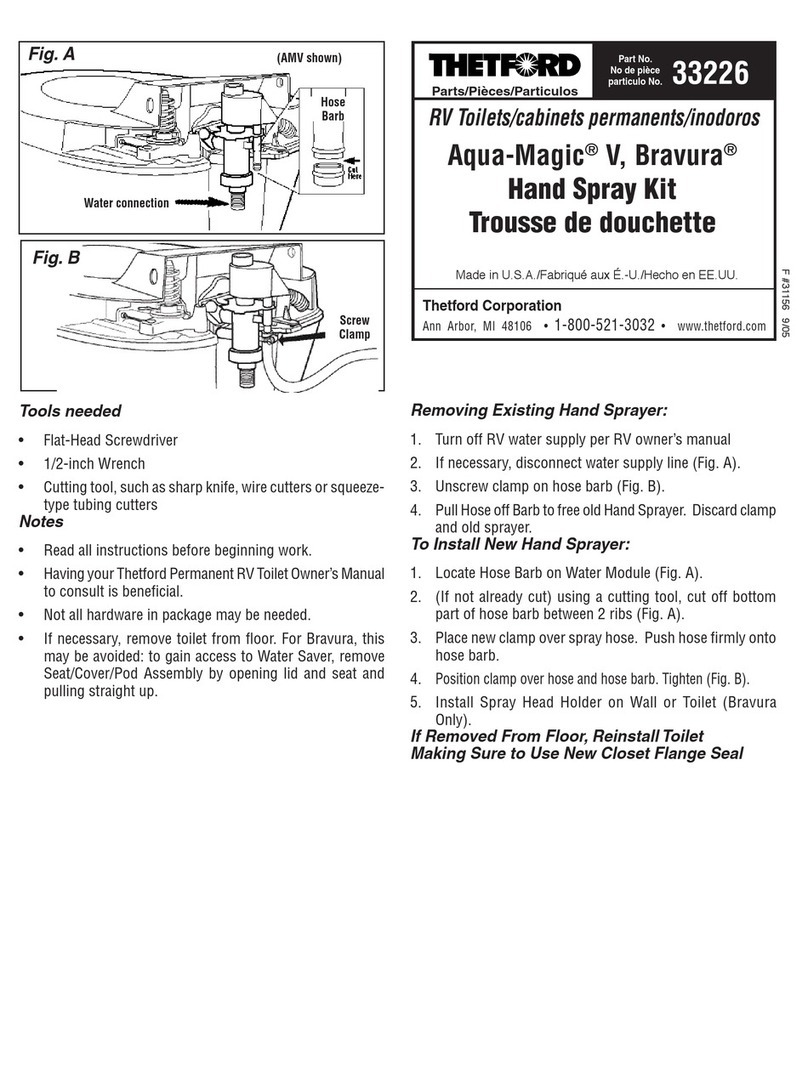
This manual suits for next models

2

Other Thetford Plumbing Product manuals

Thetford Style Plus Lite & II 34122 User manual

Thetford

Thetford Style Plus Lite & II 34122 User manual

Thetford 100 Series User manual

Thetford

Thetford 100 Series User manual

Thetford Aqua-Magic STYLE PLUS User manual

Thetford

Thetford Aqua-Magic STYLE PLUS User manual

Thetford Aqua-Magic V User manual

Thetford

Thetford Aqua-Magic V User manual

Thetford 33226 User manual

Thetford

Thetford 33226 User manual

Thetford 23709 Setup guide

Thetford

Thetford 23709 Setup guide

Thetford Sanicon Turbo 500 User manual

Thetford

Thetford Sanicon Turbo 500 User manual

Thetford 2384978 Setup guide

Thetford

Thetford 2384978 Setup guide

Thetford C500 User manual

Thetford

Thetford C500 User manual

Thetford EasyFit User manual

Thetford

Thetford EasyFit User manual

Thetford Sani-Con Turbo User manual

Thetford

Thetford Sani-Con Turbo User manual

Thetford 19833 User manual

Thetford

Thetford 19833 User manual

Thetford SmartTote User manual

Thetford

Thetford SmartTote User manual

Thetford 92909 Series Setup guide

Thetford

Thetford 92909 Series Setup guide

Thetford XR17200 User manual

Thetford

Thetford XR17200 User manual

Thetford Aqua-Magic 33186 User manual

Thetford

Thetford Aqua-Magic 33186 User manual

Thetford 51802 Setup guide

Thetford

Thetford 51802 Setup guide

Thetford ELECTRA MAGIC User manual

Thetford

Thetford ELECTRA MAGIC User manual

Thetford Aqua-Magic 34120 User manual

Thetford

Thetford Aqua-Magic 34120 User manual

Thetford Sani-Con User manual

Thetford

Thetford Sani-Con User manual

Popular Plumbing Product manuals by other brands

American Standard Elevate AM00841400 owner's manual

American Standard

American Standard Elevate AM00841400 owner's manual

Glacier bay 67405-1001 Use and care guide

Glacier bay

Glacier bay 67405-1001 Use and care guide

Teuco ACCADEMIA CONSOLLE PIETRA NATURALE Assembly instructions

Teuco

Teuco ACCADEMIA CONSOLLE PIETRA NATURALE Assembly instructions

newform DELUXE PRESTIGE 69853E instructions

newform

newform DELUXE PRESTIGE 69853E instructions

PAA VARIO LONG owner's manual

PAA

PAA VARIO LONG owner's manual

Zip HydroTap BC installation instructions

Zip

Zip HydroTap BC installation instructions

Moen 8210 Installation

Moen

Moen 8210 Installation

KWC SIN 10.261.012.000 Installation and service instructions

KWC

KWC SIN 10.261.012.000 Installation and service instructions

Brizo T609 Series manual

Brizo

Brizo T609 Series manual

alfi 100200758 Series Installation instruction

alfi

alfi 100200758 Series Installation instruction

Kraus KHF200-30 installation manual

Kraus

Kraus KHF200-30 installation manual

Mira Virtue Installation & user guide

Mira

Mira Virtue Installation & user guide

Kohler K-13700 installation guide

Kohler

Kohler K-13700 installation guide

Signature Hardware WILLISTON SHXCWL102 Installation

Signature Hardware

Signature Hardware WILLISTON SHXCWL102 Installation

Signature Hardware Rigi 948581 installation instructions

Signature Hardware

Signature Hardware Rigi 948581 installation instructions

Kohler K-1122-LA Roughing-In Guide

Kohler

Kohler K-1122-LA Roughing-In Guide

Hansa HANSADESIGNO Series Installation and maintenance guide

Hansa

Hansa HANSADESIGNO Series Installation and maintenance guide

Graff SADE Instructions for assembly and use

Graff

Graff SADE Instructions for assembly and use

manuals.online logo
manuals.online logoBrands
  • About & Mission
  • Contact us
  • Privacy Policy
  • Terms and Conditions

Copyright 2025 Manuals.Online. All Rights Reserved.