Thuli Tables Sport User manual

Sport Owner’s Manual
Table of Contents
Introduction / Opening the Table . . . . . . . . 2
Identication of Table Parts . . . . . . . . . . 3 - 5
Table Set-Up . . . . . . . . . . . . . . . . . . . . . . . . 6
Table Operation . . . . . . . . . . . . . . . . . . . 7 - 8
Table Fold-Down . . . . . . . . . . . . . . . . . . . . 9
Accessories . . . . . . . . . . . . . . . . . . . . . 10 - 12
Flexion Distraction . . . . . . . . . . . . . . . . . . . . 13
Care & Maintenance . . . . . . . . . . . . . . . . 14
Warranty . . . . . . . . . . . . . . . . . . . . . . . . . . 15
Overview of Products . . . . . . . . . . . . . . Back
THULI TABLES
www.thulitables.com
youtube.com/thulitables
800-458-4854
facebook.com/thulitables

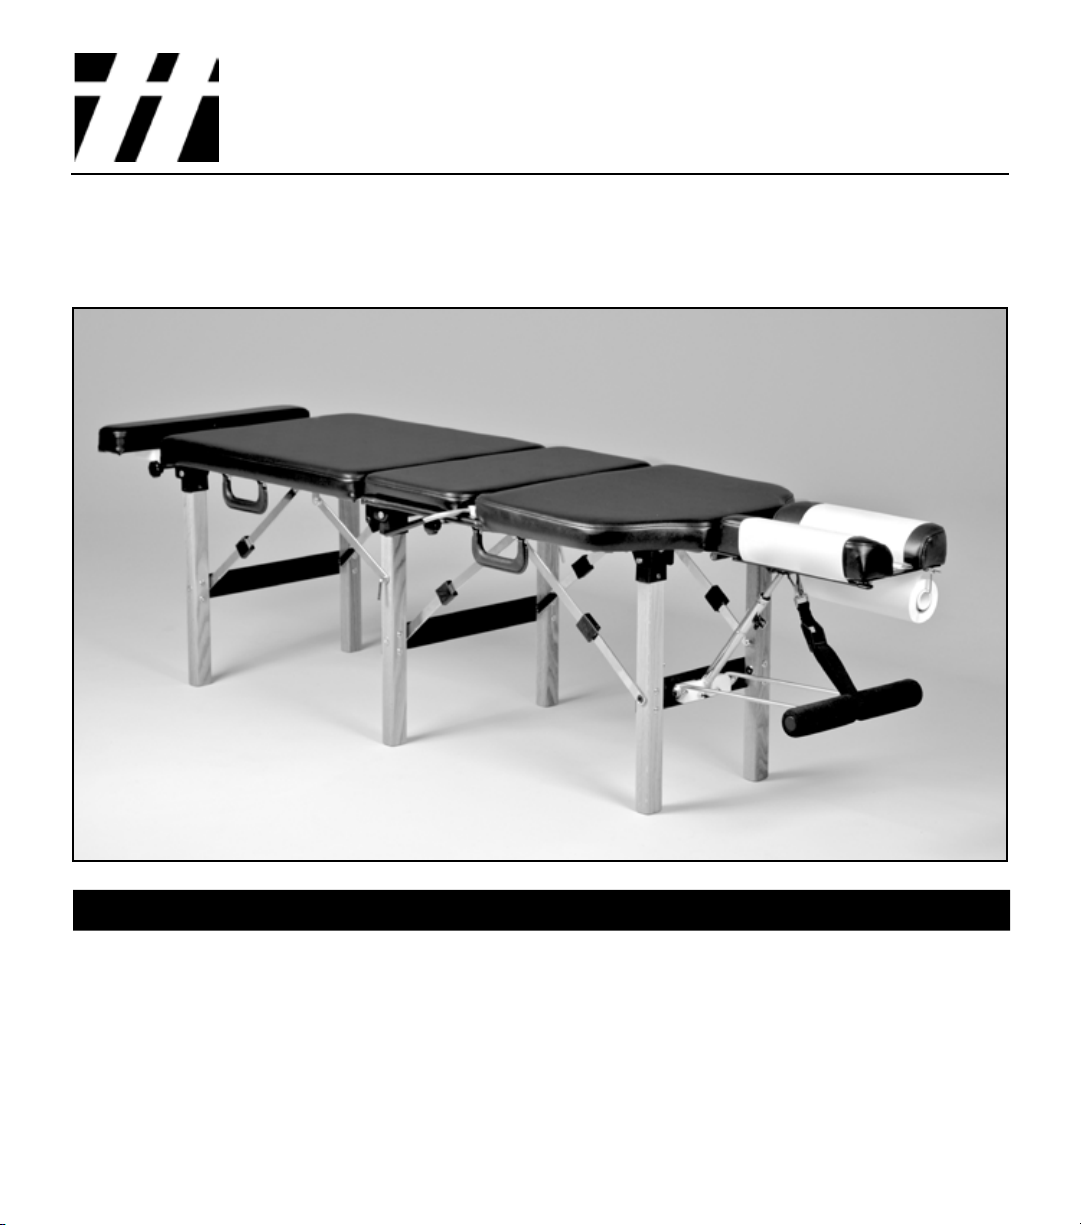
Introduction & Opening the Table 2
Eye Hook
Ankle Rest
Locking Knob
(optional)
1. Lay the table onto its contoured thoracic section.
2. If your table has an ankle rest extension, loosen
the locking knob and pull out the ankle rest.
3. Release the eye hook from the black metal bracket
located between the headpiece cushions.
4. Push the ankle rest back in and open the table.
5. Secure the eye hook into the clip when the table
is set up.
OPENING THE TABLE
Rick Thuli, D.C.
President
Sincerely,
We are pleased to provide you with a chiropractic adjusting table that is
elegant in design and engineered with precision. It has been thoroughly
inspected and tested right down to the smallest detail before leaving our
shop. We are condent that it will provide you with many years of reliable
service.
Please take the time to read this manual carefully. It will familiarize you
with the table and instruct you on its proper operation and maintenance.
If you have any questions or comments, please contact us.
Thank you for your purchase of a Sport portable table.

Paper
Hanger
Prone Arm Rest
(adjustable)
Ankle Rest Extension
(optional)
Pelvic Drop
(optional)
Flexion / Extension
Piston
Mid-Leg Brace
Folding
Leg Brace
Ankle Rest
Locking Knob
(optional)
Pelvic Cocking Lever
& Tension Control Rod
Paper
Hold-Down Wire
Paper
Tear-Off Bar
Identification of Table Parts 3
Brace Lock
(optional)

Pelvic Drop
(optional)
Piston
Head
Pelvic Tension
Control Rod
(optional)
Flexion / Extension
Piston
Folding Leg Brace
(Left)
Headpiece
Paper
Pelvic Cocking Lever
(optional)
Protective
Floor Glide
Front Leg Mid-Leg
Folding Leg Brace
(Right)
Brace Lock
Prone Arm Rest
Headpiece
Hinge
Identification of Parts 4
Paper
Hold-Down Wire

Table
Closing Hook
Ankle Rest Locking Knob
(optional)
Ankle Rest Extension
(optional)
Mid-Leg Brace
Headpiece
Paper Hanger
Ankle Rest Housing
(optional)
Protective
Floor Glide
Identification of Parts 5

BACK & MIDDLE LEGS SET-UP
1. Start with the back legs. Grasp the horizontal crosspiece and raise the back legs from their folded positon.
Straighten the folding leg braces and lock them into place by sliding the brace locks over the brace joints.
2. Raise the middle legs and lock the folding braces into place.
3. Raise the two straight mid-leg braces and snap them onto the mid-leg pins.
HEADPIECE & FRONT LEGS SET-UP
2. Raise the headpiece and the front set
of legs simutaneously by grasping the
front legs with one hand and the headpiece
with the other hand. Straighten the
folding leg braces and lock them into
place.
1. Remove the headpiece paper.
2. Remove the paper hanger from the back section.
3. Set the table upright.
4. Lower the prone arm rest and clip the snap
into the hole in the headpiece mount bracket.
SETTING THE TABLE UPRIGHT
1. Release the snap from the headpiece. 3. Lower the headpiece to the oor by pinching
together the two tabs located in the center of
the exion/extension piston.
Table Set-Up 6
Snap
Snap
Tabs
1. Lay the table onto its contoured thoracic section.
2. If your table has an ankle rest extension, loosen
the locking knob and pull out the ankle rest.
3. Release the eye hook from the black metal bracket
located between the headpiece cushions.
4. Push the ankle rest back in and open the table.
5. Secure the eye hook into the clip when the table
is set up.
Eye Hook
Ankle Rest
Locking Knob
(optional)
OPENING THE TABLE

4. To advance the headpiece paper,
open the tear-off bar, hold your
ngers on the hold-down wire
and pull the paper across the
cushions. Pulling the paper in an
upward direction will reduce
friction, making it easier to pull.
It is not necessary to raise the
hold-down wire each time the
paper is advanced.
HEADPIECE PAPER
Flex and extend the headpiece by
grasping the cephalic end and pinching
together the two tabs located in the
center of the piston.
FLEXION & EXTENSION
1. Install a standard 8.5” roll of paper.
2. Raise the hold-down wire and
advance the paper, tucking it
between the cushions.
3. Lower the hold-down wire between
the cushions.
5. To tear off used headpiece paper, use
an outward motion while holding in
on the tear-off bar.
Table Operation 7
Hold-down wire
NOTE: Advise your patient before
changing the position of the headpiece
to prevent any unnecessary startle.

The pelvic drop has adjustable tension and cocks with an upward movement of the cocking
lever. Position the patient’s anterior superior iliac spine (ASIS) at the juncture of the pelvic
and thoracic sections. To set the tension, use the following guidelines, which may vary
according to the practioner’s preference.
PELVIC DROP (optional)
It is recommended that the patient’s wrists rest on the cushioned portion of the arm rest with
the hands relaxed. Advise the patient not to apply weight on the prone arm rest when getting
up from the table.
PRONE ARM REST
The ankle rest can be extended up to 13” and locked into position by tightening the
knob near the ankle rest. Shorter patients can drop their feet into the recess created by
the extended ankle rest.
ANKLE REST EXTENSION (optional)
The prone arm rest is adjustable in height.
To raise the prone arm rest, pull on the loop at
the end of the strap.
To lower the prone arm rest, squeeze the
cam lock and pull down on the prone
arm rest grips.
Table Operation 8
Cam
Lock
1. Advise your patient prior to setting the tension.
2. With the patient on the table, cock the drop section with an upward motion of the cocking
lever. There must be sufcient tension on the drop to hold the patient's weight.
3. Decrease the tension control knob by turning it counterclockwise until the section drops.
4. Increase the tension by turning the tension control knob clockwise 3-4 half turns.
As a general rule, the drop section is now set for the patient's weight.

1. Remove the headpiece paper and hanger.
2. Lay the table onto its cushions.
3. Disconnect the prone arm rest from the headpiece mount bracket
and swing it up as far as possible.
4. Pinch together the two tabs in the center of the piston and ex the
headpiece until it is stopped by the piston.
5. Slide the brace locks down from the brace joints until they contact the
brace bracket.
6. Collapse the folding leg braces inward and fold the front legs into
the table. The headpiece and prone arm rest will automatically
fall into position.
7. Headpiece paper & hanger storage (see photo):
Remove the headpiece paper from the paper hanger. Store the
paper hanger on the eyescrews in the back section of the table.
Compress the headpiece paper and store it underneath the prone
arm rest.
8. Loosen the prone arm rest strap and clip the snap onto the
hold-down wire. Pull the D-ring to tighten.
9. Detach the mid-leg braces and swing them into the back section
of the table.
10. Fold the middle legs into the table.
11. Fold the back legs into the table.
12. Fold the back section onto the front thoracic section.
13. If your table has an ankle rest extension, pull it out.
14. To close the table, engage the closing hook into the metal bracket
located between the headpiece cushions.
15. Push the ankle rest back in.
16. Tighten the locking knob.
D-Ring
Buckle
Cam Lock
Snap
Paper
FOLD THE TABLE IN REVERSE ORDER OF SET-UP
Table Fold-Down 9
Headpiece & Prone Arm Rest Storage
Headpiece
Hold-Down
Wire
Paper Storage

The Comfort Pillow offers
massage quality facial comfort
in the prone position.
CRESCENT ARM REST
Accessories 10
Comfort Pillow
Crescent Arm Rest
Rotate the Comfort Pillow 180
degrees to provide cervical
support in the supine position.
COMFORT PILLOW
The Crescent Arm Rest provides additional forearm support in
the prone position. Adjustable in height. Simply slide the
slotted ends of the bracket onto the bolts located on the inside of
the front legs and push down onto the Prone Arm Rest. It will
snap into place.
Add to your table anytime (minor retrot installation required).
Base
Pillow
The velcro on the underside of the Comfort Pillow secures
it to the base, allowing for width adjustability. The base
quickly inserts between the headpiece cushions.
ACCESSORY BAG
Accessory Bags are custom-sized for the Crescent Arm Rest
and Comfort Pillow. Black only (grey, as shown in photo, is
no longer available).
Bolsters are 20" wide. Choice of two heights: 2.75" or 4.25”.
Nonslip base. Use in prone position under ankles or in supine
position under knees to relax hamstrings.
BOLSTERS
2.75" x 20" Bolster (shown on Tour table)
PRONE ARM REST SHIELDS
Nonporous and durable plastic shields
slip over the prone arm rest grips.
Easy to sanitize.

PROTECTIVE COVER
Secure the Protective Cover
by matching up the Velcro
strips.
Lean the table in the opposite
direction and pull the ap
from under the table.
Lean the table away from the
long ap and tuck the ap
under the table.
Provides protection when
traveling by car. With the
folded table in its upright
position, place the cover over
the top of the table.
(Shown with Tour table).
AIRLINE TRAVEL CASE
Traveling to a seminar or home to adjust family?
The airline Travel Case offers easy loading and ample
protection for your Sport during airline travel.
Available in black or white and a choice of strap colors
(red, yellow, blue or black). See www.thulitables.com
for color combinations.
PULL CART
This strong, lightweight folding Pull Cart is ideal for
transporting your table, including negotiating stairs,
curbs and athetic elds. Nylon strap with Velcro
closure secures the table to the Pull Cart. We advise
using the Protective Cover with the Pull Cart to avoid
scufng the vinyl upholstery. Can be used with the
Travel Case as well.
Accessories 11

AIRLINE TRAVEL CASE
With interior foam padding, the airline Travel Case offers protection for the Sport during airline travel. Designed and engineered
to be easy to load and durable. Available in Lightweight or Heavy-Duty versions. The top and bottom caps are the same on both
versions, but the sleeves are made of different materials (as described below).
To prepare the Travel Case for loading,
un-buckle the straps (but keep them
attached to the top and bottom caps).
Remove both the top cap and the sleeve.
Place the Sport into the bottom cap. Slide the sleeve over the table. Be sure
the sleeve ts snugly inside the bottom
cap.
Place the top cap over the sleeve. Secure
the case closed by buckling the two straps.
Make transporting easy by placing
the Travel Case onto the Pull Cart.
Position it vertically on the cart to
navigate stairs and through door
openings. Secure the Travel Case to
the Pull Cart using the strap.
Accessories 12
Lightweight Travel Case: Features a corrugated plastic (Coroplast) sleeve. Coroplast is durable, waterproof and shock abosrbent.
Please note that the construction tape on the sides of the case simply hide the functional heavy-duty staples which secure the sides together.
Heavy-Duty Travel Case: Features a durable, rigid ABS plastic sleeve and is recommended for more rugged use (eg. train or
bus travel).
Bottom Cap
Top Cap
Sleeve
Logo
Lift the Travel Case by grasping the straps.

FLEXION DISTRACTION DEVICE
Add Flexion Distraction to your Sport at anytime with this ingenious, mechanical device. Simply fold the table's back legs into
their storage position and attach the FD Device in seconds. Quickly dissasembles for portability so you can take it on the road.
FLEXION DISTRACTION TRAVEL CASE
Protect the FD Device in this rugged and compact
Travel Case during car or airline travel. Made of
durable, corrugated plastic. Straps secure the case
closed and serve as lifting/carrying handles.
Custom die-cut, shock absorbing foam offers maximum protection
of individual component parts during travel.
Flexion Distraction 13
Flexion Distraction Device

Care & Maintenance 14
TENSION CONTROL ADJUSTMENT
Set Screw
Periodic lubrication of the pelvic drop will ensure a smooth, crisp
drop. Apply 3-IN-ONE oil every month or 500 adjustments. If the
drop has not been lubricated on a regular basis, rst apply WD-40
to clean the plunger from dust & debris.
PELVIC DROP: CLEANING & LUBRICATION
VINYL CLEANING
1. Mild Daily Cleaning: Use dish soap and warm water (1:10) with a soft cloth. Follow with a thorough, clear water rinse.
If more cleaning is necessary, use a soft bristle brush with the same solution. Avoid harsh detergents and powdered abrasives.
Areas coming in contact with hair, body oils or perspiration should be washed frequently. Remove stains immediately to
prevent the possibility of becoming permanent.
2. Disinfecting Options:
Bleach: Dilute 4 tsp bleach in 1 quart of water in a spray bottle. Spray on vinyl, leave for 1-2 minutes and rinse with water.
Hydrogen Peroxide (3%): Available in spray bottle. Use undiluted and leave on for 5 minutes and rinse well with water.
Alcohol (70% min): Use undiluted. Leave on for 1-2 minutes and rinse well with water.
REPLACEMENT VINYL: In the event of wear or damage, pre-sewn replacement vinyl is available from Thuli Tables.
3. Water Rinse: It is important to follow cleaning with a thorough, clear water rinse to minimize premature deterioration of the
vinyl from extended exposure to chemicals.
The resistance on the tension control rod can be increased or decreased.
Locate the set screw on the bottom of the pelvic drop block (see photo).
Use an 1/8" allen wrench to adjust.
Increase resistance: Turn the set screw clockwise. This is helpful
if the tension control rod is “backing out" while using the drop.
Decrease resistance: Turn the set screw counter-clockwise.
1. Place the table on its cushions.
2. Locate the stainless steel plunger of the pelvic drop.
3. Apply 3-IN-ONE oil onto the plunger. Allow a few minutes
for the oil to penetrate before setting the table upright.
Routine lubrication:
If the drop has not been lubricated on a regular basis:
1. Lay the table on its cushions.
2. Apply WD-40 onto the plunger and allow a few minutes
for penetration. Set the table upright and drop the section
several times to clean from dust & debris.
2. Set the table back on its cushions and apply 3-IN-ONE oil
onto the plunger for lubrication. Allow a few minutes for
the oil to penetrate before setting the table upright. Drop the
section several times.

Warranty 15
If your table needs repair, whether under warranty or not, please contact us. We will determine what is needed and, at our
discretion, send you either a replacement or the necessary part for repairing. Our tables have been designed so that replacing a part
is relatively easy to do yourself on location. Please note that we do not cover labor costs if you hire someone to install the
replacement part.
Our tables are designed and built to high standards and we are proud to offer a limited lifetime warranty against manufacturing
defects. This warranty is valid to the original owner and only if the table has not been altered in any way. It does not cover
issues caused by normal wear and tear (which naturally and inevitably occur as a result of use over time) or damage caused by
accidents, improper use and negligence. It also not does not cover the headpiece exion/extension piston, which is covered by
a one year warranty against manufacturing defects.


Elevation Tables
Tour Portable
300 Stationary
Sport Portable
500 Stationary
Portable Drops
Lumbo-Pelvic Drop
Extremity Drop
Speeder Board
Portable
Headpiece
Junior Portable
www.thulitables.com
608.935.9300
800.458.4854
youtube.com/thulitables
facebook.com/thulitables
Table of contents
Other Thuli Tables Medical Equipment manuals
Popular Medical Equipment manuals by other brands

Hologic
Hologic Trident user guide

Planmeca
Planmeca INTRA X-RAY UNIT installation instructions

Ohio Medical Corporation
Ohio Medical Corporation MiniOX 3000 Operation manual

Drive
Drive M-Rail installation instructions

endolite
endolite AqualimbTT Instructions for use

Otto Bock
Otto Bock 50R236 Smartspine SI Instructions for use