manuals.online logo
Brands
  1. Home
  2. •
  3. Brands
  4. •
  5. Timeguard
  6. •
  7. Controllers
  8. •
  9. Timeguard RTS113 Programming manual

Timeguard RTS113 Programming manual

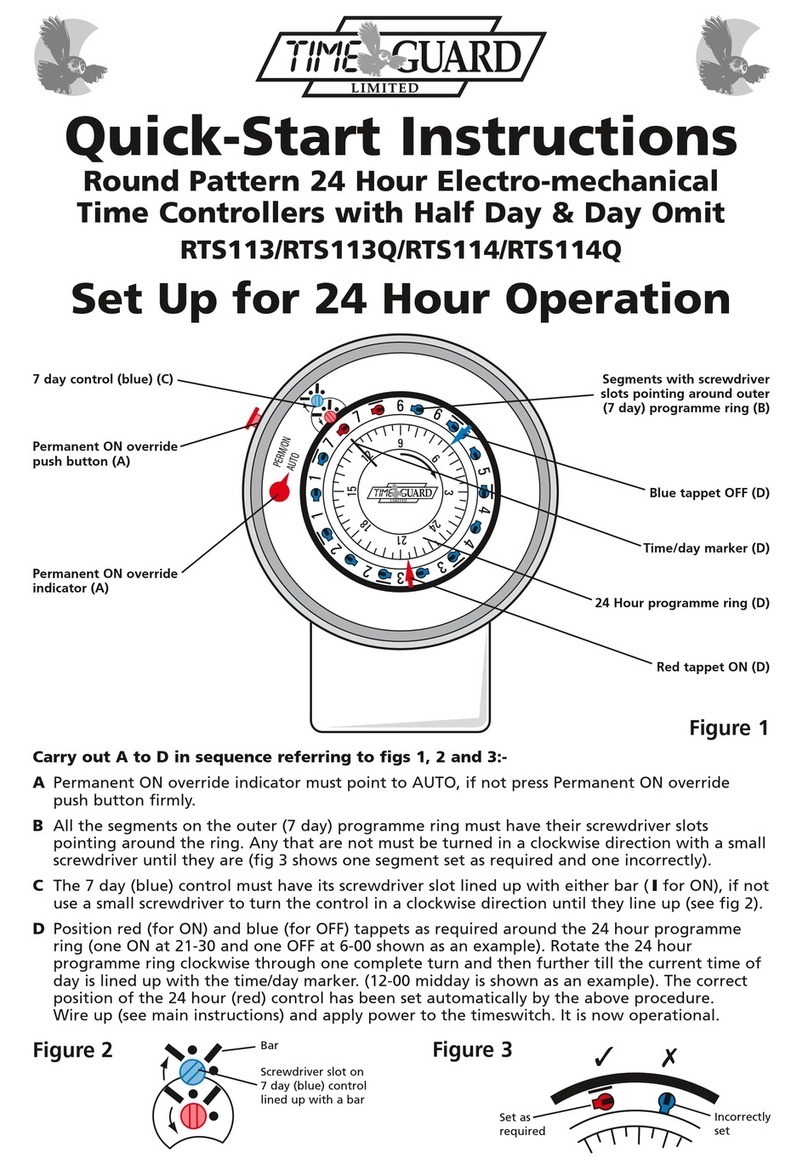
Quick-Start Instructions
Round Pattern 24 Hour Electro-mechanical
Time Controllers with Half Day & Day Omit
RTS113/RTS114
7 day control (blue) (C) Segments with screwdriver
slots pointing around outer
(7 day) programme ring (B)
Permanent ON override
indicator (A)
Permanent ON override
push button (A)
Blue tappet OFF (D)
Figure 1
Figure 2
Time/day marker (D)
24 Hour programme ring (D)
Red tappet ON (D)
Carry out A to D in sequence referring to figs 1, 2 and 3:-
APermanent ON override indicator must point to AUTO, if not press Permanent ON override
push button firmly.
BAll the segments on the outer (7 day) programme ring must have their screwdriver slots
pointing around the ring. Any that are not must be turned in a clockwise direction with a small
screwdriver until they are (fig. 3 shows one segment set as required and one incorrectly).
CThe 7 day (blue) control must have its screwdriver slot lined up with either bar (
I
for ON), if not
use a small screwdriver to turn the control in a clockwise direction until they line up (see fig. 2).
DPosition red (for ON) and blue (for OFF) tappets as required around the 24 hour programme
ring (one ON at 21-30 and one OFF at 6-00 shown as an example). Rotate the 24 hour
programme ring clockwise through one complete turn and then further till the current time of
day is lined up with the time/day marker. (12-00 midday is shown as an example). The correct
position of the 24 hour (red) control has been set automatically by the above procedure.
Wire up (see main instructions) and apply power to the timeswitch. It is now operational.
Bar
Screwdriver slot on
7 day (blue) control
lined up with a bar
Figure 3
Set Up for 24 Hour Operation
Set as
required
Incorrectly
set
✓  ✗
Figure 4
67-058-146 (Issue 2)
7 day control (blue) with
screwdriver slot pointing
to a dot (G)
Segments at midnight day 5
(Friday) and midnight day 7
(Sunday) with screwdriver
slots pointing to centre of
programme ring (E)
Note: the numbers on the outer (7 day)
programme ring represent the days of the
week 1-Monday, 7-Sunday. Each of the
numbers is repeated, the first number going
past the time/day marker in a clockwise
direction (direction of ring travel) represents
a morning (a.m.) period, the second on
afternoon/evening (p.m.) period.
Segments with a dash above (see fig. 6) will
start or stop an omitted period at midnight
if their screwdriver slot points towards the
centre of the ring. Without a dash above
and with the screwdriver slot pointing as
above the omitted period will start or stop
at midday.
Midnight switching
segment day 2
(Tuesday) Blue tappet OFF
7 Day programme
ring (divided into
12 hour steps) (E)
Time/day marker (F)
24 Hour programme ring (F)
Red tappet ON
Carry out A to D (apart from applying power) and then complete E, F and G as follows:-
EOmitting days and/or half days is done by turning segments on the outer (7 day) programme
ring anticlockwise through 90° from their 24 hour operation position. One at the beginning
and one at the end of the period to be omitted.
As an example the period to be omitted is the whole of Saturday and Sunday. Turn the blue
segment between the numbers 5 and 6 on the 7 day programme ring anticlockwise so that its
screwdriver slot points in towards the centre of the programme ring and repeat this for the
blue segment between the numbers 1 and 7 (see fig. 6).
FRotate the 24 hour programme ring clockwise until the correct time and day is set for the
example shown – day 7 (Sunday), time 12-00 midday. This may take several turns of the ring.
Note:- The time marker also acts as a day marker for the 7 day programme ring.
GTurn the blue 7 day control clockwise to align its slot with either dot (•for OFF) since, for the
example shown, the 7 day programme ring is within an omit (OFF) period (see fig. 5). Wire up
(see main instructions) and apply power to the timeswitch. It is now operational.
Victory Park, 400 Edgware Road, London NW2 6ND Sales Office Direct Line: 020 8452 1112 Email: csc@timeguard.com
Set Up to Omit Days and/or
1/2 Days from 7 Day Operation
Correct
segment
position
between
1 and 7
(shown)
also 5
and 6
Note:- With these timeswitches it is not possible to have
different ON periods for different days of the week.
Figure 5 Figure 6
Dot
Screwdriver slot on
7 day (blue) control
lined up with a dot
Midday switching
segment day 2
(Tuesday)


This manual suits for next models

1

Other Timeguard Controllers manuals

Timeguard MLSA360N Manual

Timeguard

Timeguard MLSA360N Manual

Timeguard SLFM360N Manual

Timeguard

Timeguard SLFM360N Manual

Timeguard PDRS1500N Installation instructions

Timeguard

Timeguard PDRS1500N Installation instructions

Timeguard SLB2300RF Manual

Timeguard

Timeguard SLB2300RF Manual

Timeguard PDFM1500 Manual

Timeguard

Timeguard PDFM1500 Manual

Timeguard RTS113Q Programming manual

Timeguard

Timeguard RTS113Q Programming manual

Timeguard SLDD1000 Manual

Timeguard

Timeguard SLDD1000 Manual

Timeguard TLRX05 Manual

Timeguard

Timeguard TLRX05 Manual

Timeguard MLB3000 Manual

Timeguard

Timeguard MLB3000 Manual

Timeguard TRTD7N Manual

Timeguard

Timeguard TRTD7N Manual

Timeguard ELU56 Manual

Timeguard

Timeguard ELU56 Manual

Timeguard ProgramaSTAT UFPT24 User manual

Timeguard

Timeguard ProgramaSTAT UFPT24 User manual

Timeguard SLW360L Manual

Timeguard

Timeguard SLW360L Manual

Timeguard LEDPRORFKB Manual

Timeguard

Timeguard LEDPRORFKB Manual

Timeguard SLW360N Manual

Timeguard

Timeguard SLW360N Manual

Timeguard SureTime STLW1000 Manual

Timeguard

Timeguard SureTime STLW1000 Manual

Timeguard SLB2300RF Manual

Timeguard

Timeguard SLB2300RF Manual

Timeguard SLFM360 Manual

Timeguard

Timeguard SLFM360 Manual

Timeguard SLB2300 Manual

Timeguard

Timeguard SLB2300 Manual

Timeguard PDWM1500 Manual

Timeguard

Timeguard PDWM1500 Manual

Timeguard SLFM360L Manual

Timeguard

Timeguard SLFM360L Manual

Timeguard TRT039N Manual

Timeguard

Timeguard TRT039N Manual

Timeguard PDFM1500N Manual

Timeguard

Timeguard PDFM1500N Manual

Timeguard PDSM1500 Manual

Timeguard

Timeguard PDSM1500 Manual

Popular Controllers manuals by other brands

Polar King KE2 user manual

Polar King

Polar King KE2 user manual

Hydrocom Water Controller Owner's manual & installation guide

Hydrocom

Hydrocom Water Controller Owner's manual & installation guide

APD HV-PRO quick start guide

APD

APD HV-PRO quick start guide

Gavita FB1 user manual

Gavita

Gavita FB1 user manual

Omega DPF700 quick start

Omega

Omega DPF700 quick start

Motorola MVME172P4 Series Specifications

Motorola

Motorola MVME172P4 Series Specifications

Elko iNELS RFGB-20 manual

Elko

Elko iNELS RFGB-20 manual

Bose Panaray SDC user guide

Bose

Bose Panaray SDC user guide

Linak ACTUATOR LA36 user manual

Linak

Linak ACTUATOR LA36 user manual

Deif AGC 200 Series Operator's manual

Deif

Deif AGC 200 Series Operator's manual

Emerson Dixell XRB60CHC Installing and operating instructions

Emerson

Emerson Dixell XRB60CHC Installing and operating instructions

Spark SP22 instruction manual

Spark

Spark SP22 instruction manual

HP MSA 2040 installation instructions

HP

HP MSA 2040 installation instructions

Dontek Aquasun 3CD instruction manual

Dontek

Dontek Aquasun 3CD instruction manual

Fri-Jado 9128135 Technical manual

Fri-Jado

Fri-Jado 9128135 Technical manual

ABB LME620-AI instructions

ABB

ABB LME620-AI instructions

Software House RM2L-NH Quick start installation guide

Software House

Software House RM2L-NH Quick start installation guide

GCE druva FMD 230 Series instructions

GCE druva

GCE druva FMD 230 Series instructions

manuals.online logo
manuals.online logoBrands
  • About & Mission
  • Contact us
  • Privacy Policy
  • Terms and Conditions

Copyright 2025 Manuals.Online. All Rights Reserved.