Timex 100 Lap Ironman Triathlon with the FLIX User manual

100 Lap Ironman Triathlon with the FLIX
Plain language instructions for the 100 Lap Ironman Triathlon with the FLIX Indiglo activation system.
1. S TTING TH WATCH
•Setting
•xample of setting the watch
2. CHRONO (stopwatch)
•Timing with the chronograph
•Storing and clearing the chrono memory
•Chronograph terms
3. TIM R
•Setting
•Starting/Stopping
4. ALARM
•Setting
•Arming and disarming the alarm
5. M MO
•Setting
6. INDIGLO
•Activation of the FLIX System Indiglo night-light
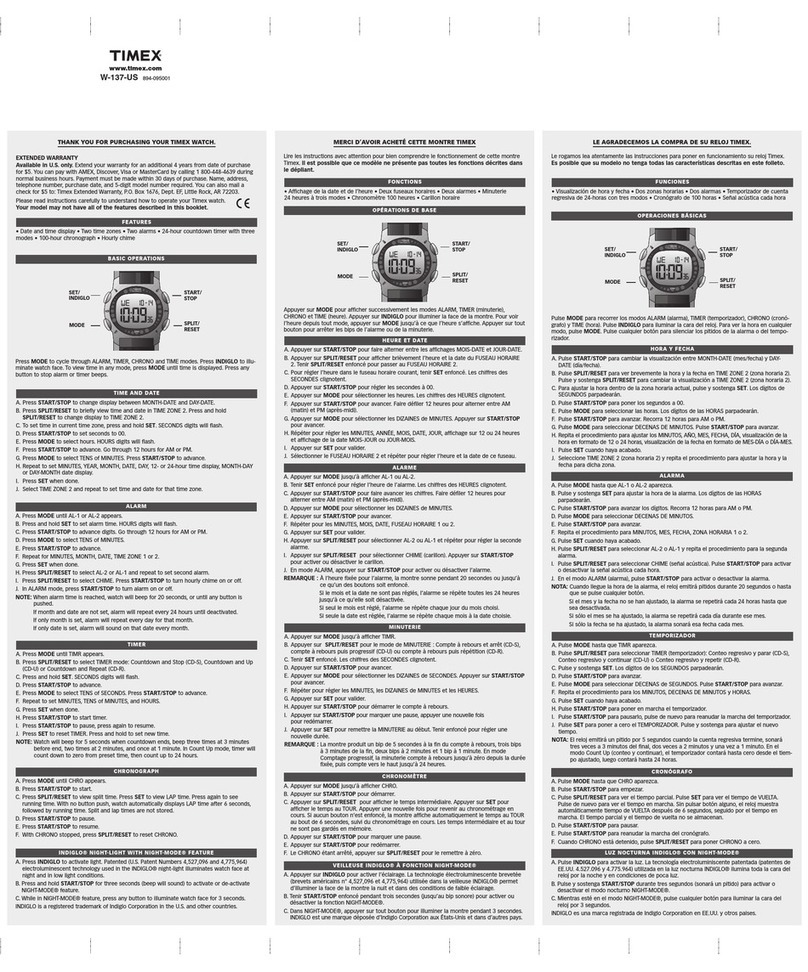
There are 6 buttons on the watch, and to prevent confusion I will identify each by its location upper right,
lower left on the side, lower left on the face, etc. ach button tends to have the same sort of function in
most watch modes, and given only that information, you can figure out most things with your watch, so
I'll give those functions first.
MODE also called PREVIOUS
The lower button on the left side - moves you around outside the modes. (Or backward through the
inside of a mode.)
INDIGLO
The upper button on the left side activates the Indiglo nightlight.
STOP RESET also called SCROLL DOWN (button with a raised line)
The lower left button on the face makes changes downward.
START SPLIT also called LAP-NEXT (button with 3 raised bumps)
The lower right button on the face moves you around forward inside the modes.
RECALL also called SCROLL UP
The upper button on the right side makes changes upward.
SET also called STATUS
The lower button on the right side gets you into and out of setting mode.
1. SETTING THE WATCH.
SETTING
1. First, find the regular time mode by pressing the MOD button until the time (with the date at the
top) shows.
2. Press & hold the S T button until the word NT R disappears and is replaced by the word TIM .
Release that button. You'll notice that at the top of the display, the words S T T1 or S T - T2.
This is where you select between setting the 1st time zone or the 2nd time zone. Select between T1
or T2 by pressing the R CALL button or the STOP/R S T button.
3. Press either the MOD or the START/SPLIT button. You'll notice that whatever is blinking is

what you can change. You can make the changes by pressing either the R CALL or the
STOP/R S T button. You can change the Seconds, the Hours, the Minutes, the Month, the Date,
the Year, and choose between 12 hour (civilian) or 24 hour (military) time. If you keep MOD or
START/SPLIT button, you will go through all the things you can change and start again at the
beginning. The START/SPLIT button goes through these things forward, and the MOD goes
through the backwards, so if you pass something and want to back up, just switch buttons. In the
same way, the R CALL changes things by making them larger, and STOP/R S T changes them
by making them smaller, so if you accidentally pass the number you're trying to set it to, just
switch to the other button and go back.
EXAMPLE OF SETTING THE WATCH
Suppose you want to set the hours and the date in the 2nd Time Zone. (Just as an example, but setting any
other time or date settings would be the same.)
1. Press the lower left button on the side (MOD ) until you see the date & time.
2. Press & hold the lower right button on the side (S T) until the word TIM appears on the display,
then release it.
3. If S T T1 is showing, then press & release the upper right button on the side (R CALL) to
change it to T2 (because we're wanting to set the 2nd Time Zone we'd leave this unchanged if we
wanted to set the 1st time zone, T1.)
4. Press & release the lower right button on the face (START/SPLIT) twice, skipping the seconds.
You should see the hours flashing.
5. Press & release the upper right button on the side (R CALL) repeatedly until you have the hours
position set to what you want it to be. If you pass the hour you want, go to the lower left button on
the face (STOP/R S T) and press & release it to back up.
6. Press & release the lower right button on the face (START/SPLIT) three times, skipping minutes
and months, so that the date begins flashing. Press the R CALL button until you have the date
you want. (You can go backwards by pressing the STOP/R S T.)
7. When you're done, and you've set everything you want to, press & release the S T button once to
tell the watch you're through setting and to lock those settings in.
2. CHRONO (Stopwatch)
1. Travel to the Chronograph mode by pressing & releasing the MOD button once from regular
time. The display should say CHRONO for a moment, which is then replaced by the chronograph
readings. The readings show the laps at the top in small letters, the splits in the middle in large
letters, and at the bottom the segment you are on. (Or next segment you'll start, if you are between
segments.) I'll put definitions for these terms at the bottom of the Chrono section, in case they're
needed.
2. If your laps and splits say anything besides 00, you'll probably want to clear them out before you
get started. Look at STORING & CL ARING TH CHRONO (below) to see how.
TIMING WITH THE CHRONO
1. Press & release the START/SPLIT button (on the right on the face). The chronograph will begin
to run. Laps and splits should say the same thing, since you are on your first lap. To indicate the
beginning of the next lap, press & release the START/SPLIT button again. It will pause for 10
seconds, as if stopped. It's not stopped in fact it's already gone on to the next lap, but it pauses for
10 seconds so you can see how well you did in your last lap. After those 10 seconds, it will revert
back to the next lap. The top line on the display will show how long you've been in the current lap,
and the middle line will show the amount of time you've been in the event. The bottom line will
show which segment you are in, and which lap you are in.

2. If you press & release the STOP/R S T (the left button on the face) the chronograph will stop.
You can use this to either end the event or to pause it. The difference is, if you only wanted to
pause it, then you start it up again by pressing & releasing the START/SPLIT button. The
chronograph will go on as if it never stopped. Pausing the chronograph like this doesn't affect the
laps or splits, other than that they aren't running while it is paused.
3. You can view the laps and splits by pressing the R CALL (upper right) button. It will show you
the date, the number of the segment you are looking at, and the total time for the event. Press &
release it again, and that total time will be replaced with a display of the average time per lap.
Press & release it again, and it will say B ST and show you the time of the quickest lap, as well as
the lap number for that lap. Continue pressing and releasing that button and it will show you each
lap and split of the event, in order. To look at a different segment (those that have been previously
stored), press & release the MOD (lower left on the side) button while you're still in recall mode.
To get out of recall mode, either press & release the STOP/R S T button, or just leave the watch
alone for a few minutes.
4. The chronograph, if running, will continue running if you switch to regular time mode. While in
the regular time mode, you can press the START/SPLIT button to glance at the chronograph
without changing it.
STORING & CLEARING THE CHRONO
1. You can store the laps and splits of an event into memory by pressing the STOP/R S T button
and holding it until the words HOLD TO STOR disappear. It will store that information as one
S GM NT into the memory and clear the information off the display, preparing you for the next
event.
2. You can delete stored segments by pressing & holding the STOP/R S T button after the last
segment has been stored. It will say HOLD TO CL AR S G (and then the last segment number).
If you continue to hold, that segment will be cleared out of memory, and the segment number will
be replaced with the words 'all segs', so the whole display will say HOLD TO CL AR ALL
S GS. If you let go the button now, that segment is all that will be deleted. If you continue to hold
it until the display clears out and shows the lap and split listings, all the segments in memory will
be cleared. Segments can only be erased individually by erasing the most recent segment first.
CHRONOGRAPH TERMS
Laps
The time of your event divided into separate chunks. An example of laps might be: if someone ran 5
miles, each mile could be a lap.
Splits
The time of your event all the way from the beginning of the event right up to the end of the lap. An
example of splits might be: if someone timed a race, then hit the START/SPLIT button as each
person crossed the finish line. ach person's total time would be recorded as one split.
Segment
A segment is a group of laps or splits in a unit. Usually, watch users use these to separate events,
since you save or delete whole segments as a unit instead of as individual laps or splits. An example
of a segment might be: Thursday's run saved as segment three, Friday's saved as segment four.
3. TIMER (Countdown Timer)
Setting
1. Press & release MOD button until you get to TIM R mode.
2. Press & release S T button once. This tells the watch you are ready to set the timer. At this point,
the watch should say "S T # NO. OF R PS". (The # will either be a number from 1 to 9, or the

letter C.) Reps is the number of times the watch will repeat the timing sequence you set. For
instance, if your watch is set with two intervals, one 6 minutes, one 5 minutes, and you choose 3
as your NO. OF R PS, then the watch will count down 6 minutes, sound an alarm, then count
down 5 minutes, sound an alarm, and it will repeat this process 3 times. Thus, you can set number
of times your sequence will repeat to 1 time, 9 times, or anything in between. You can also set "C"
(for "continuous") so that once started, the watch will continue to repeat the sequence (alarming at
the end of every countdown) until you shut it off. Knowing this information, set your NO. OF
R PS by...
3. Press & release R CALL button to increase the NO. OF R PS or press & release STOP/R S T
button to decrease the NO. OF R PS.
4. The watch will present a display that says "Y S - NO CHRONO AT ND." What this means is,
once the all the reps of the entire sequence have repeated themselves, and the timer is through,
then the watch shifts over to Chronograph (stopwatch) mode and begins counting up from 0, so
you'll know if you check back later, how long it's been since the countdowns ended. Choose Y S
or NO to the CHRONO AT ND question by pressing either the R CALL button or
STOP/R S T button. Whatever is flashing is what you have chosen.
NOT : This message will not appear if a) you chose "C" for your NO. OF R PS, (since the watch
knows the countdowns will never end until you stop them) or b) if the chronograph is already
running (in CHRONOGRAPH mode), in which case the display will read "CHRONO IN US "
5. Press & release the START/SPLIT button. The display should show INT then a number between 1
and 9 at the top, and that should be flashing. Below that, you'll see slots for an amount of time in
hours, minutes, and seconds. At the bottom of the display, it will say S T INT. An interval is one
countdown. You can have up to 9 of them, and each can be a different length. ach interval can be
identified by a number, and you select which interval you wish to set by pressing & releasing the
R CALL button to advance through the interval numbers, or pressing & releasing the
STOP/R S T button to go backward through the numbers.
6. Once you've selected the interval you wish to set, press & release the START/SPLIT button to
move to the section of time you want to set. Whatever is flashing is what you can set. Press &
release START/SPLIT to make the next thing flash. If you pass something, don't worry - Just keep
pressing the START/SPLIT and you'll come back to it. (You can also use that button to go back
and change the interval you want to set.) You can set the hours from 1 to 99 (or leave them at 0).
Similarly, minutes and seconds can be set from 1 to 59, or left at 0.
7. Once everything is set on your interval, if you want to set another interval, press the
START/SPLIT until the interval number is flashing. Press the STOP/R S T or R CALL button
to select another interval.
8. Once you have all the intervals set that you want, then press the S T button to lock everything in
and tell the watch you are through setting.
Starting Stopping
Start the countdown timer (while you're in TIM R mode) by pressing the START/SPLIT button. To stop
the countdown, press the same button. To reset the timer to your beginning settings, press & hold the
STOP/R S T button.
WARNING: If the timer has already been reset, then pressing and holding the STOP/R S T button will
clear all your timer intervals back to 0. If you press & hold that button, then check the message it displays
to be safe. It will be either HOLD TO R S T, or HOLD TO CL AR ALL INTS.
4. ALARM
Setting
1. Using the MOD button, go to Alarm mode. The display will say ALARM for a moment, then

that will be replaced by an alarm time. At the top, it will say T1 or T2, followed either by some
dashes, or a month and date. In the middle, it will show a time, and at the bottom it will give the
alarm number. You can set up to 5 alarms on this watch. To choose between the 5 alarms, press
the R CALL button.
2. To set the alarm you have selected, press & release the S T button. T1 (or T2) begins to flash.
This tells the watch whether this alarm should go off according to the time you have set in your
1st time zone, or according to the time in the 2nd time zone. Press the R CALL button to choose
between T1 or T2.
3. Press the START/STOP (lower right button on the face) button and the AM or PM will begin
flashing. Choose whether you want the alarm to go off in AM or PM by pressing the R CALL
button.
4. Press the START/STOP button and the hours will begin flashing. Choose the hour by pressing the
R CALL button. If you pass the hour you want, you can back up by pressing the STOP/R S T
button (the lower left button on the face).
5. Press the START/STOP button and the minutes will begin flashing. Choose the hour by pressing
the R CALL button. If you pass the minute you want, you can back up by pressing the
STOP/R S T button.
6. Press the START/STOP and the months position will begin flashing. If you want the alarm to go
off as a daily alarm, then leave this as dashes. If you want the alarm to go off as an anniversary
(yearly) alarm, then press the R CALL button to set the month. If you pass the month you want,
you can back up by pressing the STOP/R S T button.
7. Press the START/STOP and the days position will begin flashing. If you want the alarm to go off
as a daily alarm, then leave this as dashes. If you want the alarm to go off as an anniversary
(yearly) alarm, or as a once-a-month alarm, then press the R CALL button to set the date. If you
pass the day you want, you can back up by pressing the STOP/R S T button.
8. When everything is set the way you want it, you may get out of setting mode and lock your
settings in by pressing the S T button.
Arming and Disarming the Alarm
When you are in ALARM mode (but not in setting mode) you may turn your alarm on or off by pressing
& releasing the START/STOP button. A little symbol that looks like a clock will appear above the M in
AM or PM when the alarm is armed. If it is disarmed, that symbol will not be there. If that symbol is
showing when you are in regular time mode, then at least one of your 5 alarms is armed. You can go to
alarm mode and use the R CALL button to scroll through all 5 alarms to see which ones are armed.
Arming and Disarming the Hourly Chime
Added by Frank Haney:
The hourly chime is enabled/disabled by pressing the STOP/R S T button when you are in the ALARM
mode. When it is enabled a symbol that looks like a musical note is displayed next to the alarm symbol.
The watch will beep as you disable it.
5. MEMO
The last mode is the M MO mode. You have up to 10 memos with 3 "pages" each. These pages each
hold 8 characters. The characters can be letters, numbers, or a few punctuation symbols. Choose a memo
by pressing & releasing the R CALL button. Scroll through the pages of the memo by pressing &
releasing the START/SPLIT button. Clear a memo by pressing & holding the STOP/R S T button.
To enter a memo or change an existing one, press & release the S T button while in M MO mode.
Repeatedly press & release the R CALL (scroll up) or the STOP/R S T (scroll down) button to select
the character to put in the space that is flashing. Press the START/SPLIT to advance to the next space.

When you are finished, press the S T button to lock your memo in.
While in the regular time mode, you can press the STOP/R S T button to glance at the memo you last
selected in M MO mode.
6. INDIGLO
Activation of the FLIX System Indiglo night-light
1. To activate FLIX, put the watch into Night-Mode by pressing and holding the Indiglo night-light
button (S6) 3 seconds until it beeps.
2. With the watch in Night-Mode, a forward flick of the wrist with a sharp stop will activate the
Indiglo night-light for 3 seconds.
3. To avoid inadvertent activation and to conserve battery life, FLIX is directionally oriented. ONLY
MOV M NTS IN TH DIR CTION OF TH L NS OF TH WATCH COMBIN D WITH A
SHARP STOP WILL ACTIVAT TH INDIGLO NIGHT-LIGHT.
4. Movements in other directions will not activate your Indiglo night-light.
Following notes added by Frank Haney:
Model No: 66801 (probably)
Model No on backplate: 814
Replacement strap Q7B807
Table of contents
Other Timex Watch manuals

Timex
Timex IRONMAN Move x20 FAQs Installation guide

Timex
Timex W-207 User manual

Timex
Timex 155-095000 User manual

Timex
Timex 660-095000 User manual

Timex
Timex iConnect Square M03Z User manual

Timex
Timex 791-095003 User manual

Timex
Timex W205 User manual

Timex
Timex 939-095000 User manual

Timex
Timex W-184 User manual

Timex
Timex W-215 User manual

Timex
Timex FamilyConnect SENIOR User manual

Timex
Timex 70 User manual

Timex
Timex W223 NA User manual

Timex
Timex 94 User manual

Timex
Timex T100 User manual

Timex
Timex KIDS User manual

Timex
Timex Ironman SLEEK 250-LAP User manual

Timex
Timex Stopwatch User manual

Timex
Timex Ironman Data Link USB User manual

Timex
Timex Ironman SLEEK 250-LAP User manual