Timex W217 User manual

W217 AS 111-095012
W217_AS_Cvr_W217_AS_Cvr 3/9/10 11:09 AM Page cvr1

English page 2
日本語 ページ 28
中文 页码 54
Pусский страница 80
W217_AS_Cvr_W217_AS_Cvr 3/9/10 11:09 AM Page cvr3
TIMEX®WATCHES
Congratulations on purchasing your TIMEX®watch.
Please read these instructions carefully to
understand how to operate your Timex timepiece.
Your watch may not have all of the features
described in this booklet.
For more information, please visit:
www.timex.com
W217_AS_EN_analoglayout_4 3/9/10 10:59 AM Page ENi
TABLE OF CONTENTS
2 How to Start Your Watch
3 Water and Shock Resistance
4 Indiglo®Night-Light
5Date Models
7 Day/Date Models
8 Easy Set Alarm
12 Perpetual Calendar
15 Elapsed Time Ring
17 Tachymeter Ring
18 Compass Ring
19 How to Adjust Bracelet
21 Bracelet Link Removal
22 Battery
23 Warranty
ENGLISH
W217_AS_EN_analoglayout_4 3/9/10 10:59 AM Page ENii
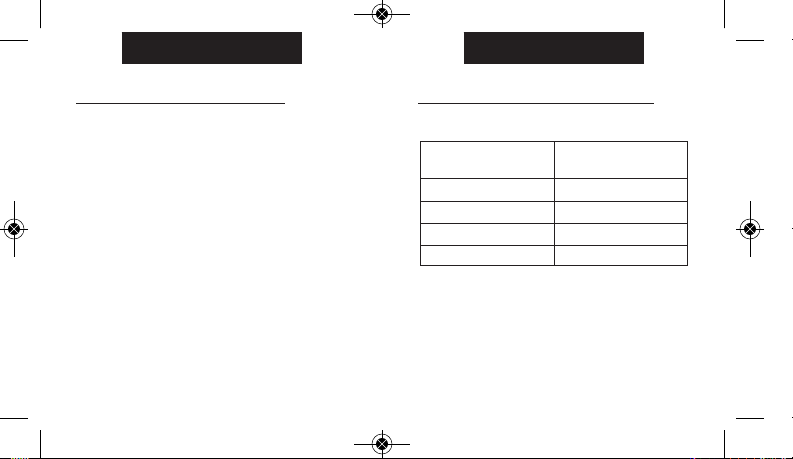
WATER AND SHOCK RESISTANCE
If your watch is water-resistant, meter marking
(WR_M) is indicated.
*pounds per square inch absolute
WARNING: TO MAINTAIN WATER-RESISTANCE,
DO NOT PRESS ANY BUTTONS OR PULL OUT
THE CROWN UNDER WATER UNLESS YOUR
WATCH IS INDICATED AS 200 METER WATER-
RESISTANT.
3
ENGLISH
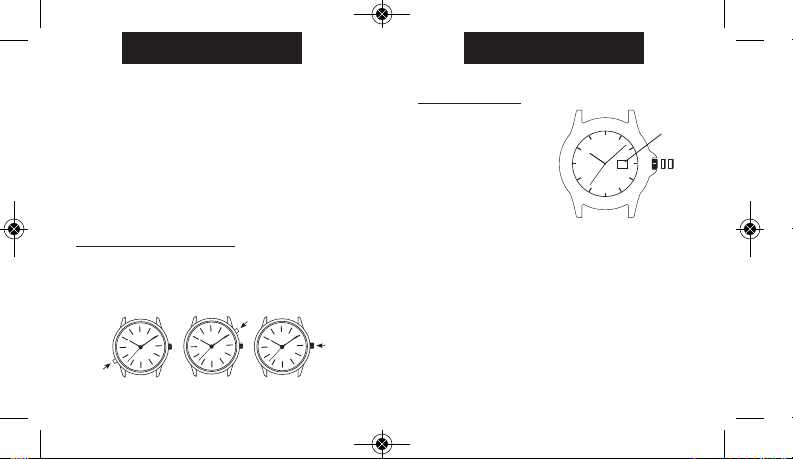
HOW TO START YOUR WATCH
To start your watch remove the plastic guard from
under the crown, then press the crown in against
the case. The second hand will begin advancing in
one-second intervals.
Some deep-depth water-resistant watches require
the setting crown to be screwed in to secure
water-resistance. If your watch case has a protrusion
with screw threads, the crown must be screwed in
after setting the watch.
To screw in, push the crown firmly against the
threaded protrusion and hold in while turning the
crown clockwise. Continue to screw in the crown
until it is tight. You will need to unscrew the crown
(counter-clockwise) before pulling it out the next time
you want to set your watch.
2
ENGLISH
Water-Resistance Depth p.s.i.a. * Water pressure
Below Surface
30m/98ft 60
50m/164ft 86
100m/328ft 160
200m/656ft 284
W217_AS_EN_analoglayout_4 3/9/10 10:59 AM Page 2
DATE MODELS
TO SET TIME:
1) PULL crown all the
way out and turn to
correct time.
2) Push crown in to
restart. For screw-in
setting crown, push
crown in while turning
CLOCKWISE to tighten.
Watches with date: Note correct time of day
(A.M or P.M.) for proper date function.
TO SET DAY:
1) PULL crown to “middle” position and turn
CLOCKWISE until correct day appears. If day does
not change, pull crown to “out” position and turn
CLOCKWISE or COUNTERCLOCKWISE through
necessary number of 24 hour periods until
correct day appears.
C
B
A
CROWN
POSITION
DATE
5
ENGLISH
1. Watch is water-resistant only as long as crystal,
crown and case remain intact.
2. Watch is not a diver watch and should not be
used for diving.
3. Rinse watch with fresh water after exposure to
salt water.
4. Shock-resistance will be indicated on the watch
face or caseback. Watches are designed to pass
ISO test for shock-resistance. However, care
should be taken to avoid damaging the crystal.
INDIGLO®NIGHT-LIGHT
Press button or crown to activate light.
Electroluminescent technology used in the INDIGLO®
night-light illuminates entire watch face at night and in
low light conditions.
4
ENGLISH
W217_AS_EN_analoglayout_4 3/9/10 10:59 AM Page 4

DAY / DATE MODELS
TO SET THE TIME:
1) PULL the crown out
to the “C” position.
2) TURN the crown
either way to the
correct time.
3) PUSH in the crown to
the “A” position.
TO SET THE DATE:
1) PULL the crown out to the “B” position.
2) TURN the crown either way to the correct date.
3) PUSH in the crown to the “A” position.
TO SET THE DAY:
1) PULL the crown out to the “C” position.
2) TURN the crown either way for full 24 hour cycle
to set day.
3) PUSH the crown in to the “A” position.
7
ENGLISH
TO SET “QUICK DATE®” FEATURE:
3-Position Crown:
1) Pull crown to “Middle” position and turn CLOCK-
WISE or COUNTERCLOCKWISE until correct date
appears.
2-Position Crown:
1) Pull crown to “OUT” position and turn CLOCKWISE
until date changes. Repeat until correct date
appears. Adjust date when month has less than
31 days. Push crown in when finished.
Caution: Wearing or storing the watch with the crown
in the "middle" position will cause damage to the move-
ment. Always return the crown to the normal position,
or if you wish to save the battery life while storing the
watch, leave the crown in the "out" position.
The date function advances the date between the
hours of 10 PM and 2 AM. Avoid setting the date
during this timeframe. If you attempt to set the date
during this time period, rotate the crown at a very
slow rate to avoid damaging the watch.
6
ENGLISH
C
B
A
CROWN
POSITION
DAY/DATE
W217_AS_EN_analoglayout_4 3/9/10 10:59 AM Page 6

EASY SET ALARM DATE & TIME SETTINGS
TO SET THE DATE:
1) With the TIMEKEEPING CROWN in the “B” position
TURN the TIMEKEEPING CROWN or TURNING RING
in either direction to set the date.
TO SET THE TIME:
1) With the TIMEKEEPING CROWN in the “C” position
TURN the TIMEKEEPING CROWN or TURNING RING
in either direction to set the time.
EASY SET ALARM SETTINGS
1) Your easy set alarm watch is equipped with two
types of alarms:
2) 12-Hour Alarm: rings OR vibrates twice per day at
the desired hour and minute as long as the alarm
is activated. (Alarm crown must be in “E” position.)
3) Hourly Alarm: rings OR vibrates every hour at the
desired minute if activated. (Alarm crown must be
in “F” position.)
9
ENGLISH
EASY SET ALARM
EASY SET ALARM
WITH DATE & INDIGLO®NIGHT-LIGHT
1) From the “A” position, PUSH the TIMEKEEPING
CROWN in (towards the watch case) to activate
the INDIGLO®Night-Light and illuminate the watch
dial.
8
ENGLISH
A B C POSITION
POSITION
D E F
ALARM CROWN
PULL CROWN “OUT” TO ACTIVATE
THE ALARM
TIMEKEEPING / INDIGLO®
NIGHT-LIGHT CROWN.
PUSH CROWN TO ACTIVATE
THE INDIGLO NIGHT-LIGHT
HOUR MARKER
ALARM SET
TURNING RING
MINUTE MARKER
W217_AS_EN_analoglayout_4 3/9/10 10:59 AM Page 8

TO SET THE HOURLY ALARM:
1) With the ALARM CROWN in the “D” position, TURN
the ALARM CROWN or TURNING RING in either
direction to set the minute alarm marker.
2) To activate the alarm to ring or vibrate at the
desired minute, PULL the ALARM CROWN out to
the “F” position. Three beeps sound and flash
OR a vibration indicates the Hourly Alarm is
activated.
3) The alarm will sound and the dial will flash OR
vibrate at the desired minute and will repeat
every hour on the specified minute unless the
alarm is deactivated.
NOTE: Alarm is deactivated when the ALARM
CROWN is in the “D” position.
If the alarm is not deactivated it will automatically
stop ringing after 20 beeps and flashes OR stop
vibrating, and will resume again in one hour at
the indicated minute.
11
ENGLISH
TO SET THE 12-HOUR ALARM:
1) With the ALARM CROWN in the “D” position,
TURN the ALARM CROWN or TURNING RING in
either direction to set the hour and minute alarm
markers. To activate the alarm to ring or vibrate at
the desired time, PULL the ALARM CROWN out to
the “E” position. A single beep sound and flash,
OR a vibration will indicate that the 12-Hour
Alarm is activated.
2) The alarm will sound and the dial will flash OR
vibrate at the desired time (hour and minute) and
will repeat every twelve hours unless the alarm is
deactivated.
NOTE: Alarm is deactivated when the ALARM
CROWN is in the “D” position.
If the alarm is not deactivated it will automatically
stop ringing after 20 beeps and flashes OR stop
vibrating, and will resume in 12 hours at the
indicated time.
10
ENGLISH
W217_AS_EN_analoglayout_4 3/9/10 10:59 AM Page 10
TO SET TIME
To set time, simply pull crown all the way out and
turn. Day and date change automatically when time
is adjusted past midnight; there is no additional step
for setting day or date. Push crown in when done.
After setting, if date changes at noon, time needs to
be adjusted ahead or back 12 hours.
If crown is accidentally put in MIDDLE position and
turned, date display will change temporarily, but date
setting is unaffected. Simply pull crown all the way
out and set time. Proper date display will resume.
7-YEAR BATTERY LIFE* WITH
FREE LIFETIME REPLACEMENT**
If the battery needs to be changed, we recommend
that only TIMEX replace it. Your watch will need to be
recalibrated to correct time and date after changing
the battery. To return your watch to Timex use a pre-
paid shipper. To obtain a pre-paid shipper please call
1-800-448-4639 or visit the retailer where you
purchased your watch or go to www.TIMEX.com.
Please include the following with your watch to cover
13
ENGLISH
PERPETUAL CALENDAR
Your Perpetual Calendar watch accurately keeps
track of how many days are in each month. It also
adjusts for leap years. The date on your watch
(including the month and year) was preset at the
factory to Eastern Standard Time, Greenwich Mean
Time or Hong Kong Standard Time (depending on
where you purchased your watch). You only need to
adjust the time.
12
ENGLISH
I
I
WED 14
I
I
WED 14
MIDDLE OUT
CHECK DATE
(FACTORY USE ONLY)
SET TIME
DAY, DATE
W217_AS_EN_analoglayout_4 3/9/10 10:59 AM Page 12
Table of contents
Languages:
Other Timex Watch manuals

Timex
Timex W-154-US User manual

Timex
Timex 896-095000 User manual

Timex
Timex W-184 User manual

Timex
Timex Reebok User manual

Timex
Timex W92 User manual

Timex
Timex iConnect User manual

Timex
Timex Ironman User manual

Timex
Timex 941 User manual

Timex
Timex CR1216 Operation manual

Timex
Timex MARATHON M434 User manual

Timex
Timex Ironman Run x20 GPS User manual

Timex
Timex W223 NA User manual

Timex
Timex iConnect Pro User manual

Timex
Timex W-162 User manual

Timex
Timex EXPEDITION WORLD TIME DIGITAL User manual

Timex
Timex 95 User manual

Timex
Timex T5K549 User manual

Timex
Timex DGTL MAKO User manual

Timex
Timex T5F001 User manual

Timex
Timex Global trainer User manual


