TLV CV-COSR User manual

172-65587MA-02 (CV-COSR Pneumatic Control Valve) 3 June 2019
Pneumatic Control Valve
CV-COSR
Copyright © 2019 by TLV CO., LTD.
All rights reserved

172-65587MA-02 (CV-COSR Pneumatic Control Valve) 3 Jun 2019
1
Contents
Introduction ........................................................................ 2
Safety Considerations........................................................ 3
Specifications..................................................................... 5
Configuration...................................................................... 7
Installation.......................................................................... 8
Electrical Wiring ................................................................11
Operational Check ........................................................... 12
Maintenance..................................................................... 14
Disassembly/Reassembly................................................ 15
Troubleshooting................................................................ 19
Product Warranty ............................................................. 21
Options............................................................................. 22

172-65587MA-02 (CV-COSR Pneumatic Control Valve) 3 Jun 2019
2
Introduction
Thank you for purchasing the TLV pneumatic control valve.
This product has been thoroughly inspected before being shipped from the
factory. When the product is delivered, before doing anything else, check the
specifications and external appearance to make sure nothing is out of the
ordinary. Also be sure to read this manual carefully before use and follow the
instructions to be sure of using the product properly.
This product employs an integrated positioner/diaphragm-type actuator with
no lever, making it very compact. In addition, a threaded condensate drainage
port is provided at the bottom of the body to allow installation of a blow valve
or steam/air trap in order to eliminate condensate flowing in the piping,
contributing to prevention of valve seat erosion and rapid start-up of the
equipment.
This instruction manual is intended for use with the model(s) listed on the front
cover. It is needed not only for installation, but also for subsequent
maintenance, disassembly/reassembly and troubleshooting. Please keep it in
a safe place for future reference.

172-65587MA-02 (CV-COSR Pneumatic Control Valve) 3 Jun 2019
3
Safety Considerations
Read this section carefully before use and be sure to follow the instructions.
Installation, inspection, maintenance, repairs, disassembly, adjustment and valve
opening/closing should be carried out only by trained maintenance personnel.
The precautions listed in this manual are designed to ensure safety and prevent
equipment damage and personal injury. For situations that may occur as a result
of erroneous handling, three different types of cautionary items are used to
indicate the degree of urgency and the scale of potential damage and danger:
DANGER, WARNING and CAUTION.
The three types of cautionary items above are very important for safety: be sure
to observe all of them as they relate to installation, use, maintenance and repair.
Furthermore, TLV accepts no responsibility for any accidents or damage
occurring as a result of failure to observe these precautions.
Symbols
Indicates a DANGER, WARNING or CAUTION item.
DANGER
Indicates an urgent situation which poses a threat of death or
serious injury
WARNING
Indicates that there is a potential threat of death or serious injury
CAUTION
Indicates that there is a possibility of injury or equipment / product
damage
CAUTION
Install properly and DO NOT use this product outside the
recommended operating pressure, temperature and other
specification ranges.
Improper use may result in such hazards as damage to the
product or malfunctions that may lead to serious accidents. Local
regulations may restrict the use of this product to below the
conditions quoted.
Use hoisting equipment for heavy objects (weighing
approximately 20 kg (44 lb) or more).
Failure to do so may result in back strain or other injury if the
object should fall.
Take measures to prevent people from coming into direct
contact with product outlets.
Failure to do so may result in burns or other injury from the
discharge of fluids.
When disassembling or removing the product, wait until the
internal pressure equals atmospheric pressure and the
surface of the product has cooled to room temperature.
Disassembling or removing the product when it is hot or under
pressure may lead to discharge of fluids, causing burns, other
injuries or damage.
Continued on next page

172-65587MA-02 (CV-COSR Pneumatic Control Valve) 3 Jun 2019
4
CAUTION
Be sure to use only the recommended components when
repairing the product, and NEVER attempt to modify the
product in any way.
Failure to observe these precautions may result in damage to the
product and burns or other injury due to malfunction or the
discharge of fluids.
Do not use excessive force when connecting threaded pipes
to the product.
Over-tightening may cause breakage leading to fluid discharge,
which may cause burns or other injury.
Use only under conditions in which no freeze-up will occur.
Freezing may damage the product, leading to fluid discharge,
which may cause burns or other injury.
Use only under conditions in which no water hammer will
occur.
The impact of water hammer may damage the product, leading to
fluid discharge, which may cause burns or other injury.
Make sure the power supply is OFF before carrying out work
on the wiring or inspections involving disassembly.
If such work is carried out with the power on, there is a danger
that equipment may malfunction or electric shock may occur,
leading to injury or other accidents.
Make sure that wiring work requiring a special license is
carried out by qualified personnel.
If carried out by unqualified personnel, overheating or short
circuits leading to injury, fires, damage or other accidents may
occur.
When using this product, NEVER stand close to, or leave
tools anywhere near, moving parts, such as the shaft.
Contact with moving parts or objects becoming caught in moving
parts could lead to injury or damage or other accidents.

172-65587MA-02 (CV-COSR Pneumatic Control Valve) 3 Jun 2019
5
Specifications
Install properly and DO NOT use this product outside the recommended
operating pressure, temperature and other specification ranges.
Improper use may result in such hazards as damage to the product or
malfunctions which may lead to serious accidents. Local regulations
may restrict the use of this product to below the conditions quoted.
CAUTION
Use only under conditions in which no freeze-up will occur. Freezing
may damage the product, leading to fluid discharge, which may cause
burns or other injury.
CAUTION
Refer to the product nameplate*** for detailed specifications.
Model
Nominal Diameter
Maximum Allowable*
Pressure*
Maximum Operating
Pressure
Maximum Allowable
Temperature (TMA)*
Maximum Operating
Temperature (TMO)
Valve No.**
Production Lot No.
Cv(US) or Kvs(DIN) & Valve Characteristic
* Maximum allowable pressure (PMA) and maximum allowable temperature (TMA) are
PRESSURE SHELL DESIGN CONDITIONS, NOT OPERATING CONDITIONS.
** Valve No. is displayed for products with options. This item is omitted from the nameplate
when there are no options.
*** Nameplate layout depends on product specifications.
Actuator/Pneumatic Positioner
Actuator Area
120 cm2(18.6 in2)
Operation
Air-to-Open (Reverse Action)
Air Supply Connection Port
Pneumatic positioner body G1/4(with adapter for
G1/4× RC1/4, BSPT1/4or NPT1/4)
Maximum Air Supply Pressure
0.6 MPaG (85 psig)
Motive Medium
Oil-free air, filtered to 5 µm
Air Consumption
At air supply pressure 0.4 MPaG: 0.16 Nm3/h
(55 psig: 5.65 ft3/h)
Electrical Input Signal/Resistance
4 to 20 mA DC / approximately 300 Ω
Electrical Connection Port
PG11
Protection Class
IP54 (dust and splash-proof type)
Allowable Ambient Temperature Range
-10 to 60 C (14 to 140 F)
Material
Die cast aluminum/synthetic resin
Air Supply Pressure
Size
Pressure Supplied
to Filter Regulator
Air Pressure Supplied to
Positioner
Air Pressure Supplied to
Actuator
(Spring Range)
15 –50 mm
(1/2–2 in)
0.40 –0.60 MPaG
(55 –85 psig)
0.38 MPaG
(54 psig)
0.21 –0.33 MPaG
(30 –48 psig)
(1 MPa = 10.197 kg/cm2)

172-65587MA-02 (CV-COSR Pneumatic Control Valve) 3 Jun 2019
6
Valve
Size mm (in)
15 (1/2)
20 (3/4)
25 (1)
40 (11/2)
50 (2)
Maximum Operating
Pressure (PMO)
See nameplate
Maximum Operating
Temperature (TMO)
See nameplate
Applicable Fluid*
Steam, Water, Air
Valve Plug & Stem/
Valve Seat Material
Stainless steel
Valve Characteristic
Equal percentage
Stroke (Travel)
15 mm (9/16 in)
Rangeability
50:1
Cv and Kvs
Values
Cv (US)
3.5
6.0
9.0
27
40
Cv (UK)
2.9
5.0
7.5
23
33
Kvs (DIN)
3.0
5.1
7.7
23
34
Valve Leakage Rate
(Leak Rate Class)
Less than 0.01% of the rated Cv and Kvs value
(IEC/ANSI/EN Class IV)
Condensate Drainage
Port
Rc(PT)1/2, BSPT1/2or NPT1/2
(1 MPa = 10.197 kg/cm2)
*Do not use for toxic, flammable or otherwise hazardous fluids.

172-65587MA-02 (CV-COSR Pneumatic Control Valve) 3 Jun 2019
7
Configuration
Size: 15 –25 mm
No.
Part Name
M*
R*
1
Actuator Body
2
Pressure Gauge
3
Bushing
4
Specifications Sticker
5
Guide Bushing
6
Valve Bonnet Nut
7
Valve Bonnet
8
Stuffing Box V-rings
9
Stuffing Box Washer
10
Stuffing Box Spring
11
Valve Plug & Stem
12
Valve Bonnet Gasket
13
Bolt
14
Flange
15
Valve Bonnet Guide
16
Valve Bonnet Guide Gasket
17
Body
18
Valve Seat
19
Valve Seat Gasket
20
Cover Plug
21
Cover Plug Gasket
22
Nameplate
23
Gasket
24
Bolt
25
Nut
26
Stem Bracket Connector Plate Set
27
Drain Plug
Size: 40, 50 mm
No.
Part Name
M*
R*
1
Actuator Body
2
Pressure Gauge
3
Bushing
4
Specifications Sticker
5
Guide Bushing
6
Valve Bonnet Nut
7
Valve Bonnet
8
Stuffing Box V-rings
9
Stuffing Box Washer
10
Stuffing Box Spring
11
Valve Plug & Stem
12
Valve Bonnet Gasket
13
Bolt
14
Flange
15
Valve Bonnet Guide
16
Valve Bonnet Guide Gasket
17
Body
18
Valve Seat
19
Valve Seat Gasket
20
Cover
21
Cover Gasket
22
Nameplate
23
Gasket
24
Bolt
25
Nut
26
Stem Bracket Connector Plate Set
27
Cover Bolt
28
Drain Plug
*Replacement parts are available only in the following kits:
M = Maintenance Kit R = Repair Kit

172-65587MA-02 (CV-COSR Pneumatic Control Valve) 3 Jun 2019
8
Installation
Install properly and DO NOT use this product outside the recommended
operating pressure, temperature and other specification ranges.
Improper use may result in such hazards as damage to the product or
malfunctions which may lead to serious accidents. Local regulations
may restrict the use of this product to below the conditions quoted.
CAUTION
Use hoisting equipment for heavy objects (weighing approximately
20 kg (44 lb) or more). Failure to do so may result in back strain or other
injury if the object should fall.
CAUTION
Take measures to prevent people from coming into direct contact with
product outlets. Failure to do so may result in burns or other injury from
the discharge of fluids.
CAUTION
Installation, inspection, maintenance, repairs, disassembly and adjustment and
valve opening/closing should be carried out only by trained maintenance
personnel.
Check to make sure that the piping where the product is to be installed is
constructed properly. If the piping is not correctly constructed, the valve may not
perform optimally.
1. Blowdown
Before installing the CV-COSR unit, be sure to blow down all piping thoroughly.
If this is not possible, perform a blowdown using the bypass valve. Blowdown
is especially important for newly installed piping or after the system has been
shut down for a long period of time.
2. Removing any Protective Caps and Seals
Before installation, be sure to remove all protective seals and caps.
(Found in 2 locations, on the product inlet and outlet.)
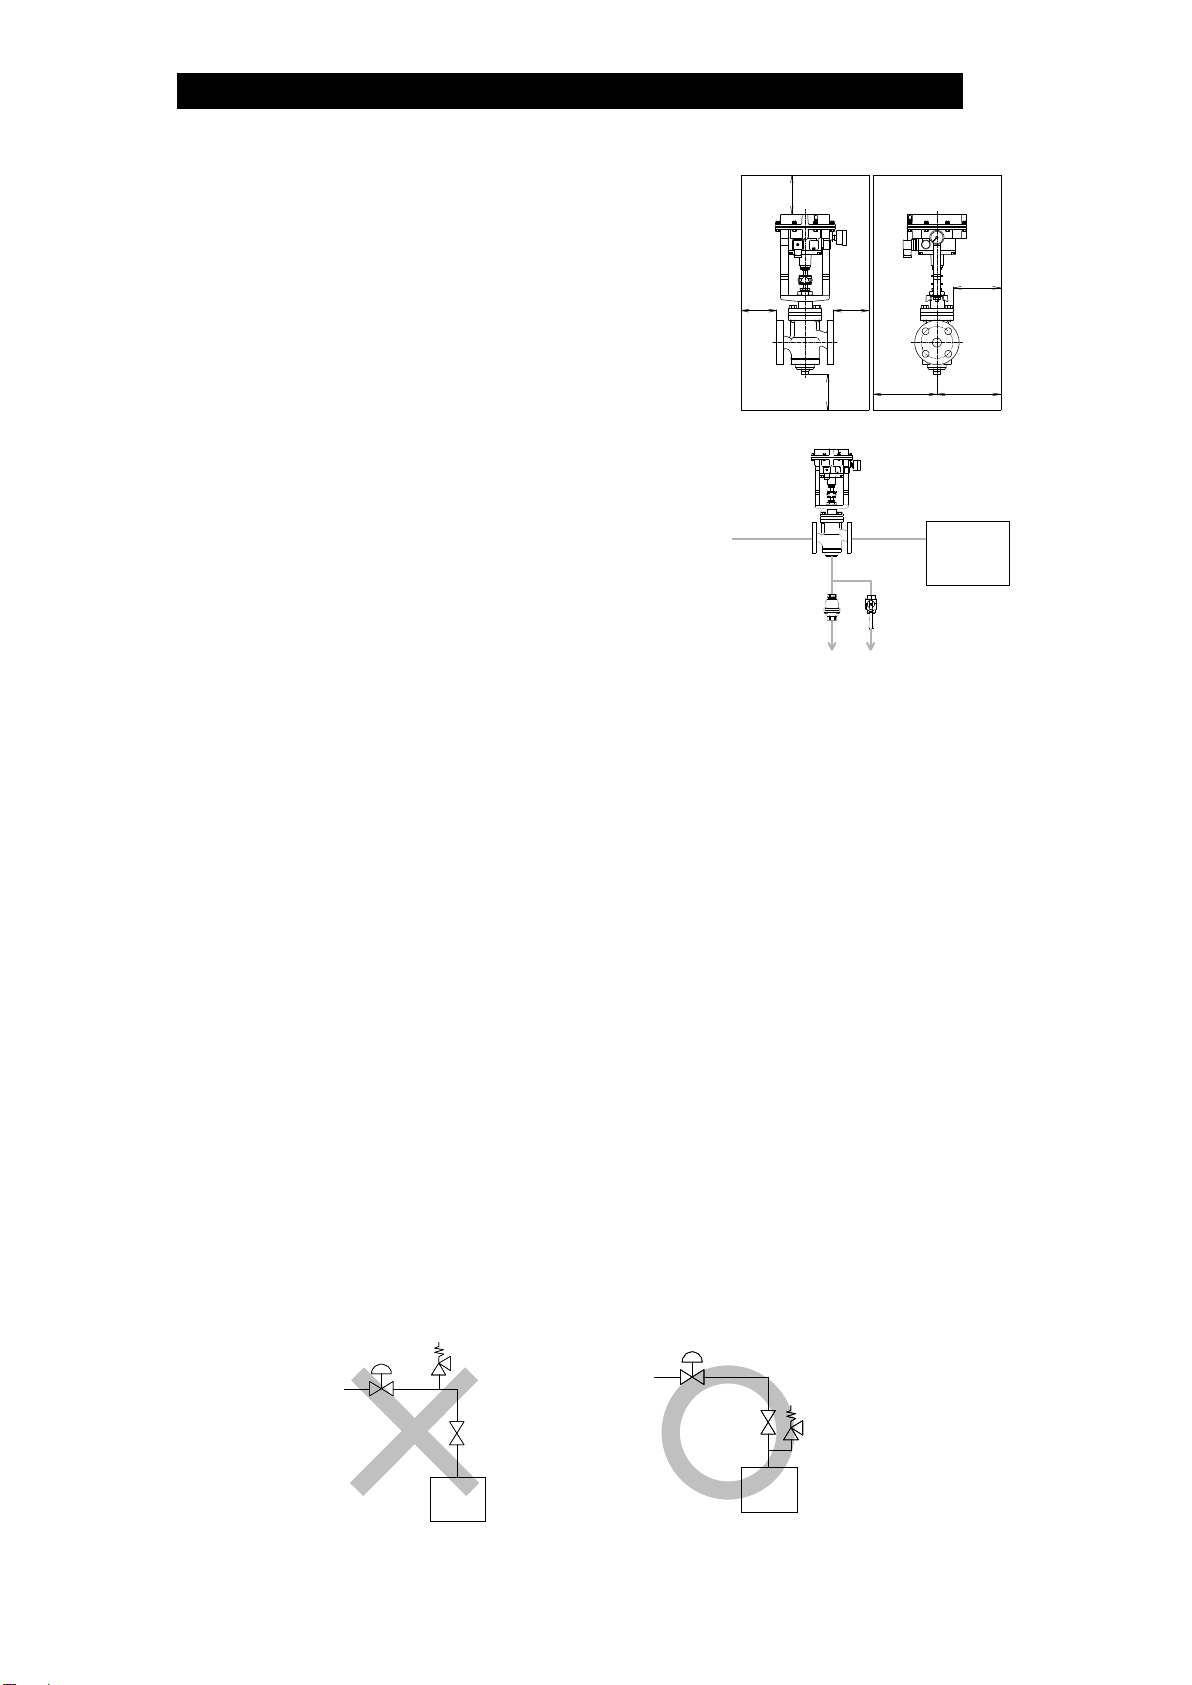
3. Installation Orientation
Install the CV-COSR so that the arrow mark on
the body points in the direction of fluid flow.
If the CV-COSR is going to be used with the drain
plug in place, there are no further restrictions on
the installation orientation. If a blow valve or a
steam/air trap is going to be installed, the CV-
COSR should be installed horizontally in the
piping with the actuator at the top.
4. Piping Support
Install the CV-COSR, paying attention to avoid excessive
load, bending and vibration. Support the inlet and outlet
pipes securely.
① ②
172-65587MA-02 (CV-COSR Pneumatic Control Valve) 3 Jun 2019
9
5. Maintenance Space
Leave sufficient space for maintenance, inspection
and repair.
6. Drainage Port Usage Example
The threaded condensate drainage port at the
bottom of the body makes possible installation of
a blow valve or steam/air trap. Because the
condensate drainage port is located on the
primary side of the CV-COSR, condensate
flowing in the primary side piping can quickly be
eliminated, contributing to prevention of valve
seat erosion and rapid start-up of the equipment.
7. Accessories
Always install a shut-off valve, pressure gauge and bypass lines at both inlet and
outlet. Ball valves, which will not retain condensate, are recommended for inlet
and outlet shut-off valves. The bypass pipe should be at least 1/2of the size of the
inlet (primary side) pipe.
8. Installation Environment
Check the installation environment to make sure that the ambient temperature
does not exceed the actuator ambient temperature limit and that no corrosive
gasses are present.
9. Shut-off Valve Installation
Though the CV-COSR adequately performs the function of a shut-off valve
initially, extended use will result in a drop in its performance as an isolation valve.
Be sure to install a separate shut-off or automatic valve if complete isolation is
needed.
10. Safety Valve Installation
When installing a safety valve, be sure not to install it between the control valve
and the shut-off valve. It must be installed near the equipment it is to protect,
on the outlet side of the shut-off valve.
Safety Valve
Safety Valve
Drainage Pit
Approx.
300 mm
(12 in)
100 mm
(4 in)
100 mm
(4 in)
110 mm
(41/2in)
100 mm
(4 in)
400 mm
(16 in)
400 mm
(16 in)

172-65587MA-02 (CV-COSR Pneumatic Control Valve) 3 Jun 2019
10
11. Avoid Foreign Matter and Water Hammer
Do not install in locations in the piping where foreign matter accumulates or
where impact from water pressure (water hammer) occurs.
12. Piping Gaskets
Be careful that the piping gaskets do not protrude outside the inner bore of the
flange.
The type of medium being used and the temperature must be taken into account
in order to select a gasket of a suitable material.
13. Air Line Blowdown/Purge
Before connecting the air lines for the motive air that is to be piped to the
actuator, blow out the air in the lines to purge any dirt, foreign matter, oil or water
from inside of the piping.
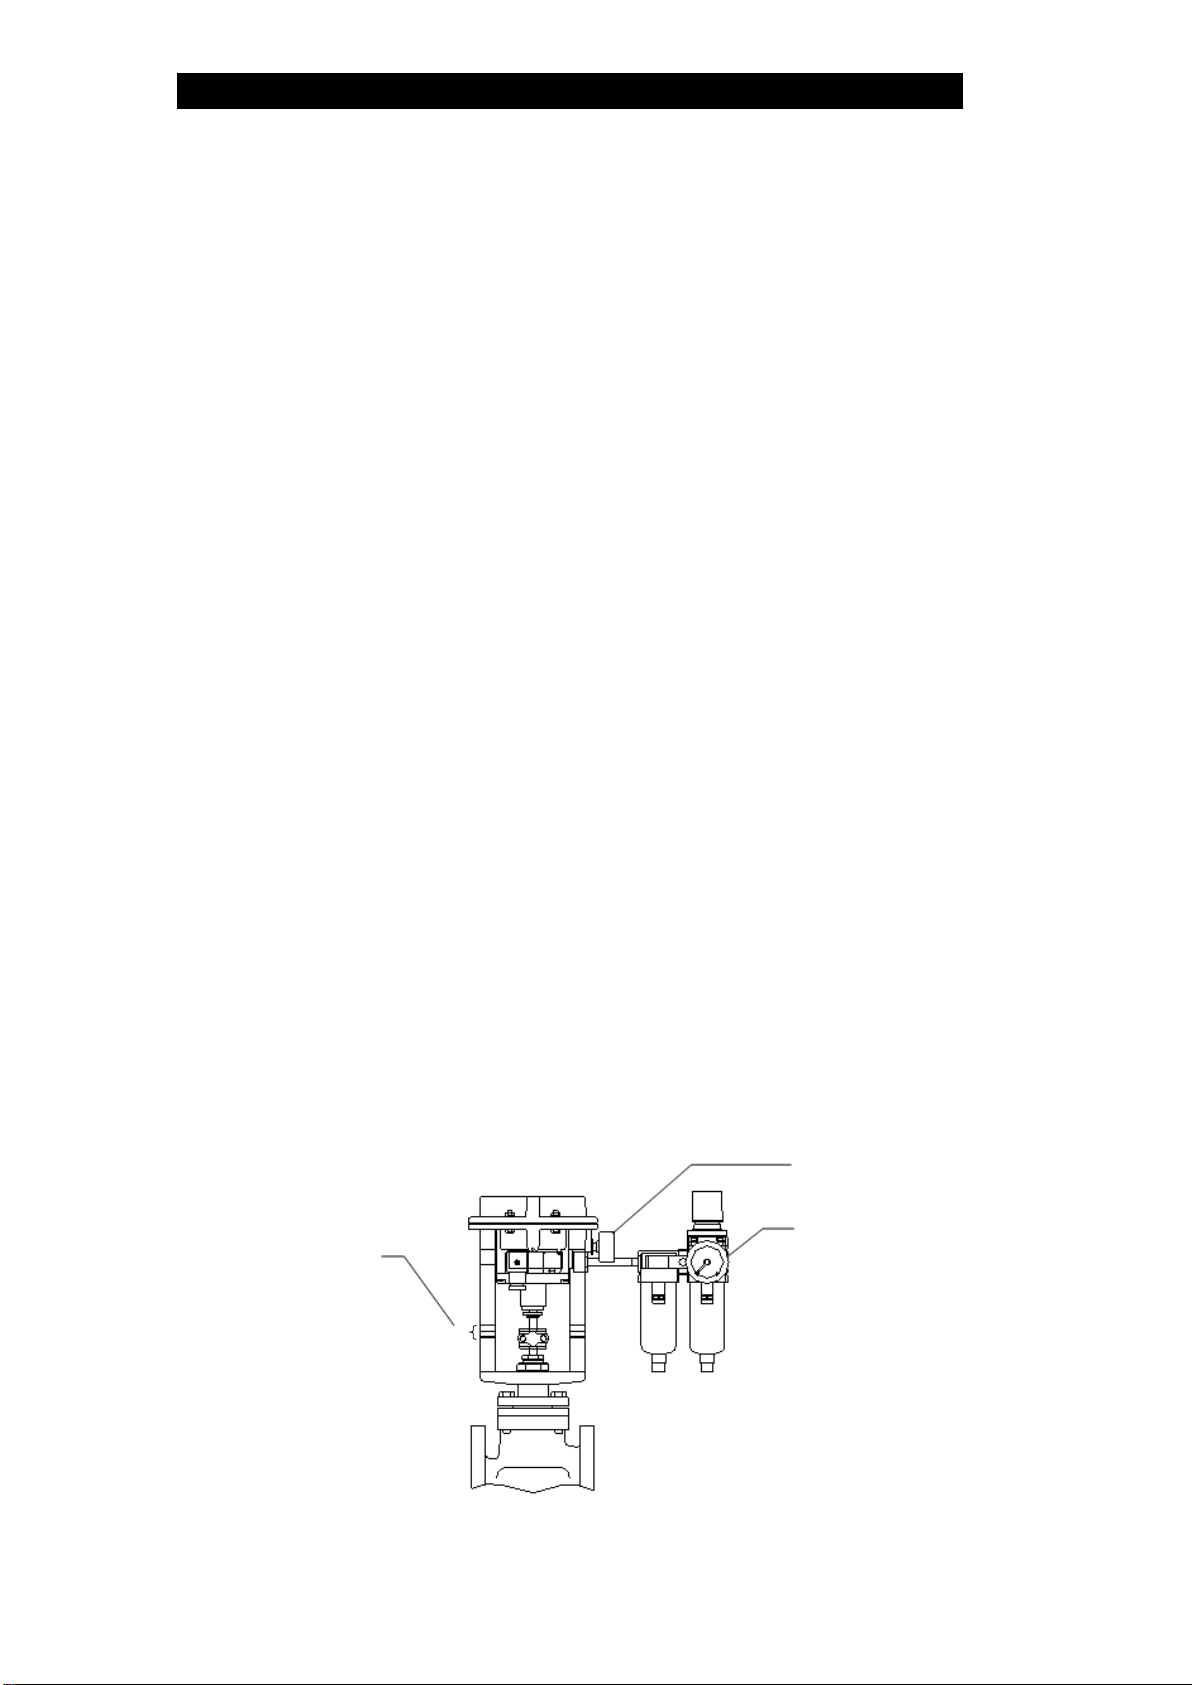
14. Quality of Motive Air
Supply to the actuator only clean air that does not contain water, oil or foreign
matter.
To prevent malfunction due to contamination of the air supply, installation of the
optional air filter regulator (5µ filter) and mist separator (0.3µ filter) as a set is
recommended.
If air quality results in operation failure, the entire actuator unit (including the
integrated positioner) must be replaced.
If there is a problem in operation, determine the cause using the “Troubleshooting”
section in this manual.

172-65587MA-02 (CV-COSR Pneumatic Control Valve) 3 Jun 2019
11
Electrical Wiring
Make sure the power supply is OFF before carrying out work on the
wiring or inspections involving disassembly. If such work is carried out
with the power on, there is a danger that equipment may malfunction or
electric shock may occur, leading to injury or other accidents.
CAUTION
Make sure that wiring work requiring a special license is carried out only
by qualified personnel. If carried out by unqualified personnel,
overheating or short circuits leading to injury, fires, damage or other
accidents may occur.
CAUTION
Connecting the Electrical Plug Connector
1. Loosen the screw (1) in the center section of the electrical wiring plug connector
by using a screwdriver.
2. Pull the entire plug connector out of the actuator. Be careful not to lose the rubber
gasket (5).
3. Insert a screwdriver into the notch (4) in the terminal plug (3) and remove the
terminal plug (3) from the plug connector case (2).
4. Insert the input signal wiring through the wiring connection port (6) and connect
the wiring to the 1(+), 2(-) and ground terminals at the symbols imprinted on the
terminal plug (3), taking care not to reverse the polarity.
5. Reinsert the connected terminal plug (3) into the plug connector case (2).
When inserting the terminal plug (3) into the plug connector case (2), the
orientation of the wiring connection port may be altered by rotating the terminal
plug (3) 90or 180.
6. Reinsert the plug connector into the actuator. Make sure to correctly align the
male and female pins. Remember to reinsert the rubber gasket (5) between the
plug connector and the actuator.
7. Retighten the screw (1) in the center section of the electrical wiring plug connector
by using a screwdriver.
Connector
Screw
NOTE: Use shielded cable to avoid noise interference in the electrical wiring.
172-65587MA-02 (CV-COSR Pneumatic Control Valve) 3 Jun 2019
12
Operational Check
Before beginning steady operation, perform an operational check by following the
steps outlined below:
1. Close the shut-off valves on the CV-COSR inlets and outlets. Check operation
without yet starting the flow of fluid (steam, water or air).
2. Check to make sure the designated air pressure is being supplied to the pneumatic
positioner. (Air pressure: 0.38 MPaG (54 psig))
NOTE: If the air supply pressure is incorrect, adjust it using an inlet air reducing valve.
NOTE: If an air reducing valve is attached, check the reading on its pressure gauge.
3. Turn on the power to the controller operation signal source, etc. (referred to
hereinafter as the controller).
4. Set the operation signal output from the controller to the CV-COSR to 0% (4 mA).
5. Check the CV-COSR valve travel and the actuator air supply pressure.
Valve Travel: Fully closed (valve travel 0%)
Air Pressure: 0 MPaG (check the pressure gauge on the pneumatic positioner for
the air pressure)
NOTE: If the air pressure is not 0 MPaG (0 psig), refer to the "Adjusting the Zero/
Span" section of this product Instruction Manual and adjust the zero.
6. Set the controller operation signal to 100% (20 mA).
7. Check the CV-COSR valve travel and the actuator air supply pressure.
Valve Travel: Fully open (valve travel 100%)
Air Pressure: Approximately 0.38 MPaG (54 psig) (check the pressure gauge on
the pneumatic positioner for the air pressure)
NOTE: If the valve travel differs widely from 100%, refer to the "Adjusting the
Zero/Span" section of this product Instruction Manual and re-adjust the
span and the zero.
NOTE: If the control valve does not move from the fully closed position, check to
see if the wires for the controller and control valve have any breaks, short-
circuits, or have their polarity reversed (+ and –are reversed).
8. Set the controller operation signal to 50% (12 mA).
9. Make sure valve travel is smooth and without vibration.
NOTE: If the valve is vibrating vertically, it may be being caused by noise on the
signal wiring. Check to see if there is a possible source of noise nearby.
Actuator Air Supply Pressure
Positioner Air Supply
Pressure Gauge
Valve Travel Gauge

172-65587MA-02 (CV-COSR Pneumatic Control Valve) 3 Jun 2019
13
Adjusting the Zero/Span
1. After connecting the air piping, operate the air pressure reducing valve to maintain
the positioner air supply pressure at 0.38 MPaG (54 psig) (reverse action).
2. Connect a current generator or a controller for input of an operation signal of 4 to
20 mA.
3. Loosen the cover plate screw and open the cover plate.
4. Pull out the jumper pin. (Be sure not to lose it.)
5. Set the operation signal output from the current generator or controller to 4 mA
(0%).
6. Turn the zero adjustment dial slowly until the valve just begins to open (the
actuator pressure gauge just beings to move). (The valve must NOT be open.)
NOTE: Turning counterclockwise causes the valve to begin to open earlier.
7. Change the operation signal to 4.1 mA (1%) and check to make sure the valve
begins to open.
8. Change the operation signal to 4 mA (0%) and check to make sure the valve is
completely closed (the actuator pressure gauge is completely at zero).
9. Change the operation signal to 20 mA (100%), and make sure that the stroke
indicator reads in the vicinity of 100%.
If it does not, use a precision flat-head screwdriver to turn the span adjustment
potentiometer until it is close to 100%.
NOTE: Turning clockwise increases the stroke (travel).
10. Each modification of the span results in a zero shift. Repeat the above correction
procedure until both the zero and span are correct.
11. After completing the adjustment, insert the jumper pin securely into their previous
position and close the cover.
Stroke Guide
Zero/Span Adjustment
100%
50%
0%
Stroke Gauge
Span Adjustment
Potentiometer
Jumper Pin
Cover Plate
Zero Adjustment
Dial

172-65587MA-02 (CV-COSR Pneumatic Control Valve) 3 Jun 2019
14
Maintenance
Take measures to prevent people from coming into direct contact with
product outlets. Failure to do so may result in burns or other injury from
the discharge of fluids.
CAUTION
When disassembling or removing the product, wait until the internal
pressure equals atmospheric pressure and the surface of the product
has cooled to room temperature. Disassembling or removing the
product when it is hot or under pressure may lead to discharge of fluids,
causing burns, other injuries or damage.
CAUTION
Be sure to use only the recommended components when repairing the
product, and NEVER attempt to modify the product in any way. Failure to
observe these precautions may result in damage to the product or burns
or other injury due to malfunction or the discharge of fluids.
CAUTION
Operational Check
An inspection of the following items should be done on a daily basis to determine
whether the product is operating properly or has failed. Periodically (at least
biannually) the operation should also be checked.
In the event of failure (malfunction), also refer to the "Troubleshooting" section for
remedies.
Inspection Item
Inspection Points
Remedy for Failure (Malfunction)
Leakage from valve
(when the valve is
closed)
Visual inspection or stethoscope
inspection; is the outlet side
pressure or temperature elevated,
or is there the sound of the
medium flowing?
Adjust the zero/span; if that does
not solve the problem, replace
with a new valve plug & stem and
valve seat
Leakage from gland
area
Visual inspection; is fluid leaking
from the gap between the gland
and the valve stem, or are there
signs it has leaked previously?
Coat the gland and the valve
stem with grease; if that does not
solve the problem, replace with
new V-rings
Air leakage from
actuator
Visual inspection or stethoscope
inspection; can the sound of a
large amount of air leaking from
the actuator area or the exhaust
tap during stable actuator
operation always be heard?
Replace with a new actuator unit
Leakage from the
gaskets between
any pressurized
parts
Visual inspection; is fluid leaking
from the gasket areas on
pressurized parts?
Apply additional tightening (refer
to recommended torque) or
replace with new gaskets
Leakage from
pressurized parts
such as body and
valve bonnet
Visual inspection; is fluid leaking
from pressurized parts such as
the body or valve bonnet?
Replace any pressurized parts at
leak locations
Operating conditions
Visual inspection; does the actual
valve travel differ from the
designated operation signal value?
Readjust the air pressure
reducing valve and positioner
zero and span; if that does not
solve the problem, refer to the
"Troubleshooting" section

172-65587MA-02 (CV-COSR Pneumatic Control Valve) 3 Jun 2019
15
Disassembly/Reassembly
When disassembling or removing the product, wait until the internal
pressure equals atmospheric pressure and the surface of the product
has cooled to room temperature. Disassembling or removing the
product when it is hot or under pressure may lead to discharge of fluids,
causing burns, other injuries or damage.
CAUTION
Be sure to use only the recommended components when repairing the
product, and NEVER attempt to modify the product in any way. Failure to
observe these precautions may result in damage to the product or burns
or other injury due to malfunction or the discharge of fluids.
CAUTION
Use the following procedures to remove components. Use the same procedures in
reverse to reassemble. (Installation, inspection, maintenance, repairs, disassembly,
adjustment and valve opening/closing should be carried out only by trained
maintenance personnel.)
NOTE: Be sure to coat all threaded portions of the valve seat and bolts with anti-seize.
Perform the following procedure before beginning disassembly:
1. After connecting the air piping, operate the air pressure reducing valve to maintain
the positioner air supply pressure at 0.38 MPaG (54 psig).
2. Connect a current generator or a controller for input of an operation signal of 4 to
20 mA.
Removing/Reattaching the Stem Bracket Plates
Part
During Disassembly
During Reassembly
—
Set the actuator air supply
pressure to 0 MPaG (0 psig)
to maintain the valve in the
fully closed position.
Set the actuator air supply
pressure to 0 MPaG (0 psig) to
maintain the valve in the fully
closed position.
Check to make sure the valve
stem and actuatorstem are in
firm contact with each other.
Bolts and
Nuts
Remove with a socket wrench
Consult the table of tightening
torques and tighten to the
proper torque
Stem
Bracket
Plate
Take the bracket apart
(separates into 2 plates)
After aligning the plates, tighten
the nuts and bolts while making
sure the gap between the
plates is even on both sides
CAUTION
Be careful not to pinch your fingers between the
valve stem and actuator stem!
Disassembling/Reassembling the Valve and Actuator Sections
Part
During Disassembly
During Reassembly
The actuator unit
orientation can be
changed.
—
Set the operation signal input
to 12 mA (50%)
Make sure the gap between
the valve stem and the
actuator stem is open
Set the operation signal input
to 12 mA (50%)
Make sure the gap between
the valve stem and the
actuator stem is open
Valve
Bonnet Nut
Remove with an open-end
wrench
Consult the table of tightening
torques and tighten to the
proper torque
CAUTION
Be careful not to pinch your fingers between the
valve stem and actuator stem!

172-65587MA-02 (CV-COSR Pneumatic Control Valve) 3 Jun 2019
16
Disassembling/Reassembling of the Body Section
Part
During Disassembly
During Reassembly
Guide Bushing
Loosen slightly with a socket wrench to
make the following procedure easier
Consult the table of tightening torques
and tighten to the proper torque
Bolts for flange
Remove with a socket wrench
Tighten the bolts evenly, while checking
to make sure that there is no catching
or biting when the valve plug is seated
in the valve seat; after tightening to the
rated torque, check to make sure that
the valve plug & stem moves up and
down smoothly; make sure to tighten
evenly
Flange
Pull up and off, being careful not to
damage the valve plug & stem or valve
seat
Reattach, being careful not to damage
the valve plug & stem or valve seat
Insert the valve bonnet into the gasket
housing securely and without tilting
Valve Bonnet
Valve Bonnet
Gasket
Remove the gasket and clean sealing
surfaces
Be sure to replace with a new gasket;
do not coat with anti-seize
Valve Bonnet
Guide
Pull up and off, being careful not to
damage the valve plug & stem or valve
seat
The difference between the inner
diameter of the body and the outer
diameter of the valve bonnet guide is
very small, so make sure that it does
not tilt and get caught when pulling the
valve bonnet guide up and off
Reattach, being careful not to damage
the valve plug & stem or valve seat
The difference between the inner
diameter of the body and the outer
diameter of the valve bonnet guide is
very small, so make sure that it does
not tilt and get caught when inserting
the valve bonnet guide
Valve Bonnet
Guide Gasket
Remove the gasket and clean sealing
surfaces
Replace with a new gasket if warped or
damaged
Valve Plug &
Stem
Pull up and out, being careful not to
damage the plug & stem
Reattach, being careful not to damage
the plug & stem
Valve Seat
Remove with a socket wrench
Consult the table of tightening torques
and tighten to the proper torque
Valve Seat
Gasket
Remove the gasket and clean sealing
surfaces
Replace with a new gasket if warped or
damaged
Valve Bonnet Guide
Gasket
Valve Plug & Stem
Valve Seat
Valve Seat Gasket
Body
Bolt
Flange
Guide Bushing
Valve Bonnet
Valve Bonnet
Gasket
Valve Bonnet
Guide

172-65587MA-02 (CV-COSR Pneumatic Control Valve) 3 Jun 2019
17
Removing/Reattaching the Cover Plug and Cover
Part
15 –25 mm
40, 50 mm
During Disassembly
During Reassembly
Drain Plug*
Remove with an appropriate
tool; be careful of residual
fluid flowing out from inside
the body
Wrap threaded portion with
sealing tape; consult the
table of tightening torques
and tighten to the proper
torque
Cover Plug
Uses a screwed connection;
remove with an appropriate
tool
Consult the table of
tightening torques and
tighten to the proper torque
Cover
Remove cover bolts with an
appropriate tool
Consult the table of
tightening torques and
tighten cover bolts to the
proper torque
Cover Plug
Gasket
Remove the gasket and
clean sealing surfaces
Replace with a new gasket if
warped or damaged
*When a steam/air trap or blow valve is connected to the bottom of the body, piping
connected to the steam/air trap or the blow valve should be removed.
15 –25 mm
40, 50 mm
Body
Cover Plug Gasket
Cover Plug
Cover
Cover Bolt
Drain Plug
Disassembling/Reassembling the Gland and its Components
In the procedure below, first partially loosen the guide bushing and then remove the
valve plug & stem before removing the other parts. (The procedure is most easily
performed if the bushing is loosened while it is attached to the valve body.)
Part
During
Disassembly
During Reassembly
Guide
Bushing
Stuffing Box
Washer
Stuffing Box
Spring
Valve Bonnet
Stuffing Box
V-rings
BLK
BLK
WHT
BLK
BLK
Sectional View of
Stuffing Box V-rings
Guide
Bushing
Remove with a
socket wrench
Consult the table of
tightening torques and
tighten to the proper torque
Stuffing Box
V-rings
Pull up and out
Make sure to reassemble the
V-rings in the proper
orientation; coat the groove
with heat-resistant silicon
grease; reattach the V-rings
with their grooves facing
downward
Stuffing Box
Washer
Pull up and out
Reinsert
Stuffing Box
Spring

172-65587MA-02 (CV-COSR Pneumatic Control Valve) 3 Jun 2019
18
Parts Inspection
When parts have been removed, use the following table to inspect the parts and
replace any that are found to be defective.
Inspection Item
Gasket(s): Check for warping and damage
(Graphite gaskets MUST be replaced if disassembled)
Stuffing Box V-rings: Check for warping or damage
Valve Plug & Stem, Valve Seat: Check for damage or scratches
Table of Tightening Torques
Part
15 mm (½ in)
20 mm (¾ in)
25 mm (1 in)
40 mm (1½ in)
50 mm (2 in)
Torque
Dist.
Across
Flats
Torque
Dist.
Across
Flats
Torque
Dist.
Across
Flats
Torque
Dist.
Across
Flats
Torque
Dist.
Across
Flats
N·m
(lbf·ft)
mm
(in)
N·m
(lbf·ft)
mm
(in)
N·m
(lbf·ft)
mm
(in)
N·m
(lbf·ft)
mm
(in)
N·m
(lbf·ft)
mm
(in)
Bolts and Nuts for
Stem Bracket Plates
7
(5.1)
8
(5/16)
7
(5.1)
8
(5/16)
7
(5.1)
8
(5/16)
7
(5.1)
8
(5/16)
7
(5.1)
8
(5/16)
Valve Bonnet Nut
150
(72)
36
(113/32)
150
(72)
36
(113/32)
150
(72)
36
(113/32)
150
(72)
36
(113/32)
150
(72)
36
(113/32)
Guide Bushing
(Valve Bonnet
Section)
120
(88)
24
(15/16)
120
(88)
24
(15/16)
120
(88)
24
(15/16)
120
(88)
24
(15/16)
120
(88)
24
(15/16)
Bolts for Flange
40
(29)
17
(21/32)
40
(29)
17
(21/32)
40
(29)
17
(21/32)
40
(29)
17
(21/32)
50
(37)
19
(3/4)
Valve Seat
100
(73)
30
(13/16)
100
(73)
30
(13/16)
125
(92)
36
(113/32)
250
(185)
50
(131/32)
300
(220)
60
(23/8)
Cover Plug
250
(185)
41
(15/8)
250
(185)
41
(15/8)
350
(260)
46
(113/16)
—
—
—
—
Cover Bolt
—
—
—
—
—
—
60
(44)
17
(21/32)
70
(51)
19
(3/4)
Drain Plug
40* (29*) N·m (lb·ft) 14 (9/16) mm (in)
(1 N·m ≈ 10 kg·cm)
* These values represent tightening torques for threads that are wrapped with 3 - 3.5 turns of sealing
tape.

172-65587MA-02 (CV-COSR Pneumatic Control Valve) 3 Jun 2019
19
Troubleshooting
When disassembling or removing the product, wait until the internal
pressure equals atmospheric pressure and the surface of the product
has cooled to room temperature. Disassembling or removing the
product when it is hot or under pressure may lead to discharge of fluids,
causing burns, other injuries or damage.
CAUTION
When the product fails to operate properly, use the following table to locate the
cause and remedy.
Problem
Cause
Diagnosis
Remedy (Countermeasure)
Valve Leakage
The pressure of the
air supply to the
positioner is too high
Check the pressure of the air
supply to the positioner and
confirm product specifications
Adjust the pressure of the air
supply for the positioner to
match the pressure in the
product specifications
The positioner’s zero
point is miscalibrated
Check the actuator air supply
pressure (on the positioner’s
pressure gauge) when the
operation signal is at 4 mA
If the pressure on the pressure
gauge is elevated (not 0
MpaG (0 psig)), adjust the
positioner’s zero point
The inlet pressure for
the valve is too high
Check the inlet pressure for
the valve
Operate at an inlet pressure of
1.0 MPaG (150 psig) or less
The valve plug and
valve seat are off-
center
Move the valve plug & stem up
and down and check to see if it
catches
Reassemble the valve bonnet
section correctly
There is a problem
with the sealing
surfaces of the valve
plug and valve seat
Check the valve plug and
valve seat
Replace with a new valve plug
& stem and valve seat
The valve does
not travel
beyond a certain
point
The bellowphragm in
the actuator is broken
Check to see if a large amount
of air is leaking from the
exhaust tap
Replace with a new positioner/
actuator unit
[Check to make sure that the
valve is not operating
(traveling) too often and that
the ambient temperature is not
too high]
The positioner’s
internal parts are
broken
(The diaphragm is
cracked, etc.)
Check to see if any unusual
noise is coming from the
positioner
Replace with a new positioner/
actuator unit
[Check to make sure that the
valve is not operating
(traveling) too often and that
the ambient temperature is not
too high]
There is insufficient
air supply pressure to
the positioner
Check the pressure of the air
supply to the positioner and
refer to product specifications
Adjust the supply air pressure
for the positioner
(Confirm product
specifications)
Malfunction of the
signal system
Check to make sure the
controller is emitting a 4 to 20
mA signal and that the wires
are not disconnected, etc.
Inspect the controller and
repair the signal wiring if
necessary
Continued on next page
Table of contents
Other TLV Control Unit manuals


