TOP racing PHOTON User manual


3
Made by vabroom
/ www.rctech.net
, provided for publication to www.petitrc.com
T.O.P. Amendment:
Place Mold J-03-1 (40T flange) on top of Mold J-01-1 (Spool) before applying small amount of instant glue, so
that the glue could get in the small gap between the glue parts. This way the glue would not get on the teeth of
the pulley due to higher surface tension formed at the contact junction of the two parts
Building Tips:
- Make sure the pulley guide is glued on all the way. If you only have it glued only in the inner diameter, it will flex
and the belt will come off. (ejevans post 1182)
Building Tips:
- When building mine what I did is I tapped the spool all the way through from both sides with a 3mm tap. The
when inserting the drive cups into the spool it made sure to push them in rather firmly to make absolutely sure
they get fully seated. This is important because the fit is quite snug and it would be easy to think that the screw is
threaded far enough in when in fact the drive cups may not even be all the way in. Now that the cups are fully
seated and you have some good, sec u r e , p re -threaded threads in the spool you can just go ahead and insert the
originally supplied screws ( in think they are 10 - 12mm) and you will have no doubt that the screws are properly
attached. (mrrcguy post 1066)
- To get a bit more bite into your spool and stop the drive cups from rounding out, replace the 3mm kit screws with
#5 x 5/8” wood screw. NOTE: You have to trim about 1.5-2mm from the end of each screw so they don't hit inside


5
Made by vabroom
/ www.rctech.net
, provided for publication to www.petitrc.com
To avoid the end of TC-PDT001-1 (diff. screw) from touching PO-DT0006-1 (Dog Bone C Drive) in Step 15 when
using smaller rear toe-in or larger camber angles, reduce the number of TC-PDT004-1 (Diff. Cone Washer) to 4
pcs or use our optional 44.5mm universal bone.
Building Tips:
- Make sure you sand the diff rings really good. The rings in the kit are far from being truly flat. Use like a 200 then
go up to 400 grit getting the rings as flat as they can be. You'll see what I mean when you start sanding. It takes a
little bit on each ring to get it right. (schreff post 1365)
- The Photon diff is super smooth out of the box, so keeping it this is a priority. Here’s what I do to keep it this way:
•-Build the diff as normal: sand the rings with fine grit sandpaper, liberally coat the thrust in Associated
black grease, and use a good quality diff lube on the balls themselves. I use ceramic balls and I will use a
ceramic 1pc thrust when one eventually becomes available.
•Tighten the diff and run it in, then readjust the tightness. I run diff in by holding one wheel and holding
one wheel and holding half throttle for 30 seconds.
•Stretch some heat shrink over the outdrive to cover the adjustment hole
•Plug the hole above the screw/thrust with some foam or similar – Tamiya shock foam bushings are a
perfect fit.
•Smear grease on the outdrive under where the diff cover joins to catch any grit that makes its past the
cover. (craigm)
- We left the thin 12×0.3 mm shims on the outdrives off as to achieve a small amount of axial play between the
differential outdrives and the bearings (Step 05). Also the triangle shaped slots in the differential gear hold extra
ball grease. This is a nice idea and seems to work but we advise not to use too much grease as otherwise things can
become a bit messy. After our first run the rear differential felt a bit gritty. Maybe it slipped a bit under
acceleration. We disassembled it, polished the diff rings with WD40 and very fine grit wet & dry paper and
reassembled it. After this treatment the differential felt smooth and consistent for the rest of the day. (Quantum
Mechanics review)
- The kit came with 9 thrust balls but only 8 are required. ONLY USE 8. (stiltskin 4491)

6
Made by vabroom
/ www.rctech.net
, provided for publication to www.petitrc.com
T.O.P. Amendment:
The fitting between Mold L-03-1 a n d M o ld L -02-1 are purposefully designed to have a tight fitting. Be very
careful when applying instant glue at the contact edge AFTER the 2 parts are locked together. TC-PDT005RD-1 is
replaced by TC-PDT005BK-1.
Building Tips:
- When gluing the centre drive pulleys and the outer flanges together we first pressed the outer rings onto the
pulleys and applied tiny drops of CA glue after that. You can dose the amount of glue easily by applying a small
drop on the tip of a scalpel and let it drip into the gap. (Quantum Mechanics review)
T.O.P. Amendment
The fitting between Mold L-03-1 a n d M o ld L -02-1 are purposefully designed to have a tight fitting. Be very
careful when applying instant glue at the contact edge AFTER the 2 parts are locked together. TC-PDT005RD-1 is
replaced by TC-PDT005BK-1.
Building Tips:
- Ream the holes of the spur before putting it on the adapter. (mikexray post 4999)
- Spur gears - Of course you can run as small as the pulleys. How big depends. If you use the optional "wings" that
connect through the center then a 116 is the maximum. If you take this off I think you can run a 120 (don't quote
me as I'm not 100%) and possibly 124 if you slightly bevel the slot under the spur in the chassis. The possible pinion
size with this I am not sure but I only recommend this for if you use the car for foam tires to move the motor
7
Made by vabroom
/ www.rctech.net
, provided for publication to www.petitrc.com
forward. In rubber - center to back on the motor screw slots will provide the best performance. (josh cyrul post
1013)
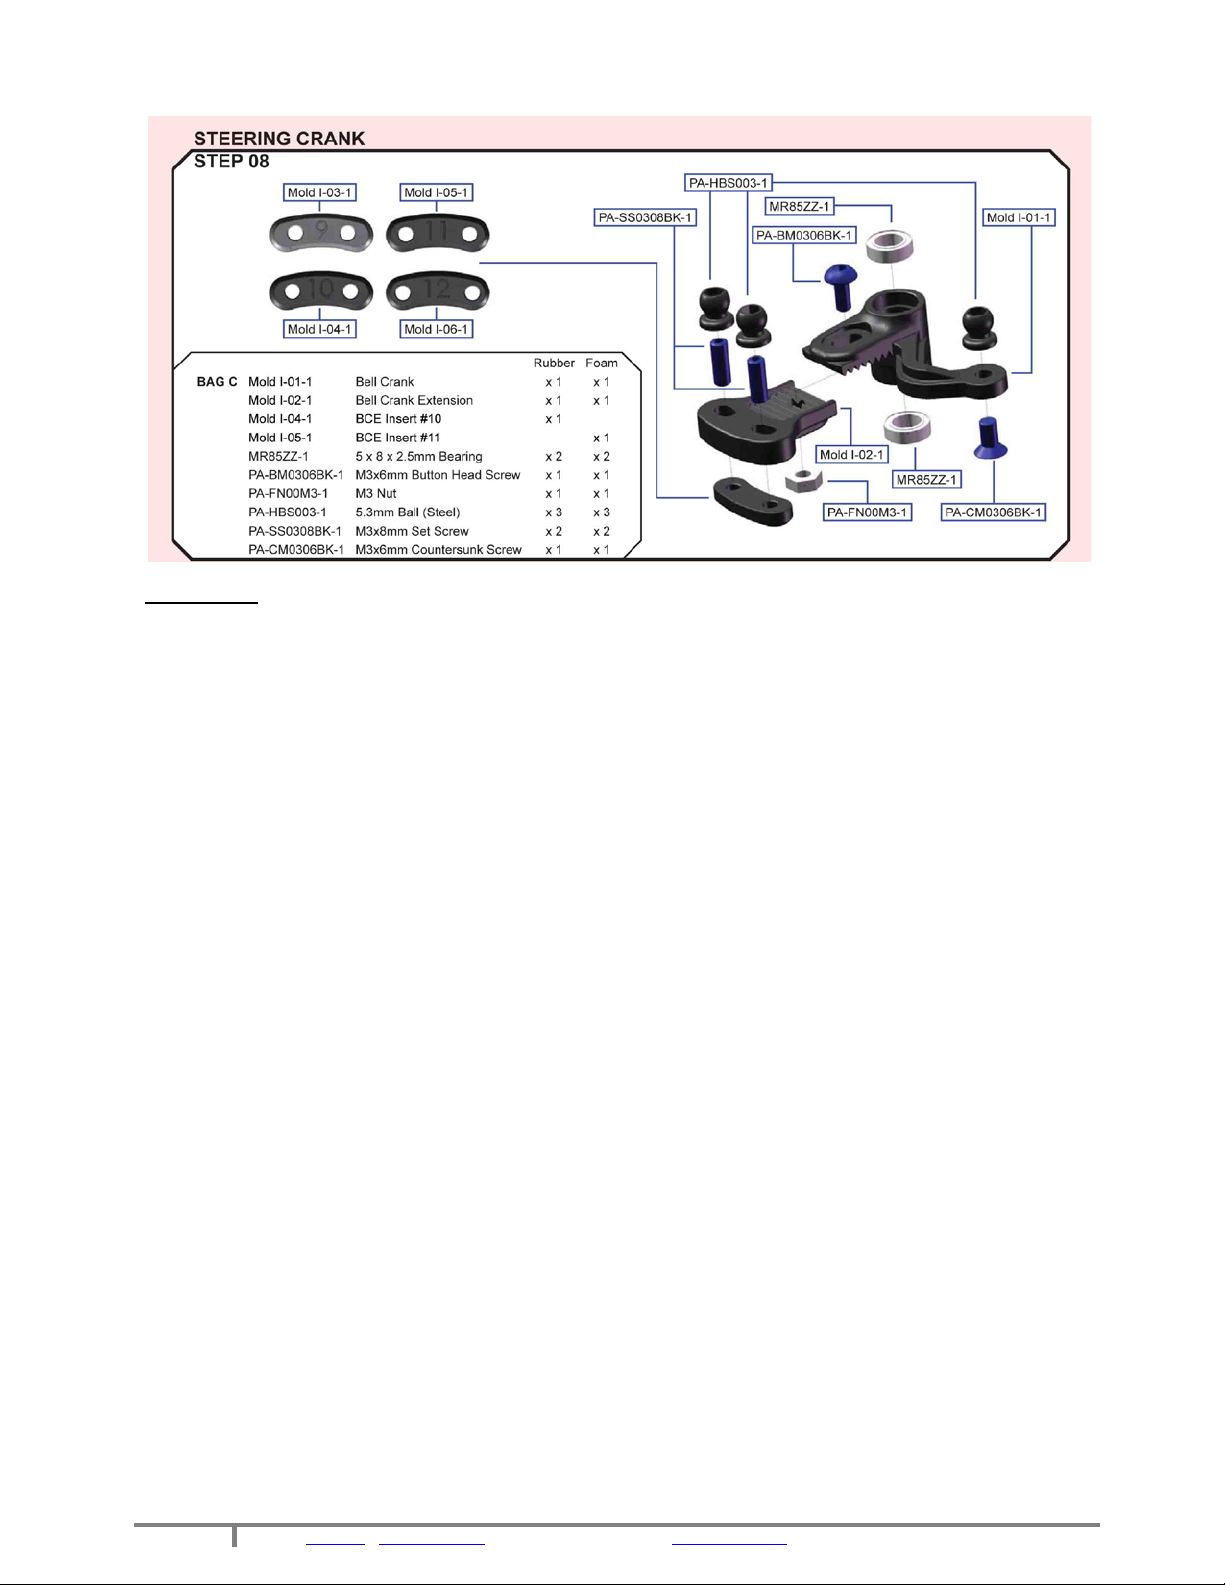
Building Tips:
- When connecting #mold1-02-1 to mold1-01-1 (ackerman rack) use a 3x8mm screw rather than the supplied
3x6mm screw.
This will allow easy adjustment of the rack without separation of the rack due the the extra few threads. (mrrcguy
post 923)
- A couple tips I've picked up from the local TOP team like LarryF, use button heads to mount the ballstuds on the
bellcrank, I also used a longer screw on the adjustment screw. (mikexray post 4999)
- In my first run with car I hit a board and ripped a screw clean out of the Ackerman plate (a servo saver would
have also helped). While trying to fix it, I dropped the nut out of the bottom of the plate and it was a massive PITA
to get back together. To alleviate these problems, I did the following:
•Glue the nut into the back of the plate with rubber cement or CA.
•Use a slightly longer screw into said nut, to give you another 2mm for easy Ackerman adjustment.
•Use normal screws from the bottom up in the radial Ackerman plates in place of the grub screws. There
isn’t much clearance for the heads above the chassis wings so I ream the radial plate holes slightly and use
countersunk screws. (craigm)


10
Made by vabroom
/ www.rctech.net
, provided for publication to www.petitrc.com
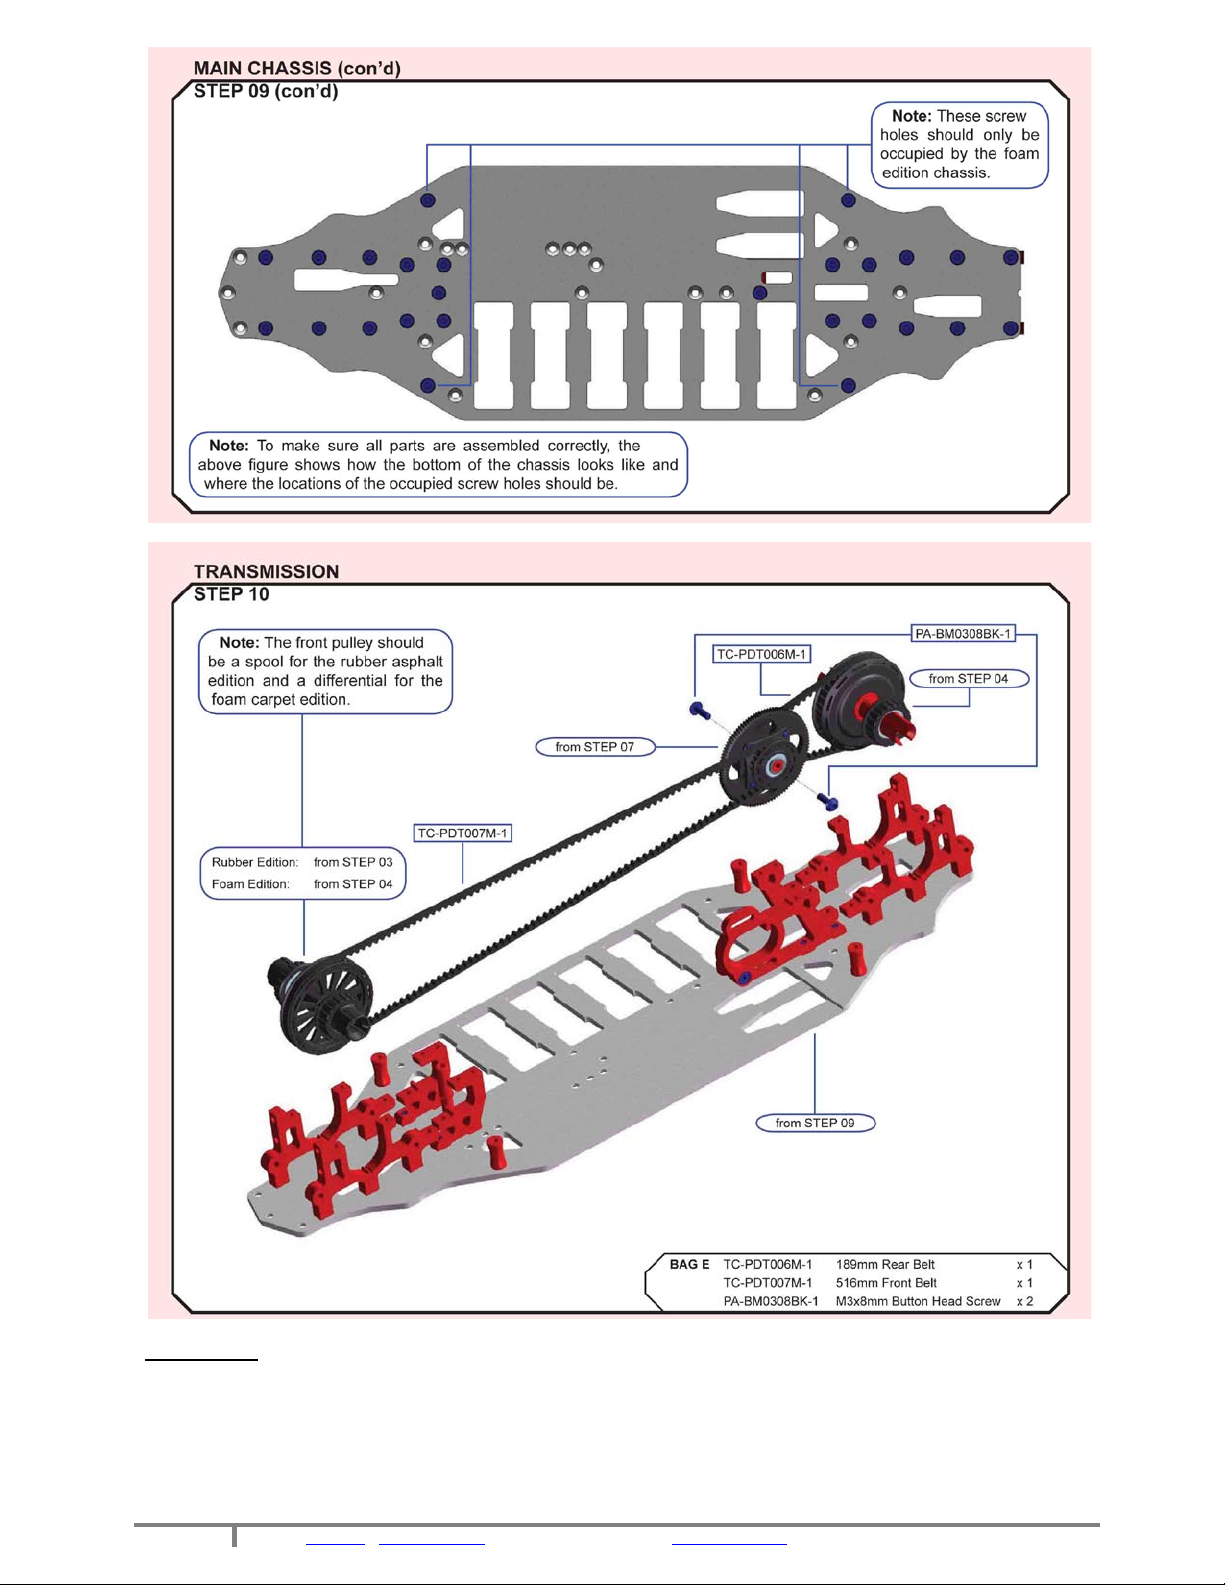
Building Tips:
- I'm running the belts the standard way. If I was trying to get weight down under 1400 then I would reverse the
belts so I can take off weight and still balance the car L/R. (ejevans 4393)
- To avoid chassis tweak, loosen all top deck screws INCLUDING the lay shaft screws. Tighten all of the top deck
screws then finally tighten up the lay shaft screws should fix your problem.
11
Made by vabroom
/ www.rctech.net
, provided for publication to www.petitrc.com
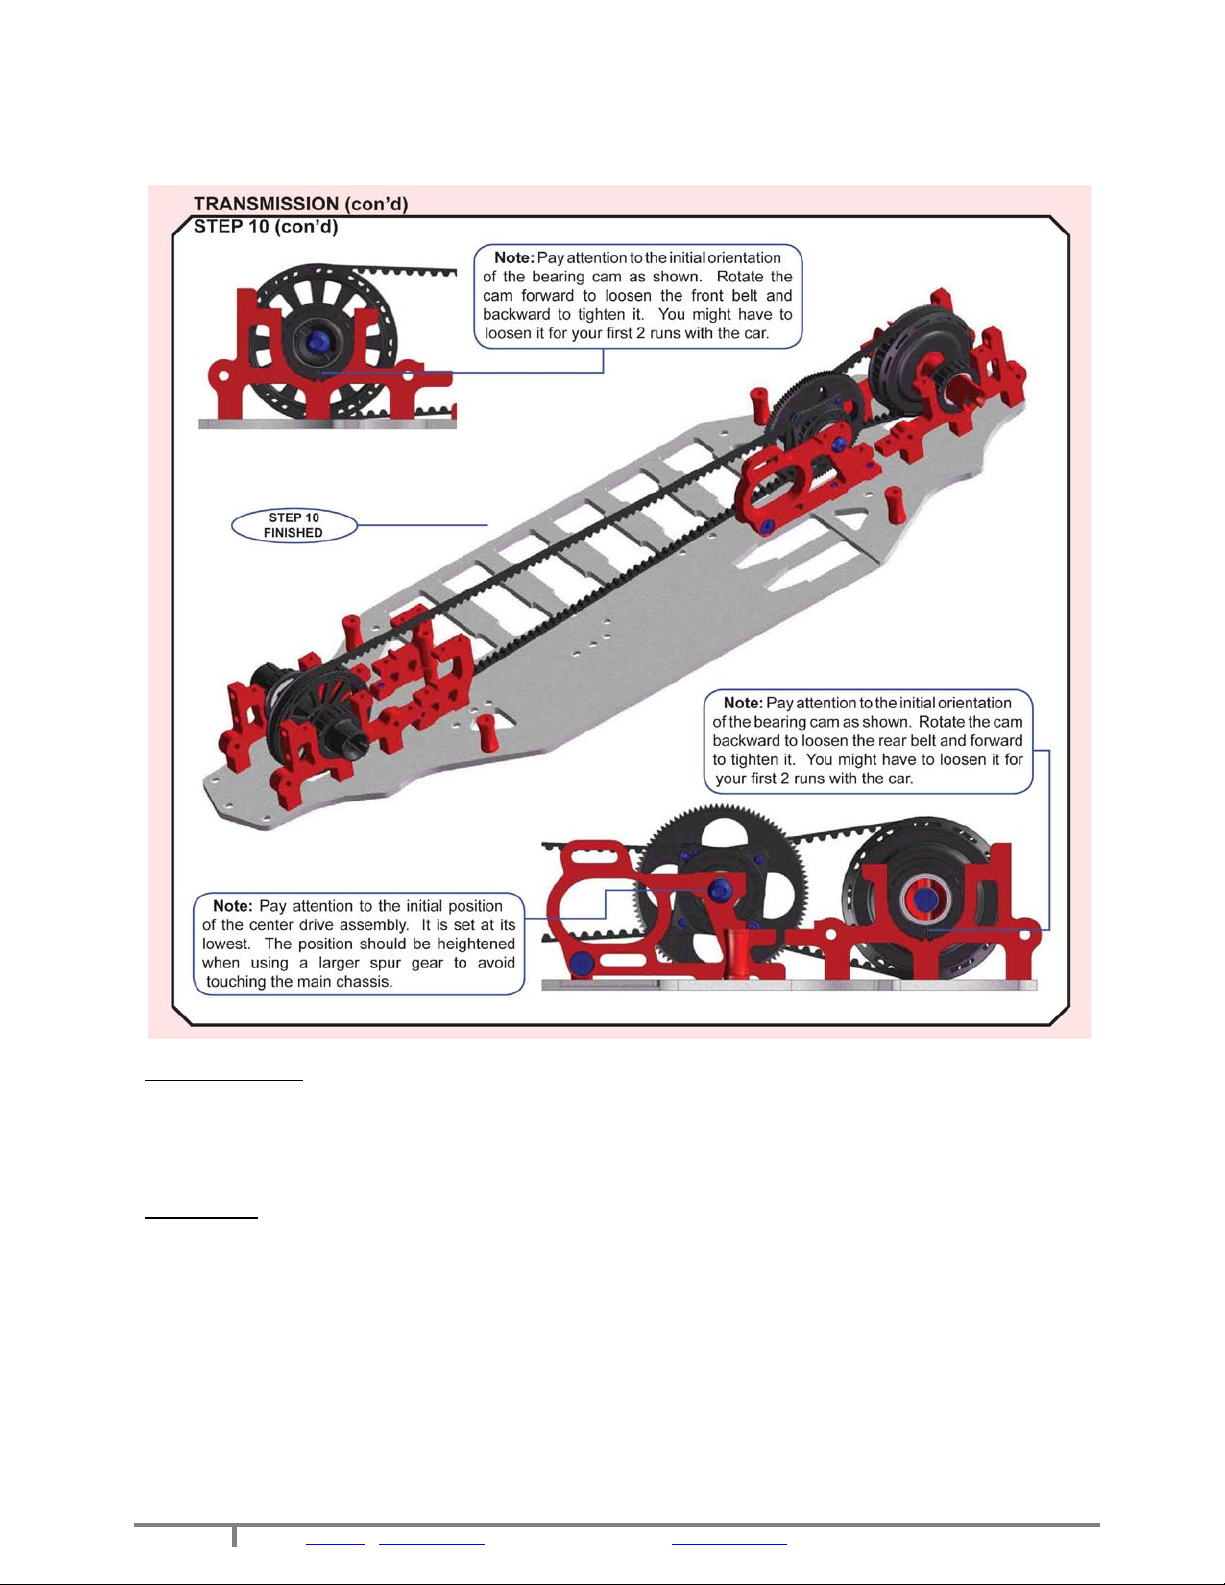
If you tighten up the lay shaft first it seems to pull the bulkheads together pinching on the chassis resulting in
chassis tweak. (vr01 post 2702)
- Put a small amount of Loctite on the screws that keep the spur in place. The power of mod/superstock can cause
these to unwind, resulting in a stripped spur. (vr01)
T.O.P. Amendment
If you choose to heighten the position of the center drive assembly, pay attention to whether the front drive belt
touches your pinion. If that’s the case, you would have to use a larger pinion or spur gear, or choose not to
heighten the assembly too much.
Building Tips:
- The Photon main belt is very tight out of the box and installing it, even in the loosest position when building can
tweak the chassis. A handy tip is to not tighten the spur gear until you’ve bolted the top deck and the wings on, as
this will give you a bit more slack to get the chassis flat before putting the belt on. Another more extreme option is
to not install the front diff until the chassis is built up, this will ensure your car is tweak free from the start. (vr01)
- I understand that you are trying to make the transmission as free as possible but keep in mind that you are
probably hurting yourself. At top end RPMs, running the belts too loose will cause them to bounce all over the
place and really make the transmission actually bind up. Loose belts = good punch off the corner but they make for
terrible top speed (to a point). The belts should have a maximum of 4mm deflection (from relaxed position to


14
Made by vabroom
/ www.rctech.net
, provided for publication to www.petitrc.com
Building Tips:
- To avoid chassis tweak, loosen all top deck screws INCLUDING the lay shaft screws. Tighten all of the top deck
screws then finally tighten up the lay shaft screws should fix your problem.
If you tighten up the lay shaft first it seems to pull the bulkheads together pinching on the chassis resulting in
chassis tweak. (vr01 post 2702)
15
Made by vabroom
/ www.rctech.net
, provided for publication to www.petitrc.com
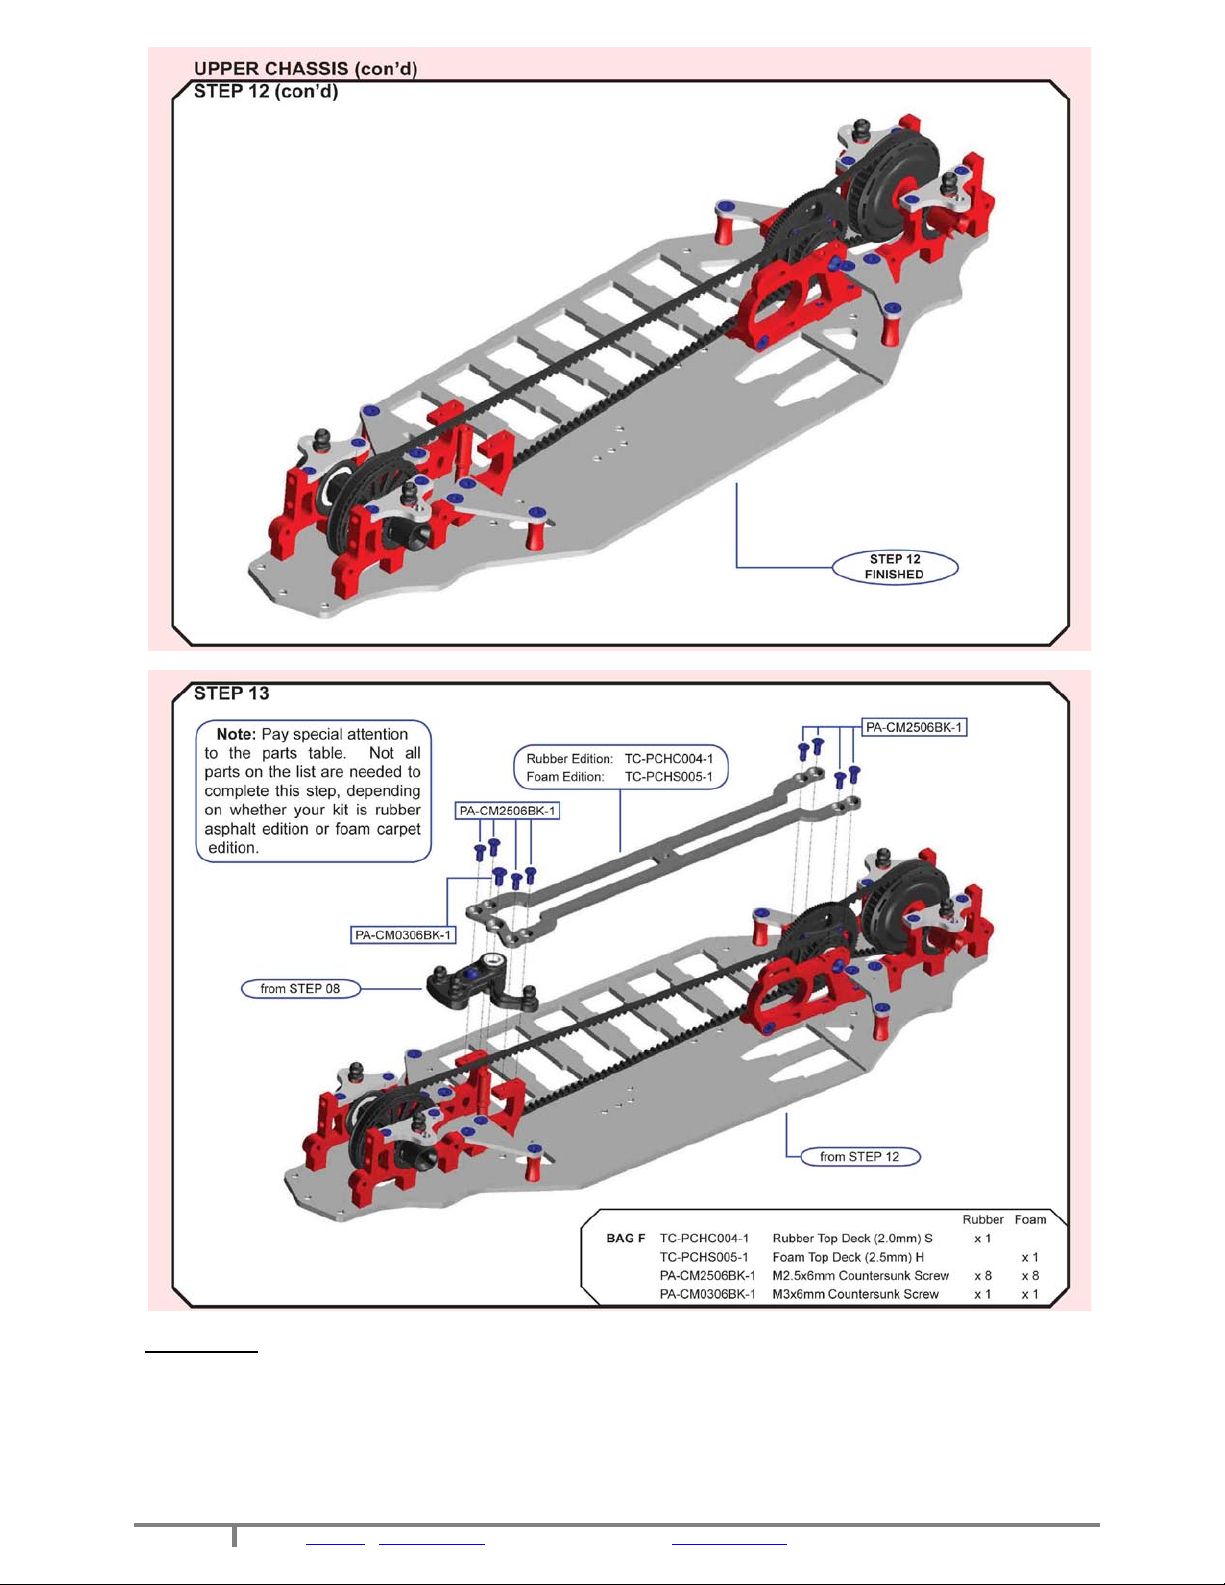
Building Tips:
- Install the upper of the two motor screws before fixing the top deck. We found it quite hard to insert the screw as
the button head touches the top deck making it nearly impossible to put the motor screw where it belongs. If you
already installed the upper deck remove the four 2.5×6 mm countersunk screws located over the layshaft and raise
the top deck slightly so the button head motor screw can slide underneath it. (Quantum Mechanics review)

16
Made by vabroom
/ www.rctech.net
, provided for publication to www.petitrc.com
T.O.P. Amendment
PO-S DT 0 0 8 -1 is replaced by PO-SDT027RD.
T.O.P. Amendment
Due to the same reason as of Step 04 , cut any burr that might exist a t P O -DT0006-1 (Dog Bone C Drive).
Building Tips:
- Take off the wheel clamp(hex) take the pin out and see how far you can push the axle with the blade in the
outdrives till it hits the screw or nut. If you have some play it should be fine. Check it in all the arm positions.
(marcel p post 1315)
- The plastic between the two holes on top of the rear hubs is quite thin, can be susceptible to damage in a
collision. To strengthen this up, put a grub screw into the vacant hole. (danjoy25)

17
Made by vabroom
/ www.rctech.net
, provided for publication to www.petitrc.com
Building Tips:
- Take off the wheel clamp(hex) take the pin out and see how far you can push the axle with the blade in the
outdrives till it hits the screw or nut. If you have some play it should be fine. Check it in all the arm positions.
(marcel p post 1315)

18
Made by vabroom
/ www.rctech.net
, provided for publication to www.petitrc.com
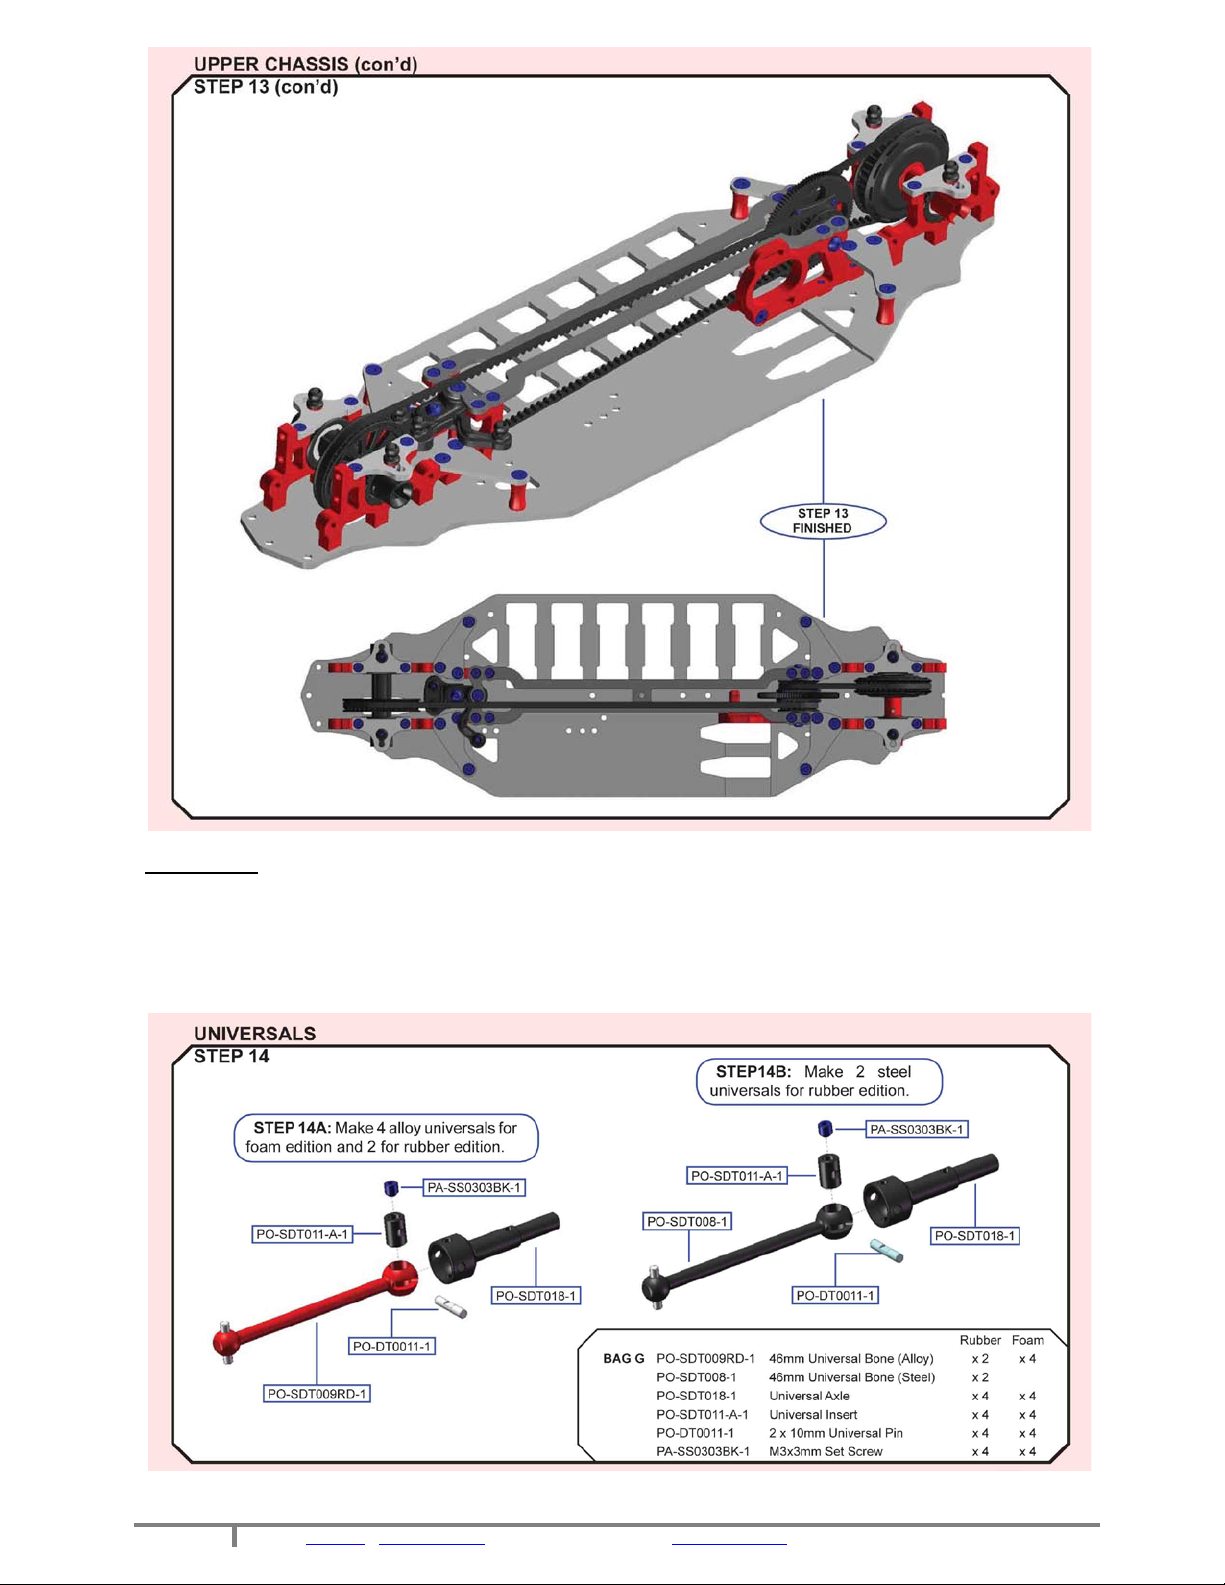
T.O.P. Amendment
When tightening PA-SS0312BK-1 (M3x12 Set Screw), be sure not to over tighten it because this would cause the
end of the screw to touch PO-SDT018-1 (Universal Axle).
Building Tips:
- You can use X-Ray caster blocks and caster block bushings. That's what Larry and I have been doing as a stop gap
measure. All you have to do is sand a little bit of the caster block to fit in the arm freely and use a .5mm shim on
the steering block to get rid of any vertical slop. (schreff post 2713)


Other TOP racing Motorized Toy Car manuals

TOP racing
TOP racing Rebel 10 User manual

TOP racing
TOP racing Sabre S4 User manual

TOP racing
TOP racing Rebel 12 User manual

TOP racing
TOP racing Rebel R-F01 User manual

TOP racing
TOP racing Rebel F1X User manual

TOP racing
TOP racing Photon EX User manual

TOP racing
TOP racing Sabre S4 User manual

TOP racing
TOP racing Sabre 4WD Mini S-MB01 User manual
Popular Motorized Toy Car manuals by other brands


ANSMANN
ANSMANN Deuce Instruction guide

WRC
WRC NTX.3 instruction manual

Carson
Carson Wild GP Attack Assembly guide

XTM Racing
XTM Racing X-Terminator 2e Operating manual and assembly guide

Supertrax
Supertrax Porsche Macan S Style Assembly and instruction manual

3DVIA Racing
3DVIA Racing 3DV-X1 Operation manual