Topdon BT20 User manual

WIRELESS BATTERY LOAD TESTER USER MANUAL
BT20

For your safety and the safety of others, as well as to
avoid any damage to the product and your vehicle,
carefully read and make sure you fully understand
this manual's safety instructions in its entirety. You
must read the vehicle's service manual, the battery
manufacturer's specic safeguards, and observe the
stated precautions or instructions before and during
any test or service procedure.
ONLY OPERATE TESTS IN A WELL-VENTILATED AREA
since the vehicle produces carbon monoxide (a
toxic, poisonous gas, and particulate matter) when
the engine is running.
ALWAYS BE AWARE OF MOVING PARTS (such as
coolant fans, pulleys, belts) since they spin or turn at
high speeds when the engine is running.
DO NOT TOUCH HOT ENGINE PARTS to prevent
severe burns. The motor parts can get extremely hot
when the engine is running.
TURN THE IGNITION OFF BEFORE CONNECTING OR
DISCONNECTING THE TOOL FROM THE BATTERY
to prevent damage to the tester or the vehicle's
electronic components.
DON'T SMOKE NEAR THE VEHICLE when testing.
Fuel and battery vapors are highly ammable.
ALWAYS WEAR APPROVED SAFETY EYE
PROTECTION to prevent damage from sharp objects
and caustic liquids.
SAFETY IS ALWAYS THE
FIRST PRIORITY!
READ THE INSTRUCTIONS BEFORE USING
ENGLISH
EN I 5

EN I 7
DO NOT WEAR LOOSE CLOTHING OR JEWELRY
WHEN WORKING ON AN ENGINE. Loose clothing can
easily be caught in the engine's fan, pulleys, belts,
etc., and jewelry is highly conductive, which may
cause severe burn or electric shock if it contacts
electricity.
DO NOT CUT THE PRODUCTS CORDS OR SUBMERGE
THEM IN WATER. The product is an electrical device
that can cause shock and severe burns.
WARNING: Battery acid is extremely corrosive. If acid
gets into your eyes, RINSE THEM THOROUGHLY WITH
COLD RUNNING WATER FOR AT LEAST 20 MINUTES
AND SEEK MEDICAL ATTENTION IMMEDIATELY.
If battery acid contacts your skin or clothing, WASH
IT IMMEDIATELY WITH A SOLUTION OF WATER AND
BAKING SODA.
SECTION 1
WHAT'S IN THE BOX?
BT20
Quick User Guide
SECTION 2
PRODUCT OVERVIEW
EN I 6
BT20BT20
LCD Display
Test Button
Battery Health
Indicators
Positive Battery Clamp
(Red)
Negtive Battery Clamp
(Black)
Battey Voltage
Indicators
SECTION 3 GETTING STARTED
Where is the battery of a car located?
Let's take the following picture as a reference:
Explanation of LCD Display:
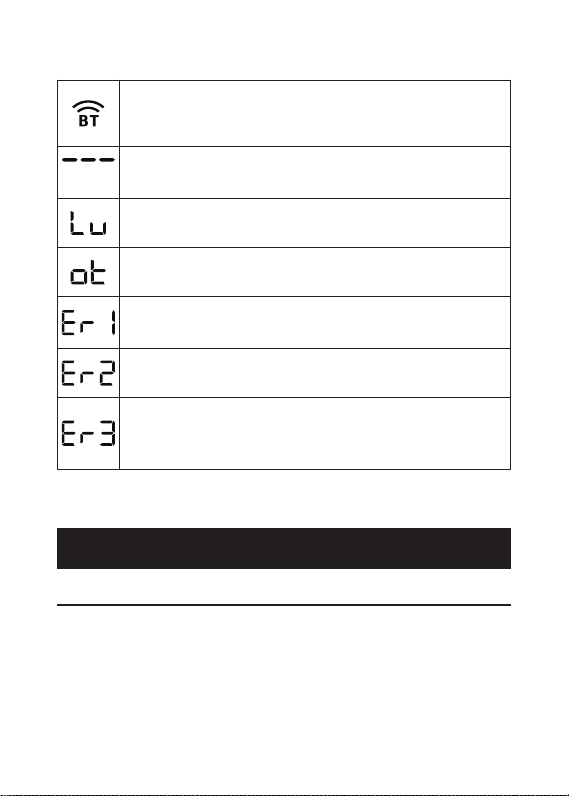
Bluetooth icon. A ashing icon indicates the tester is
not connected to the App; a solid icon indicates the
tester is connected.
This symbol indicates NOT to test twice within 10
seconds.
This symbol indicates voltage is too low. Charge the
battery rst.
This symbol indicates an over temperature. Wait until
the temperature is normal, and then test again.
This symbol indicates a poor connection between the
battery and clamps. Please reconnect.
This symbol indicates the tester reset failed. Please
reconnect the battery and clamps.
This symbol indicates the tester is abnormal or the
battery capacity is beyond the test range. Please
reconnect the battery and clamps, and try again.
1) Most models hold the battery in the engine bay, under the
hood, in one of the front corners. See battery location ① and ②
in Figure 3.1.1.
2) To balance uneven weight distribution, some manufacturers
hold the engine in the trunk. See battery location ⑤, ⑥, and
⑦in Figure 3.1.1. In this case, the battery may have a plastic
cover that should be removed prior to any testing.
3) For some models, the battery might be stored underneath the
rear seat. See battery location ④ in Figure 3.1.1.
4) For other vehicles, the battery can be located underneath the
passenger seat. See battery location ③in Figure 3.1.1.
WARNING:
DO NOT TEST THROUGH THE JUMPSTART POSTS. For
models that hold the battery under the seat or in the trunk,
the manufacturer usually includes jumpstart connector
conductor posts under the hood (see Figure 3.1.2) to make
jumpstarting easier. However, to ensure data accuracy and
operation safety, DO NOT CONNECT THE BATTERY TESTER
TO THE JUMPSTART POSTS.
Figure 3.1.1
EN I 9EN I 8

SECTION 3 GETTING STARTED
Where is the battery of a car located?
Let's take the following picture as a reference:
Explanation of LCD Display:
Bluetooth icon. A ashing icon indicates the tester is
not connected to the App; a solid icon indicates the
tester is connected.
This symbol indicates NOT to test twice within 10
seconds.
This symbol indicates voltage is too low. Charge the
battery rst.
This symbol indicates an over temperature. Wait until
the temperature is normal, and then test again.
This symbol indicates a poor connection between the
battery and clamps. Please reconnect.
This symbol indicates the tester reset failed. Please
reconnect the battery and clamps.
This symbol indicates the tester is abnormal or the
battery capacity is beyond the test range. Please
reconnect the battery and clamps, and try again.
1) Most models hold the battery in the engine bay, under the
hood, in one of the front corners. See battery location ① and ②
in Figure 3.1.1.
2) To balance uneven weight distribution, some manufacturers
hold the engine in the trunk. See battery location ⑤, ⑥, and
⑦in Figure 3.1.1. In this case, the battery may have a plastic
cover that should be removed prior to any testing.
3) For some models, the battery might be stored underneath the
rear seat. See battery location ④ in Figure 3.1.1.
4) For other vehicles, the battery can be located underneath the
passenger seat. See battery location ③in Figure 3.1.1.
WARNING:
DO NOT TEST THROUGH THE JUMPSTART POSTS. For
models that hold the battery under the seat or in the trunk,
the manufacturer usually includes jumpstart connector
conductor posts under the hood (see Figure 3.1.2) to make
jumpstarting easier. However, to ensure data accuracy and
operation safety, DO NOT CONNECT THE BATTERY TESTER
TO THE JUMPSTART POSTS.
Figure 3.1.1
EN I 9EN I 8

1) Reserve Capacity: 80Ah
The Reserve Capacity is a time measurement that explains
how long a fully-charged battery can deliver a 25 amps current
in an 80°F- environment before the battery is discharged and
drops to 10.5 volts.
2) Voltage: 12V
When fully charged, automotive batteries should measure
at 12.6 volts. However, this measurement should be from 13.7
Figure 3.1.2
Figure 3.2.1
How to Identify What Type of Battery You Have?
Let's take the following picture as an example:
Manufacturers
Part No.
80Ah 12v
Reserve Capacity CCA in USAVoltage
650A(SAE)
AGM
E51
Battery
Type
1) Before connecting the clamps to the terminals, please use
sandpaper to polish off the corrosion on the battery terminals.
With this, you can avoid inaccurate test values.
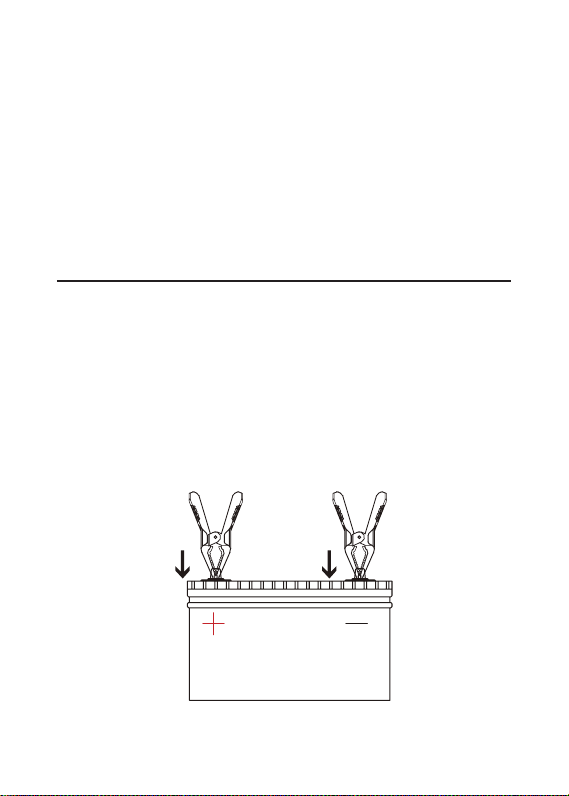
2) Attach the red clamp to the positive (+) terminal, and connect
the black clamp to the negative (-).
• ALWAYS KEEP THE RED & BLACK CLAMPS FROM
TOUCHING.
• ALWAYS DISCONNECT THE NEGATIVE CABLE FROM THE
BATTERY FIRST AND RECONNECT IT LAST.
3) Once the clamps are properly connected, the battery tester
will power on automatically and be ready to conduct tests.
Connect the Clamps to the Battery Terminals (See
Figure 3.3.1)
(Red) (Black)
Figure 3.3.1
to 14.7 volts when the engine is running. If the battery tester
reads less than this standard, it means that the battery's
resting voltage is weak. In this case, typically, the battery needs
to be charged or replaced.
3) CCA: 650A (SAE)
The CCA rating refers to how many amps a 12-volt battery
can deliver at 0°F in 30 seconds while maintaining at least a
7.2V voltage. This means that the higher the CCA rating is, the
easier the engine can be cranked in cold temperatures.
EN I 11EN I 10
1) Reserve Capacity: 80Ah
The Reserve Capacity is a time measurement that explains
how long a fully-charged battery can deliver a 25 amps current
in an 80°F- environment before the battery is discharged and
drops to 10.5 volts.
2) Voltage: 12V
When fully charged, automotive batteries should measure
at 12.6 volts. However, this measurement should be from 13.7
Figure 3.1.2
Figure 3.2.1
How to Identify What Type of Battery You Have?
Let's take the following picture as an example:
Manufacturers
Part No.
80Ah 12v
Reserve Capacity CCA in USAVoltage
650A(SAE)
AGM
E51
Battery
Type
1) Before connecting the clamps to the terminals, please use
sandpaper to polish off the corrosion on the battery terminals.
With this, you can avoid inaccurate test values.
2) Attach the red clamp to the positive (+) terminal, and connect
the black clamp to the negative (-).
• ALWAYS KEEP THE RED & BLACK CLAMPS FROM
TOUCHING.
• ALWAYS DISCONNECT THE NEGATIVE CABLE FROM THE
BATTERY FIRST AND RECONNECT IT LAST.
3) Once the clamps are properly connected, the battery tester
will power on automatically and be ready to conduct tests.
Connect the Clamps to the Battery Terminals (See
Figure 3.3.1)
(Red) (Black)
Figure 3.3.1
to 14.7 volts when the engine is running. If the battery tester
reads less than this standard, it means that the battery's
resting voltage is weak. In this case, typically, the battery needs
to be charged or replaced.
3) CCA: 650A (SAE)
The CCA rating refers to how many amps a 12-volt battery
can deliver at 0°F in 30 seconds while maintaining at least a
7.2V voltage. This means that the higher the CCA rating is, the
easier the engine can be cranked in cold temperatures.
EN I 11EN I 10
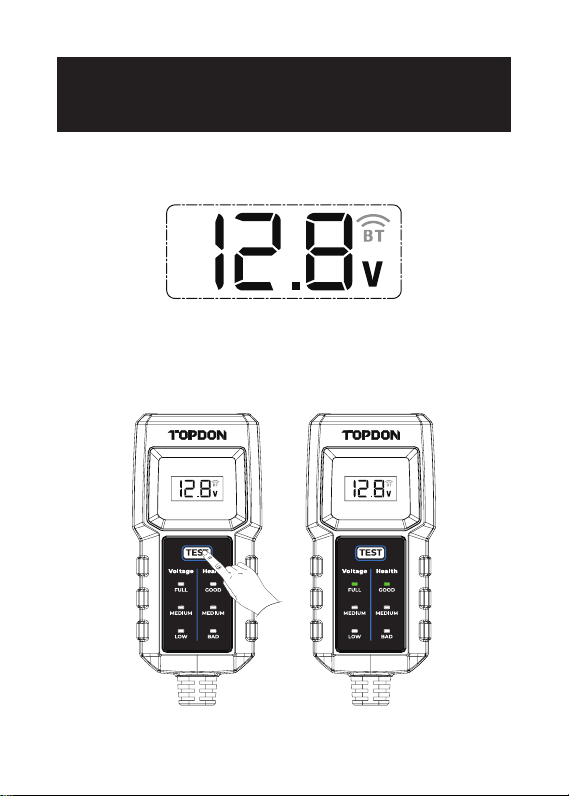
SECTION 4 TEST THROUGH
THE TEST BUTTON
Soon after the battery tester is powered on, the real-time voltage
of the battery will be displayed on the screen, and the Bluetooth
icon will ash.
Press the Test Button, and wait for several seconds. The
corresponding Battery Voltage Indicator (FULL / MEDIUM / LOW)
and Battery Health Indicator (GOOD / MEDIUM / BAD) will light
up to show the test result.
Figure 4.1.1
Figure 4.2.1
BT20BT20 BT20BT20
SECTION 5 TEST THROUGH
THE APP BT20
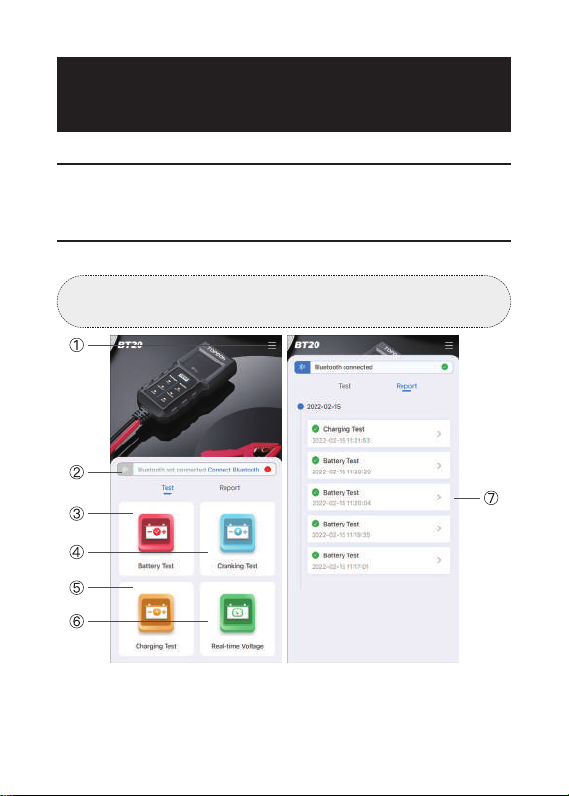
App Downloading and Installation
Home Page
Search "BT20" in the App Store™ or Google Play™, download,
and install it to your mobile device.
Launch the App "BT20" to enter the home page.
①Settings
· Tap [Language] to select your preferred language.
· Tap [Login] to set up your account. (If you would not like to
Tip:
Please allow the App to access your Network and Bluetooth.
Figure 5.2.1
EN I 13EN I 12
SECTION 4 TEST THROUGH
THE TEST BUTTON
Soon after the battery tester is powered on, the real-time voltage
of the battery will be displayed on the screen, and the Bluetooth
icon will ash.
Press the Test Button, and wait for several seconds. The
corresponding Battery Voltage Indicator (FULL / MEDIUM / LOW)
and Battery Health Indicator (GOOD / MEDIUM / BAD) will light
up to show the test result.
Figure 4.1.1
Figure 4.2.1
BT20BT20 BT20BT20
SECTION 5 TEST THROUGH
THE APP BT20
App Downloading and Installation
Home Page
Search "BT20" in the App Store™ or Google Play™, download,
and install it to your mobile device.
Launch the App "BT20" to enter the home page.
①Settings
· Tap [Language] to select your preferred language.
· Tap [Login] to set up your account. (If you would not like to
Tip:
Please allow the App to access your Network and Bluetooth.
Figure 5.2.1
EN I 13EN I 12

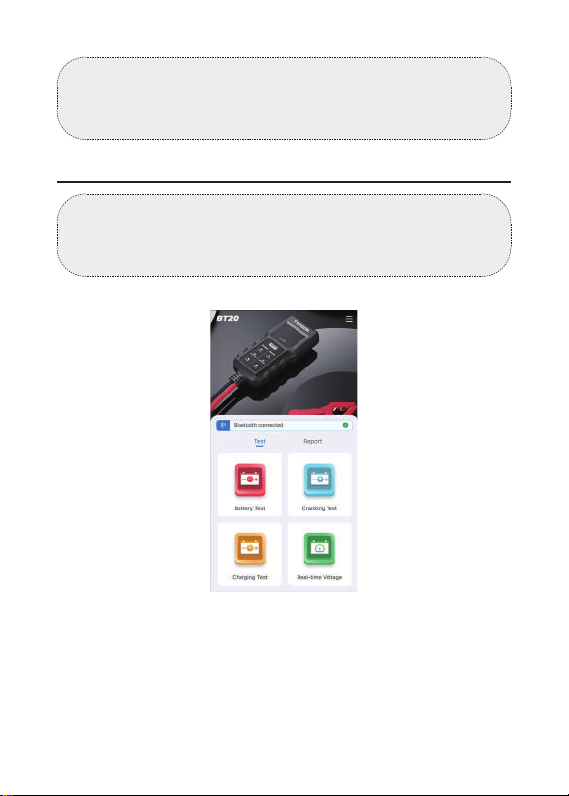
Bluetooth Connection
After connecting the tester to the battery properly and
completing the account setup, tap Connect Bluetooth on the
home page to connect the battery tester to the App.
After a successful connection, the Bluetooth icon on the LCD
display will light up and not ash on and off.
②Bluetooth Connection
③Battery Test
④Cranking Test
⑤Charging Test
⑥Real-time Voltage
⑦Test Results by Timeline
Tip:
If you already have a TOPDON account, please directly
log in with it. If you don't have, tap [Register Now] at the
bottom of the [Login] page, register an account with a valid
email address, and then log in.
log in, just skip it.)
Figure 5.3.1
Notes:
1. Only one tester can be connected to the App at a time.
2. Once the Bluetooth is connected, the Test Button on the
battery tester will become unavailable.
WARNING:
Before the test, the engine and all other accessory loads
must be off to ensure accurate results. The battery testing
function only applies to 12V lead-acid batteries.
Battery Test
1) Select Battery Test.
2) Select a battery parameter (CCA or Ah), enter the value, and
tap Next. The specic battery standard is normally listed on
the battery label.
3) Tap Test.
Figure 5.4.1
EN I 15EN I 14

4) The test result will display as below:
Figure 5.4.2 Figure 5.4.3
Figure 5.4.4
①Back
②Reference Tablet for Test Values
③Real-time Voltage
④Loaded Voltage: the voltage measured when turning on the
on-board electrical appliances
⑤Unloaded Voltage: the voltage measured when turning off the
on-board electrical appliances
⑥Jump to the page of the real-time voltage waveform
⑦The CCA/Ah you entered at the previous step
⑧Test result of Battery Status
⑨Test result of Voltage
⑩Tap Save to save the test result to your mobile device as an
image
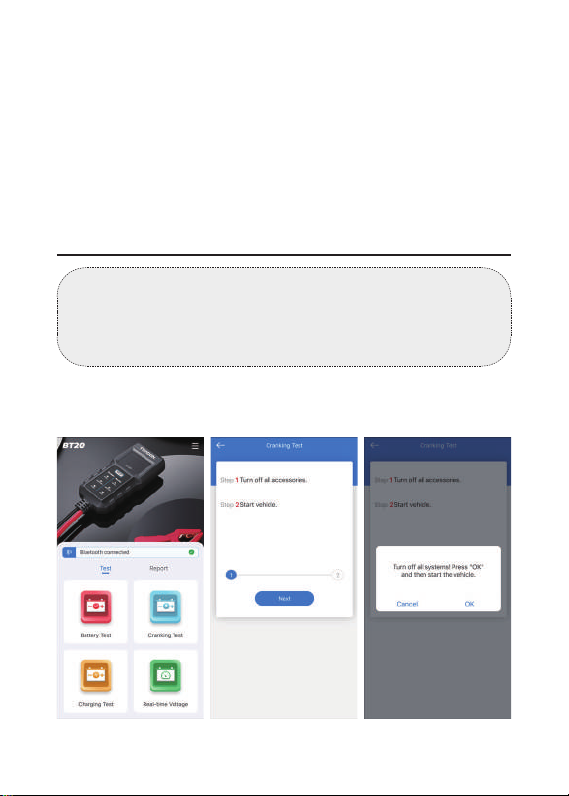
WARNING:
Before the cranking test, the engine and all other accessory
loads must be off in order to ensure accurate results.
The battery testing function only applies to 12V lead-acid
batteries.
Cranking Test
1) Select Cranking Test.
2) Tap Next.
3) Follow the instructions and start the engine.
Figure 5.5.2 Figure 5.5.3Figure 5.5.1
EN I 17EN I 16
4) The test result will display as below:
Figure 5.4.2 Figure 5.4.3
Figure 5.4.4
①Back
②Reference Tablet for Test Values
③Real-time Voltage
④Loaded Voltage: the voltage measured when turning on the
on-board electrical appliances
⑤Unloaded Voltage: the voltage measured when turning off the
on-board electrical appliances
⑥Jump to the page of the real-time voltage waveform
⑦The CCA/Ah you entered at the previous step
⑧Test result of Battery Status
⑨Test result of Voltage
⑩Tap Save to save the test result to your mobile device as an
image
WARNING:
Before the cranking test, the engine and all other accessory
loads must be off in order to ensure accurate results.
The battery testing function only applies to 12V lead-acid
batteries.
Cranking Test
1) Select Cranking Test.
2) Tap Next.
3) Follow the instructions and start the engine.
Figure 5.5.2 Figure 5.5.3Figure 5.5.1
EN I 17EN I 16

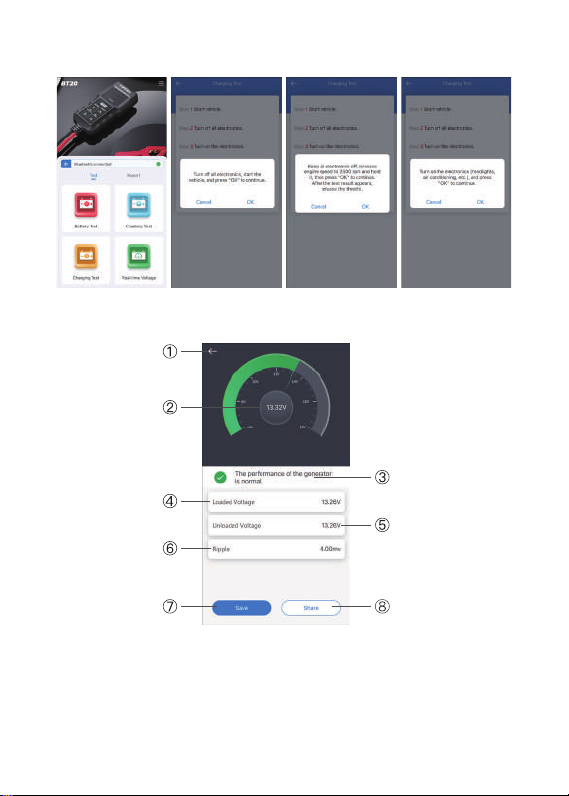
WARNING:
Always start the engine before performing the charging
test. The battery testing function only applies to 12V lead-
acid batteries.
Charging Test
4) The test result will appear soon.
Figure 5.5.4
①Back
②Real-Time Voltage
③Test Result
④Cranking Voltage: the battery voltage while the engine is starting
⑤Cranking Time: the time a vehicle takes to start an engine
⑥Tap Save to save the test result to your mobile device as an
image
⑦Tap Share to share the test result with your coworkers and
clients
1) Select Charging Test.
2) Start the engine and tap OK.
3) Increase the RPM to 2500 and tap OK.
4) Turn on the electronics and tap OK.
5) The test result will appear soon.
①Back
②Real-Time Voltage
③Test Result
④Loaded Voltage: The voltage measured when turning on the
on-board electrical appliances
Figure 5.6.1 Figure 5.6.2 Figure 5.6.3 Figure 5.6.4
Figure 5.6.5
EN I 19EN I 18
⑤Unloaded Voltage: The voltage measured when turning off
the on-board electrical appliances
⑥Ripple: A vehicle's battery operates on one-way direct current
(DC) electricity, while alternators output alternating current
(AC) electricity. In this process, the power needs to go through
the diode rectier to turn into a direct current - that's when
the ripple occurs
⑦Tap Save to save the test result to your mobile device as an
image
⑧Tap Share to share the test result with your coworkers or
clients
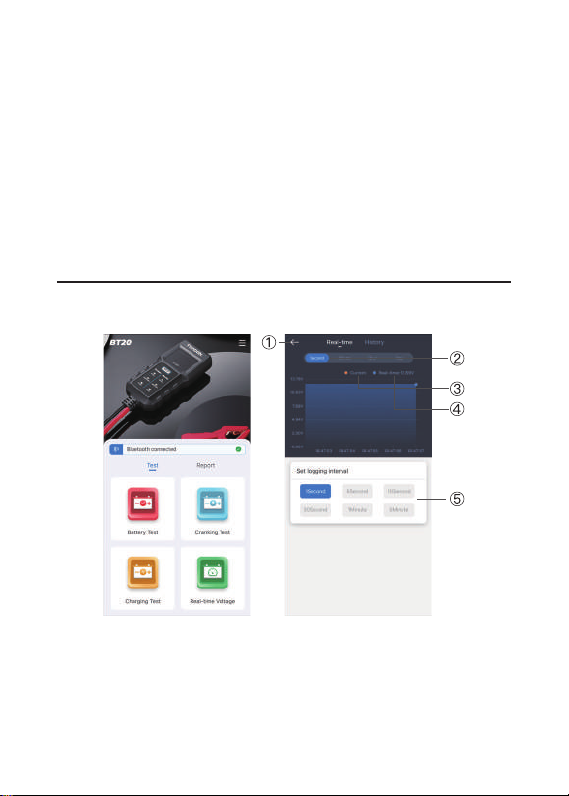
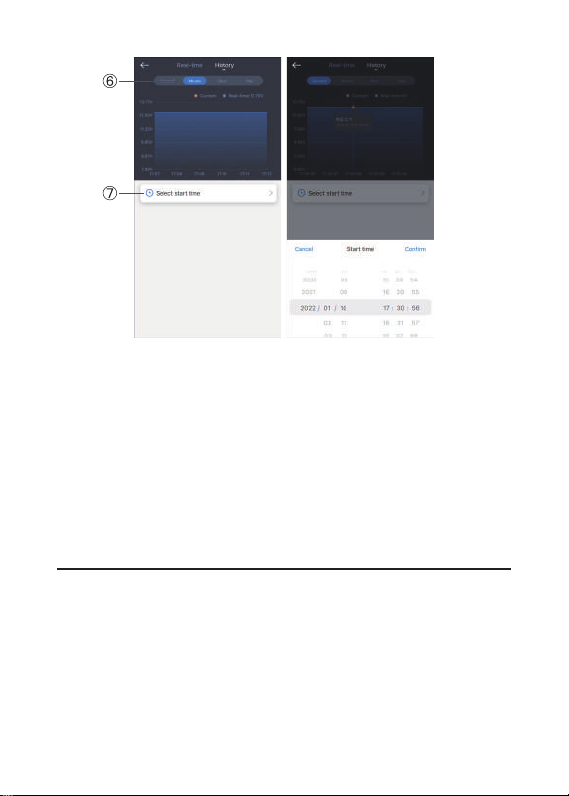
Real-Time Voltage
Select Real-Time Voltage. You can check the real-time voltage
and the recorded voltage waveforms.
Figure 5.7.1 Figure 5.7.2
Figure 5.7.3 Figure 5.7.4
①Back
②Display the real-time voltage by a certain time interval (second/
minute/hour/day)
③Current Voltage: The voltage at a selected moment on the
waveform
④Real-Time Voltage
⑤Selects the time interval of recording the voltage values
⑥Displays the recorded voltage by a certain time interval
(second/minute/hour/day)
⑦Sets the start time of the recorded voltage waveforms
Check Test Reports
Tap Report on the Home Page. The test reports will be displayed
by timeline, including battery test, cranking test, and charging
test reports.
Select and tap one of the reports to enter the detailed report
page.
EN I 21EN I 20
⑤Unloaded Voltage: The voltage measured when turning off
the on-board electrical appliances
⑥Ripple: A vehicle's battery operates on one-way direct current
(DC) electricity, while alternators output alternating current
(AC) electricity. In this process, the power needs to go through
the diode rectier to turn into a direct current - that's when
the ripple occurs
⑦Tap Save to save the test result to your mobile device as an
image
⑧Tap Share to share the test result with your coworkers or
clients
Real-Time Voltage
Select Real-Time Voltage. You can check the real-time voltage
and the recorded voltage waveforms.
Figure 5.7.1 Figure 5.7.2
Figure 5.7.3 Figure 5.7.4
①Back
②Display the real-time voltage by a certain time interval (second/
minute/hour/day)
③Current Voltage: The voltage at a selected moment on the
waveform
④Real-Time Voltage
⑤Selects the time interval of recording the voltage values
⑥Displays the recorded voltage by a certain time interval
(second/minute/hour/day)
⑦Sets the start time of the recorded voltage waveforms
Check Test Reports
Tap Report on the Home Page. The test reports will be displayed
by timeline, including battery test, cranking test, and charging
test reports.
Select and tap one of the reports to enter the detailed report
page.
EN I 21EN I 20

Q: What types of batteries does the BT20 work on?
A: 12V lead-acid batteries.
Q: How to determine whether the battery is good or bad?
A: The larger the battery capacity, the higher the voltage value of
the load test. Generally speaking, the load voltage should be
above 10V for batteries above 50Ah (500CCA); above 9.5V for
batteries above 20Ah (200CCA).
Q: Why does the device get hot after running tests?
A: The device tests the battery by simulating the vehicle load. It
is normal for the device to heat up.
Q: What is the maximum battery capacity supported by BT20?
A: It is not recommended to test batteries with a capacity
greater than 200Ah (2000CCA), because their output current
is too large and may cause the device to overheat.
Figure 5.8.1
SECTION 6 FAQ
SECTION 7
TECHNICAL SPECIFICATION
Working Temperature
Storage Temperature
Operating Voltage
Dimensions
Cable Length
-10°C~55°C (14°F~131°F)
-20°C~75°C (-4°F~167°F)
DC 5~20V
145 x 52 x 34mm (5.7 x 2.83 x
1.34")
450mm (17.7")
TOPDON One Year Limited Warranty
The TOPDON Company warrants to its original purchaser that
TOPDON products will be free from defects in material and
workmanship for 12 months from the date of purchase (Warranty
Period). For the defects reported during the Warranty Period,
TOPDON will, according to its technical support analysis and
conrmation, either repair or replace the defective part or
product.
Some states do not allow limitations on how long an implied
warranty lasts, so the above limitations may not apply to you.
This limited warranty is void under the following conditions:
The product was misused, disassembled, altered, or repaired by
unauthorized stores or technicians.
Damage caused by careless handling and/or using the product
other than as directed.
Notice: All information in this manual is based on the latest
SECTION 8 WARRANTY
EN I 23EN I 22
Other manuals for BT20
2
Table of contents
Other Topdon Test Equipment manuals

Topdon
Topdon BT20 User manual

Topdon
Topdon BT20 User manual

Topdon
Topdon BT50 User manual

Topdon
Topdon BT MOBILE User manual

Topdon
Topdon Ultrascan OBDCAN PLUS User manual

Topdon
Topdon BTMOBILE lite User manual

Topdon
Topdon ArtiHD I User manual

Topdon
Topdon BT100 User manual

Topdon
Topdon BT300P User manual

Topdon
Topdon BT300P User manual

Topdon
Topdon BTMOBILE PROS User manual

Topdon
Topdon BT50 User manual

Topdon
Topdon BT200 User manual

Topdon
Topdon AL500B User manual

Topdon
Topdon BT600 User manual

Topdon
Topdon Phoenix Plus User manual

Topdon
Topdon BT200 User manual

Topdon
Topdon ArtiPad I User manual

Topdon
Topdon BT600 User manual

Topdon
Topdon BT50 User manual


