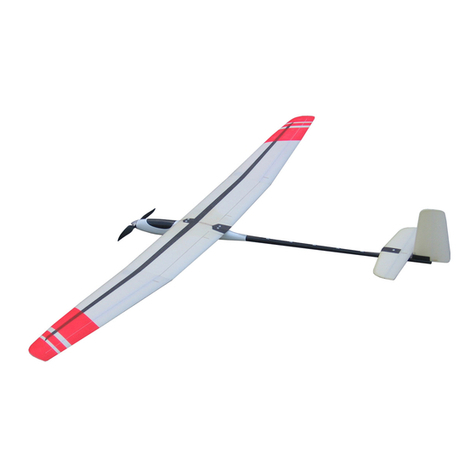
Topmodel HABANERO 2 User manual

ATTENTION !
Ce modèle à construire n’est pas un jouet, il
ne convient pas aux enfants de moins de 14 ans.
Une mauvaise utilisation de ce matériel peut
provoquer des dommages matériels ou corporels.
Vous êtes pleinement responsable
lorsque vous utilisez votre modèle.
Volez à une distance de sécurité des zones
habitées.
Soyez sûr que personne n’émet sur la même
fréquence que vous.
CAUTION !
This model construction kit is not a toy and is not
suitable for children under the age of 14.
Incorrect use of this material could cause material
damage ou personal injury.
You are fully responsible for your actions when you
use this model.
Fly at a safe distance from occupied zones.
Be sure that no one else is using the same
frequency as you.
Distribué par / Distributed by:
TOPMODEL S.A.S.
Le jardin d’entreprises de SOLOGNE - F-41300 SELLES SAINT DENIS - www.topmodel.fr
#02008 ©TOPMODEL JAN2022 V1.0
Caractéristiques techniques/Technical data:
Envergure/wingspan: 1.52m
Longueur/length: 0.95m
Poids/TO weight: 0.8/1.0kg (Electro)
Surface/wing area: 25.2dm2
Profil/airfoil: HN1038
Equipements recommandés/Related items:
Radio/RC set: Récepteur/Receiver: JETI DUPLEX 2.4GHz REX7
Ailerons/Ailerons: 2 servos TOPMODEL SS1816
Papillon/V-Tail: 2 servos TOPMODEL PS2012MG
Volets/Flaps: 2 servos TOPMODEL SS1816
Pack Rx/Rx Bat Pack: 4.8v PROPINE NiMH AA 2000mAh JR B
Divers:
Voir liste détaillée page 6 / See the detail list page 6
Electric Version:
Voir liste détaillée page 7 / See the detail list page 7.
ADV
Pour modélistes ayant
un bon niveau
For advanced
modellers
PLANEUR 60” TOUT PLASTIQUE
HOLLOW MOLDED 60” SAILPLANE
Order N° 02008
Au choix, planeur pur
ou
propulsion électrique
You can use both: Pure
Sailplane or Electric Power

2
MERCI
d’avoir choisi le planeur (électrique) tout composites HABANERO 2 !
Nous avons fait un grand effort en dessinant et construisant ce planeur pour qu’il soit le meilleur modèle que vous ayez jamais construit et fait
voler.
Nous vous fournissons un kit avec la plus haute qualité et les meilleures performances possibles.
Nous vous souhaitons un grand succès en assemblant et en faisant évoluer votre nouveau
HABANERO 2 TOPMODEL.
Le saviez vous? L’HABANERO est l’un des piments les plus forts au monde; ça arrache !
C’est la toute nouvelle version !
HABANERO 2
avec volets de courbure pour des performances encore plus optimisées !
C’est le planeur 60” le plus polyvalent du marché.
La vitesse pure est très élevée. La maniabilité est excellente tout en ayant une trajectoire très «propre». La conservation de l’énergie en
virage est ce qui se fait de mieux dans cette catégorie.
Les performances par petit temps sont tout simplement fantastiques.
Les volets permettent de cambrer le profil pour la “gratte” ou, en les relevant très légèrement, d’augmenter encore la vitesse sur trajectoire
de notre bolide. Pour l’atterrissage, il suffit de les abaisser en les mixant aux ailerons (croco) pour poser encore plus court et avec une
grande précision.
La voltige est un régal.
Possibilité d’électrification (livré avec un gabarit pour couper le nez facilement). Il se comporte alors comme un planeur ballasté, véritable
petite Ferrari des pentes!
IMPORTANT: Merci de bien vouloir lire et étudier cette notice de montage avant de commencer l’assemblage. Faire l’inventaire des pièces à
l’aide de la nomenclature pour contrôler qu’il n’y a pas de manquant ou d’imperfection.
Merci de contacter immédiatement TOPMODEL si vous constatez une pièce manquante ou une pièce endommagée.
GARANTIE: Il est important de notifier à TOPMODEL tous dommages ou problèmes avec ce modèle dans les 14 jours suivant la réception du
kit pour bénéficier de la garantie. En cas de retour du modèle, le client est responsable du transport et le port retour est à sa charge. En cas
de défaut, la pièce sera échangée ou remplacée une fois que celle-ci sera réceptionnée par TOPMODEL pour expertise (transport à la charge
du propriétaire). En cas de problème, n’hésitez pas à contacter TOPMODEL.
TOPMODEL ne peut pas contrôler la dextérité du modéliste et ne peut pas influencer le constructeur durant l’assemblage ou l’utilisation de ce
modèle radio-commandé. Aussi, nous ne pouvons, en aucun cas, être tenus responsables des dégâts matériels, accidents corporels ou décès
pouvant être causés par ce modèle réduit.
L’acheteur/utilisateur accepte toutes les responsabilités en cas de problèmes structurels ou mécaniques.

3
THANK YOU for your purchase of the all molded Hotliner
HABANERO 2 !
We made a main effort while drawing and building this sailplane so that it is the best model you ever built and fly.
We provide you a kit with the highest quality and the best possible performances.
We wish you a great success while assembling and flying your new
HABANERO 2 TOPMODEL.
Did you know? HABANERO is one of the hottest peppers in the world - oohh !!! yes, that’s hot !
This is the brand new version !
HABANERO 2
with camber flaps for even more optimized performance !
It is the most versatile 60” glider on the market.
The pure speed is very high. The handling is excellent while having a very “clean” glide path. Energy conservation when cornering is the best
in this category.
The performance in light weather conditions is simply fantastic.
The flaps allow the airfoil to be arched for the hunting the thermals or, by raising them very slightly, to further increase the speed on the
trajectory. For landing, simply lower them by mixing them with the ailerons (butterfly) to land even shorter and with great precision.
Aerobatics are a treat.
Possibility of power with a motor (delivered with a template to cut the nose easily). It then behaves like a ballasted glider, a real little Ferrari
on the slopes!
IMPORTANT: Please take a few moments to read this instruction manual before beginning assembly. Do an inventory of the parts using the
parts list, to control that there is no lack or imperfection.
Thank you to contact TOPMODEL immediately, if you note a missing part or a damaged part.
WARRANTY: It is important to notify to TOPMODEL all damage or problems with this model within 14 days following the reception of the kit to
be able to benefit the warranty. In the event of return of the model, the customer is responsible for transport and return shipping cost is at his
expenses. In the event of defect, the part will be exchanged or replaced once this one will be delivered to TOPMODEL for expertise (transport
on your cost). In the event of problem, do not hesitate to contact TOPMODEL.
TOPMODEL cannot control the dexterity of the modeler and cannot influence the builder during the assembly or the use of this radiocontrolled
model, thus TOPMODEL will in no way accept or assume responsability or liability for damages resulting from the use of this user assembled
product.
The purchaser/user accepts all the responsibilities in the event of structural or mechanical problems.
Au choix, planeur pur
ou
propulsion électrique
You can use both:
Pure Sailplane or
Electric Power

4

5
CONTENU DU KIT
KIT CONTENT
PIECES FUSELAGE
(A) Fuselage fibre de verre (avec commandes de prof. et dir. passées) ........................... 1
(B1) Couple moteur (CTP 3mm découpé laser).................................................................. 1
(B2) Platine radio planeur (CTP 3mm découpé laser) ....................................................... 1
(B3) Platine radio motoplaneur (CTP 3mm découpé laser) ............................................... 1
(B4) Gabarit “coupe nez” (CTP 3mm découpé laser) ........................................................ 1
(B5) Guide gaine de commande (CTP 3mm découpé laser) .............................................. 1
(C) Verrière fibre de verre (avec système de fixation en place)......................................... 1 set
PIECES AILES
(A) Aile fibre de verre (avec ailerons et volets).................................................................. 1
(B) Platine servo ailerons (CTP 5mm usiné CNC)............................................................... 2
(C) Tringlerie aileron (Quick-Link M2 acier) ........................................................................ 2
(D) Chape aileron (Métal M2) ............................................................................................. 2
(E) Guignol aileron (Laiton)................................................................................................. 2
(F) Carénage servo ailerons (Fibre de verre) .................................................................... 2
(G) Platine servo volets (CTP 5mm usiné CNC) .................................................................. 2
(H) Tringlerie volet (Quick-Link M2 acier)........................................................................... 2
(I) Chape volet (Métal M2).................................................................................................. 2
(J) Guignol volet (Laiton)..................................................................................................... 2
(K) Insert guignol volet (Laiton) ......................................................................................... 2
(L) Carénage servo volets (Fibre de verre)........................................................................ 2
(M) Sorties carénées commande volets (Fibre de verre) .................................................. 2
(N) Vis de fixation aile (1x vis (AV) TF M4x25mm + 1x vis (AR) TF M4x15mm) ............... 1 set
PIECES EMPENNAGES PAPILLON
(A) Empennages Papillon fibre de verre............................................................................. 1 set
(B) Guignol avec chape à rotule.......................................................................................... 2 sets
(C) Embout de chape .......................................................................................................... 2
(D) Vis fixation empennages papillon (2x vis Chc M3x12mm)............................................ 2
DIVERS
Notice de construction ........................................................................................................ 1
Autocollants vinyl découpés Cnc.......................................................................................... 1 set
FUSELAGE PARTS
(A) Fiberglass Fuselage (with Elev and Rud linkages installed) ......................................... 1
(B) Motor mount (CNC machined 3mm plywood) ............................................................... 1
(B) Glider servos tray (CNC machined 3mm plywood)........................................................ 1
(B) MotoGlider servos tray (CNC machined 3mm plywood)................................................ 1
(B) “Nose Cut” Jig (CNC machined 3mm plywood) ............................................................. 1
(B5) Outer Control Tube Guide (CNC machined 3mm plywood).......................................... 1
(C) Fiberglass Canopy (with attachment system installed) ................................................. 1 set
WINGS PARTS
(A) Fiberglass Wing (with ailerons and flaps) ..................................................................... 1
(B) Ailerons servo tray (CNC machined 5mm plywood)...................................................... 2
(C) Aileron Pushrod (Steel M2 one end)............................................................................. 2
(D) Aileron Clevis (M2 Metal) .............................................................................................. 2
(E) Aileron Control Horn (Brass) ........................................................................................ 2
(F) Ailerons servo Cover (Fiberglass)................................................................................. 2
(G) Flaps servo tray (CNC machined 5mm plywood) .......................................................... 2
(H) Flap Pushrod (Steel M2 one end)................................................................................. 2
(I) Flap Clevis (M2 Metal).................................................................................................... 2
(J) Flap Control Horn (Brass).............................................................................................. 2
(K) Flap Control Horn Bushing (Brass)............................................................................... 2
(L) Flaps servo Cover (Fiberglass) ..................................................................................... 2
(M) Flaps Control Cover (Fiberglass) .................................................................................. 2
(N) Wing Attachment (1x HSFCH Front screw M4x25mm+1x HSFCH Rear screw M4x15mm) . 1 set
V-TAIL PARTS
(A) Fiberglass V-Tail ............................................................................................................ 1 set
(B) Elevator Control Horn with ball Clevis ........................................................................... 2 sets
(C) Coupler (Brass)............................................................................................................. 2
(G) Stab Attachment (2x SH screw M3x12mm) .................................................................. 2
VARIOUS
Construction Manual............................................................................................................ 1
Cnc Cut Vinyl Stickers .......................................................................................................... 1 set

6
A RAJOUTER POUR ASSEMBLER CE KIT/ TO BE ADDED TO BUILD THIS KIT
H l Radio
l 1x RC set - JETI dc/ds recommended.
l 4x Servo TOPMODEL SS1816 (#0201816) (2xAIL, 2xFLAPS)
l 2x Servo TOPMODEL PS2012MG (#0202012MG) (1xRUD,
1xELEV)
l 1x BAT PACK 4.8V PROPINE NiMH AA 2000mAh JR B
(#04380694)
l 1x SWITCH HARNESS JR (#01613205)
l 2x SERVO EXTENSION JR/FUT 20cm (#0434054-20)
l 2x SERVO EXTENSION JR/FUT 40cm (#0434054-40)
l 1x MG6 (MPX) CONNECTORS 2 PAIRS (#40071310)
l Radio
l 1x Ensemble radio - JETI dc/ds recommandé.
l 4x Servo TOPMODEL SS1816 (#0201816) (2xAIL, 2xVOL)
l 2x Servo TOPMODEL PS2012MG (#0202012MG) (1xDIR,
1xPROF)
l 1x PACK 4,8V PROPINE NiMH AA 2000mAh JR B
(#04380694)
l 1x INTER OR AVEC PRISE DE CHARGE JR/GR (#01613205)
l 2x RALLONGE SERVO JR/FUT 20cm (#0434054-20)
l 2x RALLONGE SERVO JR/FUT 40cm (#0434054-40)
l 1x PRISES MG6 (MPX) 2 PAIRES (#40071310)
Légende/Legend
l Non inclus/not included
H Anglais/English
VERSION PLANEUR
SAILPLANE VERSION
Au choix, planeur pur
ou
propulsion électrique
You can use both: Pure
Sailplane or Electric Power

7
A RAJOUTER POUR ASSEMBLER CE KIT/ TO BE ADDED TO BUILD THIS KIT
H l Radio
l 1x RC set - JETI dc/ds recommended.
l 4x Servo TOPMODEL SS1816 (#0201816) (2xAIL, 2xFLAPS)
l 2x Servo TOPMODEL PS2012MG (#0202012MG) (1xRUD,
1xELEV)
l 1x PRECISION SPINNER Ø30/Ø5.0mm (#020C1505)
l 1x XPower CARBON FOLDING PROP 10x6” (#099FBC10060)
l 1x XPower F2915/12 XLight (#099F291512)
l 1x ESC XPower XREG30 V5 (#099REG30V5)
l 1x Bat Pack LiPo HOT LIPS 11.1V 1300mAh XT60
(#09113003S1P34)
l 2x SERVO EXTENSION JR/FUT 20cm (#0434054-20)
l 2x SERVO EXTENSION JR/FUT 40cm (#0434054-40)
l 1x MG6 (MPX) CONNECTORS 2 PAIRS (#40071310)
l Radio
l 1x Ensemble radio - JETI dc/ds recommandé.
l 4x Servo TOPMODEL SS1816 (#0201816) (2xAIL, 2xVOL)
l 2x Servo TOPMODEL PS2012MG (#0202012MG) (1xDIR,
1xPROF)
l 1x CONE DE PRECISION Ø30/Ø5,0mm (#020C1505)
l 1x XPower CARBON FOLDING PROP 10x6” (#099FBC10060)
l 1x XPower F2915/12 XLight (#099F291512)
l 1x CONTROLEUR XPower XREG30 V5 (#099REG30V5)
l 1x Pack LiPo HOT LIPS 11,1V 1300mAh XT60
(#09113003S1P34)
l 2x RALLONGE SERVO JR/FUT 20cm (#0434054-20)
l 2x RALLONGE SERVO JR/FUT 40cm (#0434054-40)
l 1x PRISES MG6 (MPX) 2 PAIRES (#40071310)
Légende/Legend
l Non inclus/not included
H Anglais/English
VERSION ELECTRO
ELECTRIC VERSION
Au choix, planeur pur
ou
propulsion électrique
You can use both: Pure
Sailplane or Electric Power

8
PIECES AILES
(A) Aile bre de verre (avec ailerons et volets) ........ 1
(B) Platine servo ailerons (CTP 5mm usiné CNC)..... 2
(C) Tringlerie aileron (Quick-Link M2 acier) ............ 2
(D) Chape aileron (Métal M2) ..................................... 2
(E) Guignol aileron (Laiton) ........................................ 2
(F) Carénage servo ailerons (Fibre de verre)............ 2
l Servo Aileron (SS1816) ............................................ 2
l Rallonge servo 40cm................................................. 2
l Prise MG6 (MPX) (mâle+femelle) ..................... 1 set
HWINGS PARTS
(A) Fiberglass Wing (with ailerons and aps)........... 1
(B) Ailerons servo tray (CNC machined 5mm ply)... 2
(C) Aileron Pushrod (Steel M2 one end).................... 2
(D) Aileron Clevis (M2 Metal) ..................................... 2
(E) Aileron Control Horn (Brass)................................ 2
(F) Ailerons servo Cover (Fiberglass) ........................ 2
l Aileron servo (SS1816)............................................. 2
l 40cm Servo Extension.............................................. 2
l MG6 (MPX) connector (male+female).............. 1 set
AILES AILERONS/WINGS AILERONS
B
C
D
E
F
A

9
4) Visser le guignol d’aileron E et y connecter la trin-
glerie C&D. Utilisez celle-ci pour repérer la position
du servo puis le coller avec son support dans l’aile.
H Screw in the aileron horn E and connect the linkage
C&D to it. Use it to position the servo and then glue it
with its support into the wing.
AILES AILERONS/WINGS AILERONS
l) Montage ailerons :
Visser le servo d’aileron sur son support B.
Connecter une rallonge de 40cm, sécuriser, au choix,
avec du l, de la gaine thermo, etc.
Mettre le servo au neutre.
Notez le scotch d’emballage destiné à protéger le ser-
vo lors du collage.
H Screw the aileron servo onto its tray B. Connect a
40cm extension, secure, as desired, with wire, shrin-
king tube, etc.
Center the servo.
Note the packing tape to protect the servo when
gluing.
2) Dépolir la zone de collage du servo au papier de
verre.
H Use sandpaper to roughen the servo bonding area.
3) A l’aide d’une CAP, passer la rallonge dans l’aile.
H Using a music wire, route the extension through the
wing.
B
Scotch
Tape
Sécuriser
Secure
40cm
C
DE

10
AILES AILERONS/WINGS AILERONS
5) Aileron et servo au neutre, marquer la tringlerie au
niveau du trou du palonnier.
H Aileron and servo centered, mark the pushrod at
the hole of the servo arm.
6) Réaliser une baïonnette à l’endroit repéré et
connecter.
H Make a Z-bend in the marked location and connect.
7) Fixer ensuite le cache servo à l’aide de scotch crys-
tal (non fourni).
H Then x the servo cover using crystal tape (not sup-
plied).

11
AILES VOLETS/WINGS FLAPS
PIECES AILES
(A) Aile bre de verre (avec ailerons et volets) ........ 1
(G) Platine servo volets (CTP 5mm usiné CNC) ........ 2
(H) Tringlerie volet (Quick-Link M2 acier) ............... 2
(I) Chape volet (Métal M2) .......................................... 2
(J) Guignol volet (Laiton) ............................................ 2
(K) Insert guignol volet (Laiton)................................. 2
(L) Carénage servo volets (Fibre de verre) ............... 2
(M) Sorties carénées commande volets (FdV).......... 2
l Servo Volet (SS1816) ................................................ 2
l Rallonge servo 20cm................................................. 2
HWINGS PARTS
(A) Fiberglass Wing (with ailerons and aps)........... 1
(G) Flaps servo tray (CNC machined 5mm plywood)2
(H) Flap Pushrod (Steel M2 one end)......................... 2
(I) Flap Clevis (M2 Metal)............................................ 2
(J) Flap Control Horn (Brass) ..................................... 2
(K) Flap Control Horn Bushing (Brass) ..................... 2
(L) Flaps servo Cover (Fiberglass) ............................. 2
(M) Flaps Control Cover (Fiberglass)......................... 2
l Flap servo (SS1816) .................................................. 2
l 20cm Servo Extension.............................................. 2
H
M
A
I
L
KJ
G

12
AILES VOLETS/WINGS FLAPS
1) Montage volets:
Procéder comme pour le servo d’aileron, avec une ral-
longe de 20 cm cette fois. A l’aide de la radio, placer le
palonnier en position « volets rentrés » à 90° du servo.
H Flaps assembly:
Proceed as for the aileron servo, this time with a 20cm
long extension. Using the radio, move the servo arm
to the position «Flaps In» position. 90° to the servo.
3) Fraiser l’emplacement du guignol de volet.
Attention de ne pas percer et déboucher à l’intrados !
H Mill the location of the ap horn.
Be careful not to pierce and emerge on the underside
of the wing skin !
2) En position « volets sortis » le palonnier est incliné
d’environ 40° vers le bord de fuite (BdF).
H In «Flaps Out» position, the arm is inclined by ap-
proximately 40 ° towards the trailing edge (TE).
4) Visser le guignol J dans l’insert K. Puis coller le
tout à la colle époxy lente dans la position montrée...
H Screw the horn J into the bushing K. Then glue the
whole with slow cure epoxy adhesive in the position
shown ...
G
20cm
90°
40°
Volets rentrés
Flaps In
Volets sortis
Flaps Out
Vers BdF
To TE

13
AILES VOLETS/WINGS FLAPS
4) Visser le guignol J dans l’insert K. Puis coller le
tout à la colle époxy lente dans la position montrée...
H Screw the horn J into the bushing K. Then glue the
whole with slow cure epoxy adhesive in the position
shown ...
6) A l’aide d’une CAP, passer la rallonge dans l’aile.
H Using a music wire and route the extension through
the wing.
5) Dépolir la zone de collage du servo au papier de
verre.
H Use sandpaper to roughen the servo bonding area.
7) Connecter la tringlerie H&I au guignol du volet. A
l’aide de celle-ci repérer la position du servo puis le
coller avec son support dans l’aile.
H Connect the H&I linkage to the Flap horn. Use it to
locate the position of the servo and then glue the ser-
vo with its support in the wing.
C
J
K
H

14
AILES VOLETS/WINGS FLAPS
8) Volet et servo au neutre, marquer la tringlerie au
niveau du trou du palonnier.
H Flap and servo centered, mark the pushrod at the
hole in the servo arm.
10) Fixer ensuite le cache servo à l’aide de scotch
crystal (non fourni).
H Then x the servo cover using crystal tape (not sup-
plied).
9) Démonter le servo de volet et la tringlerie. Réali-
ser une baïonnette à l’endroit repéré et connecter au
palonnier.
Remonter le tout.
H Remove the ap servo and the linkage. Make a Z-
bend at the location marked and connect to the servo
arm.
Put all back together.
11) Coller ensuite le carénage de tringlerie L à l’extra-
dos de l’aile. Bien vérier que la commande ne touche
pas.
H Then glue the L linkage fairing to the upper sur-
face of the wing. Make sure that the control does not
scratch.
L

15
AILES/WINGS
12) Repérer les couleurs des rallonges et les couper à
environ 5cm de l’aile.
H Identify the colors of the extensions and cut them
all about 5cm from the wing.
13) Souder ensuite une prise type MPX (tous les «plus
+» sont sur le même pin ainsi que tous les « moins - », un
signal par pin soit 6 pins au total).
H Then solder an MPX type socket (all the “plus +” are
on the same pin as well as all the “minus -”, one signal
per pin, ie 6 pins in total).

16
EMPENNAGES PAPILLON/V-TAIL
PIECES FUSELAGE
(A) Fuselage bre de verre (avec commandes de prof.
et dir. passées) ............................................................... 1
(B1) Couple moteur (CTP 3mm découpé laser)......... 1
(B2) Platine radio planeur (CTP 3mm découpé laser) .1
(B3) Platine radio motoplaneur (CTP 3mm découpé
laser) ............................................................................... 1
(B4) Gabarit “coupe nez” (CTP 3mm découpé laser) 1
(B5) Guide gaine de commande (CTP 3mm découpé
laser) ............................................................................... 1
(C) Verrière bre de verre (avec système de xation
en place) ................................................................... 1 set
PIECES EMPENNAGES PAPILLON
(A) Empennages Papillon bre de verre............... 1 set
(B) Guignol avec chape à rotule........................... 2 sets
(C) Embout de chape..................................................... 2
(D) Vis xation papillon (2x vis Chc M3x12mm)..... 2
FUSELAGE PARTS
(A) Fiberglass Fuselage (with Elev and Rud linkages
installed)......................................................................... 1
(B) Motor mount (CNC machined 3mm plywood) .... 1
(B) Glider servos tray (CNC machined 3mm plywood) 1
(B) MotoGlider servos tray (CNC machined 3mm
plywood) ......................................................................... 1
(B) “Nose Cut” Jig (CNC machined 3mm plywood)... 1
(B5) Outer Control Tube Guide (CNC machined 3mm
plywood) ......................................................................... 1
(C) Fiberglass Canopy (with attachment system ins-
talled)........................................................................ 1 set
V-TAIL PARTS
(A) Fiberglass V-Tail ............................................... 1 set
(B) Elevator Control Horn with ball Clevis ........ 2 sets
(C) Coupler (Brass) ....................................................... 2
(D) Stab Attachment (2x SH screw M3x12mm) ...... 2
A
A
B1B5 B4
B2 B3
B
C
D

17
EMPENNAGES PAPILLON/V-TAIL
1) Bien gratter les extrémités des CAP et y souder à
l’étain les embouts de chapes C du set de guignols de
l’empennage.
H Thoroughly scrape the ends of the controls (music
wires) and tin solder the couplers C of the V-Tail horn
set.
3) Visser le stab sur le fuselage avec les vis D.
H Attach the V-Tail to the fuse with the screws D.
3) Connecter les chapes et vérier que les gouvernes
débattent librement.
H Connect the clevises to the horns and check the
control surfaces move freely.
2)Visser les guignols B dans les gouvernes de
l’empennage,(vérier la symétrie des guignols et que
les boules se trouvent à la même hauteur) puis visser
les chapes sur leur embout.
H Screw the horns B into the control surfaces of the
V-Tail, (check the symmetry of the horns and that the
balls are at the same height) then screw the clevises
on their coupler.
C
B
D

18
FUSELAGE VERSION PLANEUR/FUSELAGE GLIDER VERSION
1) Dépolir les faces internes du fuselage au papier de
verre, coller la platine B2 (bien horizontale, se servir
de la décoration du fuselage comme repère) et y vis-
ser les servos de profondeur-direction.
H Roughen the internal faces of the fuselage with san-
dpaper, glue servo tray B2 (horizontal, use the deco-
ration of the fuselage as a reference) and screw the
Elevator-Rudder servos there.
Si vous voulez réaliser la version électrique de l’HABANERO 2, sautez cette page et reportez vous directement à la page
suivante > page 19.
If you want to make the electric version of the HABANERO 2, skip this page and go directly to the next page> page 19.
3) Il reste à xer votre accu de réception et votre ré-
cepteur à l’aide d’un morceau de bande velcro®.
Connecter l’interrupteur radio.
Un peu de lest dans le nez sera nécessaire pour obte-
nir le bon centrage.
H All that remains is to secure your Rx battery pack
and receiver with a piece of Velcro® tape.
Connect the radio switch.
A little ballast in the nose will be necessary to obtain
the correct balance.
2) Pour chaque commande, gouverne et servo au
neutre, marquer la tringlerie au niveau du trou du
palonnier. Réaliser une baïonnette à l’endroit repéré
et connecter.
H For each control, rudder and servo well centered,
mark the linkage at the hole of its respective ser-
vo arm. Make a Z-bend in the marked location and
connect to the servos.
Q
B2
VERSION PLANEUR
GLIDER VERSION
Bon Vols !
Good flights !

19
FUSELAGE VERSION ELECTRO/FUSELAGE ELECTRIC VERSION
1) Visser les servos de l’empennage sur la platine B3.
Remarquez la èche sur la platine, elle indique l’avant
du modèle.
H Screw the V-Tail servos onto tray B3.
Notice the arrow on the plate, it indicates the front of
the model.
3) ...la coller en position (bien horizontale, se servir
de la décoration du fuselage comme repère).
H ... glue it in position (very horizontal, use the deco-
ration of the fuselage as a reference).
2) Après avoir dépoli au papier de verre la zone de col-
lage de la platine radio, l’insérer par l’avant du fuse-
lage jusque sous l’aile puis...
H After having roughen the gluing area of the radio
tray with sandpaper, insert it from the front of the
fuselage to under the wing then ...
4) Raccourcir les gaines plastiques et les CAP des com-
mandes de l’empennage (en gardant un peu de marge)
puis enler le guide B5 sur les CAP.
H Shorten the outer tubes and the piano wires of the
V-Tail controls (keeping a little margin) then slip in
the plywood guide B5 onto the wires.
B3
B5

20
FUSELAGE VERSION ELECTRO/FUSELAGE ELECTRIC VERSION
5) Mettre le guide B5 en position dans son encoche,
le coller sur la platine servo. Puis coller les gaines de
commande dans le guide (Attention à ne pas mettre
de colle sur les CAP).
H Put guide B5 in position in its slot, glue it on the
servo plate. Then glue the control outer tubes into the
guide (Be careful not to put glue on the CAPs).
7) Eléments de motorisation
Gabarit B4 pour couper le nez.
H Power set
B4 Jig «Nose Cut».
6) Pour chaque commande, gouverne et servo au
neutre, marquer la tringlerie au niveau du trou du
palonnier. Réaliser une baïonnette à l’endroit repéré
et connecter.
H For each control, control surfaces and servos cen-
tered, mark the linkage at the hole of their respective
servo arm. Make a Z-bend in the marked location and
connect.
8) Assembler et coller les éléments du gabarit B4 de
découpe du nez.
H Assemble and glue the parts of jig B4 «Nose Cut».
Coller
Glue
B5
B4
B4
B1
B1
This manual suits for next models
1
Table of contents
Other Topmodel Aircraft manuals
Popular Aircraft manuals by other brands

czech sport aircraft
czech sport aircraft SportCruiser N107BK Pilot operating handbook

RedWing RC
RedWing RC 30cc Slick 540 manual

czech sport aircraft
czech sport aircraft PS-28 cruiser Operating handbook

Ozone
Ozone Explore V2 manual
Cessna
Cessna SKYMASTER 337 Series Service & parts manual
Diamond
Diamond DA20-C1 Maintenance manual
