Toro Sand Pro 5020 User manual

)&0.1"/9
0 "3352& ."8*.5. 3"'&49 014*.5. 1&2'02."/$&
"/% 40 ("*/ ,/07-&%(& 0' 4)& 120%5$4 *4 *3 &33&/4*"-
4)"4 905 02 "/9 04)&2 01&2"402 0' 4)& ."$)*/& 2&"%
"/% 5/%&234"/% 4)& $0/4&/43 0' 4)*3 ."/5"- #&'02&
4)& &/(*/& *3 &6&2 34"24&% "9 1"24*$5-"2 "44&/4*0/
40 4)& ! )*()-*()4&% #9 4)*3
39.#0-
)& 3"'&49 "-&24 39.#0- .&"/3
02 : 1&230/"- 3"'&49
*/3425$4*0/ "*-52& 40 $0.1-9 7*4) 4)& */3425$4*0/
."9 2&35-4 */ 1&230/"- */+529

The SAND PRO 5020was developed to provide an efficient, trou le free and economical method of sand trap
maintenance. The latest concepts of engineering, design and safety have een incorporated into this machine,
along with the highest quality parts and workmanship. Excellent service will e derived if proper operation and
maintenance practices are followed.
You know, since you have purchased the industry leader in sand trap and other maintenance excellence, that future
performance and dependa ility are of prime importance. TORO also is concerned a out future use of the machine
and of safety to the user. Therefore, this manual must e read y you and those involved with the SAND PRO 5020 to
make sure that safety, proper setĆup, operation and maintenance procedures are followed at all times. The major
sections of the manual are:
! -1 (,-+.-$)(,
-2* (,-+.-$)(,
!)+ * +-$("
* +-$(" (,-+.-$)(,
$(- ((
Safety, mechanical and some general information in this manual are emphasized. , and
identify safety messages. Whenever the triangle safety sym ol appears, it is followed y a safety
message that must e read and understood. For more details concerning safety, read the safety instructions on
pages 4 and 5. identifies special mechanical information and identifies general information
worthy of special attention.
The engine exhaust from this product
contains chemicals known to the State of
California to cause cancer, birth defects,
or other reproductive harm.
In some areas there are local, state or federal regulations requiring a spark arrester muffler must e used on the
engine of this machine. If a spark arrester is required, order the following part(s) from your local Toro Distri utor.
(1) 83-2240 Spark Arrester
These parts are approved y the United States Department of Agriculture and the United States Forest Service.
# ( -# '#$( $, ., )+ )* +- )( (1 &$!)+($ !)+ ,- +.,# )+ "+,, )/ + &( *+)* +&1
)* +-$(" ,*+% ++ ,- + '.,- --# -) -# '.!!& + # )* +-)+ $, /$)&-$(" ,-- &0 -$)(
.&$ ,).+ , ) $! ,*+% ++ ,- + $, ()- .,
If help concerning set up, operation, maintenance or safety is ever needed, contact your local Authorized TORO
Distri utor. In addition to genuine TORO replacement parts, the distri utor also has optional equipment for the
complete line of TORO turf care equipment. Keep your Toro all TORO. Buy genuine TORO parts and accessories.

#
#
Inst ll Re r Wheels 8. . . . . . . . . . . . . . . . . . . . . . . .
Inst ll Steering Wheel 8. . . . . . . . . . . . . . . . . . . . . .
Remove B ttery 8. . . . . . . . . . . . . . . . . . . . . . . . . . .
Activ te nd Ch rge B ttery 8. . . . . . . . . . . . . . . .
Inst ll B ttery 9. . . . . . . . . . . . . . . . . . . . . . . . . . . . .
Check Cr nkc se Oil 10. . . . . . . . . . . . . . . . . . . . . .
Fill Fuel T nk 10. . . . . . . . . . . . . . . . . . . . . . . . . . . . .
Check Hydr ulic System 11. . . . . . . . . . . . . . . . . .
Check Tire Pressure 11. . . . . . . . . . . . . . . . . . . . . .
" #
St rting/Stopping Engine 14. . . . . . . . . . . . . . . . . .
Check Tr ction Interlock System 14. . . . . . . . . . . .
Pushing S nd Pro 14. . . . . . . . . . . . . . . . . . . . . . . .
Bre k-in Period 14. . . . . . . . . . . . . . . . . . . . . . . . . .
Oper ting Ch r cteristics 14. . . . . . . . . . . . . . . . . .
Inspection nd Cle n-Up 15. . . . . . . . . . . . . . . . .
! !
#
Ch nging Engine Oil nd Filter 18. . . . . . . . . . . . .
Servicing Engine Air Cle ner 18. . . . . . . . . . . . . . .
Servicing Remote Air Cle ner 18. . . . . . . . . . . . . .
Adjusting Throttle Control 19. . . . . . . . . . . . . . . . . .
Adjusting Choke Control 19. . . . . . . . . . . . . . . . . . .
Repl cing Sp rk Plugs 19. . . . . . . . . . . . . . . . . . . .
Cle ning Cylinder He d Fins 20. . . . . . . . . . . . . . .
Ch nging Hydr ulic System Oil nd Filter 20. . . .
Checking Hydr ulic Lines nd Hoses 20. . . . . . .
Ch rging Hydr ulic System 21. . . . . . . . . . . . . . . .
Adjusting Steering Ch in 21. . . . . . . . . . . . . . . . . .
Repl cing Fuel Filter 21. . . . . . . . . . . . . . . . . . . . . .
Adjusting Tr ction Drive for Neutr l 22. . . . . . . . .
Adjusting Ped l for Forw rd 22. . . . . . . . . . . . . . . .
Adjusting Steering Wheel Tilt Lever 22. . . . . . . . .
Adjusting P rking Br ke 23. . . . . . . . . . . . . . . . . . .
Adjusting Lift Lever (Flo t Position) 23. . . . . . . . .
B ttery Stor ge 23. . . . . . . . . . . . . . . . . . . . . . . . . . .
B ttery C re 24. . . . . . . . . . . . . . . . . . . . . . . . . . . . .
#
"# !

# !
+( 9$5 '(5,*1(' $1' 6(56(' 62
2))(4 5$)( 5(48,&( 9+(1 23(4$6(' $1' 0$,16$,1('
3423(4/: /6+27*+ +$;$4' &21642/ $1' $&&,'(16
34(8(16,21 3$46,$//: $4( '(3(1'(16 7321 6+( '(5,*1
$1' &21),*74$6,21 2) 6+( 0$&+,1( 6+(5( )$&6245 $4(
$/52 '(3(1'(16 7321 6+( $9$4(1(55 &21&(41 $1'
3423(4 64$,1,1* 2) 6+( 3(45211(/ ,182/8(' ,1 6+(
23(4$6,21 64$153246 0$,16(1$1&( $1' 5624$*( 2)
6+( 0$&+,1( 03423(4 75( 24 0$,16(1$1&( 2) 6+(
0$&+,1( &$1 4(57/6 ,1 ,1-74: 24 '($6+ 2 4('7&( 6+(
326(16,$/ )24 ,1-74: 24 '($6+ &203/: 9,6+ 6+(
)2//29,1* 5$)(6: ,15647&6,215
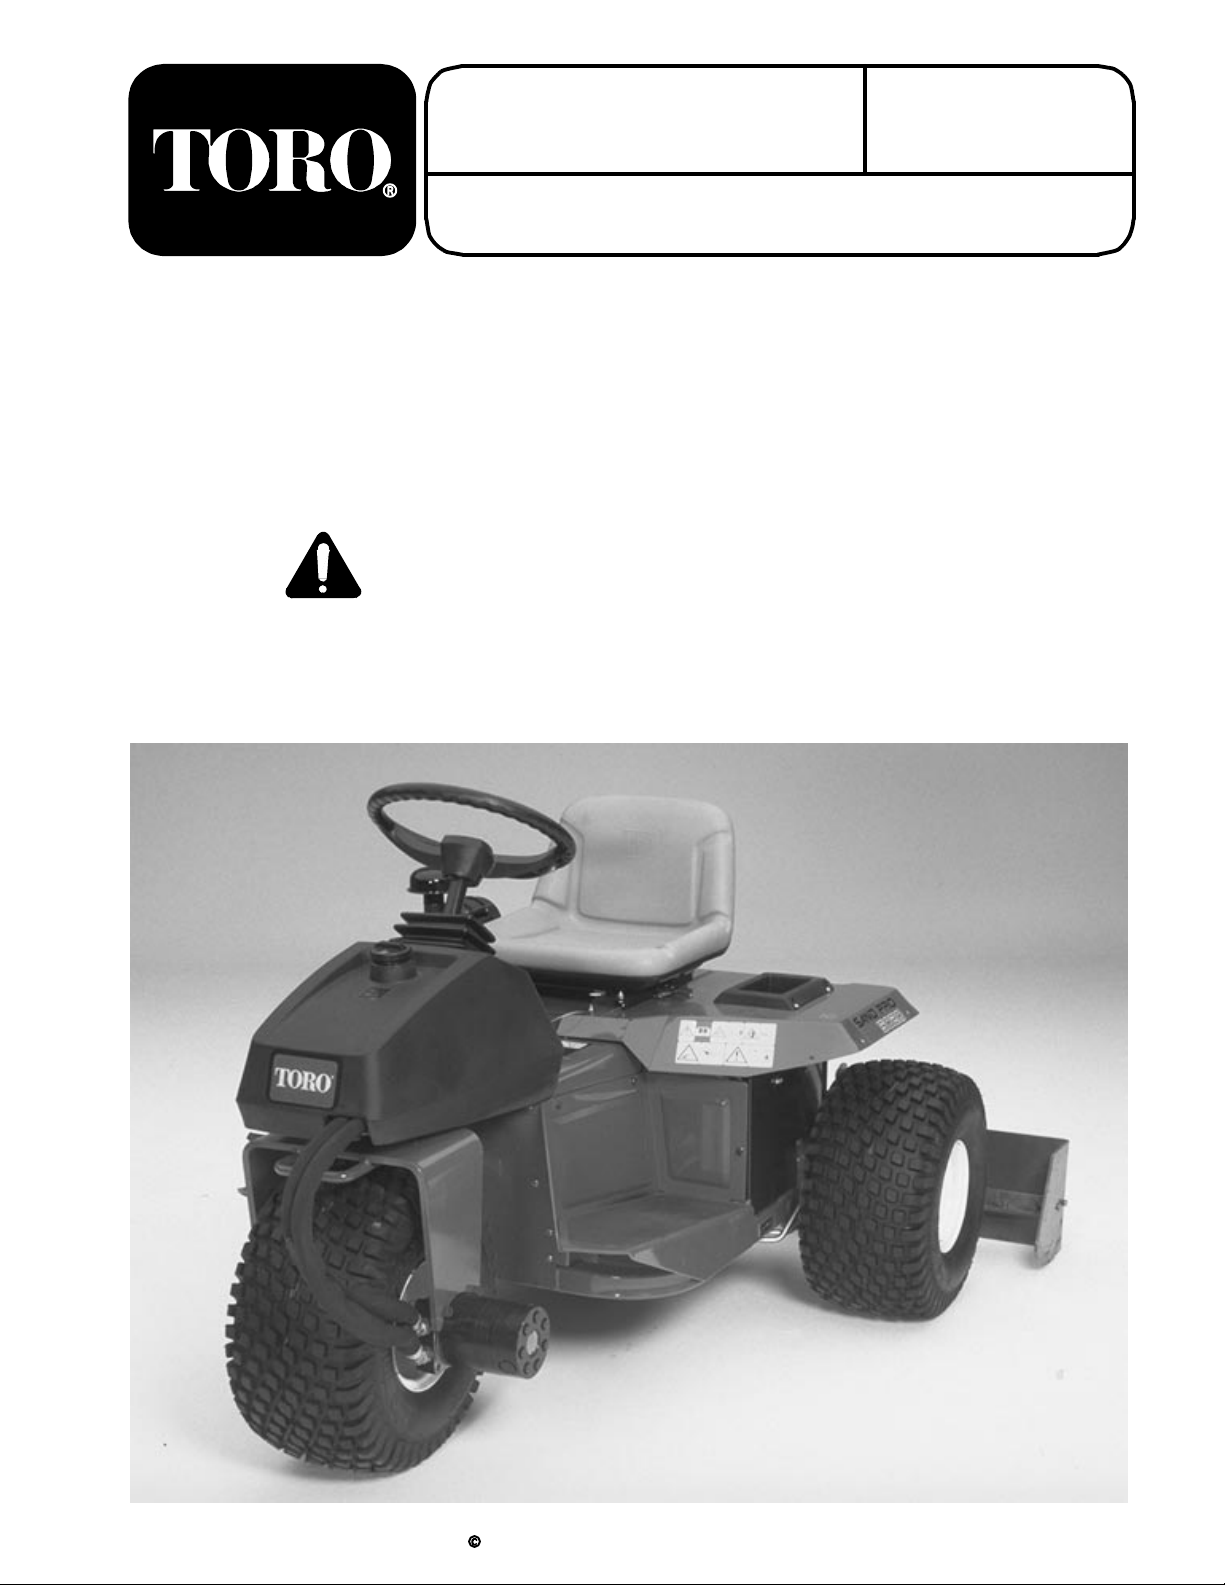
Operate the machine only after reading and
understanding the contents of this manual. A
replacement manual is available by sending complete
model and serial number to:
The Toro Company,
8111 Lyndale Avenue outh
Minneapolis, Minnesota 55420-1196.
Never allow children to operate the machine or
adults to operate it without proper instructions.
Become familiar with the controls and know how to
stop the engine quickly.
Keep all shields, safety devices and decals in
place. If a shield, safety device or decal is
malfunctioning, illegible, or damaged, repair or replace
it before operating the machine.
Always wear substantial shoes. Do not operate
machine while wearing sandals, tennis shoes or
sneakers. Do not wear loose fitting clothing which
could get caught in moving parts and cause personal
injury.
. Wearing safety glasses, safety shoes, long pants
and a helmet is advisable and required by some local
safety and insurance regulations.
Ensure traction neutral is adjusted correctly so
engine cannot be started unless traction pedal is
released and in neutral position.
Keep everyone, especially children and pets away
from the areas of operation.
ince gasoline is highly flammable, handle it
carefully.
Use an approved gasoline container.
Do not remove cap from fuel tank when engine
is hot or running.
Do not smoke while handling gasoline.
Fill fuel tank outdoors and to about one inch
below top of tank, (bottom of filler neck). Do not
overfill.
Wipe up any spilled gasoline.
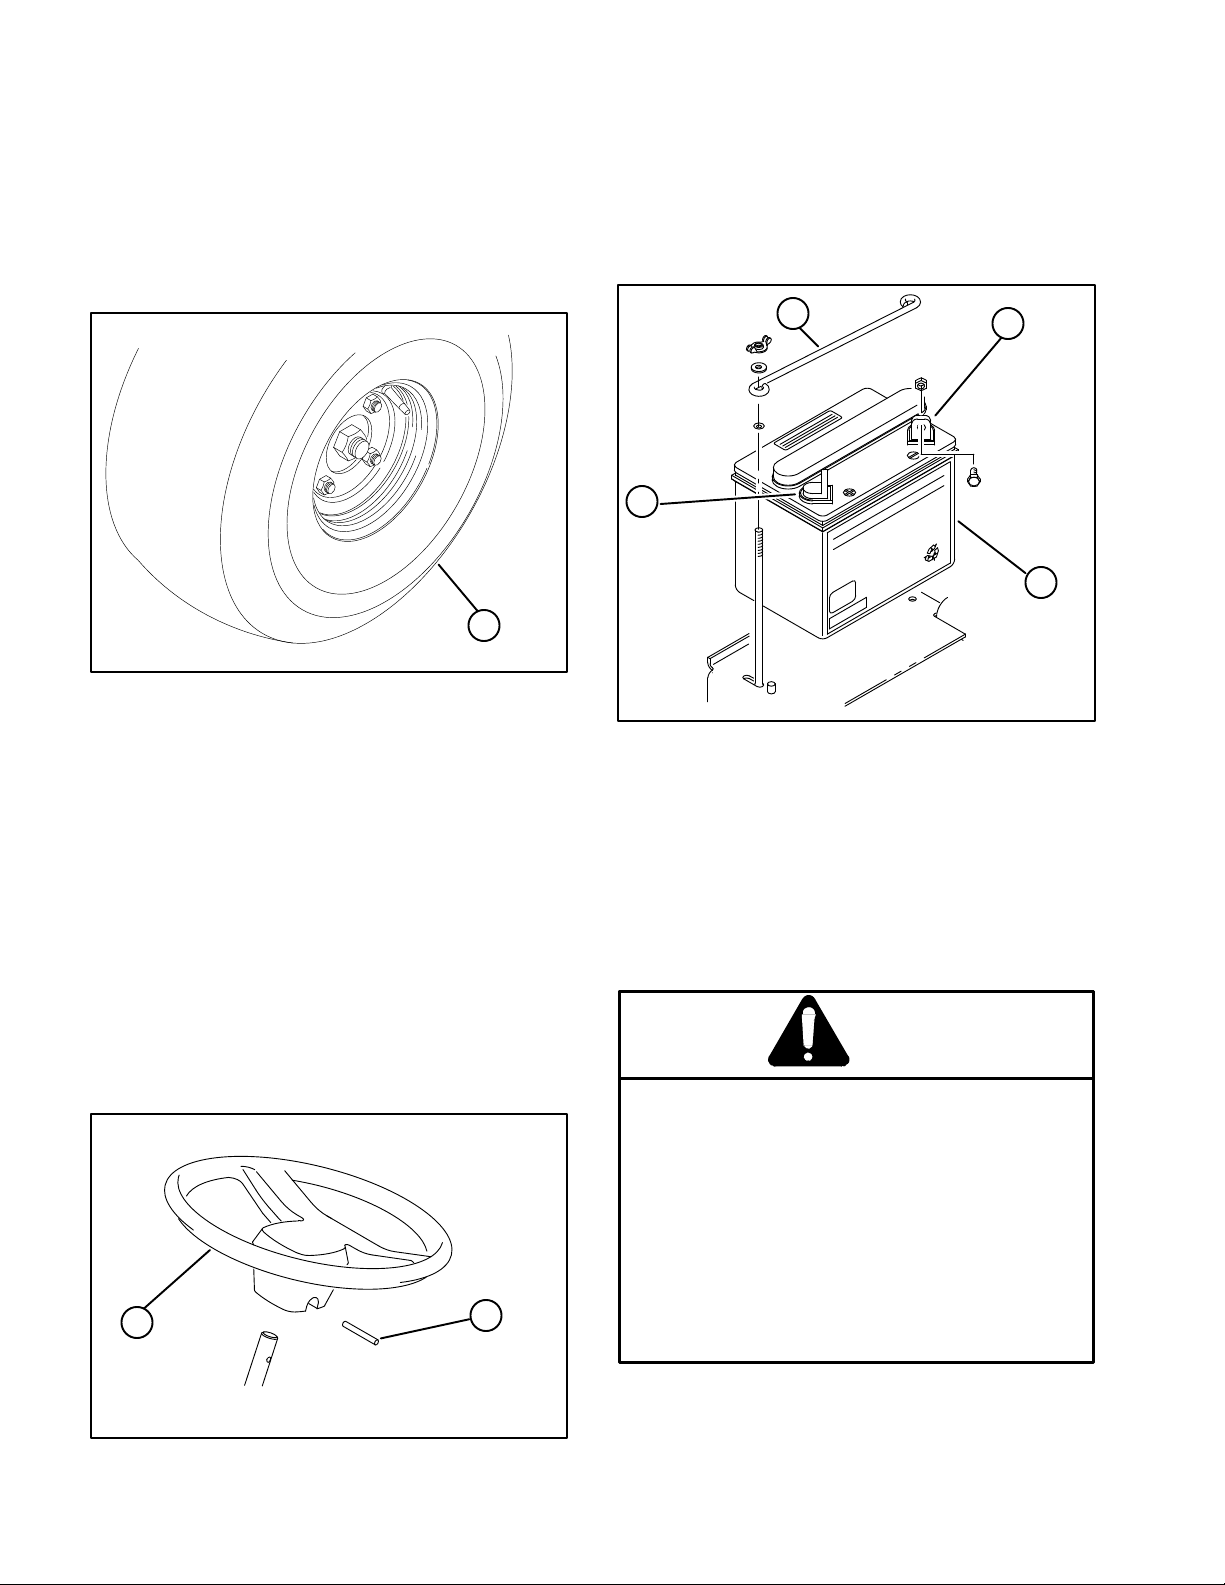
+(&. 6+( 5$)(6: ,16(4/2&. 5:56(0 '$,/: )24
3423(4 23(4$6,21 4()(4 62 3$*( ) 6+( 59,6&+
5+27/' 0$/)71&6,21 4(3/$&( 6+( 59,6&+ %()24(
23(4$6,1* 0$&+,1( )6(4 (8(4: 692 :($45 4(3/$&(
6+( ,16(4/2&. 59,6&+ ,1 6+( 5$)(6: 5:56(0 9+(6+(4 ,6
,5 924.,1* 3423(4/: 24 126
"
Exhaust fumes are hazardous and could be
deadly, so do not run the engine in a confined area
without adequate ventilation.
it on seat when operating the machine. Never
carry passengers.
When starting the engine:
Make sure traction pedal is released.
After the engine is started, keep foot off
traction pedal. Machine must not move. If
movement is evident, the neutral return
mechanism is adjusted incorrectly; therefore, shut
engine off and readjust so machine does not move
when in neutral position. If engine does not start,
check interlock switch connections.
Using the machine demands attention. To prevent
tipping or loss of control:
Use care when entering and leaving sand
traps. Use extreme caution around ditches, creeks
or other hazards.
Watch for holes or other hidden hazards.
Use caution when operating machine on a
steep slope. Reduce speed when making sharp
turns or when turning on hillsides.
Avoid sudden stops and starts. Do not go from
reverse to full forward without first coming to a
complete stop.
Before backing up, look to the rear and assure
no one is behind the machine.
Watch out for traffic when near or crossing
roads. Always yield the right of way.
If optional Hitch Kit, model 08833, is installed on
machine, vertical load on hitch should not exceed 200
lbs.
Do not touch engine, muffler or muffler shield while
engine is running or soon after it has stopped because
these areas are hot enough to cause burns.
. If the machine ever vibrates abnormally, stop
immediately, turn engine off, wait for all motion to stop
and inspect for damage. Repair all damage before
commencing operation.

!# !"!
Before gett ng off the seat:
Stop movement of the mach ne. Take
precaut ons to prevent acc dental starts, roll ng
away, etc.
. Engage park ng brake
Shut eng ne off and wa t for all movement to
stop.
Lower attachments to the ground.
Whenever mach ne s left unattended, be sure
eng ne s stopped, park ng brake engaged, mplement
s lowered and key s removed from gn t on.
!
. Before serv c ng or mak ng adjustments to the
mach ne, stop the eng ne and pull the spark plug w re
off spark plug to prevent acc dental start ng of the
eng ne.
Make sure all hydraul c l ne connectors are t ght,
and all hydraul c hoses and l nes are n good cond t on
before apply ng pressure to the system.
Keep body and hands away from p n hole leaks or
nozzles that eject hydraul c flu d under h gh pressure.
Use paper or cardboard, not hands, to search for
leaks. Hydraul c flu d escap ng under pressure can
have suff c ent force to penetrate sk n and do ser ous
damage. If flu d s njected nto the sk n t must be
surg cally removed w th n a few hours by a doctor
fam l ar w th th s form of njury or gangrene may result.
Before d sconnect ng or perform ng any work on
the hydraul c system, all pressure n system must be
rel eved by stopp ng eng ne and lower ng attachments
to the ground.
To make sure ent re mach ne s n good cond t on,
keep all nuts, bolts and screws properly t ghtened.
. If major repa rs are ever needed or ass stance s
requ red, contact an Author zed TORO D str butor.
. To reduce potent al f re hazard, keep the eng ne
area free of excess ve grease, grass, leaves and
accumulat on of d rt.
If the eng ne must be runn ng to perform a
ma ntenance adjustment, keep hands, feet, cloth ng,
and any parts of the body away from the eng ne and
any mov ng parts. Keep everyone away.
Do not overspeed eng ne by chang ng governor
sett ngs. Max mum eng ne speed s 3200 rpm. To
assure safety and accuracy, have an Author zed Toro
D str butor check max mum eng ne speed w th a
tachometer.
Eng ne must be shut off before check ng o l or
add ng o l to the crankcase.
To be sure of opt mum performance and safety,
always purchase genu ne TORO replacement parts
and accessor es. Replacement parts and accessor es
made by other manufacturers could be dangerous.
Such use could vo d the product warranty of The Toro
Company.
!# !"!
!+( )0--06,/* 3$)(47 $/' ,/3425&4,0/ '(&$-3 $2( ,/34$--(' 0/ 4+( .$&+,/( ) $/7 %(&0.( '$.$*(' 02 ,--(*,%-(
2(1-$&( 4+(. (&$- 1$24 /5.%(23 $2( -,34(' %(-06 $/' ,/ 4+( 1$243 &$4$-0* 2'(2 2(1-$&(.(/43 )20. 7052
54+02,8(' !020 ,342,%5402
"
$24 0
! "
$24 0
"! " !
$24 0

!# !"!
!+( )0--06,/* 3$)(47 $/' ,/3425&4,0/ '(&$-3 $2( ,/34$--(' 0/ 4+( .$&+,/( ) $/7 %(&0.( '$.$*(' 02 ,--(*,%-(
2(1-$&( 4+(. (&$- 1$24 /5.%(23 $2( -,34(' %(-06 $/' ,/ 4+( 1$243 &$4$-0* 2'(2 2(1-$&(.(/43 )20. 7052
54+02,8(' !020 ,342,%5402
!
$24 0
" ! !
$24 0
!
$24 0
!
!
$24 0
!
$24 0
!
$24 0
!!#
$24 0
" !!#
$24 0

.-%(&41 3(.- Tricycle vehicle with welded steel
frame construction. Rear engine placement. All wheels
powered.
-&(-$: Briggs & Stratton, V-twin cylinder, 4 cycle,
OHV, air cooled, gas engine with cast iron sleeves. 18
hp @ 3600 rpm, 34.8 cu. in. (570 cc) displacement,
1.75 qt. oil capacity. Electronic ignition. Full pressure
lubrication, oil filter. Engine and remote mounted air
cleaners.
4&$ Hour meter.
.-31.+2 Hand operated throttle, choke, lift lever and
parking brake. Foot pedal controls traction forward /
reverse speed.
3$$1(-& Front wheel steering with adjustable tilt
steering wheel.
2 -* 5.5 gallon capacity.
33$17 12 volt, lead acid, 280 CCA.
1(5$ Hydraulic. Coupling driven variable
displacement piston pump with integral auxiliary
charge pump to hydraulic motors which directly drive
wheels.
7#1 4+(" (+ (+3$1 25 micron, spin on type.
7#1 4+(" (+ $2$15.(1 3 gallon capacity.
+5$ Single section for raising and lowering of
implement with float.
7+(-#$1 Double acting.
(1$2 22 x 11.00 - 8 two ply pneumatic tubeless.
De-mountable and interchangeable. Recommended
tire pressure is 4 PSI.
/$$#2 3 Variable between 0 and 11
MPH forward and 0 and 4 MPH reverse.
$ 3 #)423,$-3 4 inches - fore and aft. Additional
1.75 inches forward adjustment available by using
front mounting holes. Additional adjustment for small
operator attained by removing seat slides and base
and mounting seat directly to support.
(,$-2(.-2
Width w/o implements: 58"
Width w/rake Model 08812: 75"
Height: 45.25"
Length w/o implements: 64.5"
Wheelbase 42.75"
Net Weight: (Wet) 810 lb.
/3(.- + 04(/,$-3
Drag Mat Model No. 08845
Rake Mounting it Model No. 08814
Tooth Rake Model No. 08812
Weeder/Cultivator Model No. 08815
Finish Grader Model No. 08867
Spiker Model No. 08856
Front Blade Model No. 08821
Spring Rake Model No. 08813
Hitch Part No. 92-2380
.3$ Use this chart as a checklist to ensure all parts necessary for assembly have been shipped. If any of these
parts are missing, total set-up cannot be completed.
Tire & rim assembly 2 Install on rear motors
Lug nuts 8
Steering wheel 1 Mount steering wheel
Roll pin 1/4 x 2" lg. 1
Capscrew 1/4 - 20 x 5/8" lg. 2 Secure battery cables to battery
Nuts 1/4 - 20 2
Capscrew 1/2 - 13 x 1-1/4" lg. 4 Mount rear attachments
Washer 1/2 4
Cylinder pin 1
Hairpin cotter 2 Attach cylinder to implement
Capscrew 3/8 - 16 x 2-1/4" lg. 1
Locknut 3/8 - 16 1
Spacer 1
eys 2
Operator's manual 1 Read before operating machine.
Parts catalog 1
Registration card 1 Fill out and return to Toro.
/$"(%(" 3(.-2 -# #$2(&- 24!)$"3 3. "' -&$ 6(3'.43 -.3("$

",*
15( Install the rear wheels to the mach ne wh le t s
st ll on the pallet sh pp ng blocks.
Mount a wheel to each wheel motor and secure
w th lug nuts. T ghten lug nuts evenly and gradually n a
cr sscross manner to 45-55 ft-lb.
,*63(
($3 8+((.
Remove the sh pp ng blocks and lower the
mach ne onto the rear wheels.
15( We suggest sav ng the sh pp ng blocks, as they
are the correct he ght for block ng the un t when
chang ng t res, serv c ng wheel motors or perform ng
other serv ce work.
" ,*
Move front wheel so t po nts stra ght ahead.
Sl de steer ng wheel onto steer ng shaft al gn ng
mount ng holes.
Secure steer ng wheel n place w th roll p n.
,*63(
5((3,0* 8+((.
1.. 2,0
! # ,*
P vot seat upward and engage seat prop.
Remove (2) w ng nuts and washers secur ng top
battery hold down to s de battery hold downs. Remove
top battery hold and remove battery.
$55(3:
14,5,7( %$55(3: 5(3/,0$.
(*$5,7( %$55(3: 5(3/,0$.
12 %$55(3: +1.' '180
,*63(
! #
If Battery s not f lled w th electrolyte or act vated,
bulk electrolyte w th 1.260 spec f c grav ty must be
purchased from a local battery supply outlet and
added to battery.
"($3 4$)(5: *1**.(4 $0' 36%%(3 *.17(4
8+(0 813-,0* 8,5+ (.(&531.:5( +$3*( 5+(
%$55(3: ,0 $ 8(.. 7(05,.$5(' 2.$&( 41 *$44(4
231'6&(' 8+,.( &+$3*,0* &$0 ',44,2$5(
,0&( 5+( *$4(4 $3( (92.14,7( -((2 12(0
).$/(4 $0' (.(&53,&$. 42$3- $8$: )31/ 5+(
%$55(3: '1 015 4/1-( $64($ /$: 3(46.5
,) 5+( *$4(4 $3( ,0+$.(' 02.6* &+$3*(3
)31/ (.(&53,&$. 165.(5 %()13( &100(&5,0* 51
13 ',4&100(&5,0* &+$3*(3 .($'4 )31/ %$5;
5(3: 21454
Remove f ller caps from battery and slowly f ll each
cell unt l electrolyte s up to f ll l ne.
Replace f ller caps and connect a 3 to 4 amp
battery charger to the battery posts. Charge the battery
at a rate of 3 to 4 amperes for 4 to 8 hours.

When battery is charged, disconnect charger from
electrical outlet and battery posts. Allow battery to sit
for 5 to 10 minutes before proceeding to next step.
Remove filler caps and slowly add electrolyte to
each cell until level is up to fill line. Install filler caps.
: . -.2 .4$0%(++ ! 22$06 +$"20.+62$ 5(++
.4$0%+.5 .-2. .2'$0 / 021 .% 2'$ , "'(-$ -#
1$4$0$ ".00.1(.- -# #$2$0(.0 2(.- 5(++ 0$13+2
(&
Slide the battery in place, with the terminals to the
outside.
Secure the positive cable (red) to the positive (+)
terminal with a 1/4-20 x 5/8" lg. capscrew and nut.
.--$"2(-& " !+$1 2. 2'$ 50.-& /.12
".3+# 0$13+2 (- /$01.- + (-)306 -#.0
# , &$ 2. 2'$ $+$"20(" + 1612$, *$
130$ ! 22$06 .0 " !+$1 #. -.2 (-2$0%$0$ .0
03! .- -6 ,.4(-& .0 '.2 / 021
Secure the two small black wires and the negative
cable (black) to the negative (-) terminal of the battery
with a 1/4-20 x 5/8" lg. capscrew and nut.
Coat the terminals and mounting fasteners with
petroleum elly to prevent corrosion. Slide the rubber
boot over the positive (+) terminal to prevent possible
short-out from occurring.
Install the top battery hold down to side battery
hold downs and secure with washers and wing nuts.
Release seat prop and lower seat.

"
! /-
The engine is shipped with 1-3/4 quarts (w/ filter) of oil
in the crankcase; however, level of oil must be checked
before and after the engine is first started.
Position machine on a level surface.
Pivot seat upward and engage seat prop..
nscrew dipstick and wipe it with a clean rag.
Screw dipstick into tube and make sure it is seated
fully. nscrew dipstick out of tube and check level of oil.
If oil level is low, remove filler cap from valve cover (next
to dipstick) and add enough oil to raise level to F LL
mark on dipstick.
The engine uses any highĆquality detergent oil
having the American Petroleum Institute ĆAPIĆ service
classification" SE, SF or SG. Recommended viscosity
(weight) is SAE 30.
/-:7+
/589/)0
Install the dipstick firmly in place.
"" /589/)0 2:89 (+ ,:11> 8+'9+* /3 9:(+
94 574;/*+ 5745+7 8+'1/3- 4, +3-/3+ )7'30)'8+
'/1:7+ 94 8+'1 )7'30)'8+ 2'> 7+8:19 /3 +3-/3+
*'2'-+
"" .+)0 1+;+1 4, 4/1 +;+7> 45+7'9/3-
.4:78 47 *'/1> 3/9/'11> ).'3-+ 4/1 ',9+7 9.+ ,/789
.4:78 4, 45+7'9/43 9.+7+',9+7 :3*+7 3472'1
)43*/9/438 ).'3-+ 4/1 +;+7> .4:78 '3* ,/19+7
+;+7> .4:78 4<+;+7 ).'3-+ 4/1 247+
,7+6:+391> <.+3 +3-/3+ /8 45+7'9+* /3 +=97+2+1>
*:89> 47 */79> )43*/9/438
# " /-
Fuel tank capacity is approximately 5.5 gallons.
+)':8+ -'841/3+ /8 ,1'22'(1+ )':9/43
2:89 (+ :8+* <.+3 8947/3- 47 .'3*1/3- /9
4 349 ,/11 ,:+1 9'30 <./1+ +3-/3+ /8
7:33/3- .49 47 <.+3 2')./3+ /8 /3 '3
+3)148+* '7+' $'5478 2'> (:/1* :5 '3*
(+ /-3/9+* (> ' 85'70 47 ,1'2+ 84:7)+
2'3> ,++9 '<'> " ! <./1+
,/11/3- 9.+ ,:+1 9'30 94 57+;+39 9.+ 5488/(/1?
/9> 4, '3 +=5148/43 1<'>8 ,/11 ,:+1 9'30
4:98/*+ '3* </5+ :5 '3> 85/11+* -'841/3+
(+,47+ 89'79/3- +3-/3+ #8+ ' ,:33+1 47
854:9 94 57+;+39 85/11/3- -'841/3+ '3* ,/11
9'30 34 ./-.+7 9.'3 43+ /3). (+14< 945 4,
9'30 (49942 4, ,/11+7 3+)0 "
$ !947+ -'841/3+ /3 ' )1+'3
8',+9> '5574;+* )439'/3+7 '3* 0++5 9.+
)'5 43 9.+ )439'/3+7 ++5 -'841/3+ /3 '
)441 <+11;+39/1'9+* 51')+ 3+;+7 /3 '3
+3)148+* '7+' 8:). '8 ' .49 8947'-+ 8.+*
"4 '88:7+ ;41'9/1/9> *4 349 (:> 247+ 9.'3 '
*'> 8:551> 4, -'841/3+ '841/3+ /8 '
,:+1 ,47 /39+73'1 )42(:89/43 +3-/3+8
9.+7+,47+ *4 349 :8+ /9 ,47 '3> 49.+7
5:7548+ !/3)+ 2'3> )./1*7+3 1/0+ 9.+
82+11 4, -'8 0++5 /9 4:9 4, 9.+/7 7+').
(+)':8+ 9.+ ,:2+8 '7+ +=5148/;+ '3*
*'3-+74:8 94 /3.'1+
THE TORO COMPANY STRONGLY RECOMMENDS
THE SE OF FRESH, CLEAN, #REG LAR
GRADE GASOLINE IN TORO GASOLINE POWERED
PROD CTS. NLEADED GASOLINE B RNS
CLEANER, EXTENDS ENGINE LIFE, AND
PROMOTES GOOD STARTING BY RED CING THE
B ILD- P OF COMB STION CHAMBER DEPOSITS.
LEADED GASOLINE CAN BE SED IF NLEADED IS
NOT AVAILABLE.
" $ #! " !
" " !
" " "
! "$! # !
%" ! #! # !&!"
# !#"
Clean area around fuel tank cap.
Remove fuel tank cap.
Fill tank to about one inch below top of tank,
(bottom of filler neck). " $ Then install
cap.
Wipe up any fuel that may have spilled to prevent a
fire hazard.

"
8*0 7&2/ (&4
.,85*
% # !%!" .,
The hydraulic system is designed to operate on
anti-wear hydraulic fluid. The machines reservoir is
filled at the factory with approximately 3 gallons of
Mo il 424 hydraulic fluid. -*(/ 0*9*0 3+ -;)5&80.(
+08.) '*+35* *2,.2* .6 +.567 67&57*) &2) )&.0;
7-*5*&+7*5
5384 ;)5&80.( 08.) *(311*2)*) +35
&1'.*27 7*14*5&785*6 (326.67*270; '*03: <
! 7;4* &27.:*&5 -;)5&80.( +08.)
Mo il Mo il Fluid 424
Amoco Amoco 1000
International Harvester Hy-Tran
Texaco TDH
Shell Donax TD
Union OIl Hydraulic/Tractor Fluid
Chevron Tractor Hydraulic Fluid
BP Oil BP HYD TF
Boron OIl Eldoran UTH
Exxon Torque Fluid
Conoco Power-Tran 3
Kendall Hyken 052
Phillips HG Fluid
37* The fluids within this group are interchangea le.
"" #6* 320; -;)5&80.( 3.06 64*(.+.*)
7-*5 +08.)6 (380) (&86* 6;67*1 )&1&,*
Remove cap from hydraulic oil reservoir.
Check level of oil in reservoir. Oil level should e up
to top of cone point on tank screen.
If oil level is low, slowly fill with Mo il 424 or
equivalent hydraulic oil until level is up totop of cone
point on tank screen. " $
.,85*
.0 5*6*593.5 (&4
Install reservoir cap.
"" To prevent system contamination, clean
top of hydraulic oil containers efore opening. Assure
pour spout and funnel are clean.
" !!# .,
The tires are over-inflated at the factory for shipping
purposes. Reduce the pressure to the proper levels
efore starting the machine.
Correct air pressure in front and rear tires is 4-6 psi.
.,85*
.5 9&09*

12
KNOW YOUR CON ROLS
raction and Stopping Pedal (Fig. 8 - 9) - Traction
p dal has thr functions: on , to mak th machin
mov forward, two, to mov it backward and thr , to
stop machin . Using th h l and to of th right foot,
d pr ss top of p dal to mov forward and bottom of
p dal to mov backward or to assist in stopping wh n
moving forward. Allowing p dal to mov to n utral
position will stop machin . For operator comfort, do
not rest heel of foot on reverse when operating
forward (Fig. 9).
Ground sp d is proportionat to how far traction
p dal is d pr ss d. For maximum ground sp d,
p dal must b fully d pr ss d whil throttl is in FAST
position. To g t maximum pow r or wh n asc nding a
hill, hav throttl in FAST position whil d pr ssing
p dal slightly to k p ngin rpm high. Wh n ngin
rpm b gins to d cr as , r l as p dal slightly to allow
rpm to incr as .
Figure 8
1. raction & Stopping Pedal
1
Figure 9
IMPOR AN : For maximum pulling power, throttle
should be in Fast" position, and traction pedal just
barely depressed.
Use the maximum ground speed ONLY
when driving from one area to another.
Maximum speed is not recommended
when using an attached or towed impleĆ
ment.
CAU ION
IMPOR AN : he SAND PRO must not be operated
in reverse with the implement in the down
(operating) position, or the implement could be
severely damaged.
Ignition Switch (Fig.10) - Th ignition switch, us d to
start and stop th ngin , has thr positions: OFF,
RUN and START. Rotat k y clockwis Ċ START
position Ċ to ngag start r motor. R l as k y wh n
ngin starts. Th k y will mov automatically to th
RUN position. To shut ngin off, rotat k y
count rclockwis to OFF position.
Figure 10
1. Ignition switch
2. Choke control
3. hrottle control
4. Lift lever
5. Hour meter
6. Parking brake
1
2
35
6
4
Choke Control (Fig. 10) - To start a cold ngin , clos
carbur tor chok by moving chok control forward to
th CLOSED" position. Aft r ngin starts, r gulat
chok to k p ngin running smoothly. As soon as
possibl , op n th chok by pulling upward to th
OPEN" position. A warm ngin r quir s littl or no
choking.
hrottle Control (Fig. 10) - L v r conn cts to and
op rat s throttl linkag to carbur tor. Control has two
positions: SLOW and FAST. Engin sp d can b
vari d b tw n th two s ttings.
Note: Th ngin cannot b stopp d by th throttl
control.

*/, . , (Fig. 10) - (Located under seat) Indicates
the total hours of machine operation. The Hour Meter
starts to function whenever the key switch is rotated to
ON" position.
$!. 0 , (Fig.10) -To raise the implement, pull the
lever backward; to lower implement, push the lever
forward. When the desired position is attained, release
the lever and it will return to neutral. For float position,
move lever into detent position.
# #- */' .$)" '$!.
2'$) , *1) +, --/, ) ++'$ .* .#
$(+' ( ). !*, ,.$) *+ ,.$)" *)$.$*)-
,&$)" ,& (Fig.10) - To engage parking brake,
pull back on lever. To disengage, push lever forward.
. ,$)" # ' $'. 0 , (FIg.10) - Lever on left side
of steering column allows steering wheel to be
ad usted for operator comfort.
$"/,
. ,$)" 1# ' .$'. ' 0 ,
. %/-.$)" 0 , (FIg.12) - Lever on left side of
seat allows seat to be ad usted fore and aft for operator
comfort.
$"/,
. %/-.$)" ' 0 ,
/ ' #/.!! '0 (Fig. 13)- Close fuel shut-off
valve when storing machine.
$"/,
/ ' -#/.*!! 0'0

!
Remove foot from traction pedal, make sure pedal
is in neutral position and engage parking brake.
Pus c oke forward to ON position - w en
starting a cold engine - and t rottle lever to SLOW
position.
Insert key into ignition switc and rotate it
clockwise to start t e engine. Release key w en
engine starts. Regulate t e c oke to keep engine
running smoot ly.
1 23(7(05 17(3+($5,0* 1) 5+( 45$35(3
/1513 '1 015 (0*$*( 45$35(3 .10*(3 5+$0
4(&10'4 )5(3 4(&10'4 1) &105,06164 &3$0-,0*
8$,5 4(&10'4 %()13( (0*$*,0* 45$35(3 /1513
$*$,0
W en engine is started for t e first time, or after
over aul of t e engine, operate t e mac ine in forward
and reverse for one to two minutes. Also operate t e lift
lever to be sure of proper operation of all parts. S ut
engine off and c eck for oil leaks, loose parts and any
ot er noticeable malfunctions.
!
+65 (0*,0( 1)) $0' 8$,5 )13 $.. /17,0*
2$354 51 4512 %()13( &+(&-,0* )13 1,. .($-4
.114( 2$354 $0' 15+(3 /$.)60&5,104
To stop engine, move t rottle control to SLOW
position and rotate ignition key to OFF. Remove key
from switc to prevent accidental starting.
Close fuel s ut off valve before storing mac ine.
#
T e purpose of t e interlock system is to prevent t e
engine from cranking or starting unless t e traction
pedal is in NEUTRAL".
+( ,05(3.1&- 48,5&+ ,4 )13 5+( 12(3$5134
2315(&5,10 41 '1 015 ',4&100(&5 ,5 +(&-
12(3$5,10 1) 5+( 48,5&+ '$,.: 51 $4463(
,05(3.1&- 4:45(/ ,4 12(3$5,0* ) 5+( 48,5&+
,4 '()(&5,7( 3(2.$&( ,5 %()13( 12(3$5,0*
(*$3'.(44 ,) 48,5&+ ,4 12(3$5,0* 2312(3.:
13 015 3(2.$&( ,5 (7(3: 581 :($34 51 $4463(
/$9,/6/ 4$)(5: 1 015 3(.: (05,3(.: 10
4$)(5: 48,5&+(4 64( &1//10 4(04(
!
C eck interlock operation in a wide open area free
of debris and bystanders. Stop engine.
Sit on t e seat. Depress traction pedal in forward
and reverse directions, w ile trying to start t e engine.
If engine cranks t ere may be a malfunction in t e
interlock system. Repair immediately. If engine does
not crank, system is operating correctly.
"
In case of emergency, t e SAND PRO can be towed for
a s ort distance. However, Toro does not recommend
t is as a standard procedure.
Do not tow t e mac ine faster t an
2-3 mp because drive system may be damaged. If
mac ine must be moved a considerable distance,
transport it on a truck or trailer. Tires may lock up if
mac ine is towed too fast. If t is occurs, stop towing
mac ine and wait for traction circuit pressure to
stabilize before resuming towing at a slower speed.
Only 8 ours operating time is required for SAND
PRO break-in period.
Since t e first ours of operation are critical to
future dependability of t e mac ine, monitor its
functions and performance closely so t at minor
difficulties, w ic could lead to major problems, are
noted and can be corrected. Inspect SAND PRO
frequently during break-in for signs of oil leakage,
loose fasteners, or any ot er malfunction.
!4,0* 5+( /$&+,0( '(/$0'4 $55(05,10 1
23(7(05 5,22,0* 13 .144 1) &10531. 64(
&$3( 8+(0 (05(3,0* $0' .($7,0* 4$0'
53$24 !4( (953(/( &$65,10 $3160'
',5&+(4 &3((-4 13 15+(3 +$;$3'4 !4(
&$65,10 8+(0 12(3$5,0* /$&+,0( 10 $
45((2 4.12( ('6&( 42((' 8+(0 /$-,0*
4+$32 56304 13 8+(0 5630,0* 10 +,..4,'(4
71,' 46''(0 45124 $0' 45$354 1 015 *1
)31/ 3(7(34( 51 )6.. )138$3' 8,5+165 ),345
&1/,0* 51 $ &1/2.(5( 4512
!
Practice driving t e SAND PRO because its operating
c aracteristics are different t an some utility ve icles.
Two points to consider w en operating t e ve icle are
transmission and engine speed.

To maintain somewhat constant engine speed,
depress traction pedal slowly. This allows the engine to
keep up with ground speed of the ehicle. By contrast,
pushing down quickly on the traction pedal will reduce
engine rpm and, as a result, there will not be enough
torque-power-to mo e the ehicle. Therefore, to
transfer maximum power to the wheels, mo e throttle
to FAST and slightly depress traction pedal. By
comparison, maximum ground speed with no load
results when throttle is in FAST position and traction
pedal is slowly but fully depressed. In summary, always
keep engine speed high enough to deli er maximum
torque-power-to the wheels.
At the completion of operation, after engine has
cooled, thoroughly wash the machine with a garden
hose - without a nozzle - so excessi e water pressure
will not cause contamination and damage to seals and
bearings.
Make sure cooling fins and area around engine cooling
air intake are kept free of debris. After cleaning, it is
recommended the machine be inspected for possible
hydraulic fluid leaks, damage or wear to hydraulic and
mechanical components.

$& '&*# $& " # )'("#(' ($ (
"# '($% ## %)!! +&' $ '%&
%!)' # &"$* , &$" ( '+(
The S nd Pro h s (5) gre se fittings th t must be
lubric ted regul rly with No. 2 Gener l Purpose
Lithium B se Gre se. Lubric te front wheel be ring
nd Tr ction Control Link ge fter every 50 hours of
oper tion. Lubric te steering sh ft every 100 hours.
The be rings nd bushings th t must be lubric ted
re: front wheel be ring (Fig. 14), tr ction control
link ge (Fig. 15) steering sh ft (2) (Fig. 16) nd
steering ch in sprocket sh ft (Fig.16 ).
Wipe gre se fitting cle n so foreign m tter c nnot
be forced into the be ring or bushing.
Pump gre se into the be ring or bushing.
Wipe up excess gre se.
)&
$( To g in ccess to gre se fitting on tr ction
control link ge (Fig. 15), remove (3) screws securing
side p nel to right side of m chine nd remove p nel.
)&
)&
We do not recommend lubric ting the steering
ch in unless it becomes stiff bec use of rust. If the
ch in rusts, it m y be lubric ted lightly with
DRY-TYPE LUBRICANT.

(duplicate this page f r r utine use)
Maintenance
C
Daily Maintenance Check For Week Of ___________
Check Item bMON TUES WED THURS FRI SAT SUN
nSafety Interlock Operation
nSteering Operation
nEngine Oil Level
nRemote Air Filter Dust Cup
Clean Engine Cooling Fins
nUnusual Engine Noises
nUnusual Operating Noises
nHydraulic System Oil Level
nHydraulic Hoses for Damage
nFluid Leaks
nFuel Level
nTire Pressure
nInstrument Operation
Touch–up Damaged Paint
Inspecti n perf rmed by_____________________________
Item Date Inf rmati n
1
2
3
4
5
6
7
8
Check pr per secti n f Operat r's Manual f r fluid specificati ns

&$
Change oil initially after the first 8 hours of operation,
thereafter change oil every 50 hours and filter every 100
hours.
Park the machine on a level surface and turn the
engine off.
Remove drain plug and let oil flow into drain pan.
When oil stops, install drain plug.
Remove oil filter. Apply a light coat of clean oil to the
new filter gasket.
Screw filter on y hand until gasket contacts filter
adapter, then tighten 1/2 to 3/4 turn further. DO NOT
OVER-TIGHTEN.
Add oil to crankcase, refer to CHECK
CRANKCASE OIL, Page 10.
Dispose of oil properly.
&$/,"
, &) +'/$
&' #&'.",
&$
Inspect paper element every 100 hours of operation
and replace every 400 hours or when dirty or
damaged. Do not wash paper element or do not clean
with compressed air as damage will occur.
Park the machine on a level surface and turn the
engine off.
Pivot seat upward.
Remove kno s and air cleaner cover.
Remove filter and cover plate. Inspect filter for
cleanliness, ruptures, holes, and tears. Replace
defective filter element.
*." With air cleaner disassem led, check air cleaner
components for damage. Replace if necessary. Make
sure ru er reather tu e in ase plate is securely in
place or severe engine damage may occur. Also, make
sure car uretor reather hose is routed out through
engine vents.
&$/,"
&, !'" )", !*0",
+", "'"(").
Reinstall air cleaner and cover plate.
Reinstall air cleaner cover and secure with kno s.
&$
Inspect the dust cup once a week or every 50 hours
operation. However, daily or more frequent inspection
is required when operating conditions are extremely
dusty and dirty.
Release latches securing air cleaner cover to air
cleaner ody. Separate cover from ody. Clean inside
of air cleaner cover.
&$/,"
&, !'" )", ' .!%"-
/-. !/+
&'.",
ÇÇ
ÇÇ

!
Gently slide filter out of air cleaner body to reduce
the amount of dust dislodged. Avoid knocking filter
against air cleaner body.
Inspect filter and discard if damaged. Do not wash
or reuse a damaged filter.
Service the air cleaner filter every 400 hours (more
frequently in extreme dusty or dirty conditions). Do not
over service air filter.
#$3*+/) (4*0'
A. Prepare a solution of filter cleaner and water
and soak filter element about 15 minutes. Refer to
directions on filter cleaner carton for complete
information.
B. After soaking filter for 15 minutes, rinse it with
clear water. Maximum water pressure must not
exceed 40 psi to prevent damage to the filter
element. Rinse filter from clean side to dirty to side.
C. Dry filter element using warm, flowing air
(160_F ) max), or allow element to air-dry. Do not
use a light bulb to dry the filter element because
damage could result.
0.12(33(' +2 (4*0'
A. Blow compressed air from inside to the outside
of dry filter element. Do not exceed 100 psi
to prevent damage to the element.
B. Keep air hose nozzle at least 2" from filter and
move nozzle up and down while rotating the filter
element. Inspect for holes and tears by looking
through the filter toward a bright light.
Inspect new filter for shipping damage. Check
sealing end of filter. Do not install a damaged filter.
Insert new filter properly into air cleaner body.
Make sure filter is sealed properly by applying pressure
to outer rim of filter when installing. Do not press on
flexible center of filter.
Reinstall cover and secure latches. Make sure
cover is positioned with T P side up.
" ! !!! !
+)
Proper throttle operation is dependent upon proper
adjustment of throttle control. Before adjusting the
carburetor, assure the throttle control is operating
properly.
Pivot seat upward.
Loosen cable clamp screw securing cable to
engine.
+)52(
!*2044-( &$3+/) &-$.1 3&2(7
!*2044-( &$%-(
7+6(-
401
*0,( &$3+/) &-$.1 3&2(7
*0,( &$%-(
Move remote throttle control lever forward to FAST
position.
Pull firmly on throttle cable until back of swivel
contacts stop.
Tighten cable clamp screw and check engine RPM
setting.
High Idle: 3150 + 50
Low Idle: 1750 +50
" ! ! +)
Pivot seat upward.
Loosen cable clamp screw securing cable to
engine.
Move remote choke control lever forward to
CL SED position.
Pull firmly on choke cable until choke butterfly is
completely closed, then tighten cable clamp screw.
" +)
Replace spark plugs after every 800 operating hours or
yearly, which ever occurs first. Recommended air gap
is 0.030".
Correct spark plug to use is a Champion RC 12YC.
+)52(
04( The spark plug usually lasts a long time;
however, the plug should be removed and checked
whenever the engine malfunctions.
Clean area around spark plugs so foreign matter
cannot fall into cylinder when spark plug is removed.
. Pull spark plug wires off spark plugs and remove
plugs from cylinder head.

"
Che k ondition of side ele trode, enter
ele trode, and enter ele trode insulator to assure
there is no damage.
I "" )7')1+* ,5:2+* */79= 57 59.+7</8+
3'2,:4)9/54/4- 86'71 62:- 3:89 (+ 7+62')+* 5
459 8'4* (2'89 8)7'6+ 57 )2+'4 +2+)975*+8 (= :8/4-
' </7+ (7:8. (+)':8+ -7/9 3'= +;+49:'22= 7+2+'8+
,753 9.+ 62:- '4* ,'22 /495 9.+ )=2/4*+7 ".+ 7+8:29 /8
:8:'22= ' *'3'-+* +4-/4+
Set air gap between enter and side of ele trodes
at 0.030". Install orre tly gapped spark plug w/gasket
seal, and tighten plug to 200 in-lb. If torque wren h is
not used, tighten plug firmly.
& !
To avoid overheating and possible engine damage,
ooling fins on ylinder head must be kept lean.
& # !&!"
" /-
Normally, hange hydrauli oil and filter after every 400
operating hours. If oil be omes ontaminated, onta t
your lo al TORO distributor be ause the system must
be flushed. Contaminated oil looks milky or bla k when
ompared to lean oil.
Park the ma hine on a level surfa e and turn the
engine off.
Remove s rews se uring side panels from right
and left sides of ma hine and remove panels.
59+ Pla e a funnel or trough under drain plug, to
dire t oil into drain pan and prevent hydrauli oil from
running onto ma hine omponents.
Remove drain plug from reservoir and let hydrauli
oil flow into drain pan. Reinstall and tighten plug when
hydrauli oil stops draining.
/-:7+
=*7':2/) 7+8+7;5/7 *7'/4 62:-
Clean area around filter mounting area. Pla e drain
pan under filter and remove filter.
Lubri ate the sealing gasket,on repla ement filter
with Mobil 424 hydrauli fluid, and hand turn it on until
gasket onta ts filter head. Then tighten 3/4 turn
further. Filter should now be sealed.
Fill hydrauli tank with hydrauli oil until level is up
totop of one point on tank s reen. "
$ Refer to CHECK HYDRAULIC SYSTEM,
Page 11.
Run engine until lift ylinder extends and retra ts
and forward and reverse wheel motion is a hieved.
Stop the engine and he k the oil level in reservoir,
add oil if ne essary.
Che k all onne tions for leaks.
Dispose of oil properly.
/-:7+
=*7':2/) ,/29+7
& # !
!!
Inspe t hydrauli lines and hoses daily for leaks,
kinked lines, loose mounting supports, wear, loose
fittings, weather deterioration and hemi al
deterioration. Make all ne essary repairs before
operating.
%
++6 (5*= '4* .'4*8 '<'= ,753 6/4 .52+
2+'18 57 45>>2+8 9.'9 +0+)9 ./-. 67+88:7+ .=?
*7':2/) ,2:/* #8+ )'7*(5'7* 57 6'6+7 95 ,/4*
.=*7':2/) 2+'18 =*7':2/) ,2:/* +8)'6/4- :4?
*+7 67+88:7+ )'4 6+4+97'9+ 81/4 '4* )':8+ /4?
0:7= 2:/* '))/*+49'22= /40+)9+* /495 9.+ 81/4
3:89 (+ 8:7-/)'22= 7+35;+* </9./4 ' ,+<
.5:78 (= ' *5)957 ,'3/2/'7 </9. 9./8 ,573 5, /4?
0:7= 57 -'4-7+4+ 3'= 7+8:29
This manual suits for next models
1
Table of contents
Other Toro Lawn And Garden Equipment manuals

Toro
Toro 29517 User manual

Toro
Toro 72072 User manual

Toro
Toro HydroJect 3010 User manual

Toro
Toro 22805 User manual

Toro
Toro Dingo 322 User manual

Toro
Toro T7 Series User manual

Toro
Toro 30701 User manual

Toro
Toro Groundsmaster 120 User manual

Toro
Toro Greensmaster 3000 Series User manual

Toro
Toro 22472 User manual

Toro
Toro 44911 User manual

Toro
Toro multi-pro 1200 User manual

Toro
Toro Reelmaster 5010- H User manual

Toro
Toro TRX-16 User manual

Toro
Toro ProCore 864 User manual

Toro
Toro 25497 User manual

Toro
Toro 133-0152 User manual

Toro
Toro Reelmaster 3555 User manual

Toro
Toro AERATOR HC 4000 User manual

Toro
Toro POWER MAX HD User manual